background image

76

1

Camera Basics

2

Auto Mode /

Hybrid Auto Mode

3

Other Shooting Modes

4

P Mode

5

Tv, Av, M, and C Mode

6

Playback Mode

7

Wi-Fi Functions

8

Setting Menu

9

Accessories

10

Appendix

Index

Before Use

Basic Guide

Advanced Guide

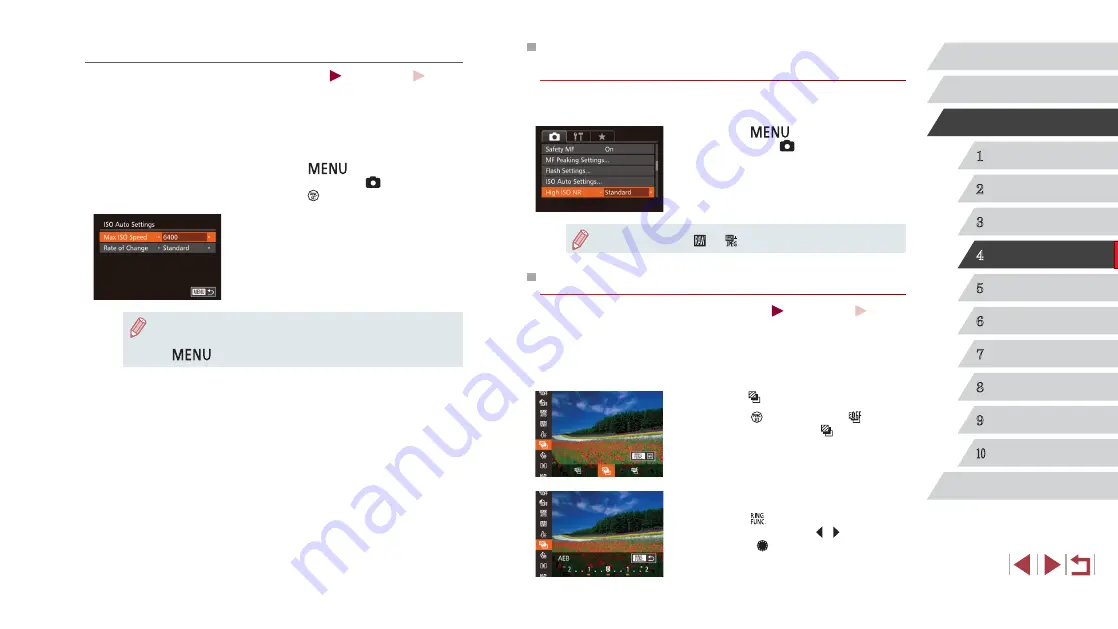
Changing the Noise Reduction Level 

(High ISO NR)

You can choose from 3 levels of noise reduction: [Standard], [High], [Low]. 

This function is especially effective when shooting at high ISO speeds.


z

Press the [

] button, choose [High 

ISO NR] on the [ ] tab, and then choose 

the desired option (

=

 30).


Not available with [ ] or 

[ ]

 (

=

 90).

Auto Exposure Bracketing (AEB Shooting)

 Still Images 


Movies

Three consecutive images are captured at different exposure levels 

(standard exposure, underexposure, and then overexposure) each time 

you shoot. You can adjust the amount of underexposure and overexposure 

(relative to standard exposure) from –2 to +2 stops in 1/3-stop increments.

Choose [ ].


z

Press the [ ] button, choose [ ] in the 

menu, and then choose [ ] (

=

 29).

Configure the setting.


z

Press the [ ] button, and then adjust the 

setting by pressing the [ ][ ] buttons or 

turning the [ ] dial.

Adjusting ISO Auto Settings

 Still Images 


Movies

When the camera is set to [AUTO], maximum ISO speed can be specified 

in a range of [400] – [12800], and sensitivity can be specified in a range of 

three levels.

Access the setting screen.


z

Press the [

] button, choose [ISO 

Auto Settings] on the [ ] tab, and then 

press the [ ] button (

=

 30).

Configure the setting.


z

Choose a menu item to configure, and 

then choose the desired option (

=

 30).


You can also access the [ISO Auto Settings] screen when 
choosing the ISO speed in the FUNC. menu, by pressing the 
[

] button.

Содержание PowerShot G7X

Страница 1: ...5SA210 Make sure you read this guide including the Safety Precautions 15 section before using the camera Reading this guide will help you learn to use the camera properly Store this guide safely so that you can use it in the future Click the buttons in the lower right to access other pages Next page Previous page Page before you clicked a link To jump to the beginning of a chapter click the chapte...

Страница 2: ...g is missing contact your camera retailer Camera Battery Pack NB 13L Battery Charger CB 2LH CB 2LHE Wrist Strap Do not peel off the battery pack label Printed matter is also included A memory card is not included 2 Compatible Memory Cards The following memory cards sold separately can be used regardless of capacity SD memory cards 1 SDHC memory cards 1 2 SDXC memory cards 1 2 1 Cards conforming to...

Страница 3: ...rain from unauthorized recording that infringes on copyright law and note that even for personal use photography may contravene copyright or other legal rights at some performances or exhibitions or in some commercial settings For information on camera warranty or Canon Customer Support please refer to the warranty information provided with your camera User Manual Kit Although the LCD monitor is p...

Страница 4: ... Macro Manual focus Left button 1 Used with NFC features 128 2 Gestures may not be detected as easily if you apply a screen protector In this case increase the sensitivity of the touch screen panel 156 z z Turning the control dial is one way to choose setting items switch images and perform other operations Most of these operations are also possible with the buttons Part Names and Conventions in T...

Страница 5: ...Up button 9 on back Left button 16 on back Right button 11 on back Down button 12 on back Control dial 6 on back Shooting modes and on screen icons and text are indicated in brackets Important information you should know Notes and tips for expert camera use Indicates touch screen operations xx Pages with related information in this example xx represents a page number Instructions in this guide app...

Страница 6: ...oting with Camera Determined Settings 34 Shooting Smart Auto 34 Shooting in Hybrid Auto Mode 36 Digest Movie Playback 36 Still Images Movies 36 Still Images 37 Movies 37 Scene Icons 38 Continuous Shooting Scenes 39 Image Stabilization Icons 39 On Screen Frames 40 Table of Contents Before Use Initial Information 2 Package Contents 2 Compatible Memory Cards 2 Preliminary Notes and Legal Information ...

Страница 7: ...s 63 Auto Shooting after Face Detection Smart Shutter 63 Auto Shooting after Smile Detection 63 Using the Wink Self Timer 64 Using the Face Self Timer 65 Shooting Starry Skies Star 66 Shooting People against Starry Skies Star Portrait 66 Shooting Night Scenes under Starry Skies Star Nightscape 67 Common Convenient Features 40 Zooming In Closer on Subjects Digital Zoom 40 Shooting at Preset Focal L...

Страница 8: ...hanging the IS Mode Settings 91 Shooting Movies with Subjects at the Same Size Shown before Shooting 92 Switching the Color of Shooting Screen Information 92 Shooting Star Trails Star Trails 68 Shooting Movies of Star Movement Star Time Lapse Movie 69 Adjusting Colors 70 Shooting Various Movies 71 Shooting Movies in Standard Mode 71 Locking or Changing Image Brightness before Shooting 71 Shooting ...

Страница 9: ...ng Images Individually 116 Selecting a Range 117 Specifying All Images at Once 117 Rotating Images 117 Deactivating Auto Rotation 118 Tagging Images as Favorites 118 5 Tv Av M and C Mode 93 Specific Shutter Speeds Tv Mode 93 Specific Aperture Values Av Mode 94 Specific Shutter Speeds and Aperture Values M Mode 94 Adjusting the Flash Output 95 Recording Movies at Specific Shutter Speeds and Apertur...

Страница 10: ...rasing Connection Information 149 Returning the Wi Fi Settings to Default 150 8 Setting Menu 151 Adjusting Basic Camera Functions 151 Silencing Camera Operations 151 Adjusting the Volume 151 Customizing Sounds 152 Convenient Control Touch Actions 119 Using Touch Actions Functions 119 Changing Touch Actions Functions 119 Assignable Functions 120 Editing Still Images 120 Resizing Images 120 Cropping...

Страница 11: ...9 Flash Unit 160 Other Accessories 160 Printers 160 Using Optional Accessories 161 Playback on a TV 161 Playback on a High Definition TV 161 Playback on a Standard Definition TV 162 Powering the Camera with Household Power 162 Using the Software 163 Software 163 Software Instruction Manual 163 Computer Connections via a Cable 164 Checking Your Computer Environment 164 Installing the Software 164 S...

Страница 12: ...lable in Each Shooting Mode 181 FUNC Menu 183 Shooting Tab 186 Set Up Tab 192 My Menu Tab 192 Playback Tab 192 Print Tab 193 Handling Precautions 193 Specifications 194 Camera Specifications 194 Wi Fi 194 Digital Zoom Focal Length 35mm equivalent 194 Number of Shots Recording Time Playback Time 195 Number of Shots per Memory Card 195 Recording Time per Memory Card 196 Flash Range 196 Shooting Rang...

Страница 13: ...hot using camera determined settings Creative Shot Mode 54 Shooting people well Portraits 55 Against Snow 55 Matching specific scenes Night Scenes 55 Under Water 55 Fireworks 55 Starry Skies 66 Applying special effects Vivid Colors 58 Poster Effect 58 Aged Photos 59 Fish Eye Effect 60 Miniature Effect 60 Toy Camera Effect 61 Background Defocus 62 Soft Focus 62 Monochrome 63 Focus on faces 34 55 84...

Страница 14: ...vanced Guide Use Wi Fi Functions Send images to a smartphone 128 Share images online 138 Send images to a computer 145 View View images Playback Mode 103 Automatic playback Slideshow 112 On a TV 161 On a computer 164 Browse through images quickly 107 Erase images 116 Shoot View Movies Shoot movies 34 71 96 View movies Playback Mode 103 Print Print pictures 166 Save Save images to a computer via a ...

Страница 15: ...e caution when using the product in places where use of electronic devices is restricted such as inside airplanes and medical facilities Do not allow the camera to maintain contact with skin for extended periods Even if the camera does not feel hot this may cause low temperature burns manifested in redness of the skin or blistering Use a tripod in hot places or if you have poor circulation or inse...

Страница 16: ...overheat and distort resulting in fire Do not leave any dedicated battery packs near pets Pets biting the battery pack could cause leakage overheating or explosion resulting in product damage or fire Caution Denotes the possibility of injury When carrying the product by the strap be careful not to bang it subject it to strong impacts or shocks or let it get caught on other objects Be careful not t...

Страница 17: ...d do not use old and new batteries together Do not insert the batteries with the and terminals reversed This may cause the product to malfunction Do not sit down with the camera in your pant pocket Doing so may cause malfunctions or damage the screen When putting the camera in your bag ensure that hard objects do not come into contact with the screen Also close the screen so that it faces the body...

Страница 18: ...d of the strap through the strap hole 1 and then pull the other end of the strap through the loop on the threaded end 2 z z The strap can also be attached to the left side of the camera Holding the Camera z z Place the strap around your wrist z z When shooting keep your arms close to your body and hold the camera securely to prevent it from moving If you have raised the flash do not rest your fing...

Страница 19: ...ice you should format the memory card with this camera 154 1 Open the cover z z Slide the switch 1 and open the cover 2 2 1 Charging the Battery Pack Before use charge the battery pack with the included charger Be sure to charge the battery pack initially because the camera is not sold with the battery pack charged 1 Insert the battery pack z z After aligning the marks on the battery pack and char...

Страница 20: ...en is displayed 2 Insert the battery pack z z Holding the battery pack with the terminals 1 facing as shown press the battery lock 2 in the direction of the arrow and insert the battery pack until the lock clicks shut z z If you insert the battery pack facing the wrong way it cannot be locked into the correct position Always confirm that the battery pack is facing the right way and locks when inse...

Страница 21: ...n if the camera is left off Once the date time battery is depleted the Date Time screen will be displayed when you turn the camera on Set the correct date and time as described in Setting the Date and Time 20 2 Set the date and time z z Press the buttons to choose an option z z Press the buttons or turn the dial to specify the date and time z z When finished press the button 3 Specify your home ti...

Страница 22: ... of the screen z z Frames displayed around any detected subjects indicate that they are in focus 3 Compose the shot z z To zoom in and enlarge the subject move the zoom lever toward telephoto and to zoom away from the subject move it toward wide angle Display Language Change the display language as needed 1 Enter Playback mode z z Press the button 2 Access the setting screen z z Press and hold the...

Страница 23: ...our finger off the movie button 2 Finish shooting z z Press the movie button again to stop shooting The camera beeps twice as recording stops 1 4 Shoot Shooting Still Images 1 Focus z z Press the shutter button lightly halfway down The camera beeps twice after focusing and AF frames are displayed to indicate image areas in focus z z If Raise the flash appears on the screen move the switch to raise...

Страница 24: ...play mode quickly drag left or right repeatedly z z To return to single image display from Scroll Display mode touch the image in the middle of the screen z z Choose a movie and touch to start playback z z To adjust the volume during movie playback quickly drag up or down across the screen 1 Viewing After shooting images or movies you can view them on the screen as follows 1 Enter Playback mode z ...

Страница 25: ...d 1 Choose an image to erase z z Press the buttons or turn the dial to choose an image 2 Erase the image z z Press the button z z After Erase is displayed press the buttons or turn the dial to choose Erase and then press the button z z The current image is now erased z z To cancel erasure press the buttons or turn the dial to choose Cancel and then press the button You can choose multiple images t...

Страница 26: ...gain Playback Mode z z Press the button to turn the camera on and view your shots z z To turn the camera off press the button again To switch to Playback mode from Shooting mode press the button To switch to Shooting mode from Playback mode press the shutter button halfway 27 The lens will be retracted after about one minute once the camera is in Playback mode You can turn the camera off when the ...

Страница 27: ...essing the shutter button halfway Length of shutter sound playback varies depending on the time required for the shot It may take longer in some shooting scenes and images will be blurry if you move the camera or the subject moves before the shutter sound ends Power Saving Features Auto Power Down As a way to conserve battery power the camera automatically deactivates the screen Display Off and th...

Страница 28: ...ab and press the buttons to choose Off When the camera is not in use keep the screen closed Be careful not to open the screen any further than this as it will damage the camera Shooting Modes Use the mode dial to access each shooting mode 1 2 3 6 5 4 1 Auto Mode Hybrid Auto Mode Fully automatic shooting with camera determined settings 22 34 36 2 Creative Shot Mode See several effects applied to ea...

Страница 29: ... z Options labeled with a icon can be configured by pressing the button 4 Finish the setup process z z Press the button z z The screen before you pressed the button in step 1 is displayed again showing the option you configured To undo any accidental setting changes you can restore the camera s default settings 157 1 2 Shooting Display Options Press the button to view other information on the scre...

Страница 30: ...oose a tab initially you can switch between tabs by pressing the buttons 3 Choose a menu item z z Press the buttons or turn the dial to choose a menu item z z For menu items with options not shown first press the or button to switch screens and then either press the buttons or turn the dial to select the menu item z z To return to the previous screen press the button Using Touch Screen Operations ...

Страница 31: ...enu items for which options are not shown first touch the menu item to access the setting screen On the setting screen either drag or touch to choose the menu item and then touch to choose the option To return to the previous screen touch You can also touch input elements such as check boxes or text fields to select them and you can enter text by touching the on screen keyboard When is shown you c...

Страница 32: ...t images or damage the camera or memory card On Screen Keyboard Use the on screen keyboard to enter information for Face ID 44 Wi Fi connections 135 and so on Note that the length and type of information you can enter varies depending on the function you are using Entering Characters z z Touch the characters to enter them z z The amount of information you can enter 1 varies depending on the functi...

Страница 33: ...de Clock You can check the current time z z Press and hold the button z z The current time appears z z If you hold the camera vertically while using the clock function it will switch to vertical display Press the buttons or turn the dial to change the display color z z Press the button again to cancel the clock display When the camera is off press and hold the button then press the ON OFF button t...

Страница 34: ...tartup screen is displayed 2 Enter mode z z Set the mode dial to z z Aim the camera at the subject The camera will make a slight clicking noise as it determines the scene z z Icons representing the scene and image stabilization mode are displayed in the upper left of the screen 38 39 z z Frames displayed around any detected subjects indicate that they are in focus 3 Compose the shot z z To zoom in...

Страница 35: ...brightness and colors will be automatically adjusted 3 Finish shooting z z Press the movie button again to stop shooting The camera beeps twice as recording stops z z Recording will stop automatically when the memory card becomes full The flash firing during shots indicates that the camera has automatically attempted to ensure optimal colors in the main subject and background Multi area White Bala...

Страница 36: ... Still Images Movies If the camera is turned on while the button is held down the camera will no longer sound To activate sounds again press the button and choose Mute on the tab and then press the buttons to choose Off Shooting in Hybrid Auto Mode Still Images Movies You can make a short movie of the day just by shooting still images The camera records 2 4 second clips of scenes before each shot ...

Страница 37: ... choose MENU 30 tab Wind Filter Off Still Images A blinking icon warns that images are more likely to be blurred by camera shake In this case mount the camera on a tripod or take other measures to keep it still If your shots are dark despite the flash firing move closer to the subject For details on the flash range see Flash Range 196 The subject may be too close if the camera only beeps once when...

Страница 38: ...ing children are displayed when Face ID is set to On and faces of registered babies less than two years old or children 2 12 years old are detected 44 Confirm beforehand that the date and time are correct 20 Try shooting in mode 73 if the scene icon does not match actual shooting conditions or if it is not possible to shoot with your expected effect color or brightness Scene Icons Still Images Mov...

Страница 39: ...vertical camera shake and horizontal stabilization stops Similarly when you follow subjects moving vertically image stabilization only counteracts horizontal camera shake To cancel image stabilization set IS Mode to Off 91 In this case an IS icon is not displayed In mode no icon is displayed Continuous Shooting Scenes If you shoot a still image when the following scene icons are displayed the came...

Страница 40: ...m range where the image will appear grainy Because the blue range will not be available at some resolution settings 49 the maximum zoom factor can be achieved by following step 1 1 On Screen Frames Still Images Movies In mode a variety of frames are displayed once the camera detects subjects you are aiming the camera at A white frame is displayed around the subject or person s face determined by t...

Страница 41: ...und z z Two seconds before the shot the blinking and sound will speed up The lamp will remain lit in case the flash fires z z To cancel shooting after you have triggered the self timer press the button z z To restore the original setting choose in step 1 To deactivate digital zoom choose MENU 30 tab Digital Zoom Off Shooting at Preset Focal Lengths Step Zoom Still Images Movies You can shoot at pr...

Страница 42: ...z Touch the subject on the screen and then lift your finger immediately z z The camera shoots as a shutter sound is played z z To cancel touch shutter choose Off in step 1 Even while the shot is displayed you can prepare for the next shot by touching Using the Self Timer to Avoid Camera Shake Still Images Movies This option delays shutter release until about two seconds after you have pressed the ...

Страница 43: ...170 or adding to a photobook 171 To do these things either view grouped images individually 110 or cancel grouping 110 first Continuous Shooting Still Images Movies In mode hold the shutter button all the way down to shoot continuously For details on the continuous shooting speed see Continuous Shooting Speed 196 1 Configure the setting z z Press the button choose either press the buttons or turn ...

Страница 44: ...e is displayed on the face and then shoot z z If the face is not recognized you cannot register face information Using Face ID If you register a person ahead of time the camera will detect that person s face and prioritize focus brightness and color for that person when shooting In mode the camera can detect babies and children based on registered birthdays and optimize settings for them when shoo...

Страница 45: ... optimize focus brightness and color for that person when shooting z z When you point the camera toward a subject the names of up to 3 registered people will be displayed when they are detected z z Shoot z z Displayed names will be recorded in still images Even if people are detected but their names are not displayed the names up to 5 people will be recorded in the image z z After Register is disp...

Страница 46: ...nd then press the button People other than those registered may be mistakenly detected as the registered person if they share similar facial features Registered people may not be correctly detected if the captured image or scene differs drastically from the registered face information If a registered face is not detected or not easily detected overwrite registered information with new face info Re...

Страница 47: ...g info 46 and then register new face information 44 as needed Even if you change names in Edit Profile the names recorded in previously shot images will remain the same You can use the software 163 to edit registered names Some characters entered with the software may not display on the camera but will be correctly recorded in images Overwriting and Adding Face Information You can overwrite existi...

Страница 48: ...visions or similar display devices Also used for printing images at 3 5 x 5 inch or A series sizes Square aspect ratio Aspect ratio commonly used for portraits You can customize camera operation so that turning the ring changes the aspect ratio 97 Not available in mode Erasing Registered Information You can erase information face info names birthdays registered to Face ID However names recorded in...

Страница 49: ...hed shooting under mercury lamps you should set Hg Lamp Corr back to Off Otherwise green hues not caused by mercury lamps may be corrected by mistake Try taking some test shots first to make sure you obtain the desired results In continuous shooting 43 this setting is set to Off and cannot be changed Changing Image Resolution Size Still Images Movies Choose from 4 levels of image resolution as fol...

Страница 50: ...s not displayed during movie recording If you hold the camera vertically the orientation of the electronic level will be updated automatically to match the camera orientation Calibrate the electronic level if it seems ineffective in helping you level the camera 155 Not available in mode 1 2 Changing Movie Image Quality Still Images Movies 4 image quality settings are available For guidelines on th...

Страница 51: ...c 4 sec 8 sec or Hold in Display Time 52 This feature is not available during continuous shooting in mode 39 This feature is not available in continuous shooting mode 43 87 Magnifying the Area in Focus Still Images Movies You can check the focus by pressing the shutter button halfway which will enlarge the portion of the image in focus in the AF frame 1 Configure the setting z z Press the button c...

Страница 52: ... is displayed you can take another shot by pressing the shutter button halfway again Hold Displays images until you press the shutter button halfway Off No image display after shots Customizing Camera Operation Customize shooting functions on the tab of the menu screen as follows For instructions on menu functions see Using the Menu Screen 30 Deactivating the AF Assist Beam Still Images Movies You...

Страница 53: ...2 Configure the settings z z Press the buttons or turn the dial to choose Display Info Press the buttons to choose the desired option z z To restore the original setting repeat this process but choose Off Off Displays only the image Detailed Displays shooting details 180 When Display Time 52 is set to Off or Quick Display Info is set to Off and cannot be changed By pressing the button while an ima...

Страница 54: ...wn As you shoot the shutter sound is played three times z z After the six images are displayed in succession they are displayed simultaneously for about two seconds z z To keep the images displayed until you press the shutter button halfway press the button For full screen display in this state choose an image by pressing the buttons or turning the dial and then press the button z z To return to t...

Страница 55: ...Still Images Movies z z Take shots of people with a softening effect Shooting Evening Scenes without Using a Tripod Handheld NightScene Still Images Movies z z Beautiful shots of evening scenes or portraits with evening scenery in the background without the need to hold the camera very still as with a tripod z z A single image is created by combining consecutive shots reducing camera shake and ima...

Страница 56: ... it still and prevent camera shake Additionally you should set IS Mode to Off when using a tripod or other means to secure the camera 91 When you use a tripod for evening scenes shooting in mode instead of mode will give better results 34 In mode although no frames are displayed when you press the shutter button halfway optimal focus is still determined Shooting Underwater Underwater Still Images ...

Страница 57: ...B represents blue and A amber White balance can also be manually corrected by recording custom white balance data 79 before following the preceding steps Using Functions for Underwater Shots Shooting with an Underwater Focusing Range Still Images Movies If focusing is difficult in mode 55 with a focus range of using a focus range designed for underwater shooting can ensure optimal underwater shots...

Страница 58: ...ou from obtaining the desired results If excessive camera shake interferes with shooting mount the camera on a tripod or take other measures to keep it still Additionally you should set IS Mode to Off when using a tripod or other means to secure the camera 91 Any subject movement will cause images to look blurry There will be a delay before you can shoot again as the camera processes and combines ...

Страница 59: ...l look with the effect applied 3 Shoot Try taking some test shots first to make sure you obtain the desired results Colors will look faded on the shooting screen but the image aging effect is not shown Review the image in Playback mode to see the effect 103 The image aging effect is not shown in movies Adding Artistic Effects z z Follow steps 1 2 in Image Effects Creative Filters 58 and choose z z...

Страница 60: ...reative Filters 58 and choose z z A white frame is displayed indicating the image area that will not be blurred 2 Choose the area to keep in focus z z Press the button z z Move the zoom lever to resize the frame and turn the dial to move it 3 For movies choose the movie playback speed z z Turn the ring to choose the speed 4 Return to the shooting screen and shoot z z Press the button to return to ...

Страница 61: ...s have a cooler tone than with Standard Try taking some test shots first to make sure you obtain the desired results Playback Speed and Estimated Playback Time for One Minute Clips Speed Playback Time Approx 12 sec Approx 6 sec Approx 3 sec The zoom is not available when shooting movies Be sure to set the zoom before shooting Try taking some test shots first to make sure you obtain the desired res...

Страница 62: ...g Subjects Stand Out Background Defocus Still Images Movies You can shoot subjects so that they stand out from the background Two consecutive images are captured with settings optimized for background defocus The background is defocused through lens effects and subject and scene based image processing 1 Choose z z Follow steps 1 2 in Image Effects Creative Filters 58 and choose 2 Shoot z z Hold th...

Страница 63: ...and then press the button z z The camera now enters shooting standby mode and Smile Detection on is displayed 2 Aim the camera at a person z z Each time the camera detects a smile it will shoot after the lamp lights up z z To pause smile detection press the button Press the button again to resume detection Switch to another mode when you finish shooting or the camera will continue shooting each ti...

Страница 64: ...will shoot after a person enters the shooting area and winks You can also choose the shooting mode by choosing in steps 1 2 of Specific Scenes 55 touching to access the setting screen touching and then touching the same option or You can also shoot as usual by pressing the shutter button The camera can detect smiles more easily when subjects face the camera and open their mouth wide enough so that...

Страница 65: ... for the final shot You can also choose the shooting mode by choosing in steps 1 2 of Specific Scenes 55 touching to access the setting screen touching and then touching the same option or Using the Face Self Timer Still Images Movies The camera will shoot about two seconds after detecting that the face of another person such as the photographer has entered the shooting area 84 This is useful when...

Страница 66: ...ke sure the person you shoot in steps 4 5 stays still Shooting Starry Skies Star Shooting People against Starry Skies Star Portrait Still Images Movies Capture beautiful shots of people against starry skies After initially firing the flash to capture the person the camera shoots twice without flash The three images are combined into a single image and processed to make the stars more prominent For...

Страница 67: ...viewing try choosing MENU tab Night Display On 92 before shooting To adjust subject brightness try changing the flash exposure compensation 89 To adjust background brightness try changing the exposure compensation 74 However images may not look as expected under some shooting conditions and the person should stay still in steps 4 5 which may take up to about 15 seconds To capture more stars and br...

Страница 68: ...ing mode by choosing in steps 1 2 of Specific Scenes 55 touching to access the setting screen touching and then touching the same option or For easier viewing try choosing MENU tab Night Display On 92 before shooting To make stars brighter choose MENU 30 tab Star Emphasis Sharp To emphasize the bright stars in a starry sky set Star Emphasis to Soft This setting can produce eye catching shots by en...

Страница 69: ...c 4 sec 1 min 4 sec 1 min 2 sec Shooting Movies of Star Movement Star Time Lapse Movie Still Images Movies By recording a time lapse movie that combines images shot at a specified interval you can create movies with fast moving stars You can adjust the shooting interval and recording duration as needed Note that each session takes a long time and requires many shots Check the battery level and mem...

Страница 70: ...esses the images If the camera runs out of battery power or memory card space shooting stops and a movie created from the images up to that point is saved A shooting interval of 1 min is not available with these effects or Sound is not recorded For easier viewing try choosing MENU tab Night Display On 92 before shooting You can also access the screen in step 2 by choosing MENU 30 tab Star Time Lap...

Страница 71: ...h on the screen z z Touch to adjust the exposure 3 Shoot 71 The exposure compensation dial cannot be used You can also adjust the exposure by turning the ring before recording Shooting Various Movies Still Images Movies Shooting Movies in Standard Mode Still Images Movies 1 Enter mode z z Set the mode dial to z z Press the button choose in the menu and then choose 29 z z Black bars are displayed o...

Страница 72: ... Movies Shoot movies that can be edited with iFrame compatible software or devices You can quickly edit save and manage your iFrame movies using the software 163 1 Choose z z Set the mode dial to z z Press the button choose in the menu and then choose 29 z z Black bars displayed on the top and bottom edges of the screen indicate image areas not recorded 2 Shoot 71 iFrame is a video format develope...

Страница 73: ... when you press the shutter button halfway shutter speeds and aperture values are displayed in orange In this case try adjusting the ISO speed 75 or activating the flash if subjects are dark 88 which may enable adequate exposure Movies can be recorded in mode as well by pressing the movie button However some FUNC 29 and MENU 30 settings may be automatically adjusted for movie recording P Mode More...

Страница 74: ...ness of light across the entire image area calculated by treating brightness in the central area as more important Spot Metering restricted to within the Spot AE Point frame You can also link the Spot AE Point frame to the AF frame 75 Image Brightness Exposure Adjusting Image Brightness Exposure Compensation Still Images Movies The standard exposure set by the camera can be adjusted in 1 3 stop in...

Страница 75: ...O speed to AUTO press the shutter button halfway Although choosing a lower ISO speed may reduce image graininess there may be a greater risk of subject and camera shake in some shooting conditions Choosing a higher ISO speed will increase shutter speed which may reduce subject and camera shake and increase the flash range However shots may look grainy You can also set the ISO speed by pressing the...

Страница 76: ...then overexposure each time you shoot You can adjust the amount of underexposure and overexposure relative to standard exposure from 2 to 2 stops in 1 3 stop increments 1 Choose z z Press the button choose in the menu and then choose 29 2 Configure the setting z z Press the button and then adjust the setting by pressing the buttons or turning the dial Adjusting ISO Auto Settings Still Images Movie...

Страница 77: ...vailable in mode 88 Continuous shooting 87 is not available in this mode If exposure compensation is already in use 74 the value specified for that function is treated as the standard exposure level for this function You can also access the setting screen of step 2 by pressing the button when the exposure compensation screen 74 is displayed Three shots are taken regardless of any quantity specifie...

Страница 78: ...descent lighting Fluorescent For shooting under white fluorescent lighting Fluorescent H For shooting under daylight fluorescent lighting Flash For shooting with the flash Underwater For shooting underwater 55 Custom For manually setting a custom white balance 79 Shadow Correct Still Images Movies Automatically preserve image detail in shadows as follows z z Press the button choose in the menu and...

Страница 79: ...y touching or dragging the bar in step 1 or the frame in step 2 You can also access the screen in step 2 by touching in step 1 On the screen in step 2 you can touch to restore the original level and touch to return to the shooting screen Custom White Balance Still Images Movies For image colors that look natural under the light in your shot adjust white balance to suit the light source where you a...

Страница 80: ...the left z z Press the button to complete the setting You can also specify a value by touching or dragging the bar Changing Image Color Tones My Colors Still Images Movies Change image color tones as desired such as converting images to sepia or black and white z z Press the button choose in the menu and choose the desired option 29 z z The option you configured is now displayed My Colors Off Vivi...

Страница 81: ... shows the distance and focal position and the magnified display area press the buttons or turn the dial to specify the general focal position and then press the button z z To adjust the magnification press the button z z During magnified display you can move the focusing frame by dragging on the screen 3 Fine tune the focus z z Press the shutter button halfway to have the camera fine tune the foc...

Страница 82: ...quantity specified in 42 In Blink Detection mode 51 this function is only available for the final shot When you focus manually the AF frame mode 83 is 1 point and AF frame size 84 is Normal and these settings cannot be changed Focusing is possible when using the digital zoom 40 or digital tele converter 83 or when using a TV as a display 161 but the magnified display will not appear You can also a...

Страница 83: ...ss the shutter button all the way down Focus Lock The AF frame position is enlarged when you press the shutter button halfway and AF Point Zoom 51 is set to On To access the screen in step 2 you can either touch on the screen in step 1 or touch on the manual focus screen 81 You can also configure this setting by touching or dragging the bar on the screen in step 2 to specify a value and then touch...

Страница 84: ...s or 25 frames 21 frames If faces are not detected when Servo AF 85 is set to On the AF frame is displayed in the center of the screen when you press the shutter button halfway Examples of faces that cannot be detected Subjects that are distant or extremely close Subjects that are dark or light Faces in profile at an angle or partly hidden The camera may misinterpret non human subjects as faces No...

Страница 85: ... on 1 Prepare the camera for Face Select z z Set the AF frame to Face AiAF 84 z z Assign to the button 99 Shooting with Servo AF Still Images Movies This mode helps avoid missing shots of subjects in motion because the camera continues to focus on the subject and adjust the exposure as long as you press the shutter button halfway 1 Configure the setting z z Press the button choose Servo AF on the ...

Страница 86: ...n all the way down to shoot 2 Enter Face Select mode z z Aim the camera at the person s face and press the button z z After Face Select On is displayed a face frame is displayed around the face detected as the main subject z z Even if the subject moves the face frame follows the subject within a certain range z z If a face is not detected is not displayed 3 Choose the face to focus on z z To switc...

Страница 87: ...fires With Touch Shutter 42 the camera shoots continuously while you touch the screen If you prefer the camera not to shoot when you touch the screen make sure Touch Shutter mode is deactivated Press the button choose Touch Shutter on the tab and then choose Off 30 Tracking may not be possible when subjects are too small or move too rapidly or when there is inadequate contrast between subjects and...

Страница 88: ...ng without the flash If a blinking icon is displayed when you press the shutter button halfway in camera shake inducing low light conditions mount the camera on a tripod or take other measures to keep it still Adjustment is also possible by pressing the button touching the desired option and then touching it again Flash Changing the Flash Mode Still Images Movies You can change the flash mode to m...

Страница 89: ...l cancel FE Lock FE Flash Exposure Adjusting the Flash Exposure Compensation Still Images Movies Just as with regular exposure compensation 74 you can adjust the flash exposure from 2 to 2 stops in 1 3 stop increments z z Raise the flash press the button and immediately turn the ring to choose the compensation level and then press the button z z The correction level you specified is now displayed ...

Страница 90: ...AW images RAW images are raw unprocessed data recorded with essentially no loss of image quality from the camera s image processing The data cannot be used in this state for viewing on a computer or printing You must first use the software Digital Photo Professional to convert images to ordinary JPEG or TIFF files Images can be adjusted with minimal loss of image quality For details on resolution ...

Страница 91: ...vies 1 Access the setting screen z z Press the button choose IS Settings on the tab and then press the button 30 2 Configure the setting z z Press the button choose IS Mode on the tab and then press the buttons to choose the desired option 30 Continuous Optimal image stabilization for the shooting conditions is automatically applied Intelligent IS 39 Shoot Only Image stabilization is active only a...

Страница 92: ... not adjusted in Playback mode If image stabilization cannot prevent camera shake mount the camera on a tripod or take other measures to hold it still In this case set IS Mode to Off Shooting Movies with Subjects at the Same Size Shown before Shooting Still Images Movies Normally once movie recording begins the image display area changes and subjects are enlarged to allow for correction of signifi...

Страница 93: ...0 In conditions requiring slower shutter speeds there may be a delay before you can shoot again as the camera processes images to reduce noise When shooting at low shutter speeds on a tripod you should set IS Mode to Off 91 The speed you set may be lowered automatically as needed if the flash fires Orange display of aperture values when you press the shutter button halfway indicates that the setti...

Страница 94: ...r screen brightness remains the same when the flash is up and the mode is set to Images shot at high ISO speeds may look grainy 1 2 3 4 Specific Aperture Values Av Mode Still Images Movies Set your preferred aperture value before shooting as follows The camera automatically adjusts the shutter speed to suit your aperture value For details on available aperture values see Aperture 197 1 Enter mode ...

Страница 95: ... speed and aperture value is shown for comparison to the standard exposure level 3 or is displayed when the difference from standard exposure exceeds 2 stops Calculation of standard exposure is based on the specified metering method 74 You can customize camera operation so that turning the ring adjusts the shutter speed and turning the dial adjusts the aperture value 97 Adjusting the Flash Output ...

Страница 96: ...ocked during recording by touching is then displayed Recording Movies at Specific Shutter Speeds and Aperture Values Still Images Movies Set your preferred shutter speed aperture value and ISO speed For details on available shutter speeds aperture values and ISO speeds see Shutter Speed 197 Aperture 197 and Changing the ISO Speed 75 1 Enter mode z z Set the mode dial to z z Press the button choose...

Страница 97: ...g the functions you can assign to the dial are the same as for Icons labeled with indicate that the function is not available in the current shooting mode or under current function conditions The ring can be used for step zooming in or movie mode 41 In mode you can assign aperture value or shutter speed adjustment to the ring Customization for Shooting Styles Changing Control Ring Settings Still I...

Страница 98: ...ayed in and modes ISO Tv Av ISO Av ISO Tv ISO ISO ISO speed 75 Tv shutter speed 93 Av aperture value 94 Assigning Functions to the Control Ring Still Images Movies Assign functions to the control ring based on each shooting mode 1 Choose z z Following step 1 in Changing Control Ring Settings 97 choose and press the button 2 Configure the setting z z Press the buttons or turn the dial to choose the...

Страница 99: ...stomizing Display Information Still Images Movies Set the number of custom displays 29 and what information is displayed in each display when the button is pressed in shooting screen 1 Access the setting screen z z Press the button choose Custom Display on the tab and then press the button 30 2 Configure the setting z z Press the buttons or turn the dial to choose an item and then press the button...

Страница 100: ...he menu screen 3 Configure the setting z z Press the button choose OK either press the buttons or turn the dial and then press the button To restore default settings choose in Set button and in Set button Icons labeled with indicate that the function is not available in the current shooting mode or under current function conditions With you can move and resize the AF frame by pressing the button i...

Страница 101: ...ter a shooting mode with settings you want to save and change the settings as desired 2 Configure the setting z z Press the button choose Save Settings on the tab and then press the button 3 Save the settings z z Press the buttons or turn the dial to choose OK and then press the button The screen in step 2 can also be accessed by holding down the button when the FUNC menu is displayed Items that y...

Страница 102: ...u can also touch items to select them On the Sort screen you can also drag items to change the display order To edit saved settings except their shooting mode choose change the settings and then repeat steps 2 3 These setting details are not applied in other shooting modes To clear information you have saved to and restore default values turn the mode dial to and choose Reset All 157 Saving Common...

Страница 103: ...ge press the button or turn the dial clockwise z z Press and hold the buttons to browse through images quickly z z To access this screen Scroll Display mode turn the dial rapidly In this mode turn the dial to browse through images z z To return to single image display press the button z z To browse images grouped by shooting date press the buttons in Scroll Display mode z z Movies are identified b...

Страница 104: ...for your next operation z z Touch to display the volume panel and then touch to adjust the volume At a volume of 0 is displayed z z To switch frames touch the scrollbar or drag left or right z z To resume playback touch z z Touch to return to the screen in step 2 of Viewing 103 3 Play movies z z To start playback press the button to access the movie control panel choose either press the buttons or...

Страница 105: ... GPS Information Display Still Images Movies z z The RGB histogram shows the distribution of shades of red green and blue in an image The horizontal axis represents R G or B brightness and the vertical axis how much of the image is at that level of brightness Viewing this histogram enables you to check image color characteristics z z Using a smartphone connected to the camera via Wi Fi you can geo...

Страница 106: ...d of numerical values for items not available on your smartphone or items not recorded correctly UTC Coordinated Universal Time essentially the same as Greenwich Mean Time GPS information display is not available for images that lack this information You can also switch between the RGB histogram still images only and GPS information display by dragging the lower half of the screen upward or downwa...

Страница 107: ... an image z z Turn the dial to scroll through the images z z Press the buttons to choose an image z z An orange frame is displayed around the selected image z z Press the button to view the selected image in single image display To deactivate the 3D display effect shown if you hold down the buttons or turn the dial rapidly choose MENU 30 tab Index Effect Off Checking People Detected in Face ID Sti...

Страница 108: ...e display press the button and go to step 4 z z When you have selected as the first condition press the button and press the buttons on the next screen to choose a person Touch Screen Operations z z Pinch in to switch from single image display to index display z z To view more thumbnails per screen pinch in again z z Drag up or down on the screen to scroll through displayed images z z To view fewe...

Страница 109: ...or jump by the specified number of images forward or back 4 View the filtered images z z Images matching your conditions are displayed in yellow frames To view only these images press the buttons or turn the dial z z To cancel filtered display press the button When the camera has found no corresponding images for some conditions those conditions will not be available To show or hide information pr...

Страница 110: ...ely after you shoot You can also view group images individually by touching on the screen in step 1 Touch Screen Operations z z You can also jump to the previous or next image according to your jump method chosen in step 1 of Using the Control Ring to Jump between Images 109 by dragging left or right with two fingers Turning the ring when browsing images in index display will jump to the previous ...

Страница 111: ...dial to choose OK and then press the button You can also erase names by touching OK after Erase is displayed Editing Face ID Information If you notice that a name is incorrect during playback you can change it or erase it However you cannot add names for people who are not detected by Face ID names are not displayed and for people whose names have been erased Changing Names 1 Access the setting sc...

Страница 112: ...nu item to configure and then choose the desired option 30 Image Viewing Options Magnifying Images Still Images Movies 1 Magnify an image z z Moving the zoom lever toward will zoom in and magnify the image You can magnify images up to about 10x by continuing to hold the zoom lever z z The approximate position of the displayed area 1 is shown for reference z z To zoom out move the zoom lever toward...

Страница 113: ...lay of the center image in step 2 touch that image To restore the original display touch the screen again 3 Start automatic playback z z Press the buttons or turn the dial to choose Start and then press the button z z The slideshow will start after Loading image is displayed for a few seconds z z Press the button to stop the slideshow The camera s power saving functions 27 are deactivated during s...

Страница 114: ...l to choose OK and then press the button Images will not be protected if you switch to Shooting mode or turn the camera off before finishing the setup process in step 3 You can also select or clear images by touching the screen in step 2 and you can access the confirmation screen by touching You can also protect images by touching OK on the screen in step 3 Protecting Images Still Images Movies Pr...

Страница 115: ...ct All Images z z Following step 2 in Choosing a Selection Method 114 choose Protect All Images and press the button 2 Protect the images z z Press the buttons or turn the dial to choose OK and then press the button Clearing All Protection at Once You can clear protection from all images at once To clear protection choose Unprotect All Images in step 1 of Protecting All Images at Once and then com...

Страница 116: ... you choose an image following step 2 in Choosing Images Individually 114 is displayed z z To cancel selection press the button again is no longer displayed z z Repeat this process to specify other images Erasing Images Still Images Movies You can choose and erase unneeded images one by one Be careful when erasing images because they cannot be recovered However protected images 114 cannot be erase...

Страница 117: ...t to Off 118 On the screen in step 2 you can also touch to rotate images or touch to return to the menu screen 3 Erase the image z z Press the button A confirmation message is displayed z z Press the buttons or turn the dial to choose OK and then press the button Selecting a Range 1 Choose Select Range z z Following step 2 in Choosing a Selection Method 116 choose Select Range and press the button...

Страница 118: ... or turn the dial to choose an image and then press the button is displayed z z To untag the image press the button again is no longer displayed z z Repeat this process to choose additional images 3 Finish the setup process z z Press the button A confirmation message is displayed z z Press the buttons or turn the dial to choose OK and then press the button Deactivating Auto Rotation Follow these s...

Страница 119: ...ns assigned to and by dragging across the screen z z Customize functions assigned to Touch Actions as desired Changing Touch Actions Functions Simplify your preferred camera operations by reassigning dragging patterns to them as desired 1 Access the setting screen z z Press the button and then choose Set Touch Actions on the tab 30 Images will not be tagged as favorites if you switch to Shooting m...

Страница 120: ...ial to choose an image and then press the button 3 Choose an image size z z Press the buttons or turn the dial to choose the size and then press the button z z Save new image is displayed 2 Assign a function to a Touch Action z z Press the buttons or turn the dial to choose a dragging pattern and then press the buttons to choose the function to assign Assignable Functions Favorites Tag images as f...

Страница 121: ...size the frame move the zoom lever z z To move the frame press the buttons z z To change the frame orientation press the button z z Faces detected in the image are enclosed in gray frames in the upper left image To crop the image based on this frame turn the dial to switch to the other frame z z Press the button 1 3 2 4 Save the new image z z Press the buttons or turn the dial to choose OK and the...

Страница 122: ...rs 80 You can also configure this setting by touching an option to select it on the screen in step 3 and then touching it again 4 Save as a new image and review z z Follow steps 4 5 in Resizing Images 120 Editing is not possible for images shot at a resolution of 49 or resized to 120 RAW images cannot be edited Images supported for cropping will have the same aspect ratio after cropping Cropped im...

Страница 123: ... File and then press the button z z The image is now saved as a new file z z Follow step 5 in Resizing Images 120 Correcting Image Brightness i Contrast Still Images Movies Excessively dark image areas such as faces or backgrounds can be detected and automatically adjusted to the optimal brightness Insufficient overall image contrast is also automatically corrected to make subjects stand out bette...

Страница 124: ... z z To view the portions you can cut identified by on the screen press the buttons or turn the dial to move Cut the beginning of the movie from by choosing and cut the end of the movie by choosing z z If you move to a position other than a mark in the portion before the nearest mark on the left will be cut while in the portion after the nearest mark on the right will be cut 1 2 Some images may no...

Страница 125: ...vie z z Press the buttons to choose and then press the button The edited movie is now played z z To edit the movie again repeat step 2 z z To cancel editing press the button choose OK either press the buttons or turn the dial and then press the button 4 Save the edited movie z z Press the buttons to choose and then press the button z z Press the buttons or turn the dial to choose New File and then...

Страница 126: ...Follow steps 1 2 in Viewing Short Movies Created When Shooting Still Images Digest Movies 106 to play a movie created in mode and then press the button to access the movie control panel z z Press the buttons or turn the dial to choose or and then press the button 2 Choose z z Press the buttons or turn the dial to choose and then press the button z z The selected clip is played back repeatedly 3 Co...

Страница 127: ... manual smartphones tablets and other compatible devices are collectively referred to as smartphones Computer Use software to save camera images to a computer connected via Wi Fi Web Services Add your account information to the camera for CANON iMAGE GATEWAY online photography service or other Web services to send camera images to the services Unsent images on the camera can also be sent automatic...

Страница 128: ...iPhone iPad or iPod touch find CameraWindow in the App Store and download and install the app 2 Press the button z z Press the button z z When the Device Nickname screen is displayed press the button Use the keyboard displayed to enter a nickname 32 On the Device Nickname screen choose OK either press the buttons or turn the dial and then press the button Sending Images to a Smartphone Connect the...

Страница 129: ...martphone This may damage the devices Depending on the smartphone the devices may not recognize each other immediately In this case try holding the devices together in slightly different positions Do not place other objects between the camera and smartphone Also note that camera or smartphone covers or similar accessories may block communication 3 Choose z z Press the buttons or turn the dial to c...

Страница 130: ...ame 128 3 Choose z z Press the buttons or turn the dial to choose and then press the button 4 Choose Add a Device z z Press the buttons or turn the dial to choose Add a Device and then press the button Connections require that a memory card be in the camera A message is displayed if the nickname you enter begins with a symbol or space Press the button and enter a different nickname For better secu...

Страница 131: ...s choose MENU 30 tab Wi Fi Settings Target History Off You can also send multiple images at once and change the image size before sending 144 z z The camera s SSID is displayed z z Choose a smartphone to connect to as described in steps 4 6 of Sending to a Smartphone Assigned to the Button 128 5 Adjust the privacy setting z z Press the buttons or turn the dial to choose Yes and then press the butt...

Страница 132: ...e Switch Network on the screen displayed when you establish a connection and then follow the procedure in Using Another Access Point 132 from step 4 Using Another Access Point When connecting the camera to a smartphone with the button or through the Wi Fi menu you can also use an existing access point 1 Prepare for the connection z z Access the Waiting to connect screen Either follow steps 1 3 in ...

Страница 133: ...n the installation z z Click Easy Installation and follow the on screen instructions to complete the installation process 3 When a message is displayed prompting you to connect the camera choose whether to connect or not Saving Images to a Computer Preparing to Register a Computer Checking Your Computer Environment The camera can connect via Wi Fi to computers running the following operating syste...

Страница 134: ...status Enable Universal Plug Play UPnP This will enable network devices to detect each other automatically Some security software may prevent you from completing the settings as described here Check the settings of your security software When Connecting the Camera to the Computer z z With the camera turned off open the cover 1 With the smaller plug of the USB cable in the orientation shown insert ...

Страница 135: ...is displayed press the button Use the keyboard displayed to enter a nickname 32 On the Device Nickname screen choose OK either press the buttons or turn the dial and then press the button Saving Images to a Connected Computer Connect to your access point via Wi Fi as follows Also refer to the access point user manual Confirming Access Point Compatibility Confirm that the Wi Fi router or base stati...

Страница 136: ... will be displayed on the camera screen 10 Display CameraWindow z z Windows Access CameraWindow by clicking Downloads Images From Canon Camera z z Mac OS CameraWindow is automatically displayed when a Wi Fi connection is established between the camera and computer 3 Choose z z Press the buttons or turn the dial to choose and then press the button 4 Choose Add a Device z z Press the buttons or turn...

Страница 137: ...he Pictures folder on the computer in separate folders named by date z z Click OK in the screen that is displayed after image import is complete For instructions on viewing images on a computer refer to Software Instruction Manual 163 Once you have connected to devices via the Wi Fi menu recent destinations will be listed first when you access the Wi Fi menu You can easily connect again by pressin...

Страница 138: ...t fees may be applicable To determine the access point password check on the access point itself or refer to the user manual Up to 16 access points will be displayed If no access points are detected even after you choose Refresh in step 2 to update the list choose Manual Settings in step 2 to complete access point settings manually Follow on screen instructions and enter an SSID security settings ...

Страница 139: ...er is displayed Registering CANON iMAGE GATEWAY After linking the camera and CANON iMAGE GATEWAY add CANON iMAGE GATEWAY as a destination Web service on the camera 1 Log in to CANON iMAGE GATEWAY and access the camera web link settings page z z From a computer or smartphone access http www canon com cig to visit CANON iMAGE GATEWAY z z Once the login screen is displayed enter your user name and pa...

Страница 140: ... to choose and then press the button z z The Web service settings are now updated If any configured settings change follow these steps again to update the camera settings 8 Check the confirmation numbers and complete the setup process z z Make sure the confirmation number on the camera matches the number on the smartphone or computer z z Press the buttons or turn the dial to choose OK and then pre...

Страница 141: ... icon of the Web service for sharing either press the buttons or turn the dial and then press the button z z If multiple recipients or sharing options are used with a Web service choose the desired item on the Select Recipient screen either press the buttons or turn the dial and then press the button 3 Send images z z Turn the dial to choose an image to send press the buttons to choose Send this i...

Страница 142: ...Fi menu You can easily connect again by pressing the buttons to choose the device and then pressing the button To add a new device display the device selection screen by pressing the buttons and then configure the setting If you prefer not to display recent target devices choose MENU 30 tab Wi Fi Settings Target History Off To use another access point follow steps 3 4 in Using Another Access Point...

Страница 143: ...e device and then pressing the button To add a new device display the device selection screen by pressing the buttons and then configure the setting If you prefer not to display recent target devices choose MENU 30 tab Wi Fi Settings Target History Off You can also send multiple images at once and change the image size before sending 144 Sending Images to Another Camera Connect two cameras via Wi ...

Страница 144: ...s note that the supported image quality varies depending on the smartphone For details refer to the smartphone user manual On the screen wireless signal strength is indicated by the following icons high medium low weak Sending images to Web services will take less time when resending images you have already sent that are still on the CANON iMAGE GATEWAY server Image Sending Options You can choose ...

Страница 145: ...d choose Wi Fi Settings on the tab 30 z z Press the buttons to choose Image Sync and then press the buttons to choose Stills Movies Choosing the Image Resolution Size On the image transfer screen choose by pressing the buttons and then press the button On the screen displayed choose the resolution by pressing the buttons and then press the button To send images at original size select No as the re...

Страница 146: ...ter z z Images are automatically saved to the computer when you turn it on z z Images are automatically sent to Web services from the CANON iMAGE GATEWAY server even if the computer is off When sending images you should use a fully charged battery pack or an AC adapter kit sold separately 159 3 Assign to the button only when sending images by pressing the button z z Clear the button setting if a s...

Страница 147: ...cluding the latitude longitude and elevation Before shooting make sure the date and time and your home time zone are set correctly as described in Setting the Date and Time 20 Also follow the steps in World Clock 152 to specify any shooting destinations in other time zones Others may be able to locate or identify you by using location data in your geotagged still images or movies Be careful when s...

Страница 148: ...rom the camera Shooting Remotely As you check a shooting screen on your smartphone you can use it to shoot remotely 1 Secure the camera z z Once remote shooting begins the camera lens will come out Lens motion from zooming may also move the camera out of position Keep the camera still by mounting it on a tripod or taking other measures 2 Connect the camera and smartphone 128 130 z z In the privacy...

Страница 149: ...lows z z Following step 4 in Editing Connection Information 149 choose Erase Connection Info and press the button z z After Erase is displayed press the buttons or turn the dial to choose OK and then press the button z z The connection information will be erased Editing or Erasing Wi Fi Settings Edit or erase Wi Fi settings as follows Editing Connection Information 1 Access the Wi Fi menu and choo...

Страница 150: ...Resetting the Wi Fi settings will also clear all Web service settings Be sure that you want to reset all Wi Fi settings before using this option 1 Choose Wi Fi Settings z z Press the button and choose Wi Fi Settings on the tab 30 2 Choose Reset Settings z z Press the buttons or turn the dial to choose Reset Settings and then press the button 3 Restore the default settings z z Press the buttons or ...

Страница 151: ...d movies as follows z z Choose Mute and then choose On Operation can also be silenced by holding down the button as you turn the camera on Sound is not played during movies 103 if you mute camera sounds To restore sound during movies press the button or drag up across the screen Adjust volume as needed by pressing the buttons or by dragging up or down Adjusting the Volume Adjust the volume of indi...

Страница 152: ...me 1 hour ahead choose by pressing the buttons or turning the dial and then choose by pressing the buttons z z Press the button 2 Switch to the destination time zone z z Press the buttons or turn the dial to choose World and then press the button z z is now shown on the shooting screen 179 Adjusting the date or time while in mode 21 will automatically update your Home time and date Customizing Sou...

Страница 153: ...ond when the shooting screen is displayed or when in single image display This will override the LCD Brightness setting on the tab To restore the original brightness press and hold the button again for at least one second or restart the camera Lens Retraction Timing The lens is normally retracted for safety about one minute after you press the button in Shooting mode 26 To have the lens retracted ...

Страница 154: ... the buttons to select this option A icon is displayed z z Follow steps 2 3 in Formatting Memory Cards 154 to continue with the formatting process Low level formatting takes longer than Formatting Memory Cards 154 because data is erased from all storage regions of the memory card You can cancel low level formatting in progress by choosing Stop In this case all data will be erased but the memory ca...

Страница 155: ...confirmation message is displayed z z Choose OK and then press the button File Numbering Your shots are automatically numbered in sequential order 0001 9999 and saved in folders that store up to 2 000 images each You can change how the camera assigns file numbers z z Choose File Numbering and then choose an option Continuous Images are numbered consecutively until the 9999th shot is taken saved ev...

Страница 156: ...rs entered with the software may not display on the camera but will be correctly recorded in images You can check copyright information recorded in images by using the software once you save the images to a computer Deleting All Copyright Information You can delete both the author s name and copyright details at the same time as follows z z Follow the steps in Setting Copyright Information to Reco...

Страница 157: ...ID 44 tab settings Date Time 152 Time Zone 152 Language 157 and Video System 162 Custom white balance data you have recorded 79 Shooting mode chosen in 55 and 58 modes Values set using the exposure compensation dial 74 Movie mode 71 Wi Fi settings 127 Calibrated value for the electronic level 155 Copyright information 156 The copyright info already recorded in images will not be deleted Checking C...

Страница 158: ...eader Computer TV Video System AC Adapter Kit ACK DC110 Included Accessories Power Cables HDMI Cable camera end Type D 3 Stereo AV Cable AVC DC400ST Flash Unit PictBridge Compatible Printers High Power Flash HF DC2 Waterproof Case WP DC54 Cases 1 Also available for purchase separately 2 A genuine Canon accessory is also available Interface Cable IFC 400PCU 3 Use a commercially available cable no l...

Страница 159: ...for any damages resulting from accidents such as malfunction or fire that occur due to use of non genuine Canon battery packs The battery pack includes a convenient cover which you can attach to know the charge status at a glance Attach the cover so that is visible on a charged battery pack and attach it so that is not visible on an uncharged battery pack Use of genuine Canon accessories is recomm...

Страница 160: ...a computer you can print images by connecting the camera directly to a printer For details visit your nearest Canon retailer AC Adapter Kit ACK DC110 z z For powering the camera using household power Recommended when using the camera over extended periods or when connecting the camera to a printer or computer Cannot be used to charge the battery pack in the camera The battery charger and AC adapte...

Страница 161: ...cing the cables into the camera at the same time may damage the camera or cables Touch screen operations are not supported while the camera is connected to a television Camera operating sounds are not played while the camera is connected to an HDTV Using Optional Accessories Still Images Movies Playback on a TV Still Images Movies By connecting the camera to a TV you can view your shots on the lar...

Страница 162: ...h the terminals 1 facing as shown insert the coupler just as you would a battery pack following step 2 in Inserting the Battery Pack and Memory Card 19 z z Make sure the coupler cable passes through the port 1 1 2 1 1 Playback on a Standard Definition TV Still Images Movies Connecting the camera to a TV with the Stereo AV Cable AVC DC400ST sold separately enables you to view your shots on the larg...

Страница 163: ...quired and any ISP account charges and access fees must be paid separately Software Instruction Manual Digital Photo Professional Instruction Manual Refer to these manuals when using the corresponding software The manuals can be downloaded from the following URL http www canon com icpd 4 Close the cover z z Lower the cover 1 and hold it down as you slide the switch until it clicks into the closed ...

Страница 164: ...er manual 2 Turn the camera on to access CameraWindow z z Press the button to turn the camera on z z Mac OS CameraWindow is displayed when a connection is established between the camera and computer z z Windows Follow the steps introduced below z z In the screen that displays click the link to modify the program 1 2 Computer Connections via a Cable Checking Your Computer Environment The software c...

Страница 165: ... saved in horizontal orientation RAW images or JPEG images recorded with RAW images may not be saved Image protection settings may be cleared from images saved to a computer Some problems may occur when saving images or image information depending on the operating system version the software in use or image file sizes Some functions provided by the software may not be available such as movie editi...

Страница 166: ...inters 160 RAW images cannot be printed Printing Images Still Images Movies Your shots can easily be printed by connecting the camera to a printer On the camera you can specify images to set up batch printing prepare orders for photo development services and prepare orders or print images for photobooks A Canon SELPHY CP series compact photo printer is used here for the sake of illustration Screen...

Страница 167: ...z z When finished press the button 3 Print the image z z Follow step 7 in Easy Print 166 to print Cropping may not be possible at small image sizes or at some aspect ratios Configuring Print Settings Still Images Movies 1 Access the printing screen z z Follow steps 1 6 in Easy Print 166 to access this screen 2 Configure the settings z z Press the buttons or turn the dial to choose an item and then...

Страница 168: ...68 choose ID Photo and press the button 2 Choose the long and short side length z z Press the buttons or turn the dial to choose an item Choose the length by pressing the buttons and then press the button 3 Choose the printing area z z Follow step 2 in Cropping Images before Printing 167 to choose the printing area 4 Print the image Choosing Paper Size and Layout before Printing Still Images Movie...

Страница 169: ...sheet Index Smaller versions of multiple images are printed per sheet Both Both standard and index formats are printed Date On Images are printed with the shooting date Off File No On Images are printed with the file number Off Clear DPOF data On All image print list settings are cleared after printing Off Printing Movie Scenes Still Images Movies 1 Access the printing screen z z Follow steps 1 5 ...

Страница 170: ...ividual Images 170 choose Select All Images and press the button z z Press the buttons or turn the dial to choose OK and then press the button Not all of your DPOF settings may be applied in printing by the printer or photo development service in some cases may be displayed on the camera to warn you that the memory card has print settings that were configured on another camera Changing the print s...

Страница 171: ...the memory card has print settings that were configured on another camera Changing the print settings using this camera may overwrite all previous settings After importing images to your computer also refer to Software Instruction Manual 163 and the printer manual for further information Clearing All Images from the Print List z z Following step 1 in Setting Up Printing for Individual Images 170 c...

Страница 172: ...y Still Images Movies 1 Choose Select z z Following the procedure in Choosing a Selection Method 171 choose Select and press the button 2 Choose an image z z Press the buttons or turn the dial to choose an image and then press the button z z is displayed z z To remove the image from the photobook press the button again is no longer displayed z z Repeat this process to specify other images z z When...

Страница 173: ...power quickly Battery performance decreases at low temperatures Try warming the battery pack a little by putting it in your pocket for example ensuring that the terminals do not touch any metal objects Dirty battery terminals reduce battery performance Try cleaning the terminals with a cotton swab and reinserting the battery pack a few times If these measures do not help and the battery pack still...

Страница 174: ...grainy images 55 Subjects are affected by red eye Set Red Eye Lamp to On 52 The red eye reduction lamp 4 will be activated in flash shots For best results have subjects look at the red eye reduction lamp Also try increasing the lighting in indoor scenes and shooting at closer range Edit images using red eye correction 123 Shooting Cannot shoot In Playback mode 103 press the shutter button halfway ...

Страница 175: ...card takes too long or continuous shooting is slower Use the camera to perform low level formatting of the memory card 154 Shooting settings or FUNC menu settings are not available Available setting items vary by shooting mode Refer to Functions Available in Each Shooting Mode FUNC Menu and Shooting Tab 181 186 The Babies or Children icon does not display The Babies and Children icons will not dis...

Страница 176: ...a a cable Disconnect the cable Cannot add a device destination A total of 20 items of connection information can be added to the camera Erase unneeded connection information from the camera first and then add new devices destinations 149 Use a computer or smartphone to register Web services 138 To add a smartphone first install the dedicated application CameraWindow on your smartphone 128 To add a...

Страница 177: ...rror The folder could not be created or images could not be recorded because the highest supported folder number 999 for storing images on the card has been reached and the highest supported image number 9999 for images in folders has been reached On the tab change File Numbering to Auto Reset 155 or format the memory card 154 Lens Error This error may occur if the lens is held while it is moving ...

Страница 178: ...GE GATEWAY to create space Save the images sent via Image Sync 145 to your computer Check network settings Check to make sure your computer can connect to the Internet with the current network settings A camera error was detected error number If this error message is displayed immediately after a shot the image may not have been saved Switch to Playback mode to check for the image Frequent display...

Страница 179: ...sage indicates the battery charge level Display Details Sufficient charge Slightly depleted but sufficient Blinking red Nearly depleted charge the battery pack soon Charge the battery Depleted charge the battery pack immediately On Screen Information Shooting Information Display 1 2 3 4 5 6 8 7 9 11 12 13 14 15 16 17 18 19 20 21 22 36 38 37 23 10 30 32 24 25 27 26 28 29 34 35 33 31 1 Shooting mode...

Страница 180: ...g forward keep holding down the button Erase Clip displayed when a digest movie is selected 126 Edit 124 Shown when the camera is connected to a PictBridge compatible printer 166 Displays the frame approx 4 sec before or after the current frame During movie playback you can skip back or forward or to the previous or next clip by pressing the buttons Playback Detailed Information Display 1 2 3 4 5 ...

Страница 181: ...de Advanced Guide 1 1 3 3 3 1 Flash Exposure Compensation 89 1 Flash Output Level 95 1 Av Tv Settings 93 94 Aperture Value 1 Shutter Speed 1 Functions and Menu Tables Functions Available in Each Shooting Mode Available or automatically set functions are indicated by black icons such as Unavailable functions are indicated by gray icons such as Exposure Compensation 74 1 Drive Mode 87 1 1 2 1 Flash ...

Страница 182: ...hange Display 29 1 1 Options vary depending on the assigned shooting mode 2 is set with AF lock or 3 Not available but switches to in some cases 4 FE lock not available in flash mode 5 Only with ISO Auto selected 6 When is assigned to the button or movie button 99 7 Only when is selected 8 Only available when faces are detected 9 Only in manual focus mode Program Shift 74 1 AE Lock FE Lock 71 74 8...

Страница 183: ...Tv Av M and C Mode 6 Playback Mode 7 Wi Fi Functions 8 Setting Menu 9 Accessories 10 Appendix Index Before Use Basic Guide Advanced Guide 125 12800 1 White Balance 78 1 1 1 1 1 White Balance Correction 79 1 FUNC Menu DR Correction 77 1 1 1 Shadow Correction 78 1 1 ISO Speed 75 AUTO 1 ...

Страница 184: ...back Mode 7 Wi Fi Functions 8 Setting Menu 9 Accessories 10 Appendix Index Before Use Basic Guide Advanced Guide Self Timer 41 1 1 Self Timer Settings 42 Delay 5 1 Shots 6 1 Metering Method 74 1 1 Underwater White Balance Correction 57 Color Adjustment Biaxial 70 My Colors 80 1 3 3 4 1 Bracketing 76 82 1 1 1 ...

Страница 185: ... Mode 5 Tv Av M and C Mode 6 Playback Mode 7 Wi Fi Functions 8 Setting Menu 9 Accessories 10 Appendix Index Before Use Basic Guide Advanced Guide Resolution 49 1 1 Compression 91 1 1 Movie Quality 50 1 1 1 7 ND Filter 78 1 1 Still Image Aspect Ratio 48 1 1 1 1 Image Type 90 1 ...

Страница 186: ...nding on the assigned shooting mode 2 Advanced settings not available 3 White balance is not available 4 Set in a range of 1 5 contrast sharpness color saturation red green blue and skin tone 5 Cannot be set to 0 seconds in modes without selection of the number of shots 6 One shot cannot be modified in modes without selection of the number of shots 7 Synchronizes with the aspect ratio setting and ...

Страница 187: ...ck Mode 7 Wi Fi Functions 8 Setting Menu 9 Accessories 10 Appendix Index Before Use Basic Guide Advanced Guide 4x 1 Safety MF 81 On 1 Off 1 MF Peaking Settings 82 Peaking On Off 1 Level Low High 1 Color Red Yellow Blue 1 Off 1 Touch Shutter 42 On 1 Off 1 AF assist Beam 52 On 1 Off 1 MF Point Zoom 81 Off 1 2x 1 ...

Страница 188: ...Setting Menu 9 Accessories 10 Appendix Index Before Use Basic Guide Advanced Guide Safety FE On 1 Off 1 ISO Auto Settings 76 Max ISO Speed 1 Rate of Change 1 High ISO NR 76 Low Standard High 1 Hg Lamp Corr 49 On Off Flash Settings 52 89 90 95 Flash Mode Auto 1 Manual 1 Flash Exp Comp 1 Flash Output 1 Shutter Sync 1 Red Eye Lamp On 1 Off 1 ...

Страница 189: ...es 10 Appendix Index Before Use Basic Guide Advanced Guide 2 sec 4 sec 8 sec 1 Hold 1 Display Info Off 1 Detailed 1 Blink Detection 51 On 1 Off 1 Custom Display 99 Shooting Info Grid Lines Electronic Level Histogram 1 Spot AE Point 74 Center 1 AF Point 1 Safety Shift 94 On 1 Off 1 Wind Filter 37 Auto Off 1 Review image after shooting 52 Display Time Off Quick 1 ...

Страница 190: ...es 10 Appendix Index Before Use Basic Guide Advanced Guide Dynamic IS 1 1 2 1 Digest Type 36 Include Stills No Stills Save Stills 69 On Off Star Emphasis 66 67 Sharp Off Soft Star Portrait Settings 66 Star Visibility Standard Prominent Night Display 92 On Off 1 FUNC Menu Layout 100 1 Reverse Disp 28 On Off 1 IS Settings 91 IS Mode Off 1 Continuous 1 Shoot Only 1 ...

Страница 191: ...signed shooting mode 2 Operation when no faces are detected varies by shooting mode 3 Available when the AF frame is set to 1 point 4 On when subject movement is detected Names of people in shots taken using Face ID 44 may not be displayed in some modes or with some settings but they will be recorded in the still images Star Time Lapse Movie Setting 69 Effect Shot Interval 15 sec 30 sec 1 min Fram...

Страница 192: ...ast 123 Red Eye Correction 123 Cropping 121 Resize 120 My Colors 122 Face ID Info 107 Transition Effect 103 Index Effect 107 Scroll Display 103 Group Images 110 Auto Rotate 118 Resume 103 Set Up Tab Item Ref Page Mute 151 Volume 151 Sound Options 152 Hints Tips 152 Date Time 152 Time Zone 152 Lens Retraction 153 Eco Mode 153 Power Saving 27 153 LCD Brightness 153 Start up Image 154 Format 154 File...

Страница 193: ...If cleaning is difficult contact a Canon Customer Support Help Desk To prevent condensation from forming on the camera after sudden temperature changes when the camera is transferred from cold to warm environments put the camera in an airtight resealable plastic bag and let it gradually adjust to the temperature before removing it from the bag If condensation does form on the camera stop using it ...

Страница 194: ...and digital zoom Digital Tele Converter 1 6x 38 4 160 0 mm Digital Tele Converter 2 0x 48 0 200 0 mm Specifications Camera Specifications Camera Effective Pixels Max Approx 20 2 million pixels Lens Focal Length 4 2x zoom 8 8 W 36 8 T mm 35mm film equivalent 24 W 100 T mm LCD Monitor 7 5 cm 3 0 in color TFT LCD Effective Pixels Approx 1 040 000 dots File Format Design rule for Camera File system DP...

Страница 195: ...in the table are based on Canon measurement conditions and may change depending on the subject memory card and camera settings Number of Shots Recording Time Playback Time Number of Shots Approx 210 Number of Shots Eco Mode On Approx 310 Movie Recording Time 1 Approx 40 minutes Movie Recording Time Continuous Shooting 2 Approx 1 hour 10 minutes Playback Time Approx 4 hours 1 Time under default cam...

Страница 196: ...shots varies depending on subjects the brand of memory card and other factors Recording Time per Memory Card Image Quality Recording Time per Memory Card 8 GB 32 GB 30 min 03 sec 2 hr 01 min 27 sec 43 min 29 sec 1 2 hr 55 min 43 sec 2 2 hr 03 min 55 sec 8 hr 20 min 32 sec 5 hr 14 min 34 sec 21 hr 10 min 38 sec 1 26 min 22 sec for iFrame movies 72 2 1 hr 46 min 33 sec for iFrame movies 72 The value...

Страница 197: ...6 5 4 3 2 2 5 2 1 6 1 3 1 0 8 0 6 0 5 0 4 0 3 1 4 1 5 1 6 1 8 1 10 1 13 1 15 1 20 1 25 1 30 1 40 1 50 1 60 1 80 1 100 1 125 1 160 1 200 1 250 1 320 1 400 1 500 1 640 1 800 1 1000 1 1250 1 1600 1 2000 1 In mode shutter speeds of 20 seconds or slower are not available 2 In mode shutter speeds of 1 25 seconds or slower are not available Aperture f number f 1 8 f 11 W f 2 8 f 11 T Available values in ...

Страница 198: ... all Digital tele converter 83 Digital zoom 40 Display language 22 DPOF 169 Dynamic Range Correction 77 E Eco mode 153 Editing Cropping 121 i Contrast 123 My Colors 122 Red eye correction 123 Resizing images 120 Editing or erasing connection information 149 Electronic level 50 Erasing 116 Erasing all 116 Error messages 177 Exposure AE lock 74 Compensation 74 FE lock 89 F Face AiAF AF frame mode 84...

Страница 199: ... 61 Traveling with the camera 152 Troubleshooting 173 TV display 161 Tv shooting mode 93 U Underwater macro focusing range 57 Underwater shooting mode 56 V Viewing 24 Image search 108 Index display 107 Jump display 109 Magnified display 112 Single image display 24 Slideshow 112 Smart Shuffle 113 TV display 161 ISO speed 75 J Jump display 109 L LCD monitor 28 M M shooting mode 94 Macro focusing ran...

Страница 200: ... and C Mode 6 Playback Mode 7 Wi Fi Functions 8 Setting Menu 9 Accessories 10 Appendix Before Use Basic Guide Advanced Guide Index W White balance color 78 Wi Fi functions 127 Wi Fi menu 130 Wind filter 37 Wink self timer shooting mode 64 World clock 152 Wrist strap Strap Z Zoom 22 34 40 41 ...

Страница 201: ...ings and reset the product to its default settings erase settings if necessary Canon will not make compensation for damages resulting from loss or theft of the product Canon accepts no responsibility for damages or loss resulting from unauthorized access or use of target devices registered on this product due to loss or theft of the product Be sure to use the product as directed in this guide Be s...

Страница 202: ... AT T patents to provide MPEG 4 compliant video No license is granted or implied for any other use for MPEG 4 standard Disclaimer Unauthorized reproduction of this guide is prohibited All measurements based on Canon testing standards Information subject to change without notice as are product specifications and appearance Illustrations and screenshots in this guide may differ slightly from the act...

Отзывы: