


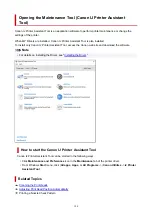


Adjusting Print Head Position Manually
Print Head Alignment corrects the installation positions of the print head and improves misalignment of
colors and lines.
This printer supports two head alignment methods:
Normally, the printer is set for automatic head alignment, but if the printing results are not satisfactory, such
as if the borders are not aligned, perform manual head alignment.
The procedure for performing manual Print Head Alignment is as follows:
Important
• Printing is required for adjusting the position of the print head. Do not open the scanning unit / cover
while printing is in progress; otherwise, printing will stop.
Print Head Alignment
1.
Open
Canon IJ Printer Assistant Tool
1.
2.
Check that the printer power is on, and then click
Custom Settings
2.
The
Custom Settings
dialog box opens.
Note
• If the printer is off or if communication between the printer and the computer is disabled, an
error message may appear because the computer cannot collect the printer status.
If this happens, click
OK
to display the most recent settings specified on your computer.
3.
Switch head alignment to manual
3.
Check the
Align heads manually
check box.
4.
Apply the settings
4.
Click
OK
and when the confirmation message appears, click
OK
.
5.
Click
Print Head Alignment
5.
The
Print Head Alignment
dialog box opens.
6.
Load paper in printer
6.
Load two sheets of A4 size or Letter size plain paper into the cassette.
7.
Perform head alignment
7.
Click
Start
.
Follow the instruction in the message.
149
Содержание Pixma TR7800 Series
Страница 1: ...TR7800 series TS6730 series TS7700A series TS7700i series Online Manual English...
Страница 11: ...Appendix Online Manual Symbols Used in This Document Trademarks and Licenses 11...
Страница 13: ...Trademarks and Licenses Trademarks Licenses 13...
Страница 41: ...Main Components and Their Use Main Components Power Supply Loading Paper Loading Originals 41...
Страница 42: ...Main Components Front View Rear View Inside View Operation Panel 42...
Страница 55: ...Power Supply Turning the Printer On and Off 55...
Страница 76: ...Note To scan the original at optimum quality load it on the platen 76...
Страница 86: ...Replacing a FINE Cartridge Replacing a FINE Cartridge Checking Ink Status on the Touch Screen 86...
Страница 105: ...Performing Changing Network Settings Canon Wi Fi Connection Assistant Screen Performing Network Settings 105...
Страница 122: ...TR9530 series TS3300 series E3300 series 122...
Страница 145: ...Managing the Printer Power Reducing the Printer Noise Changing the Printer Operation Mode 145...
Страница 168: ...168...
Страница 178: ...Changing Printer Settings from Your Computer macOS Managing the Printer Power Changing the Printer Operation Mode 178...
Страница 183: ...For more on setting items on the operation panel Setting Items on Operation Panel 183...
Страница 206: ...Safety Safety Precautions Regulatory Information WEEE 206...
Страница 225: ...Printer Handling Precautions Be careful not to let anything get inside the document output slot It may cause damage 225...
Страница 231: ...Specifications Product Specifications Supported Paper Sizes and Weights Print Area Paper Load Limit 231...
Страница 236: ...Paper Weight You can use paper in the following weight range Plain paper From 17 to 28 lb 64 to 105 g m2 236...
Страница 243: ...Printing Printing Photos and Documents Printing Hagaki and Envelopes Other Various Printing Features 243...
Страница 244: ...Printing Photos and Documents Printing from Computer Printing from Smartphone Tablet Using PIXMA MAXIFY Cloud Link 244...
Страница 261: ...Card 2 17 x3 58 55x91mm Card 2 17 x3 58 Custom Size Others 261...
Страница 318: ...Printing Using Canon Application Software Easy PhotoPrint Editor Guide 318...
Страница 319: ...Printing from Smartphone Tablet Printing from iPhone iPad iPod touch iOS Printing from Smartphone Tablet Android 319...
Страница 324: ...Other Various Printing Features Printing Pattern Paper or Templates 324...
Страница 328: ...Copying Making Copies Reducing Enlarging Copies Two Sided Copying Collated Copying Special Copy Menu 328...
Страница 335: ...Scanning Scanning and Saving to a Computer Attaching Scanned Images to E MAIL to Send 335...
Страница 340: ...Note To set the applications to integrate with see Settings Dialog Box 340...
Страница 354: ...ScanGear Scanner Driver Screens Basic Mode Tab Advanced Mode Tab Preferences Dialog Box 354...
Страница 380: ...Note To set the applications to integrate with see Settings Dialog 380...
Страница 383: ...Scanning Tips Positioning Originals Scanning from Computer 383...
Страница 386: ...The item type may not be detected automatically In that case specify the item type in IJ Scan Utility Lite and scan 386...
Страница 434: ...Problems While Printing Scanning from Smartphone Tablet Cannot Print Scan from Smartphone Tablet 434...
Страница 456: ...Opening Remote UI for Maintenance 456...
Страница 464: ...Scanning Problems Windows Scanning Problems 464...
Страница 465: ...Scanning Problems Scanner Does Not Work ScanGear Scanner Driver Does Not Start 465...
Страница 468: ...Scanning Problems macOS Scanning Problems 468...
Страница 469: ...Scanning Problems Scanner Does Not Work Scanner Driver Does Not Start 469...
Страница 483: ...Errors and Messages When Error Occurred Message Is Displayed 483...
Страница 506: ...If the measures above do not solve the problem contact your nearest Canon service center to request a repair 506...
Страница 531: ...4 Select Disable 4 531...
Страница 539: ...4 Select Disable 4 539...
Страница 545: ...2 Select Feed settings 2 3 Select Paper settings mismatch Copy or Paper settings mismatch Other 3 4 Select Disable 4 545...


