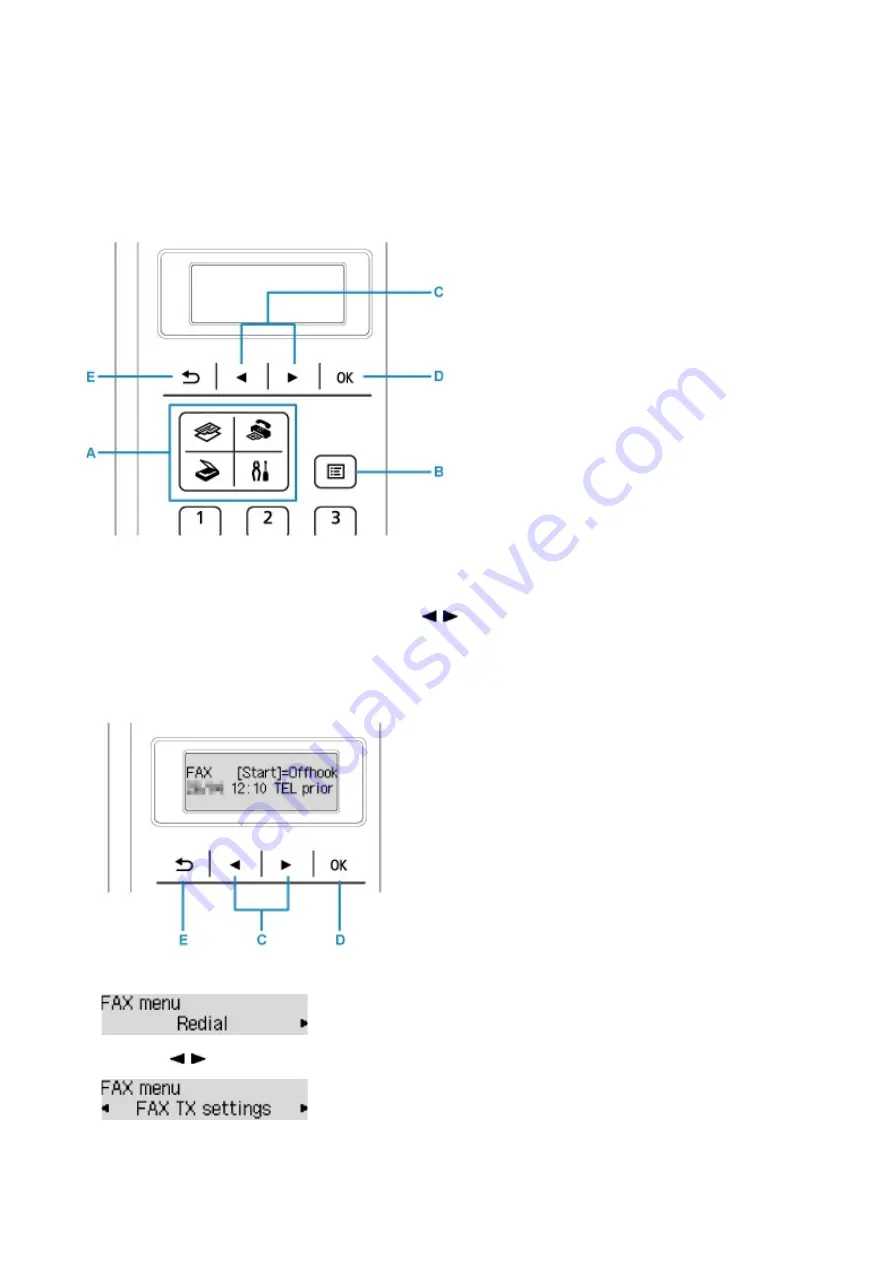
LCD and Operation Panel
The mode button (A) on the operation panel allows you to switch between the copy mode, scan mode, fax
mode, and setup menu screen.
Pressing the
Menu
button (B) in the respective modes shows the menu screen to select various functions or
settings.
Selecting a Menu or Setting Item
On the menu screen or settings screen, use the
button (C) to select an item or option, then press
the
OK
button (D) to proceed with the procedure.
To return to the previous screen, press the
Back
button (E).
Example: Changing the scan contrast for faxing.
Press the
Menu
button in the Fax standby screen.
Press the
button (C) to select
FAX TX settings
.
Press the
OK
button (D).
141
Содержание PIXMA G4010 Series
Страница 10: ...2900 507 2901 508 4103 509 5011 510 5012 511 5100 512 5200 513 5B00 514 6000 515 ...
Страница 28: ...Basic Operation Printing Photos from a Computer Printing Photos from a Smartphone Tablet Copying Faxing 28 ...
Страница 56: ...Handling Paper Originals Ink Tanks etc Loading Paper Loading Originals Refilling Ink Tanks 56 ...
Страница 57: ...Loading Paper Loading Plain Paper Photo Paper Loading Envelopes 57 ...
Страница 75: ...Refilling Ink Tanks Refilling Ink Tanks Checking Ink Level Ink Tips 75 ...
Страница 91: ...Adjusting Print Head Position 91 ...
Страница 104: ...Safety Safety Precautions Regulatory Information WEEE EU EEA 104 ...
Страница 128: ...Main Components Front View Rear View Inside View Operation Panel 128 ...
Страница 145: ...pqrs PQRS 7 tuv TUV 8 wxyz WXYZ 9 0 _ SP 2 Switch the input mode 2 SP indicates a space 145 ...
Страница 170: ...Language selection Changes the language for the messages and menus on the LCD Language selection 170 ...
Страница 176: ...Refilling Ink Tanks 176 ...
Страница 186: ...Information about Paper Supported Media Types Paper Load Limit Unsupported Media Types Handling Paper Print Area 186 ...
Страница 193: ...Printing Printing from Computer Printing from Smartphone Tablet Printing Using Operation Panel Paper Settings 193 ...
Страница 210: ...Note Selecting Scaled changes the printable area of the document 210 ...
Страница 226: ...In such cases take the appropriate action as described 226 ...
Страница 263: ...Printing Using Operation Panel Printing Templates Such as Lined or Graph Paper 263 ...
Страница 275: ...Note This setting item is displayed when standard copying is selected 275 ...
Страница 280: ...Note To set the applications to integrate with see Settings Dialog Box 280 ...
Страница 290: ...ScanGear Scanner Driver Screens Basic Mode Tab Advanced Mode Tab 290 ...
Страница 310: ...310 ...
Страница 315: ...Scanning Using Smartphone Tablet Using PIXMA MAXIFY Cloud Link Printing Scanning with Wireless Direct 315 ...
Страница 365: ...7 Press the OK button The LCD returns to the Fax standby screen 365 ...
Страница 376: ...4 When a confirmation message is displayed click Yes 376 ...
Страница 404: ...Network Communication Problems Cannot Find Printer on Network Network Connection Problems Other Network Problems 404 ...
Страница 430: ...Other Network Problems Checking Network Information Restoring to Factory Defaults 430 ...
Страница 444: ...Paper Is Blank Printing Is Blurry Colors Are Wrong White Streaks Appear Printing Is Blurry Colors Are Wrong 444 ...
Страница 455: ...Scanning Problems Windows Scanning Problems 455 ...
Страница 456: ...Scanning Problems Scanner Does Not Work ScanGear Scanner Driver Does Not Start 456 ...
Страница 459: ...Faxing Problems Problems Sending Faxes Problems Receiving Faxes Telephone Problems 459 ...
Страница 460: ...Problems Sending Faxes Cannot Send a Fax Errors Often Occur When You Send a Fax 460 ...
Страница 464: ...Problems Receiving Faxes Cannot Receive a Fax Cannot Print a Fax Quality of Received Fax is Poor 464 ...
Страница 468: ...Telephone Problems Cannot Dial Telephone Disconnects During a Call 468 ...
Страница 480: ...Errors and Messages An Error Occurs Message Support Code Appears 480 ...
Страница 502: ...7 Press down both joint buttons 8 Close both ink tank covers 9 Gently close the scanning unit cover 502 ...


