Placing Items (When Scanning from a Computer)
Learn how to place items on the platen of your scanner or printer. Place items correctly according to the
type of item to be scanned. Otherwise, items may not be scanned correctly.
Important
• Do not place objects on the document cover. When you open the document cover, the objects may fall
into your scanner or printer, resulting in malfunction.
• Close the document cover when scanning.
Placing Items
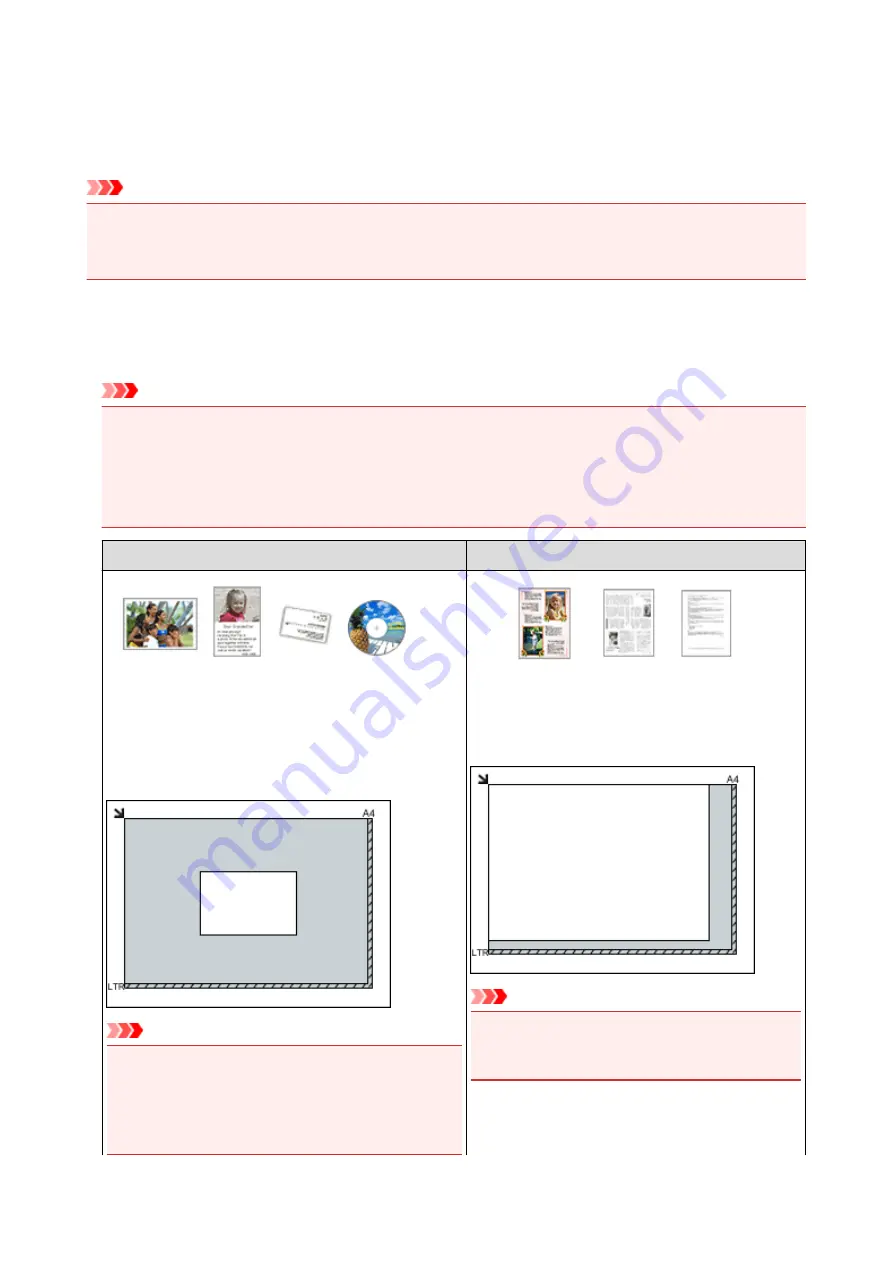
Place items as described below to scan by detecting the item type or size automatically.
Important
• When scanning by specifying the paper size in IJ Scan Utility or ScanGear (scanner driver), align an
upper corner of the item with the corner at the arrow (alignment mark) of the platen.
• Photos that have been cut to various shapes and items smaller than 1.2 inches (3 cm) square cannot
be cropped accurately when scanning.
• Reflective disc labels may not be scanned as expected.
For Photos, Postcards, Business Cards, or BD/DVD/CD
For Magazines, Newspapers, or Documents
Placing a Single Item:
Place the item face-down on the platen, with 0.4 inch (1
cm) or more space between the edges (diagonally striped
area) of the platen and the item. Portions placed on the
diagonally striped area cannot be scanned.
Important
• Large items (such as A4 size photos) that cannot be
placed away from the edges/arrow (alignment mark) of
the platen may be saved as PDF files. To save in a
format other than PDF, scan by specifying the data
format.
Place the item face-down on the platen and align an
upper corner of the item with the corner at the arrow
(alignment mark) of the platen. Portions placed on the
diagonally striped area cannot be scanned.
Important
• Refer to "Loading Originals" for your model from
Home of the
Online Manual
for details on the
portions in which items cannot be scanned.
574
Содержание MG2900 Series
Страница 62: ... 8 Display area The display changes based on the menu you select 62 ...
Страница 82: ...Safety Guide Safety Precautions Regulatory and Safety Information 82 ...
Страница 88: ...Main Components and Basic Operations Main Components About the Power Supply of the Machine 88 ...
Страница 89: ...Main Components Front View Rear View Inside View Operation Panel 89 ...
Страница 102: ...Loading Paper Originals Loading Paper Loading Originals 102 ...
Страница 114: ...Printing Area Printing Area Other Sizes than Letter Legal Envelopes Letter Legal Envelopes 114 ...
Страница 119: ...Loading Originals Loading Originals on the Platen Glass Originals You Can Load 119 ...
Страница 123: ...Replacing a FINE Cartridge Replacing a FINE Cartridge Checking the Ink Status 123 ...
Страница 128: ...Important Check if the FINE cartridge is installed correctly 128 ...
Страница 159: ...Important Be sure to turn off the power and unplug the power cord before cleaning the machine 159 ...
Страница 169: ...Note The effects of the quiet mode may be less depending on the print quality settings 169 ...
Страница 179: ...Information about Network Connection Useful Information about Network Connection 179 ...
Страница 225: ...5 Delete Deletes the selected IP address from the list 225 ...
Страница 267: ...Information in this guide is subject to change without notice 267 ...
Страница 269: ...Printing Printing from a Computer Printing from a Digital Camera 269 ...
Страница 270: ...Printing from a Computer Printing with Application Software that You are Using Printer Driver 270 ...
Страница 285: ...Note Selecting Scaled changes the printable area of the document 285 ...
Страница 315: ...Note During Grayscale Printing inks other than black ink may be used as well 315 ...
Страница 320: ...Adjusting Brightness Adjusting Intensity Adjusting Contrast 320 ...
Страница 402: ...Copying Making Copies Basic Switching the Page Size between A4 and Letter 402 ...
Страница 406: ...Scanning Scanning from a Computer 406 ...
Страница 421: ...5 Select Select Source according to the items to be scanned 6 Select Auto scan for Paper Size then click OK 421 ...
Страница 466: ...Instructions Opens this guide Defaults You can restore the settings in the displayed screen to the default settings 466 ...
Страница 474: ...Related Topic Scanning Items Larger than the Platen Image Stitch 474 ...
Страница 495: ...495 ...
Страница 518: ...Related Topic Scanning in Basic Mode 518 ...
Страница 567: ...Other Scanning Methods Scanning with WIA Driver Scanning Using the Control Panel Windows XP Only 567 ...
Страница 571: ...When scanning is completed the scanned image appears in the application 571 ...
Страница 610: ...Problems with Printing Quality Print Results Not Satisfactory Ink Is Not Ejected 610 ...
Страница 629: ...Problems with Scanning Problems with Scanning Scan Results Not Satisfactory Software Problems 629 ...
Страница 647: ...Software Problems The E mail Client You Want to Use Does Not Appear in the Screen for Selecting an E mail Client 647 ...
Страница 707: ...5B00 Cause Printer error has occurred Action Contact the service center 707 ...
Страница 708: ...5B01 Cause Printer error has occurred Action Contact the service center 708 ...


