


Printing Does Not Start
Check1
Make sure that the power plug is securely plugged in, then press the
ON
button
to turn the machine on.
While the
ON
lamp is flashing, the machine is initializing. Wait until the
ON
lamp stops flashing and remains lit.
Note
• When printing large data such as a photo or graphics, it may take longer to start printing. While the
ON
lamp is flashing, the computer is processing data and sending it to the machine. Wait until printing starts.
Check2
Make sure that the machine is connected to your computer properly.
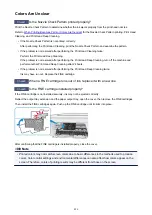
When the machine is connected to your computer with a USB cable, make sure that the USB cable is securely
plugged in to the machine and the computer, then check the followings:
• If you are using a relay device such as a USB hub, disconnect it, connect the machine directly to the
computer, and try printing again. If printing starts normally, there is a problem with the relay device. Consult
the reseller of the relay device for details.
• There could also be a problem with the USB cable. Replace the USB cable and try printing again.
When you use the machine over LAN, make sure that the machine is set up to be used over network correctly.
Check3
Is the access point mode enabled?
When you print using a mode other than the access point mode, disable the access point mode in advance.
Check4
If you are printing from the computer and there are any unnecessary print jobs,
delete them.
Deleting the Undesired Print Job
Check5
Make sure that your machine's name is selected in the Print dialog.
The machine will not print properly if you are using a printer driver for a different printer.
Make sure that your machine's name is selected in
Printer
in the Print dialog.
Note
• To make the machine the one selected by default, select the machine for
Default printer
.
Check6
Restart your computer if you are printing from the computer.
414
Содержание MG2900 Series
Страница 61: ...61...
Страница 81: ...Safety Guide Safety Precautions Regulatory and Safety Information 81...
Страница 87: ...Main Components and Basic Operations Main Components About the Power Supply of the Machine 87...
Страница 88: ...Main Components Front View Rear View Inside View Operation Panel 88...
Страница 101: ...Loading Paper Originals Loading Paper Loading Originals 101...
Страница 113: ...Printing Area Printing Area Other Sizes than Letter Legal Envelopes Letter Legal Envelopes 113...
Страница 118: ...Loading Originals Loading Originals on the Platen Glass Originals You Can Load 118...
Страница 122: ...Replacing a FINE Cartridge Replacing a FINE Cartridge Checking the Ink Status 122...
Страница 127: ...Important Check if the FINE cartridge is installed correctly 127...
Страница 159: ...Important Be sure to turn off the power and unplug the power cord before cleaning the machine 159...
Страница 179: ...Information about Network Connection Useful Information about Network Connection 179...
Страница 187: ...About Network Communication Changing and Confirming Network Settings Appendix for Network Communication 187...
Страница 209: ...Appendix for Network Communication Using the Card Slot over a Network About Technical Terms Restrictions 209...
Страница 233: ...Information in this guide is subject to change without notice 233...
Страница 235: ...Printing Printing from a Computer Printing from a Digital Camera 235...
Страница 236: ...Printing from a Computer Printing with Application Software that You are Using Printer Driver 236...
Страница 241: ...Important In the Presets section click Save Current Settings as Preset Save As to register the specified settings 241...
Страница 248: ...Click Print When you execute print the document will be enlarged or reduced to fit to the page size 248...
Страница 262: ...Adjusting Color Balance Adjusting Brightness Adjusting Intensity Adjusting Contrast 262...
Страница 279: ...Related Topics Setting the Print Quality Level Custom Printing a Color Document in Monochrome 279...
Страница 300: ...Copying Making Copies Basic Switching the Page Size between A4 and Letter 300...
Страница 304: ...Scanning Scanning from a Computer 304...
Страница 319: ...5 Select Select Source according to the items to be scanned 6 Select Auto scan for Paper Size then click OK 319...
Страница 323: ...Note The default save folder is the Pictures folder 7 Click OK Scanned images are saved according to the settings 323...
Страница 337: ...Defaults You can restore the settings in the displayed screen to the default settings 337...
Страница 343: ...Instructions Opens this guide Defaults You can restore the settings in the displayed screen to the default settings 343...
Страница 347: ...Defaults You can restore the settings in the displayed screen to the default settings 347...
Страница 363: ...Instructions Opens this guide Defaults You can restore the settings in the displayed screen to the default settings 363...
Страница 382: ...Useful Information on Scanning Adjusting Cropping Frames in the Image Stitch Window Resolution Data Formats 382...
Страница 419: ...Problems with Printing Quality Print Results Not Satisfactory Ink Is Not Ejected 419...
Страница 436: ...Problems with Scanning Problems with Scanning Scan Results Not Satisfactory 436...
Страница 459: ...Problems with Installation Downloading Cannot Install the MP Drivers Uninstalling IJ Network Tool 459...
Страница 460: ...Cannot Install the MP Drivers Download the driver from the support page of our website then reinstall it 460...
Страница 465: ...Click Here to Search For details on how to resolve errors without Support Codes see A Message Is Displayed 465...
Страница 503: ...5B00 Cause Printer error has occurred Action Contact the service center 503...
Страница 504: ...5B01 Cause Printer error has occurred Action Contact the service center 504...


