


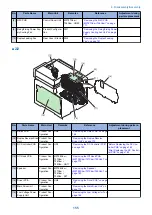


3. Remove the DC Controller PCB [1].
• 8 connectors [2]
• 5 screws [3]
[2]
[2]
[2]
[3]
[3]
[3]
[3]
[1]
[2]
5x
8x
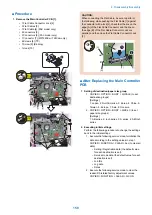
■ After Replacing the DC Controller
PCB
1. In service mode, perform the following procedure to
restore the DC Controller setting values.
COPIER > FUINCTION > VIFFNC > RSTR-DCN
When restoration is executed, "ACTIVE" will be
displayed, and then "OK!" will be displayed in about 2
minutes at the completion of restoration.
2. When backup data cannot be uploaded before
replacement due to reasons such as damage of the
DC Controller PCB, enter the value of each service
mode item described on the service label.
3. Turn OFF and then ON the power.
4. Configure the following settings from the Control
Panel.
• Menu > Adjustment/Maintenance > Print Color
Displacement Correction
• Menu > Adjustment/Maintenance > Auto Gradation
Correction > Quick Correction
5. Turn OFF and then ON the power.
Removing the High Voltage
Power Supply PCB
■ Preparation
1. Removing the Right Cover.(Refer to
)
2. Removing the Left Cover.(Refer to
)
3. Removing the Rear Upper Cover.(Refer to
“Removing the Rear Upper Cover” on page 123
)
4. Removing the ADF Unit + Reader Unit.(Refer to
“Removing the ADF Unit + Reader Unit” on page
130
5. Removing the Right Front Cover.(Refer to
“Removing the Right Front Cover” on page 121
6. Removing the Upper Cover.(Refer to
)
■ Procedure
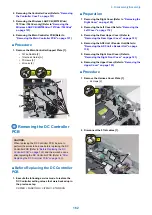
1. Remove the Harness Cover Plate [1].
• 2 screws [2]
[1]
[2]
[2]
2x
2. Remove the harness guide [1].
• 6 claws [2]
[2]
[2]
[1]
[2]
[2]
[2]
6x
3. Disconnect the flat cable [1].
[1]
1x
4. Disassembly/Assembly
163
Содержание MF720 Series
Страница 1: ...Revision 2 0 MF720 Series Service Manual...
Страница 12: ...Product Overview 1 Product Lineups 5 Product Features 7 Specifications 8 Name of Parts 14...
Страница 33: ...How to release Jam Remove the jammed paper and open close the ADF upper cover 2 Technical Explanation 25...
Страница 79: ...4 Click Import Export Import 1 2 2 Technical Explanation 71...
Страница 101: ...Periodical Service 3 Periodically Replaced Parts 94 Durable Parts 95 Periodical Services 96 Cleaning 97...
Страница 102: ...Periodically Replaced Parts No periodically replaced parts is set for this product 3 Periodical Service 94...
Страница 103: ...Durable Parts No durable parts is set for this product 3 Periodical Service 95...
Страница 104: ...Periodical Services No periodical service is set for this product 3 Periodical Service 96...
Страница 232: ...Adjustment 5 Overview 225 Adjustment at Parts Replacement 226...
Страница 248: ...Troubleshooting 6 Test Print 241 Trouble shooting items 243 Version Upgrade 244 Debug Log 248...
Страница 258: ...Error Jam Alarm 7 Outline 251 Error Codes 252 Jam Code 257...
Страница 267: ...Service Mode 8 Overview 260 COPIER 264 FEEDER 300 FAX 302 TESTMODE 308...
Страница 322: ...APPENDICES Service Tools 315 General Circuit Diagram 316 Print Sequence 317 Backup Data 318...