


4. Place a sheet of A4 or LTR blank paper (paper
recommended by Canon) on the Platen Glass of
the reader again, and execute
• COPIER > FUNCTION > CCD > DF-WLVL3
(White level adj in book mode (B&W))
5. Place the same blank paper on the ADF again, and
execute
• COPIER > FUNCTION > CCD > DF-WLVL4
(White level adj in ADF mode (B&W))
6. If the operation was successful, write the setting
value on the service label.
7. Whether the operation was successful or failed is
not shown on the UI, so perform the following
procedure to judge if the operation is successful or
not.
• COPIER > ADJUST > CCD > DFTAR-R
(Adjustment of shading target value (R) at ADF
reading)
• COPIER > ADJUST > CCD > DFTAR-G
(Adjustment of shading target value (G) at
ADF reading)
• COPIER > ADJUST > CCD > DFTAR-B
(Adjustment of shading target value (B) at ADF
reading)
Check the foregoing values, and if all the values
remain the same with those you entered, the
operation result is judged to be "failed".
8. If the operation result is "failed", turn OFF and then
ON the power, execute
• COPIER > FUNCTION > CCD > DF-WLVL1
(White level adj in book mode: color)
and then execute
• COPIER > FUNCTION > CCD > DF-WLVL2
(White level adj in ADF mode: color)
again.
9. Checking the value of DFTAR-BW
Check the value of
• COPIER > ADJUST > CCD > DFTAR-BW
(Adjustment of shading target value (B&W) at
ADF reading)
If the value remains the same as the value you
entered, the operation result is judged to be
"failed".
10. If the operation result is "failed", turn OFF and then
ON the power, execute
• COPIER > FUNCTION > CCD > DF-WLVL3
(White level adj in book mode (B&W))
and then execute
• COPIER > FUNCTION > CCD > DF-WLVL4
(White level adj in ADF mode (B&W))
again.
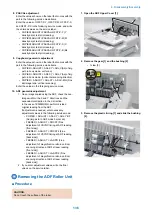
2. ADF geometric adjustment
1. On an image copied using the ADF, check the non-
image width in the X and Y directions and the
expansion/contraction in the X direction.
In the case of E353MGMH, perform 2-sided
original reading from the ADF.
If adjustment is needed, enter necessary
adjustment values in the following service mode:
• COPIER > ADJUST > ADJ-XY > ADJ-Y-DF
(Adj img pstn in ADF mode:horz scan)
• FEEDER > ADJUST > DOCST (Fine
adjustment of VSYNC timing at ADF reading
[front side])
• FEEDER > ADJUST > DOCST2 (Fine
adjustment of VSYNC timing at ADF reading
[back side])
• FEEDER > ADJUST > LA-SPD (Fine
adjustment of magnification ratio in vertical
scanning direction at ADF stream reading
[front side])
• FEEDER > ADJUST > LA-SPD2 (Fine
adjustment of magnification ratio in vertical
scanning direction at ADF stream reading
[back side])
2. If you enter adjustment values, write the final
values on the service label.
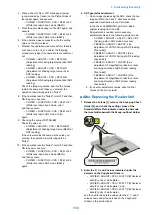
■ After Replacing the Reader Unit
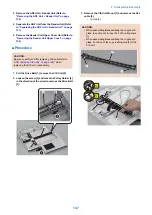
1. Release the 2 claws [1], remove the Scoop-up Sheet
Holder [2], and check the setting values of the
Standard White Plate indicated under the barcode
that was hidden beneath the Scoop-up Sheet Holder.
[2]
[1]
[1]
2x
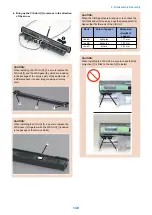
2. Enter the X, Y, and Z values indicated under the
barcode on the Copyboard Glass in
• COPIER > ADJUST > CCD > W-PLT-X (White level
data (X) entry of white plate) ,
• COPIER > ADJUST > CCD > W-PLT-Y (White level
data (Y) entry of white plate) , and
• COPIER > ADJUST > CCD > W-PLT-Z (White level
data (Z) entry of white plate) ,
and then write the entered values (the the X, Y, and Z
values shown under the barcode on the Copyboard
Glass) on the service label.
4. Disassembly/Assembly
133
Содержание MF720 Series
Страница 1: ...Revision 2 0 MF720 Series Service Manual...
Страница 12: ...Product Overview 1 Product Lineups 5 Product Features 7 Specifications 8 Name of Parts 14...
Страница 33: ...How to release Jam Remove the jammed paper and open close the ADF upper cover 2 Technical Explanation 25...
Страница 79: ...4 Click Import Export Import 1 2 2 Technical Explanation 71...
Страница 101: ...Periodical Service 3 Periodically Replaced Parts 94 Durable Parts 95 Periodical Services 96 Cleaning 97...
Страница 102: ...Periodically Replaced Parts No periodically replaced parts is set for this product 3 Periodical Service 94...
Страница 103: ...Durable Parts No durable parts is set for this product 3 Periodical Service 95...
Страница 104: ...Periodical Services No periodical service is set for this product 3 Periodical Service 96...
Страница 232: ...Adjustment 5 Overview 225 Adjustment at Parts Replacement 226...
Страница 248: ...Troubleshooting 6 Test Print 241 Trouble shooting items 243 Version Upgrade 244 Debug Log 248...
Страница 258: ...Error Jam Alarm 7 Outline 251 Error Codes 252 Jam Code 257...
Страница 267: ...Service Mode 8 Overview 260 COPIER 264 FEEDER 300 FAX 302 TESTMODE 308...
Страница 322: ...APPENDICES Service Tools 315 General Circuit Diagram 316 Print Sequence 317 Backup Data 318...