


IJ Network Scanner Selector EX2 Menu and Setting Screen
IJ Network Scanner Selector EX2 allows you to select the scanners or printers to be used for scanning or
printing over a network from your computer or the operation panel.
After installation, IJ Network Scanner Selector EX2 appears in the notification area on the desktop.
Important
• If you cannot scan over a network, download and upgrade to the latest MP Drivers from our website.
• While IJ Network Scanner Selector EX2 is enabled, it periodically transmits packets to check whether it
can communicate with your scanner or printer over the network. When using the computer in a network
environment other than the one used to set up your scanner or printer, disable IJ Network Scanner
Selector EX2.
Note
• If the icon is not displayed in the notification area on the desktop, follow the procedure below to start.
•
Windows 10:
From
Start
menu, click
All apps
>
Canon Utilities
>
IJ Network Scanner Selector EX2
.
•
Windows 8.1/Windows 8:
Click
IJ Network Scanner Selector EX2
on the Start screen.
If
IJ Network Scanner Selector EX2
is not displayed on the Start screen, select the
Search
charm, then search for "IJ Network Scanner Selector EX2".
•
Windows 7/Windows Vista:
From the
Start
menu, click
All Programs
>
Canon Utilities
>
IJ Network Scanner Selector EX2
>
IJ Network Scanner Selector EX2
.
Menu
Displays a menu when you right-click
(IJ Network Scanner Selector EX2) in the notification area on
the desktop.
Disable Canon IJ Network Scanner Selector EX2 / Enable Canon IJ Network Scanner Selector EX2
Enables or disables IJ Network Scanner Selector EX2.
When you select
Disable Canon IJ Network Scanner Selector EX2
, you will not be able to scan
over a network from the operation panel.
Enabled:
, Disabled:
Important
• When using a model with which you cannot scan over a network from the operation panel, you
cannot scan using the operation panel even if this setting is enabled.
Settings...
The Scan-from-PC Settings screen appears. You can select the model you want to use.
869
Содержание MB5400 Series
Страница 48: ...Faxing 48 ...
Страница 137: ...All registered users can register and delete apps freely 137 ...
Страница 139: ...4 The senior clerk selects Advanced management from 5 For Select how to manage the senior clerk selects Set 139 ...
Страница 173: ...Loading Paper Paper Sources Loading Plain Paper Photo Paper Loading Envelopes 173 ...
Страница 176: ...176 ...
Страница 195: ...Inserting a USB Flash Drive Inserting a USB Flash Drive Removing a USB Flash Drive 195 ...
Страница 198: ...Replacing Ink Tanks Replacing Ink Tanks Checking Ink Status on the Touch Screen 198 ...
Страница 235: ...4 When finished push the document feeder cover closed until it clicks into place 5 Close the document tray 235 ...
Страница 244: ...Safety Safety Precautions Regulatory Information WEEE EU EEA 244 ...
Страница 264: ...Main Components Front View Rear View Inside View Operation Panel 264 ...
Страница 267: ... 15 platen glass Load originals here 267 ...
Страница 271: ...Device user settings 271 ...
Страница 287: ...The Page Setup tab is displayed again 287 ...
Страница 292: ...Note The effects of the quiet mode may be less depending on the paper source and the print quality settings 292 ...
Страница 297: ...For more on setting items on the operation panel Setting Items on Operation Panel 297 ...
Страница 316: ... Proxy server setup Performs settings for a proxy server Follow the display on the touch screen to perform settings 316 ...
Страница 346: ...3 Select Install 4 Select Install on displayed dialog The root certificate registration is completed 346 ...
Страница 355: ...The resending setting is completed 355 ...
Страница 356: ...Network Connection Network Connection Tips 356 ...
Страница 377: ...5 Displays this guide Note This item has the same function as Online Manual in the Help menu 377 ...
Страница 399: ...IJ Network Device Setup Utility Menus Printer Menu View Menu Option Menu Help Menu 399 ...
Страница 406: ...Other Network Information Technical Terms Restrictions Firewall 406 ...
Страница 437: ...Print Area Print Area Standard Sizes Envelopes 437 ...
Страница 442: ...Administrator Settings Sharing the Printer on a Network 442 ...
Страница 454: ...Printing Printing from Computer Printing from Smartphone Tablet Printing Using Operation Panel Paper Settings 454 ...
Страница 506: ...Related Topic Displaying the Print Results before Printing 506 ...
Страница 509: ...Note During Grayscale Printing inks other than black ink may be used as well 509 ...
Страница 514: ...Adjusting Color Balance Adjusting Brightness Adjusting Intensity Adjusting Contrast 514 ...
Страница 594: ...Printing Using a Web Service Using PIXMA MAXIFY Cloud Link Printing with Google Cloud Print 594 ...
Страница 611: ...Printing from Smartphone Tablet Printing Directly from Smartphone Tablet Printing Using a Web Service 611 ...
Страница 624: ...Printing Using a Web Service Using PIXMA MAXIFY Cloud Link Printing with Google Cloud Print 624 ...
Страница 628: ...Printing Using Operation Panel Printing Photo Data Printing Documents PDF File Saved on USB Flash Drive 628 ...
Страница 647: ...Copying Making Copies Basics Reducing Enlarging Copies Two Sided Copying Special Copy Menu 647 ...
Страница 673: ...See Two Sided Copying for two sided copying 673 ...
Страница 680: ...Note Refer to Settings Dialog Box for how to set the applications to integrate with 680 ...
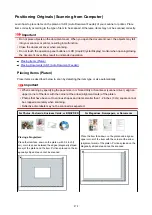
Страница 695: ...5 Select Select Source according to the items to be scanned 6 Select Auto scan for Paper Size then click OK 695 ...
Страница 757: ...Instructions Opens this guide Defaults You can restore the settings in the displayed screen to the default settings 757 ...
Страница 769: ...Instructions Opens this guide Defaults You can restore the settings in the displayed screen to the default settings 769 ...
Страница 780: ...Related Topic Scanning Originals Larger than the Platen Image Stitch 780 ...
Страница 801: ...None Medium 801 ...
Страница 864: ...Other Scanning Methods Scanning with WIA Driver 864 ...
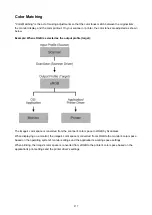
Страница 873: ...Scanning Tips Resolution Data Formats Color Matching 873 ...
Страница 900: ... Print send log Prints out the send log of the printer Tap Yes to start printing 900 ...
Страница 941: ...8 Specify number of time and tap OK 9 Tap OK The Function list screen is displayed 941 ...
Страница 982: ...5 Tap Complete to finalize changing 982 ...
Страница 998: ...Receiving Faxes Receiving Faxes Changing Paper Settings Memory Reception Receiving Faxes Using Useful Functions 998 ...
Страница 1049: ...4 When a confirmation message is displayed click Yes 1049 ...
Страница 1057: ...Sending Faxes from Computer Mac OS Sending a Fax General Notes 1057 ...
Страница 1059: ...5 Specify fax paper settings as needed 6 Enter fax telephone numbers in To 1059 ...
Страница 1064: ...Network Communication Problems Cannot Find Machine on Network Network Connection Problems Other Network Problems 1064 ...
Страница 1081: ...Perform setup following the instructions on the screen 1081 ...
Страница 1095: ...Note To check the MAC address or IP address of your computer see Checking Computer IP Address or MAC Address 1095 ...
Страница 1112: ...Problems while Printing Scanning from Smartphone Tablet Cannot Print Scan from Smartphone Tablet 1112 ...
Страница 1123: ...Back of Paper Is Smudged Uneven or Streaked Colors 1123 ...
Страница 1126: ...Paper Is Blank Printing Is Blurry Colors Are Wrong White Streaks Appear Paper Is Blank Printing Is Blurry Colors Are Wrong 1126 ...
Страница 1167: ...Software Problems The E mail Client You Want to Use Does Not Appear in the Screen for Selecting an E mail Client 1167 ...
Страница 1174: ...Faxing Problems Problems Sending Faxes Problems Receiving Faxes Cannot Send a Fax Clearly Telephone Problems 1174 ...
Страница 1189: ...Telephone Problems Cannot Dial Telephone Disconnects During a Call 1189 ...
Страница 1205: ...Errors and Messages An Error Occurs A Message for Faxing Is Displayed on Fax Standby Screen Message Appears 1205 ...
Страница 1225: ...3 Hold jammed paper firmly in both hands If the paper is rolled up pull out it 4 Pull paper out slowly so as not to tear it 1225 ...
Страница 1249: ...1660 Cause An ink tank is not installed What to Do Install the ink tank 1249 ...
Страница 1278: ...2805 Cause Document cover is open What to Do Close the document cover and tap OK on the touch screen of the printer 1278 ...
Страница 1279: ...3401 Cause Reserve copy is canceled What to Do Tap OK on the touch screen of the printer 1279 ...
Страница 1282: ...3404 Cause Document is remained in ADF What to Do Wait for a while Copying will start 1282 ...
Страница 1285: ...3407 Cause Loading next sheet is required What to Do Load the next sheet and tap OK on the touch screen of the printer 1285 ...
Страница 1333: ...5500 Cause Ink tank has not been properly recognized What to Do Contact the service center 1333 ...
Страница 1334: ...5501 Cause Ink tank has not been properly recognized What to Do Contact the service center 1334 ...
Страница 1335: ...5B00 Cause Printer error has occurred What to Do Contact your nearest Canon service center to request a repair 1335 ...
Страница 1336: ...5B01 Cause Printer error has occurred What to Do Contact your nearest Canon service center to request a repair 1336 ...


