background image

 16 


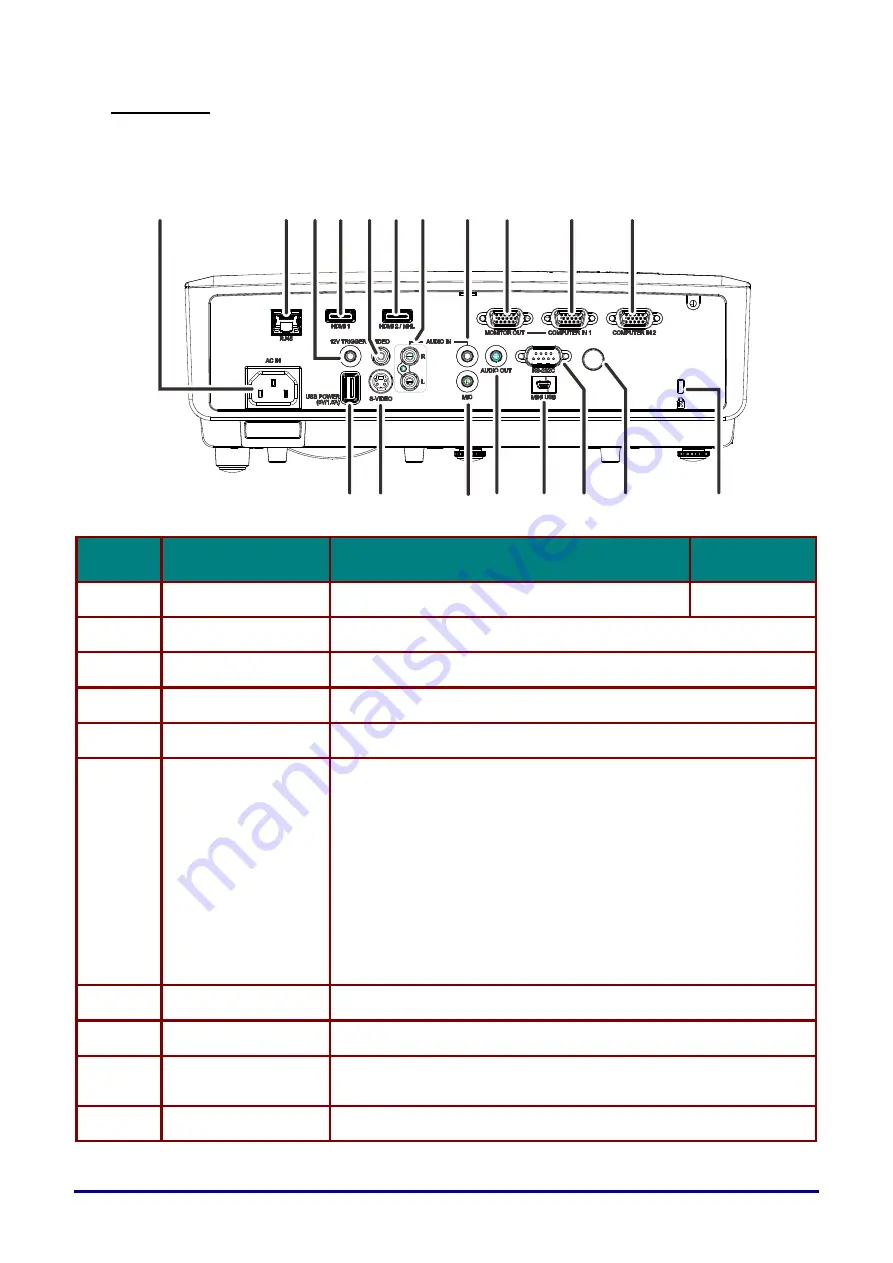
 Rear view 

Before connecting the projector to other equipment, turn off both the projector and the other 
equipment. 


I

TEM


L

ABEL


D

ESCRIPTION


S

EE PAGE


1.  

AC IN 

Connect the POWER cable 

22 

2.  

RJ45 

Connect a LAN cable from Ethernet 

3.  

12V TRIGGER 

Connect the 12V OUT (Screen Trigger-- For screen controllers used) 

4.  

HDMI 1 

Connect the HDMI cable from a HDMI device(*) 

5.  

VIDEO 

Connect the COMPOSITE cable from a video device  

6.  

HDMI 2 / MHL 

Connect the HDMI cable from a HDMI device. (*) 
Connect the MHL cable from a MHL-compatible device.  
Note: 
• A dedicated adapter is required if your projector does not support the 

standard MHL cable. 

• Use a MHL cable (available on the market) and MHL-HDMI 

conversion adapter (available on the market) that certified with the 
MHL standard. When non-compliant items are used, image projection 
may not be possible, or the connected device may malfunction or 
generate heat. 

• Images may not be displayed correctly depending on the connected 

device type and the settings. 

• When images cannot be projected properly, disconnect and 

reconnect the MHL cable. 

• Operation is not guaranteed for all connected devices. 

7.  

AUDIO IN (R / L) 

Connect an AUDIO cable from the audio device 

8.  

AUDIO IN 

Connect an AUDIO cable from the audio device 

9.  

MONITOR OUT 

Connect the RGB cable from a computer 
(Loop Thru only for COMPUTER IN-1) 

10.  

COMPUTER IN 1 

Connect the RGB cable from a computer or components device 

* When connecting to HDMI device, use an HDMI certified cable. 

19 18

1716 15 14 13

12

9

11

10

8

7

6

5

4

3

2

1

Содержание LV-HD420

Страница 1: ...s Manual BEFORE USING BE SURE TO READ THIS USER S MANUAL Read the Safety Instructions in this manual thoroughly and use cor rectly the projector Store this user s manual in a convenient location where you can refer to it easily ...

Страница 2: ...NE 27 ADJUSTING THE VOLUME 28 ON SCREEN DISPLAY OSD MENU SETTINGS 29 OSD MENU CONTROLS 29 Navigating the OSD 29 SETTING THE OSD LANGUAGE 30 OSD MENU OVERVIEW 31 IMAGE MENU 34 Analog setting Menu 35 Advanced Feature 36 White Balance 37 Color Manager 38 SETTINGS 1 MENU 39 Keystone 40 Audio 40 Advanced 1 Feature 41 Advanced 2 Feature 43 4 Corner 44 SETTINGS 2 MENU 45 Status 46 Advanced 1 Feature 47 A...

Страница 3: ...ECTION DISTANCE VS PROJECTION SIZE 73 Projection Distance and Size Table 73 TIMING MODE TABLE 75 PROJECTOR DIMENSIONS 77 REGULATORY COMPLIANCE 78 FCC WARNING 78 CANADA 78 SAFETY CERTIFICATIONS 78 APPENDIX I 79 RS 232 PROTOCOL 79 ...

Страница 4: ...oes not seem to be operating properly read this manual again check operations and cable connections and try the solutions in the Troubleshooting section in the user s manual If the problem still persists contact the Canon Customer Support Center THIS SYMBOL INDICATES THAT DANGEROUS VOLTAGE CONSTITUTING A RISK OF ELECTRIC SHOCK IS PRESENT WITHIN THIS UNIT THIS SYMBOL INDICATES THAT THERE ARE IMPORT...

Страница 5: ... with dust and it may cause a breakdown or a disaster Make sure to implement anti fall measures such as an anti fall wire when installing the projector in high places for example installing it on the ceiling DO NOT SET THE PROJECTOR IN GREASY WET OR SMOKY CONDITIONS SUCH AS IN A KITCHEN TO PREVENT A BREAKDOWN OR A DISASTER IF THE PROJECTOR COMES IN CONTACT WITH OIL OR CHEMICALS IT MAY BECOME DETER...

Страница 6: ...power supplied contact the Canon Customer Support Center or local power company Do not overload wall outlets and extension cords as this can result in fire or electric shock Do not allow anything to rest on the power cord Do not locate this projector where the cord may be damaged by people walking on it Do not attempt to service this projector yourself as opening or removing covers may expose you ...

Страница 7: ...rective 2006 66 EC and or national legislation implementing those Directives If a chemical symbol is printed beneath the symbol shown above in accordance with the Battery Directive this indicates that a heavy metal Hg Mercury Cd Cadmium Pb Lead is present in this battery or accumulator at a concentration above an applicable threshold specified in the Battery Directive This product should be handed...

Страница 8: ...or relocate the receiving antenna Increase the separation between the equipment and receiver Connect the equipment into an outlet on a circuit different from that to which the receiver is connected Consult the dealer or an experienced radio TV technician for help The cable with a ferrite core provided with the projector must be used with this equipment in order to comply with Class B limits in Sub...

Страница 9: ...y power source with a voltage other than the voltage indicated AC 100 240 V Do not pull the power cord and be sure to hold the power plug or connector when removing Incorrect handling may damage the power cord Do not insert any metal objects into the contact parts of the power plug or connector Do not remove the power plug or connector with wet hands Insert the power plug and connector securely up...

Страница 10: ...ossibly resulting in the projector falling from its mounting and causing an accident or personal injury As strong light beams are emitted while the projector is in use do not look directly into the projector lens Doing so could cause an eye injury Pay particular attention to prevent small children from doing so Light from the projector is classified as Risk Group 2 RG2 according to IEC 62471 5 201...

Страница 11: ...n Customer Support Center for internal cleaning inspection and lamp replacement If you accidentally inhale gas from the lamp or get any pieces in your eyes or mouth consult a doctor immediately Take the following precautions when replacing lamps that stop working Failure to do so may result in injury If illumination suddenly stops either when you turn the projector on or during use the lamp may ha...

Страница 12: ...re removing the lamp wait at least 45 minutes after turning off the projector and confirm that the lamp and projector have cooled down sufficiently Failure to do so may result in burns or other injury Be prepared by keeping a spare lamp Dispose of used mercury lamps in accordance with local regulations Caution for viewing 3D content Pay attention to the following points when viewing 3D content Pho...

Страница 13: ... Otherwise it may damage the projector due to condensation or a rapid change in temperature Do not install the projector in extremely hot or cold locations This may damage the projector Ranges for the environment of use and storage are as follows Environment of use 5 C 41 F to 40 C 104 F up to 85 RH Storage temperature 10 C 14 F to 60 C 140 F When using the projector at an altitude of 1 500 m 4 92...

Страница 14: ...rrounding air temperature within the enclosure does not exceed operation temperature while the projector is running and the air intake and exhaust vents are unobstructed All enclosures should pass a certified thermal evaluation to ensure that the projector does not recycle exhaust air as this may cause the device to shutdown even if the enclosure temperature is with the acceptable operation temper...

Страница 15: ...ndows 7 Windows 8 Windows 8 1 and Windows 10 are registered trademarks or trademarks of Microsoft Corporation in the United States and or other countries Mac Mac OS and Macintosh are trademarks of Apple Inc registered in the United States and or other countries HDMI the HDMI logo and High Definition Multimedia Interface are trademarks or registered trademarks of HDMI Licensing LLC PJLink is a regi...

Страница 16: ...or and check that the following items are included PROJECTOR REMOTE CONTROL WITH ONE CR2025 BATTERY RGB CABLE 1 8 M 5 9 MINI D SUB 15 PIN MINI D SUB 15 PIN P N 3081409201 POWER CORD 1 8 M 5 9 CD ROM THIS USER S MANUAL IMPORTANT INFORMATION WARRANTY CARD Warranty Card ...

Страница 17: ...ring Focuses the projected image 27 5 Zoom ring Enlarges the projected image 6 Function keys See Top view On screen Display OSD buttons and LEDs 15 Install at a Sufficient Distance from Walls and Other Obstructions If the air intake or exhaust vent is blocked heat will accumulate inside the projector possibly resulting in a shortened projector lifetime or a malfunction Exhaust vent Air intake vent...

Страница 18: ...ion and resolution 5 Navigates and changes settings in the OSD Quick Menu For Keystone 6 ECO Enter the lamp mode menu 7 Enter or confirm highlighted OSD menu item 29 8 Turns the projector On or Off 9 Navigates and changes settings in the OSD Quick Menu For Keystone 10 MENU Opens and exits OSD menus 11 POWER LED Solid Standby Lamp Lit over temperature 68 Flashing System Initialized System Power On ...

Страница 19: ...he market and MHL HDMI conversion adapter available on the market that certified with the MHL standard When non compliant items are used image projection may not be possible or the connected device may malfunction or generate heat Images may not be displayed correctly depending on the connected device type and the settings When images cannot be projected properly disconnect and reconnect the MHL c...

Страница 20: ...r Receive IR signal from remote control 14 RS 232 Connect RS 232 serial port cable to control the projector with control commands 15 MINI USB Connect the USB cable from a computer For service only 16 AUDIO OUT Connect an AUDIO cable to audio amplifier 17 MIC Connect the Microphone for use 18 S VIDEO Connect the S VIDEO cable from a video device 19 USB POWER 5V 1 5A Connect the USB cable for power ...

Страница 21: ...E 1 Ceiling support holes Contact your dealer for information on mounting the projector on a ceiling 2 Adjustable feet Rotate adjuster lever to adjust angle position 26 3 Fixed foot 126mm 5 55mm 2 2 145mm 5 7 155mm 6 1 31mm 1 2 46mm 1 8 2 1 2 1 1 3 ...

Страница 22: ...XIT Goes back to previous OSD menu exits and saves menu settings Goes back to previous page 3 Navigates and changes settings in the OSD Keystone correction 29 4 Enters and confirms settings in the OSD 5 Navigates and changes settings in the OSD Keystone correction 6 Navigates and changes settings in the OSD Keystone correction 7 ASPECT RATIO Displays the ASPECT RATIO selections 8 SOURCE Displays t...

Страница 23: ...ays the brightness setting bar 22 LAMP Displays the lamp mode selection 23 MENU Opens and exits OSD menus 29 24 AUTO Auto adjustment for frequency phase position 25 Navigates and changes settings in the OSD Keystone correction Remote Control Operating Range The remote control is an infrared type Point it at the infrared remote receiver on the front or rear of the projector to operate it Remote con...

Страница 24: ...ury Do not heat short circuit or disassemble the battery or place them in a fire Do not attempt to recharge the battery that is included with the remote control Remove the battery when they are flat or when the remote control will not be used for a long period of time Insert the battery with the and terminals in the correct directions If any liquid from inside the battery leaks out and contacts yo...

Страница 25: ...ted devices are detected See Setting an Access Password Security Lock on page 24 if security lock is enabled 4 If more than one input device is connected press the SOURCE button and use to scroll among devices Component is supported through the RGB to COMPONENT ADAPTER COMPUTER1 COMPUTER2 Analog RGB COMPOSITE VIDEO Traditional composite video S VIDEO Super video Y C separated HDMI 1 HDMI HDMI 2 MH...

Страница 26: ...tor has cooled down How to store the projector in the soft carrying case LV SC02 The soft carrying case is not provided with the projector Please contact with a store if you want to purchase it Note To protect lens of the projector make sure to store the projector with its lens up as shown below ...

Страница 27: ...d strictly Without the password you will not be able to use the projector If you lose the password contact Canon Customer Support Center for information on clearing the password 1 Press the MENU button to open the OSD menu 2 Press the cursor button to move to the Settings 1 menu press the cursor button to select Advanced 1 3 Press Enter to enter the Advanced 1 sub menu Press the cursor button to s...

Страница 28: ... not less than five Press the cursor buttons in any order to set the password Push the MENU button to exit the dialog box 6 The password confirm menu appears when user presses the power on key in case the Security Lock is enabled Enter the password in the order you set it at step 5 In case you forget the password please contact the Canon Customer Support Center ...

Страница 29: ...en setting up the projector The projector table or stand should be level and sturdy Position the projector so that it is perpendicular to the screen To adjust the angle of the picture turn the Adjustable feet right or left until the desired angle has been achieved ...

Страница 30: ...rojected image Use the Focus ring to sharpen the projected image 2 Use the KEYSTONE buttons to correct image trapezoid wider top bottom left side or right side The keystone control appears on the display Press for V Keystone correcting image Press for H Keystone correcting image ...

Страница 31: ...s the Volume buttons on the remote control The volume control appears on the display Press the buttons on the remote control to adjust volume 2 Press the MUTE button to turn off the volume This feature is available only on the remote ...

Страница 32: ...on 2 There are three menus Press the cursor button to move through the menus 3 Press the cursor button to move up and down in a menu 4 Press to change values for settings 5 Press MENU to close the OSD or leave a submenu Note Depending on the video source not all items in the OSD are available For example the Horizontal Vertical Position items in the Analog Setting menu can only be modified when co...

Страница 33: ...he cursor button to navigate to Settings 1 Press the cursor button to move to the Advanced 1 menu 2 Press Enter to enter the Advanced 1 sub menu Press the cursor button until Language is highlighted 3 Press the cursor button until the language you want is highlighted 4 Press the MENU button four times to close the OSD ...

Страница 34: ...epend on Autolock Frequency 0 31 Tracking 5 0 5 Auto Image Advanced Brilliant Color 0 10 Sharpness 0 31 Gamma 1 8 2 0 2 2 2 4 Linear Color Temperature 6500K 7500K 8300K Video AGC On Off Video Saturation 0 50 100 Video Tint 0 50 100 White Balance RGain 0 100 200 GGain 0 100 200 BGain 0 100 200 ROffset 256 0 255 GOffset 256 0 255 BOffset 256 0 255 Color Manager Red Hue Saturation Gain 0 100 Green Hu...

Страница 35: ...sch Español 簡体中文 繁體中文 Italiano Svenska Nederlands Русский Polski 한국어 Čeština Türkçe Việt 日本語 ไทย Security Lock Off On Blank Screen Blank Red Green Blue White Splash Logo On Off Closed Captioning Off On KeypadLock Off On 3D Setting 3D Off DLP Link 3D Sync Invert Off On 3D Format Frame Sequential Top Bottom Side By Side Frame Packing Advanced 2 Test Pattern None Grid White Red Green Blue Black H Ima...

Страница 36: ...32 Network Fan Speed Normal High Lamp Hour Reset Projector ID 0 98 Network DHCP Off On IP Address 0 10 255 0 10 255 0 10 255 0 10 255 Subnet Mask 0 255 0 255 0 255 0 255 Gateway 0 255 0 255 0 255 0 255 DNS 0 255 0 255 0 255 0 255 Apply Advanced 2 Sleep Timer 0 Off 1 600 Source Filter COMPUTER 1 Disable Enable COMPUTER 2 Disable Enable COMPOSITE VIDEO Disable Enable S VIDEO Disable Enable HDMI 1 Di...

Страница 37: ...andard Movie or sRGB mode if you want to emphasize the color temperature since the Presentation mode prioritizes brightness Movie mode Suitable for projecting movies sRGB mode Suitable for projecting photos from a digital camera that supports sRGB Brightness Press the cursor button to enter and adjust the display brightness Contrast Press the cursor button to enter and adjust the display contrast ...

Страница 38: ...button to enter and adjust the display position to left or right Vertical Position Press the cursor button to enter and adjust the display position to up or down Frequency Press the cursor button to adjust the total number of dots in the horizontal direction Adjust this when stripes are displayed on the screen Tracking Press the cursor button to adjust a timing to reproduce the projected image bas...

Страница 39: ...adjust the display Sharpness Gamma Press the cursor button to enter and adjust the gamma correction of the display Color Temperature Press the cursor button to enter and adjust the color temperature Video AGC Press the cursor button to enter and enable or disable the Automatic Gain Control for video source Video Saturation Press the cursor button to enter and adjust the video saturation Video Tint...

Страница 40: ...n Press the buttons to adjust the Red Gain G Gain Press the buttons to adjust the Green Gain B Gain Press the buttons to adjust the Blue Gain R Offset Press the buttons to adjust the Red Offset G Offset Press the buttons to adjust the Green Offset B Offset Press the buttons to adjust the Blue Offset ...

Страница 41: ...ager Press the buttons to adjust the Hue Saturation and Gain Blue Select to enter the Blue Color Manager Press the buttons to adjust the Hue Saturation and Gain Cyan Select to enter the Cyan Color Manager Press the buttons to adjust the Hue Saturation and Gain Magenta Select to enter the Magenta Color Manager Press the buttons to adjust the Hue Saturation and Gain Yellow Select to enter the Yellow...

Страница 42: ...enter and choose from four projection methods Aspect Ratio Press the cursor button to enter and adjust the video aspect ratio Keystone Press Enter to enter the keystone menu See Keystone on page 40 Digital Zoom Press the cursor button to enter and adjust the Digital Zoom menu Audio Press Enter to enter the Audio menu See Audio on page 40 Advanced 1 Press Enter to enter the Advanced 1 menu See Adva...

Страница 43: ...to 30 Audio Press the Menu button to open the OSD menu Press to move to the Settings 1 menu Press to move to the Audio menu and then press Enter or Press to move up and down in the Audio menu ITEM DESCRIPTION Volume Press the buttons to enter and adjust the audio volume Mute Press the buttons to enter and turn on or off the speaker MIC Press the buttons to enter and turn MIC Mode Off or On Note Wh...

Страница 44: ...curity lock function Blank Screen Press the cursor button to enter and select different color to blank the screen Splash Logo Press the cursor button to enter and select splash logo Closed Captioning Press the cursor buttons to enter and enable or disable Closed Captioning Keypad Lock Press the cursor button to enter and enable or disable keys can be work on keypad When keypad locked press button ...

Страница 45: ...s Off 2 If an input signal is a displayable 3D image the 3D menu items are disabled in OSD 3 Please use 3D glasses for DLP Link projectors when watching a 3D image 4 A 3D content in 3D DVD or 3D media file format is required 5 Some 3D DVD contents have a 3D on off selection feature If some case turn on the 3D feature 6 Turn on and set up the 3D glasses in accordance with the setup instructions in ...

Страница 46: ... press Enter or Press to move up and down in the Advanced 2 menu Press to enter and change values for setting ITEM DESCRIPTION Test Pattern Press the cursor button to enter and select internal test pattern H Image Shift Press the cursor button to enter and select H Image Shift V Image Shift Press the cursor button to enter and select V Image Shift ...

Страница 47: ... enter the 4 Corner sub menu 1 Press the cursor buttons to select a corner and press ENTER 2 Press the cursor buttons to adjust vertical and press the cursor buttons to adjust horizontal 3 Press MENU to save and Exit the settings ...

Страница 48: ...wer On Press the cursor button to enter and enable or disable a function to power on the projector only by connecting the AC power cable Lamp Mode Press the cursor button to enter and select the lamp mode for higher brightness or lower brightness to save lamp life Reset All Press Enter to reset all settings to default values Reset All will not reset the following settings Language Network Lamp Hou...

Страница 49: ... and press Enter or to enter ITEM DESCRIPTION Active Source Display the activated source Video Information Displays resolution video information for RGB source Lamp Hours Eco Normal Smart Eco Lamp hour used information is displayed Eco Normal Smart Eco Software Version Showing system software version ...

Страница 50: ...andby Both network and RS 232 functions are enabled RS 232 The RS 232 function is enabled The network function is disabled Network The network function is enabled The RS 232 function is disabled Fan Speed Press the cursor button to enter and toggle between Normal and High fan speeds Note We recommend selecting high speed in high altitude 1 500m 4 921 or higher areas Lamp Hour Reset After replacing...

Страница 51: ...DHCP On or Off Note If you select DHCP Off complete the IP Address Subnet Mask Gateway and DNS fields IP Address Enter a valid IP address if DHCP is turned off Subnet Mask Enter a valid Subnet Mask if DHCP is turned off Gateway Enter a valid Gateway address if DHCP is turned off DNS Enter a valid DNS name if DHCP is turned off Apply Press Enter to confirm settings ...

Страница 52: ...o registration in Japan the United States of America and other countries by JBMIA Supported External Devices This projector is supported by the specified commands of the Crestron Electronics controller and related software ex RoomView http www crestron com This projector is supported by AMX Device Discovery http www amx com This projector supports all commands of PJLink Class1 Version 1 00 http pj...

Страница 53: ... 50 LAN_RJ45 1 Connect an RJ45 cable to RJ45 ports on the projector and the PC Laptop 2 On the PC Laptop select Start Control Panel Network and Internet ...

Страница 54: ...Connection and select Properties 4 In the Properties window select the Networking tab and select Internet Protocol TCP IP 5 Click Properties 6 Click Use the following IP address and fill in the IP address and Subnet mask then click OK ...

Страница 55: ...0 10 10 Subnet Mask 255 255 255 0 Gateway 0 0 0 0 DNS Server 0 0 0 0 10 Press Enter to confirm settings Open a web browser for example Microsoft Internet Explorer with Adobe Flash Player 9 0 or higher 11 In the Address bar input the IP address 10 10 10 10 12 Press Enter The projector is setup for remote management The LAN RJ45 function displays as follows ...

Страница 56: ...Name 10 Location 10 Assigned To 10 Network Configuration DHCP Enabled N A IP Address 15 Subnet Mask 15 Default Gateway 15 DNS Server 15 User Password Enabled N A New Password 10 Confirm 10 Admin Password Enabled N A New Password 10 Confirm 10 For more information please visit http www crestron com ...

Страница 57: ...ure that user can access the homepage of LAN RJ45 function by web browser for ex ample Microsoft Internet Explorer 2 From the Homepage of LAN RJ45 click Alert Mail Settings 3 By default these input boxes in Alert Mail Settings are blank ...

Страница 58: ...py of the alert to the specified email address This is an optional field for example the projector administrator s assistant The From field is the sender s email address for example the projector administrator This is a required field Select the alert conditions by checking the desired boxes Note Fill in all fields as specified User can click Send Test Mail to test what setting is correct For send...

Страница 59: ... IP Address on OSD of the projector 2 Make sure that laptop PC can access the web page of the projector 3 Have the TELNET function enabled See How to have TELNET enabled in Windows 7 8 10 on page 57 4 Start All Programs Accessories Command Prompt 5 Input the command format like the below telnet ttt xxx yyy zzz 23 Enter key pressed ttt xxx yyy zzz IP Address of the projector If Telnet Connection re...

Страница 60: ...10 By default installation for Windows TELNET function is not included But end user can have it by way of Turn Windows features On or Off to be enabled 1 Open Control Panel in Windows 2 Open Programs 3 Select Turn Windows features on or off to open ...

Страница 61: ...ally Close Windows Telnet utility directly after TELNET connection ready 5 Limitation 1 for Telnet Control there is less than 50 bytes for successive network payload for Telnet Control application Limitation 2 for Telnet Control there is less than 26 bytes for one complete RS232 command for Telnet Control Limitation 3 for Telnet Control Minimum delay for next RS232 command must be more than 200 ms...

Страница 62: ...ON Sleep Timer Press the cursor button to enter and set Sleep timer The projector automatically turns off after the preset period of time Source Filter Press Enter to enter the Source Filter menu See page 60 for more information on Source Filter Screen Color Press the cursor button to enable or disable the Screen Color function Color Space Press the cursor button to enter and adjust the Color Spac...

Страница 63: ...PUTER 1 source COMPUTER 2 Press the buttons to enter and enable or disable the COMPUTER 2 source Composite Video Press the buttons to enter and enable or disable the Composite Video source S Video Press the buttons to enter and enable or disable the S Video source HDMI 1 Press the buttons to enter and enable or disable the HDM 1 source HDMI 2 MHL Press the buttons to enter and enable or disable th...

Страница 64: ... or other pieces get in your eyes or mouth consult a doctor immediately Caution Before replacing the lamp always turn off the projector unplug it after the cooling fan stops and wait at least 45 minutes Do not touch the lamp immediately after turning the projector off It is very hot initially and poses a risk of burns Be sure to use the specified lamp Contact the Canon Customer Support Center for ...

Страница 65: ... 62 2 Remove the lamp cover 3 Disconnect the lamp connector 4 Remove the two screws from the lamp module 5 Lift the module handle up 6 Pull firmly on the module handle to remove the lamp module 1 2 ...

Страница 66: ...or must be connected properly and place as drawing before Lamp cover installation back Note Lamp Connector must be installed flush with the connector base as shown in the image below A gap between the Lamp Connector and the connector base will cause damage to the projector The following images illustrate correct and incorrect Lamp Connector installations 8 Close the lamp cover and tighten the scre...

Страница 67: ...e OSD menu 2 Press the cursor button to move to the Settings 2 menu Press the cursor button to move down to Advanced 1 and press enter 3 Press the cursor button to move down to Lamp Hour Reset 4 Press the cursor or Enter button A message screen appears 5 Press the four buttons in order to reset the lamp hour 6 Press the MENU button to get back to Settings 2 ...

Страница 68: ...ipe the projector s main unit softly with a soft cloth If the projector is heavily soiled soak the cloth in water with a small amount of Neutral detergent in it squeeze the cloth thoroughly and then wipe the projector with it After cleaning wipe the projector with a dry cloth Cleaning the Lens When cleaning the projector s lens use a commonly available air blower or lens cleaning paper The lens su...

Страница 69: ...etails on purchasing a suitable Kensington security cable The security lock corresponds to Kensington s MicroSaver Security System If you have any comment contact Kensington 2853 Campus Drive San Mateo CA 94403 U S A Tel 800 535 4242 http www Kensington com Using the Security Bar In addition to the Kensington lock the Security Bar helps protect the projector from unauthorized removal See the follo...

Страница 70: ... are securely attached Ensure the attached device is turned on Ensure a connected PC is not in suspending mode Ensure a connected PC is configured for an external display This is usually done by pressing an Fn key combination on the PC Tips for Troubleshooting In each problem specific section try the steps in the order suggested This may help you to solve the problem more quickly Try to pin point ...

Страница 71: ...mp ballast Communication error 5 blinks 10 blinks OFF Fan 1 error 6 blinks 1 blinks OFF Fan 2 error 6 blinks 2 blinks OFF Fan 3 error 6 blinks 3 blinks OFF Fan 4 error 6 blinks 4 blinks OFF Lamp Cover Open 7 blinks OFF OFF DMD error 8 blinks OFF OFF Color wheel error 9 blinks OFF OFF In the event of an error please disconnect the AC power cord and wait for one 1 minute before restarting the projec...

Страница 72: ... projector 1 Check that the power cable is securely connected 2 Ensure the power source is good by testing with another electrical device 3 Restart the projector in the correct order and check that the Power LED is on 4 If you have replaced the lamp recently try resetting the lamp connections Problem The lamp goes off Power surges can cause the lamp to turn off Re plug power cord When the Power LE...

Страница 73: ...Having the Projector Serviced If you are unable to solve the problem you should have the projector serviced Pack the projector in the original carton Include a description of the problem and a checklist of the steps you took when trying to fix the problem For servicing return the projector to the place you purchased it or Canon Customer Support Center ...

Страница 74: ... 2 3 8000 1 10000 1 Ratio of brightness at periphery to center 2 80 Speaker 10W monaural Supported input signal types See Timing Mode Table page 75 Display resolution Computer signal input Maximum input resolution 1920 1200 dot Re sizing display Panel display resolution 1920 1080 Maximum input resolution 1920 1200 dot Re sizing display Panel display resolution 1024 768 Video signals Analog PC inpu...

Страница 75: ...umption Lamp mode Eco 320W Power consumption in standby RS 232 0 5W Network 2 0W Standard dimensions W 314 mm 12 4 H 112 mm 4 4 D 231 mm 9 1 Weight 3 4 kg Accessories Remote control battery for remote control power cord computer cable User s Manual CD ROM Important Information and Warranty Card 1 Picture mode Presentation 2 Compliance with ISO21118 2012 3 Optimizes the contrast depending on the br...

Страница 76: ...0 133 75 1 85 73 2 78 109 113 80 177 100 2 46 97 3 7 146 150 100 221 125 3 08 121 4 63 182 188 120 266 149 3 69 145 5 55 219 224 140 310 174 4 31 170 6 48 255 261 160 354 199 4 92 194 7 4 291 299 180 398 224 5 54 218 8 33 328 336 200 443 249 6 15 242 9 25 364 374 210 465 262 6 46 254 9 72 383 393 220 487 274 6 77 267 411 240 531 299 7 39 291 449 260 576 324 8 315 486 280 620 349 8 62 339 524 300 6...

Страница 77: ...91 2 23 88 3 35 132 126 80 163 122 2 97 117 4 47 176 170 100 203 152 3 72 146 5 59 220 211 120 244 183 4 46 176 6 71 264 254 140 284 213 5 21 205 7 82 308 296 160 325 244 5 95 234 8 94 352 339 170 346 249 6 32 249 9 5 374 346 180 366 274 6 69 263 381 200 406 305 7 44 293 424 220 447 335 8 18 322 466 230 467 351 8 55 337 488 240 188 366 8 92 351 509 260 528 396 9 67 381 550 ...

Страница 78: ... 600 46 9 75 0 O O 800 x 600 48 1 72 2 O O 800 x 600 53 7 85 1 O O 800 x 600 76 3 120 0 O O 1024 x 768 48 4 60 0 O O 1024 x 768 56 5 70 1 O O 1024 x 768 60 0 75 0 O O 1024 x 768 68 7 85 0 O O 1024 x 768 97 6 120 0 O O 1280 x 720 45 0 60 0 O O 1280 x 720 91 5 119 9 O O 1280 x 800 49 7 59 8 O O 1280 x 800 62 8 74 9 O O 1280 x 800 71 6 84 8 O O 1280 x 800 101 6 119 9 O O 1280 x 1024 64 0 60 0 O O 128...

Страница 79: ...5 50 0 O O EDTV 576p 31 3 50 0 O O 480p 31 5 60 0 O O HDTV 720p 37 5 50 0 O O 720p 45 0 60 0 O O 1080i 33 8 60 0 O O 1080i 28 1 50 0 O O 1080p 67 5 60 0 O O 1080p 56 3 50 0 O O 1080p 27 24 0 O O 1080p 28 25 0 O O 1080p 33 7 30 0 O O O Frequency supported Frequency not supported LV HD420 native resolution of the panel is 1920 x 1080 LV X420 native resolution of the panel is 1024 x 768 The aspect ra...

Страница 80: ... 77 Projector Dimensions 112mm 4 4 218mm 8 6 314mm 12 4 ...

Страница 81: ... and if not installed and used in accordance with the instruction manual may cause harmful interference to radio communications Operation of this equipment in a residential area is likely to cause harmful interference in which case the user will be required to correct the interference at his her own expense Changes or modifications not expressly approved by the parties responsible for compliance c...

Страница 82: ... Pn F VXXS0006 56h Xh Xh 53h 30h 30h 30h 36h 0Dh System Reset P F VXXG0007 56h Xh Xh 47h 30h 30h 30h 37h 0Dh Get System Status 0 Reset 1 Standby 2 Operation 3 Cooling Pn F VXXG0008 56h Xh Xh 47h 30h 30h 30h 38h 0Dh Get F W Version Pn F Command Group 01 ASCII HEX Function Description Return Value VXXG0101 56h Xh Xh 47h 30h 31h 30h 31h 0Dh Get Brightness n 0 100 Pn F VXXS0101n 56h Xh Xh 53h 30h 31h ...

Страница 83: ...tion 3 Movie 5 sRGB 7 User Pn F VXXS0108n 56h Xh Xh 47h 30h 33h 31h 38h nh 0Dh Adjust the Picture mode 0 Standard 1 Presentation 3 Movie 5 sRGB 7 User P F Command Group 02 ASCII HEX Function Description Return Value VXXS0201 56h Xh Xh 53h 30h 32h 30h 31h 0Dh Select COMPUTER1 P F VXXS0202 56h Xh Xh 53h 30h 32h 30h 32h 0Dh Select COMPUTER2 P F VXXS0204 56h Xh Xh 53h 30h 32h 30h 34h 0Dh Select Video ...

Страница 84: ...Xh Xh 47h 30h 33h 30h 39h 0Dh Get vertical keystone value n 30 30 Pn F VXXS0309n 56h Xh Xh 53h 30h 33h 30h 39h nh 0Dh Set vertical keystone value n 30 30 P F VXXG0310 56h Xh Xh 47h 30h 33h 31h 30h 0Dh Get horizontal keystone value n 30 30 Pn F VXXS0310n 56h Xh Xh 53h 30h 33h 31h 30h nh 0Dh Set horizontal keystone value n 30 30 P F VXXG0315 56h Xh Xh 47h 30h 33h 31h 35h 0Dh Get 3D Mode n 0 1 Pn F V...

Страница 85: ...ue n 100 100 Pn F VXXS0340n 56h Xh Xh 47h 30h 33h 34h 30h nh 0Dh Set the Red Hue n 100 100 P F VXXG0341 56h Xh Xh 47h 30h 33h 34h 31h 0Dh Get the Red Saturation n 100 100 Pn F VXXS0341n 56h Xh Xh 53h 30h 33h 34h 31h nh 0Dh Set the Red Saturation n 100 100 P F VXXG0342 56h Xh Xh 47h 30h 33h 34h 32h 0Dh Get the Red Gain n 100 100 Pn F VXXS0342n 56h Xh Xh 53h 30h 33h 34h 32h nh 0Dh Set the Red Gain n...

Страница 86: ...h Get the Magenta Gain n 100 100 Pn F VXXS0354n 56h Xh Xh 53h 30h 33h 35h 34h nh 0Dh Set the Magenta Gain n 100 100 P F VXXG0355 56h Xh Xh 53h 30h 33h 35h 35h 0Dh Get the Yellow Hue n 100 100 Pn F VXXS0355n 56h Xh Xh 47h 30h 33h 35h 35h nh 0Dh Set the Yellow Hue n 100 100 P F VXXG0356 56h Xh Xh 47h 30h 33h 35h 36h 0Dh Get the Yellow Saturation n 100 100 Pn F VXXS0356n 56h Xh Xh 53h 30h 33h 35h 36h...

Страница 87: ...Melville New York 11747 U S A For all inquires concerning this product call toll free in the U S 1 800 OK CANON CANON EUROPE LTD 3 The Square Stockley Park Uxbridge Middlesex UB11 1ET United Kingdom CANON EUROPA N V Bovenkerkerweg 59 1185 XB Amstelveen The Netherlands CANON INC 2017 YT1 7506 000 ...

Отзывы: