When printing paper of a type other than plain paper or envelopes from the paper drawer
Select [Drawer 1] or [Drawer 2] (optional).
If you select [Auto], you cannot print from the paper drawer. (Paper is fed from the multi-
purpose tray.)
How to display the printer driver
"Printing (Basic Procedure)"
"Changing the Default Values for Printing Preferences"
Click [OK].
Precautions for Handling the Multi-purpose Tray or Paper Drawer
Be careful of the following points when handling the multi-purpose tray or paper drawer.
Be sure to turn the printer on once when loading paper in the paper drawer for the first time after installing
the paper feeder.
Observe the following points during printing. This may result in paper jams or damage to the printer.
Do not pull out the paper drawer.
Do not touch the paper in the multi-purpose tray or pull it out.
Refill the paper drawer after all the loaded paper runs out. If the paper drawer is refilled when paper still
remains in the drawer, this may result in misfeeds.
Do not put anything other than the printing paper on the multi-purpose tray. Also, do not press on top of
or apply excessive force to the multi-purpose tray. This may result in damage to the multi-purpose tray.
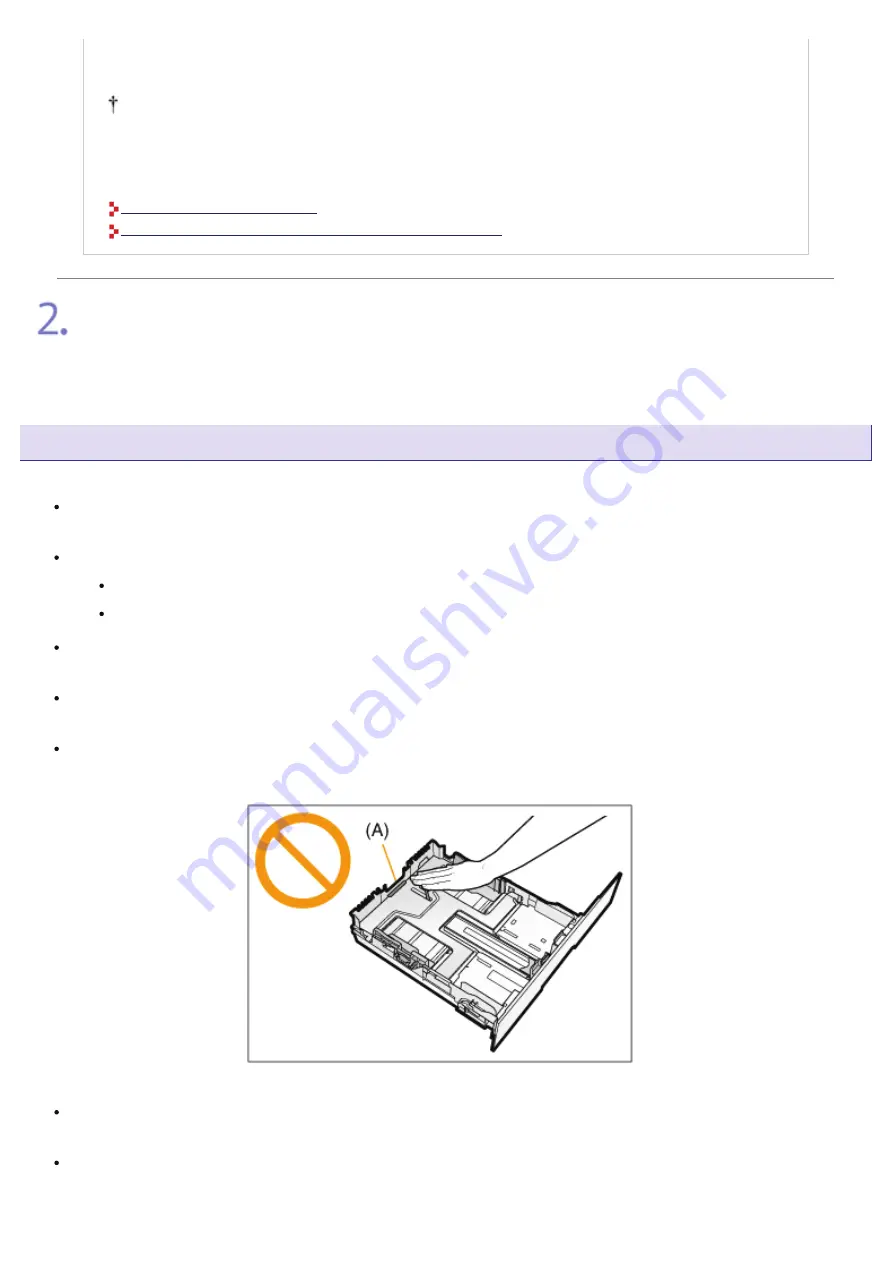
Do not touch the black rubber pad (A) in the paper drawer. This may result in misfeeds.
If you are printing from the multi-purpose tray or Drawer 2 (optional), make sure that Drawer 1 is set
before printing.
Remove the paper loaded in the multi-purpose tray before closing it.
Also. keep the multi-purpose tray closed when it is not used.
㻞㻞㻤㻌㻛㻌㻣㻜㻡
Содержание LBP7210Cdn
Страница 1: ...㻝㻌㻛㻌㻣㻜㻡 ...
Страница 10: ...㻝㻜㻌㻛㻌㻣㻜㻡 ...
Страница 23: ... C Using the e Manual 㻞㻟㻌㻛㻌㻣㻜㻡 ...
Страница 42: ...Click Exit Click Back Click Exit NOTE 㻠㻞㻌㻛㻌㻣㻜㻡 ...
Страница 44: ... D Specifications and Parts 㻠㻠㻌㻛㻌㻣㻜㻡 ...
Страница 59: ... E Printer Installation and Software Installation 㻡㻥㻌㻛㻌㻣㻜㻡 ...
Страница 100: ...Plug the power plug into the AC power outlet Connect the USB cable to the printer as needed 㻝㻜㻜㻌㻛㻌㻣㻜㻡 ...
Страница 125: ... Installation on Clients 㻝㻞㻡㻌㻛㻌㻣㻜㻡 ...
Страница 138: ...If the User Account Control dialog box appears click Continue 㻝㻟㻤㻌㻛㻌㻣㻜㻡 ...
Страница 159: ...ĺ The test page is printed NOTE If the test page is not printed properly Printing Does Not Work 㻝㻡㻥㻌㻛㻌㻣㻜㻡 ...
Страница 171: ... F Printing 㻝㻣㻝㻌㻛㻌㻣㻜㻡 ...
Страница 198: ...NOTE For details on the settings See Help How to Use Help 㻝㻥㻤㻌㻛㻌㻣㻜㻡 ...
Страница 212: ...㻞㻝㻞㻌㻛㻌㻣㻜㻡 ...
Страница 225: ...See Loading Envelopes 㻞㻞㻡㻌㻛㻌㻣㻜㻡 ...
Страница 284: ...ĺ The printer starts printing 㻞㻤㻠㻌㻛㻌㻣㻜㻡 ...
Страница 304: ...Click OK or Print ĺ The printer starts printing 㻟㻜㻠㻌㻛㻌㻣㻜㻡 ...
Страница 361: ... G Maintenance 㻟㻢㻝㻌㻛㻌㻣㻜㻡 ...
Страница 363: ... G 03 Checking by the Remote UI Checking by the Remote UI 㻟㻢㻟㻌㻛㻌㻣㻜㻡 ...
Страница 380: ... G 09 Loading Index Cards Loading Index Cards 㻟㻤㻜㻌㻛㻌㻣㻜㻡 ...
Страница 381: ... G 10 Loading Envelopes Loading Envelopes 㻟㻤㻝㻌㻛㻌㻣㻜㻡 ...
Страница 382: ... G 11 Loading Custom Size Paper Non Standard Size Paper Loading Custom Size Paper Non Standard Size Paper 㻟㻤㻞㻌㻛㻌㻣㻜㻡 ...
Страница 384: ... G 13 Correcting Rough Textured Images Correcting Rough Textured Images 㻟㻤㻠㻌㻛㻌㻣㻜㻡 ...
Страница 385: ... G 14 Adjusting the Toner Density Adjusting the Toner Density 㻟㻤㻡㻌㻛㻌㻣㻜㻡 ...
Страница 386: ... G 15 Printing with Brightness and Contrast Adjusted Printing with Brightness and Contrast Adjusted 㻟㻤㻢㻌㻛㻌㻣㻜㻡 ...
Страница 387: ... G 16 Adjusting the Color Adjusting the Color 㻟㻤㻣㻌㻛㻌㻣㻜㻡 ...
Страница 388: ... G 17 Matching the Color on the Display Matching the Color on the Display 㻟㻤㻤㻌㻛㻌㻣㻜㻡 ...
Страница 389: ... G 18 Calibrating the Printer Calibrating the Printer 㻟㻤㻥㻌㻛㻌㻣㻜㻡 ...
Страница 390: ... G 19 Correcting Out of Register Colors Correcting Out of Register Colors 㻟㻥㻜㻌㻛㻌㻣㻜㻡 ...
Страница 401: ... G 23 Paper Feeder Paper Feeder 㻠㻜㻝㻌㻛㻌㻣㻜㻡 ...
Страница 403: ...㻠㻜㻟㻌㻛㻌㻣㻜㻡 ...
Страница 404: ... G 25 Location of the Serial Number Location of the Serial Number 㻠㻜㻠㻌㻛㻌㻣㻜㻡 ...
Страница 405: ... H Troubleshooting 㻠㻜㻡㻌㻛㻌㻣㻜㻡 ...
Страница 431: ...If you changed the setting Restart the computer and printer 㻠㻟㻝㻌㻛㻌㻣㻜㻡 ...
Страница 437: ...IP address 192 168 0 10 㻠㻟㻣㻌㻛㻌㻣㻜㻡 ...
Страница 451: ... 2 Click OK 㻠㻡㻝㻌㻛㻌㻣㻜㻡 ...
Страница 485: ...Correcting Out of Register Colors 㻠㻤㻡㻌㻛㻌㻣㻜㻡 ...
Страница 487: ...If the Printer Status Window is not displayed Printer Status Window 㻠㻤㻣㻌㻛㻌㻣㻜㻡 ...
Страница 491: ...In case of the paper feeder Remove the jammed paper by pulling it gently in the direction of the arrow 㻠㻥㻝㻌㻛㻌㻣㻜㻡 ...
Страница 502: ...Also check if the paper drawer is inserted into the printer firmly 㻡㻜㻞㻌㻛㻌㻣㻜㻡 ...
Страница 514: ...Click OK 㻡㻝㻠㻌㻛㻌㻣㻜㻡 ...
Страница 516: ...Click OK 㻡㻝㻢㻌㻛㻌㻣㻜㻡 ...
Страница 518: ...㻡㻝㻤㻌㻛㻌㻣㻜㻡 ...
Страница 562: ...Click Close Click Apply Click OK 㻡㻢㻞㻌㻛㻌㻣㻜㻡 ...
Страница 586: ...About the DNS settings See Configuring the Protocol Settings 㻡㻤㻢㻌㻛㻌㻣㻜㻡 ...
Страница 598: ...NOTE About the Remote UI See Remote UI 㻡㻥㻤㻌㻛㻌㻣㻜㻡 ...
Страница 599: ... I 13 Print Server Environment Printer Sharing Print Server Environment Printer Sharing 㻡㻥㻥㻌㻛㻌㻣㻜㻡 ...
Страница 600: ... I 14 Configuring the Print Server Configuring the Print Server 㻢㻜㻜㻌㻛㻌㻣㻜㻡 ...
Страница 601: ... I 15 Installation on Clients Installation on Clients 㻢㻜㻝㻌㻛㻌㻣㻜㻡 ...
Страница 602: ... J Managing and Configuring the Printer 㻢㻜㻞㻌㻛㻌㻣㻜㻡 ...
Страница 614: ...Select Display Language Click OK 㻢㻝㻠㻌㻛㻌㻣㻜㻡 ...
Страница 641: ...Click Change under Security Enter the password currently being used 㻢㻠㻝㻌㻛㻌㻣㻜㻡 ...
Страница 649: ...㻢㻠㻥㻌㻛㻌㻣㻜㻡 ...
Страница 673: ...Click OK 㻢㻣㻟㻌㻛㻌㻣㻜㻡 ...
Страница 680: ...Click OK 㻢㻤㻜㻌㻛㻌㻣㻜㻡 ...
Страница 683: ...Click Change under Security Select the Restrict Multicast Discovery check box 㻢㻤㻟㻌㻛㻌㻣㻜㻡 ...
Страница 686: ...㻢㻤㻢㻌㻛㻌㻣㻜㻡 ...
Страница 689: ...Click Change under Security Select the Restrict MAC Address Access check box 㻢㻤㻥㻌㻛㻌㻣㻜㻡 ...
Страница 692: ...㻢㻥㻞㻌㻛㻌㻣㻜㻡 ...
Страница 696: ...㻢㻥㻢㻌㻛㻌㻣㻜㻡 ...


