0F40-00W
WARNING
Do not disassemble or modify the printer. There are high-temperature and high-voltage components inside the
printer which may result in a fire or electrical shock.
Electrical equipment can be hazardous if not used properly. Do not allow children to touch the power cord, cables,
internal gears, or electrical parts.
If the printer makes an unusual noise or emits smoke, heat, or an unusual smell, immediately turn OFF the power
switch and disconnect the interface cables if they are connected. Then, unplug the power plug from the AC power
outlet and contact your local authorized Canon dealer. Continued use can result in a fire or electrical shock.
Do not use flammable sprays near the printer. If flammable substances come into contact with electrical parts inside
the printer, this may result in a fire or electrical shock.
Always turn OFF the power switch and unplug the power plug and interface cables before moving the printer.
Failure to do so can damage the cables or cords, resulting in a fire or electrical shock.
Confirm that the power plug or power connecter is inserted completely after moving the printer. Failure to do so can
result in an overheating and fire.
Do not drop paper clips, staples, or other metal objects inside the printer. Also, do not spill water, liquids, or other
flammable substances (alcohol, benzene, paint thinner, and so on) inside the printer. If these items come into
contact with a high-voltage area inside the printer, this may result in a fire or electrical shock. If these items are
dropped or spilled inside the printer, immediately turn OFF the power switch and disconnect the interface cables if
they are connected. Then, unplug the power plug from the AC power outlet and contact your local authorized Canon
dealer.
When plugging or unplugging a USB cable when the power plug is plugged into an AC power outlet, do not touch
the metal part of the connector, as this can result in electrical shock.
CAUTION
Do not place heavy objects on the printer. The object or the printer may fall, resulting in personal injury.
Turn OFF the power switch when the printer will not be used for a long period of time, such as overnight. Turn OFF
the printer and unplug the power plug if the printer will not be used for an extended period of time, such as for
several days.
Open or close covers and install or remove drawers gently and carefully. Be careful not to hurt your fingers.
Keep your hands and clothing away from the roller in the output area. Even if the printer is not printing, the roller
may suddenly rotate and catch your hands or clothing, resulting in personal injury.
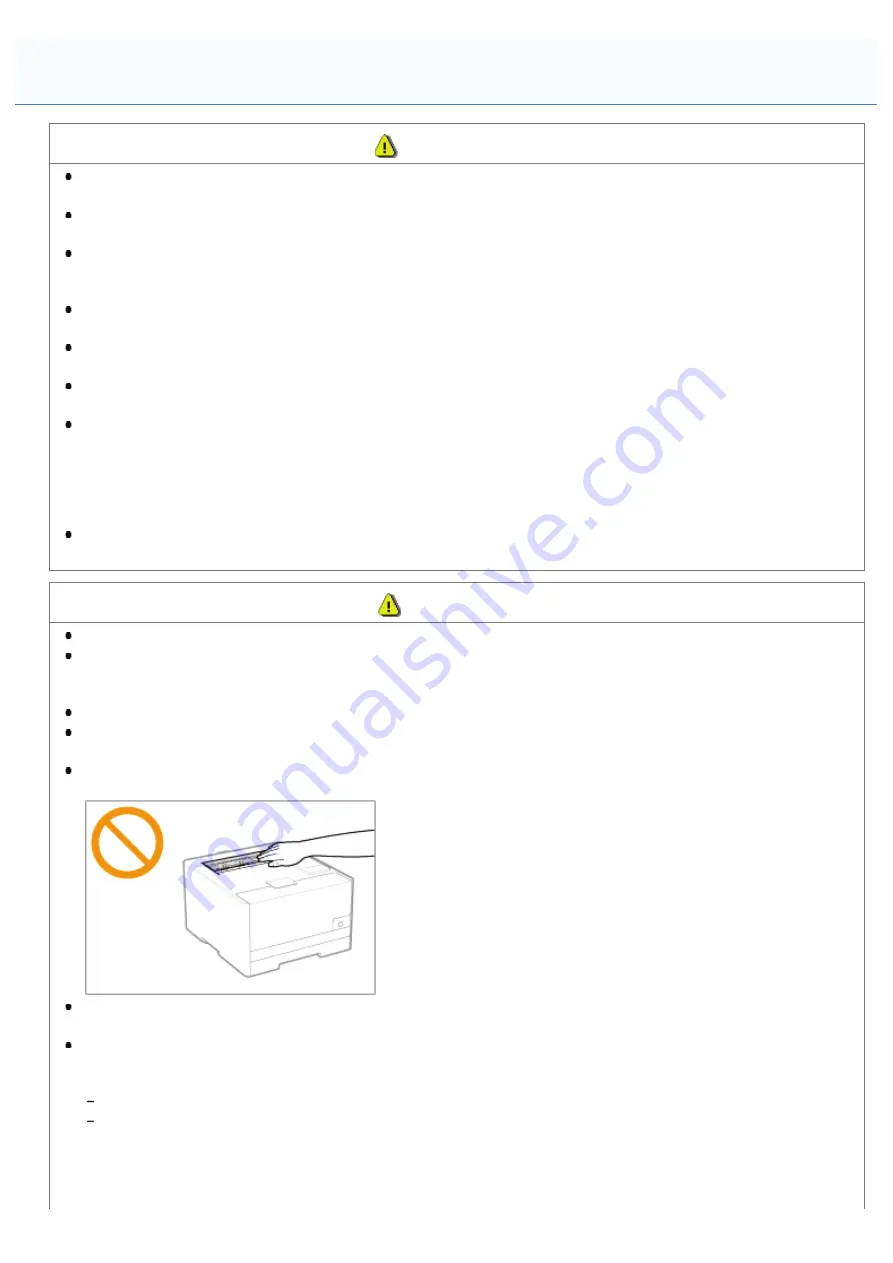
The output slot is hot during and immediately after printing. Do not touch the area surrounding the output slot, as
this may result in burns.
Printed paper may be hot immediately after being output. Be careful when removing the paper and aligning the
removed paper, especially after continuous printing. Failure to do so may result in burns.
The laser beam used in the printer can be harmful to human bodies. The laser beam is confined in the laser
scanner unit by a cover, so there is no danger of the laser beam escaping during normal printer operation. Read the
following remarks and instructions for safety.
Never open covers other than those indicated in this manual.
Do not remove the caution label attached to the cover of the laser scanner unit.
Handling
㻟㻣㻌㻛㻌㻡㻝㻠
Содержание LBP7100Cn
Страница 1: ......
Страница 7: ...For Windows 8 Server 2012 Users 512 For Macintosh Users 513 Office Locations 514...
Страница 21: ...7 Click Exit When the following screen appears you can remove the CD ROM...
Страница 38: ...If the laser beam should escape and enter your eyes exposure may cause damage to your eyes...
Страница 81: ......
Страница 83: ...It takes approximately 60 seconds...
Страница 88: ......
Страница 102: ...Close the covers and insert the paper drawer after you finish checking Next install the printer Installing the Printer...
Страница 105: ...0F40 02E Installing the Printer Driver Uninstalling the Printer Driver Driver Installation...
Страница 119: ......
Страница 121: ...2 Click Next Proceed to the Printer Information Screen...
Страница 124: ......
Страница 132: ...17 Click Exit When the following screen appears you can remove the CD ROM...
Страница 153: ......
Страница 156: ...3 Click OK If you cannot cancel a job You cannot cancel the job whose pages are in the process of printing...
Страница 174: ...3 Click OK For details on the basic printing procedure see Basic Printing Procedure...
Страница 178: ...For details on the basic printing procedure see Basic Printing Procedure...
Страница 180: ...Click OK For details on the basic printing procedure see Basic Printing Procedure...
Страница 183: ...3 Click OK Then the Page Setup sheet reappears...
Страница 187: ...Color 3 Click OK For details on the basic printing procedure see Basic Printing Procedure...
Страница 196: ...3 Click OK For details on the basic printing procedure see Basic Printing Procedure...
Страница 198: ...4 Click OK For details on the basic printing procedure see Basic Printing Procedure...
Страница 204: ...Low...
Страница 214: ...changed 4 Confirm the settings then click OK The printer folder reappears...
Страница 223: ...If you do not know which port you are using see Basic Operations Various Information for Windows...
Страница 249: ......
Страница 255: ......
Страница 265: ...4 Click Edit 5 Specify the dedicated port settings 1 Specify the dedicated port settings 2 Click OK...
Страница 268: ...4 Click Edit 5 Specify the waiting time until connected to the network 1 Specify the waiting time 2 Click OK...
Страница 277: ...WPA WPA2 PSK Settings Displays the WPA WPA2 PSK setting WEP Settings Displays the WEP setting...
Страница 282: ...6 Click Close 7 Click Apply 8 Click OK NOTE...
Страница 286: ......
Страница 303: ...9 Click Finish...
Страница 317: ...2 Click OK...
Страница 319: ...4 Change the display language 1 Select a display language 2 Click OK...
Страница 323: ......
Страница 353: ......
Страница 355: ...4 Click Edit 5 Configure the SNMPv1 protocol...
Страница 362: ...4 Click Generate Key 5 Specify a key to be created...
Страница 366: ...4 Click Register Key and Certificate 5 Click Install...
Страница 370: ...1 Select Security Settings 2 Click CA Certificate Settings 4 Click Register CA Certificate 5 Click Install...
Страница 372: ...8 Click Register...
Страница 378: ......
Страница 384: ...4 Click Initialize 5 Click OK to initialize the key and certificate CA certificate...
Страница 389: ......
Страница 392: ...2 Click IEEE 802 1X Settings 4 Click Edit 5 Select the Use IEEE 802 1X check box...
Страница 393: ...6 Enter a login name 7 Select the Use TLS check box...
Страница 397: ...4 Click Edit 5 Select the Use IEEE 802 1X check box...
Страница 401: ......
Страница 429: ...3 Click Next 4 Manually specify the port using Port Printer Information Screen...
Страница 436: ...7 Disconnect the USB cable from the computer then restart Windows...

