background image

07K5-093

Perform one of the following solutions according to the cause.

<Cause 1> The toner cartridge was installed with the sealing tape still attached.

Solution

Take the toner cartridge out of the printer, pull out the sealing tape, and reinstall the toner cartridge.

"Toner Cartridge Replacement"

<Cause 2> Multiple sheets of paper are fed at a time.

Solution

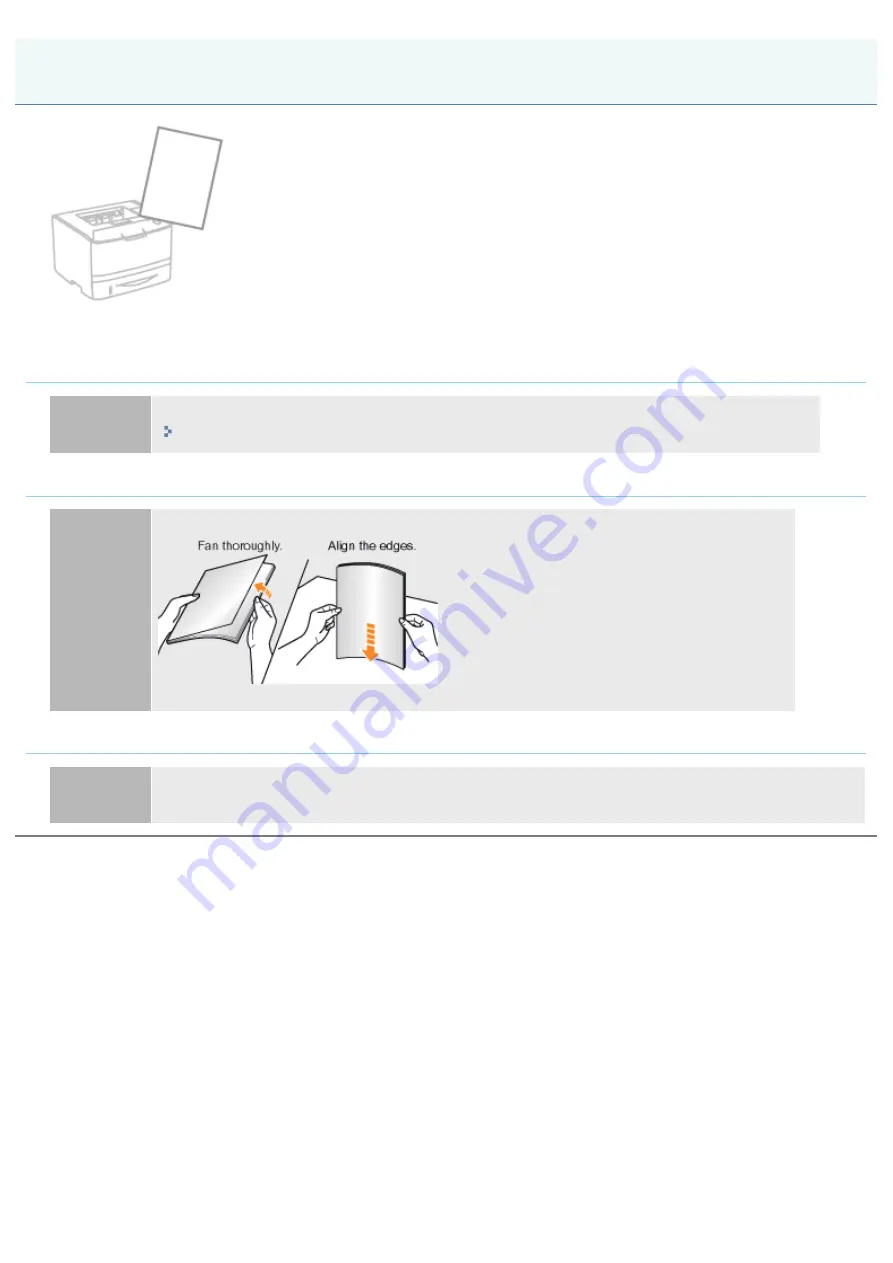
Fan the paper thoroughly, and then align the edges of the stack properly on a hard, flat surface.

<Cause 3> Paper of the size different from the setting for [Output Size] is loaded.

Solution

When the message <Specified Paper Different from Set Paper> appears in the Printer Status Window,
perform the described solutions in "

A Message Appears in the Printer Status Window

."

Blank Paper Is Output (Nothing Is Printed on the Paper)

㻠㻟㻤㻌㻛㻌㻠㻡㻞

Содержание LBP6310dn

Страница 1: ...㻝㻌㻛㻌㻠㻡㻞 ...

Страница 2: ...spections 38 Consumables 40 Others 41 About This Printer 42 Printer Specifications 43 System Requirements for Printing 46 Introduction of the Optional Accessories 47 Names and Dimensions of Each Part 48 Control Panel 51 Printer Status Window 53 Energy saving Mode 55 Sleep Mode 56 Auto Shutdown 57 Introduction of the Utilities 59 Cautions for Handling the Printer 61 Consumables 62 Maintenance 63 To...

Страница 3: ...d Output 139 Loading Paper in the Paper Drawer 141 Attention Paper Drawer 144 Registering the Paper Size 145 Loading Paper in the Multi purpose Tray 147 Attention Multi purpose Tray 150 Basic Printing Procedure 151 Attention Basic Printing 155 How to Use Help 156 Canceling a Job 158 Canceling a Print Job Using the Print Queue 159 Canceling a Print Job Using the Printer Status Window 161 Canceling ...

Страница 4: ... Editing Deleting a Profile 225 Selecting a Profile 229 Configuring the Network Settings Sharing the Printer 230 Checking Your Printing Environment 231 If You Use the Printer by Direct Connection 232 Installing the Printer Driver LAN Connection 233 Setting the IP Address 234 Setting the IP Address Using NetSpot Device Installer 235 Setting the IP Address Using the ARP PING Command 240 Setting the ...

Страница 5: ...overy 351 Restricting the Users Who Can Access 355 Restricting the FTP Access from End Users 358 Obtaining the Security Access Logs 360 Checking the Security Access Logs 363 Troubleshooting 365 Printing Cannot Be Performed 366 Printing Cannot Be Performed USB Connection 367 Printing Cannot Be Performed LAN Connection 370 Printing Cannot Be Performed via the Print Server 374 The Print Server for Co...

Страница 6: ...The Back of the Printed Paper Has Smudge Marks 428 The Overall Print Result Is Dark 429 Residual Images Appear on Non printed Areas 430 White Dust Is Attached to the Printed Transparencies 431 The Overall Print Result Is Faint 432 Colored Lines and Text Appear Faded 433 The Printing Position Is Skewed 434 A Portion of the Page Is Not Printed 435 Data Is Reduced and Printed 436 The Next Page Is Pri...

Страница 7: ...07K5 000 Legal Notices Legal Limitations on the Usage of Your Product and the Use of Images Using the e Manual Before You Start 㻣㻌㻛㻌㻠㻡㻞 ...

Страница 8: ...0825 1 2007 and EN60825 1 2007 This means that the product does not produce hazardous laser radiation Since radiation emitted inside the product is completely confined within protective housings and external covers the laser beam cannot escape from the machine during any phase of user operation Do not remove protective housings or external covers except as directed by the equipment s manuals The l...

Страница 9: ...according to the WEEE Directive 2002 96 EC and your national law This product should be handed over to a designated collection point e g on an authorized one for one basis when you buy a new similar product or to an authorized collection site for recycling waste electrical and electronic equipment EEE Improper handling of this type of waste could have a possible negative impact on the environment ...

Страница 10: ... of the images scanned printed or otherwise reproduced you should consult in advance with your legal advisor for guidance Paper Money Travelers Checks Money Orders Food Stamps Certificates of Deposit Passports Postage Stamps canceled or uncanceled Immigration Papers Identifying Badges or Insignias Internal Revenue Stamps canceled or uncanceled Selective Service or Draft Papers Bonds or Other Certi...

Страница 11: ...te Map Search Method Viewing the e Manual To find the desired content Selecting between the category icons From the top page select a category icon you want Top Page Searching from the site map On the site map you can view the list of whole sections of the e Manual sorted by category You can directly display sections in a category Site Map Whole text search function You can search by keyword in th...

Страница 12: ...the following links to see the system requirements to use the e Manual and how to install uninstall the e Manual Operating Environment Installing the e Manual Uninstalling the e Manual How to Use the e Manual 㻝㻞㻌㻛㻌㻠㻡㻞 ...

Страница 13: ...of the following Web browsers is guaranteed Internet Explorer 6 0 7 0 8 0 9 0 FireFox 2 x 3 x 4 x 5 x 6 x 7 x 8 x 9 x 10 x 11 x NOTE Enabling the script function Enable the script function for a Web browser before using the e Manual Operating Environment 㻝㻟㻌㻛㻌㻠㻡㻞 ...

Страница 14: ...of your computer 2 Click Custom Installation If the above screen does not appear Basic Operations Various Information for Windows If the AutoPlay dialog box appears Click Run AUTORUN EXE If the User Account Control dialog box appears Click Continue or Yes 3 Perform the following procedure 1 Clear the Printer Driver check box 2 Click Install Installing the e Manual 㻝㻠㻌㻛㻌㻠㻡㻞 ...

Страница 15: ...4 Read the contents of License Agreement and then click Yes ĺ The installation starts Wait until the following screen disappears It may take a long time to install the e Manual 5 Click Next 㻝㻡㻌㻛㻌㻠㻡㻞 ...

Страница 16: ... CD ROM Displaying the e Manual Double click LBP6310 e Manual created on the desktop When a security protection message appears Perform the following procedure 1 Click the information bar and then select Allow Blocked Content from the pop up menu 2 Click Yes 㻝㻢㻌㻛㻌㻠㻡㻞 ...

Страница 17: ...ut installing it in the computer you are using 1 Insert the supplied CD ROM User Software into the CD ROM drive of your computer 2 Click Display Manuals 3 Click button next to e Manual Depending on the operating system you are using a security protection message is displayed Allow the contents to be displayed 㻝㻣㻌㻛㻌㻠㻡㻞 ...

Страница 18: ...rocedure 1 Insert the supplied CD ROM User Software into the CD ROM drive of your computer 2 Click Additional Software Programs If the above screen does not appear Basic Operations Various Information for Windows If the AutoPlay dialog box appears Click Run AUTORUN EXE If the User Account Control dialog box appears Click Continue or Yes 3 Click Start in Manual Uninstaller Uninstalling the e Manual...

Страница 19: ...4 Click Uninstall to start the uninstallation Please wait a moment until the uninstallation is complete It may take a long time to uninstall the printer driver 5 Click Exit 6 Click Back 㻝㻥㻌㻛㻌㻠㻡㻞 ...

Страница 20: ...7 Click Exit When the following screen appears you can remove the CD ROM 㻞㻜㻌㻛㻌㻠㻡㻞 ...

Страница 21: ...is called Topic Page in this section Site map is displayed from Site map which is located on the upper right of the e Manual The search panel is used to make search through the e Manual The screen layout is different for each page so click the following links to see the instruction Top Page Topic Page Site Map Search Method Screen Layout of the e Manual 㻞㻝㻌㻛㻌㻠㻡㻞 ...

Страница 22: ...estions Frequently asked questions are featured For details on the solutions for the other problems see Troubleshooting 5 Installation This section describes how to install this printer how to install the printer driver and so on 6 Search The search panel is displayed by entering keyword s and clicking For details see Search Method 7 Top The top page of the e Manual is displayed 8 Site map The ent...

Страница 23: ...The information about the third party software is displayed 14 Office Locations Inquiries for this printer are displayed 㻞㻟㻌㻛㻌㻠㻡㻞 ...

Страница 24: ...ed topic is displayed at the upper left of the topic page Click a link to move to a higher level 3 Chapter menu You can select a different chapter from the pull down menu 4 Contents tab Click to display the chapter contents panel 5 Search tab Click to display the search panel For details see Search Method 6 Click to display or hide the chapter contents panel search panel 7 Previous Next Click to m...

Страница 25: ...ories Shows the chapters of the e Manual Click an item to view the detailed list of the chapter 2 Whole contents Shows the all chapters and sections of the e Manual Click an item to view the contents Site Map 㻞㻡㻌㻛㻌㻠㻡㻞 ...

Страница 26: ...t if you want to display pages which include words Toner and Replacement 2 Search result The search results for a keyword are displayed If there are more than 10 search results you can see the other results by clicking or the number which is located below the result 3 Search options Click to display the search options The search options can be used to specify the chapter to search case sensitivity...

Страница 27: ...ification of an operation or contains additional explanations for a procedure Reading these notes is highly recommended Indicates an operation that must not be performed Read these items carefully and make sure not to perform the described operations Keys and Buttons Used in This Manual The following are examples of how control panel keys and on screen buttons are depicted in the e Manual Type Dep...

Страница 28: ...Operating Systems In the e Manual operating systems are abbreviated as follows Microsoft Windows XP operating system Windows XP Microsoft Windows Vista operating system Windows Vista Microsoft Windows 7 operating system Windows 7 Microsoft Windows Server 2003 operating system Windows Server 2003 Microsoft Windows Server 2008 operating system Windows Server 2008 Microsoft Windows operating system W...

Страница 29: ...IED EXCEPT AS PROVIDED HEREIN INCLUDING WITHOUT LIMITATION THEREOF WARRANTIES AS TO MARKETABILITY MERCHANTABILITY FITNESS FOR A PARTICULAR PURPOSE OF USE OR AGAINST INFRINGEMENT OF ANY PATENT CANON INC SHALL NOT BE LIABLE FOR ANY DIRECT INCIDENTAL OR CONSEQUENTIAL DAMAGES OF ANY NATURE OR LOSSES OR EXPENSES RESULTING FROM THE USE OF THIS MATERIAL Disclaimers 㻞㻥㻌㻛㻌㻠㻡㻞 ...

Страница 30: ...rt of this publication may be reproduced or transmitted in any form or by any means electronic or mechanical including photocopying and recording or by any information storage or retrieval system without the prior written permission of Canon Inc Copyright 㻟㻜㻌㻛㻌㻠㻡㻞 ...

Страница 31: ...ems Incorporated Microsoft Windows Windows Vista Windows Server and Internet Explorer are either registered trademarks or trademarks of Microsoft Corporation in the United States and or other countries Ethernet is a trademark of Xerox Corporation Other product and company names herein may be the trademarks of their respective owners Trademarks 㻟㻝㻌㻛㻌㻠㻡㻞 ...

Страница 32: ...ights holders of the SOFTWARE 3 You may use the SOFTWARE solely for use with the Canon product you purchased the PRODUCT 4 You may not assign sublicense market distribute or transfer the SOFTWARE to any third party without prior written consent of rights holders of the SOFTWARE 5 Notwithstanding the foregoing you may transfer the SOFTWARE only when a you assign all of your rights to the PRODUCT an...

Страница 33: ...e instructions Also as it may result in unexpected accidents or injuries do not perform any operation unless otherwise specified in the manual Improper operation or use of this machine could result in personal injury and or damage requiring extensive repair that may not be covered under your Limited Warranty Installation Power Supply Handling Maintenance and Inspections Consumables Others Importan...

Страница 34: ...d floors or in locations subject to excessive vibrations as this may cause the printer to fall or tip over resulting in personal injury The ventilation slots are provided for proper ventilation of working parts inside the printer Never place the printer on a soft surface such as a bed sofa or rug Blocking the slots can cause the printer to overheat resulting in a fire Do not install the printer in...

Страница 35: ... can result in a fire or electrical shock If excessive stress is applied to the connection part of the power cord it may damage the power cord or the wires inside the machine may disconnect This could result in a fire Avoid the following situations Connecting and disconnecting the power cord frequently Tripping over the power cord The power cord is bent near the connection part and continuous stre...

Страница 36: ...er outlet and contact your local authorized Canon dealer When plugging or unplugging a USB cable when the power plug is plugged into an AC power outlet do not touch the metal part of the connector as this can result in electrical shock CAUTION Do not place heavy objects on the printer The object or the printer may fall resulting in personal injury Turn OFF the power switch when the printer will no...

Страница 37: ...If the laser beam should escape and enter your eyes exposure may cause damage to your eyes 㻟㻣㻌㻛㻌㻠㻡㻞 ...

Страница 38: ...lp line There are burn marks on the power plug The blade on the power plug is deformed or broken The power is turned OFF or ON when bending the power cord The coating of the power cord is damaged cracked or dented A part of the power cord becomes hot Check regularly that the power cord plug and connector are not handled in the following manner This may result in a fire or electrical shock The powe...

Страница 39: ...rtridge carefully so as to prevent the toner from scattering and getting into your eyes or mouth If toner gets into your eyes or mouth wash them immediately with cold water and consult a physician Do not attempt to disassemble the toner cartridge The toner may scatter and get into your eyes or mouth If toner gets into your eyes or mouth wash them immediately with cold water and consult a physician...

Страница 40: ...lfunction in the vacuum cleaner or result in a dust explosion due to static discharge CAUTION Keep the toner cartridges and other consumables out of the reach of small children If the toner or other parts are ingested consult a physician immediately Do not attempt to disassemble the toner cartridge The toner may scatter and get into your eyes or mouth If toner gets into your eyes or mouth wash the...

Страница 41: ...07K5 00Y WARNING The printer generates a low level magnetic field If you use a cardiac pacemaker and feel abnormalities move away from the printer and consult your physician immediately Others 㻠㻝㻌㻛㻌㻠㻡㻞 ...

Страница 42: ...nts for Printing Introduction of the Optional Accessories Names and Dimensions of Each Part Control Panel Printer Status Window Energy saving Mode Introduction of the Utilities Cautions for Handling the Printer Consumables About This Printer 㻠㻞㻌㻛㻌㻠㻡㻞 ...

Страница 43: ...ng on the output environment Paper size Drawer 1 Drawer 2 Optional Standard sizes A4 B5 A5 A6 Legal Letter Executive and 16K Custom paper sizes Width 105 0 to 215 9 mm Length 148 0 to 355 6 mm Multi purpose tray Standard sizes A4 B5 A5 A6 Legal Letter Executive 16K Index Card Envelope DL Envelope No 10 COM10 Envelope C5 Envelope B5 and Envelope Monarch Custom paper sizes Width 76 2 to 215 9 mm Len...

Страница 44: ...inter is turned OFF power is consumed only slightly while the power plug is inserted into the AC power outlet To cut the power consumption completely unplug the power plug from the AC power outlet Consumables Toner cartridge Canon Cartridge 719 Canon Cartridge 719 H For details on the yield see Replacement Timing in Consumables Weight Printer unit and included parts Printer unit excluding the tone...

Страница 45: ...This printer supports Raw only It does not support LPR 㻠㻡㻌㻛㻌㻠㻡㻞 ...

Страница 46: ...n the installation screen of the printer driver Recommended System Requirements Windows XP and Server 2003 Windows Vista 7 and Server 2008 CPU 1 2 GHz or more CPU and RAM conforming to recommended system requirements for Windows Vista 7 or Server 2008 Available memory RAM 256 MB or more Interface When connecting with USB Hi Speed USB USB When connecting to a network Connector 10BASE T or 100BASE T...

Страница 47: ...ts of plain paper 80 g m2 of the following sizes in the paper feeder Standard sizes A4 B5 A5 A6 Legal Letter Executive and 16K Custom paper sizes Width 105 0 to 215 9 mm Length 148 0 to 355 6 mm IMPORTANT Use a paper feeder designed for this printer Be sure to use a paper feeder designed for this printer NOTE How to install the paper feeder Printer Installation Introduction of the Optional Accesso...

Страница 48: ...Tray 6 Auxiliary Tray 9 Open Button Rear View 1 Power Socket 6 Output Selection Cover 11 ERR Indicator Orange 2 Duplex Unit Cover 7 Rating Label 12 LNK Indicator Green 3 Paper Size Switch Lever 8 Lift Handles 13 100 Indicator Green 4 Ventilation Slots 9 Sub output Tray 14 LAN Connector 5 Rear Cover 10 Reset Button 15 USB Connector Interior View Names and Dimensions of Each Part 㻠㻤㻌㻛㻌㻠㻡㻞 ...

Страница 49: ...artridge Guide 2 Transport Guide Multi purpose Tray 1 Paper Guide 2 Tray Extension 3 Auxiliary Tray Paper Drawer 1 Lock Release Lever 2 Paper Guide 3 Paper Level Indicator Dimensions of Each Part Printer 㻠㻥㻌㻛㻌㻠㻡㻞 ...

Страница 50: ...Paper Feeder Unit PF 44 㻡㻜㻌㻛㻌㻠㻡㻞 ...

Страница 51: ...ing A paper jam is occurring and printing cannot be performed Paper Jams 3 Alarm Indicator On A service error is occurring and printing cannot be performed The Alarm Indicator Is On Blinking Blinking An error is occurring and printing cannot be performed 4 Ready Indicator On The printer is ready to print or in the sleep mode Blinking The printer is busy printing preparing to print or cleaning 5 Ca...

Страница 52: ...linking Key Name Function Refer to 5 Cancel Job Key Pressing this key cancels the job in which an error is occurring and that in a printing process Canceling a Print Job Using the Cancel Job Key 㻡㻞㻌㻛㻌㻠㻡㻞 ...

Страница 53: ... status The printer is ready to print or in the sleep mode The printer pauses The printer problems need to be corrected Communication cannot be performed with the printer A service call is occurring 4 Animation Area Displays the printer status using an animated graphic This area displays the printing progress or error conditions depending on the printer status 5 Message Area Displays messages abou...

Страница 54: ... driver Click Display Printer Status Window in locations such as in the Page Setup sheet Displaying the Printer Status Window automatically The Printer Status Window icon is displayed automatically under the following situations When an error is occurring while printing When the toner cartridge needs to be replaced soon while printing Clicking this icon can display the Printer Status Window You ca...

Страница 55: ...certain time Sleep Mode You can configure the printer to enter the sleep mode when data is not sent from the computer or when the printer status remains as it is longer than the specified time Auto Shutdown You can configure the printer to shut down when the specified time is elapsed after entering the sleep mode Energy saving Mode 㻡㻡㻌㻛㻌㻠㻡㻞 ...

Страница 56: ...the Enter Sleep Mode after Fixed Period check box 2 Specify the time until the printer enters the sleep mode in Time to Enter Sleep Mode 3 Click OK NOTE About the setting for the time to enter the sleep mode You can select 5 10 15 30 60 90 120 150 or 180 minutes for Time to Enter Sleep Mode The default value is 5 minutes We recommend that you use this option in the default setting Sleep Mode 㻡㻢㻌㻛㻌...

Страница 57: ...in which a local printer is installed 1 Insert the supplied CD ROM User Software into the CD ROM drive of your computer 2 Click Additional Software Programs If the above screen does not appear Basic Operations Various Information for Windows If the AutoPlay dialog box appears Click Run AUTORUN EXE If the User Account Control dialog box appears Click Yes or Continue 3 Click Start in Auto Shutdown T...

Страница 58: ...eck box 2 Specify the time to shut down in Auto Shutdown After 3 Click OK NOTE About the setting for the time to execute auto shutdown When Auto Shutdown After is changed during sleep mode the specified time to execute auto shutdown is reset You can specify Auto Shutdown After for auto shutdown with 1 hour increments between 1hr and 8hr 㻡㻤㻌㻛㻌㻠㻡㻞 ...

Страница 59: ... administrator password Only the administrator can configure the settings or perform the operations related to the printer management by setting the administrator password You can specify the network settings at a time FTP Client By accessing the FTP server of the printer you can specify the network settings security settings and so on Because the setting items are listed in a file you can specify...

Страница 60: ...vice Installer NetSpot Device Installer is software included in the supplied CD ROM You can start NetSpot Device Installer directly from the CD ROM without installing it You can also install NetSpot Device Installer on a computer 㻢㻜㻌㻛㻌㻠㻡㻞 ...

Страница 61: ... direct sunlight or strong light may result in deterioration in print quality Do not open the covers on the printer during printing This may result in damage to the printer Handle each cover gently when opening or closing it Failure to do so may result in damage to the printer If you want to put a cover on the printer to prevent dust from entering the printer turn the power OFF and allow the print...

Страница 62: ...rganization for Standardization 2 When the toner cartridge needs to be replaced soon the following message will appear in the Printer Status Window The toner cartridge needs to be replaced soon IMPORTANT About replacement toner cartridges For optimum print quality using Canon genuine toner cartridges is recommended Model Name Supported Canon Genuine Toner Cartridge LBP6310dn Canon Cartridge 719 Ca...

Страница 63: ...Replacing the Toner Cartridge Replacing the Toner Cartridge Storing Toner Cartridges Moving the Printer Cleaning the Printer Cleaning the Inside of the Printer Cleaning the Outside of the Printer Location of the Serial Number Maintenance 㻢㻟㻌㻛㻌㻠㻡㻞 ...

Страница 64: ...ollowing section before replacing the toner cartridge You may be able to print for a while until the toner is used up completely Before Replacing the Toner Cartridge If the printout result is not improved If white streaks unevenness or faded print appears on printout results even after performing the above procedure replace the toner cartridge with a new one Replacing the Toner Cartridge In cases ...

Страница 65: ... counterfeit toner cartridge For more information see http www canon com counterfeit Hold the toner cartridge properly When handling the toner cartridge hold it properly with the arrowed side facing up as shown in the figure Do not place it vertically or upside down Do not touch the electrical contacts A or the toner cartridge memory B and do not open the drum protective shutter C If you touch the...

Страница 66: ...llow it to adjust to the new temperature Do not leave the front cover open for a long time with the toner cartridge installed Keep toner cartridge away from products that generate magnetic waves such as a computer or computer display A toner cartridge is a magnetic product Keep the toner cartridge away from products that may be damaged by magnetism such as a floppy disk or disk drive This may lead...

Страница 67: ...while until the toner is used up completely Before performing the following procedure see Attention Toner Cartridge 1 Open the front cover while pressing the open button 2 Remove the toner cartridge 3 Shake the toner cartridge five or six times as shown in the figure to evenly distribute the toner inside the cartridge 4 Before Replacing the Toner Cartridge 㻢㻣㻌㻛㻌㻠㻡㻞 ...

Страница 68: ...e printer 5 Close the front cover If you cannot close the front cover Make sure that the toner cartridge is installed in the printer properly Do not try to forcefully close the front cover as this may damage the printer If white streaks unevenness or faded print appears on printout results even after performing the above procedure replace the toner cartridge with a new one Replacing the Toner Cart...

Страница 69: ...on 2 Remove the toner cartridge 3 Take out the new toner cartridge from the protective bag You can open the protective bag with your hands from the notch Keep the protective bag Do not discard it You will need it when you remove the toner cartridge for printer maintenance or other purposes Replacing the Toner Cartridge 㻢㻥㻌㻛㻌㻠㻡㻞 ...

Страница 70: ...ward If the tape is severed this may become difficult to pull out completely If the sealing tape stops at midpoint pull it out of the toner cartridge completely If any tape remains in the toner cartridge this may result in poor print quality Dispose of the removed sealing tape according to local regulations 7 Install the toner cartridge Push the toner cartridge into the printer firmly until it tou...

Страница 71: ...the front cover If you cannot close the front cover Make sure that the toner cartridge is installed in the printer properly Do not try to forcefully close the front cover as this may damage the printer 㻣㻝㻌㻛㻌㻠㻡㻞 ...

Страница 72: ...t is contained in the air or where there is a lot of dust Keep toner cartridges out of the reach of small children Keep toner cartridges away from products that may be damaged by magnetism such as a floppy disk or disk drive Store toner cartridges in the same orientation as when they are installed in the printer Do not store toner cartridges vertically or upside down When removing the toner cartri...

Страница 73: ...OFF then disconnect the cables or cords from the printer How to disconnect the cable or cord USB cable 2 Turn the computer off 3 Disconnect the cable from the printer LAN cable 4 Disconnect the cable from the printer Power cord 5 Disconnect the power plug from the AC power outlet 6 Disconnect the cable from the printer Whether the cable is connected or not varies depending on your environment 2 Pu...

Страница 74: ...n personal injury For details on the procedure for installing the paper feeder see Printer Installation 4 Set the paper drawer in the printer Push it into the printer firmly 5 Connect the removed cable or cord How to connect the cable or cord USB cable Connect to the USB connector on the printer LAN cable Connect to the LAN connector on the printer Power cord 1 Plug the power cord to the power soc...

Страница 75: ...ridges also Securely pack the printer in the original box with packing materials If the original box and packing materials are not available find an appropriate box along with packing materials and pack the printer and the parts appropriately 㻣㻡㻌㻛㻌㻠㻡㻞 ...

Страница 76: ...ean the inside of the printer Cleaning the inside of the printer can prevent print quality deterioration Cleaning the Outside of the Printer Periodically clean the outer surfaces and ventilation slots of the printer to maintain the optimal printing quality Cleaning the Printer 㻣㻢㻌㻛㻌㻠㻡㻞 ...

Страница 77: ... purpose tray or paper drawer Paper Loading and Output 2 Click in the Windows task tray and then select the printer name 3 4 Click OK Then the cleaning page is printed Next clean the fixing roller using the printed cleaning page 5 If any paper is loaded in the multi purpose tray remove it 6 Load the cleaning page in the multi purpose tray with the printed side facing up Cleaning the Inside of the ...

Страница 78: ...the printer starts cleaning the fixing roller NOTE Cleaning time It takes approximately 60 seconds Cleaning the fixing roller cannot be canceled Please wait until it is completed The cleaning is finished when the paper is output completely 㻣㻤㻌㻛㻌㻠㻡㻞 ...

Страница 79: ... printer LAN cable 4 Disconnect the cable from the printer Power cord 5 Disconnect the power plug from the AC power outlet 6 Disconnect the cable from the printer Whether the cable is connected or not varies depending on your environment 2 Firmly wring a soft cloth dampened with water or a mild detergent diluted with water and wipe off the dirt 3 After wiping off the dirt wipe the printer with a d...

Страница 80: ...USB cable Connect to the USB connector on the printer LAN cable Connect to the LAN connector on the printer Power cord 1 Plug the power cord to the power socket on the printer 2 Plug the power plug into the AC power outlet Whether the cable is connected or not varies depending on your environment 㻤㻜㻌㻛㻌㻠㻡㻞 ...

Страница 81: ...s may deform or crack the plastic materials in the printer When using a mild detergent be sure to dilute it with water Also if you use a mild detergent for cleaning be sure to wipe away the detergent with a soft cloth dampened with water Grease or oil does not have to be applied to this printer Do not apply grease or oil Attention Cleaning 㻤㻝㻌㻛㻌㻠㻡㻞 ...

Страница 82: ...maintenance service You can find the serial number at the location shown in the following figure Do not remove the labels on which the serial number is indicated Rear of the printer Outside view of the packaging box Location of the Serial Number 㻤㻞㻌㻛㻌㻠㻡㻞 ...

Страница 83: ...king Materials 3 Installing the Paper Feeder Only when installing the paper feeder Installing the Paper Feeder 4 Installing the Printer Carrying the Printer to the Installation Site Connecting the Power Cord Installing the Printer 5 Loading Paper Loading Paper in the Paper Drawer Loading Paper in the Multi purpose Tray 6 Installing the Printer Driver Installing the Printer Driver 7 Registering a P...

Страница 84: ... mains voltage may cause the printer or computer to operate incorrectly or lose data Do not install the printer in the following locations as this may result in damage to the printer A location subject to dramatic changes in temperature or humidity A location subject to condensation A poorly ventilated location If you use the printer for a long time or to perform a large amount of printing in a po...

Страница 85: ...he paper drawer for the first time after installing the paper feeder NOTE About the toner cartridge included with this printer The average yield of the included toner cartridge is 2 100 pages The average yield is on the basis of ISO IEC 19752 when printing A4 paper with the default print density setting ISO IEC 19752 is the global standard related to Method for the determination of toner cartridge...

Страница 86: ...se a USB cable with the following symbol Checking the Installation Site In order to use this printer in a safe and trouble free manner install the printer in a place that fulfills the following conditions Temperature and Humidity Conditions Temperature range 10 to 30 C 50 to 86 F Humidity range 20 to 80 RH no condensation Power Supply Requirements 220 to 240 V 10 50 60 Hz 2 Hz Installation Require...

Страница 87: ...A location with good ventilation A location with a flat even surface A location able to fully support the weight of the printer 㻤㻣㻌㻛㻌㻠㻡㻞 ...

Страница 88: ... materials may be changed in form or placement or may be added or removed without notice Remove all the orange tape if it is attached to the printer when performing the following procedure 1 Open the front cover while pressing the open button 2 Turn over the paper toward you 3 Remove the packing material inside the front cover Removing the Packing Materials 㻤㻤㻌㻛㻌㻠㻡㻞 ...

Страница 89: ...ake the toner cartridge five or six times as shown in the figure to evenly distribute the toner inside the cartridge 6 Place the toner cartridge on a flat surface 7 Fold the tab and then pull out the sealing tape approx 48 cm 㻤㻥㻌㻛㻌㻠㻡㻞 ...

Страница 90: ...ge completely If any tape remains in the toner cartridge this may result in poor print quality Dispose of the removed sealing tape according to local regulations 8 Remove the packing material with paper inside the front cover 9 Install the toner cartridge Push the toner cartridge into the printer firmly until it touches the back of the printer while aligning A on both sides of the toner cartridge ...

Страница 91: ...y Do not try to forcefully close the front cover as this may damage the printer Check Checking if the packing materials are removed Check that the following packing materials are completely removed Dispose of the left packing materials according to local regulations Make sure that all the orange tape is completely removed 㻥㻝㻌㻛㻌㻠㻡㻞 ...

Страница 92: ...edures If you want to use the printer with the paper feeder installed Place the paper feeder at the installation site before installing the printer Installing the Paper Feeder If you want to use the printer without the paper feeder Install the printer Installing the Printer 㻥㻞㻌㻛㻌㻠㻡㻞 ...

Страница 93: ...nter to the Installation Site 1 Pull out the paper drawer 2 Carry the printer unit to the installation site After confirming that the covers and trays are closed carry the printer by holding it by the lift handles from the front side 3 Insert the paper drawer into the printer Push it into the printer firmly Connecting the Power Cord 1 Connect the power cord Installing the Printer 㻥㻟㻌㻛㻌㻠㻡㻞 ...

Страница 94: ... the following procedures 1 Load paper Loading Paper in the Paper Drawer Loading Paper in the Multi purpose Tray 2 Install the printer driver Installing the Printer Driver 3 Register a paper size Registering the Paper Size 4 Check the printing operation Check the operations by Configuration Page Print Checking the Printer Settings 㻥㻠㻌㻛㻌㻠㻡㻞 ...

Страница 95: ...nstalling the paper feeder in the printer after installing the printer move the printer to an appropriate location temporarily Moving the Printer For details on the precautions for when installing the paper feeder see Attention Printer Installation 1 Take the paper feeder out of the box 2 Remove the tape attached to the position shown in the figure 3 Pull out the paper drawer of the paper feeder I...

Страница 96: ...t handles when carrying the printer 5 Pull out the paper drawer of the printer 6 Carry the printer unit to the installation site After confirming that the covers and trays are closed carry the printer by holding it by the lift handles from the front side 㻥㻢㻌㻛㻌㻠㻡㻞 ...

Страница 97: ... printer and paper feeder firmly Next perform the following procedures If you install the printer and paper feeder at the same time 1 Connect the power cord Connecting the Power Cord 2 Load paper Loading Paper in the Paper Drawer Loading Paper in the Multi purpose Tray 3 Install the printer driver Installing the Printer Driver 4 Register a paper size Registering the Paper Size 5 Check the printing...

Страница 98: ...sing the printer already 1 Connect the cables and cords Connect the removed cables and cords again 2 Load paper Drawer 2 Loading Paper in the Paper Drawer 3 Register a paper size Drawer 2 Registering the Paper Size Paper drawer of the paper feeder 㻥㻤㻌㻛㻌㻠㻡㻞 ...

Страница 99: ...07K5 024 Installing the Printer Driver Uninstalling the Printer Driver Driver Installation 㻥㻥㻌㻛㻌㻠㻡㻞 ...

Страница 100: ...lied CD ROM CD ROM Setup The e Manual is also installed simultaneously Easy Installation Plug and Play Detects the printer with Plug and Play and installs the printer driver by selecting it manually from the supplied CD ROM Installing with Plug and Play If You Are Connecting the Printer and Computer with a LAN Cable There are the following two ways to install the printer driver The procedures for ...

Страница 101: ...nstallation is complete configure the print server Configuring the Print Server If your computer is a client computer There are the following two ways to install the printer driver Local Installation You can install the printer driver using the supplied CD ROM Easy Installation Download Installation You can install the printer driver without using the supplied CD ROM but by downloading the printer...

Страница 102: ...ndows as a user with administrative rights If a wizard and so on appear through the Plug and Play automatic setup USB connection Click Cancel turn OFF the printer and then use this procedure to install the printer driver 3 Insert the supplied CD ROM User Software into the CD ROM drive of your computer 4 Click Easy Installation Easy Installation 㻝㻜㻞㻌㻛㻌㻠㻡㻞 ...

Страница 103: ...tions Various Information for Windows If the AutoPlay dialog box appears Click Run AUTORUN EXE If the User Account Control dialog box appears Click Continue or Yes 5 Click Install 6 Read the contents of License Agreement and then click Yes 㻝㻜㻟㻌㻛㻌㻠㻡㻞 ...

Страница 104: ...ent procedure varies depending on your environment See the appropriate procedure according to your environment Easy Installation USB Connection Easy Installation LAN Connection Easy Installation via the Print Server 㻝㻜㻠㻌㻛㻌㻠㻡㻞 ...

Страница 105: ...inter operation if the printer is connected using unidirectional print servers USB hubs or switching devices NOTE About the USB cable This printer does not come with a USB cable Have an appropriate one available for the computer you are using Use a USB cable with the following symbol 1 Make sure that the printer and computer are OFF 2 Connect the USB cable Flat end A Connects to a USB port on your...

Страница 106: ...ble for the LAN If you want to connect the printer to a 100BASE TX Ethernet network all the devices to be connected to the LAN hub LAN cable and network board for computer must support 100BASE TX For more details contact your local authorized Canon dealer 1 Connect the LAN cable 2 Turn the printer ON 3 Make sure that the LNK indicator A on the network interface is on If you are using 100BASE TX th...

Страница 107: ...orange is on The hardware of the printer is in an abnormal condition Contact your local authorized Canon dealer to request service When all the indicators are off All the Indicators on the Network Interface Are Off 㻝㻜㻣㻌㻛㻌㻠㻡㻞 ...

Страница 108: ...ct the method of installation 1 Select Install with USB Connection 2 Click Next If a message that prompts you to restart the computer appears Restart the computer and install the printer driver again 2 Click Yes 3 When the following screen appears turn the printer ON ĺ The installation starts Easy Installation USB Connection 㻝㻜㻤㻌㻛㻌㻠㻡㻞 ...

Страница 109: ...tomatically recognized The Printer Is Not Recognized Automatically Easy Installation 4 Confirm that appears in Install and then click Next If appears You Cannot Install the Printer Driver 5 Restart your computer 1 Select the Restart Computer Now Recommended check box 2 Click Restart When the following screen appears you can remove the CD ROM 㻝㻜㻥㻌㻛㻌㻠㻡㻞 ...

Страница 110: ...When the installation is complete an icon and folder for this printer will be created After Installation 㻝㻝㻜㻌㻛㻌㻠㻡㻞 ...

Страница 111: ...pears click Yes 2 Operation procedure varies depending on the content displayed in Product Name in Printer List If LBP6310 is displayed in Product Name If Unknown Device is displayed in Product Name If no devices are displayed in Printer List The Printer Cannot Be Searched for Auto Setup If LBP6310 is displayed in Product Name 1 Add LBP6310 to Printer List for Driver Installation 1 Select LBP6310 ...

Страница 112: ...ddress of the printer 2 Click OK Get automatically Obtains an IP address using DHCP The DHCP server needs to be running Use the following IP address Allows you to set the IP address directly Enter the IP address by separating the numbers with a period for example AAA BBB CCC DDD 3 Add LBP6310 to Printer List for Driver Installation 1 Select LBP6310 2 Click Add 4 Proceed to Step 3 㻝㻝㻞㻌㻛㻌㻠㻡㻞 ...

Страница 113: ...heck box if you want to use this printer as the default printer Use as Shared Printer Select the check box to use the computer on which the printer driver is being installed as the print server For details on the printer sharing print server environment see If You Use the Printer in the Print Server Environment Shared Name Change the shared name as needed NOTE If you selected the Use as Shared Pri...

Страница 114: ...2 Select an operating system displayed in Drivers to Add 3 Click OK 5 Click Start 6 Click Yes ĺ The installation starts Wait until the following screen disappears It may take a long time to install the printer driver 㻝㻝㻠㻌㻛㻌㻠㻡㻞 ...

Страница 115: ...e Printer Driver 8 Restart your computer 1 Select the Restart Computer Now Recommended check box 2 Click Restart When the following screen appears you can remove the CD ROM When the installation is complete an icon and folder for this printer will be created After Installation 㻝㻝㻡㻌㻛㻌㻠㻡㻞 ...

Страница 116: ...If you want to change the network settings for the printer see Changing the Network Settings for the Printer 㻝㻝㻢㻌㻛㻌㻠㻡㻞 ...

Страница 117: ...ion method the procedure before Step 1 see Easy Installation 1 Select the method of installation 1 Select Manually Set Port to Install 2 Click Next 2 Click Add Port 3 Select a port to be added 1 Select Network 2 Click OK Easy Installation via the Print Server 㻝㻝㻣㻌㻛㻌㻠㻡㻞 ...

Страница 118: ...hared printer on the print server 2 Click OK 5 Select whether or not to use the printer as the default printer 1 If you want to use the printer as the default printer select the Set as Default check box 2 Click Next 6 Click Start 㻝㻝㻤㻌㻛㻌㻠㻡㻞 ...

Страница 119: ...tion starts Wait until the following screen disappears It may take a long time to install the printer driver If the Printers dialog box appears Click Install driver 8 Confirm that appears in Install and then click Next 㻝㻝㻥㻌㻛㻌㻠㻡㻞 ...

Страница 120: ...your computer 1 Select the Restart Computer Now Recommended check box 2 Click Restart When the following screen appears you can remove the CD ROM When the installation is complete an icon and folder for this printer will be created After Installation 㻝㻞㻜㻌㻛㻌㻠㻡㻞 ...

Страница 121: ...rograms or Programs under the Start menu Canon Printer Uninstaller Canon LBP6310 Uninstaller Use this option when uninstalling the printer driver Desktop LBP6310 e Manual This icon does not appear if you install the printer driver using a method other than Easy Installation All Programs or Programs under the Start menu Canon LBP6310 LBP6310 e Manual This icon does not appear if you install the pri...

Страница 122: ...See You Cannot Install the Printer Driver and install the printer driver again 㻝㻞㻞㻌㻛㻌㻠㻡㻞 ...

Страница 123: ...gh the Plug and Play automatic setup If the printer driver is installed automatically If you installed the printer driver for this printer previously the driver is installed automatically If you want to update the printer driver or want to install it manually install the printer driver after uninstalling it once Uninstalling the Printer Driver If the following screen appears Installing with Plug a...

Страница 124: ...river is included Select one of the following file and folders For a 32 bit operating system Select the folders in the supplied CD ROM English 32bit Driver For a 64 bit operating system Select the folders in the supplied CD ROM English x64 Driver If you are not sure whether you are using 32 bit Windows Vista 7 Server 2008 or 64 bit Windows Vista 7 Server 2008 see Basic Operations Various Informati...

Страница 125: ...When the installation is complete an icon and folder for this printer will be created After Installation 㻝㻞㻡㻌㻛㻌㻠㻡㻞 ...

Страница 126: ... as a user with administrative rights 3 Close the following files and programs if open Help files Printer Status Window Control Panel Other applications 4 Start the uninstaller URP WKH 6WDUW PHQX VHOHFW OO 3URJUDPV RU 3URJUDPV ĺ DQRQ 3ULQWHU 8QLQVWDOOHU ĺ DQRQ 3 8QLQVWDOOHU If the uninstaller is not found in the Start menu Starting the Uninstaller from Control Panel If the User Account Control dia...

Страница 127: ... Click Delete 6 Click Yes ĺ The uninstallation starts Wait until the following screen disappears It may take a long time to uninstall the printer driver When the following screen appears click Yes or Yes To All 7 Click Exit 㻝㻞㻣㻌㻛㻌㻠㻡㻞 ...

Страница 128: ...r is displayed 1 Right click the icon and then select Delete or Remove device from the pop up menu 2 Click Yes 10 Restart Windows Next uninstall the e Manual using the following procedure If you did not install the e Manual you do not need to perform the following procedure 11 Insert the supplied CD ROM User Software into the CD ROM drive of your computer 㻝㻞㻤㻌㻛㻌㻠㻡㻞 ...

Страница 129: ...ove screen does not appear Basic Operations Various Information for Windows If the AutoPlay dialog box appears Click Run AUTORUN EXE If the User Account Control dialog box appears Click Continue or Yes 13 Click Start in Manual Uninstaller 㻝㻞㻥㻌㻛㻌㻠㻡㻞 ...

Страница 130: ...nstallation Please wait a moment until the uninstallation is complete It may take a long time to uninstall the printer driver 15 Click Exit 16 Click Back 17 Click Exit When the following screen appears you can remove the CD ROM 㻝㻟㻜㻌㻛㻌㻠㻡㻞 ...

Страница 131: ...㻝㻟㻝㻌㻛㻌㻠㻡㻞 ...

Страница 132: ...QHO ĺ GG RU 5HPRYH 3URJUDPV From the Start menu select Control Panel and then double click Programs and Features 2 Perform the following procedure 1 Select Canon LBP6310 2 Click Change Remove 1 Select Canon LBP6310 2 Click Uninstall Change If Canon LBP6310 is not listed Starting the Uninstaller from the CD ROM If the User Account Control dialog box appears Click Continue or Yes Starting the Uninst...

Страница 133: ...Paper Printable Area Paper Loading and Output Loading Paper in the Paper Drawer Loading Paper in the Multi purpose Tray Basic Printing Procedure How to Use Help Canceling a Job Checking the Printer Status Basic Printer Operations 㻝㻟㻟㻌㻛㻌㻠㻡㻞 ...

Страница 134: ...er 2 60 to 90 g m2 Plain Paper Default Plain Paper L 3 A4 B5 A5 A6 Legal Letter Executive 16K Custom size paper 4 5 5 Heavy paper 91 to 150 g m2 Heavy Paper 1 A4 6 6 6 B5 6 6 A5 6 6 A6 6 6 Legal 6 6 6 Letter 6 6 6 Executive 6 6 16K 6 6 Custom size paper 4 5 6 5 6 Heavy paper 151 to 163 g m2 Heavy Paper 2 A4 B5 A5 A6 Legal Letter Executive 16K Custom size paper 4 Transparency Transparency A4 Letter...

Страница 135: ... mm long 5 You can load custom size paper that is 105 0 to 215 9 mm wide and 148 0 to 355 6 mm long 6 You can use heavy paper of up to 120 g m2 IMPORTANT About print speed The print speed may drop depending on the paper settings for the size type orientation and number of copies When continuously printing paper whose length is 269 4 mm or less the print speed may drop gradually Precautions for pap...

Страница 136: ...with an extremely rough or smooth surface Paper that is thicker or thinner than the specified usable paper Usable Paper IMPORTANT About paper with staples clips ribbons or tape This kind of paper may result in the printer malfunction or damage to the printer About paper that contains ink that melts burns evaporates or emits harmful gases at or lower than the heating temperature of the fixing unit ...

Страница 137: ...r is evaporating due to the heat generated when toner fixes this is not a malfunction This is likely to occur when the room temperature is low Storing Printouts When handling or storing paper printed by this printer be careful of the following points How to store printouts Store paper on a flat surface Avoid storing printouts in folders made of PVC material as this may cause the toner to melt and ...

Страница 138: ...Heavy Paper Transparency Label Index Card You cannot print on any area within 5 mm of the edges of paper Envelope This printer can print on the following area You may have to change the printable area before printing depending on the application you use IMPORTANT When printing on envelopes We recommended that you configure the document to print the data smaller than the printable area When printin...

Страница 139: ...over as shown in the figure Precautions for Output Trays Pay attention to the following points when handling the output trays See Important Safety Instructions also When performing 2 sided printing close the output selection cover When outputting paper to the sub output tray you cannot perform 2 sided printing During 2 sided printing do not touch the paper until it is output to the output tray com...

Страница 140: ...m2 Approx 25 sheets Approx 20 sheets 1 sheet Transparency Approx 15 sheets 1 sheet 1 sheet Label Approx 20 sheets Approx 10 sheets 1 sheet Index Card Approx 15 sheets Approx 10 sheets 1 sheet Envelope Approx 5 sheets Approx 10 sheets 1 sheet 1 Actual paper capacity varies depending on the installation environment and paper type to be used 2 If the paper size is smaller than A5 the paper capacity i...

Страница 141: ...Paper Load paper in Drawer 2 optional in the same manner as you load paper in Drawer 1 Before loading paper see Attention Paper Drawer 1 Pull out the paper drawer 2 Slide the paper guides to the position of the size of the paper to be loaded While holding the lock release lever A adjust the guides Align the position of B with the size mark of the paper to be loaded When loading A6 paper Slide the ...

Страница 142: ...orientation 4 Hold down the paper then set it under the hooks A on the paper guides IMPORTANT Be sure to align the paper guides with the paper If the paper guides are too loose or too tight this may result in misfeeds or paper jams 5 Make sure that the paper stack does not exceed the load limit mark lines A or B A Paper larger than A5 B A6 paper Be sure that the paper stack does not exceed the loa...

Страница 143: ...lines this may result in misfeeds 6 Set the paper drawer in the printer Next register a paper size Registering the Paper Size 㻝㻠㻟㻌㻛㻌㻠㻡㻞 ...

Страница 144: ...rom Drawer 2 optional Make sure that Drawer 1 is set before printing from Drawer 2 If you print from Drawer 2 when Drawer 1 is not set this will cause paper jams Do not pull out the paper drawer during printing This may result in paper jams or damage to the printer When using paper that is poorly cut Multiple sheets of paper may be fed at a time In this case fan the paper thoroughly and then align...

Страница 145: ...y while one of the following messages is displayed Specified Paper Different from Set Paper Out of Paper 1 Click in the Windows task tray and then select the printer name 2 3 Register the paper size 1 Select the size of the paper loaded in the paper drawer Drawer 1 The paper drawer supplied with the printer unit Drawer 2 The paper drawer of the optional paper feeder 2 Click OK For details on the b...

Страница 146: ... Registering a Custom Paper Size 㻝㻠㻢㻌㻛㻌㻠㻡㻞 ...

Страница 147: ...ti purpose tray and then pull out the auxiliary tray When loading long size paper Open the tray extension also 2 Slide the paper guides a little wider than the actual paper width 3 Gently load paper with the printing side facing up until it touches the back of the tray Be sure to load paper in portrait orientation Loading Paper in the Multi purpose Tray 㻝㻠㻣㻌㻛㻌㻠㻡㻞 ...

Страница 148: ...er Loading Orientation and load the paper in the correct orientation 4 Align the paper guides with the width of the paper IMPORTANT Be sure to align the paper guides with the width of the paper If the paper guides are too loose or too tight this may result in misfeeds or paper jams 5 Be sure that the paper stack is loaded under the load limit guides A 㻝㻠㻤㻌㻛㻌㻠㻡㻞 ...

Страница 149: ...ls on the basic printing procedure see Basic Printing Procedure If printing custom size paper you need to register the custom paper size in the printer driver previously Registering a Custom Paper Size 㻝㻠㻥㻌㻛㻌㻠㻡㻞 ...

Страница 150: ...oading it in the printer Do not touch the paper in the multi purpose tray or pull it out during printing This may result in paper jams or damage to the printer When using paper that is poorly cut Multiple sheets of paper may be fed at a time In this case fan the paper thoroughly and then align the edges of the stack properly on a hard flat surface Also do not press the top of or apply excessive fo...

Страница 151: ...ntion Basic Printing 1 Load paper in the paper drawer or multi purpose tray Paper Loading and Output 2 Open the PDF file to be printed using Adobe Reader 3 Select Print from the File menu 4 Configure the printing preferences 1 Select this printer You can change the printer name in the printer folder Basic Operations Various Information for Windows 2 Configure the printing preferences Basic Printin...

Страница 152: ...5 Click Properties 6 Specify the setting for Print Style 1 Display the Finishing sheet 2 Select 2 sided Printing or 1 sided Printing 㻝㻡㻞㻌㻛㻌㻠㻡㻞 ...

Страница 153: ...ly reduced or enlarged to fit on the page 8 Specify the settings for Paper Source and Paper Type 1 Display the Paper Source sheet 2 Set the paper source you want to use 3 Select the type of the paper loaded in the paper source Specify the setting according to the paper type as follows Paper Type Setting for Paper Type Plain paper 60 to 90 g m2 Plain Paper Default Plain Paper L Heavy paper 91 to 15...

Страница 154: ...annot print from the paper drawer Paper is fed from the multi purpose tray 9 Specify the other printing preferences as needed Useful Printing Functions describes the printing procedures that use the various printing functions Make full use of the functions of this printer NOTE For details on the settings See Help How to Use Help 10 Confirm the settings then click OK ĺ The Print dialog box reappear...

Страница 155: ...nter Driver When printing on custom size paper You need to register the custom paper size in the printer driver previously Registering a Custom Paper Size About the contents specified in Basic Printing Procedure The specified settings apply only to data to be printed from the same application Exiting the application resets the changed settings to the default settings For details on the procedure f...

Страница 156: ...ist and then double click the option you would like information on Search sheet Enter an arbitrary word or phrase to search the topic Enter the word or phrase in Type in the word s to search for and click List Topics Double click a sheet dialog box and others for your desired option in the listed topics 2 Topic pane The setting list are displayed for each sheet or dialog box Click the desired opti...

Страница 157: ...㻝㻡㻣㻌㻛㻌㻠㻡㻞 ...

Страница 158: ...l it Canceling a Print Job Using the Printer Status Window You can cancel a job currently being printed with one click If you want to cancel another user s job If you cannot print because an error is occurring with a print job from another user use the Cancel Job key to cancel the job Canceling a Print Job Using the Cancel Job Key If you are connecting the printer and computer with a LAN cable you...

Страница 159: ...ndows 2 Double click the icon for this printer 2 Right click the job that you want to cancel then select Cancel from the pop up menu If a print job does not appear Another user s job is not displayed For the print server environment all print jobs are displayed on the print server If an error is occurring with a print job from another user use the Cancel Job key to cancel the job Canceling a Print...

Страница 160: ...NOTE For details on the print queue See Windows Help 3 Clicking Yes cancels the print job If you cannot cancel a job You cannot cancel the job whose pages are in the process of printing 㻝㻢㻜㻌㻛㻌㻠㻡㻞 ...

Страница 161: ...b whose pages are in the process of printing You cannot cancel another user s job For the print server environment you can cancel print jobs on the print server If an error is occurring with a print job from another user use the Cancel Job key to cancel the job Canceling a Print Job Using the Cancel Job Key Canceling a Print Job Using the Printer Status Window 㻝㻢㻝㻌㻛㻌㻠㻡㻞 ...

Страница 162: ...be canceled Depending on the settings for the Settings of the Cancel Job Key dialog box in the Printer Status Window you may not be able to cancel a job NOTE The meanings of the Cancel Job indicator orange While the key is being pressed On While a job is being canceled Blinking Specifying the types of jobs which the Cancel Job key can cancel You can specify the types of jobs which can be canceled ...

Страница 163: ... status with messages animations and icons If you find any problems with the printer check the Printer Status Window NOTE If you are connecting the printer and computer with a LAN cable You can also check the printer status in the Status page in the Remote UI Screen Layout of the Remote UI Details on Each Setting Page Checking the Printer Status 㻝㻢㻟㻌㻛㻌㻠㻡㻞 ...

Страница 164: ...ting on Plain Paper Heavy Paper or Index Card Printing on Transparencies Printing on Labels Printing on Envelopes Printing on Custom Size Paper Paper Loading Orientation Printing on Various Types of Paper 㻝㻢㻠㻌㻛㻌㻠㻡㻞 ...

Страница 165: ...om size paper See Printing on Custom Size Paper Loading paper The paper which you can load in the paper drawer or multi purpose tray varies depending on the paper type Available Unavailable Paper Type Paper Drawer Multi purpose Tray Plain paper 60 to 90 g m2 Heavy paper 91 to 120 g m2 Heavy paper 121 to 163 g m2 Index Card Loading Paper in the Paper Drawer Loading Paper in the Multi purpose Tray P...

Страница 166: ... enough multiple sheets of paper may be fed at once causing paper jams When fanning or aligning the transparencies try to hold the edges to avoid touching the printing surface Take care not to mark or stain the printing surface of the transparencies with fingerprints dust or oil This may result in poor print quality Printing from an application After loading transparencies perform printing Basic P...

Страница 167: ... You can load labels only in the multi purpose tray Loading Paper in the Multi purpose Tray Precautions when loading labels Fan the labels thoroughly and then align the edges before loading them If they are not fanned enough multiple sheets of paper may be fed at once causing paper jams Take care not to mark or stain the printing surface of the labels with fingerprints dust or oil This may result ...

Страница 168: ...s Envelopes with address windows Envelopes with adhesive on the surface Wrinkled or creased envelopes Poorly manufactured envelopes in which the glued parts are uneven Irregularly shaped envelopes Loading envelopes You can load envelopes only in the multi purpose tray Loading Paper in the Multi purpose Tray Precautions when loading envelopes Load envelopes in the correct orientation as follows Fee...

Страница 169: ...ls as shown in the figure 3 Align the edges of the envelopes on a flat surface Printing from an application After loading envelopes perform printing Basic Printing Procedure Do not print on the reverse side glued side of envelopes The print speed drops when printing on envelopes When envelopes are printed they may be creased If the output envelopes curl Switch the output tray to the sub output tra...

Страница 170: ...paper type Available Unavailable Paper Type Paper Drawer Multi purpose Tray Plain paper 60 to 90 g m2 Heavy paper 91 to 120 g m2 Heavy paper 121 to 163 g m2 Loading Custom Size Paper Registering a custom paper size If printing custom size paper you need to register the custom paper size in the printer driver previously Registering a Custom Paper Size Printing from an application After loading cust...

Страница 171: ...ad paper in Drawer 2 optional in the same manner as you load paper in Drawer 1 Before loading paper see Attention Paper Drawer 1 Pull out the paper drawer 2 Slide the paper guides a little wider and longer than the actual paper size While holding the lock release lever A adjust the guides 3 Load the paper with the printing side facing down so that the edges of the stacked paper are aligned with th...

Страница 172: ...the paper guide at the rear center with the paper IMPORTANT Be sure to align the paper guides with the paper If the paper guides are too loose or too tight this may result in misfeeds or paper jams 5 Make sure that the paper stack does not exceed the load limit mark lines A or B A Paper larger than A5 B Paper smaller than A5 Be sure that the paper stack does not exceed the load limit mark lines If...

Страница 173: ...6 Set the paper drawer in the printer Next register a paper size Registering the Paper Size 㻝㻣㻟㻌㻛㻌㻠㻡㻞 ...

Страница 174: ...dows 2 Right click the icon for this printer then select Printing Preferences from the pop up menu 3 Display the Custom Paper Size Settings dialog box 1 Display the Page Setup sheet 2 Click Custom Paper Size 4 Specify the custom paper size Registering a Custom Paper Size 㻝㻣㻠㻌㻛㻌㻠㻡㻞 ...

Страница 175: ...ze Specify the height and width of the custom paper size Height Width Specify the custom paper size in portrait orientation Height Width within user definable sizes 5 Register the custom paper size 1 Click Register The number of custom paper sizes that you can add depends on the system environment 2 Confirm that the registered custom paper size is added to Paper List 3 Click OK 㻝㻣㻡㻌㻛㻌㻠㻡㻞 ...

Страница 176: ...er 1 sided printing With the printing side facing down With the printing side facing down Paper drawer 2 sided printing With the front side facing up With the front side facing up Multi purpose tray 1 sided printing With the printing side facing up With the printing side facing up Multi purpose tray 2 sided printing With the front side facing down With the front side facing down Paper Loading Orie...

Страница 177: ...to Be Printed Watermark Printing Printing Borders the Printing Date and so on Combining Data before Printing Changing the Output Method According to the Print Data or Number of Copies Adjusting the Image Quality or Grayscale Registering the Printing Preferences Changing the Default Values for Printing Preferences Saving Frequently Used Printing Preferences Adding Editing Deleting a Profile Useful ...

Страница 178: ...n the application 2 Select this printer and then click Properties or Preferences Displaying from the printer folder Basic Operations Various Information for Windows Printing preferences screen You can change the default values for printing preferences which apply to all data How to display Right click the icon for this printer then select Printing Preferences from the pop up menu Printer propertie...

Страница 179: ... by Windows The following sheets are displayed by Windows For more details see Windows Help General sheet Sharing sheet Ports sheet Advanced sheet Color Management sheet Security sheet About the printer driver The functions of the printer driver may be changed due to upgrade 㻝㻣㻥㻌㻛㻌㻠㻡㻞 ...

Страница 180: ... performing 2 sided printing Paper Loading and Output Printing on the reverse side of paper that was previously printed Performing 2 sided printing manually This printer enables you to perform 2 sided printing manually by inserting the reverse side of the paper that was previously printed even if the paper cannot be used for 2 sided printing When printing on the reverse side of paper that was prev...

Страница 181: ... 3 Close the duplex unit cover 2 Display the setting screen of the printer driver Displaying the Setting Screen 3 Specify the setting for Print Style 1 Display the Finishing sheet 2 Select 1 sided Printing or 2 sided Printing NOTE Using Preview to specify the setting You can also specify a print style by clicking the button in Preview 㻝㻤㻝㻌㻛㻌㻠㻡㻞 ...

Страница 182: ... 1 sided Printing 2 sided Printing 4 Click OK For details on the basic printing procedure see Basic Printing Procedure 㻝㻤㻞㻌㻛㻌㻠㻡㻞 ...

Страница 183: ...case where the last page is 1 sided printing In cases such as where the last page for the 2 sided printing is 1 sided printing specifying the following setting allows you to print faster than normal 2 sided printing 1 Click Advanced Settings in the Finishing sheet 2 Set Print Last Page in 1 sided Mode when 2 sided Printing is Set to On However when performing 2 sided printing on punched paper or p...

Страница 184: ...ng to the paper size 1 Display the Page Setup sheet 2 Select the page size of the document created by an application 3 Select the size of the paper loaded in the paper source If you select a different paper size from Page Size the print data will be automatically enlarged or reduced When printing with arbitrary scaling 1 Display the Page Setup sheet 2 Select the Manual Scaling check box 3 Specify ...

Страница 185: ...3 Click OK For details on the basic printing procedure see Basic Printing Procedure 㻝㻤㻡㻌㻛㻌㻠㻡㻞 ...

Страница 186: ... a document as a collated set of copies Do not use this function when printing multiple pages on one sheet The document may not be printed properly 1 Display the setting screen of the printer driver Displaying the Setting Screen 2 Specify the setting for Page Layout 1 Display the Page Setup sheet 2 Select the number of pages to be printed on one sheet If you cannot specify the setting The Printer ...

Страница 187: ...specify a page layout by repeatedly left clicking within the document image or right clicking on Preview when is selected 3 Specify the page order layout on paper 4 Click OK For details on the basic printing procedure see Basic Printing Procedure 㻝㻤㻣㻌㻛㻌㻠㻡㻞 ...

Страница 188: ...together 1 Display the setting screen of the printer driver Displaying the Setting Screen 2 Specify the setting for poster printing 1 Display the Page Setup sheet 2 Select Poster N x N N 2 3 4 from Page Layout If you cannot specify the setting The Printer Driver Settings Cannot Be Changed 3 Click OK Printing an Image Larger than A4 Poster Printing 㻝㻤㻤㻌㻛㻌㻠㻡㻞 ...

Страница 189: ...For details on the basic printing procedure see Basic Printing Procedure 㻝㻤㻥㻌㻛㻌㻠㻡㻞 ...

Страница 190: ...t is output completely The paper is first output partially after the front side is printed and then it is fed again to be printed on the reverse side Be sure to close the output selection cover before performing booklet printing Paper Loading and Output 1 Set the paper size switch lever to the appropriate position according to the paper size for booklet printing If the lever is not set to the appr...

Страница 191: ...1 Display the Finishing sheet 2 Select Booklet Printing If you cannot specify the setting The Printer Driver Settings Cannot Be Changed 4 Specify the detailed settings for booklet printing as needed 1 Click Booklet 2 Specify each setting For more details on each setting see Help How to Use Help 3 Click OK Then the Finishing sheet reappears 㻝㻥㻝㻌㻛㻌㻠㻡㻞 ...

Страница 192: ...5 Click OK For details on the basic printing procedure see Basic Printing Procedure 㻝㻥㻞㻌㻛㻌㻠㻡㻞 ...

Страница 193: ...river Displaying the Setting Screen 2 Select a watermark 1 Display the Page Setup sheet 2 Select the Watermark check box 3 Select the character string to be printed as a watermark When adding editing or deleting a watermark see Adding Editing or Deleting a Watermark If you cannot select the Watermark check box The Printer Driver Settings Cannot Be Changed 3 Adding a Watermark to a Document to Be P...

Страница 194: ...Click OK For details on the basic printing procedure see Basic Printing Procedure 㻝㻥㻠㻌㻛㻌㻠㻡㻞 ...

Страница 195: ... 3 Click Edit Watermark If you cannot select the Watermark check box The Printer Driver Settings Cannot Be Changed 2 Add edit or delete a watermark When adding a watermark 1 Click Add 2 Specify each setting For more details on each setting see Help How to Use Help Adding Editing or Deleting a Watermark 㻝㻥㻡㻌㻛㻌㻠㻡㻞 ...

Страница 196: ...the default watermarks For more details on each setting see Help How to Use Help When deleting a watermark 1 Select a watermark you want to delete from Watermark List 2 Click Delete You cannot delete the default watermarks or a watermark which is being selected in the printing preferences dialog box 3 Click Yes 㻝㻥㻢㻌㻛㻌㻠㻡㻞 ...

Страница 197: ...3 Click OK Then the Page Setup sheet reappears 㻝㻥㻣㻌㻛㻌㻠㻡㻞 ...

Страница 198: ...ng Screen 2 Display the Page Options dialog box 1 Display the Page Setup sheet 2 Click Page Options If you cannot click Page Options The Printer Driver Settings Cannot Be Changed 3 Specify the settings for borders the printing date and so on 1 Specify each setting For more details on each setting see Help Printing Borders the Printing Date and so on 㻝㻥㻤㻌㻛㻌㻠㻡㻞 ...

Страница 199: ... How to Use Help 2 Click OK Then the Page Setup sheet reappears 4 Click OK For details on the basic printing procedure see Basic Printing Procedure 㻝㻥㻥㻌㻛㻌㻠㻡㻞 ...

Страница 200: ...ns You can also preview the print data 1 Display the setting screen of the printer driver from an application Displaying the Setting Screen 2 Select Edit and Preview from Output Method If you cannot select Edit and Preview The Printer Driver Settings Cannot Be Changed 3 Click OK 4 Configure the printing preferences Combining Data before Printing 㻞㻜㻜㻌㻛㻌㻠㻡㻞 ...

Страница 201: ...og box when performing printing Set Output Method to Edit and Preview as a default value for printing preferences and then select the Lock check box For details on the procedure for changing the default values for printing preferences see Changing the Default Values for Printing Preferences 6 Repeat Step 1 to 5 to combine the desired data 7 Combine the print data 1 Select the print data that you w...

Страница 202: ...and then click OK 8 Perform the following procedure 1 Enter the name of the combined print data 2 Click Combine 9 Print the combined print data 1 Select the combined print data 2 Select Print from the File menu Then the printer starts printing 㻞㻜㻞㻌㻛㻌㻠㻡㻞 ...

Страница 203: ...d the print data is deleted from Canon PageComposer The print data is also deleted if Canon PageComposer is closed without printing the print data For more details on Canon PageComposer See Help for Canon PageComposer Help is displayed by clicking Help in the Help menu 㻞㻜㻟㻌㻛㻌㻠㻡㻞 ...

Страница 204: ...ientations in the Same Data Printing with a Gutter Selecting the Paper Output Method Printing with the Page 180 Degrees Rotated Selecting Paper for Each Page Changing the Output Method According to the Print Data or Number of Copies 㻞㻜㻠㻌㻛㻌㻠㻡㻞 ...

Страница 205: ...ing the Setting Screen 2 Perform the following procedure 1 Display the Finishing sheet 2 Select the Print in Different Orientations check box 3 Specify the paper alignment and gutter settings for output 1 Click Details 2 Specify each setting For more details on each setting see Help How to Use Help 3 Click OK Then the Finishing sheet reappears Printing Data with Different Orientations in the Same ...

Страница 206: ...4 Click OK For details on the basic printing procedure see Basic Printing Procedure 㻞㻜㻢㻌㻛㻌㻠㻡㻞 ...

Страница 207: ...e the image size to fit the remaining space 1 Display the setting screen of the printer driver Displaying the Setting Screen 2 Perform the following procedure 1 Display the Finishing sheet 2 Select an edge on which the gutter is to be located NOTE Using Preview to specify the setting You can also specify the gutter by clicking an edge of the document image on Preview when is selected 3 Printing wi...

Страница 208: ...utter 2 Specify each setting For more details on each setting see Help How to Use Help 3 Click OK Then the Finishing sheet reappears 4 Click OK For details on the basic printing procedure see Basic Printing Procedure 㻞㻜㻤㻌㻛㻌㻠㻡㻞 ...

Страница 209: ...uts of a complete job are collated 1 Display the setting screen of the printer driver Displaying the Setting Screen 2 Specify the setting for Finishing 1 Display the Finishing sheet 2 Select a paper output method NOTE Using Preview to specify the setting You can also specify a paper output method by right clicking on Preview when is selected Selecting the Paper Output Method 㻞㻜㻥㻌㻛㻌㻠㻡㻞 ...

Страница 210: ...3 Click OK For details on the basic printing procedure see Basic Printing Procedure 㻞㻝㻜㻌㻛㻌㻠㻡㻞 ...

Страница 211: ...hat can be fed only in specific orientations 1 Display the setting screen of the printer driver Displaying the Setting Screen 2 Display the Advanced Settings dialog box 1 Display the Finishing sheet 2 Click Advanced Settings 3 Specify the setting for Rotate Print Data 180 Degrees 1 Select Rotate Print Data 180 Degrees 2 Select On 3 Click OK Then the Finishing sheet reappears Printing with the Page...

Страница 212: ...4 Click OK For details on the basic printing procedure see Basic Printing Procedure 㻞㻝㻞㻌㻛㻌㻠㻡㻞 ...

Страница 213: ...etting for Paper Selection 1 Display the Paper Source sheet 2 Select the pages for which paper is specified Different for Cover and Others can be selected only if Print Style in the Finishing sheet is set to Booklet Printing If you cannot specify the setting The Printer Driver Settings Cannot Be Changed 3 Specify the setting for the paper source to be used for each page Selecting Paper for Each Pa...

Страница 214: ... specify a paper source You can also specify a paper source by clicking each paper source or Auto using Preview when is selected 4 Click OK For details on the basic printing procedure see Basic Printing Procedure 㻞㻝㻠㻌㻛㻌㻠㻡㻞 ...

Страница 215: ...forming Printing Appropriate for Particular Print Data Correcting Rough Textured Images Adjusting the Toner Density Printing with Brightness and Contrast Adjusted Adjusting the Image Quality or Grayscale 㻞㻝㻡㻌㻛㻌㻠㻡㻞 ...

Страница 216: ...f the printer driver Displaying the Setting Screen 2 Specify the setting for Objective 1 Display the Quality sheet 2 Select the appropriate mode for the contents of the document Selecting each mode displays a comment on the mode under the list If you want to change the printing preferences for the selected mode to meet your needs click Advanced Settings 3 Click OK For details on the basic printing...

Страница 217: ...ind of low resolution image data 1 Display the setting screen of the printer driver Displaying the Setting Screen 2 Display the Advanced Settings dialog box 1 Display the Quality sheet 2 Click Advanced Settings 3 Specify the setting for image correction 1 Select Enable Image Correction 2 Select On 3 Click OK Then the Quality sheet reappears Correcting Rough Textured Images 㻞㻝㻣㻌㻛㻌㻠㻡㻞 ...

Страница 218: ...4 Click OK For details on the basic printing procedure see Basic Printing Procedure 㻞㻝㻤㻌㻛㻌㻠㻡㻞 ...

Страница 219: ...ver Displaying the Setting Screen 2 Display the Advanced Settings dialog box 1 Display the Quality sheet 2 Click Advanced Settings 3 Adjust the toner density 1 Select Toner Density 2 Select and adjust the toner density 3 Click OK Then the Quality sheet reappears Adjusting the Toner Density 㻞㻝㻥㻌㻛㻌㻠㻡㻞 ...

Страница 220: ...4 Click OK For details on the basic printing procedure see Basic Printing Procedure 㻞㻞㻜㻌㻛㻌㻠㻡㻞 ...

Страница 221: ...the Grayscale Settings dialog box 1 Display the Quality sheet 2 Select the Manual Grayscale Settings check box 3 Click Grayscale Settings 3 Adjust the brightness and contrast 1 Display the Grayscale Adjustment sheet 2 Adjust the brightness and contrast by dragging the Brightness and Contrast sliders Printing with Brightness and Contrast Adjusted 㻞㻞㻝㻌㻛㻌㻠㻡㻞 ...

Страница 222: ...4 Click OK Then the Quality sheet reappears 5 Click OK For details on the basic printing procedure see Basic Printing Procedure 㻞㻞㻞㻌㻛㻌㻠㻡㻞 ...

Страница 223: ...h time you print by changing the default values for Page Layout Saving Frequently Used Printing Preferences Adding Editing Deleting a Profile You can save frequently used multiple printing preferences as Profiles You can perform printing with the registered settings by only selecting the desired Profile Also some settings that support various jobs are registered as the default Profiles Registering...

Страница 224: ...s from the pop up menu 3 Change the printing preferences in the Page Setup Finishing Paper Source and Quality sheets The settings changed here become the default values For more details on the settings see Help How to Use Help 4 Confirm the settings then click OK ĺ The printer folder reappears Changing the Default Values for Printing Preferences 㻞㻞㻠㻌㻛㻌㻠㻡㻞 ...

Страница 225: ...tup Finishing Paper Source and Quality sheets The contents specified here is registered in Profiles For more details on the settings see Help How to Use Help 3 Click Add If you cannot click Add Profiles Cannot Be Selected or Edited 4 Specify information about a Profile Saving Frequently Used Printing Preferences Adding Editing Deleting a Profile 㻞㻞㻡㻌㻛㻌㻠㻡㻞 ...

Страница 226: ...ting screen of the printer driver reappears Make sure that the name of the added Profile is in Profile For details on the procedure for using a Profile see Selecting a Profile Editing an Added Profile You can change information about an added Profile or export a Profile as a file 1 Display the setting screen of the printer driver Displaying the Setting Screen 2 Click Edit If you cannot click Edit ...

Страница 227: ...he printer driver Displaying the Setting Screen 2 Click Edit If you cannot click Edit Profiles Cannot Be Selected or Edited 3 Delete a Profile 1 Select a Profile you want to delete 2 Click Delete You cannot delete the default Profiles or a Profile which is being selected in the setting screen of the printer driver 㻞㻞㻣㻌㻛㻌㻠㻡㻞 ...

Страница 228: ... 3 Click Yes 4 Click OK ĺ The setting screen of the printer driver reappears 㻞㻞㻤㻌㻛㻌㻠㻡㻞 ...

Страница 229: ...the printer name is changed any added Profiles cannot be used To use the added Profile change the printer name to its previous one If you cannot select a Profile Profiles Cannot Be Selected or Edited 3 Click OK For details on the basic printing procedure see Basic Printing Procedure Selecting a Profile 㻞㻞㻥㻌㻛㻌㻠㻡㻞 ...

Страница 230: ...g the Printer Driver LAN Connection Changing the Network Settings for the Printer When Changing the IP Address Changing the Port If You Use the Printer in the Print Server Environment Configuring the Print Server Installation on Clients Configuring the Network Settings Sharing the Printer 㻞㻟㻜㻌㻛㻌㻠㻡㻞 ...

Страница 231: ...r in the Print Server Environment About the print server environment If you set one of the computers on a network as the print server you can manage the printer efficiently as follows You can manage all the clients jobs on the print server Clients can download and install the printer driver from the print server The CD ROM is not required Checking Your Printing Environment 㻞㻟㻝㻌㻛㻌㻠㻡㻞 ...

Страница 232: ...ver Installing the Printer Driver LAN Connection 2 Change the network settings for the printer as needed Changing the Network Settings for the Printer NOTE If you changed the IP address after installing the printer driver Specify the port to be used again in the printer driver When Changing the IP Address Changing the Port If You Use the Printer by Direct Connection 㻞㻟㻞㻌㻛㻌㻠㻡㻞 ...

Страница 233: ...he printer vary depending on the installation method Auto Setup Performs the following operations which are required for printing all at once Easy Installation Manual Setup Performs the following operations which are required for printing one at a time Setting the IP Address Setting a Port and Installing the Printer Driver Installing the Printer Driver LAN Connection 㻞㻟㻟㻌㻛㻌㻠㻡㻞 ...

Страница 234: ...PING command or the Printer Status Window If you want to set the IP address using NetSpot Device Installer you need to add NetSpot Device Installer to Windows Firewall in advance Perform either of the following procedures Adding NetSpot Device Installer to the Exceptions sheet in the Windows Firewall dialog box Readme of NetSpot Device Installer To display the Readme click in NetSpot Device Instal...

Страница 235: ...he printer is turned ON Connecting the Printer and Computer 2 Turn the computer on and then log on to Windows as a user with administrative rights 3 Insert the supplied CD ROM User Software into the CD ROM drive of your computer 4 Click Additional Software Programs If the above screen does not appear Basic Operations Various Information for Windows If the AutoPlay dialog box appears Click Run AUTO...

Страница 236: ... is set to Not Configured and the device of which Device Name is a MAC address is displayed If any devices in which IP Address is set to 192 168 0 215 are displayed If your case falls within neither of the above cases NOTE MAC address location The MAC address is listed at A on the printer If Status is set to Not Configured and the device of which Device Name is a MAC address is displayed 1 Select ...

Страница 237: ... IP Address Pool see Help of NetSpot Device Installer Help is displayed by clicking Help in the Help menu 6HOHFW 3 GGUHVV 6HWWLQJV ĺ 3 GGUHVV 3RRO IURP WKH HYLFH PHQX When setting an IP address directly 1 6HOHFW 3 GGUHVV 6HWWLQJV ĺ 0DQXDO 6HWWLQJ IURP WKH HYLFH PHQX 2 Enter the IP address of the printer 3 Click OK 3 When the message The device has been reset appears click OK Wait for approximately...

Страница 238: ...lect the device 2 Select Protocol Settings from the Device menu 3 Set the IP address 1 Specify each setting 2 Click OK IP Address Setting with Select the method for setting the IP address Manual Setting Allows you to set the IP address directly The IP address entered in IP Address is set for the printer Auto Detect Obtains an IP address using RARP BOOTP or DHCP RARP Obtains an IP address using RAR...

Страница 239: ...k OK Wait for approximately 20 seconds or longer as is after clicking OK After completing the reset the settings are enabled Next install the printer driver Setting a Port and Installing the Printer Driver If your case falls within neither of the above cases A device on the network may have the same IP address as that set for the printer In this case perform the following procedure 1 Turn OFF the ...

Страница 240: ...yboard IP address Enter the IP address to assign to the printer Specify the address with four numbers from 0 to 255 separated with a period MAC address Enter the MAC address of the printer Separate the number every two digits with a hyphen Input Example arp s 192 168 0 215 00 1E 8F 05 70 31 NOTE MAC address location The MAC address is listed at A on the printer 5 Enter ping IP address l 479 then p...

Страница 241: ...ter The subnet mask is set automatically according to the IP address The gateway address is set to 0 0 0 0 6 Enter exit then press the ENTER key on your keyboard ĺ Command Prompt closes Next install the printer driver Setting a Port and Installing the Printer Driver 㻞㻠㻝㻌㻛㻌㻠㻡㻞 ...

Страница 242: ...t need to enter the password Setting the Administrator Password 3 Click OK IP Address Setting with Select the method for setting the IP address Manual Setting Allows you to set the IP address directly The IP address entered in IP Address is set for the printer Auto Detect Obtains an IP address using RARP BOOTP or DHCP RARP Obtains an IP address using RARP The RARP daemon needs to be running BOOTP ...

Страница 243: ...hen selecting RARP You cannot enter any values in IP Address When selecting BOOTP or DHCP You cannot enter any values in IP Address Subnet Mask and Gateway Address If you cannot use RARP BOOTP or DHCP Specify the settings in Manual Setting 4 Click OK 5 Restart the printer Turn OFF the printer once wait for 10 seconds or longer and then turn it ON After restarting the printer the settings are effec...

Страница 244: ...ista 7 and Server 2008 1 Make sure that the LAN cable is connected properly and the printer is turned ON Connecting the Printer and Computer 2 Turn the computer on and then log on to Windows as a user with administrative rights 3 Open the printer folder Basic Operations Various Information for Windows 4 Click Add a printer 5 Click Add a local printer Setting a Port and Installing the Printer Drive...

Страница 245: ...ss or name of the printer 1 Select Autodetect or TCP IP Device 2 Enter the IP address or name of the printer in Hostname or IP address The DNS name to be registered on the DNS server up to 78 characters 3 Clear the Query the printer and automatically select the driver to use check box 4 Click Next 㻞㻠㻡㻌㻛㻌㻠㻡㻞 ...

Страница 246: ...etwork administrator If the printer is not detected Follow the on screen instructions and search again for the printer or see Basic Operations Various Information for Windows and specify Device Type 8 Click Have Disk 9 Insert the supplied CD ROM User Software into the CD ROM drive of your computer and then click Browse If CD ROM Setup appears click Exit 10 Open the folder in which the printer driv...

Страница 247: ...rating system Open the folders in the supplied CD ROM English x64 Driver If you are not sure whether you are using a 32 bit operating system or 64 bit operating system Basic Operations Various Information for Windows 11 Open the INF file 1 Select the INF file 2 Click Open 12 Click OK 13 Click Next 㻞㻠㻣㻌㻛㻌㻠㻡㻞 ...

Страница 248: ...elect whether or not to use the printer as the default printer Windows Vista and Server 2008 2 Click Next ĺ The installation starts Wait until the following screen disappears If the User Account Control dialog box appears Click Continue or Yes 15 When the following screen appears select whether or not to share the printer 㻞㻠㻤㻌㻛㻌㻠㻡㻞 ...

Страница 249: ...ded 2 Click Next 16 Click Finish If you want to print a test page click Print a test page When Set as the default printer is displayed select whether or not to use the printer as the default printer Windows 7 and Server 2008 R2 When the following screen appears you can remove the CD ROM When the installation is complete an icon and folder for this printer will be created After Installation If you ...

Страница 250: ...ing the Printer and Computer 2 Turn the computer on and then log on to Windows as a user with administrative rights 3 Open the printer folder Basic Operations Various Information for Windows 4 Display Add Printer Wizard Double click Add Printer Click Add a printer 5 Click Next 6 㻞㻡㻜㻌㻛㻌㻠㻡㻞 ...

Страница 251: ...ect Local printer attached to this computer 2 Clear the Automatically detect and install my Plug and Play printer check box 3 Click Next 7 Create a port 1 Select Create a new port 2 Select Standard TCP IP Port 3 Click Next 8 Click Next 㻞㻡㻝㻌㻛㻌㻠㻡㻞 ...

Страница 252: ...lue to be entered in Printer Name or IP Address The value to be entered varies depending on how the IP address of the printer was set For more details see Values for Setting a Port or ask your network administrator If the printer is not detected Follow the on screen instructions and search again for the printer or see Basic Operations Various Information for Windows and specify Device Type 10 Clic...

Страница 253: ...Setup appears click Exit 13 Open the folder in which the printer driver is included 32 bit operating system Open the folders in the supplied CD ROM English 32bit Driver 64 bit operating system Open the folders in the supplied CD ROM English x64 Driver 14 Open the INF file 1 Select the INF file 2 Click Open 㻞㻡㻟㻌㻛㻌㻠㻡㻞 ...

Страница 254: ...ext 17 Specify the printer name 1 Enter a new name if you want to change the printer name When the message Do you want to use this printer as the default printer appears select Yes or No 2 Click Next 18 Click Next 㻞㻡㻠㻌㻛㻌㻠㻡㻞 ...

Страница 255: ...ment see If You Use the Printer in the Print Server Environment Perform the following procedure 1 Select Share name and enter a name for the shared printer 2 Click Next 3 The window for entering Location and Comment is displayed Enter them as needed 4 Click Next 19 Select whether to print a test page 1 Select whether to print a test page 2 Click Next 20 Click Finish 㻞㻡㻡㻌㻛㻌㻠㻡㻞 ...

Страница 256: ... following screen disappears you can remove the CD ROM When the installation is complete an icon and folder for this printer will be created After Installation If you want to change the network settings for the printer see Changing the Network Settings for the Printer 㻞㻡㻢㻌㻛㻌㻠㻡㻞 ...

Страница 257: ... FTP Client Initializing Using NetSpot Device Installer Initializing Using the Reset Button Network Setting Items NOTE When setting the items for the printer management such as setting the administrator password Managing the Printer When setting the items for security such as restricting the users who can print Security Settings Changing the Network Settings for the Printer 㻞㻡㻣㻌㻛㻌㻠㻡㻞 ...

Страница 258: ... Prompt Setting the IP Address Using NetSpot Device Installer You can specify the settings using the Canon software NetSpot Device Installer in the supplied CD ROM If you want to configure the settings such as the DNS server settings use the Remote UI or FTP Client Setting the IP Address Using the Printer Status Window You can configure the basic protocol settings using the Printer Status Window I...

Страница 259: ...s being used on the TCP IP network Gateway Address Enter the gateway address that is being used on the TCP IP network DHCP Select whether to set the IP address using DHCP BOOTP Select whether to set the IP address using BOOTP RARP Select whether to set the IP address using RARP IMPORTANT For details on the procedure for setting a port when using DHCP BOOTP or RARP See Values for Setting a Port or ...

Страница 260: ...ame to set the SNTP client function When you specify the SNTP server name Configuring the SNTP Settings Notifying the printer of the Time via an SNTP Server Proceed to Step 5 if you do not specify the settings for the other options WINS Settings If you want to use WINS Resolution 1 Set WINS Resolution to On 2 Enter the IP address of the WINS server in WINS Server Address 3 Enter the host name to b...

Страница 261: ...o set daylight saving time set Daylight Saving Time to On If the DNS server is not configured 1 Enter the IP address of the SNTP server in SNTP Server Name 2 Select Time Zone 3 To set daylight saving time set Daylight Saving Time to On If an SNTP server is not available You can notify the printer of the time set on the computer using the following procedure 1 Click in the Windows task tray and the...

Страница 262: ...to Step 5 if you do not specify the settings for the other options Multicast Discovery Settings If you want to set the printer so that it responds to searches that use the multicast discovery function 1 Set Response to On 2 In Scope Name enter the scope name to be used when searching for certain devices from utility software such as NetSpot Device Installer by multicast If you want to set the prin...

Страница 263: ...6 Click Reset After completing the reset the settings are effective 㻞㻢㻟㻌㻛㻌㻠㻡㻞 ...

Страница 264: ...s is because a different IP address from the one that was used is assigned When using DHCP consult your network administrator and perform either of the following settings Specifying the DNS Dynamic Update function Specifying the settings so that the same IP address is always assigned when the printer starts When configuring the DNS Settings IMPORTANT DNS Dynamic Update DNS Dynamic Update is a func...

Страница 265: ...transmission speed and transfer mode by accessing the printer from a Web browser via a network NOTE When changing the transmission speed and transfer mode using software other than the Remote UI You can also change the transmission speed and transfer mode using the following software FTP Client You can change the settings by accessing the FTP server of the printer using Command Prompt 1 Start the ...

Страница 266: ... network transmission speed or transfer mode 1 Select the transmission speed and transfer mode according to your environment 2 Click OK 5 Click Reset After completing the reset the settings are effective 㻞㻢㻢㻌㻛㻌㻠㻡㻞 ...

Страница 267: ...ftware NetSpot Device Installer in the supplied CD ROM Even if none of the above methods work you can initialize the network settings by using the reset button on the printer Initializing Using the Reset Button IMPORTANT Precautions when initializing the network settings Make sure that the printer is not operating before initializing the network settings If you initialize the network settings whil...

Страница 268: ...and then log in as Administrator Starting the Remote UI 2 Select Network from the Device Manager menu 3 Click Show Parameter List under Network Interface 4 Click Initialize Network Settings Initializing Using the Remote UI 㻞㻢㻤㻌㻛㻌㻠㻡㻞 ...

Страница 269: ...5 Clicking Yes initializes the network settings 㻞㻢㻥㻌㻛㻌㻠㻡㻞 ...

Страница 270: ...yboard 4 Enter the administrator password then press the ENTER key on your keyboard If the administrator password is not specified yet do not enter any value but press the ENTER key on your keyboard 5 Enter get defaults then press the ENTER key on your keyboard ĺ The defaults file the list of the default values of the network settings is downloaded 6 Enter put defaults CONFIG then press the ENTER ...

Страница 271: ...9 Enter exit then press the ENTER key on your keyboard ĺ Command Prompt closes 㻞㻣㻝㻌㻛㻌㻠㻡㻞 ...

Страница 272: ...ich you want to initialize the network settings 3 From the Device menu select Restore to Default Settings 4 Clicking Yes initializes the network settings 5 Perform the following procedure If the message The device has been reset appears Click OK Initializing Using NetSpot Device Installer 㻞㻣㻞㻌㻛㻌㻠㻡㻞 ...

Страница 273: ...If the message Turn the device off and then on again appears Click OK and then cycle the power of the printer 㻞㻣㻟㻌㻛㻌㻠㻡㻞 ...

Страница 274: ...he printer OFF 2 Turning ON the printer while pressing the reset button A initializes the network settings Press the reset button with the tip of a ball point pen and so on Initializing Using the Reset Button 㻞㻣㻠㻌㻛㻌㻠㻡㻞 ...

Страница 275: ...r 0 to 32 characters Blank Location SYS_LOC The installation site of the printer 0 to 32 characters Blank Administrator SYS_CONTACT The name of the administrator of the printer 0 to 32 characters Blank Phone SYS_CONTACT_TEL The telephone number of the administrator of the printer 0 to 32 characters Blank Comments SYS_CONTACT_COMMENT Comments from the administrator of the printer 0 to 32 characters...

Страница 276: ...ified Addresses SNMP_CONT_MODE Accept or reject monitoring and changing of settings using the SNMP protocol for users specified in IP Addresses Accept Reject Accept IP Addresses SNMP_CONT_LIST The IP addresses specified to restrict monitoring and changing the SNMP setting Blank Security Settings Can be specified Cannot be specified Item Description Default Setting Remote UI FTP Client NetSpot Devi...

Страница 277: ...og Types SEC_LOG_KIND Security access logs to obtain 0 No Access Log to Obtain 1 Rejected TCP IP Print Jobs 2 Rejected SNMP Monitoring Setting Changes 3 Rejected TCP IP Print Jobs and Rejected SNMP Monitoring Setting Changes 4 Rejected Multicast Discoveries 5 Rejected TCP IP Print Jobs and Rejected Multicast Discoveries 6 Rejected SNMP Monitoring Setting Changes and Rejected Multicast Discoveries ...

Страница 278: ...68 0 215 Subnet Mask NET_MASK Subnet mask 255 255 255 0 Gateway Address DEF_ROUT Gateway address 0 0 0 0 FTP Settings FTP_ENB Whether to use the FTP server YES Restrict User FTP Access FTP_LIMIT_GENUSR Whether to restrict the FTP access from end users NO DHCP DHCP_ENB Whether to use DHCP for the IP address setting NO Acquire Host Name DHCP_OPT12_ENB Whether to use the DHCP option 12 to obtain the ...

Страница 279: ...HOSTNAME Registration of the WINS host name 0 to 15 characters Blank Scope ID NBT_SCOPE_ID The identifier for determining the communication range of the printer and computer 0 to 220 characters Blank SNTP Server Name SNTP_ADDR The IP address or name of the SNTP server 0 to 64 characters Blank SNTP_CHECK_INTERVAL The time interval for SNTP updates 10 min 30 min 1 hour 3 hours 6 hours 12 hours or 24...

Страница 280: ... cannot print unless you change the port 1 Open the printer folder Basic Operations Various Information for Windows 2 Right click the icon for this printer and then select Properties or Printer properties from the pop up menu 3 Perform the following procedure 1 Display the Ports sheet 2 Click Add Port 4 Select the port type 1 Select Standard TCP IP Port When Changing the IP Address Changing the Po...

Страница 281: ...ext If you are not sure about the value to be entered in Printer Name or IP Address The value to be entered varies depending on how the IP address of the printer was set For more details see Values for Setting a Port or ask your network administrator If the printer is not detected Follow the on screen instructions and search again for the printer or see Basic Operations Various Information for Win...

Страница 282: ...Click Finish 8 Click Close 9 Click Apply 10 Click OK 㻞㻤㻞㻌㻛㻌㻠㻡㻞 ...

Страница 283: ...NOTE Deleting an unnecessary port Select the port you want to delete on the Ports sheet and then click Delete Port 㻞㻤㻟㻌㻛㻌㻠㻡㻞 ...

Страница 284: ...y when you obtain the IP address from DHCP and so on If you want to set the IP address to be assigned to the printer using DHCP and so on Specify the settings such as the DHCP settings so that the same IP address is always assigned to the printer when you start the printer For more details see If you want to set the IP address to be assigned to the printer manually above If a different IP address ...

Страница 285: ...alling the Printer Driver If the printer driver is already installed you do not need to install it You can connect the printer and the print server using a USB cable or LAN cable Select a connecting method according to your environment 2 Configure the print server Configuring the Print Server If your computer is a client computer Install the printer driver There are two ways to install the printer...

Страница 286: ...g 32 bit operating systems is running is not supported due to the Windows restriction Windows XP on which no service pack or SP1 is installed Windows Server 2003 on which no service pack is installed If you download and install the printer driver on any of the above 32 bit operating systems you may fail to install the driver and may not be able to open the printing preferences dialog box 㻞㻤㻢㻌㻛㻌㻠㻡㻞...

Страница 287: ...en select Sharing from the pop up menu 1 Right click the icon for this printer and then select Printer properties from the pop up menu 2 Display the Sharing sheet 3 Perform the following procedure Select Share this printer Change Share name as needed Select the Share this printer check box Change Share name as needed Do not use spaces or special characters for the share name If Change sharing opti...

Страница 288: ...dditional Drivers If CD ROM Setup appears click Exit NOTE When updating an additional driver replacement driver Perform the following procedure 1 Uninstall the printer driver on the print server Uninstalling the Printer Driver 2 Install the new printer driver on the print server Installing the Printer Driver 3 Reinstall the additional driver 5 Select the additional driver 1 Select the additional d...

Страница 289: ...eck box for x86 in the Processor column If you are not sure whether you are using a 32 bit operating system or 64 bit operating system Windows Vista 7 and Server 2008 Basic Operations Various Information for Windows 6 Click Browse 7 Open the folder in which the printer driver is included If a 32 bit operating system is running on the print server Open the folders in the supplied CD ROM English x64...

Страница 290: ... of the additional driver starts Wait until the following screen disappears When the following screen disappears you can remove the CD ROM If the User Account Control dialog box appears Click Yes 10 Click Close or OK 㻞㻥㻜㻌㻛㻌㻠㻡㻞 ...

Страница 291: ...ettings Clear it using the following procedure Select Do not share this printer in the Sharing sheet Clear the Share this printer check box in the Sharing sheet If Change sharing options appears click Change sharing options If the User Account Control dialog box appears click Continue 㻞㻥㻝㻌㻛㻌㻠㻡㻞 ...

Страница 292: ... 6WDUW PHQX VHOHFW RQWURO 3DQHO DQG WKHQ FOLFN 9LHZ QHWZRUN VWDWXV DQG WDVNV ĺ KDQJH DGDSWHU VHWWLQJV URP WKH 6WDUW PHQX VHOHFW RQWURO 3DQHO ĺ 1HWZRUN RQQHFWLRQV ĺ RFDO UHD RQQHFWLRQ From the Start menu select Control Panel double click Network and Sharing Center and then click Manage network connections 2 Display the Local Area Connection Properties dialog box Right click the Local Area Connectio...

Страница 293: ...lected If the check box is not selected select it 2 Click OK NOTE If you are using Windows XP You cannot configure the print server with the operating system default settings the settings immediately after installation Before configuring the print server run Network Setup Wizard to enable the printer sharing settings For more details see Windows Help 㻞㻥㻟㻌㻛㻌㻠㻡㻞 ...

Страница 294: ...nter Folder Installing from Windows Explorer NOTE Precautions when downloading and installing the printer driver If a 64 bit operating system is running on the print server the download installation for a client computer on which any of the following 32 bit operating systems is running is not supported due to the Windows restriction Windows XP on which no service pack or SP1 is installed Windows S...

Страница 295: ...your operating system Windows Vista 7 and Server 2008 Windows XP and Server 2003 Windows Vista 7 and Server 2008 1 Turn the computer on and then log on to Windows 2 Open the printer folder Basic Operations Various Information for Windows 3 Click Add a printer 4 Click Add a network wireless or Bluetooth printer Installing from the Printer Folder 㻞㻥㻡㻌㻛㻌㻠㻡㻞 ...

Страница 296: ...inter that I want isn t listed 6 Perform the following procedure 1 Select Select a shared printer by name 2 Click Next 7 Select a shared printer 1 Select a shared printer on the print server 2 Click Select 㻞㻥㻢㻌㻛㻌㻠㻡㻞 ...

Страница 297: ...box appears Click Continue or Yes 9 Click Next When Set as the default printer is displayed select whether or not to use the printer as the default printer Windows Vista and Server 2008 10 Click Finish If you want to print a test page click Print a test page When Set as the default printer is displayed select whether or not to use the printer as the default printer Windows 7 and Server 2008 R2 㻞㻥㻣...

Страница 298: ...003 1 Turn the computer on and then log on to Windows 2 Open the printer folder Basic Operations Various Information for Windows 3 Display Add Printer Wizard Click Add a printer Double click Add Printer 4 Click Next 㻞㻥㻤㻌㻛㻌㻠㻡㻞 ...

Страница 299: ...ed to another computer 2 Click Next 6 Perform the following procedure 1 Select Connect to this printer or to browse for a printer select this option and click Next 2 Click Next 7 Select a shared printer 1 Select a shared printer on the print server 2 Click Next 㻞㻥㻥㻌㻛㻌㻠㻡㻞 ...

Страница 300: ...irectly Specify the network path as the print server name the computer name of the print server the printer name 8 When the following screen appears select whether or not to use this printer as the default printer 1 If you want to use the printer as the default printer select Yes 2 Click Next 9 Click Finish 㻟㻜㻜㻌㻛㻌㻠㻡㻞 ...

Страница 301: ...3URJUDPV ĺ FFHVVRULHV ĺ LQGRZV SORUHU 3 Perform the following procedure 1 Select the print server from My Network Places or Network 2 Double click the shared printer icon or drag and drop the icon into the printer folder 4 Follow the on screen instructions to install the printer driver Installing from Windows Explorer 㻟㻜㻝㻌㻛㻌㻠㻡㻞 ...

Страница 302: ... Managing the Printer Remote UI FTP Client NetSpot Device Installer Managing Print Jobs Checking the Printer Settings Setting the Administrator Password Specifying the Device Name or Administrator Information Managing the Printer 㻟㻜㻞㻌㻛㻌㻠㻡㻞 ...

Страница 303: ...age Can be managed Cannot be managed Can be managed partly Management Item Printer Status Window Remote UI FTP Client NetSpot Device Installer Managing Print Jobs Checking the Printer Settings Setting the Administrator Password Specifying the Device Name or Administrator Information Changing the Network Settings for the Printer Security Settings Software That Can Be Used for Managing the Printer 㻟...

Страница 304: ...ing various network settings in the Remote UI Central management of all the printer settings with the administrator password Only the administrator can configure the settings or perform the operations related to the printer management by setting the administrator password Starting the Remote UI Screen Layout of the Remote UI Details on Each Setting Page Displaying or Changing Support Links Changin...

Страница 305: ...er name 2 Select Remote UI from the Options menu If you cannot select Remote UI Check the following points The printer and computer are connected properly via a network The printer is turned ON 3 Log in as Administrator as needed By logging in as Administrator you can perform all the operations and settings of the Remote UI 1 Enter a password in Administrator Password If the administrator password...

Страница 306: ... you can enter host name domain name instead of the IP address Input Example http my_printer xy_dept company com If the Remote UI does not start Check the following points The Remote UI is enabled Enabling the Remote UI The printer and computer are connected properly via a network The printer is turned ON The IP address or host name domain name is entered correctly Nevertheless if the Remote UI to...

Страница 307: ...he operations and settings of the Remote UI 1 Enter a password in Administrator Password If the administrator password is not specified you do not need to enter the password Setting the Administrator Password 2 Click Log In NOTE When exiting the administrator mode Click Log Out 㻟㻜㻣㻌㻛㻌㻠㻡㻞 ...

Страница 308: ...he settings vary depending on the network environment Consult your network administrator About Cookies Configure your Web browser to enable cookies Starting the Remote UI If the Remote UI is running on multiple computers at a time the latest settings are valid If you want to log in as Administrator we recommend that only one Remote UI should be running at a time Attention Remote UI 㻟㻜㻤㻌㻛㻌㻠㻡㻞 ...

Страница 309: ...nable the Remote UI by accessing the FTP server of the printer using Command Prompt 1 Click in the Windows task tray and then select the printer name 2 3 Enable the Remote UI 1 Select the Enable Remote UI check box 2 Enter the administrator password for the printer the password that is specified in the Remote UI If the password is not specified you do not need to enter the password Setting the Adm...

Страница 310: ...4 Click OK 5 Restart the printer Turn OFF the printer once wait for 10 seconds or longer and then turn it ON After restarting the printer the Remote UI is enabled 㻟㻝㻜㻌㻛㻌㻠㻡㻞 ...

Страница 311: ...ministrator you can log out by clicking this button 5 Displays each setting page Device Manager Status Page Information Page Features Page Network Page Job Manager Managing Print Jobs Support Links Displaying or Changing Support Links 6 If the page is scrolled down moves the scroll box up to the top of the page 7 Updates the information in the currently displayed page to the latest one 8 Displays ...

Страница 312: ...ys information about the paper sources A The names of each paper source B The amount of paper remaining in each paper source C The sizes of paper in each paper source 4 Remaining Toner Displays the status of the toner cartridge The contents and solutions of the messages are as follows Message Contents and Solutions Available Continue using as normal Replacement Needed Soon You can continue to prin...

Страница 313: ...ns How to change the settings Setting the Administrator Password Restricting the Users Who Can Print Restricting the Users Who Can Access Restricting the Users Who Can Monitor Change the Settings Using the SNMP Protocol Restricting the Users Who Can Perform Multicast Discovery Restricting the FTP Access from End Users Obtaining the Security Access Logs 4 Display Log Clicking this button displays t...

Страница 314: ...m print speed of the printer the total number of printed pages and so on Network Page Displays the network settings for the printer and so on 1 Network Interface Displays information about the network interface and so on How to change the settings Changing the Network Transmission Speed or Transfer Mode 2 Protocol Displays the network protocol settings 㻟㻝㻠㻌㻛㻌㻠㻡㻞 ...

Страница 315: ...guring the Protocol Settings NOTE Changing the settings You can change the settings only if you logged in as Administrator After changing the network settings click Reset After completing the reset the settings are effective 㻟㻝㻡㻌㻛㻌㻠㻡㻞 ...

Страница 316: ... you logged on as Administrator you can change the links Displaying a Support Page 1 Click a link you want to display from Support Links in the top page NOTE Displaying a support page from the Support Links page 1 Select Support Links 2 Click a link you want to display Changing Support Links or Comments 1 Select Support Links Displaying or Changing Support Links 㻟㻝㻢㻌㻛㻌㻠㻡㻞 ...

Страница 317: ...2 Click Edit If Edit does not appear Log in as Administrator Starting the Remote UI 3 Change the link 1 Specify each link as needed 2 Click OK 㻟㻝㻣㻌㻛㻌㻠㻡㻞 ...

Страница 318: ... Link Enter the link name URL Enter the URL of the link Comments Enter a comment for the link 㻟㻝㻤㻌㻛㻌㻠㻡㻞 ...

Страница 319: ...ge of the Remote UI 1 Select Information from the Device Manager menu 2 Click Change under Language If Change does not appear Log in as Administrator Starting the Remote UI 3 Change the display language 1 Select a display language 2 Click OK Changing the Display Language of the Remote UI 㻟㻝㻥㻌㻛㻌㻠㻡㻞 ...

Страница 320: ...㻟㻞㻜㻌㻛㻌㻠㻡㻞 ...

Страница 321: ...the ENTER key on your keyboard Input Example ftp 192 168 0 215 If you are not sure about the IP address of the printer Refer to Network Status Print printed in Checking the Printer Settings or ask your network administrator 3 Enter root as the user name then press the ENTER key on your keyboard 4 Enter the administrator password then press the ENTER key on your keyboard If the administrator passwo...

Страница 322: ...ss ENTER on your keyboard In the file name enter the name of the config file that was entered when the file was downloaded 8 Enter get reset then press the ENTER key on your keyboard ĺ After completing the reset the settings are effective 9 Enter quit then press the ENTER key on your keyboard 10 Enter exit then press the ENTER key on your keyboard ĺ Command Prompt closes 㻟㻞㻞㻌㻛㻌㻠㻡㻞 ...

Страница 323: ...Installer Uninstalling NetSpot Device Installer Types of Devices That Can Be Configured You can use NetSpot Device Installer to configure a device connected to the TCP IP network You cannot configure a device connected to a network other than a TCP IP network System Requirements of NetSpot Device Installer Operating system Windows XP Professional or Home Edition Windows XP Professional x64 Edition...

Страница 324: ...Hard disk space Free disk space of 20 MB or more to install the software on the computer Protocol TCP IP Protocol stack TCP IP protocol supplied with Windows 㻟㻞㻠㻌㻛㻌㻠㻡㻞 ...

Страница 325: ...perform installation be sure to log on as a user with administrative rights 1 Insert the supplied CD ROM User Software into the CD ROM drive of your computer When the following screen appears click Exit If the AutoPlay dialog box appears Select Open folder to view files and then proceed to Step 4 2 Display My Computer or Computer Basic Operations Various Information for Windows 3 Right click the C...

Страница 326: ...e NetSpot_Device_Installer Windows folders 5 Double click nsdisetup exe If the User Account Control dialog box appears Click Continue or Yes 6 Read the contents of License Agreement and then click Yes 㻟㻞㻢㻌㻛㻌㻠㻡㻞 ...

Страница 327: ...ange the installation directory click Browse and then select a folder If you do not want to add NetSpot Device Installer to the Start menu clear the Add to Start Menu check box 2 Click OK When the following screen appears click Yes 8 Click OK 9 Click Cancel 㻟㻞㻣㻌㻛㻌㻠㻡㻞 ...

Страница 328: ...of NetSpot Device Installer by adding Plug Ins For more details on Plug ins see Readme of NetSpot Device Installer To display the Readme click in NetSpot Device Installer for TCP IP in the Additional Software Programs screen in CD ROM Setup 㻟㻞㻤㻌㻛㻌㻠㻡㻞 ...

Страница 329: ... 6WDUW PHQX VHOHFW OO 3URJUDPV RU 3URJUDPV ĺ 1HW6SRW HYLFH QVWDOOHU ĺ 1HW6SRW HYLFH QVWDOOHU If NetSpot Device Installer is not found in the Start menu Double click nsdi exe in the folder in which NetSpot Device Installer is installed If the User Account Control dialog box appears Click Continue or Yes Running NetSpot Device Installer Directly from the Supplied CD ROM 1 Insert the supplied CD ROM ...

Страница 330: ...P IP If License Agreement appears read the contents and then click Yes How to use NetSpot Device Installer NetSpot Device Installer allows you to configure the basic protocol settings and display the statuses of various printers on a network For details on the procedure for setting the IP address see Setting the IP Address Using NetSpot Device Installer For more details on the other usage see Help...

Страница 331: ... the uninstallation starts The uninstallation is completed when Command Prompt closes If NetSpot Device Installer is not found in the Start menu Double click rmnsdi bat in the following location Documents and Settings the user name Local Settings Application Data canon jp nsdi in the drive on which the system is installed Users the user name AppData Local canon jp nsdi in the drive on which the sy...

Страница 332: ... a method other than the Remote UI Canceling a Job Before managing print jobs see Attention Job Manager Checking Deleting the Job Currently Being Printed 1 Start the Remote UI Starting the Remote UI 2 From the Job Manager menu select Print Job to display the job currently being printed 3 If you want to delete the job click Delete Managing Print Jobs 㻟㻟㻞㻌㻛㻌㻠㻡㻞 ...

Страница 333: ...Checking Print Logs 1 Start the Remote UI Starting the Remote UI 2 Select Print Log from the Job Manager menu 㻟㻟㻟㻌㻛㻌㻠㻡㻞 ...

Страница 334: ... beginning of the file name About Interface Name If you print via USB Local is displayed in Interface Name If you print via a network nothing is displayed in the field Deleting the pages in process of printing The pages in process of printing when Delete is clicked will be printed Print logs Up to 32 jobs can be displayed When the number of jobs exceeds 32 the print logs are automatically deleted ...

Страница 335: ...aper drawer Paper Loading and Output 2 Click in the Windows task tray and then select the printer name 3 Configuration Page Print Prints the settings of the printer unit the total number of printed pages and other printer information Network Status Print Prints the TCP IP settings including the IP address and information including security settings 4 Click OK to print Status Print If Status Print ...

Страница 336: ... Printing Cannot Be Performed via the Print Server 㻟㻟㻢㻌㻛㻌㻠㻡㻞 ...

Страница 337: ...m a Web browser via a network NOTE When specifying the settings using software other than the Remote UI You can also specify the settings using the following software FTP Client You can specify the settings by accessing the FTP server of the printer using Command Prompt NetSpot Device Installer You can specify the settings using the Canon software NetSpot Device Installer in the supplied CD ROM 1 ...

Страница 338: ...OK Current Password Enter the password currently being used If you set the administrator password for the first time you do not need to enter the password New Password Enter a new desired password Confirm To confirm the password enter the entered New Password again 㻟㻟㻤㻌㻛㻌㻠㻡㻞 ...

Страница 339: ...ttings using the following software FTP Client You can specify the settings by accessing the FTP server of the printer using Command Prompt NetSpot Device Installer You can specify the settings using the Canon software NetSpot Device Installer in the supplied CD ROM 1 Start the Remote UI and then log in as Administrator Starting the Remote UI 2 Select Information from the Device Manager menu 3 Cli...

Страница 340: ... as needed 2 Click OK Device Name Enter the printer name Location Enter the location to install the printer Administrator Enter the name of the printer administrator Phone Enter the telephone number of the printer administrator Comments Enter the comments of the printer administrator 㻟㻠㻜㻌㻛㻌㻠㻡㻞 ...

Страница 341: ...cess Logs NOTE Software to be used for the security settings You can specify the settings using the following software Remote UI You can specify the settings by accessing the printer from a Web browser via the network FTP Client You can specify the settings by accessing the FTP server of the printer using Command Prompt This section describes the procedure for specifying the settings using the Rem...

Страница 342: ...ote UI is not restricted If restricted users try to print the message Cannot Print appears in the Printer Status Window There are some items which restricted users cannot select from the Options menu in the Printer Status Window 1 Start the Remote UI and then log in as Administrator Starting the Remote UI 2 Select Information from the Device Manager menu 3 Click Change under Security Restricting t...

Страница 343: ...ly users specified in IP Addresses can perform printing Reject Specified Addresses Users specified in IP Addresses cannot perform printing 6 Set the IP address 1 Enter the IP address of a computer for which you permit or reject printing Enter the IP address by separating the numbers with period for example AAA BBB CCC DDD 2 Click Add 㻟㻠㻟㻌㻛㻌㻠㻡㻞 ...

Страница 344: ...lent to entering addresses from AAA BBB CCC 15 to AAA BBB CCC 18 AAA BBB CCC Entering asterisk is equivalent to entering the numbers from 0 to 255 The example on the left is equivalent to entering addresses from AAA BBB CCC 0 to AAA BBB CCC 255 You can set IP addresses of up to 255 characters Counting example of the number of characters 192 168 0 215 13 characters 192 168 0 215 192 168 0 218 27 ch...

Страница 345: ...㻟㻠㻡㻌㻛㻌㻠㻡㻞 ...

Страница 346: ...s using FTP Client see FTP Client 1 Start the Remote UI and then log in as Administrator Starting the Remote UI 2 Select Information from the Device Manager menu 3 Click Change under Security 4 Configure the SNMP v 1 protocol Restricting the Users Who Can Monitor Change the Settings Using the SNMP Protocol 㻟㻠㻢㻌㻛㻌㻠㻡㻞 ...

Страница 347: ... use the SNMP v 1 protocol Set SNMP v 1 to Off If Off is specified you may not be able to use the Canon utility software Consult your network administrator before selecting Off 5 Configure the SNMP v 3 protocol If you want to use the SNMP v 3 protocol 1 Set SNMP v 3 to On The user name to be used for the SNMP v 3 protocol is set to initial 2 Specify the authentication key or privacy key to be used...

Страница 348: ...lt values Initializing the Network Settings 6 Select the Restrict SNMP Monitoring Setting Changes check box 7 Select Permit Specified Addresses or Reject Specified Addresses Permit Specified Addresses Only users specified in IP Addresses can monitor and change the settings Reject Specified Addresses Users specified in IP Addresses cannot monitor and change the settings 8 Set the IP address 1 Enter...

Страница 349: ...of the largest number The example on the left is equivalent to entering addresses from AAA BBB CCC 15 to AAA BBB CCC 18 AAA BBB CCC Entering asterisk is equivalent to entering the numbers from 0 to 255 The example on the left is equivalent to entering addresses from AAA BBB CCC 0 to AAA BBB CCC 255 You can set IP addresses of up to 255 characters Counting example of the number of characters 192 16...

Страница 350: ...9 Click OK 㻟㻡㻜㻌㻛㻌㻠㻡㻞 ...

Страница 351: ... Protocol SLP By using the multicast discovery function you can search for only the devices whose values in Scope Name are verified using the service location protocol SLP from utility software such as NetSpot Device Installer 1 Start the Remote UI and then log in as Administrator Starting the Remote UI 2 Select Information from the Device Manager menu 3 Click Change under Security Restricting the...

Страница 352: ...searches that used the multicast discovery function Do Not Respond to Specified Addresses Users specified in IP Addresses cannot respond to searches that used the multicast discovery function 6 Set the IP address 1 Enter an IP address that can respond or cannot respond to searches that used the multicast discovery Enter the IP address by separating the numbers with period for example AAA BBB CCC D...

Страница 353: ...lent to entering addresses from AAA BBB CCC 15 to AAA BBB CCC 18 AAA BBB CCC Entering asterisk is equivalent to entering the numbers from 0 to 255 The example on the left is equivalent to entering addresses from AAA BBB CCC 0 to AAA BBB CCC 255 You can set IP addresses of up to 255 characters Counting example of the number of characters 192 168 0 215 13 characters 192 168 0 215 192 168 0 218 27 ch...

Страница 354: ...㻟㻡㻠㻌㻛㻌㻠㻡㻞 ...

Страница 355: ...t NOTE When restricted users access to print or perform some other operation The message Network Board Error appears in the Printer Status Window 1 Start the Remote UI and then log in as Administrator Starting the Remote UI 2 Select Information from the Device Manager menu 3 Click Change under Security Restricting the Users Who Can Access 㻟㻡㻡㻌㻛㻌㻠㻡㻞 ...

Страница 356: ...address when entering it If there is no corresponding MAC address you cannot access the network In this case you can access the network by initializing the network settings Initializing the Network Settings 6 Set the MAC address 1 Enter the MAC address of a device for which you permit or reject accessing Enter 12 digit alphanumeric characters as 0123456789ab without separating them with hyphen or ...

Страница 357: ... 2 Click Add NOTE When deleting a set MAC address 1 Select a MAC address you want to delete 2 Click Delete 7 Click OK 㻟㻡㻣㻌㻛㻌㻠㻡㻞 ...

Страница 358: ...ent 1 Start the Remote UI and then log in as Administrator Starting the Remote UI 2 Select Information from the Device Manager menu 3 Click Change under Security 4 Select the Restrict User FTP Access check box If the check box for this option is cleared all the users can access using FTP Client Restricting the FTP Access from End Users 㻟㻡㻤㻌㻛㻌㻠㻡㻞 ...

Страница 359: ...5 Click OK 㻟㻡㻥㻌㻛㻌㻠㻡㻞 ...

Страница 360: ...ddress Range Settings is blocked This section describes the procedure for specifying the settings using the Remote UI To specify the settings using FTP Client see FTP Client 1 Start the Remote UI and then log in as Administrator Starting the Remote UI 2 Select Information from the Device Manager menu 3 Click Change under Security 4 Set Access Logs to On Obtaining the Security Access Logs 㻟㻢㻜㻌㻛㻌㻠㻡㻞...

Страница 361: ...perform the TCP IP printing is blocked Rejected SNMP Monitoring Setting Changes The security access log is recorded when access from a user who is rejected to monitor change the SNMP setting is blocked Rejected Multicast Discoveries The security access log is recorded when access from a user who is rejected to perform the multicast discovery is blocked 6 Click OK 㻟㻢㻝㻌㻛㻌㻠㻡㻞 ...

Страница 362: ...To check the obtained security access logs Checking the Security Access Logs 㻟㻢㻞㻌㻛㻌㻠㻡㻞 ...

Страница 363: ...lear the security access logs 1 Start the Remote UI and then log in as Administrator Starting the Remote UI 2 Select Information from the Device Manager menu 3 Click Display Log under Security Access Log Settings 4 Check the security access logs or other information Checking the Security Access Logs 㻟㻢㻟㻌㻛㻌㻠㻡㻞 ...

Страница 364: ...chronized with the SNTP server at The date and time when they were obtained Next synchronization in The date and time when they are to be obtained next While in the process of obtaining the status Getting time from SNTP Server When failed to obtain the status Failed to get time from SNTP Server 4 Save Saves the obtained security access log in text format 5 Clear Clears the obtained security access...

Страница 365: ...s You Cannot Install the Printer Driver You Cannot Uninstall the Printer Driver The Printer Driver Settings Cannot Be Changed Profiles Cannot Be Selected or Edited The Status of the Paper Feeder Cannot Be Obtained Automatically Paper Jams Paper Jams Error Display The Alarm Indicator Is On Blinking A Message Appears in the Printer Status Window Printout Problems Poor Printout Results Troubleshootin...

Страница 366: ...inting Cannot Be Performed USB Connection If the printer is connected by a LAN cable Printing Cannot Be Performed LAN Connection If You Are Using the Printer in the Print Server Environment If your computer is the print server Printing Cannot Be Performed USB Connection Printing Cannot Be Performed LAN Connection If your computer is a client computer Printing Cannot Be Performed via the Print Serv...

Страница 367: ... 2 Check the indicators on the printer unit The Load Paper indicator is blinking Load paper Paper Loading and Output The Paper Jam indicator is blinking Paper Jams The Alarm indicator is on The Alarm Indicator Is On Blinking The Alarm indicator is blinking The Ready indicator is on To Question 3 The Ready indicator is blinking The printer is operating Please wait a moment Question 3 Is the USB cab...

Страница 368: ...Connect the cable properly Connecting the Printer and Computer Question 4 Can you print a test page in Windows Basic Operations Various Information for Windows Printable There is no problem with the printer and driver Check the printing preferences in the application Not printable To Question 5 Question 5 Is the port to be used selected correctly Basic Operations Various Information for Windows Se...

Страница 369: ...nect those unneeded If drivers or software of any other devices USB connection is installed on your computer uninstall those unneeded Connect the USB cable to another USB port on your computer Connect the printer to another computer with a USB cable If printing does not work proceed to Question 8 Question 8 Install the printer driver again Uninstalling the Printer Driver Installing the Printer Dri...

Страница 370: ... 2 Check the indicators on the printer unit The Load Paper indicator is blinking Load paper Paper Loading and Output The Paper Jam indicator is blinking Paper Jams The Alarm indicator is on The Alarm Indicator Is On Blinking The Alarm indicator is blinking The Ready indicator is on To Question 3 The Ready indicator is blinking The printer is operating Please wait a moment Question 3 Is the LAN cab...

Страница 371: ... printer is in an abnormal condition Contact your local authorized Canon dealer to request service All the indicators are off All the Indicators on the Network Interface Are Off Question 5 Can you print a test page in Windows Basic Operations Various Information for Windows Printable There is no problem with the printer and driver Check the printing preferences in the application Not printable To ...

Страница 372: ...er is specified as the default printer The TCP IP protocol is running The users who can print are not restricted Restricting the Users Who Can Print If printing does not work proceed to Question 9 Question 9 Connect the printer and computer directly with the cross type LAN cable This is a LAN cable which is used to connect a printer and computer directly without a hub LAN network If printing does ...

Страница 373: ...Printable Make resident software invalid including security software Not printable Contact your local authorized Canon dealer 㻟㻣㻟㻌㻛㻌㻠㻡㻞 ...

Страница 374: ...tors on the printer unit The Load Paper indicator is blinking Load paper Paper Loading and Output The Paper Jam indicator is blinking Paper Jams The Alarm indicator is on The Alarm Indicator Is On Blinking The Alarm indicator is blinking The Ready indicator is on To Question 3 The Ready indicator is blinking The printer is operating Please wait a moment Question 3 Is the printer connected to the p...

Страница 375: ...connected to the network properly The additional driver alternate driver is updated properly Configuring the Print Server Printing can be performed from the print server If printing does not work proceed to Question 6 Question 6 Can you print a test page in Windows Basic Operations Various Information for Windows Printable There is no problem with the printer and driver Check the printing preferen...

Страница 376: ...th the CD ROM ĺ KDQJH WKH LQVWDOODWLRQ PHWKRG WR WKH GRZQORDG LQVWDOODWLRQ LQVWDOOLQJ WKH SULQWHU GULYHU ZLWKRXW WKH 520 If you performed the download installation installing the printer driver without the CD ROM ĺ KDQJH WKH LQVWDOODWLRQ PHWKRG WR WKH ORFDO LQVWDOODWLRQ LQVWDOOLQJ WKH SULQWHU GULYHU ZLWK WKH 520 If printing does not work proceed to Question 9 Question 9 Can another client print Pr...

Страница 377: ... the print server or printer Solution Ask your network administrator to change the user permissions Cause 5 Network discovery is not enabled Windows Vista 7 and Server 2008 Solution Perform the following procedure 1 From the Start menu select Control Panel 2 Click View network status and tasks 3 Set Network discovery to On 1 From the Start menu select Control Panel 2 Click View network status and ...

Страница 378: ...rmation for Windows If the icon for this printer is not displayed Ask your network administrator about the problem If the icon for this printer is displayed You can install the printer driver by performing either of the following procedures and following the instructions on the screen Double clicking the icon for this printer Dragging and dropping the icon for this printer into the printer folder ...

Страница 379: ...s depending on the processing type of the print data Solution Performing the following procedure in the printer driver may be able to solve the problem 1 Display the Finishing sheet 2 Click Advanced Settings 3 Change the EMF Spooling setting When EMF Spooling is set to On the Printer Status Window may not be displayed automatically In this case display it manually For details on methods for displa...

Страница 380: ...ension cord or multiple power strip Solution Plug the power plug directly into an AC power outlet Cause 3 The breakers have tripped Solution Reset the breakers on the switch board Cause 4 There is a break in the power cord Solution If the printer can be turned on after replacing the power cord with one that is of the same type then purchase a new power cord and replace the broken one You Cannot Tu...

Страница 381: ... mark Solution 2 If the hub has an UP LINK cascade switch switch to X Cause 3 A cross LAN cable is being used Solution 1 Replace the cable with a straight LAN cable Solution 2 Connect the cross LAN cable to the UP LINK cascade port on the hub If the hub has an UP LINK cascade switch switch to the side Cause 4 Cannot communicate with the hub Solution Make sure that the power of the hub is on Cause ...

Страница 382: ...e Print Server for Connection Cannot Be Found The Shared Printer Cannot Be Accessed If the printer driver is not installed properly Perform the following procedure Solution 1 Install the printer driver again Uninstalling the Printer Driver Installing the Printer Driver Solution 2 Only when connecting with USB Uninstall the USB class driver and then install the printer driver again Uninstalling the...

Страница 383: ...lled Solution Perform the following procedure 1 Turn the printer OFF 2 Disconnect the USB cable 3 Connect the USB cable again 4 While the following screen appears turn the printer ON Cause 4 An inappropriate USB cable is being used Solution Use a USB cable that is appropriate for the USB interface environment of the printer and has the following symbol The following is the USB interface environmen...

Страница 384: ...orming the above procedure Solution 1 1 Click Manual Search by IP Address 2 Enter the IP address of the printer to be installed The default IP address of the printer is 192 168 0 215 3 Click OK Solution 2 1 Install the printer driver with a USB connection Installing the Printer Driver 2 Set the IP address using the Printer Status Window Setting the IP Address Using the Printer Status Window 3 Chan...

Страница 385: ...out administrative rights installed the printer driver You may not be able to uninstall the printer driver successfully depending on your operating system In this case uninstall the printer driver using the following procedure 1 Open the printer folder Basic Operations Various Information for Windows 2 Right click the icon for this printer then select Delete or Remove device from the pop up menu 3...

Страница 386: ...n appears click Exit If the AutoPlay dialog box appears Select Open folder to view files and then proceed to Step 4 2 Display My Computer or Computer Basic Operations Various Information for Windows 3 Right click the CD ROM icon then select Open from the pop up menu Starting the Uninstaller from the CD ROM 㻟㻤㻢㻌㻛㻌㻠㻡㻞 ...

Страница 387: ... folder in which the uninstaller is included For a 32 bit operating system Open the English 32bit MISC folders For a 64 bit operating system Open the English x64 MISC folders 5 Double click the exe file 㻟㻤㻣㻌㻛㻌㻠㻡㻞 ...

Страница 388: ...If the User Account Control dialog box appears Click Continue or Yes For details on the uninstallation see Uninstalling the Printer Driver 㻟㻤㻤㻌㻛㻌㻠㻡㻞 ...

Страница 389: ...ned ON 2 Perform the following procedure From the Start menu select Control Panel and then click Add or Remove Programs From the Start menu select Control Panel and then click Uninstall a program URP WKH 6WDUW PHQX VHOHFW RQWURO 3DQHO ĺ GG RU 5HPRYH 3URJUDPV From the Start menu select Control Panel and then double click Programs and Features 3 Make sure that Canon LBP6310 is not displayed 1 Make s...

Страница 390: ...JHU 1 From the Start menu select Control Panel 2 Double click Device Manager If the User Account Control dialog box appears Click Continue or Yes 5 Double click Universal Serial Bus controllers 6 Right click USB Printing Support then select Uninstall from the pop up menu Do not uninstall any drivers for other devices If you uninstall them by mistake Windows may not operate properly If the USB clas...

Страница 391: ...Other Devices Select the USB class driver which is displayed as Unknown device and then uninstall it 7 Click OK 8 Click to close the Device Manager dialog box 9 Disconnect the USB cable from the computer then restart Windows 㻟㻥㻝㻌㻛㻌㻠㻡㻞 ...

Страница 392: ...rinter folder Basic Operations Various Information for Windows 2 Right click the icon for this printer and then select Properties or Printer properties from the pop up menu 3 Change the setting for Spooling at Host 1 Display the Device Settings sheet 2 Select Auto for Spooling at Host If you cannot change the setting You need administrative rights to change the setting Contact your system administ...

Страница 393: ...1 Open the printer folder Basic Operations Various Information for Windows 2 Right click the icon for this printer and then select Properties or Printer properties from the pop up menu 3 Change the settings for Define Document Property 1 Display the Profile sheet 2 Select the Allow Profile Selection and Allow Setting Edition check boxes If you cannot change the setting Profiles Cannot Be Selected ...

Страница 394: ...You need administrator rights to change the setting Contact your system administrator 4 Click OK 㻟㻥㻠㻌㻛㻌㻠㻡㻞 ...

Страница 395: ... folder Basic Operations Various Information for Windows 2 Right click the icon for this printer and then select Properties or Printer properties from the pop up menu 3 Obtain the status of the paper feeder 1 Display the Device Settings sheet 2 Click Get Device Status 3 Click Yes to obtain the status of the paper feeder The Status of the Paper Feeder Cannot Be Obtained Automatically 㻟㻥㻡㻌㻛㻌㻠㻡㻞 ...

Страница 396: ... of the paper feeder cannot be obtained even by installing it again see the following and make sure that the printer and computer can communicate with each other Printing Cannot Be Performed USB Connection Printing Cannot Be Performed LAN Connection Printing Cannot Be Performed via the Print Server 4 Click OK 㻟㻥㻢㻌㻛㻌㻠㻡㻞 ...

Страница 397: ... each area in the order of the displayed areas in the message Message and Clearance Procedure Paper Jam Area 1 Clearing Paper Jams Multi purpose Tray 2 Clearing Paper Jams Paper Drawer 3 Clearing Paper Jams Duplex Unit 4 Clearing Paper Jams Inside the Output Area 5 Clearing Paper Jams Inside the Front Cover If the Printer Status Window is not displayed Printer Status Window Paper Jams 㻟㻥㻣㻌㻛㻌㻠㻡㻞 ...

Страница 398: ...he power is turned off the data being printed will be deleted Do not remove the jammed paper forcefully Removing jammed paper with excess force may cause the paper to tear or damage the inside of the printer Remove the paper by pulling it gently If the paper is torn Remove all remaining pieces of paper Do not touch the high voltage contacts A or the electrical contacts B This may result in damage ...

Страница 399: ...㻟㻥㻥㻌㻛㻌㻠㻡㻞 ...

Страница 400: ...ch is displayed in a message Next proceed to the clearing procedure for another area which is displayed in the message 1 Clearing Paper Jams Multi purpose Tray 2 Clearing Paper Jams Paper Drawer 3 Clearing Paper Jams Duplex Unit 4 Clearing Paper Jams Inside the Output Area 5 Clearing Paper Jams Inside the Front Cover Clearing Paper Jams Multi purpose Tray 㻠㻜㻜㻌㻛㻌㻠㻡㻞 ...

Страница 401: ...ther area which is displayed in the message 3 Insert the paper drawer in the printer If the paper feeder is installed insert the paper drawer of the paper feeder also Next proceed to the clearing procedure for another area which is displayed in the message 1 Clearing Paper Jams Multi purpose Tray 2 Clearing Paper Jams Paper Drawer 3 Clearing Paper Jams Duplex Unit 4 Clearing Paper Jams Inside the ...

Страница 402: ...de 3 Remove the paper by pulling it gently If the jammed paper cannot be removed easily do not try to remove it forcefully but proceed to Step 4 4 Holding the green tab close the duplex print transport guide firmly Close it by pressing the both sides firmly Clearing Paper Jams Duplex Unit 㻠㻜㻞㻌㻛㻌㻠㻡㻞 ...

Страница 403: ... do not try to remove it forcefully but proceed to Step 8 and perform the clearing procedure for another area which is displayed in the message 8 Close the duplex unit cover Next proceed to the clearing procedure for another area which is displayed in the message 1 Clearing Paper Jams Multi purpose Tray 2 Clearing Paper Jams Paper Drawer 㻠㻜㻟㻌㻛㻌㻠㻡㻞 ...

Страница 404: ... 3 Clearing Paper Jams Duplex Unit 4 Clearing Paper Jams Inside the Output Area 5 Clearing Paper Jams Inside the Front Cover 㻠㻜㻠㻌㻛㻌㻠㻡㻞 ...

Страница 405: ...ther area which is displayed in the message 3 Close the rear cover Next proceed to the clearing procedure for another area which is displayed in the message 1 Clearing Paper Jams Multi purpose Tray 2 Clearing Paper Jams Paper Drawer 3 Clearing Paper Jams Duplex Unit 4 Clearing Paper Jams Inside the Output Area 5 Clearing Paper Jams Inside the Front Cover Clearing Paper Jams Inside the Output Area ...

Страница 406: ...pressing the open button 3 Remove the toner cartridge Immediately place the removed toner cartridge into the original protective bag or wrap it with a thick cloth For details on handling the toner cartridge see Attention Toner Cartridge 4 Clearing Paper Jams Inside the Front Cover 㻠㻜㻢㻌㻛㻌㻠㻡㻞 ...

Страница 407: ...gently Remove the jammed paper as horizontally as possible to prevent unfixed toner from spilling 6 Move the transport guide back to its original position slowly 7 Install the toner cartridge Push the toner cartridge into the printer firmly until it touches the back of the printer while aligning A on both sides of the toner cartridge with the toner cartridge guides inside the printer 㻠㻜㻣㻌㻛㻌㻠㻡㻞 ...

Страница 408: ...e the printer If the Paper Jam indicator does not turn off Paper may be jammed in another area Check another area also and remove the paper 1 Clearing Paper Jams Multi purpose Tray 2 Clearing Paper Jams Paper Drawer 3 Clearing Paper Jams Duplex Unit 4 Clearing Paper Jams Inside the Output Area 5 Clearing Paper Jams Inside the Front Cover If the Paper Jam indicator does not turn off even after remo...

Страница 409: ... printer 1 Turn the printer OFF wait for 10 seconds or longer and then turn it ON again If the message does not reappear the printer is ready If the message reappears you need to request service Follow the procedure below and then contact your local authorized Canon dealer to request service 2 Note down the error code displayed in the Printer Status Window The Alarm Indicator Is On Blinking 㻠㻜㻥㻌㻛㻌...

Страница 410: ...isconnect the power plug from the AC power outlet 6 Disconnect the cable from the printer Whether the cable is connected or not varies depending on your environment 4 Contact your local authorized Canon dealer to request service When contacting your Canon dealer please report also the error code which you noted down in Step 2 If you are not sure what the problem is contact your local authorized Ca...

Страница 411: ...olve the problem following the message displayed in the Printer Status Window A Message Appears in the Printer Status Window If the Printer Status Window is not displayed Printer Status Window 㻠㻝㻝㻌㻛㻌㻠㻡㻞 ...

Страница 412: ...ide Printer Insufficient Memory Insufficient Disk Space Out of Paper No Toner Cartridge Specified Paper Different from Set Paper The printer pauses Start Cleaning Check the Paper Service Error Cause The printer is in an abnormal condition Solution Turn the printer OFF wait for a while and then turn it ON again If the service error appears even after cycling the power of the printer turn the printe...

Страница 413: ...cation function is not enabled the computer cannot communicate with the printer Solution Enable bi directional communication and restart the computer and printer Basic Operations Various Information for Windows Cause 2 The computer cannot communicate with the printer redirected in the terminal connection environment Solution The Firewall settings and so on may be the cause Check the communication ...

Страница 414: ...er according to the displayed message Clearing Paper Jams Multi purpose Tray Clearing Paper Jams Paper Drawer Clearing Paper Jams Duplex Unit Clearing Paper Jams Inside the Output Area Clearing Paper Jams Inside the Front Cover If the message does not disappear even after removing the paper check that the rear cover is closed firmly Insufficient Disk Space Cause The disk space on the computer or s...

Страница 415: ...abled and clicked the printer prints on the paper currently loaded in the multi purpose tray Specified Paper Different from Set Paper If the message Specified Paper Different from Set Paper appears blank paper may be output Cause Paper of the size different from that of the job is loaded Solution 1 Load the indicated paper in the paper source Loading Paper in the Paper Drawer Loading Paper in the ...

Страница 416: ...ng is stopped to check if the paper loaded in the multi purpose tray is appropriate Solution 1 If appropriate paper is loaded click Resolve Error Solution 2 Load appropriate paper Loading Paper in the Multi purpose Tray 㻠㻝㻢㻌㻛㻌㻠㻡㻞 ...

Страница 417: ... Non printed Areas White Dust Is Attached to the Printed Transparencies Printing is faint or faded The Overall Print Result Is Faint Colored Lines and Text Appear Faded Printout is skewed missing or has unneeded space The Printing Position Is Skewed A Portion of the Page Is Not Printed Data Is Reduced and Printed The Next Page Is Printed from Halfway across the Previous Page Others Blank Paper Is ...

Страница 418: ...l authorized Canon dealer If a problem that is not indicated in the e Manual occurs if none of the suggested measures solve the problem or if you cannot determine the problem contact your local authorized Canon dealer 㻠㻝㻤㻌㻛㻌㻠㻡㻞 ...

Страница 419: ...o Special Settings B6 If the problem is not solved specify Special Settings B5 Normally use the printer with Special Print Mode set to Off Specify Special Settings B6 or Special Settings B5 only if the described problems occur If you specify Special Settings B6 printing speed drops If you specify Special Settings B5 printing speed drops compared to when specifying Special Settings B6 Cause 2 Appro...

Страница 420: ...r Loading Paper in the Multi purpose Tray Cause 2 Damp paper is used Solution Replace the paper with new paper in an unopened package Precautions for Paper Cause 3 Appropriate paper is not being used Solution Replace the paper with that which can be used with this printer Usable Paper Cause 4 There is a foreign object inside the printer Solution Remove the foreign object inside the printer Paper C...

Страница 421: ... toner cartridge out of the printer shake it gently five or six times to evenly distribute the toner and then reinstall the toner cartridge Toner Cartridge Replacement Cause 2 The drum in the toner cartridge is deteriorated Solution Replace the toner cartridge with a new one Toner Cartridge Replacement White Streaks Lines Appear 㻠㻞㻝㻌㻛㻌㻠㻡㻞 ...

Страница 422: ...ause 2 The toner cartridge is almost out of toner Solution Take the toner cartridge out of the printer shake it gently five or six times to evenly distribute the toner and then reinstall the toner cartridge Toner Cartridge Replacement Cause 3 The drum in the toner cartridge is deteriorated Solution Replace the toner cartridge with a new one Toner Cartridge Replacement Printing Is Uneven 㻠㻞㻞㻌㻛㻌㻠㻡㻞 ...

Страница 423: ...h that which can be used with this printer Usable Paper Cause 2 Damp paper is used Solution Replace the paper with new paper in an unopened package Precautions for Paper Cause 3 The drum in the toner cartridge is deteriorated Solution Replace the toner cartridge with a new one Toner Cartridge Replacement Printed Pages Have White Specks 㻠㻞㻟㻌㻛㻌㻠㻡㻞 ...

Страница 424: ... Basic Printing Procedure Cause 2 Appropriate paper is not being used Solution Replace the paper with that which can be used with this printer Usable Paper Cause 3 A problem is occurring inside the printer Solution When the Alarm indicator is on perform the solution using the procedure in The Alarm Indicator Is On Blinking Toner Stain or Toner Peeling Occurs 㻠㻞㻠㻌㻛㻌㻠㻡㻞 ...

Страница 425: ...07K5 08H Perform the following procedure Cause The fixing roller is dirty Solution Clean the fixing roller Cleaning the Inside of the Printer The Printed Paper Has Smudge Marks 㻠㻞㻡㻌㻛㻌㻠㻡㻞 ...

Страница 426: ...e printed paper In this case reset the setting to Mode 1 Vertical streaks are alleviated by specifying a setting between Mode 2 and Mode 4 However this decreases print density compared to when Mode 1 is specified This may also make outlines appear to be blurred or slightly jagged Cause 2 The toner cartridge was replaced or the printer was not printed for a long period of time Solution Perform the ...

Страница 427: ...rform the following procedure in the printer driver 1 Display the Finishing sheet 2 Click Advanced Settings 3 Set Special Print Mode to Special Settings A5 Normally use the printer with Special Print Mode set to Off Specify Special Settings A5 only if the described problems occur Selecting Special Settings A5 may deteriorate print quality depending on the paper type especially for thin paper or th...

Страница 428: ...lowing procedure Cause The size of the print data was larger than that of the loaded paper Solution Check if the size of the print data matches that of the loaded paper The Back of the Printed Paper Has Smudge Marks 㻠㻞㻤㻌㻛㻌㻠㻡㻞 ...

Страница 429: ... for Toner Density is not appropriate Solution Adjust Toner Density in the printer driver to a lighter setting Adjusting the Toner Density Cause 2 The printer is exposed to direct sunlight or strong light Solution Move the printer Moving the Printer The Overall Print Result Is Dark 㻠㻞㻥㻌㻛㻌㻠㻡㻞 ...

Страница 430: ...er is not being used Solution Replace the paper with that which can be used with this printer Usable Paper Cause 2 The drum in the toner cartridge is deteriorated Solution Replace the toner cartridge with a new one Toner Cartridge Replacement Residual Images Appear on Non printed Areas 㻠㻟㻜㻌㻛㻌㻠㻡㻞 ...

Страница 431: ...wing procedure Cause You print transparencies after printing paper other than transparency continuously Solution Wipe and remove the chipped paper with a soft cloth White Dust Is Attached to the Printed Transparencies 㻠㻟㻝㻌㻛㻌㻠㻡㻞 ...

Страница 432: ...opriate Solution Adjust Toner Density in the printer driver to a darker setting Adjusting the Toner Density Cause 2 Toner Save is enabled Solution Perform the following procedure in the printer driver 1 Display the Quality sheet 2 Click Advanced Settings 3 Set Toner Save to Off The Overall Print Result Is Faint 㻠㻟㻞㻌㻛㻌㻠㻡㻞 ...

Страница 433: ...se Thin lines or text was printed Solution Perform the following procedure in the printer driver 1 Display the Quality sheet 2 Click Advanced Settings 3 Set Print Colored Text and Lines in Black to On Colored Lines and Text Appear Faded 㻠㻟㻟㻌㻛㻌㻠㻡㻞 ...

Страница 434: ...inter driver 1 Display the Finishing sheet 2 Click Gutter 3 Set Gutter to 0 Cause 2 Top Margin and Paper Position in the application are not specified properly Solution Specify the settings for Top Margin and Paper Position in the application properly See the instruction manual supplied with the application The Printing Position Is Skewed 㻠㻟㻠㻌㻛㻌㻠㻡㻞 ...

Страница 435: ...eck box then specify an appropriate scale factor according to the paper size to be used Cause 2 The position of the paper is incorrect Solution Load the paper properly Loading Paper in the Paper Drawer Loading Paper in the Multi purpose Tray Cause 3 A document with no margins was printed Solution 1 Data is printed with a margin of 5 mm 10 mm for envelopes Provide a margin around the data Printable...

Страница 436: ...r the Manual Scaling check box If the Manual Scaling check box is cleared the scale factor will be set according to Page Size and Output Size automatically Solution 2 Perform the following procedure in the printer driver 1 Display the Page Setup sheet 2 Select the Manual Scaling check box then specify an appropriate scale factor according to the paper size to be used Data Is Reduced and Printed 㻠㻟...

Страница 437: ...n is not specified properly Solution Specify the settings for Line Spacing or Lines Page in the application so that the data fits in one page and then print again See the instruction manual supplied with the application The Next Page Is Printed from Halfway across the Previous Page 㻠㻟㻣㻌㻛㻌㻠㻡㻞 ...

Страница 438: ...ment Cause 2 Multiple sheets of paper are fed at a time Solution Fan the paper thoroughly and then align the edges of the stack properly on a hard flat surface Cause 3 Paper of the size different from the setting for Output Size is loaded Solution When the message Specified Paper Different from Set Paper appears in the Printer Status Window perform the described solutions in A Message Appears in t...

Страница 439: ...llowing procedure Cause The drum in the toner cartridge is deteriorated Solution Replace the toner cartridge with a new one Toner Cartridge Replacement The Overall Surface of the Paper Is Printed in Black Completely 㻠㻟㻥㻌㻛㻌㻠㻡㻞 ...

Страница 440: ...r may be able to solve the problem 1 Display the Finishing sheet 2 Click Advanced Settings 3 Change the EMF Spooling setting When EMF Spooling is set to On the Printer Status Window may not be displayed automatically In this case display it manually For details on methods for displaying the Printer Status Window see Printer Status Window The Printout Is Different from What Is Displayed on Screen 㻠...

Страница 441: ...6 Perform the following procedure Cause The envelope is inappropriate Solution Replace the envelope with that which can be used with this printer Usable Paper The Flap of the Printed Envelope Sticks 㻠㻠㻝㻌㻛㻌㻠㻡㻞 ...

Страница 442: ...ing procedure Cause You are using paper which tends to be fed at a time Solution Fan the paper thoroughly and then align the edges of the stack properly on a hard flat surface Multiple Sheets of Paper Are Fed at a Time 㻠㻠㻞㻌㻛㻌㻠㻡㻞 ...

Страница 443: ...07K5 098 Basic Operations Various Information for Windows Appendix 㻠㻠㻟㻌㻛㻌㻠㻡㻞 ...

Страница 444: ...select Computer Displaying the CD ROM Top Page If the CD ROM top page does not appear even after inserting the CD ROM perform the following procedure The CD ROM drive name is indicated as D in this manual The CD ROM drive name may differ depending on the computer you are using 1 From the Start menu select Run 2 Enter D English MInst exe 3 Click OK 1 Enter D English MInst exe in Start Search or Sea...

Страница 445: ...NS Dynamic Update function Configuring the Protocol Settings Configure DHCP or other settings so that the same IP address is always assigned to the printer when the printer is started Configuring the Protocol Settings Checking and configuring the subnet Enter ipconfig as a command in Command Prompt The network setting information of the computer appears Confirm that the computer and printer are on...

Страница 446: ...it Operating System is displayed Printing a Test Page in Windows You can check the operations of the printer driver by printing a test page in Windows 1 Load A4 paper in the multi purpose tray or paper task tray Paper Loading and Output 2 Open the printer folder Displaying the Printer Folder 3 Right click the icon for this printer and then select Properties or Printer properties from the pop up me...

Страница 447: ...k Print Test Page to print a test page Checking the Bi directional Communication 1 Open the printer folder Displaying the Printer Folder 2 Right click the icon for this printer and then select Properties or Printer properties from the pop up menu 㻠㻠㻣㻌㻛㻌㻠㻡㻞 ...

Страница 448: ...printing Displaying the Printer Folder From the Start menu select Printers and Faxes URP WKH 6WDUW PHQX VHOHFW RQWURO 3DQHO DQG WKHQ FOLFN 3ULQWHUV DQG 2WKHU DUGZDUH ĺ 3ULQWHUV DQG D HV From the Start menu select Control Panel and then click Printer From the Start menu select Devices and Printers From the Start menu select Control Panel and then double click Printers Checking Printers in the Print...

Страница 449: ...My Network Places or Network 2 Check the icon for this printer is displayed Checking the Port 1 Open the printer folder Displaying the Printer Folder 2 Right click the icon for this printer and then select Properties or Printer properties from the pop up menu 3 Check a port 1 Display the Ports sheet 2 Confirm the port is selected properly 㻠㻠㻥㻌㻛㻌㻠㻡㻞 ...

Страница 450: ...r Device Type when Setting a Port If the printer cannot be detected when setting a port set Device Type as follows 1 Select Standard and then select Canon Network Printing Device with P9100 2 Click Next 㻠㻡㻜㻌㻛㻌㻠㻡㻞 ...

Страница 451: ...CANON EUROPA N V Bovenkerkerweg 59 61 1185 XB Amstelveen The Netherlands CANON CHINA CO LTD 15F Jinbao Building No 89 Jinbao Street Dongcheng District Beijing 100005 PRC CANON SINGAPORE PTE LTD 1 HarbourFront Avenue 04 01 Keppel Bay Tower Singapore 098632 CANON AUSTRALIA PTY LTD 1 Thomas Holt Drive North Ryde Sydney NSW 2113 Australia CANON GLOBAL WORLDWIDE SITES http www canon com Office Location...

Страница 452: ...he contents described in this section carefully before using the printer Precautions for When Performing Procedures Be sure to switch to the desktop when performing the following procedures Installation and uninstallation of the printer driver Displaying the Printer Status Window Detailed settings of the printer driver However the settings that are specified in the desktop may not be reflected dep...

Отзывы: