07K5-02S
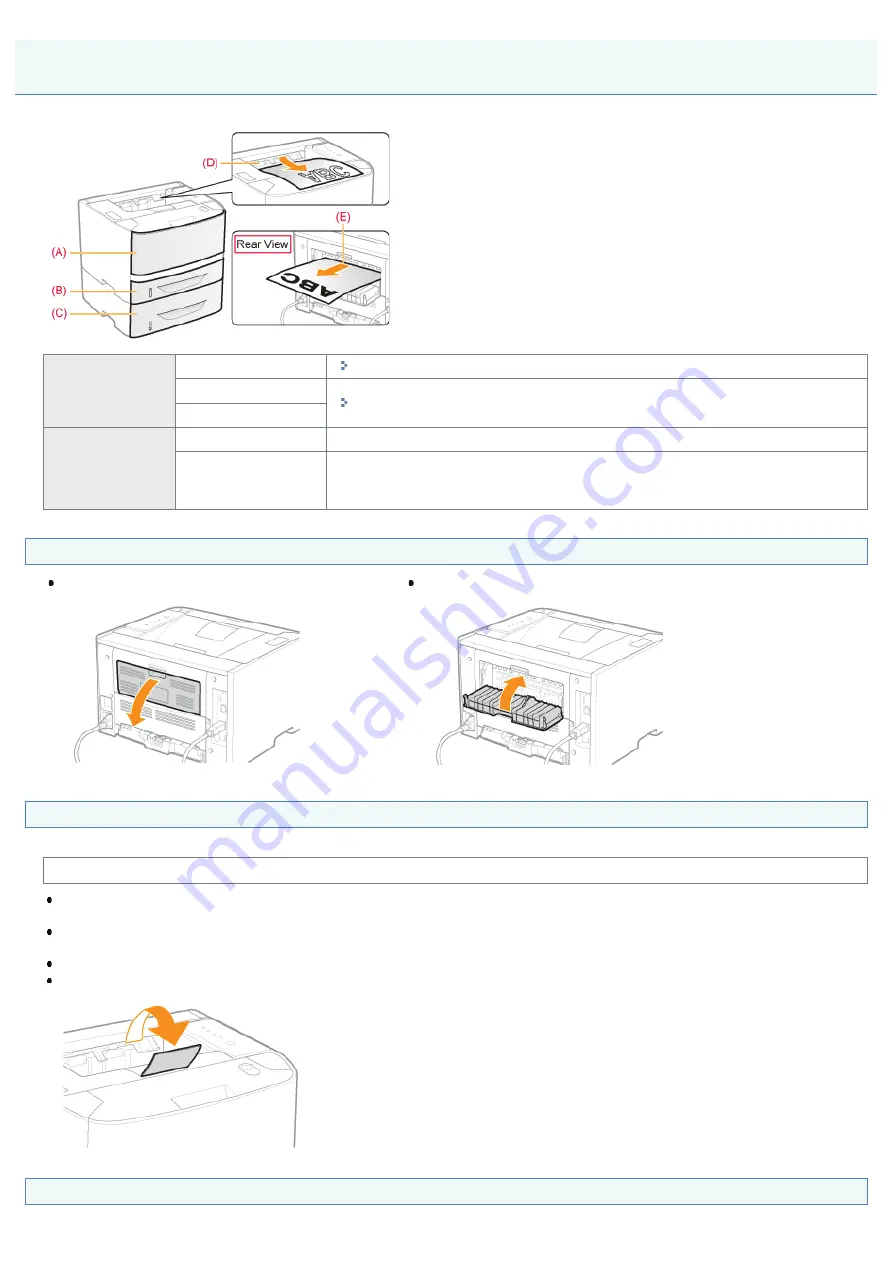
This printer has the following paper sources and output trays.
Paper Source
(A): Multi-purpose tray
"Loading Paper in the Multi-purpose Tray"
(B): Drawer 1
"Loading Paper in the Paper Drawer"
(C): Drawer 2 (optional)
Output Tray
(D): Output tray
Outputs paper with the printed side facing down.
(E): Sub-output tray
Outputs paper with the printed side facing up.
The sub-output tray is suitable to print transparencies, labels, or envelopes which tend to curl,
since the printed paper is output flattened.
How to Switch Output Trays
When switching to the sub-output tray
Open the output selection cover as shown in the figure.
When switching to the output tray
Close the output selection cover as shown in the figure.
Precautions for Output Trays
Pay attention to the following points when handling the output trays.
See "
" also.
When performing 2-sided printing, close the output selection cover.
(When outputting paper to the sub-output tray, you cannot perform 2-sided printing.)
During 2-sided printing, do not touch the paper until it is output to the output tray completely. The paper is first output partially after the front side
is printed, and then it is fed again to be printed on the reverse side.
When paper is output to the sub-output tray, take out one piece at a time each time it is output.
When outputting long-size paper, such as Legal paper, to the output tray, open the auxiliary tray to prevent the paper from hanging out of the
output tray.
Paper Capacity of the Paper Sources and Output Trays
Paper Loading and Output
㻝㻟㻥㻌㻛㻌㻠㻡㻞
Содержание LBP6310dn
Страница 1: ...㻝㻌㻛㻌㻠㻡㻞 ...
Страница 20: ...7 Click Exit When the following screen appears you can remove the CD ROM 㻞㻜㻌㻛㻌㻠㻡㻞 ...
Страница 37: ...If the laser beam should escape and enter your eyes exposure may cause damage to your eyes 㻟㻣㻌㻛㻌㻠㻡㻞 ...
Страница 45: ...This printer supports Raw only It does not support LPR 㻠㻡㻌㻛㻌㻠㻡㻞 ...
Страница 50: ...Paper Feeder Unit PF 44 㻡㻜㻌㻛㻌㻠㻡㻞 ...
Страница 99: ...07K5 024 Installing the Printer Driver Uninstalling the Printer Driver Driver Installation 㻥㻥㻌㻛㻌㻠㻡㻞 ...
Страница 110: ...When the installation is complete an icon and folder for this printer will be created After Installation 㻝㻝㻜㻌㻛㻌㻠㻡㻞 ...
Страница 116: ...If you want to change the network settings for the printer see Changing the Network Settings for the Printer 㻝㻝㻢㻌㻛㻌㻠㻡㻞 ...
Страница 122: ...See You Cannot Install the Printer Driver and install the printer driver again 㻝㻞㻞㻌㻛㻌㻠㻡㻞 ...
Страница 125: ...When the installation is complete an icon and folder for this printer will be created After Installation 㻝㻞㻡㻌㻛㻌㻠㻡㻞 ...
Страница 131: ...㻝㻟㻝㻌㻛㻌㻠㻡㻞 ...
Страница 146: ... Registering a Custom Paper Size 㻝㻠㻢㻌㻛㻌㻠㻡㻞 ...
Страница 157: ...㻝㻡㻣㻌㻛㻌㻠㻡㻞 ...
Страница 173: ...6 Set the paper drawer in the printer Next register a paper size Registering the Paper Size 㻝㻣㻟㻌㻛㻌㻠㻡㻞 ...
Страница 185: ...3 Click OK For details on the basic printing procedure see Basic Printing Procedure 㻝㻤㻡㻌㻛㻌㻠㻡㻞 ...
Страница 189: ...For details on the basic printing procedure see Basic Printing Procedure 㻝㻤㻥㻌㻛㻌㻠㻡㻞 ...
Страница 192: ...5 Click OK For details on the basic printing procedure see Basic Printing Procedure 㻝㻥㻞㻌㻛㻌㻠㻡㻞 ...
Страница 194: ...Click OK For details on the basic printing procedure see Basic Printing Procedure 㻝㻥㻠㻌㻛㻌㻠㻡㻞 ...
Страница 197: ...3 Click OK Then the Page Setup sheet reappears 㻝㻥㻣㻌㻛㻌㻠㻡㻞 ...
Страница 206: ...4 Click OK For details on the basic printing procedure see Basic Printing Procedure 㻞㻜㻢㻌㻛㻌㻠㻡㻞 ...
Страница 210: ...3 Click OK For details on the basic printing procedure see Basic Printing Procedure 㻞㻝㻜㻌㻛㻌㻠㻡㻞 ...
Страница 212: ...4 Click OK For details on the basic printing procedure see Basic Printing Procedure 㻞㻝㻞㻌㻛㻌㻠㻡㻞 ...
Страница 218: ...4 Click OK For details on the basic printing procedure see Basic Printing Procedure 㻞㻝㻤㻌㻛㻌㻠㻡㻞 ...
Страница 220: ...4 Click OK For details on the basic printing procedure see Basic Printing Procedure 㻞㻞㻜㻌㻛㻌㻠㻡㻞 ...
Страница 228: ... 3 Click Yes 4 Click OK ĺ The setting screen of the printer driver reappears 㻞㻞㻤㻌㻛㻌㻠㻡㻞 ...
Страница 263: ...6 Click Reset After completing the reset the settings are effective 㻞㻢㻟㻌㻛㻌㻠㻡㻞 ...
Страница 269: ...5 Clicking Yes initializes the network settings 㻞㻢㻥㻌㻛㻌㻠㻡㻞 ...
Страница 271: ...9 Enter exit then press the ENTER key on your keyboard ĺ Command Prompt closes 㻞㻣㻝㻌㻛㻌㻠㻡㻞 ...
Страница 273: ...If the message Turn the device off and then on again appears Click OK and then cycle the power of the printer 㻞㻣㻟㻌㻛㻌㻠㻡㻞 ...
Страница 282: ...Click Finish 8 Click Close 9 Click Apply 10 Click OK 㻞㻤㻞㻌㻛㻌㻠㻡㻞 ...
Страница 318: ... Link Enter the link name URL Enter the URL of the link Comments Enter a comment for the link 㻟㻝㻤㻌㻛㻌㻠㻡㻞 ...
Страница 320: ...㻟㻞㻜㻌㻛㻌㻠㻡㻞 ...
Страница 333: ...Checking Print Logs 1 Start the Remote UI Starting the Remote UI 2 Select Print Log from the Job Manager menu 㻟㻟㻟㻌㻛㻌㻠㻡㻞 ...
Страница 336: ... Printing Cannot Be Performed via the Print Server 㻟㻟㻢㻌㻛㻌㻠㻡㻞 ...
Страница 345: ...㻟㻠㻡㻌㻛㻌㻠㻡㻞 ...
Страница 350: ...9 Click OK 㻟㻡㻜㻌㻛㻌㻠㻡㻞 ...
Страница 354: ...㻟㻡㻠㻌㻛㻌㻠㻡㻞 ...
Страница 359: ...5 Click OK 㻟㻡㻥㻌㻛㻌㻠㻡㻞 ...
Страница 362: ...To check the obtained security access logs Checking the Security Access Logs 㻟㻢㻞㻌㻛㻌㻠㻡㻞 ...
Страница 394: ...You need administrator rights to change the setting Contact your system administrator 4 Click OK 㻟㻥㻠㻌㻛㻌㻠㻡㻞 ...
Страница 399: ...㻟㻥㻥㻌㻛㻌㻠㻡㻞 ...
Страница 443: ...07K5 098 Basic Operations Various Information for Windows Appendix 㻠㻠㻟㻌㻛㻌㻠㻡㻞 ...


