background image

6-33

Optional Accessor

ies

6

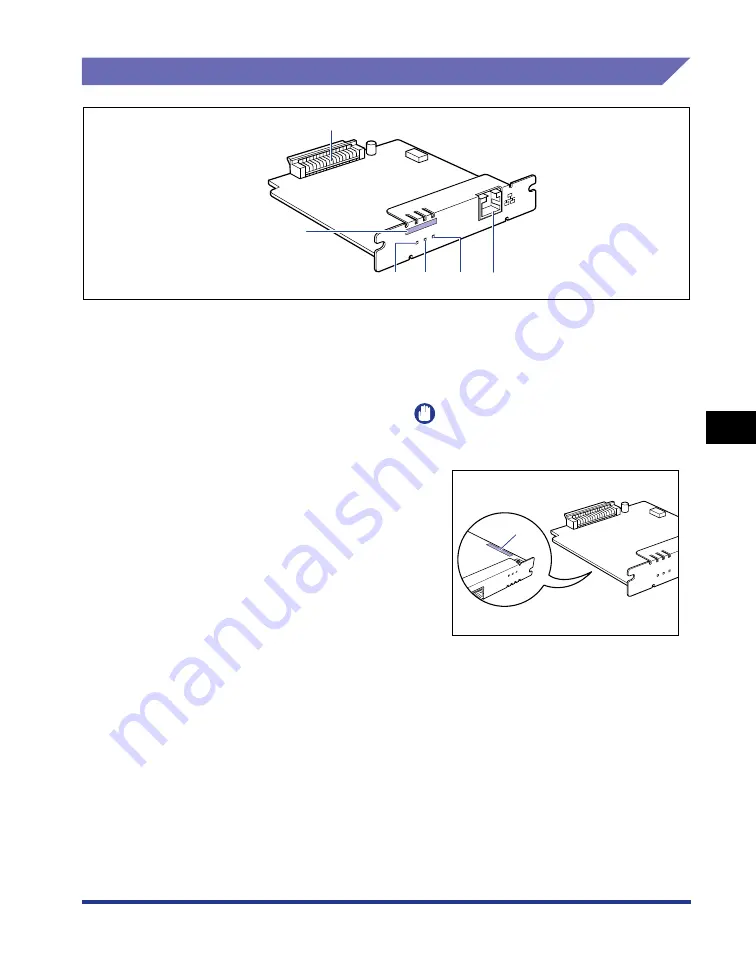
Network Board


Parts and Their Functions

a

a

a

a

Printer Connector

Connects to the printer. Do not touch the connector 
directly with your hands.

b

b

b

b

LAN Connector

Connects to a 10BASE-T/100BASE-TX LAN cable.

c

c

c

c

100 Indicator (Green)

Comes on when the network board is connected to 
the network by 100BASE-TX.
Does not come on when connected by 10BASE-T.

d

d

d

d

LNK Indicator (Green)

Comes on when the network board is connected to 
the network properly.

e

e

e

e

ERR Indicator (Orange)

Comes on or blinks when the network board is not 
working properly.

f

f

f

f

MAC Address

It is required when setting the IP address using the 
ARP/PING command. It may be also required when 
installing the printer driver.

IMPORTANT

The MAC address for NB-C1 can be 
found at the location of (A).

ERR

 LNK

 100

a

c

b

d

e

f

ERR LNK 100

ERR

 LNK

 100

(A)

Содержание LASER SHOT LBP3500

Страница 1: ...ENG IMPORTANT Read this manual carefully before using your printer Save this manual for future reference Laser Beam Printer User s Guide User s Guide ...

Страница 2: ...LBP3500 Laser Printer User s Guide ...

Страница 3: ... s Guide This Manual CD ROM Setting Up the Network Environment for Printing Managing the Printer in the Network Environment Only when the optional network board is installed Network Guide CD ROM Operating Setting the Printer from the Web Browser Only when the optional network board is installed Remote UI Guide CD ROM To view the manual in PDF format Adobe Reader Adobe Acrobat Reader is required If...

Страница 4: ...intenance Optional Accessories Troubleshooting Appendix Chapter 1 Chapter 2 Chapter 3 Chapter 4 Chapter 5 Chapter 6 Chapter 7 Chapter 8 Considerable effort has been made to ensure that this manual is free of inaccuracies and omissions However as we are constantly improving our products if you need an exact specification please contact Canon ...

Страница 5: ...tive xiii Trademarks xiii Copyright xiv Disclaimers xiv Legal Limitations on the Usage of Your Product and the Use of Images xv Important Safety Instructions xvi Installation xvi Power Supply xvii Handling xviii Maintenance and Inspections xx Consumables xxi Others xxi Chapter 1 Before You Start Features and Benefits 1 2 Parts and Their Functions 1 4 Printer Unit 1 4 Front View 1 4 Rear View 1 5 I...

Страница 6: ...19 Paper Capacity of the Output Trays 2 21 Selecting an Output Tray 2 22 Switching to the Sub output Tray 2 22 Switching to the Output Tray 2 24 Loading Paper in a Paper Cassette 2 26 When Loading Standard Size Paper 2 27 When Loading Custom Size Paper 2 34 Loading Paper in the Multi purpose Tray 2 45 Loading Plain Paper Heavy Paper Transparencies or Labels in the Multi purpose Tray 2 46 Loading E...

Страница 7: ...6 Installation on Clients 3 68 Installing from CD ROM Setup 3 70 Installing from the Printers and Faxes Folder or the Printers Folder 3 76 Installing from Windows Explorer 3 80 Uninstalling the CAPT Software 3 81 Chapter 4 Printing a Document Setting Printer Information Before Printing 4 3 Printing from an Application 4 5 Specifying the Printing Preferences 4 9 Displaying the Document Properties D...

Страница 8: ...inting with Toner Density Adjusted 4 60 Specifying the Brightness and Contrast 4 62 Printing a Grayscale Sample 4 64 Specifying Profiles 4 65 Adding a Profile 4 65 Editing Deleting a Profile 4 67 Editing Jobs with PageComposer 4 68 How to Use Online Help 4 72 Displaying Online Help on the Options Displayed on the Screen 4 72 Displaying Online Help on the Operation Procedures 4 73 Retrieving the Op...

Страница 9: ...ndling the Printer 5 35 Chapter 6 Optional Accessories Optional Accessories 6 2 Paper Cassette 6 2 Paper Feeder 6 3 Duplex Unit 6 4 Network Board 6 5 Paper Feeder 6 6 Installation Space 6 7 Moving the Printer 6 8 Removing the Packing Materials and Installing the Paper Feeder 6 12 Removing the Paper Feeder 6 20 Duplex Unit 6 22 Installation Space 6 23 Installing the Duplex Unit 6 24 Removing the Du...

Страница 10: ...tallation 7 57 Installation Problems When the Printer is Shared on a Network 7 58 Problems on Installing the Network Board 7 59 Miscellaneous Problems 7 61 Confirming the Printer Features 7 63 Chapter 8 Appendix Specifications 8 2 Hardware Specifications 8 2 Software Specifications 8 5 Dimensions of Each Part 8 6 NetSpot Device Installer 8 9 Print Monitor Installer 8 10 NetSpot Console 8 11 Window...

Страница 11: ... safely always pay attention to these warnings CAUTION Indicates a caution concerning operations that may lead to injury to persons or damage to property if not performed correctly In order to use the printer safely always pay attention to these cautions IMPORTANT Indicates operational requirements and restrictions Be sure to read these items carefully in order to operate the printer correctly and...

Страница 12: ... can be pressed on the screen shot of computer operation screen all buttons are marked Select the button which suits your needs Illustrations Used in This Manual Although the names of the indicators or key are not indicated in the illustrations of the control panel used in this manual the names are indicated on the right of the indicators or key depending on the country or region 8 Click Next Clic...

Страница 13: ...ames are abbreviated as follows Microsoft Windows 2000 operating system Windows 2000 Microsoft Windows XP operating system Windows XP Microsoft Windows Server 2003 operating system Windows Server 2003 Microsoft Windows Vista operating system Windows Vista Microsoft Windows Server 2008 operating system Windows Server 2008 Microsoft Windows 7 operating system Windows 7 Microsoft Windows operating sy...

Страница 14: ...directive at nominal mains input 230 V 50 Hz although the rated input of the product is 220 240 V 50 60 Hz C tick marking on the rating label means that we declare the product is in conformity with the relevant requirements at nominal mains input 230 V 50 Hz although the rated input of the product is 220 240 V 50 60 Hz Laser Safety 220 240 V model Laser radiation could be hazardous to the human bo...

Страница 15: ...tle 21 This printer has been classified under IEC60825 1 1993 EN60825 1 1994 and conforms to the following classes CLASS 1 LASER PRODUCT LASER KLASSE 1 APPAREIL A RAYONNEMENT LASER DE CLASSE 1 APPARECCHIO LASER DI CLASSE 1 PRODUCTO LASER DE CLASE 1 APARELHO A LASER DE CLASSE 1 CAUTION Performance of procedures other than those specified in this manual may result in hazardous radiation exposure ...

Страница 16: ...AR Partner Canon Inc has determined that this product meets the ENERGY STAR Program for energy efficiency The International ENERGY STAR Office Equipment Program is an international program that promotes energy saving through the use of computers and other office equipment The program backs the development and dissemination of products with functions that effectively reduce energy consumption It is...

Страница 17: ...sclaimers The information in this manual is subject to change without notice CANON INC MAKES NO WARRANTY OF ANY KIND WITH REGARD TO THIS MATERIAL EITHER EXPRESS OR IMPLIED EXCEPT AS PROVIDED HEREIN INCLUDING WITHOUT LIMITATION THEREOF WARRANTIES AS TO MARKETABILITY MERCHANTABILITY FITNESS FOR A PARTICULAR PURPOSE OF USE OR AGAINST INFRINGEMENT OF ANY PATENT CANON INC SHALL NOT BE LIABLE FOR ANY DI...

Страница 18: ...print or otherwise reproduce any particular document and or of the use of the images scanned printed or otherwise reproduced you should consult in advance with your legal advisor for guidance Paper Money Travelers Checks Money Orders Food Stamps Certificates of Deposit Passports Postage Stamps canceled or uncanceled Immigration Papers Identifying Badges or Insignias Internal Revenue Stamps cancele...

Страница 19: ...tallation WARNING Do not install the printer near alcohol paint thinner or other flammable substances If flammable substances come into contact with electrical parts inside the printer it may result in a fire or electrical shock Do not place the following items on the printer If these items come into contact with a high voltage area inside the printer it may result in a fire or electrical shock If...

Страница 20: ...ury When connecting the interface cable connect it properly following the instructions in this manual If not connected properly this may result in malfunction or electrical shock When moving the printer follow the instructions in this manual to hold it correctly Failure to do so may cause you to drop the printer resulting in personal injury See Moving the Printer on p 5 28 Power Supply WARNING Do ...

Страница 21: ... power cord If the power cord is damaged this could cause current to leak resulting in a fire or electrical shock Leave sufficient space around the power plug so that it can be unplugged easily If objects are placed around the power plug you will be unable to unplug it in an emergency Handling WARNING Do not attempt to disassemble or modify the printer There are high temperature and high voltage c...

Страница 22: ...r a sharp portion of the expansion board may result in personal injury Turn OFF the power switch for safety when the printer will not be used for a long period of time such as overnight Also turn OFF the power switch on the right of the printer and unplug the power plug for safety when the printer will not be used for an extended period of time such as during consecutive holidays Keep your hands o...

Страница 23: ...vice this printer yourself except as explained in this manual There are no user serviceable parts inside the printer Adjust only those controls that are covered in the operating instructions Improper adjustment could result in personal injury and or damage requiring extensive repair that may not be covered under your Limited Warranty The fixing unit and its surroundings inside the printer become h...

Страница 24: ...d to open flames as this may cause the toner or paper to ignite and result in burns or a fire CAUTION Keep toner cartridges and other consumables out of the reach of small children If these items are ingested consult a physician immediately Others WARNING The toner cartridge generates a low level magnetic field If you use a cardiac pacemaker and feel abnormalities please move away from the toner c...

Страница 25: ...xxii ...

Страница 26: ...atures and Benefits 1 2 Parts and Their Functions 1 4 Printer Unit 1 4 Control Panel 1 7 Connecting the Power Cord 1 8 Turning the Printer ON OFF 1 10 Turning the Printer ON 1 10 Turning the Printer OFF 1 11 Power Saving Sleep Mode 1 12 Connecting to a Computer 1 14 Using a USB Cable 1 14 Using a LAN Cable 1 16 ...

Страница 27: ...600 dpi laser printer engine A stunningly high resolution of 2400 dpi equivalent x 600 dpi is made possible through the new AIR Automatic Image Refinement which is unique to Canon Simple Maintenance and Printer Status Window The toner cartridge made for this printer Canon Genuine Cartridge is designed as a single part containing both toner and the light sensitive drum so that it can be easily repl...

Страница 28: ...optional network board The network board enables the operation of the printer using a built in web browser Remote UI allowing you to specify settings and manage the printer from a computer on the network NOTE For details on the operating systems that support the optional network board and procedure for setting the board see Network Guide ...

Страница 29: ...e printer unit CAUTION Never block the ventilation slots on the printer The ventilation slots are provided for proper ventilation of working parts inside the printer Blocking the ventilation slots can cause the printer to overheat resulting in a fire Front View The following are the parts on the front side of the printer and their functions a a a a Output Tray Outputs paper with the printed side f...

Страница 30: ... tray when loading long size paper such as A3 j j j j Auxiliary Tray Multi purpose Tray Be sure to pull out the auxiliary tray when loading paper in the multi purpose tray k k k k Multi purpose Tray Load paper when feeding the paper from the multi purpose tray See p 2 45 l l l l Auxiliary Tray Output Tray Opened to prevent the paper from hanging out of the output tray when outputting long size pap...

Страница 31: ...able to the USB port on the computer Inner View The following are the parts inside the printer and their functions a a a a Toner Cartridge Guide When setting the toner cartridge push it while aligning the projections on each side of the toner cartridge with this guide b b b b Transport Guide Lift the guide when removing paper jammed inside the front cover See p 7 20 c c c c Rating Label The serial...

Страница 32: ... Orange Blinking A paper jam is occurring disabling printing c c c c Alarm Indicator Orange On Service call is occurring Blinking An error is occurring disabling printing d d d d Ready Indicator Green On The printer is ready to print Blinking The printer is busy performing some kind of processing or operation such as printing warming up cleaning or pausing a job e e e e Cancel Job Key Cancel Job I...

Страница 33: ... on p xvi IMPORTANT Do not plug the power plug into the auxiliary outlet on a computer One AC power outlet should be used exclusively for the printer Do not connect this printer to an uninterruptible power source This may cause printer malfunction or breakdown at the occurrence of a power failure 1 Make sure that the power switch of the printer is OFF The printer is OFF when of the power switch is...

Страница 34: ...1 9 Before You Start 1 Connecting the Power Cord 2 Plug the supplied power cord into the power socket 3 Plug the power plug into the AC power outlet ...

Страница 35: ... power switch to turn the printer ON After running a self diagnostic test on the printer unit and optional accessories the printer will be ready to print IMPORTANT Do not turn the power ON immediately after turning it OFF If you want to turn the printer ON again after turning it OFF wait at least 10 seconds after turning the printer OFF before turning it ON again If the printer does not operate pr...

Страница 36: ...ng the following procedure IMPORTANT If the printer is used on a network make sure that it is not printing data from another computer before turning the power OFF If you turn the printer OFF all print data remaining in the printer memory will be erased So wait for the necessary print data to be printed before turning the power OFF Do not turn the power OFF when the printer is in any of the followi...

Страница 37: ...ower is consumed only slightly while the power plug is inserted into the AC power outlet To cut the power consumption completely unplug the power plug from the AC power outlet NOTE You can select 5 10 15 30 60 90 120 150 or 180 minutes for Time to Enter Sleep Mode The sleep mode is cleared in the following circumstances Printing is performed Cleaning is performed 1 Display the Printer Status Windo...

Страница 38: ...F 2 From the Options menu in the Printer Status Window select Device Settings Sleep Settings 3 Select the Use Sleep Mode check box in the Sleep Settings dialog box to specify the time to switch to the sleep mode in Time to Enter Sleep Mode 4 Click OK ...

Страница 39: ...not plug or unplug the USB cable while the computer and printer are ON as this may result in damage to the printer This printer uses bi directional communication Operation of the printer when connected via unidirectional communication equipment has not been tested and as a result Canon cannot guarantee printer operation when the printer is connected using unidirectional print servers USB hubs or s...

Страница 40: ...er 3 Connect the A type flat end of the USB cable to the USB port on the computer NOTE If a Wizard appears after connecting the USB cable by the Plug and Play automatic setup install the software for this printer using either one of the following procedures For more details see Installing the CAPT Software on p 3 4 Click Cancel and install the software from CD ROM Setup Install with Plug and Play ...

Страница 41: ...ed as a network printer the print server will need to be configured For details on these settings see the instruction manual supplied with the network operating system or Network Guide Network Environment The optional network board supports 10BASE T 100BASE TX connections When connecting to a 10BASE T Ethernet network When connecting to a 100BASE TX Ethernet network LAN Connector 10BASE T Hub Comp...

Страница 42: ... installed if there is no free port NOTE When connecting to the 100BASE TX Ethernet network all the devices to be connected to LAN such as hub LAN cable and network board for computer must support 100BASE TX For more details contact your local authorized Canon dealer 1 If you are using NB C1 attach the ferrite core to the LAN cable as shown in the figure Attach the ferrite core at 5 cm or less fro...

Страница 43: ...o a Computer 2 Connect the LAN cable to the LAN connector of the network board Connect a LAN cable that is compatible with the LAN connector of the network board according to the network 3 Connect the other end of the LAN cable to the hub ...

Страница 44: ...Cassette 2 15 Output Tray 2 17 Output Tray Type 2 17 Paper Capacity of the Output Trays 2 21 Selecting an Output Tray 2 22 Loading Paper in a Paper Cassette 2 26 When Loading Standard Size Paper 2 27 When Loading Custom Size Paper 2 34 Loading Paper in the Multi purpose Tray 2 45 Loading Plain Paper Heavy Paper Transparencies or Labels in the Multi purpose Tray 2 46 Loading Envelopes in the Multi ...

Страница 45: ...m wide or smaller the safety function that prevents damages caused by heat may slow the print speed down in stages The print speed may be as slow as approximately 1 9 ppm Paper Size The following shows the paper sizes that can be used with this printer The symbol indicates the paper that can be used for 1 sided printing and automatic 2 sided printing using the optional duplex unit the symbol indic...

Страница 46: ...ng paper in portrait orientation Width 210 0 to 297 0 mm Length 210 0 to 431 8 mm If the paper width is 279 5 to 297 0 mm the paper length should be 210 0 to 420 0 mm When loading paper in landscape orientation Width 210 0 to 297 0 mm Length 148 0 to 297 0 mm 5 You can load paper of the following custom paper sizes When loading paper in portrait orientation Width 210 0 to 297 0 mm Length 210 0 to ...

Страница 47: ...B4 A4 B5 A5 Ledger 11 x 17 Legal Letter Executive 8K 16K and custom paper sizes that weighs between 60 and 90 g m2 Plain paper can be loaded in the paper cassettes and multi purpose tray Also paper at sizes of A3 B4 A4 B5 A5 Ledger 11 x 17 Letter Legal Executive 16K and paper of the following custom paper sizes are available for automatic 2 sided printing When loading paper in portrait orientation...

Страница 48: ...backing sheet Labels with uneven adhesive Index Card This printer can print Index Card size media IMPORTANT Do not print plain paper 60 90 g m2 of the Index Card size Otherwise this may result in paper jams Envelope The envelopes that can be used with this printer are as follows Load the envelopes with the address side non glued side facing up in the multi purpose tray You cannot use envelopes at ...

Страница 49: ...ng air and press the fold lines along the edges tight Do not print on the reverse side glued side of envelopes When loading envelopes at a size of DL COM10 C5 or Monarch load them so that the flap is toward the left of the printer when viewed from the front Feeding direction When loading envelopes of the Envelope B5 size close the flaps and load them so that the envelopes are printed from the top ...

Страница 50: ...pper Left of Sheet as Starting Point check box in the Finishing Details dialog box in the printer driver however you can extend the printable area to near the edges of the paper For more details see Help of the printer driver Plain Paper Heavy Paper Transparency Label You cannot print on any area within 5 mm of the edges of paper Paper Size Abbreviations on the Paper Cassette Ledger 11 x 17 11 x 1...

Страница 51: ...ters etc Labels with backing sheet that is easily peeled off Paper that has already been printed by a copy machine or another laser printer The reverse side of the paper is also unusable Using the multi purpose tray however you can perform 2 sided printing manually on the other side of previously printed paper You cannot print on the printed side again Paper with jagged edges Wrinkled paper Paper ...

Страница 52: ...jams or deterioration in print quality Observe the following guidelines when storing and handling paper IMPORTANT Store paper away from moisture since paper quality deteriorates in a moist environment Paper wrappers help avoiding moisture and dryness Keep paper in the wrapper until it is ready to be used Store all unused paper in a wrapper Store paper on a flat surface Do not store paper on the fl...

Страница 53: ...t when soluble adhesive is used Before using the adhesive test it with paper that is no longer required Make sure that the printed paper is completely dry before placing one over another Toner may melt if they are placed together half dried Store paper on a flat surface Toner may peel when they are folded or creased Avoid storing printouts at high temperatures Otherwise toner may melt and blot Put...

Страница 54: ...optional paper feeder Cassette 2 up to 3 paper sources can be used Paper Level Indicator The paper cassette has a paper level indicator A that shows the amount of paper remaining in the cassette If the cassette is full the paper level indicator is at the top Because the indicator moves down as the amount of paper drops this gives a rough estimate of the amount of paper remaining A ...

Страница 55: ...e 1 C Cassette 2 Optional Paper Capacity of Paper Source Paper Type Paper Source Multi purpose Tray Cassette 1 Cassette 2 Optional Plain paper 64 g m2 Approx 100 sheets Approx 250 sheets Approx 500 sheets Heavy paper 128 g m2 Approx 50 sheets x x Transparency Approx 50 sheets x x Label Approx 40 sheets x x Envelope Approx 10 sheets x x A B C ...

Страница 56: ...er source For details on the procedure for displaying the Paper Source sheet in the printer driver see Specifying the Printing Preferences on p 4 9 NOTE When the setting for Paper Source is set to Auto when the paper source is selected automatically you can select which paper cassette is the target for the automatic selection in Cassettes Settings in the Device Settings menu in the Printer Status ...

Страница 57: ... a different type of paper Different for First Second Others and Last Different for Cover and Others 1 Transparency Interleaving Allows you to interleave paper sheets between transparencies Paper Source Auto Multi purpose Tray Cassette 1 Cassette 2 2 Select a paper source Options to be specified differ depending on the setting for Paper Selection First Page Second Page Cover Page 1 Other Pages Las...

Страница 58: ...paper cassette after all the loaded paper runs out If the cassette is refilled when paper still remains in the cassette it may result in misfeeds Do not put anything other than the printing paper on the multi purpose tray Also do not press on top of or apply excessive force to the multi purposes tray This may result in damage to the multi purpose tray Continue Printing with the Multi purpose Tray ...

Страница 59: ...Do not touch the feed roller A in Cassette 2 This may result in misfeeds Be sure to turn the printer ON once when loading paper in the paper cassette for the first time after installing the paper feeder NOTE Before closing the multi purpose tray remove any loaded paper Keep the multi purpose tray closed when it is not used A A ...

Страница 60: ... printer unit Do not switch one output tray to another during printing This may result in paper jams CAUTION Keep your hands or clothing away from the roller in the output area Even if the printer is not printing sudden rotation of the roller may catch your hands or clothing resulting in personal injury Output Tray Printed paper is output to the output tray with the printed side facing down ...

Страница 61: ...uch the paper until it is output to the output tray completely In 2 sided printing the paper is partially output once after printed on its surface and is fed again to be printed on its reverse side The surroundings of the output tray are hot during printing or immediately after printing When taking out of the paper or removing jammed paper do not touch the surroundings of the output tray NOTE The ...

Страница 62: ...utput to the sub output tray on the rear of the printer unit with the printed side facing up Printed paper is stacked with the page order reversed The sub output tray is suitable to print transparencies labels or envelopes that curl easily since the printed paper is output flattened ...

Страница 63: ...e paper from hanging out of the sub output tray When outputting A3 size paper or other long size paper to the sub output tray open the tray extension When you use the tray extension gently open it until it stops IMPORTANT Be sure to close the sub output tray before performing automatic 2 sided printing Do not open the sub output tray during automatic 2 sided printing ...

Страница 64: ...he paper capacity varies depending on the paper size or paper type For more details see Paper Capacity of the Output Trays on p 2 21 Paper Capacity of the Output Trays Actual paper capacity varies depending on the installation environment and paper type Paper Type Output Trays Output Tray Sub output Tray Plain paper 64 g m2 Approx 250 sheets Approx 50 sheets Heavy paper 128 g m2 Approx 150 sheets ...

Страница 65: ...cting an Output Tray Switching to the Sub output Tray Switch an output tray to the sub output tray using the following procedure 1 Open the sub output tray a a a a When outputting A4 size paper or other large size paper pull out the auxiliary tray b a b ...

Страница 66: ... is output to the sub output tray with the printed side facing up Therefore when printing from the first page the paper is stacked with the page order reversed If you want the printer to output paper with the pages collated in the right order select the Reverse Output Order When Using Sub output Tray check box in the Finishing Details dialog box in the Finishing sheet and you can output paper with...

Страница 67: ...ing and Outputting Paper 2 Switching to the Output Tray Switch an output tray to the output tray using the following procedure 1 Close the tray extension and auxiliary tray a a a a then close the sub output tray b b b b b a ...

Страница 68: ...t Tray 2 Select Auto or Output Tray in Paper Output in the Finishing sheet in the printer driver Make sure that the sub output tray is closed before selecting Auto If the sub output tray is opened printed paper is output to the sub output tray ...

Страница 69: ...n the Printer Status Window and the Load Paper indicator orange comes on or blinks In this case refill paper The paper loading methods are different between standard size paper and custom size paper Therefore load paper properly using the following procedures When Loading Standard Size Paper See p 2 27 When Loading Custom Size Paper See p 2 34 IMPORTANT For more details on the usable paper see Usa...

Страница 70: ...rientation differs as follows Cassette 1 Cassette 2 Ex A4 Landscape orientation Portrait orientation Ex A3 Paper that can be loaded in portrait orientation A3 B4 Ledger 11 x 17 Legal Paper that can be loaded in landscape orientation A4 B5 A5 Letter Executive 16K Ex A4 Ex A3 Landscape orientation Portrait orientation Paper that can be loaded in portrait orientation A3 B4 Ledger 11 x 17 Legal Paper ...

Страница 71: ...orizontally If you try to pull it out forcefully this may result in damage to the paper cassette Hold the paper cassette with both hands securely because the cassette is heavy Place the removed paper cassette on a flat and stable surface Cassette 1 Pull out the paper cassette gently until it stops a Cassette 2 Pull out the paper cassette gently until it stops a Raise the front side of the paper ca...

Страница 72: ...paper at sizes of A3 B4 Ledger 11 x 17 and Legal extend the paper cassette To adjust the length of the paper cassette align the lock release lever with to release the lock slide the paper cassette by holding the rear portion of the paper cassette and then align the lock release lever with to lock the cassette While holding the lock release lever of the side paper guides slide the guides to the siz...

Страница 73: ... that the rear edge is aligned with the paper guide CAUTION When loading paper take care not to cut your hands with the edges of the paper IMPORTANT Be sure to check if the paper guide is at the position of the size of the loaded paper If the paper guide is set at a wrong position this may result in misfeeds If you use paper that has been poorly cut multiple sheets of paper may be fed at once In t...

Страница 74: ...eding direction When loading paper at a size of A4 B5 A5 Letter Executive or 16K in landscape orientation load the paper so that the printing side is facing down as shown in the following figures When loading paper at a size of A3 B4 Ledger 11 x 17 or Legal in portrait orientation load the paper so that the printing side is facing down as shown in the following figures Cassette 1 Cassette 2 Casset...

Страница 75: ...the hooks of the paper guides and the paper stack If there is no sufficient space slightly reduce the amount of paper Cassette 1 Cassette 2 IMPORTANT The paper capacity of Cassette 1 is approximately 250 sheets of plain paper 64 g m2 and that of Cassette 2 is approximately 500 sheets of plain paper 64 g m2 Be sure that the paper stack does not exceed the load limit marks on the paper guides If the...

Страница 76: ...size of the loaded paper IMPORTANT Make sure that the paper size the paper size register dial is indicating corresponds with the size of the loaded paper before setting the paper cassette in the printer If the paper size that the paper size register dial is indicating does not correspond with the size of the loaded paper this may result in printer malfunction Do not use A4R LTRR and 8 5 x 13 Casse...

Страница 77: ... the paper cassette in the printer be careful not to catch your fingers Next configure the printer driver See p 2 64 When Loading Custom Size Paper Perform the following procedure to load custom size paper IMPORTANT You can load paper of the following custom paper sizes When loading paper in portrait orientation Width 210 0 to 297 0 mm Length 210 0 to 431 8 mm When loading paper that is 279 5 to 2...

Страница 78: ...he printer may become damaged resulting in personal injury IMPORTANT The paper cassette cannot be pulled out horizontally If you try to pull it out forcefully this may result in damage to the paper cassette Hold the paper cassette with both hands securely because the cassette is heavy Place the removed paper cassette on a flat and stable surface Cassette 1 Pull out the paper cassette gently until ...

Страница 79: ...holding the rear portion of the paper cassette and then align the lock release lever with to lock the cassette 3 Load the paper so that the edge of the paper is aligned with the front side of the paper cassette CAUTION When loading paper take care not to cut your hands with the edges of the paper IMPORTANT If you use paper that has been poorly cut multiple sheets of paper may be fed at once In thi...

Страница 80: ...n according to the following instructions Feeding direction When loading paper in landscape orientation load the paper so that the printing side is facing down as shown in the following figures When loading paper in portrait orientation load the paper so that the printing side is facing down as shown in the following figures Cassette 1 Cassette 2 Cassette 1 Cassette 2 ...

Страница 81: ...ver of the rear paper guide slide the guide to the size mark for the loaded paper 6 Hold down the paper as shown in the figure make sure that the paper stack does not exceed the load limit marks A and then set it under the hooks B on the paper guides Make sure that there is sufficient space between the hooks of the paper guides and the paper stack If there is no sufficient space slightly reduce th...

Страница 82: ... of Cassette 1 is approximately 250 sheets of plain paper 64 g m2 and that of Cassette 2 is approximately 500 sheets of plain paper 64 g m2 Be sure that the paper stack does not exceed the load limit marks on the paper guides If the paper stack exceeds the load limit marks this may result in misfeeds B B A A B A B B A B ...

Страница 83: ...ize register dial A to Custom IMPORTANT Make sure that the paper size register dial is set to Custom before setting the paper cassette in the printer If the paper size that the paper size register dial is indicating does not correspond with the size of the loaded paper this may result in printer malfunction Cassette 1 Cassette 2 Cassette 1 Cassette 2 A A A A ...

Страница 84: ...printer firmly until the front side of the paper cassette is flush with the front surface of the printer CAUTION When setting the paper cassette in the printer be careful not to catch your fingers Then specify the paper feed direction of the custom size paper in the Printer Status Window 10 Display the Printer Status Window For details on methods for displaying the Printer Status Window see Displa...

Страница 85: ...splayed 12 Specify the paper feed direction the loading orientation of the custom size paper loaded in the paper cassette in Feed Direction of Custom Paper Size in the Cassettes Settings dialog box and then click OK 13 Register the size of the loaded custom size paper using the following procedure When printing custom size paper you need to register the custom paper size in the printer driver prev...

Страница 86: ...for Windows 2000 Vista 14 Display the Page Setup sheet then click Custom Paper Size 15 Specify the following options as needed Paper List Displays Name and Size of standard paper sizes and added custom paper sizes Name of Custom Paper Size You can enter the name of the custom paper size to be added Up to 31 characters can be entered Unit Specify the unit Millimeter or Inch to be used when setting ...

Страница 87: ... custom paper size Height Width Specify the custom paper size in portrait orientation Height Width within user definable sizes 16 Click Register NOTE The number of custom paper sizes that can be added depends on the system environment 17 Confirm the settings then click OK Next configure the printer driver See p 2 64 ...

Страница 88: ...t be loaded in a paper cassette such as heavy paper transparencies and envelopes can be loaded in the multi purpose tray The paper loading procedure varies depending on the paper type Refer to the respective procedures for each paper type Plain Paper Heavy Paper Transparency Label See Loading Plain Paper Heavy Paper Transparencies or Labels in the Multi purpose Tray on p 2 46 Envelope See Loading ...

Страница 89: ...Load paper in portrait or landscape orientation Depending on the size of the paper to be loaded the loading orientation differs as follows 1 Open the multi purpose tray Holding the blue opening at the center of the printer open the multi purpose tray Ex A3 Portrait orientation Landscape orientation Ex A4 Paper that can be loaded in landscape orientation A4 B5 A5 Letter Executive Index Card 16K Pap...

Страница 90: ... Loading Paper in the Multi purpose Tray 2 Pull out the auxiliary tray IMPORTANT Be sure to pull out the auxiliary tray when loading paper in the multi purpose tray 3 When loading long size paper such as A3 B4 etc open the tray extension ...

Страница 91: ... the paper IMPORTANT Be sure to fan the transparencies or labels thoroughly before loading them If they are not fanned enough multiple sheets of paper may be fed at once causing paper jams When fanning or aligning the transparencies try to hold the edges to avoid touching the printing surface Take care not to mark or stain the printing surface of the transparencies with fingerprints dust or oil Th...

Страница 92: ...ed below Make sure that the paper stack does not exceed the load limit guides Plain paper Approx 100 sheets 64 g m2 Heavy paper Approx 50 sheets 128 g m2 Transparency Approx 50 sheets Label Approx 40 sheets Load the paper so that it is straight If the rear edge of the paper stack is not properly aligned this may result in misfeeds or paper jams If the paper is curled or folded at corners flatten i...

Страница 93: ...aper printed with a logo load the paper in the proper orientation according to the following instructions Feeding direction When loading paper at a size of A4 B5 A5 Letter Executive Index Card or 16K in landscape orientation load the paper so that the printing side is facing up as shown in the following figures ...

Страница 94: ... the Multi purpose Tray When loading paper at a size of A3 B4 Ledger 11 x 17 Legal or 8K in portrait orientation load the paper so that the printing side is facing up as shown in the following figures 7 Align the paper guides with both sides of the stack ...

Страница 95: ...may result in misfeeds or paper jams Next configure the printer driver See p 2 64 Loading Envelopes in the Multi purpose Tray You can load envelopes at sizes of DL COM10 C5 Monarch and B5 in the multi purpose tray Use the following procedure when loading envelopes in the multi purpose tray 1 Open the multi purpose tray Holding the blue opening at the center of the printer open the multi purpose tr...

Страница 96: ...ading Paper in the Multi purpose Tray 2 Pull out the auxiliary tray IMPORTANT Be sure to pull out the auxiliary tray when loading paper in the multi purpose tray 3 When loading long size paper such as Envelope B5 etc open the tray extension ...

Страница 97: ... the paper guides a little wider than the actual paper width 5 Place the stack of envelopes on a flat surface flatten them to release any remaining air and be sure that the edges are pressed tightly CAUTION When loading paper take care not to cut your hands with the edges of the paper ...

Страница 98: ...lopes and flatten curls as shown in the figure 7 Align the edges of the envelopes on a flat surface 8 Gently load the stack of envelopes with the printing side facing up until it touches the back of the multi purpose tray as shown in the figure Be sure that the paper stack is loaded under the load limit guides A A ...

Страница 99: ...can be loaded in the multi purpose tray Make sure that the paper stack does not exceed the load limit guides You cannot print on the reverse side glued side of envelopes 9 Align the paper guides with both sides of the stack Envelope DL COM10 C5 Monarch Envelope B5 Load the envelopes so that the flap is toward the left of the printer when viewed from the front Close the flaps and load the envelopes...

Страница 100: ...oo loose or too tight this may result in misfeeds or paper jams Next configure the printer driver See p 2 64 Loading Custom Size Paper Non Standard Paper in the Multi purpose Tray Perform the following procedure to load custom size paper in the multi purpose tray 1 Open the multi purpose tray Holding the blue opening at the center of the printer open the multi purpose tray ...

Страница 101: ... purpose Tray 2 58 Loading and Outputting Paper 2 2 Pull out the auxiliary tray IMPORTANT Be sure to pull out the auxiliary tray when loading paper in the multi purpose tray 3 When loading long size paper open the tray extension ...

Страница 102: ...t the paper stack is loaded under the load limit guides A CAUTION When loading paper take care not to cut your hands with the edges of the paper IMPORTANT The multi purpose tray can be loaded with up to approximately 100 sheets of plain paper 64 g m2 Make sure that the paper stack does not exceed the load limit guides Load the paper so that it is straight If the rear edge of the paper stack is not...

Страница 103: ...ts of paper may be fed at once In this case fan the paper thoroughly and then align the edges of the stack on a hard flat surface NOTE To print letterhead paper or paper printed with a logo load the paper in the proper orientation according to the following instructions Feeding direction When loading paper in landscape orientation load the paper so that the printing side is facing up as shown in t...

Страница 104: ...aper 2 Loading Paper in the Multi purpose Tray When loading paper in portrait orientation load the paper so that the printing side is facing up as shown in the following figures 6 Align the paper guides with both sides of the stack ...

Страница 105: ...per jams 7 Register the size of the loaded custom size paper using the following procedure When printing custom size paper you need to register the custom paper size in the printer driver previously NOTE To specify the settings for custom size paper display the Document Properties dialog box from the Printers and Faxes folder the Printers folder for Windows 2000 Vista 8 Display the Page Setup shee...

Страница 106: ...ter driver See p 2 64 Paper List Displays Name and Size of standard paper sizes and added custom paper sizes Name of Custom Paper Size You can enter the name of the custom paper size to be added Up to 31 characters can be entered Unit Specify the unit Millimeter or Inch to be used when setting the custom paper size Paper Size Specify the height and width of the custom paper size Height Width Speci...

Страница 107: ...gure the printer driver using the following procedure before printing NOTE For more details on the settings for the printer driver see Online Help For details on methods for displaying Online Help see How to Use Online Help on p 4 72 1 Select Print from the File menu in the application Select the name of this printer for Name or Printer Name and then click Properties ...

Страница 108: ... size of a document that you have created with the application NOTE If you set Page Size to Index Card the following message appears and Paper Type is automatically specified If you set Page Size to Envelope DL Envelope COM10 Envelope C5 Envelope Monarch or Envelope B5 the following message appears and Paper Type is automatically specified ...

Страница 109: ... needed Leave the setting at Match Page Size when the paper size specified for Page Size and that of the paper loaded in the paper source are the same since there is no need to change the setting IMPORTANT The print will be automatically reduced or enlarged to fit on the page when the settings for Page Size and Output Size are different ...

Страница 110: ...per Source sheet then select Paper Source Specify the same setting as the one for Paper Source although the setting for Paper Source changes to ones such as First Page or Other Pages when Paper Selection is set to other than Same Paper for All Pages 5 Select the paper type specified in Paper Type ...

Страница 111: ...Paper H 3 If you want to improve the fixation when printed with Heavy Paper L selected select Heavy Paper H 4 When printing envelopes the printer automatically applies the appropriate print mode to the envelope type by specifying Output Size in the Page Setup sheet 6 Click OK to close the Properties dialog box Paper Type Printer Driver Setting Plain paper 60 90 g m2 Plain Paper Plain Paper L 1 Pla...

Страница 112: ...2 69 Loading and Outputting Paper 2 Setting Up the Printer Driver and Printing 7 Click OK to start printing ...

Страница 113: ...ely In automatic 2 sided printing the paper is partially output once after printed on its surface and is fed again to be printed on its reverse side Be sure to close the sub output tray before performing automatic 2 sided printing Do not open the sub output tray during automatic 2 sided printing When performing manual 2 sided printing flatten folds and curls of the paper and then load the paper on...

Страница 114: ...aper should be loaded in the opposite orientation to that for 1 sided printing When printing paper such as a letterhead in which faces and directional orientations specified load the paper using the following procedure When loading paper at a size of A4 B5 A5 Letter Executive or 16K in the paper cassette in landscape orientation load the paper so that the printing side is facing up as shown in the...

Страница 115: ...d Outputting Paper 2 When loading paper at a size of A3 B4 Ledger 11 x 17 or Legal in the paper cassette in portrait orientation load the paper so that the printing side is facing up as shown in the following figures Feeding direction ...

Страница 116: ... sided Printing When loading paper at a size of A4 B5 A5 Letter Executive or 16K in the multi purpose tray in landscape orientation load the paper so that the printing side is facing down as shown in the following figures Feeding direction ...

Страница 117: ...putting Paper 2 When loading paper at a size of A3 B4 Ledger 11 x 17 Legal or 8K in the multi purpose tray in portrait orientation load the paper so that the printing side is facing down as shown in the following figures Feeding direction ...

Страница 118: ...Select Print from the File menu in the application Select the name of this printer for Name or Printer Name and then click Properties 3 Display the Page Setup sheet then from Page Size select the size of a document that you have created with the application ...

Страница 119: ...Size when the page size and the size of the paper loaded in the paper source are the same since there is no need to change the setting IMPORTANT The print will be automatically reduced or enlarged to fit on the page when the settings for Page Size and Output Size are different 5 Display the Finishing sheet and select 2 sided Printing for Print Style ...

Страница 120: ...eet then select Paper Source Specify the same setting as the one for Paper Source although the setting for Paper Source changes to ones such as First Page or Other Pages when Paper Selection is set to other than Same Paper for All Pages 7 Select the paper type specified in Paper Type ...

Страница 121: ... curls excessively when printed with Plain Paper selected select Plain Paper L 2 If you want to improve the fixation when printed with Plain Paper selected select Plain Paper H 8 Click OK to close the Properties dialog box Paper Type Printer Driver Setting Plain paper 60 90 g m2 Plain Paper Plain Paper L 1 Plain Paper H 2 ...

Страница 122: ...2 79 Loading and Outputting Paper 2 2 sided Printing 9 Click OK to start printing ...

Страница 123: ...ded printing cannot be applied IMPORTANT When performing manual 2 sided printing flatten folds and curls of the paper and then load the paper one piece at a time in the multi purpose tray 1 Load paper in the multi purpose tray NOTE When loading paper at a size of A4 B5 A5 Letter Executive or 16K in landscape orientation load the paper so that the printing side is facing up as shown in the followin...

Страница 124: ...ting Paper 2 2 sided Printing When loading paper at a size of A3 B4 Ledger 11 x 17 Legal or 8K in portrait orientation load the paper so that the printing side is facing up as shown in the following figures Feeding direction ...

Страница 125: ...Select Print from the File menu in the application Select the name of this printer for Name or Printer Name and then click Properties 3 Display the Page Setup sheet then from Page Size select the size of a document that you have created with the application ...

Страница 126: ... when the page size and the size of the paper loaded in the multi purpose tray are the same since there is no need to change the setting IMPORTANT The print will be automatically reduced or enlarged to fit on the page when the settings for Page Size and Output Size are different 5 Display the Paper Source sheet and set Paper Source to Multi purpose Tray ...

Страница 127: ...d with Plain Paper selected select Plain Paper L 2 If you want to improve the fixation when printed with Plain Paper selected select Plain Paper H 3 If you want to improve the fixation when printed with Heavy Paper L selected select Heavy Paper H Paper Type Printer Driver Setting Plain paper 60 90 g m2 Plain Paper Plain Paper L 1 Plain Paper H 2 Heavy paper 91 199 g m2 Heavy Paper L Heavy Paper H ...

Страница 128: ...2 85 Loading and Outputting Paper 2 2 sided Printing 7 Click OK to close the Properties dialog box 8 Click OK to start printing ...

Страница 129: ...2 sided Printing 2 86 Loading and Outputting Paper 2 ...

Страница 130: ...ystem Requirements 3 2 Installing the CAPT Software 3 4 Installing from CD ROM Setup 3 5 Installing with Plug and Play 3 12 Installing from the Printers and Faxes Folder or the Printers Folder 3 30 After Completing Installation 3 49 For Windows Vista 3 49 For Windows XP Server 2003 3 50 For Windows 2000 3 51 Checking the Operations by Configuration Page Print 3 52 Printing from a Network Computer ...

Страница 131: ...er on a network and use it from a computer on the network you must specify the settings for the computer and install the printer driver on the client computers Tasks to Perform Each Time You Print The following shows the tasks that should be performed each time you print Specifying printing preferences Specify the paper size document size and print copies in the printer driver If you do not specif...

Страница 132: ...nvironment or installation method System Requirements recommended Interface When connecting with USB USB 2 0 Hi Speed USB Full Speed USB1 1 equivalent When connecting to a network Requires the optional network board Connector 10BASE T or 100BASE TX Protocol TCP IP NOTE When using Sound a PC synthesizer and the driver for PCM synthesizer must be installed in your computer Do not use a PC Speaker dr...

Страница 133: ...nd increase the free space and then install the CAPT software again Installation method Contents Reference page Easy Installation Installs the manuals when installing the printer driver from the CD ROM supplied with the printer CD ROM Setup P 3 5 Custom Installation You can choose to install only the printer driver or only the manuals from the CD ROM supplied with the printer CD ROM Setup 1 P 3 5 ...

Страница 134: ... you want to update the additional driver alternate driver perform the following procedure 1 Uninstall the printer driver used in the print server See p 3 81 2 Install the new printer driver on the print server See p 3 4 3 See Print Server Settings p 3 56 and install the additional driver again When you connect this printer to your computer with a USB cable use the supplied USB cable or a USB cabl...

Страница 135: ...into the drive IMPORTANT If you are using Windows Vista and the AutoPlay dialog box appears click Run AUTORUN EXE If CD ROM Setup does not appear display it using the following procedures The CD ROM drive name is indicated as D in this manual The CD ROM drive name may differ depending on the computer you are using If you are using an operating system other than Windows Vista select Run from the St...

Страница 136: ...Printing Environment 3 6 Click Easy Installation or Custom Installation Easy Installation allows you to install the printer driver and the instruction manuals simultaneously If you do not install the manuals select Custom Installation 7 Click Install ...

Страница 137: ...ng the CAPT Software Setting Up the Printing Environment 3 If you selected Custom Installation in Step 6 clear the Online Manuals check box and then click Install 8 Confirm the contents then click Yes 9 Click Next ...

Страница 138: ...Firewall to unblock communication with the client computers when sharing the printer on a network Click Yes when you share the printer on a network After completing the installation see Printing from a Network Computer by Sharing the Printer on a Network p 3 55 and specify the settings for sharing the printer on the network Click No when you do not share the printer on a network NOTE Even after th...

Страница 139: ...this driver software anyway 12 When the following screen is displayed turn the printer ON Press of the power switch to turn the printer ON Installation of the USB class driver and the printer driver starts automatically NOTE If the printer is not recognized automatically even after the USB cable is connected see Installation Problems on p 7 51 If you are using Windows XP Server 2003 and the Hardwa...

Страница 140: ... Up the Printing Environment 3 13 If Easy Installation is selected in Step 6 the manuals are installed 14 Confirm the installation results then click Next NOTE If the printer driver is not installed properly see Installation Problems on p 7 51 ...

Страница 141: ...er and the printer driver is completed Installing with Plug and Play IMPORTANT If you are using Windows 7 you may not be able to install the printer driver properly due to the Windows restriction even after detecting the printer with Plug and Play Click What can I do if my device did not install properly and then see Windows Help or reinstall the printer driver in Installing from CD ROM Setup See ...

Страница 142: ...inting Environment 3 For Windows Vista 1 Make sure that the printer and computer are OFF 2 Connect the B type square end of the USB cable to the USB connector on the printer 3 Connect the A type flat end of the USB cable to the USB port on the computer ...

Страница 143: ... the computer on and start up Windows Vista 6 Log on as a member of Administrators The Found New Hardware dialog box appears NOTE Full Control Permission is required for the installation of the printer driver 7 Click Locate and install driver software recommended NOTE If the User Account Control dialog box appears click Continue ...

Страница 144: ...3 15 Installing the CAPT Software Setting Up the Printing Environment 3 8 If the following screen appears click Don t search online 9 Click I don t have the disc Show me other options ...

Страница 145: ...ware Setting Up the Printing Environment 3 10 Click Browse my computer for driver software advanced 11 Insert the supplied LBP3500 User Software CD ROM into the CD ROM drive and then click Browse If CD ROM Setup appears click Exit ...

Страница 146: ...whether you are using 32 bit Windows Vista or 64 bit Windows Vista see Checking the Processor Version of Windows Vista on p 8 18 If you are using 32 bit Windows Vista Select the folder in the supplied CD ROM English 32bit Win2K_Vista then click OK If you are using 64 bit Windows Vista Select the folder in the supplied CD ROM English x64 Driver then click OK ...

Страница 147: ...in this location and then click Next Copying files is started NOTE If the Windows Security dialog box appears click Install this driver software anyway 14 Click Close IMPORTANT If you want to use the computer in which the printer driver was installed as the print server configure Windows Firewall to unblock communication with the client computers See p 8 12 ...

Страница 148: ...system and the printer driver is completed For Windows XP Server 2003 The screen shots used in this section are from Windows XP 1 Make sure that the printer and computer are OFF 2 Connect the B type square end of the USB cable to the USB connector on the printer 3 Connect the A type flat end of the USB cable to the USB port on the computer ...

Страница 149: ...indows XP Server 2003 6 Log on as a member of Administrators NOTE Full Control Permission is required for the installation of the printer driver 7 Insert the supplied LBP3500 User Software CD ROM into the CD ROM drive If CD ROM Setup appears click Exit If the following screen is displayed Select Install from a list or specific location Advanced then click Next ...

Страница 150: ...lling the CAPT Software Setting Up the Printing Environment 3 If the following screen is displayed Select No not this time then click Next Select Install from a list or specific location Advanced then click Next ...

Страница 151: ...cations clear the Search removable media floppy CD ROM check box and then select the Include this location in the search check box 9 Select the folder in which the printer driver is included If you are using 32 bit Windows XP or Server 2003 Select the folder in the supplied CD ROM English 32bit Win2K_Vista then click OK ...

Страница 152: ...erver 2003 Select the folder in the supplied CD ROM English x64 Driver then click OK 10 Make sure that the folder to be browsed is displayed for Include this location in the search and then click Next The installation process is displayed NOTE If the Hardware Installation dialog box appears click Continue Anyway ...

Страница 153: ...er with Windows XP Service Pack 2 or another operating system equipped with Windows Firewall as the print server you need to configure Windows Firewall to unblock communication with the client computers See p 8 12 The installation of the USB class driver supplied with an operating system and the printer driver is completed ...

Страница 154: ...rinting Environment 3 For Windows 2000 1 Make sure that the printer and computer are OFF 2 Connect the B type square end of the USB cable to the USB connector on the printer 3 Connect the A type flat end of the USB cable to the USB port on the computer ...

Страница 155: ...ss of the power switch to turn the printer ON 5 Turn the computer on and start up Windows 2000 6 Log on as a member of Administrators The Found New Hardware Wizard dialog box appears NOTE Full Control Permission is required for the installation of the printer driver 7 Click Next ...

Страница 156: ... 3 8 Select Search for a suitable driver for my device recommended then click Next NOTE Unknown may be displayed as the name of the device 9 Clear the Floppy disk drives check box and the CD ROM drives check box select the Specify a location check box and then click Next ...

Страница 157: ...lick Browse If CD ROM Setup appears click Exit 11 Select D English 32bit Win2K_Vista Select CNAB6STK INF then click Open The CD ROM drive name is indicated as D in this manual The CD ROM drive name may differ depending on the computer you are using 12 Make sure that the folder to be browsed is displayed for Copy manufacturer s files from and then click OK ...

Страница 158: ...nting Environment 3 13 Click Next Copying files is started NOTE If the Digital Signature Not Found dialog box appears click Yes 14 Click Finish The installation of the USB class driver supplied with an operating system and the printer driver is completed ...

Страница 159: ...st page make sure that the printer is properly connected to the computer and the printer is ON before installing the CAPT software 1 Turn the computer on and start up Windows Vista 2 Log on as a member of Administrators IMPORTANT If a dialog box appears by the Plug and Play automatic setup click Cancel and then install the CAPT software using this procedure NOTE Full Control Permission is required...

Страница 160: ...ling the CAPT Software Setting Up the Printing Environment 3 5 Click Add a local printer 6 Make sure that Use an existing port is selected select the USB port to which this printer is connected and then click Next ...

Страница 161: ...500 User Software CD ROM into the CD ROM drive and then click Browse If CD ROM Setup appears click Exit 9 Select the folder in which the printer driver is included NOTE If you are not sure whether you are using 32 bit Windows Vista or 64 bit Windows Vista see Checking the Processor Version of Windows Vista on p 8 18 ...

Страница 162: ... in the supplied CD ROM English 32bit Win2K_Vista Select CNAB6STK INF and then click Open If you are using 64 bit Windows Vista Select the folders in the supplied CD ROM English x64 Driver Select CNAB6STK INF and then click Open 10 Confirm that the folder to browse is displayed in Copy manufacturer s files from and then click OK ...

Страница 163: ...Copying files is started NOTE If another printer driver has already been installed in the computer Set as the default printer appears When specifying the printer as the default printer select the Set as the default printer check box If the User Account Control dialog box appears click Continue If the Windows Security dialog box appears click Install this driver software anyway ...

Страница 164: ... close to close the dialog box 14 Click Finish 15 If the printer and computer are not connected turn the computer off connect the computer and printer with a USB cable and then turn them ON IMPORTANT If you want to use the computer in which the printer driver was installed as the print server configure Windows Firewall to unblock communication with the client computers See p 8 12 ...

Страница 165: ... as a member of Administrators IMPORTANT If a Wizard appears by the Plug and Play automatic setup click Cancel and then install the CAPT software using this procedure NOTE Full Control Permission is required for the installation of the printer driver 3 Display the Printers and Faxes folder For Windows XP Professional Server 2003 From the Start menu select Printers and Faxes For Windows XP Home Edi...

Страница 166: ...ware Setting Up the Printing Environment 3 5 Click Next 6 Make sure that Local printer attached to this computer is selected then click Next NOTE Do not select the Automatically detect and install my Plug and Play printer check box ...

Страница 167: ...7 Make sure that Use the following port is selected select the USB port to which this printer is connected and then click Next 8 Click Have Disk 9 Insert the supplied LBP3500 User Software CD ROM into the CD ROM drive and then click Browse If CD ROM Setup appears click Exit ...

Страница 168: ...Server 2003 Select the folders in the supplied CD ROM English 32bit Win2K_Vista Select CNAB6STK INF and then click Open If you are using 64 bit Windows XP or Server 2003 Select the folders in the supplied CD ROM English x64 Driver Select CNAB6STK INF and then click Open 11 Confirm that the folder to browse is displayed in Copy manufacturer s files from and then click OK ...

Страница 169: ...ick Next 13 Enter a new name in Printer name if you want to change the printer name then click Next NOTE If another printer driver has already been installed in the computer the message Do you want to use this printer as the default printer appears In this case select Yes or No ...

Страница 170: ...Environment 3 14 Click Next NOTE When sharing this printer on a network select Share name and then click Next The window for entering Location and Comment is displayed Enter them as needed then click Next 15 When printing a test page click Yes then click Next ...

Страница 171: ... click Continue Anyway 17 If the printer and computer are not connected turn the computer off connect the computer and printer with a USB cable and then turn them ON IMPORTANT If you are using a computer with Windows XP Service Pack 2 or another operating system equipped with Windows Firewall as the print server you need to configure Windows Firewall to unblock communication with the client comput...

Страница 172: ...PT software 1 Turn the computer on and start up Windows 2000 2 Log on as a member of Administrators IMPORTANT If a Wizard appears by the Plug and Play automatic setup click Cancel and then install the CAPT software using this procedure NOTE Full Control Permission is required for the installation of the printer driver 3 From the Start menu select Settings Printers to open the Printers folder Then ...

Страница 173: ...the Printing Environment 3 5 Make sure that Local printer is selected then click Next NOTE Do not select the Automatically detect and install my Plug and Play printer check box 6 Select the USB port for connecting this printer and then click Next ...

Страница 174: ...ronment 3 7 Click Have Disk 8 Insert the supplied LBP3500 User Software CD ROM into the CD ROM drive and then click Browse If CD ROM Setup appears click Exit 9 Select the folders in the supplied CD ROM English 32bit Win2K_Vista Select CNAB6STK INF then click Open ...

Страница 175: ...ing Up the Printing Environment 3 10 Confirm that the folder to browse is displayed in Copy manufacturer s files from and then click OK 11 Click Next 12 Enter a new name in Printer name if you want to change the printer name then click Next ...

Страница 176: ...you want your Windows based programs to use this printer as the default printer appears In this case select Yes or No 13 Click Next NOTE When sharing this printer on a network select Shared as and then click Next The window for entering Location and Comment is displayed Enter them as needed then click Next 14 When printing a test page click Yes then click Next ...

Страница 177: ...e a dialog box will appear after printing Click OK to close the dialog box NOTE If the Digital Signature Not Found dialog box appears click Yes 16 If the printer and computer are not connected turn the computer off connect the computer and printer with a USB cable and then turn them ON The installation of the printer driver is completed ...

Страница 178: ...n and folder for this printer will be created For Windows Vista The icon for the printer is displayed in the Printers folder Canon Printer Uninstaller is added to All Programs under the Start menu If the manuals are installed LBP3500 Online Manuals is created on the desktop and LBP3500 Online Manuals under Canon LBP3500 is added to All Programs under the Start menu ...

Страница 179: ...on for this printer is displayed in the Printers and Faxes folder Canon Printer Uninstaller is added to All Programs under the Start menu If the manuals are installed LBP3500 Online Manuals is created on the desktop and LBP3500 Online Manuals under Canon LBP3500 is added to All Programs under the Start menu ...

Страница 180: ...e icon for the printer is displayed in the Printers folder Canon Printer Uninstaller is added to Programs under the Start menu If the manuals are installed LBP3500 Online Manuals is created on the desktop and LBP3500 Online Manuals under Canon LBP3500 is added to Programs under the Start menu ...

Страница 181: ... designed to be printed on A4 size paper Load A4 size paper The screen shots used in this section are from Windows XP Professional 1 Display the Printers and Faxes folder or the Printers folder For Windows 2000 From the Start menu select Settings Printers For Windows XP Professional Server 2003 From the Start menu select Printers and Faxes For Windows XP Home Edition From the Start menu select Con...

Страница 182: ...Printing Environment 3 3 Display the Page Setup sheet then click Display Printer Status Window to run the Printer Status Window NOTE For details on the Printer Status Window see Printer Status Window on p 4 83 4 From the Options menu select Utility Configuration Page Print ...

Страница 183: ...nvironment 3 5 Click OK Configuration Page Print is printed IMPORTANT This is a sample of Configuration Page Print The contents may differ from the Configuration Page Print printed by your computer NOTE If Configuration Page Print is not printed properly see Chapter 7 Troubleshooting ...

Страница 184: ...tes downloading the printer driver from the print server to client computers and installing it without using the supplied CD ROM 3 If your print server is Windows 2000 XP Server 2003 Vista 32 bit you cannot download and install the printer driver on 64 bit Windows XP Server 2003 Vista 4 If a 64 bit operating system is running on the print server the download installation for the following client c...

Страница 185: ...etwork and Dial up Connections For Windows Server 2003 From the Start menu select Control Panel Network Connections Local Area Connection click Properties and then proceed to Step 3 For Windows Vista From the Start menu select Control Panel and then click View network status and tasks Manage network connections For Windows 2000 The Network and Dial up Connections folder is displayed For Windows XP...

Страница 186: ...ng Environment 3 2 Right click the Local Area Connection icon then select Properties from the pop up menu NOTE If you are using Windows Vista and the User Account Control dialog box appears click Continue 3 Make sure that File and Printers Sharing for Microsoft Networks is selected then click OK ...

Страница 187: ...For Windows 2000 XP Server 2003 Vista 32 bit NOTE For Windows XP the printer cannot be shared on a network at the default settings the settings immediately after the installation Printer sharing settings require running Network Setup Wizard to enable the sharing settings For more details see Windows online Help 1 Display the Printers and Faxes folder or the Printers folder For Windows 2000 From th...

Страница 188: ...tting Up the Printing Environment 3 2 Right click the icon for this printer then select Sharing from the pop up menu NOTE If you are using Windows Vista and Change sharing options appears click Change sharing options If the User Account Control dialog box appears click Continue ...

Страница 189: ... printer Change the share name as needed For Windows 2000 Select Shared as For Windows Vista Select the Share this printer check box NOTE You can also specify the sharing settings during the local installation Do not enter blank or special characters for the share name 4 Click OK The printer icon changes to the shared printer icon ...

Страница 190: ...XP Service Pack 2 or another operating system equipped with Windows Firewall you need to delete the settings registered in Windows Firewall using the utility software See p 8 12 For Windows XP Server 2003 Vista 64 bit NOTE For Windows XP the printer cannot be shared on a network at the default settings the settings immediately after the installation Printer sharing settings require running Network...

Страница 191: ...ing options appears click Change sharing options If the User Account Control dialog box appears click Continue 3 Select Share this printer Change the share name as needed For Windows Vista Select the Share this printer check box NOTE You can also specify the sharing settings during the local installation Do not enter blank or special characters for the share name ...

Страница 192: ...er 2003 Vista 32 bit Click Additional Drivers NOTE If you want to update the additional driver alternate driver perform the following procedure 1 Uninstall the printer driver used in the print server See p 3 81 2 Install the new printer driver on the print server See p 3 4 3 Install the additional driver again If no client is using Windows 2000 XP Server 2003 Vista 32 bit Proceed to Step 10 ...

Страница 193: ...ck box for Windows 2000 Windows XP and Windows Server 2003 in the Version column or for x86 in the Processor column and then click OK 6 Insert the supplied LBP3500 User Software CD ROM into the CD ROM drive and then click Browse If CD ROM Setup appears click Exit 7 Open the folder in the supplied CD ROM English 32bit Win2K_Vista ...

Страница 194: ...ting Up the Printing Environment 3 8 Select CNAB6STK INF then click Open 9 Click OK Copying files is started You can take the CD ROM out of the CD ROM drive after copying files is completed NOTE If the Windows Security dialog box appears click Install this driver software anyway ...

Страница 195: ...er Account Control dialog box and then click Continue Configuring Windows Firewall If you are using Windows XP Service Pack 2 or another operating system equipped with Windows Firewall as the print server you need to configure Windows Firewall to allow communication with the client computers Use the following procedure to ensure that Windows Firewall does not block this communication If you instal...

Страница 196: ...Connections Windows Firewall For Windows Server 2003 From the Start menu select Control Panel Windows Firewall For Windows Vista From the Start menu select Control Panel and then click Allow a program through Windows Firewall If the User Account Control dialog box appears click Continue 2 In the Exceptions sheet in the Windows Firewall Windows Firewall Settings for Windows Vista dialog box select ...

Страница 197: ...ows Explorer See p 3 80 IMPORTANT When starting Windows be sure to log on as a member of Administrators If you are using Windows XP Service Pack 2 or another operating system equipped with Windows Firewall on a client computer configure the following settings If you do not perform the following settings on the client computers the printer status may not be displayed properly in the Printer Status ...

Страница 198: ...P Server 2003 Vista If a 64 bit operating system is running on the print server the download installation for the following client computers on which a 32 bit operating system is running is not supported due to the Windows restriction Windows 2000 Windows XP on which no service pack or SP1 is installed Windows Server 2003 on which no service pack is installed If you download and install the printe...

Страница 199: ...me is indicated as D in this manual The CD ROM drive name may differ depending on the computer you are using If you are using an operating system other than Windows Vista select Run from the Start menu enter D English MInst exe and then click OK If you are using Windows Vista enter D English MInst exe in Start Search under the Start menu and then press the ENTER key on your keyboard NOTE If you ar...

Страница 200: ...ter by Sharing the Printer on a Network Setting Up the Printing Environment 3 3 Click Install If you selected Custom Installation in Step 2 clear the Online Manuals check box and then click Install 4 Confirm the contents then click Yes ...

Страница 201: ...3 72 Printing from a Network Computer by Sharing the Printer on a Network Setting Up the Printing Environment 3 5 Click Next 6 Select Manually Set Port to Install then click Next 7 Click Add Port ...

Страница 202: ...he Printer on a Network Setting Up the Printing Environment 3 8 Select Network then click OK 9 Select the icon for the shared printer in the print server then click OK 10 Select whether or not to use this printer as the default printer then click Next ...

Страница 203: ...ed with Windows Firewall the following screen is displayed Click No Select Yes only when the computer on which you are currently installing the printer driver is to be used as a print server 12 The message Installation cannot be stopped once it starts Do you want to continue appears Click Yes Installation of the printer driver starts For Windows Vista The Printers dialog box appears Click Install ...

Страница 204: ...on a Network Setting Up the Printing Environment 3 13 If Easy Installation is selected in Step 2 the manuals are installed 14 Confirm the installation results then click Next NOTE If the printer driver is not installed properly see Installation Problems on p 7 51 ...

Страница 205: ...rly See p 8 12 Installing from the Printers and Faxes Folder or the Printers Folder 1 Display the Printers and Faxes folder or the Printers folder For Windows 2000 From the Start menu select Settings Printers For Windows XP Professional Server 2003 From the Start menu select Printers and Faxes For Windows XP Home Edition From the Start menu select Control Panel and then click Printers and Other Ha...

Страница 206: ...ct A network printer or a printer attached to another computer then click Next For Windows 2000 Select Network printer then click Next For Windows Vista Click Add a network wireless or Bluetooth printer If you are using Windows Vista searching the printer on a network starts automatically Click The printer that I want isn t listed ...

Страница 207: ...Select a shared printer by name and then click Next 6 Select the printer on the print server then click Next For Windows Vista select the printer on the print server and then click Select For Windows Vista The Printers dialog box appears Click Install driver If the User Account Control dialog box appears click Continue NOTE If you are using Windows XP Server 2003 and the Connect to Printer dialog ...

Страница 208: ...r check box and then click Next For Windows Vista click Print a test page when printing a test page A dialog box appears after printing Click Close to close the dialog box 8 Click Finish IMPORTANT If you are using Windows XP Service Pack 2 or another operating system equipped with Windows Firewall on the client computers configure Windows Firewall to unblock communication with the print server If ...

Страница 209: ...n double click the icon for this printer Alternatively you can drag and drop the icon for the printer into the Printers and Faxes folder or Printers folder 3 Follow the instructions on the screen IMPORTANT If you are using Windows XP Service Pack 2 or another operating system equipped with Windows Firewall on the client computers configure Windows Firewall to unblock communication with the print s...

Страница 210: ... the printer driver also uninstalls the installed manuals If you are using 64 bit Windows XP Server 2003 Vista the installed manuals are not uninstalled by uninstalling the printer driver For details on uninstalling the manuals see Uninstalling the Manuals on p 4 81 If you are not sure whether you are using 32 bit Windows Vista or 64 bit Windows Vista see Checking the Processor Version of Windows ...

Страница 211: ...ms Canon Printer Uninstaller Canon LBP3500 Uninstaller NOTE If you are using Windows Vista and the User Account Control dialog box appears click Allow 3 Select the name of this printer then click Delete NOTE Even if Canon LBP3500 is not on the list in the Delete Printer dialog box you can delete the file and information related to this printer by clicking Delete 4 Click Yes Uninstallation starts P...

Страница 212: ...is uninstalled the Program Compatibility Assistant dialog box may appear on the screen Even if the Program Compatibility Assistant dialog box appears the uninstallation of the printer driver is completed properly Click This program installed correctly NOTE If the CAPT software cannot be uninstalled see When Uninstallation Fails on p 7 52 ...

Страница 213: ...3 84 Uninstalling the CAPT Software Setting Up the Printing Environment 3 ...

Страница 214: ...4 17 Utilizing a Variety of Options for Printing 4 17 Various Pages in the Printer Driver 4 23 Preview 4 43 Printing Multiple Pages on One Sheet 4 44 Scaling Print Output 4 45 Poster Printing 4 48 Watermark Printing 4 49 Printing Borders and Printing Date 4 51 Selecting a Print Style 4 52 Printing with a Gutter 4 54 Specifying the Paper Output Method 4 55 Print with Upper Left of Sheet as Starting...

Страница 215: ...nstalling the Manuals 4 81 Printer Status Window 4 83 Functions on the Printer Status Window 4 83 Displaying the Printer Status Window 4 85 Preferences Menu 4 87 Utility Menu 4 88 Device Settings Menu 4 89 Refresh 4 89 Resolve Error 4 90 Displaying Printer Status When Using a Print Server 4 90 ...

Страница 216: ...Windows 2000 From the Start menu select Settings Printers For Windows XP Professional Server 2003 From the Start menu select Printers and Faxes For Windows XP Home Edition From the Start menu select Control Panel and then click Printers and Other Hardware Printers and Faxes For Windows Vista From the Start menu select Control Panel and then click Printer 2 Right click the icon for this printer the...

Страница 217: ...tion Before Printing 4 3 Display the Device Settings sheet then specify the settings for Paper Source Options and Duplex Unit NOTE You can also obtain the printer status such as the paper feeder automatically by clicking Get Device Status 4 Click OK ...

Страница 218: ...purpose tray NOTE When loading paper in the paper cassette see Loading Paper in a Paper Cassette p 2 26 when loading paper in the multi purpose tray see Loading Paper in the Multi purpose Tray p 2 45 and when performing 2 sided printing see 2 sided Printing p 2 70 2 Open the PDF file to print with Adobe Reader and then select Print Setup from the File menu 3 Specify the paper size of the document ...

Страница 219: ...er for Name or Printer Name and then specify the printing preferences NOTE The printer name displayed in this dialog box can be changed in the Printers and Faxes folder the Printers folder for Windows 2000 Vista 6 If you want to specify more detailed printing preferences click Properties ...

Страница 220: ...re only apply to the currently opened file Check the contents of the Document Properties dialog each time you print In particular it is recommended that you confirm the contents of the Page Setup sheet and the Paper Source sheet You can configure the default settings for all files by opening the Document Properties dialog box from the Printers and Faxes folder or the Printers folder See Displaying...

Страница 221: ...sing the Various Printing Functions See p 4 17 describes how to use the various functions of the printer and printer driver By specifying the settings for the printer and printer driver for each job you can make the best use of the printer and its functions ...

Страница 222: ...older you can specify various settings for the printer and add the frequently used options as Profiles NOTE Full Control Permission is required to specify the settings for the Printers and Faxes folder or the Printers folder If you cannot display the Document Properties dialog box from the Printers and Faxes folder or the Printers folder display the dialog box from the application The Device Setti...

Страница 223: ...4 10 Printing a Document Specifying the Printing Preferences 4 2 Confirm the printer name then click Properties The Document Properties dialog box is displayed ...

Страница 224: ... 2000 From the Start menu select Settings Printers For Windows XP Professional Server 2003 From the Start menu select Printers and Faxes For Windows XP Home Edition From the Start menu select Control Panel and then click Printers and Other Hardware Printers and Faxes For Windows Vista From the Start menu select Control Panel and then click Printer 2 Right click the icon for this printer then selec...

Страница 225: ...e Printer Properties Dialog Box from the Printers and Faxes Folder or the Printers Folder 1 Display the Printers and Faxes folder or the Printers folder For Windows 2000 From the Start menu select Settings Printers For Windows XP Professional Server 2003 From the Start menu select Printers and Faxes For Windows XP Home Edition From the Start menu select Control Panel and then click Printers and Ot...

Страница 226: ...n for this printer then select Properties from the pop up menu The Printer Properties dialog box is displayed NOTE For Windows 2000 XP Server 2003 the Printer Properties dialog box can also be displayed by selecting the icon for this printer and selecting Properties from the File menu ...

Страница 227: ...or is occurring and that in a printing process Deleting Pausing Resuming a Print Job Using the Printer Status Window 1 Start printing The Printer Status Window appears NOTE The Printer Status Window may not appear depending on the settings for Display Printer Status Window in the Preferences menu in the Printer Status Window See Preferences Menu on p 4 87 2 When deleting or pausing the job click t...

Страница 228: ...ayed and the My Job Operation tab is selected on the top by clicking the Pause Job button in the Current Print Job tab 3 Click the button for the desired operation from among the Job Operation buttons Deleting a Job Click Delete Job Pausing a Job Click Pause Job Resuming the Job Click Resume Job ...

Страница 229: ...and the job when the key is released are different the both jobs cannot be canceled Depending on the settings for Enable to Cancel Error Jobs or Enable to Cancel Any Processing Print Job in the Settings of the Cancel Job Key menu in Device Settings in the Printer Status Window you may not be able to cancel the job See Device Settings Menu on p 4 89 NOTE The Cancel Job indicator orange comes on whi...

Страница 230: ...variety of ways by using the printer driver as follows Printing Multiple Pages on One Sheet See p 4 44 Multiple pages can be printed on one sheet of paper Scaling Print Output See p 4 45 Specify this option when A4 size data is reduced in size and printed on B5 size paper or B5 size data is enlarged and printed on A4 size paper You can specify an arbitrary scaling ...

Страница 231: ... it out on multiple sheets of paper You can join these printouts together to make one large poster Watermark Printing See p 4 49 You can superimpose watermarks such as COPY DRAFT etc over the documents created by an application Printing Borders and Printing Date See p 4 51 You can print with borders printing date and or page numbers etc ...

Страница 232: ...aligned properly and ready to be bound into a booklet Therefore 4 pages in total are printed on a single sheet of paper For example when making a booklet of 12 pages 3 sheets are used in total since 2 pages are printed on each side of paper To make a booklet you only have to fold the printouts into two and bind them The booklet printing function arranges the page order so that the pages are aligne...

Страница 233: ...te job are collated For example if you are printing three copies of a 3 page document printouts of a complete job are collated arranged in this page order 1 2 3 1 2 3 1 2 3 Print with Upper Left of Sheet as Starting Point See p 4 56 Since printing is usually performed with the upper left 5 mm 15 mm for envelopes margin within the printable area of a sheet as the starting point a certain portion lo...

Страница 234: ...rees rotated This option is useful for printing envelopes and Index Card size media that can be fed only in specific orientations Smoothing Out Rough Textured Images See p 4 59 Specify this option when printing by smoothing out this kind of low resolution image data Printing with Toner Density Adjusted See p 4 60 You can print with toner density adjusted ...

Страница 235: ... Specifying the Brightness and Contrast See p 4 62 You can perform printing with the brightness and contrast specified Printing a Grayscale Sample See p 4 64 You can print an adjusted grayscale sample after specifying the settings in the Grayscale Adjustment sheet ...

Страница 236: ...rties dialog box contain the following sheets that allow you to specify the various printing functions You can switch among the sheets by clicking the tabs across the top of the dialog box This section describes the types of printing preferences that can be specified in each sheet Document Properties Dialog Box Page Setup Sheet Finishing Sheet Paper Source Sheet Quality Sheet Printer Properties Di...

Страница 237: ...ecify the actual paper size to be printed Copies You can specify the number of copies to be printed Orientation You can specify the printing orientation Page Layout See p 4 44 N Pages per Sheet N 1 2 4 6 8 9 16 Prints multiple pages on one sheet of paper Some applications provide a function to print a document as a collated set of copies Do not use this function with N Pages per Sheet Poster N x N...

Страница 238: ... application Select the check box for this option and select a watermark to print with the document Select the watermark from the drop down list on the right Edit Watermark See p 4 50 Displays a dialog box for modifying the added watermarks Custom Paper Size Displays a dialog box for specifying custom paper sizes Page Options See p 4 51 Allows you to print printing date user name page numbers or a...

Страница 239: ...er size in portrait orientation Height Width within user definable sizes Delete Deletes the custom paper size selected in Paper List However you cannot delete the default standard paper sizes and Custom Name Fixed Register Registers custom paper sizes Setting Button Contents Position You can specify the position to print the selected watermark on the document Enter X and Y axis values between 50 a...

Страница 240: ...st However you cannot delete the default watermarks Name You can enter the name for the added watermark to be displayed in Watermark in the Page Setup sheet Text Enter the characters to be printed as a watermark Font Select the font to be used for the watermark TrueType fonts only Style Select the font style to be used Size Specify the font size for the watermark Color Specify the color for the wa...

Страница 241: ...printouts Setting Button Contents Edging You can select the type of edging to print as a border When a border is applied the original print data will be reduced slightly in size to make room for the border Print Date You can print the date Print User Name You can print a user name that is registered in the computer Print Page Number You can print page numbers Format Settings Displays a dialog box ...

Страница 242: ... The Finishing sheet allows you to specify the following printing preferences Setting Button Contents Font Select the font to be used TrueType fonts only Style Select the font style to be used Size Specify the font size to be used Color Select the color to be used Since this printer is a monochrome printer all the colors are printed in grayscale Setting Button Contents Print Style See p 4 52 Allow...

Страница 243: ...ttings Details Finishing Sheet Displays a dialog box for detailed settings for Paper Alignment Paper Alignment Displays the settings specified in the Detailed Settings dialog box Binding Location See p 4 54 You can specify which edge of the printed paper is to be bound Gutter See p 4 54 Specifies the gutter width when binding the printouts Finishing See p 4 55 Specify the paper output method Paper...

Страница 244: ... the distance 0 to 30 mm from the center line fold line in the middle of the paper Setting Button Contents Paper Alignment Select the pattern of Paper Alignment for printing a document of mixed paper sizes or orientations Gutter When a value is specified a margin of white space is created on one side of the printed paper This margin is called Gutter The gutter is useful when binding pages Valid va...

Страница 245: ...rgin is called Gutter The gutter is useful when binding pages Valid values for Gutter range from 0 to 30 mm Image Processing When Gutter is specified the position of the page image is adjusted to make room for the gutter At this point you can select whether to reduce the size of the image to fit the remaining space Setting Button Contents Print with Upper Left of Sheet as Starting Point See p 4 56...

Страница 246: ...re different from each other However printing speed may drop Rotate Print Data 180 Degrees See p 4 58 Prints with the image 180 degrees rotated This option is useful for printing envelopes and Index Card size media that can be fed only in specific orientations Use Skip Blank Pages Mode When the check box for this option is selected blank paper is not output if the job includes blank pages Reverse ...

Страница 247: ...xt and graphics are printed smoothly Special Print Mode Print quality may deteriorate depending on the type of paper being used or the operating environment of the printer Special Print Mode provides a number of settings for solving problems related to printing quality EMF Spooling Windows 2000 XP Server 2003 only Specify whether the print data is spooled in EMF meta file format Print Last Page in...

Страница 248: ...r type of paper Multi purpose Tray Cassette 1 Cassette 2 Displayed only when the optional paper feeder is installed Feeds paper from the selected paper source The following types of paper can be loaded in each paper source Multi purpose Tray Plain paper 60 90 g m2 Heavy paper 91 199 g m2 Envelope Label Transparency Cassette 1 Cassette 2 Plain paper 60 90 g m2 Paper Type You can specify the type of...

Страница 249: ...scape orientation from the multi purpose tray select the check box for this option Width 148 0 to 297 0 mm Length 210 0 to 297 0 mm Setting Button Contents Objective Selecting the appropriate mode from Objective for the contents of the document allows you to perform optimum printing Selecting each option in Objective displays a comment on the option under the list To change the printing preference...

Страница 250: ...t are changed by 1 unit in each of the corresponding directions Setting Button Contents B W Halftones Allows you to select a dither pattern to use when printing data in monochrome halftones Print Colored Text and Lines in Black Select this check box when colored text or thin lines of CAD data etc drop out or appear broken in the printed paper You may be able to print thin lines finely Enable Image...

Страница 251: ...le Settings This dialog box has the Grayscale Adjustment sheet and the Matching sheet Grayscale Adjustment Sheet Allows you to adjust brightness and contrast for printing Setting Button Contents Preview Displays a sample image after adjustment Original Displays a sample of the original image before adjustment Brightness See p 4 62 You can adjust the brightness for the print data Contrast See p 4 6...

Страница 252: ...ritized select the check box for this option Matching Method You can specify which element is to be prioritized in matching Monitor Profile You can select the appropriate option the profiles registered in your computer are displayed for the monitor or scanner in use Gamma When Matching Mode is set to Gamma Adjustment color is adjusted by brightness without performing matching In Gamma you can adju...

Страница 253: ... at Host is performed in the computer whether the jobs are processed in the computer When Spooling at Host is not performed in the computer some options become disabled You can select either Auto or Disabled When Auto is selected the spooling status is automatically determined by the printer settings Show Icon in the Taskbar When this check box is selected an icon for displaying the Printer Status...

Страница 254: ...ays the View Settings dialog box You can view and confirm all of the current page settings Add Displays the Add Edit Profile dialog box and allows you to add a new Profile Edit Selecting the desired Profiles in Profile List and clicking this button display the Add Edit Profile dialog box and allow you to change Name Icon Comment and the settings for the added Profile However you cannot edit the de...

Страница 255: ...hat will be permitted in the Document Properties dialog box Allow Profile Selection When the check box for this option is selected you can select a Profile in the Document Properties dialog box Clear the check box for this option to disable selection of a Profile in the Document Properties dialog box Allow Setting Edition When this check box is selected you can add a new Profile setting that is di...

Страница 256: ...ded Printing only Left clicking the edge of the document image allows you to specify Binding Location The setting for Page Layout changes successively among 1 Page per Sheet 2 Pages per Sheet and 4 Pages per Sheet by repeatedly left clicking within the document image Right clicking on Preview selects 1 Page per Sheet 1 sided 2 Pages per Sheet 1 sided or 4 Pages per Sheet 1 sided If the optional du...

Страница 257: ...clicking on Preview specifies Finishing If Paper Selection is set to Different for First Others and Last Different for First Second Others and Last or Different for Cover and Others you can specify the paper source for each page Printing Multiple Pages on One Sheet Multiple pages can be printed on one sheet of paper 1 Display the Device Settings sheet and then make sure that Spooling at Host is se...

Страница 258: ... on the paper orientation or the number of pages to be printed on one sheet 4 Confirm the settings then click OK 5 Click OK or Print The printer starts printing Scaling Print Output You can select a scale when Page Layout is set to 1 Page per Sheet When the settings for Page Size and Output Size are different from each other the scale factor is adjusted automatically The scale factor can also be s...

Страница 259: ... a Document Automatically 1 Display the Page Setup sheet then specify the page size in Page Size 2 Specify the paper size in Output Size 3 Confirm the settings then click OK The scaling will be set automatically according to the sizes specified in Page Size and Output Size ...

Страница 260: ...ctions Scaling a Document Manually 1 Display the Page Setup sheet then specify the page size in Page Size 2 Specify the paper size in Output Size 3 Select the Manual Scaling check box then specify the value in the spin box 4 Confirm the settings then click OK ...

Страница 261: ...n join these printouts together to make one large poster 1 Display the Device Settings sheet and then make sure that Spooling at Host is set to Auto 2 Display the Page Setup sheet then select Poster N x N N 2 3 4 from Page Layout A layout image of the printed paper appears on Preview 3 Confirm the settings then click OK 4 Click OK or Print The printer starts printing ...

Страница 262: ...o you can add new watermarks or edit the already registered watermarks by clicking Edit Watermark in the Page Setup sheet Watermark Printing 1 Display the Device Settings sheet and then make sure that Spooling at Host is set to Auto 2 Display the Page Setup sheet select the Watermark check box and then select the watermark to print with the document from the drop down list on the right of Watermar...

Страница 263: ...ing Functions 4 Editing Watermarks 1 Display the Device Settings sheet and then make sure that Spooling at Host is set to Auto 2 Display the Page Setup sheet select the Watermark check box and then click Edit Watermark 3 Specify the options as needed ...

Страница 264: ... 72 When adding a new watermark click Add You cannot change the settings for the default watermarks 4 Confirm the settings then click OK The Page Setup sheet reappears Printing Borders and Printing Date You can print with borders printing date and or page numbers 1 Display the Device Settings sheet and then make sure that Spooling at Host is set to Auto 2 Display the Page Setup sheet then click Pa...

Страница 265: ... p 4 72 4 Confirm the settings then click OK The Page Setup sheet reappears 5 Click OK 6 Click OK or Print The printer starts printing Selecting a Print Style Allows you to select the print style 1 sided Printing 2 sided Printing or Booklet Printing The optional duplex unit is required for 2 sided printing and booklet printing IMPORTANT If Spooling at Host is set to Disabled in the Device Settings...

Страница 266: ...ws online Help For details on methods for displaying Online Help see How to Use Online Help on p 4 72 1 sided Printing Prints on one side of paper 2 sided Printing Prints on both sides of paper using the optional duplex unit Booklet Printing Performs booklet printing using the optional duplex unit Booklet printing involves printing 2 pages on both sides of a sheet of paper in the appropriate order...

Страница 267: ...ting with a Gutter You can specify a gutter on the printouts Valid gutter values range from 0 to 30 mm When a gutter is specified the position of the page image is adjusted to make room for the gutter At this point you can select whether to reduce the size of the image to fit the remaining space 1 Display the Finishing sheet specify the edge on which the gutter is to be located in Binding Location...

Страница 268: ...or Print The printer starts printing Specifying the Paper Output Method Select a paper output method from the following options in Finishing in the Finishing sheet Off Printouts of a complete job are grouped For example if you are printing three copies of a 3 page document printouts of a complete job are grouped arranged in this page order 1 1 1 2 2 2 3 3 3 Collate Printouts of a complete job are ...

Страница 269: ...m 15 mm for envelopes margin within the printable area of a sheet as the starting point a certain portion lower right may be missed when printing data with no margin In this case print with the upper left 0 mm margin as the starting point and as a result all sides of the sheet will be printed evenly IMPORTANT Depending on the print data to be printed the edge of paper may be missing partly during ...

Страница 270: ...ions 1 Display the Finishing sheet then click Finishing Details 2 Select the Print with Upper Left of Sheet as Starting Point check box 3 Confirm the settings then click OK The Finishing sheet reappears 4 Click OK 5 Click OK or Print The printer starts printing ...

Страница 271: ...e image 180 degrees rotated This option is useful for printing envelopes and Index Card size media that can be fed only in specific orientations 1 Display the Finishing sheet then click Finishing Details 2 Select the Rotate Print Data 180 Degrees check box 3 Confirm the settings then click OK The Finishing sheet reappears ...

Страница 272: ... Out Rough Textured Images When image data such as photographic images are enlarged in size in an application and printed the printed images can look rough or jagged You can print this kind of low resolution image data with smoothing it out 1 Display the Quality sheet then click Details 2 Select the Enable Image Correction check box ...

Страница 273: ...tions 4 3 Confirm the settings then click OK The Quality sheet reappears 4 Click OK 5 Click OK or Print The printer starts printing Printing with Toner Density Adjusted You can print with toner density adjusted 1 Display the Quality sheet then click Details ...

Страница 274: ...e toner density by dragging the Toner Density slider from side to side Move the slider to the right to make it denser and to the left to make it lighter 3 Confirm the settings then click OK The Quality sheet reappears 4 Click OK 5 Click OK or Print The printer starts printing ...

Страница 275: ...ous Printing Functions 4 Specifying the Brightness and Contrast You can perform printing with the brightness and contrast specified 1 Display the Quality sheet select the Manual Grayscale Settings check box and then click Grayscale Settings ...

Страница 276: ...e the Brightness slider to the right to make it lighter and to the left to make it darker Move the Contrast slider to the right to make it higher and to the left to make it lower 3 Confirm the settings then click OK The Quality sheet reappears You can print a sample after adjusting the brightness and contrast For more details see Printing a Grayscale Sample on p 4 64 ...

Страница 277: ...unit in each of the corresponding directions This is useful to adjust the grayscale of the printed paper 1 Display the Device Settings sheet and then make sure that Spooling at Host is set to Auto 2 Display the Quality sheet select the Manual Grayscale Settings check box and then select the Print Grayscale Sample check box 3 Confirm the settings then click OK IMPORTANT When printing a grayscale sa...

Страница 278: ...ngs Save the printing preferences as a Profile using the following procedure Make sure that any one of the Page Setup Finishing Paper Source and Quality sheets is displayed then perform the following procedure NOTE Up to 50 Profiles for each user account can be added If the printer name has been changed any saved Profiles cannot be imported To import the saved Profiles change the printer name to i...

Страница 279: ...le in Name Icon allows you to select the icon for the Profile Enter any comments in Comment as needed NOTE You can enter up to 31 characters for Name and up to 255 characters for Comment Confirming the Printer Settings Click View Settings When OK is clicked the Add Profile dialog box reappears ...

Страница 280: ...ppears Make sure that the name of the added Profile is in Profile List Editing Deleting a Profile You can change or save the Profile information or delete it from Profile List 1 Click Edit Profile 2 Edit information about the Profiles Editing a Profile You can change the settings for Name Icon and Comment ...

Страница 281: ... the application are applied to printing The settings for these options in the application stay enabled even if the Profiles is changed Deleting a Profile When Delete is clicked the Profile is deleted from the list IMPORTANT You can delete only custom Profiles You cannot delete the default Profiles Also you cannot delete the Profile currently selected in each sheet Editing Jobs with PageComposer Y...

Страница 282: ...cument 4 Using the Various Printing Functions 1 Select Edit and Preview from Output Method 2 The message that informs you that the output method is going to be switched to the Edit and Preview mode is displayed Click OK ...

Страница 283: ...tions 4 3 Specify the printing preferences in each sheet then click OK The Print dialog box reappears 4 Click OK or Print Depending on the application you are using click Print The Canon PageComposer dialog box is displayed and the job is displayed on a list ...

Страница 284: ...e jobs on the list in the Canon PageComposer dialog box NOTE For more details on the setting procedures for the Canon PageComposer dialog box see Help for Canon PageComposer When the Edit and Preview mode is selected in the Printer Properties dialog box and Lock is set the Canon PageComposer dialog box appears each time you print ...

Страница 285: ...ows help application WinHlp32 exe is not installed on your system download it from the Microsoft Corporation website For details on the download methods click Help in the printer driver or Printer Status Window and then see the Windows Help and Support dialog box Displaying Online Help on the Options Displayed on the Screen There are three methods to display Online Help on the windows of the print...

Страница 286: ...elp then click it This method cannot display Help on Windows Vista Press the TAB key on your keyboard to select the item of which you want to display Help then press the F1 key Displaying Online Help on the Operation Procedures Display the procedures for operating the printer driver or the Printer Status Window using the following procedure ...

Страница 287: ...4 74 Printing a Document How to Use Online Help 4 1 Click Help 2 Click Contents ...

Страница 288: ...f which you want to know the operation procedure Retrieving the Option about Which You Want to Know with Keywords and Displaying its Online Help Retrieve the option about which you want to know with keywords and display its Online Help using the following procedure 1 Click Help ...

Страница 289: ...4 76 Printing a Document How to Use Online Help 4 2 Click Index 3 Enter the keyword to display the option about which you want to know ...

Страница 290: ...e option about which you want to know NOTE Depending on your operating system a list of words created automatically may be displayed on Find You can also display Online Help by selecting a word that is related to the option about which you want to know from the displayed word list ...

Страница 291: ...he drive IMPORTANT If you are using Windows Vista and the AutoPlay dialog box appears click Run AUTORUN EXE If CD ROM Setup does not appear display it using the following procedures The CD ROM drive name is indicated as D in this manual The CD ROM drive name may differ depending on the computer you are using If you are using an operating system other than Windows Vista select Run from the Start me...

Страница 292: ... 79 Printing a Document 4 Manuals 2 Click Custom Installation 3 Clear the Printer Driver check box then click Install 4 Confirm the contents then click Yes Installation of the instruction manuals starts ...

Страница 293: ...lick Next 6 Click Exit The installation of the manuals is completed To see the manuals double click LBP3500 Online Manuals created on the desktop to display respective manuals or select Canon LBP3500 LBP3500 Online Manuals added to All Programs Programs for Windows 2000 under the Start menu ...

Страница 294: ...ta see Checking the Processor Version of Windows Vista on p 8 18 For Windows 2000 XP Server 2003 Vista 32 bit The installed manuals can also be uninstalled by uninstalling the CAPT software using the Uninstaller For details on uninstalling the CAPT software see Uninstalling the CAPT Software on p 3 81 When uninstalling only the manuals without uninstalling the CAPT software delete the following Pr...

Страница 295: ...n LBP3500 Manuals folder Desktop LBP3500 Online Manuals Shortcut for Index pdf If you want to uninstall only the manuals without uninstalling the printer driver perform the following operation also Right click Canon LBP3500 in All Programs under the Start menu then select Delete from the pop up menu NOTE If the Destination Folder Access Denied dialog box appears click Continue If the User Account ...

Страница 296: ...nd have the driver for PCM synthesizer installed Functions on the Printer Status Window For more details on operations see Online Help For details on methods for displaying Online Help see How to Use Online Help on p 4 72 Refresh Button Message Area Auxiliary Resolve Error Button Menu Bar Icon Message Area Animation Area Progress Bar Status Bar Current Print Job Tab My Job Operation Tab Job Status...

Страница 297: ...n animated graphic The background color changes from blue normal to orange when user action is required or to red when a warning is issued Refresh Button Obtains the printer status and refreshes the Printer Status Window display Resolve Error Button Allows you to resume a job when the job is paused for some reason Current Print Job Tab Progress Bar Indicates the progress of the current job by show...

Страница 298: ... Display Printer Status Window in locations such as in the Page Setup sheet in the Document Properties dialog box Display the Printer Properties dialog box and display the Device Settings sheet and then select the Show Icon in the Taskbar check box The icon for the Printer Status Window is displayed in the Windows taskbar Click the icon then click Canon LBP3500 to run it ...

Страница 299: ...ppears automatically during printing or when an error occurs If When Starting Printing is not selected in the Preferences dialog box in the Options menu the Printer Status Window does not appear during printing See Preferences Menu on p 4 87 During printing When an error occurs ...

Страница 300: ... Window automatically specify the sound settings and make the Printer Status Window monitor the printer status For more details on each setting see Online Help For details on methods for displaying Online Help see How to Use Online Help on p 4 72 1 Select Preferences from the Options menu The Preferences dialog box is displayed ...

Страница 301: ...the printer or current printer status such as the total number of printed pages For more details see Confirming the Printer Features on p 7 63 Network Status Print Only when the network board is installed Prints the version of the optional network board or the TCP IP settings For more details see Chapter 4 Troubleshooting in Network Guide Printing Position Adjustment Print Displays the Printing Po...

Страница 302: ...p Mode check box and then specify the time to switch to the sleep mode in Time to Enter Sleep Mode For more details see Power Saving Sleep Mode on p 1 12 Cassettes Settings Allows you to specify which paper cassette is to be used if Paper Source in the Paper Source sheet is set to Auto when the paper source is selected automatically and the paper feed direction of custom size paper the loading ori...

Страница 303: ...ry files then select Resolve Error Displaying Printer Status When Using a Print Server The status of a network printer can be displayed on the client s Printer Status Window as well as on the print server s If the print server has not been started up the Printer Status Window is not displayed in the client computers Printer Status of the Print Server Displaying the Printer Status Window and Job Op...

Страница 304: ... from the clients whose user name is verified by the print server NOTE To display the printer status when printing a job over the network a network environment that uses one of the following protocols is required TCP IP NetBEUI Current Print Job Tab My Job Operation Tab Job Operation Job Information Area Pause Job Button Job Information Area Job Operation Buttons Displays the first job on the prin...

Страница 305: ...4 92 Printing a Document Printer Status Window 4 ...

Страница 306: ...rtridge 5 2 When a Message Appears 5 2 Replacing the Toner Cartridge 5 3 Precautions for Handling Toner Cartridge 5 12 Storing Toner Cartridges 5 14 Cleaning the Fixing Roller 5 15 Adjusting the Printing Position 5 18 Checking the Printing Position 5 18 Adjusting the Printing Position 5 20 Cleaning the Outside of the Printer 5 25 Moving the Printer 5 28 Handling the Printer 5 35 ...

Страница 307: ...When you are replacing the toner cartridge be sure to use a toner cartridge designed for this printer Message When it is Displayed Contents and Remedies The toner is low When the toner cartridge needs to be replaced soon You can continue to print Have a new toner cartridge available It is recommended that you replace the toner cartridge before printing a large amount of data You may need to check ...

Страница 308: ...photographic printers and multi function devices that may contain printer components issued by ISO International Organization for Standardization Replacing the Toner Cartridge Replace the toner cartridge with a new one using the following procedure WARNING Do not throw a used toner cartridge into open flames as this may cause the toner remaining inside the cartridge to ignite resulting in burns or...

Страница 309: ...Routine Maintenance 5 Replacing the Toner Cartridge 1 Open the front cover Open the front cover gently while pressing the lever on the top surface of the cover 2 Remove the toner cartridge from the printer ...

Страница 310: ...tact B shown in the figure as this may result in damage to the printer 3 Clean the transport guide Raise the transport guide Holding the green tab raise the transport guide CAUTION Do not take your hands off the transport guide The transport guide may snap back to its original position and this may result in personal injury B A ...

Страница 311: ... the dirt wipe the area with a soft dry cloth IMPORTANT Do not use a cleaning agent such as mild detergent Do not touch the feed roller A This may result in damage to the printer or printer error Be sure that no water or chipped paper is remaining on the transport guide Be sure to finish with wiping with a dry cloth Water remaining inside the printer may result in damage to the printer A ...

Страница 312: ...k to its original position The transport guide may snap back to its original position and this may result in personal injury 4 Take the toner cartridge out of the protective bag There are cuts on both sides of the protective bag so you can open it by hand IMPORTANT Keep the protective bag for the toner cartridge It may be required after taking out the toner cartridge for printer maintenance ...

Страница 313: ... 6 Hold the toner cartridge as shown in the figure shake it gently 5 or 6 times to evenly distribute the toner inside the cartridge IMPORTANT If toner is not distributed evenly this may result in deterioration in print quality Be sure to carry out this procedure properly Be sure to shake the toner cartridge gently If you do not shake the cartridge gently toner may spill out b a ...

Страница 314: ...raight in the direction of the arrow CAUTION If the sealing tape is pulled out forcefully or stopped at midpoint toner may spill out If the toner gets into your eyes or mouth wash them immediately with cold water and immediately consult a physician IMPORTANT Do not pull the sealing tape diagonally upwards or downwards If the tape is severed it may become difficult to pull out completely Pull out t...

Страница 315: ...areful not to touch the toner cartridge memory A or not to hold the drum protective shutter B with your hands 8 Hold the toner cartridge properly with the arrowed side facing up as shown in the figure IMPORTANT Do not hold the toner cartridge in a manner that is not directed in this procedure A B ...

Страница 316: ...T Make sure that the front cover does not open make sure that there is no space between the front cover and the printer and that the front cover is stable If the front cover is not closed completely this may result in poor print quality If you cannot close the front cover check if the toner cartridge is installed properly If you try to close the front cover forcefully this may result in damage to ...

Страница 317: ...ner to come into contact with your hands or clothing as this will dirty your hands or clothing If they become dirty wash them immediately with cold water Washing with warm water will set the toner and make it impossible to remove the toner stains IMPORTANT When you take the toner cartridge out of the printer for servicing the printer place the toner cartridge into the original protective bag or wr...

Страница 318: ...ought into an environment that exposes it to sudden changes in temperature and or humidity If you move the toner cartridge to a location that is warmer or has higher humidity leave the cartridge in the new location for 2 hours or longer without opening the protective bag to allow it to adjust to the new temperature Be sure to use a new toner cartridge before the expiration date indicated on the pa...

Страница 319: ... place exposed to direct sunlight Do not store the cartridge in a hot or humid place or a place where the temperature and humidity can change significantly Storing environment temperature 0 to 35 C 32 to 95 F Storing humidity range 35 to 85 RH no condensation Do not store the toner cartridge in a place where corrosive gases such as ammonia are generated or where a considerable amount of salt is co...

Страница 320: ...nt quality deterioration can be prevented by cleaning the fixing roller 1 Load A4 size paper in the multi purpose tray or paper cassette 2 Display the Printer Status Window For details on methods for displaying the Printer Status Window see Displaying the Printer Status Window on p 4 85 3 From the Options menu in the Printer Status Window select Utility Cleaning A confirmation message is displayed...

Страница 321: ...g the Fixing Roller 4 Click OK The cleaning page is printed 5 Load the cleaning page in the multi purpose tray with the printed side facing down The paper is fed into the printer slowly and the printer starts cleaning the fixing roller ...

Страница 322: ...conds The cleaning process cannot be canceled Please wait until it is completed If front or back of the printed paper has smudge marks even after cleaning the fixing roller using the cleaning page load A4 size blank paper rather than the printed cleaning page and then perform the cleaning again ...

Страница 323: ...the part will be missing in the print result NOTE Be aware that when adjusting the printing position for 2 sided printing the orientation of the images on the reverse pages varies depending on the printing orientation or setting for Binding Location in the Finishing sheet Checking the Printing Position Perform the Printing Position Adjustment Print and check the position to be adjusted 1 Display t...

Страница 324: ...ion Adjustment Print The Printing Position Adjustment Print dialog box is displayed 3 Select the paper source of which you want to check the printing position in the Printing Position Adjustment Print dialog box Select the Check Duplex Unit Also check box when adjusting the printing position for 2 sided printing ...

Страница 325: ...n Adjustment Print Next check the printout results and specify the position to be adjusted in Adjusting the Printing Position See p 5 20 Adjusting the Printing Position Next check the printout results of the Printing Position Adjustment Print and specify the direction and position to be adjusted The measurements of printed on paper are as the following 5 mm 10 mm 5 mm 10 mm 5 mm from each edge of ...

Страница 326: ... Adjustment Print dialog box set to Cassette 1 as an example In this case adjust the printing position by 2 59 mm to the left 1 Display the Printer Status Window For details on methods for displaying the Printer Status Window see Displaying the Printer Status Window on p 4 85 2 From the Options menu select Device Settings Printing Position Adjustment The Printing Position Adjustment dialog box is ...

Страница 327: ...heck the printout results of the Printing Position Adjustment Print and select the numerical value to adjust the position Negative values move the position to the left and positive values to the right by the selected value IMPORTANT The default values are specified as follows Multi purpose tray 0 52 mm Cassette 1 and 2 0 69 mm Duplex unit 0 52 mm 4 Click OK ...

Страница 328: ... 5 From the Options menu select Utility Printing Position Adjustment Print The Printing Position Adjustment Print dialog box is displayed 6 Select the paper source of which you changed the printing position in the Printing Position Adjustment Print dialog box ...

Страница 329: ...djusting the Printing Position 7 Click OK The Printing Position Adjustment Print in which the setting is changed is printed Check the printout results to confirm the printing position To make further adjustment repeat step 1 to 7 ...

Страница 330: ... unplug the power plug Failure to observe these steps may result in a fire or electrical shock Do not use alcohol benzene paint thinner or other flammable substances If flammable substances come into contact with electrical parts inside the printer it may result in a fire or electrical shock IMPORTANT Be careful not to use a cleaning agent other than water or a mild detergent diluted with water as...

Страница 331: ...e USB cable b b b b and then disconnect the power plug from the AC power outlet c c c c 2 Firmly wring a soft cloth dampened with water or a mild detergent diluted with water and wipe off the dirt If you use a mild detergent for cleaning be sure to wipe away the detergent with a soft cloth dampened with water c a b a ...

Страница 332: ...enance 5 Cleaning the Outside of the Printer 3 After wiping off the dirt wipe the printer with a dry cloth 4 When the printer is completely dry plug the power plug into the AC power outlet and then connect the USB cable ...

Страница 333: ...nter NOTE For details on the installation site see Getting Started Guide 1 Turn the printer and computer OFF a a a a remove the USB cable b b b b and then disconnect the power plug from the AC power outlet c c c c WARNING Be sure to turn the printer and computer OFF unplug the power plug and then disconnect all the interface cables from the printer before moving the printer Otherwise the power cor...

Страница 334: ...r details on the procedure for removing the duplex unit see Removing the Duplex Unit on p 6 28 3 Pull out the paper cassette gently until it stops a a a a then raise the front side of the paper cassette and remove it from the printer b b b b IMPORTANT The paper cassette cannot be pulled out horizontally If you try to pull it out forcefully this may result in damage to the paper cassette a b ...

Страница 335: ...holding the center of the lift handles on the lower portion of the printer and lifting it up at the same time CAUTION This printer weighs approximately 19 4 kg without the paper cassette installed The printer must be carried by 2 or more people Please be careful not to hurt your back or other portions of your body when carrying the printer ...

Страница 336: ...outine Maintenance 5 Moving the Printer Be sure not to hold the printer by the front or rear side or any portions other than the lift handles If you do so you may drop the printer resulting in personal injury ...

Страница 337: ...ry the printer with the paper feeder installed If you do so the paper feeder may drop resulting in personal injury NOTE If the optional paper feeder was previously installed in the printer place the paper feeder on the new installation site before carrying the printer to the site For details on the procedure for installing the paper feeder see Removing the Packing Materials and Installing the Pape...

Страница 338: ...n push it into the printer gently and horizontally b b b b Push the paper cassette into the printer firmly until the front side of the paper cassette is flush with the front surface of the printer CAUTION When setting the paper cassette in the printer be careful not to catch your fingers NOTE If the optional duplex unit was previously installed reinstall it on the printer For details on the proced...

Страница 339: ...ter When transporting the printer for reasons such as relocating remove the toner cartridge and store the printer and the parts in the package that they came in with the packing materials attached in order to prevent them from being damaged while being transported If the original package and packing materials are not available find an appropriate box and packing materials and pack the printer and ...

Страница 340: ...fety Instructions See p xvi Do not place any heavy objects on the printer trays or covers This may result in damage to the printer Do not leave each cover open longer than required Exposing the printer to direct sunlight or strong light may result in deterioration in print quality Avoid vibration while the printer is printing This may result in deterioration in print quality Be sure not to open th...

Страница 341: ... allow the printer to cool down sufficiently before covering the printer If you do not plan to use the printer for a long period of time unplug the power plug from the AC power outlet Do not use or store the printer in a room where chemicals are used The surroundings of the output tray and sub output tray are hot during printing or immediately after printing When taking out of the paper or removin...

Страница 342: ...ce 6 7 Moving the Printer 6 8 Removing the Packing Materials and Installing the Paper Feeder 6 12 Removing the Paper Feeder 6 20 Duplex Unit 6 22 Installation Space 6 23 Installing the Duplex Unit 6 24 Removing the Duplex Unit 6 28 Network Board 6 31 Parts and Their Functions 6 33 Installing the Network Board 6 34 Setting the Network Board 6 39 Problems on Installing the Network Board 6 42 Resetti...

Страница 343: ...h the printer unit The 500 sheet universal cassette UC 67KD is to be replaced with the paper cassette equipped with the optional paper feeder The paper cassette can be loaded with paper at sizes of A3 B4 A4 B5 A5 Ledger 11 x 17 Legal Letter Executive 16K and paper of the following custom paper sizes When loading paper in portrait orientation Width 210 0 to 297 0 mm Length 210 0 to 431 8 mm If the ...

Страница 344: ...y 500 sheets of plain paper 64 g m2 at sizes of A3 B4 A4 B5 A5 Ledger 11 x 17 Legal Letter Executive 16K and plain paper of the following custom paper sizes When loading paper in portrait orientation Width 210 0 to 297 0 mm Length 210 0 to 431 8 mm When loading paper in landscape orientation Width 210 0 to 297 0 mm Length 148 0 to 297 0 mm NOTE The paper feeder is designed for LBP3500 You cannot u...

Страница 345: ...r Executive 8K and 16K and following custom paper sizes When loading paper in portrait orientation Width 210 0 to 297 0 mm Length 210 0 to 431 8 mm When loading paper in landscape orientation Width 210 0 to 297 0 mm Length 148 0 to 297 0 mm IMPORTANT You cannot perform automatic 2 sided printing on heavy paper transparencies labels and envelopes NOTE The duplex unit is designed for LBP3500 You can...

Страница 346: ...ettings and manage the printer from a computer on the network Also you can use NetSpot Device Installer and NetSpot Console that configure and manage a printer connected to a network on a computer NOTE For details on Remote UI see Remote UI Guide For more details on NetSpot Device Installer see Network Guide For details on NetSpot Console see NetSpot Console User s Guide For details on the procedu...

Страница 347: ...he power plug and then disconnect all the interface cables and power cord from the printer before installing the paper feeder Otherwise the power cord or interface cables may be damaged resulting in a fire or electrical shock IMPORTANT Do not touch the connector A or feed roller B in the paper feeder This may result in damage to the printer or misfeeds NOTE For details on the procedure for loading...

Страница 348: ... 7 32 6 518 406 1 473 1 401 1 415 7 673 1 200 325 100 100 1228 7 465 718 408 1 86 4 23 5 408 1 86 4 23 5 332 211 57 9 332 211 57 9 mm Front Surface Tray Extension Auxiliary Tray Multi purpose Tray Sub output Tray Auxiliary Tray Tray Extension Auxiliary Tray Dimensions of the Printer mm Front Surface Required Peripheral Space mm The rubber feet are 1 mm high and their top surface is 12 mm x 12 mm s...

Страница 349: ... cord or interface cables may be damaged resulting in a fire or electrical shock CAUTION Do not carry the printer with the paper cassette attached If you do so the paper cassette may drop resulting in personal injury 1 Turn the printer and computer OFF a a a a remove the USB cable b b b b and then disconnect the power plug from the AC power outlet c c c c 2 Remove all the interface cables and the ...

Страница 350: ...e gently until it stops a a a a then raise the front side of the paper cassette and remove it from the printer b b b b IMPORTANT The paper cassette cannot be pulled out horizontally If you try to pull it out forcefully this may result in damage to the paper cassette a b ...

Страница 351: ... the center of the lift handles on the lower portion of the printer and lifting it up at the same time CAUTION This printer weighs approximately 19 4 kg without the paper cassette installed The printer must be carried by 2 or more people and care must be taken to avoid hurting your back or other portions of your body when carrying the printer ...

Страница 352: ... Optional Accessories 6 Paper Feeder Be sure not to hold the printer by the front or rear side or any portions other than the lift handles If you do so you may drop the printer resulting in personal injury ...

Страница 353: ... carrying the printer Removing the Packing Materials and Installing the Paper Feeder The paper feeder is to be installed at the bottom of the printer unit CAUTION Put the printer or paper feeder down slowly and carefully Be careful not to hurt your hands Do not carry the printer with the paper cassette attached If you do so the paper cassette may drop resulting in personal injury NOTE The packing ...

Страница 354: ...cking material attached to the paper cassette of the paper feeder Remove the tape as shown in the figure a and then remove the packing material with tape b Remove the two pieces of tape as shown in the figure a and then remove the packing material b a b a b ...

Страница 355: ...as shown in the figure a and then remove the packing material with tape b 2 Remove the tape that is securing the paper cassette To remove the packing material with tape remove the two pieces of tape a and then remove the packing material together with the tape b b a a a b ...

Страница 356: ...ide of the paper cassette slightly b and then pull it out completely c as shown in the figure IMPORTANT Hold the paper cassette with both hands securely because the cassette is heavy Place the removed paper cassette on a flat and stable surface The paper cassette cannot be pulled out horizontally If you try to pull it out forcefully this may result in damage to the paper cassette a A b c ...

Страница 357: ...sories 6 Paper Feeder 4 While holding the lock release lever of the rear paper guide slide the guide 5 Remove the tape and packing material Remove the tape shown in the figure a Remove the packing material with tape b a b ...

Страница 358: ...or A or feed roller B in the paper feeder This may result in damage to the printer or misfeeds Do not install the paper feeder on a platform that may warp from the weight of the printer and optional accessories or where the printer is liable to sink such as a carpet or mat Secure sufficient space around the paper feeder so that you can install the printer and connect cords such as the power cord a...

Страница 359: ... Accessories 6 Paper Feeder 7 Attach the cassette protective cover IMPORTANT Do not put your hand or things on the cassette protective cover or shove the cover hard This may damage the cassette protective cover a b ...

Страница 360: ...o set the printer forcefully without lifting it the connector and positioning pins may be broken 9 Set the paper cassette in the printer unit and paper feeder NOTE If the optional duplex unit was previously installed reinstall it on the printer For details on the procedure for installing the duplex unit see Installing the Duplex Unit on p 6 24 10 Connect the interface cables except for the USB cab...

Страница 361: ...o turn the printer and computer OFF unplug the power plug and then disconnect all the interface cables and power cord from the printer before removing the paper feeder Otherwise the power cord or interface cables may be damaged resulting in a fire or electrical shock CAUTION Do not carry the printer with the paper cassette attached If you do so the paper cassette may drop resulting in personal inj...

Страница 362: ...he paper cassettes from the printer unit and paper feeder 4 Remove the cassette protective cover 5 Lift the printer and remove it from the paper feeder 6 Move the paper feeder 7 Move back the printer unit to the installation site 8 Set the paper cassette in the printer NOTE If the optional duplex unit was previously installed reinstall it on the printer For details on the procedure for installing ...

Страница 363: ...e printer unit WARNING Be sure to turn the printer OFF unplug the power plug and then disconnect all the interface cables and power cord from the printer before installing the duplex unit Otherwise the power cord or interface cables may be damaged resulting in a fire or electrical shock Duplex Unit DU 67 ...

Страница 364: ... duplex unit installed are indicated in the following figures 544 200 121 6 172 2 93 8 184 88 6 40 6 518 438 7 32 6 277 272 286 6 344 325 100 100 1193 7 430 718 Tray Extension Auxiliary Tray Multi purpose Tray Sub output Tray Auxiliary Tray Tray Extension Auxiliary Tray mm mm Dimensions of the Printer Front Surface Front Surface Required Peripheral Space ...

Страница 365: ...NOTE The packing materials may be changed in form or position to be placed or may be added or removed without notice 1 Turn the printer and computer OFF a a a a remove the USB cable b b b b and then disconnect the power plug from the AC power outlet c c c c 2 Remove all the interface cables and the power cord from the printer c a b a ...

Страница 366: ...es 6 Duplex Unit 3 Remove the duplex unit cover Hook your finger in the opening A of the duplex unit cover and remove it IMPORTANT Keep the duplex unit cover The duplex unit cover is required when the duplex unit is removed A ...

Страница 367: ...s 6 Duplex Unit 4 Install the duplex unit Push the duplex unit into the printer firmly and horizontally as shown in the figures CAUTION Push the duplex unit gently to avoid catching your hands Be careful not to hurt your hands ...

Страница 368: ...the interface cables except for the USB cable and connect the power cord 6 Plug the power plug into the AC power outlet 7 Connect the USB cable NOTE After installing the duplex unit you have to specify the settings for the optional accessories in the Device Settings sheet in the printer driver You can obtain the status of the optional accessories automatically by clicking Get Device Status in the ...

Страница 369: ...the duplex unit was installed WARNING Be sure to turn the printer and computer OFF unplug the power plug and then disconnect all the interface cables and power cord from the printer before removing the duplex unit Otherwise the power cord or interface cables may be damaged resulting in a fire or electrical shock IMPORTANT When moving or servicing the printer remove the duplex unit ...

Страница 370: ...e USB cable and then disconnect the power plug from the AC power outlet 2 Remove all the interface cables and the power cord from the printer 3 Pull out the duplex unit gently until it stops a a a a then raise the front side of the duplex unit and remove it from the printer b b b b b a ...

Страница 371: ...the duplex unit cover Hook your finger in the opening A of the duplex unit cover and install it 5 Connect the interface cables except for the USB cable and connect the power cord 6 Plug the power plug into the AC power outlet 7 Connect the USB cable A ...

Страница 372: ...tional network board you can use LBP3500 directly connected to a network Network board Screws 2 pieces Guide booklet Ferrite core Only for NB C1 ERR LNK 100 Print server Client Client Client Client Connecting the network board on the printer directly to the computer Connecting the printer to the computer via a print server LBP3500 Network board installed LBP3500 Network board installed TCP IP TCP ...

Страница 373: ...tricity Observe the following precautions when handling the network board to prevent damage from static electricity Touch a metal object to dissipate static electricity before handling the network board When handling the network board do not touch anything that generates static electricity such as the computer display Do not touch the network board parts printed wire or connectors with your hands ...

Страница 374: ...k by 100BASE TX Does not come on when connected by 10BASE T d d d d LNK Indicator Green Comes on when the network board is connected to the network properly e e e e ERR Indicator Orange Comes on or blinks when the network board is not working properly f f f f MAC Address It is required when setting the IP address using the ARP PING command It may be also required when installing the printer driver...

Страница 375: ...crews NOTE This network board does not come with a LAN cable A Category 5 twisted pair cable is required for installing the network board and connecting the printer to a network Have cables or a hub ready as needed 1 Turn the printer and computer OFF a a a a remove the USB cable b b b b and then disconnect the power plug from the AC power outlet c c c c 2 Remove the power cord If there is not enou...

Страница 376: ...p them where they will not get lost 4 Insert the network board into the expansion slot Hold the metal panel portions of the network board and insert the board while aligning it with the guide rails inside the expansion slot IMPORTANT Do not touch the network board parts printed wire or connectors with your hands Insert the printer connector of the network board securely into the connector inside t...

Страница 377: ... of the network board with the two screws supplied with the network board 6 If you are using NB C1 attach the ferrite core to the LAN cable as shown in the figure Attach the ferrite core at 5 cm or less from the end of the connector which is connected to the printer 5 cm or less ...

Страница 378: ... network board according to the network 8 Connect the power cord 9 Plug the power plug into the AC power outlet 10 Connect the USB cable as needed 11 Press of the power switch to turn the printer ON IMPORTANT If the printer does not operate properly or an error message appears in the Printer Status Window see Troubleshooting on p 7 1 ...

Страница 379: ...king properly when the LNK indicator is on If the network board is connected by 100BASE TX the board is working properly when the LNK indicator and 100 indicator are on A ERR Indicator B LNK Indicator C 100 Indicator If the network board is not working properly turn the printer OFF and then check the LAN cable connection hub performance and network board installation C B A ...

Страница 380: ...Before setting the DIP switches turn the printer OFF then remove the network board A Phillips screwdriver is required for removing the network board Have a screwdriver ready in advance that matches the size of the screws Set the DIP switches according to the transmission speed of the connected network as follows IMPORTANT When setting the DIP switches be careful not to damage the main board with t...

Страница 381: ...es and the power cord from the printer 3 Remove the two screws and remove the network board IMPORTANT Do not touch the network board parts printed wire or connectors with your hands Communication speed and Transmission mode of LAN 10BASE T Half duplex ON OFF ON OFF ON OFF ON OFF ON OFF Auto detect default setting 10BASE T Full duplex 100BASE TX Half duplex 100BASE TX Full duplex Setting the DIP Sw...

Страница 382: ...ning it with the guide rails inside the expansion slot IMPORTANT Do not touch the network board parts printed wire or connectors with your hands Insert the printer connector of the network board securely into the connector inside the expansion slot 6 Secure the top and bottom portions of the network board with the two screws supplied with the network board 7 Connect the LAN cable 8 Connect the pow...

Страница 383: ...ub Remedy 1 Connect the LAN cable to a port with a X mark Remedy 2 If the hub has a UP LINK cascade switch switch to X Cause 3 A cross LAN cable is being used Remedy 1 Replace the cable with a straight LAN cable Remedy 2 Connect the cross LAN cable to the UP LINK cascade port on the hub If the hub has a UP LINK cascade switch switch to NOTE A cross LAN cable is a cable used to connect a printer an...

Страница 384: ...nking Cause The hardware of the network board is in an abnormal condition Remedy Contact your local authorized Canon dealer for servicing Resetting the Network Board If you want to reset the network board to the default values use the Remote UI or FTP Client For details on the Remote UI see Chapter 3 Various Functions of Remote UI in Remote UI Guide and on FTP Client see Chapter 5 Appendix in Netw...

Страница 385: ...damage the main board with the tip of a ball point pen etc Do not use a sharp object such as a mechanical pencil 5 Insert the network board into the expansion slot Hold the metal panel portions of the network board and insert the board while aligning it with the guide rails inside the expansion slot IMPORTANT Do not touch the network board parts printed wire or connectors with your hands Insert th...

Страница 386: ...comes on and then press of the power switch to turn the printer OFF 10 Disconnect the power plug from the AC power outlet 11 Remove the power cord 12 Remove the network board then reset the DIP switch 1 to OFF Set the DIP switches with the tip of a ball point pen etc IMPORTANT When setting the DIP switches be careful not to damage the main board with the tip of a ball point pen etc Do not use a sh...

Страница 387: ... and then remove the USB cable If you attempt to remove the network board when the printer is ON or any cable is connected to the printer this may result in an electrical shock Be careful when handling the network board Touching the edges or a sharp portion of the network board may result in personal injury 1 Turn the printer and computer OFF remove the USB cable and then disconnect the power plug...

Страница 388: ...oard 4 Attach the protective plate to the expansion slot and secure it with the screw 5 Connect the interface cables except for the USB cable and connect the power cord 6 Plug the power plug into the AC power outlet 7 Connect the USB cable ...

Страница 389: ...6 48 Optional Accessories 6 Network Board ...

Страница 390: ...per Jams 7 7 Service Call Display 7 40 Print Quality Problems 7 43 Paper Problems 7 48 When Nothing is Printed 7 50 Installation Problems 7 51 When Uninstallation Fails 7 52 Uninstalling the USB Class Driver 7 54 Problems on Local Installation 7 57 Installation Problems When the Printer is Shared on a Network 7 58 Problems on Installing the Network Board 7 59 Miscellaneous Problems 7 61 Confirming...

Страница 391: ...inter is not connected to your computer See Connecting to a Computer on p 1 14 Follow the messages displayed on the Printer Status Window to remedy an error See Printer Status Window on p 4 83 The power cord is not connected The power switch is turned OFF See Turning the Printer ON OFF on p 1 10 The Alarm indicator is on or blinking See Alarm Indicator on p 7 3 The printer is installed in an adver...

Страница 392: ... occurred in the printer the Alarm indicator orange comes on or blinks When the Alarm indicator is on a service error is occurring In this case see Service Call Display on p 7 40 If the Alarm indicator is blinking follow the directions displayed in the Printer Status Window ...

Страница 393: ...t is completely cool before removing the jammed paper Touching the fixing unit when it is still hot may result in burns When removing jammed paper take care not to allow the toner to come into contact with your hands or clothing as this will dirty your hands or clothing If they become dirty wash them immediately with cold water Washing with warm water will set the toner and make it impossible to r...

Страница 394: ...e may result in tearing paper or damaging the parts in the printer When removing jammed paper pull out the paper in the most appropriate direction judging from the position of the paper If paper is torn be sure to find and remove any remaining pieces of paper The error message may remain if jammed paper is removed without opening the front cover In this case open and close the front cover once Do ...

Страница 395: ...surroundings of the output tray and sub output tray are hot during printing or immediately after printing When taking out of the paper or removing jammed paper be careful not to touch the surroundings of the output tray or sub output tray ...

Страница 396: ...lti purpose Tray See p 7 8 b Cassette 1 Cassette 2 only when the paper feeder is installed Cassette 1 Cassette 2 See p 7 9 c Inside the front cover Front Cover See p 7 17 d Output tray Sub output tray Sub output Tray See p 7 23 e Duplex print transport area only when the duplex unit is installed Duplex Unit See p 7 30 Output Tray Multi purpose Tray Paper Feeder Unit Optional Duplex Unit Optional S...

Страница 397: ...sing the multi purpose tray remove any paper jammed in the multi purpose tray and then close it IMPORTANT If jammed paper cannot be removed easily do not try to remove it forcefully but proceed to Clearing Paper Jams Front Cover Area p 7 17 2 Open the front cover Open the front cover gently while pressing the lever on the top surface of the cover ...

Страница 398: ...over and the printer and that the front cover is stable If the front cover is not closed completely this may result in poor print quality Do not leave the front cover open for a long time Clearing Paper Jams Cassette 1 Cassette 2 Area Remove any jammed paper using the following procedures 1 If you are using the multi purpose tray remove any paper jammed in the multi purpose tray and then close it ...

Страница 399: ...y but proceed to Clearing Paper Jams Front Cover Area p 7 17 2 If the paper feeder is installed pull out the paper cassette Pull out the paper cassette until it stops a Hold the grips A with both hands raise the front side of the paper cassette slightly b and then pull it out completely c as shown in the figure a A b c ...

Страница 400: ... Troubleshooting 7 Paper Jams 3 Pull out the paper cassette of the printer unit gently until it stops a a a a then raise the front side of the paper cassette and remove it from the printer unit b b b b a b ...

Страница 401: ... Remove any jammed paper If paper is jammed in the paper cassette of the printer unit pull out the paper downward as shown in the figure If paper is jammed between the paper feeder and printer unit remove the paper from the printer unit ...

Страница 402: ...7 13 Troubleshooting 7 Paper Jams IMPORTANT Do not touch the feed rollers A in the printer and paper feeder This may result in damage to the printer or printer error A ...

Страница 403: ...in the printer at an angle as shown in the figure a a a a then push it into the printer gently and horizontally b b b b Push the paper cassette into the printer firmly until the front side of the paper cassette is flush with the front surface of the printer b a ...

Страница 404: ... Troubleshooting 7 Paper Jams If the paper feeder is installed set the paper cassette of the paper feeder also CAUTION When setting the paper cassette in the printer be careful not to catch your fingers b a ...

Страница 405: ...e front cover gently while pressing the lever on the top surface of the cover 7 Hold the toner cartridge with both hands and install it into the printer Align A of the toner cartridge with the toner cartridge guides B then insert the cartridge until it stops B A B A ...

Страница 406: ...ont cover and the printer and that the front cover is stable If the front cover is not closed completely this may result in poor print quality Do not leave the front cover open for a long time Clearing Paper Jams Front Cover Area Remove any jammed paper using the following procedures 1 If you are using the multi purpose tray remove any paper jammed in the multi purpose tray and then close it ...

Страница 407: ...ammed paper cannot be removed easily do not try to remove it forcefully but proceed to the next step 2 Open the front cover Open the front cover gently while pressing the lever on the top surface of the cover 3 Remove the toner cartridge from the printer ...

Страница 408: ...electrical contact B shown in the figure as this may result in damage to the printer NOTE For details on handling the toner cartridge see Precautions for Handling Toner Cartridge on p 5 12 4 Place the toner cartridge into the protective bag 5 Remove any paper jammed inside the front cover B A ...

Страница 409: ...ams 6 Raise the transport guide Holding the green tab raise the transport guide CAUTION Do not take your hands off the transport guide The transport guide may snap back to its original position and this may result in personal injury ...

Страница 410: ...y jammed paper Send the top edge of the jammed paper out of the transport guide a then remove the paper in the direction of the arrow gently b Remove the jammed paper in the direction of the arrow gently to prevent unfixed toner from spilling a b ...

Страница 411: ...that the front cover does not open make sure that there is no space between the front cover and the printer and that the front cover is stable If the front cover is not closed completely this may result in poor print quality If you cannot close the front cover check if the toner cartridge is installed properly If you try to close the front cover forcefully this may result in damage to the printer ...

Страница 412: ...are using the multi purpose tray remove any paper jammed in the multi purpose tray and then close it IMPORTANT If jammed paper cannot be removed easily do not try to remove it forcefully but proceed to Clearing Paper Jams Front Cover Area p 7 17 2 Open the front cover Open the front cover gently while pressing the lever on the top surface of the cover ...

Страница 413: ...output trays the output tray and sub output tray IMPORTANT If the jammed paper cannot be removed easily do not try to remove it forcefully but proceed to the next step If the output tray is being used Remove any paper jammed in the output tray Open the sub output tray ...

Страница 414: ...pen the white transport guide inside the sub output tray a then remove any jammed paper b Send the top edge of the jammed paper toward you then remove it If you used the sub output tray remove any paper jammed in the sub output tray b a ...

Страница 415: ...til it stops a then raise the front side of the duplex unit and remove it from the printer unit b When removing the duplex unit be sure to check that the front cover is open If you remove the duplex unit with the front cover open you need to cycle the power to make the printer ready to print If the power is turned OFF once the data being printed will be deleted b a ...

Страница 416: ...7 27 Troubleshooting 7 Paper Jams Raise the sub output tray slightly a then unhook the hook of the black transport guide b Open the sub output tray to the position shown in the figure a b ...

Страница 417: ...7 28 Troubleshooting 7 Paper Jams Remove any jammed paper Close the sub output tray Holding the duplex unit as shown in the figure push it into the printer firmly and horizontally ...

Страница 418: ...the front cover Close the front cover completely IMPORTANT Make sure that the front cover does not open make sure that there is no space between the front cover and the printer and that the front cover is stable If the front cover is not closed completely this may result in poor print quality Do not leave the front cover open for a long time ...

Страница 419: ...g the multi purpose tray remove any paper jammed in the multi purpose tray and then close it IMPORTANT If jammed paper cannot be removed easily do not try to remove it forcefully but proceed to Clearing Paper Jams Front Cover Area p 7 17 2 Open the front cover Open the front cover gently while pressing the lever on the top surface of the cover ...

Страница 420: ...7 Paper Jams 3 Remove any paper jammed in the output tray IMPORTANT If the jammed paper cannot be removed easily do not try to remove it forcefully but proceed to the next step 4 Remove the toner cartridge from the printer ...

Страница 421: ...esult in damage to the printer NOTE For details on handling the toner cartridge see Precautions for Handling Toner Cartridge on p 5 12 5 Place the toner cartridge into the protective bag 6 If a paper jam occurs when performing 2 sided printing perform the following procedure If you are not performing 2 sided printing proceed to the next step B A ...

Страница 422: ...r Jams Raise the black transport guide a then remove any jammed paper b CAUTION Do not take your hands off the transport guide The transport guide may snap back to its original position and this may result in personal injury b a ...

Страница 423: ...uplex unit and remove it from the printer unit b When removing the duplex unit be sure to check that the front cover is open If you remove the duplex unit with the front cover open you need to cycle the power to make the printer ready to print If the power is turned OFF once the data being printed will be deleted b a ...

Страница 424: ...7 35 Troubleshooting 7 Paper Jams Remove any paper jammed in the duplex unit If you see the jammed paper in the area of A pull out the paper toward you to remove it Open the sub output tray A ...

Страница 425: ...7 36 Troubleshooting 7 Paper Jams Raise the sub output tray slightly a then unhook the hook of the black transport guide b Open the sub output tray to the position shown in the figure a b ...

Страница 426: ...7 37 Troubleshooting 7 Paper Jams Remove any jammed paper Close the sub output tray Holding the duplex unit as shown in the figure push it into the printer firmly and horizontally ...

Страница 427: ...gn A of the toner cartridge with the toner cartridge guides B then insert the cartridge until it stops 8 Close the front cover Close the front cover completely IMPORTANT Make sure that the front cover does not open make sure that there is no space between the front cover and the printer and that the front cover is stable If the front cover is not closed completely this may result in poor print qua...

Страница 428: ... close the front cover check if the toner cartridge is installed properly If you try to close the front cover forcefully this may result in damage to the printer Do not leave the front cover open for a long time after installing the toner cartridge ...

Страница 429: ... work properly the Alarm indicator orange comes on and the following service call appears in the Printer Status Window When a service call appears cycle the power of the printer using the following procedure This may clear the message 1 Turn the power OFF wait for 10 seconds or longer and then turn it ON again ON OFF ...

Страница 430: ... be used as normal If the error message still appears proceed to the next step 2 Note down the error code displayed in the Printer Status Window 3 Turn the printer and computer OFF a a a a remove the USB cable b b b b and then disconnect the power plug from the AC power outlet c c c c c a b a ...

Страница 431: ...7 42 Troubleshooting 7 Service Call Display 4 Contact your local authorized Canon dealer When contacting your Canon dealer please report the problems and the error code that you have noted ...

Страница 432: ...cartridge has run out of toner Remedy Replace the toner cartridge with a new one See Replacing the Toner Cartridge on p 5 2 Cause 2 The drum in the toner cartridge has deteriorated Remedy Replace the toner cartridge with a new one See Replacing the Toner Cartridge on p 5 2 Printed pages have white specks Cause 1 Appropriate paper is not being used Remedy Replace the paper with one that can be used...

Страница 433: ...the setting for Toner Density display the Detailed Settings dialog box by clicking Details in the Quality sheet Cause 2 The printer is exposed to direct sunlight or strong light Remedy Move the printer to a place where it will not be exposed to direct sunlight or strong light Alternatively move the strong light source away from the printer The print is uneven Cause 1 The toner cartridge has run ou...

Страница 434: ...argins was printed Remedy 1 The printable area for this printer is the area except for within a 5 mm margin 15 mm for envelopes on all sides of the paper Create a margin around the print data Remedy 2 Select the Print with Upper Left of Sheet as Starting Point check box in the printer driver then print the document However data may be printed with the edges missing In order to specify the setting ...

Страница 435: ...l the toner cartridge See Replacing the Toner Cartridge on p 5 2 Cause 2 Multiple sheets of paper were fed at a time Remedy Align the paper stack in the paper cassette properly and load it again See Loading Paper in a Paper Cassette on p 2 26 Loading Paper in the Multi purpose Tray on p 2 45 The overall surface of the paper is printed in black completely Cause The drum in the toner cartridge has d...

Страница 436: ... in the printer driver If this solves the problem set Special Print Mode to Off In order to specify the setting for Special Print Mode display the Advanced Settings dialog box by clicking Finishing Details in the Finishing sheet and then clicking Advanced Settings in the Finishing Details dialog box Colored lines and text come out faint Cause Thin lines or text are being used Remedy Select the Pri...

Страница 437: ... If this solves the problem set Special Print Mode to Off In order to specify the setting for Special Print Mode display the Advanced Settings dialog box by clicking Finishing Details in the Finishing sheet and then clicking Advanced Settings in the Finishing Details dialog box Paper jams occur frequently Cause Paper is inappropriate Remedy 1 Replace the paper with one that can be used and print a...

Страница 438: ...Special Print Mode to Off In order to specify the setting for Special Print Mode display the Advanced Settings dialog box by clicking Finishing Details in the Finishing sheet and then clicking Advanced Settings in the Finishing Details dialog box Cause 4 Paper that curls easily is output to the output tray Remedy When printing transparencies labels or envelopes that curl easily switch an output tr...

Страница 439: ...l it again See Uninstalling the CAPT Software on p 3 81 2 Print a test page Click Print Test Page in the General sheet in the Printer Properties dialog box When the test page is printed correctly Printing can be performed from the CAPT software Check the application to make sure that all the settings are specified properly When the test page cannot be printed Uninstall the CAPT software reinstall ...

Страница 440: ...T Software on p 3 81 Delete Canon LBP3500 in Add or Remove Programs 2 See When Uninstallation Fails on p 7 52 Delete Canon LBP3500 in Add or Remove Programs 2 See When Uninstallation Fails on p 7 52 Install the CAPT software again See Installing the CAPT Software on p 3 4 Install the CAPT software again See Installing the CAPT Software on p 3 4 Canon Printer Uninstaller is displayed in All Program...

Страница 441: ...e Programs For Windows Server 2003 From the Start menu select Control Panel Add or Remove Programs For Windows Vista From the Start menu select Control Panel and then click Uninstall a program 2 Select Canon LBP3500 in the Add or Remove Programs dialog box then click Change Remove For Windows 2000 Select Canon LBP3500 in the Add Remove Programs dialog box then click Change Remove For Windows Vista...

Страница 442: ...using Windows Vista and the User Account Control dialog box appears click Continue 3 Select the name of this printer then click Delete 4 Click Yes Uninstallation starts Please wait a moment 5 Click Exit The Delete Printer dialog box closes 6 Restart Windows ...

Страница 443: ...ams For Windows 2000 From the Start menu select Settings Control Panel and then double click Add Remove Programs For Windows Server 2003 From the Start menu select Control Panel Add or Remove Programs For Windows Vista From the Start menu select Control Panel and then click Uninstall a program 3 Make sure that Canon LBP3500 is not displayed in the Add or Remove Programs dialog box and then click F...

Страница 444: ... select Settings Control Panel and then double click the System icon For Windows Server 2003 From the Start menu select Control Panel System For Windows Vista From the Start menu select Control Panel and then click Hardware and Sound View hardware and devices NOTE If you are using Windows Vista and the User Account Control dialog box appears click Continue 5 Click Hardware Device Manager and then ...

Страница 445: ...is not installed properly Select Unknown device then uninstall it Never delete any drivers for other devices If you delete them by mistake Windows may not operate properly If the USB class driver is not installed properly USB Printing Support is not displayed 7 When the Confirm Device Removal Confirm Device Uninstall for Windows Vista dialog box appears click OK 8 Click Device Manager closes ...

Страница 446: ...r OFF and disconnect the USB cable Then connect the USB cable again and turn the printer ON Cause 2 The printer is OFF Remedy Turn the printer ON Cause 3 The USB cable is not connected properly Remedy Make sure that the printer and computer are connected with the USB cable properly Cause 4 An inappropriate USB cable is being used Remedy Use a USB cable appropriate for the USB interface of this pri...

Страница 447: ...nistrators Remedy CAPT Canon Advanced Printing Technology software needs to be installed by a member of Administrators Have a user with the correct permissions to install the software Installation Problems When the Printer is Shared on a Network The print server to be connected cannot be found Cause 1 The print server has not been started up Remedy Start up the print server Cause 2 The printer is ...

Страница 448: ...connect it Cause 2 The cable is connected to the UP LINK cascade port on the hub Remedy 1 Connect the LAN cable to a port with a X mark Remedy 2 If the hub has a UP LINK cascade switch switch to X Cause 3 A cross LAN cable is being used Remedy 1 Replace the cable with a straight LAN cable Remedy 2 Connect the cross LAN cable to the UP LINK cascade port on the hub If the hub has a UP LINK cascade s...

Страница 449: ...rly Remedy 2 Replace the network cable with a proper one and check if there is no disconnection or damage Remedy 3 If the ERR indicator still comes on even after applying the Remedy 1 and 2 contact your local authorized Canon dealer for servicing The ERR indicator on the network board blinks at an interval of four times Cause The DIP switch 1 on the network board is ON Remedy Set the DIP switch 1 ...

Страница 450: ...PT Software on p 3 4 The printer stops printing temporarily Cause When printing after the paper is changed from narrower one to wider one the printer cools down the fixing unit so that the print quality is maintained Remedy Please wait a moment The printer cools down the fixing unit automatically When the printer finished cooling down the fixing unit it stops operation and becomes ready to print I...

Страница 451: ...Remedy Start up the print server then configure Windows Firewall to unblock communication with the client computers See Windows Firewall on p 8 12 The printer status is not displayed properly in the Printer Status Window when the printer is shared over a network Cause You are using a computer with Windows XP Service Pack 2 or another operating system equipped with Windows Firewall as a client comp...

Страница 452: ...work board or confirm the TCP IP settings Use these functions when required after installing and connecting the printer for example when you want to check the operation NOTE Configuration Page Print is designed to be printed on A4 size paper Load A4 size paper For details on Network Status Print see Chapter 4 Troubleshooting in Network Guide 1 Display the Printer Status Window For details on metho...

Страница 453: ...guration Page Print is printed 4 Confirm the contents of the Configuration Page Print Configuration Page Print prints information as shown in the following figure You can confirm the optional settings of the printer and printer status such as Number of Total Printed Pages ...

Страница 454: ...7 65 Troubleshooting 7 Confirming the Printer Features IMPORTANT This is a sample of Configuration Page Print The contents may differ from the Configuration Page Print printed by your computer ...

Страница 455: ...7 66 Troubleshooting 7 Confirming the Printer Features ...

Страница 456: ... Print Monitor Installer 8 10 NetSpot Console 8 11 Windows Firewall 8 12 Configuring Windows Firewall to Unblock Communication with the Client Computers 8 13 Configuring Windows Firewall to Block Communication with Client Computers 8 15 Configuring Windows Firewall to Unblock Communication with the Print Server 8 16 Checking the Processor Version of Windows Vista 8 18 Index 8 19 Location of the Se...

Страница 457: ...d the settings of the fixing mode This is because the safety function that prevents damage caused by heat becomes active Warm up time Time from power on to printer ready 17 seconds or less May vary depending on the use conditions such as the availability of the optional accessories and installation environment Recovery time Time from sleep mode to printer ready 15 seconds or less First print time ...

Страница 458: ...r in landscape orientation Width 210 0 to 297 0 mm Length 148 0 to 297 0 mm Paper capacity approx 500 sheets 64 g m2 Multi purpose tray Standard sizes A3 B4 A4 B5 A5 Ledger 11 x 17 Legal Letter Executive Index Card Envelope DL Envelope COM10 Envelope C5 Envelope Monarch Envelope B5 8K 16K Custom paper size When loading paper in portrait orientation Width 98 0 to 312 0 mm Length 148 0 to 470 0 mm W...

Страница 459: ... indicators 1 Operation key Expansion slot 1 Power supply 220 240 V 10 50 60 Hz 2 Hz Power consumption at temperature of 20 C 68 F Average during operation approx 434 W 1 Average during standby approx 36 W 1 Average during the sleep mode approx 7 W 1 Maximum 1547 W 2 or less 1 When the printer is with standard equipment 2 However the instantaneous peak on startup shall not be counted Consumables T...

Страница 460: ... approx 9 3 kg Duplex unit DU 67 approx 3 9 kg mark indicates optional products Printing software CAPT Canon Advanced Printing Technology Printable area Data cannot be printed within a 5 mm margin on all sides of the paper 15 mm for envelopes The data may be printed with the edges missing when a document with no margins is printed even if the Print with Upper Left of Sheet as Starting Point check ...

Страница 461: ... 8 438 7 32 6 184 88 6 40 6 277 344 272 286 6 518 Tray Extension Auxiliary Tray Multi purpose Tray Auxiliary Tray Sub output Tray Auxiliary Tray Tray Extension Front Surface mm 121 6 172 2 93 8 184 88 6 40 6 438 7 32 6 518 406 1 473 1 401 1 415 7 Tray Extension Auxiliary Tray Multi purpose Tray Sub output Tray Auxiliary Tray Tray Extension Auxiliary Tray ...

Страница 462: ...8 7 32 6 277 272 286 6 344 Tray Extension Auxiliary Tray Multi purpose Tray Sub output Tray Auxiliary Tray Tray Extension Auxiliary Tray mm Front Surface 121 6 88 6 172 2 93 8 184 40 6 438 7 32 6 518 406 1 473 1 401 1 415 7 Tray Extension Auxiliary Tray Multi purpose Tray Sub output Tray Auxiliary Tray Tray Extension Auxiliary Tray mm Front Surface Front Surface mm 160 5 142 6 518 600 9 ...

Страница 463: ...8 8 Appendix 8 Dimensions of Each Part Duplex Unit DU 67 Front Surface mm 25 133 355 414 4 397 8 ...

Страница 464: ...Spot Device Installer is software that allows you to easily initialize the settings of printers connected to the network For more details on NetSpot Device Installer see Network Guide NOTE When the printer driver is installed from CD ROM Setup the initial settings for the network are performed automatically Use NetSpot Device Installer as needed when you want to reset the IP address manually witho...

Страница 465: ...ecting your computer to the printer on a TCP IP network as well as the printing software CAPT For more details on Canon CAPT Print Monitor see Network Guide NOTE When the printer driver is installed from CD ROM Setup a port Canon CAPT Print Monitor is created automatically Use Print Monitor Installer as needed when you want to create the port without using CD ROM Setup ...

Страница 466: ...nsole allows you to view a list of printers display a printer map specify detailed protocol settings monitor printer states perform job operations and configure and view a variety of printer information using a web browser For more details on NetSpot Console see NetSpot Console User s Guide NOTE You can download NetSpot Console from the Canon website ...

Страница 467: ...CAPT Windows Firewall Utility to your hard disk to run it copy all of the files CNAB6FW EXE CAPTRGFW DLL and CNAB6FW INI from the WF_UTIL folder on the supplied LBP3500 User Software CD ROM to your hard disk Setting See Print server When installing CAPT Software from CD ROM Setup The Warning dialog box appears during the installation Click Yes to configure Windows Firewall to unblock communication...

Страница 468: ...D ROM icon and then select Open from the pop up menu 3 Double click English WF_UTIL CNAB6FW EXE CAPT Windows Firewall Utility runs IMPORTANT You can also run CAPT Windows Firewall Utility using the following procedures The CD ROM drive name is indicated as D in this manual The CD ROM drive name may differ depending on the computer you are using For an operating system other than Windows Vista Sele...

Страница 469: ...l Panel and then click Network and Internet Connections Windows Firewall For Windows Server 2003 From the Start menu select Control Panel Windows Firewall For Windows Vista From the Start menu select Control Panel and then click Allow a program through Windows Firewall If the User Account Control dialog box appears click Continue 2 Make sure that the Canon LBP3500 RPC Server Process check box is s...

Страница 470: ...ROM icon and then select Open from the pop up menu 3 Double click English WF_UTIL CNAB6FW EXE CAPT Windows Firewall Utility runs IMPORTANT You can also run CAPT Windows Firewall Utility using the following procedures The CD ROM drive name is indicated as D in this manual The CD ROM drive name may differ depending on the computer you are using For an operating system other than Windows Vista Select...

Страница 471: ...he printer status may not be displayed properly in the Printer Status Window and some of the printer functions may not operate properly 1 Display the Windows Firewall Windows Firewall Settings for Windows Vista dialog box For Windows XP From the Start menu select Control Panel and then click Network and Internet Connections Windows Firewall For Windows Server 2003 From the Start menu select Contro...

Страница 472: ...he Exceptions sheet in the Windows Firewall Windows Firewall Settings for Windows Vista dialog box select the File and Printer Sharing check box and then click OK Windows Firewall is configured to unblock communication with the print server ...

Страница 473: ...ng 32 bit Windows Vista or 64 bit Windows Vista you can check that using the following procedure 1 From the Start menu select Control Panel 2 Click System and Maintenance System 3 Check the processor version of Windows Vista in System type For 32 bit Windows Vista 32 bit Operating System appears For 64 bit Windows Vista 64 bit Operating System appears ...

Страница 474: ...ller 5 15 Outside of the Printer 5 25 Client 3 55 3 68 Continue Printing with the Multi purpose Tray 4 36 Contrast 4 62 Control Panel 1 5 Copies 4 24 Custom Installation 3 4 Custom Paper Size 4 25 D Deleting Pausing Resuming a Print Job 4 14 Detailed Settings 4 31 4 37 Detailed Settings for Booklet 4 30 Details 4 36 Device Settings Sheet 4 40 Dimensions 8 6 Document Properties Windows 2000 XP Serv...

Страница 475: ...1 5 LNK Indicator 6 33 Load Paper Indicator 1 7 Loading Paper Custom Paper Size 2 57 Envelope 2 52 Heavy Paper 2 26 2 46 Label 2 46 Multi purpose Tray 2 45 Paper Cassette 2 26 Plain Paper 2 26 2 46 Transparency 2 46 Local Installation 3 55 Local Printer 3 37 3 44 M MAC Address 6 33 Manual Grayscale Settings 4 36 Manual Scaling 4 25 Manuals 4 78 Matching Sheet 4 39 Miscellaneous Problems 7 61 Multi...

Страница 476: ...d Their Functions 1 4 Pause when Printing from the Multi purpose Tray 4 35 Peripheral Space Required 6 7 Plain Paper 2 4 Plug and Play Windows 2000 3 25 Windows Vista 3 13 Windows XP Server 2003 3 19 Poster Printing 4 48 Power Socket 1 6 Power supply Turning the Printer OFF 1 11 Turning the Printer ON 1 10 Power Switch 1 5 Preview 4 43 Print Grayscale Sample 4 64 Print Grayscale Sample 4 37 4 64 P...

Страница 477: ...42 Import 4 41 Name 4 41 Profile List 4 41 Specifying Profiles 4 65 Profile Sheet 4 41 Q Quality Sheet 4 36 R Rating Label 1 6 Ready Indicator 1 7 S Scaling 4 45 Self diagnostic Test 1 10 Serial Number 8 24 Service Call Display 7 40 Shared Printer 3 55 Show Icon in the Taskbar 4 40 Sleep Mode 1 12 Specifications 8 2 Hardware 8 2 Software 8 5 Spooling at Host 4 40 Sub output Tray 1 5 2 19 2 22 Syst...

Страница 478: ...8 23 Index 8 Appendix V Ventilation Slots 1 5 W Watermark 4 25 4 49 When Nothing is Printed 7 50 Windows Firewall 8 12 ...

Страница 479: ...service The serial number for this printer is indicated at the location shown in the following figure IMPORTANT The labels on which the serial number is indicated are required for service or maintenance Be sure not to remove them Inside of the front cover Outside View of the Packaging Box Serial Number XXXV XXXXHz XXA Serial Number ...

Страница 480: ...FA7 9916 060 CANON INC 2009 ...

Отзывы: