background image

75

Before Use

Basic Guide

Advanced Guide

Camera Basics

Auto Mode
Other Shooting 

Modes
P Mode

Playback Mode

Setting Menu

Wi-Fi Functions

Accessories

Appendix

Index

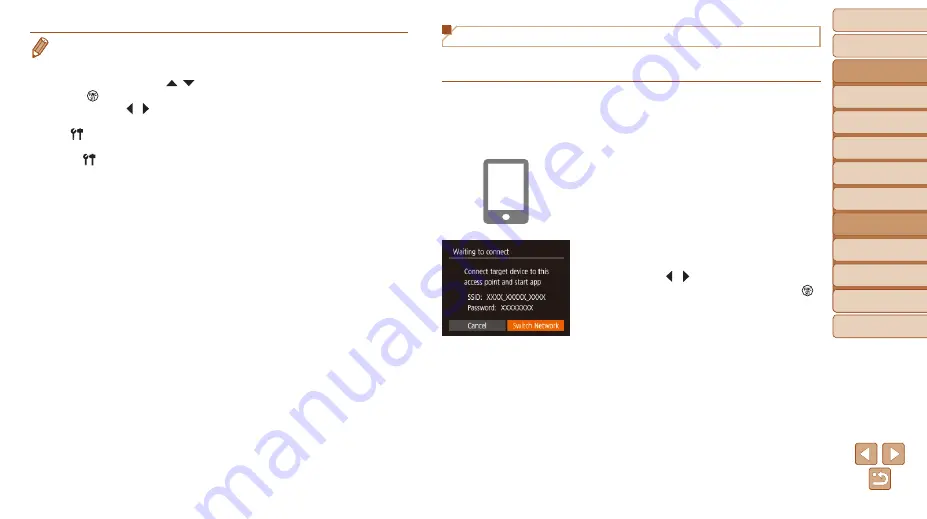
Using Another Access Point

When connecting the camera to a smartphone through the Wi-Fi menu, you 

can also use an existing access point.

1

  Prepare for the connection.

z

z

Access the [Waiting to connect] screen 

by following steps 1 – 4 in “Adding a 

Smartphone” (

=


 73

).

2

  Connect the smartphone to the 

access point.

3

  Choose [Switch Network].

z

z

Press the [ ][ ] buttons to choose 

[Switch Network], and then press the [ ] 

button.

z

z

A list of detected access points will be 

displayed.

• 

Connections require that a memory card be in the camera.

• 

Once you have connected to devices via the Wi-Fi menu, recent destinations 

will be listed first when you access the Wi-Fi menu. You can easily connect 

again by pressing the [ ][ ] buttons to choose the device and then pressing 

the [ ] button. To add a new device, display the device selection screen by 

pressing the [ ][

] buttons, and then configure the setting.

• 

If you prefer not to display recent target devices, choose MENU (

=


 21

) ► 

[

] tab ► [Wireless settings] ► [Wi-Fi Settings] ► [Target History] ► [Off].

• 

To connect without entering a password in step 5, choose MENU (

=


 21

► [ ] tab ► [Wireless settings] ► [Wi-Fi Settings] ► [Password] ► [Off]. 

[Password] is no longer displayed on the SSID screen (in step 4).

• 

You can also send multiple images at once and change the image size before 

sending (

=


 89

).

• 

You can send the current image by choosing [Send this image] on the screen 

in step 9.

Содержание Ixus 180sd500

Страница 1: ...er right to access other pages Next page Previous page Page before you clicked a link To jump to the beginning of a chapter click the chapter title at right From chapter title pages you can access topics by clicking their titles Make sure you read this guide including the Safety Precautions 6 section before using the camera Reading this guide will help you learn to use the camera properly Store th...

Страница 2: ...liates and its distributors are not liable for any consequential damages arising from any malfunction of a camera or accessory including memory cards that result in the failure of an image to be recorded or to be recorded in a way that is machine readable Images recorded by the camera shall be for personal use Refrain from unauthorized recording that infringes on copyright law and note that even f...

Страница 3: ...ide angle Playback magnify index Shutter button Lamp Power button Flash N Mark Tripod socket Memory card battery cover Strap mount Used with NFC features 71 Shooting modes and on screen icons and text are indicated in brackets Important information you should know Notes and tips for expert camera use xx Pages with related information in this example xx represents a page number The tabs shown above...

Страница 4: ...een Information 127 Functions and Menu Tables 129 Handling Precautions 135 Specifications 135 Index 139 Wi Fi Wireless LAN Precautions 141 Table of Contents Package Contents 2 Compatible Memory Cards 2 Preliminary Notes and Legal Information 2 Part Names and Conventions in This Guide 3 Table of Contents 4 Common Camera Operations 5 Safety Precautions 6 Basic Guide 9 Initial Preparations 10 Trying ...

Страница 5: ... Colors 38 Poster Effect 38 Fish Eye Effect 38 Miniature Effect 39 Toy Camera Effect 40 Monochrome 40 z z Focus on faces 24 37 48 z z Without using the flash Flash Off 32 52 z z Include yourself in the shot Self Timer 30 41 z z Add a date stamp 32 View z z View images Playback Mode 56 z z Automatic playback Slideshow 59 z z On a TV 108 z z On a computer 109 z z Browse through images quickly 57 z z...

Страница 6: ...ld result in electrical shock or fire If the product gets wet or if liquid or foreign objects get inside remove the battery pack batteries or unplug immediately If your model has a viewfinder or interchangeable lens do not look through the viewfinder or lens at bright light sources such as the sun on a clear day or a bright artificial light source This may damage your eyesight If your model has an...

Страница 7: ...usty places These could cause leakage overheating or an explosion of the battery pack batteries resulting in electrical shock fire burns or other injuries Overheating and damage may result in electrical shock fire burns or other injuries The slideshow transition effects may cause discomfort when viewed for prolonged periods When using optional lenses lens filters or filter adapters if applicable b...

Страница 8: ...heating or explosion resulting in product damage or fire If your product uses multiple batteries do not use batteries that have different levels of charge together and do not use old and new batteries together Do not insert the batteries with the and terminals reversed This may cause the product to malfunction Do not sit down with the camera in your pant pocket Doing so may cause malfunctions or d...

Страница 9: ... Index Basic Guide Basic information and instructions from initial preparations to shooting and playback Initial Preparations 10 Attaching the Strap 10 Holding the Camera 10 Charging the Battery Pack 10 Inserting the Battery Pack and Memory Card 11 Setting the Date and Time 12 Display Language 13 Trying the Camera Out 14 Shooting Smart Auto 14 Viewing 15 ...

Страница 10: ...he flash Charging the Battery Pack Before use charge the battery pack with the included charger Be sure to charge the battery pack initially because the camera is not sold with the battery pack charged g 1 Insert the battery pack z z After aligning the marks on the battery pack and charger insert the battery pack by pushing it in and down 2 Charge the battery pack z z CB 2LF Flip out the plug and ...

Страница 11: ...ery pack Inserting the Battery Pack and Memory Card Insert the included battery pack and a memory card sold separately Note that before using a memory card that is new or has been formatted in another device you should format the memory card with this camera 101 1 Open the cover z z Slide the cover and open it 2 Insert the battery pack z z While pressing the battery lock in the direction of the ar...

Страница 12: ...on you specify this way is recorded in image properties when you shoot and it is used when you manage images by shooting date or print images showing the date You can also add a date stamp to shots if you wish 32 1 Turn the camera on z z Press the power button z z The Date Time screen is displayed 2 Set the date and time z z Press the buttons to choose an item z z Press the buttons to specify the ...

Страница 13: ...e time battery backup battery after the battery pack is removed The date time battery will be charged in about 4 hours once you insert a charged battery pack even if the camera is left off Once the date time battery is depleted the Date Time screen will be displayed when you turn the camera on Set the correct date and time as described in Setting the Date and Time 12 Display Language Change the di...

Страница 14: ...p the camera still until the shutter sound ends z z After displaying your shot the camera will revert to the shooting screen Still Images Movies Trying the Camera Out Follow these instructions to turn the camera on shoot still images or movies and then view them Shooting Smart Auto For fully automatic selection of the optimal settings for specific scenes simply let the camera determine the subject...

Страница 15: ...orded z z Frames displayed around any detected faces indicate that they are in focus z z Once recording begins take your finger off the movie button Finish recording z z Press the movie button again to stop recording The camera beeps twice as recording stops Elapsed Time Viewing After shooting images or movies you can view them on the screen as follows 1 Enter Playback mode z z Press the button z ...

Страница 16: ...yback To switch to Shooting mode from Playback mode press the shutter button halfway Erasing Images You can choose and erase unneeded images one by one Be careful when erasing images because they cannot be recovered 1 Choose an image to erase z z Press the buttons to choose an image 2 Erase the image z z Press the button z z After Erase is displayed press the buttons to choose Erase and then press...

Страница 17: ...cessories Appendix Index Advanced Guide Camera Basics Other basic operations and more ways to enjoy your camera including shooting and playback options On Off 18 Power Saving Features Auto Power Down 18 Shutter Button 19 Shooting Display Options 19 Using the FUNC Menu 20 Using the Menu Screen 21 On Screen Keyboard 22 Indicator Display 22 ...

Страница 18: ...e You can turn the camera off when the lens is retracted by pressing the button Power Saving Features Auto Power Down As a way to conserve battery power the camera automatically deactivates the screen Display Off and then turns itself off after a specific period of inactivity Power Saving in Shooting Mode The screen is automatically deactivated after about one minute of inactivity In about two mor...

Страница 19: ...utter sound ends Images may be out of focus if you shoot without initially pressing the shutter button halfway Length of shutter sound playback varies depending on the time required for the shot It may take longer in some shooting scenes and images will be blurry if you move the camera or the subject moves before the shutter sound ends Shooting Display Options Press the button to view other inform...

Страница 20: ...oose a menu item and then press the or button z z Depending on the menu item functions can be specified simply by pressing the or button or another screen is displayed for configuring the function 3 Choose an option z z Press the buttons to choose an option z z Items labeled with a icon can be configured by pressing the button z z To return to the menu items press the button Options Menu Items 4 F...

Страница 21: ...e a tab z z Move the zoom lever to choose a tab z z After you have pressed the buttons to choose a tab initially you can switch between tabs by pressing the buttons 3 Choose a menu item z z Press the buttons to choose an item z z For menu items with options not shown first press the or button to switch screens and then press the buttons to select the menu item z z To return to the previous screen ...

Страница 22: ... not turn the camera off or open the memory card battery cover or shake or hit the camera This may corrupt images or damage the camera or memory card On Screen Keyboard Use the on screen keyboard to enter information for Wi Fi connections 69 Note that the length and type of information you can enter varies depending on the function you are using Entering Characters z z Press the buttons to choose ...

Страница 23: ...oting Smart Auto 24 Scene Icons 27 Image Stabilization Icons 27 On Screen Frames 28 Common Convenient Features 28 Zooming In Closer on Subjects Digital Zoom 28 Auto Zooming in Response to Subject Movement Auto Zoom 29 Using the Self Timer 30 Deactivating the Flash 32 Adding a Date Stamp 32 Continuous Shooting 33 Image Customization Features 34 Changing the Number of Recording Pixels Image Size 34 ...

Страница 24: ...veral AF frames are displayed when multiple areas are in focus Zoom Bar Shooting with Camera Determined Settings For fully automatic selection of the optimal settings for specific scenes simply let the camera determine the subject and shooting conditions Still Images Movies Shooting Smart Auto 1 Turn the camera on z z Press the power button z z The startup screen is displayed 2 Enter mode z z Pres...

Страница 25: ...re displayed on the top and bottom edges of the screen and the subject is slightly enlarged The black bars indicate image areas not recorded z z Frames displayed around any detected faces indicate that they are in focus z z Once recording begins take your finger off the movie button Elapsed Time Resize the subject and recompose the shot as needed z z To resize the subject repeat the operations in ...

Страница 26: ... be lit when shooting in low light conditions A blinking icon displayed when you attempt to shoot indicates that shooting is not possible until the flash has finished recharging Shooting can resume as soon as the flash is ready so either press the shutter button all the way down and wait or release it and press it again Although you can shoot again before the shooting screen is displayed your prev...

Страница 27: ...tions is automatically applied Intelligent IS Additionally the following icons are displayed in mode Image stabilization for still images Normal Image stabilization for movies reducing strong camera shake as when recording while walking Dynamic Image stabilization for still images when panning Panning Image stabilization for slow camera shake such as when recording movies at telephoto Powered Imag...

Страница 28: ...ou are pressing the shutter button halfway and the camera detects subject movement a blue frame is displayed and the focus and image brightness are constantly adjusted Servo AF Try shooting in mode 43 if no frames are displayed if frames are not displayed around desired subjects or if frames are displayed on the background or similar areas Common Convenient Features Still Images Movies Zooming In ...

Страница 29: ...n Response to Subject Movement Auto Zoom The camera automatically zooms in and out to keep a detected face 24 at a constant size If the person moves closer the camera automatically zooms out and vice versa 1 Enter Auto Zoom mode z z Press the button z z is displayed z z A white frame is displayed around the detected face and the camera zooms in and out to keep the subject on the screen z z When mu...

Страница 30: ...le to maintain a constant face display size depending on subject movement and shooting conditions When no face is detected the camera zooms to a certain level and stops zooming until a face is detected Still Images Movies Using the Self Timer With the self timer you can include yourself in group photos or other timed shots The camera will shoot about 10 seconds after you press the shutter button 1...

Страница 31: ...splayed z z Follow step 2 in Using the Self Timer 30 to shoot Still Images Movies Customizing the Self Timer You can specify the delay 0 30 seconds and number of shots 1 10 1 Choose z z Following step 1 in Using the Self Timer 30 choose and press the button 2 Configure the setting z z Press the buttons to choose Delay or Shots z z Press the buttons to choose a value and then press the button z z O...

Страница 32: ...e shutter button halfway in camera shake inducing low light conditions mount the camera on a tripod or take other measures to keep it still Still Images Adding a Date Stamp The camera can add the shooting date to images in the lower right corner However note that date stamps cannot be edited or removed so confirm beforehand that the date and time are correct 12 1 Configure the setting z z Press th...

Страница 33: ...he Canon website 109 to print Still Images Continuous Shooting Hold the shutter button all the way down to shoot continuously For details on the continuous shooting speed see Camera 135 1 Configure the setting z z Press the button choose in the menu and then choose 20 z z Once the setting is complete is displayed 2 Shoot z z Hold the shutter button all the way down to shoot continuously Cannot be ...

Страница 34: ...ing Based on Paper Size z z For e mailing images z z For images displayed on widescreen HDTVs or similar display devices on a 16 9 screen A2 16 5 x 23 4 in A3 A5 11 7 x 16 5 5 8 x 8 3 in 5 x 7 in Postcard 3 5 x 5 in Movies Changing Movie Image Quality Two image quality settings are available For guidelines on the total recording time for movies at each level of image quality that will fit on a mem...

Страница 35: ... instructions on menu functions see Using the Menu Screen 21 Still Images Deactivating the Lamp You can deactivate the lamp that normally lights up to help you focus in low light conditions when you press the shutter button halfway or that lights up to reduce red eye when you shoot in low light conditions with the flash z z Press the button choose Lamp Setting on the tab and then choose Off 21 z z...

Страница 36: ...nhanced with unique image effects or captured using special functions Specific Scenes 37 Applying Special Effects 38 Shooting with a Fish Eye Lens Effect Fish Eye Effect 38 Shots Resembling Miniature Models Miniature Effect 39 Shooting with a Toy Camera Effect Toy Camera Effect 40 Shooting in Monochrome 40 Special Modes for Other Purposes 41 Auto Shooting after Detecting New Person Face Self Timer...

Страница 37: ...ill Images Movies Shooting Portraits Portrait z z Take shots of people with a softening effect Still Images Shooting under Low Light Low Light z z Shoot with minimal camera and subject shake even in low light conditions Still Images Movies Shooting Fireworks Fireworks z z Vivid shots of fireworks In mode mount the camera on a tripod or take other measures to keep it still and prevent camera shake ...

Страница 38: ...s Movies Posterized Shots Poster Effect z z Shots that resemble an old poster or illustration In and modes try taking some test shots first to make sure you obtain the desired results Still Images Shooting with a Fish Eye Lens Effect Fish Eye Effect Shoot with the distorting effect of a fish eye lens 1 Choose z z Follow step 1 in Specific Scenes 37 and choose 2 Choose an effect level z z Press the...

Страница 39: ...choose the movie playback speed z z Press the button and then press the buttons to choose the speed 4 Return to the shooting screen and shoot z z Press the button to return to the shooting screen and then shoot Playback Speed and Estimated Playback Time for One Minute Clips Speed Playback Time Approx 12 sec Approx 6 sec Approx 3 sec The zoom is not available when shooting movies Be sure to set the...

Страница 40: ...on z z A preview is shown of how your shot will look with the effect applied 3 Shoot Standard Shots resemble toy camera images Warm Images have a warmer tone than with Standard Cool Images have a cooler tone than with Standard Try taking some test shots first to make sure you obtain the desired results Still Images Movies Shooting in Monochrome Shoot images in black and white sepia or blue and whi...

Страница 41: ...und the face you focus on and white frames around other faces 3 Press the shutter button all the way down z z The camera now enters shooting standby mode and Look straight at camera to start count down is displayed z z The lamp blinks and the self timer sound is played 4 Join the subjects in the shooting area and look at the camera z z After the camera detects a new face the lamp blinking and self...

Страница 42: ...r speed z z Press the button choose in the menu and choose the desired shutter speed 20 3 Check the exposure z z Press the shutter button halfway to view the exposure for your selected shutter speed 4 Shoot On screen image brightness in step 3 when you pressed the shutter button halfway may not match the brightness of your shots With shutter speeds of 1 3 seconds or slower there will be a delay be...

Страница 43: ...mode 129 133 Shooting in Program AE P Mode 44 Image Brightness Exposure 44 Adjusting Image Brightness Exposure Compensation 44 Changing the Metering Method 45 Changing the ISO Speed 45 Correcting Image Brightness i Contrast 46 Adjusting White Balance 46 Shooting Range and Focusing 47 Shooting Close Ups Macro 47 Shooting Distant Subjects Infinity 48 Changing the AF Frame Mode 48 Magnifying the Area...

Страница 44: ...optimum exposure Movies can be recorded in mode as well by pressing the movie button However some FUNC 20 and MENU 21 settings may be automatically adjusted for movie recording For details on the shooting range in mode see Shooting Range 137 Image Brightness Exposure Still Images Movies Adjusting Image Brightness Exposure Compensation The standard exposure set by the camera can be adjusted in 1 3 ...

Страница 45: ...l area as more important Spot Metering restricted to within the Spot AE Point frame displayed in the center of the screen Still Images Changing the ISO Speed Set the ISO speed to AUTO for automatic adjustment to suit the shooting mode and conditions Otherwise set a higher ISO speed for higher sensitivity or a lower value for lower sensitivity z z Press the button choose in the menu and choose the ...

Страница 46: ...mages to appear grainy You can also correct existing images 67 Still Images Movies Adjusting White Balance By adjusting white balance WB you can make image colors look more natural for the scene you are shooting z z Press the button choose in the menu and choose the desired option 20 z z The option you configured is now displayed Auto Automatically sets the optimal white balance for the shooting c...

Страница 47: ...tire screen is white Press the button z z The tint of the screen changes once the white balance data has been recorded Colors may look unnatural if you change camera settings after recording white balance data Shooting Range and Focusing Still Images Shooting Close Ups Macro To restrict the focus to subjects at close range set the camera to For details on the range of focus see Shooting Range 137 ...

Страница 48: ... a white frame is displayed around the person s face determined by the camera to be the main subject and up to two gray frames are displayed around other detected faces When the camera detects movement frames will follow moving subjects within a certain range After you press the shutter button halfway up to nine green frames are displayed around faces in focus If faces are not detected or when onl...

Страница 49: ...s that of the background too closely AF Point Zoom on the tab is not available and are not available Still Images Movies Center One AF frame is displayed in the center Effective for reliable focusing A yellow AF frame is displayed with if the camera cannot focus when you press the shutter button halfway To compose shots so that subjects are positioned at the edge or in a corner first aim the camer...

Страница 50: ...e when using the self timer 30 Still Images Magnifying the Area in Focus You can check the focus by pressing the shutter button halfway which will enlarge the portion of the image in focus in the AF frame 1 Configure the setting z z Press the button choose AF Point Zoom on the tab and then choose On 21 2 Check the focus z z In Face AiAF AF mode the face detected as the main subject is magnified wh...

Страница 51: ...ttery power because the camera does not focus constantly Flash Still Images Changing the Flash Mode You can change the flash mode to match the shooting scene For details on the flash range see Camera 135 z z Press the button press the buttons to choose a flash mode and then press the button z z The option you configured is now displayed Auto Fires automatically in low light conditions On Fires for...

Страница 52: ...asures to keep it still Other Settings Still Images Movies Displaying Grid Lines Grid lines can be displayed on the screen for vertical and horizontal reference while shooting z z Press the button choose Grid Lines on the tab and then choose On 21 z z Once the setting is complete grid lines are displayed on the screen Grid lines are not recorded in your shots Still Images Movies Deactivating the D...

Страница 53: ...s images for the specified time Even while the shot is displayed you can take another shot by pressing the shutter button halfway again Hold Displays images until you press the shutter button halfway Off No image display after shots Changing the Screen Displayed after Shots Change the way images are displayed after shots as follows 1 Set Display Time to 2 sec 4 sec 8 sec or Hold 53 2 Configure the...

Страница 54: ... is changed to Continuous for movie recording If image stabilization cannot prevent camera shake mount the camera on a tripod or take other measures to hold it still In this case set IS Mode to Off Movies Recording Movies with Subjects at the Same Size Shown before Shooting Normally once movie recording begins the image display area changes and subjects are enlarged to allow for correction of sign...

Страница 55: ... other cameras Viewing 56 Switching Display Modes 57 Browsing and Filtering Images 57 Navigating through Images in an Index 57 Finding Images Matching Specified Conditions 58 Image Viewing Options 59 Magnifying Images 59 Viewing Slideshows 59 Protecting Images 60 Using the Menu 61 Choosing Images Individually 61 Selecting a Range 61 Protecting All Images at Once 62 Erasing Images 63 Erasing Multip...

Страница 56: ...dentified by a icon To play movies go to step 3 3 Play movies z z To start playback press the button press the buttons to choose and then press the button again 4 Adjust the volume z z Press the buttons to adjust the volume z z To adjust the volume when the volume indicator is no longer displayed press the buttons 5 Pause playback z z To pause or resume playback press the button z z After the movi...

Страница 57: ...y 57 is a histogram showing the distribution of brightness in the image The horizontal axis represents the degree of brightness and the vertical axis how much of the image is at each level of brightness Viewing the histogram is a way to check exposure Browsing and Filtering Images Still Images Movies Navigating through Images in an Index By displaying multiple images in an index you can quickly fi...

Страница 58: ... navigation z z Press the buttons to choose a condition and then press the button 3 View the filtered images z z Images matching your conditions are displayed in yellow frames To view only these images press the buttons z z To cancel filtered display choose in step 1 When the camera has found no corresponding images for some conditions those conditions will not be available To show or hide informa...

Страница 59: ... pressing the buttons For fast forward or fast rewind hold the buttons down In filtered display 58 only images matching search conditions are played Image Viewing Options Still Images Magnifying Images 1 Magnify an image z z Moving the zoom lever toward will zoom in and magnify the image You can magnify images up to about 10x by continuing to hold the zoom lever z z To zoom out move the zoom lever...

Страница 60: ... menu item to configure and then choose the desired option 21 z z To start the slideshow with your settings choose Start and press the button z z To return to the menu screen press the button Still Images Movies Protecting Images Protect important images to prevent accidental erasure 63 z z Press the button and then choose in the menu 20 Protected is displayed z z To cancel protection repeat this ...

Страница 61: ...hoose an image z z Press the buttons to choose an image and then press the button is displayed z z To cancel selection press the button again is no longer displayed z z Repeat this process to specify other images 3 Protect the image z z Press the button A confirmation message is displayed z z Press the buttons to choose OK and then press the button Images will not be protected if you switch to Sho...

Страница 62: ... Images before the first image cannot be selected as the last image 4 Protect the images z z Press the button to choose Protect and then press the button To cancel protection for groups of images choose Unlock in step 4 Protecting All Images at Once 1 Choose Protect All Images z z Following step 2 in Using the Menu 61 choose Protect All Images and press the button 2 Protect the images z z Press th...

Страница 63: ...n z z After Erase is displayed press the buttons to choose Erase and then press the button z z The current image is now erased z z To cancel erasure press the buttons to choose Cancel and then press the button Erasing Multiple Images at Once You can choose multiple images to erase at once Be careful when erasing images because they cannot be recovered However protected images 60 cannot be erased C...

Страница 64: ...cess to specify other images 3 Erase the images z z Press the button A confirmation message is displayed z z Press the buttons to choose OK and then press the button Selecting a Range 1 Choose Select Range z z Following step 2 in Choosing a Selection Method 63 choose Select Range and press the button 2 Choose images z z Follow steps 2 3 in Selecting a Range 61 to specify images 3 Erase the images ...

Страница 65: ...etting Using the Menu 1 Choose Rotate z z Press the button and choose Rotate on the tab 21 2 Rotate the image z z Press the buttons to choose an image z z The image is rotated 90 each time you press the button z z To return to the menu screen press the button Rotation is not possible when Auto Rotate is set to Off 65 Deactivating Auto Rotation Follow these steps to deactivate automatic image rotat...

Страница 66: ...nd then choose in the menu 20 z z Tagged as Favorite is displayed z z To untag the image repeat this process and choose again and then press the button Using the Menu 1 Choose Favorites z z Press the button and choose Favorites on the tab 21 2 Choose an image z z Press the buttons to choose an image and then press the button is displayed z z To untag the image press the button again is no longer d...

Страница 67: ... press the button z z The image is now saved as a new file 5 Review the new image z z Press the button Display new image is displayed z z Press the buttons to choose Yes and then press the button z z The saved image is now displayed Editing is not possible for images shot at a recording pixel setting of or 34 Images cannot be resized to a higher number of recording pixels Still Images Correcting I...

Страница 68: ...y red eye You can save the corrected image as a separate file 1 Choose Red Eye Correction z z Press the button and then choose Red Eye Correction on the tab 21 2 Choose an image z z Press the buttons to choose an image 3 Correct the image z z Press the button z z Red eye detected by the camera is now corrected and frames are displayed around corrected image areas z z Enlarge or reduce images as ne...

Страница 69: ...Preparing to Register a Computer 76 Saving Images to a Connected Computer 78 Sending Images to a Registered Web Service 82 Registering Web Services 82 Uploading Images to Web Services 85 Printing Images Wirelessly from a Connected Printer 86 Sending Images to Another Camera 87 Image Sending Options 89 Sending Multiple Images 89 Notes on Sending Images 90 Choosing the Number of Recording Pixels Ima...

Страница 70: ...images on the camera can also be sent to a computer or Web service via CANON iMAGE GATEWAY Printers Send images wirelessly to a PictBridge compatible printer supporting DPS over IP to print them Another Camera Send images wirelessly between Wi Fi compatible Canon cameras Sending Images to a Smartphone There are several ways to connect the camera to a smartphone and send images Connect via NFC 71 S...

Страница 71: ...rtphone s NFC to simplify the process of installing Camera Connect and connecting to the camera Operation when devices are initially connected via NFC varies depending on the camera mode when the devices are touched together If the camera is off or in Shooting mode when the devices are touched together you can choose and send images on the image selection screen Once the devices are connected you ...

Страница 72: ...oose No in step 3 Once you have registered a smartphone you can change privacy settings for it on the camera 94 Connections require that a memory card be in the camera You can also change the camera nickname on the screen in step 2 71 Not all NFC compatible smartphones have an N Mark For details refer to the smartphone user manual You can also send multiple images at once and change the image size...

Страница 73: ... a Device and then press the button Connecting via NFC When Camera Is in Playback Mode z z Press the button to turn the camera on z z Touch the smartphone with Camera Connect installed 71 against the camera s N Mark z z Press the buttons to choose an image to send and then press the button is displayed z z To cancel selection press the button again is no longer displayed z z Repeat this process to...

Страница 74: ...tion z z To add multiple smartphones repeat the above procedure starting from step 1 All images in the camera can be viewed from the connected smartphone when you choose Yes in step 8 To keep camera images private so that they cannot be viewed from the smartphone choose No in step 8 Once you have registered a smartphone you can change privacy settings for it on the camera 94 z z The camera SSID an...

Страница 75: ...t a memory card be in the camera Once you have connected to devices via the Wi Fi menu recent destinations will be listed first when you access the Wi Fi menu You can easily connect again by pressing the buttons to choose the device and then pressing the button To add a new device display the device selection screen by pressing the buttons and then configure the setting If you prefer not to displa...

Страница 76: ...n instructions to complete the installation process z z Installation may take some time depending on computer performance and the Internet connection z z Click Finish or Restart on the screen after installation 4 Connect to the access point z z For WPS compatible access points connect to the access point as described in steps 5 8 in Using WPS Compatible Access Points 78 z z For non WPS access poin...

Страница 77: ...ternet access is required and any ISP account charges and access fees must be paid separately To uninstall the software follow these steps Windows Select Start menu All Programs Canon Utilities and then choose the software for uninstallation Mac OS In the Canon Utilities folder within the Applications folder drag the folder of the software for uninstallation to the Trash and then empty the Trash C...

Страница 78: ... Nickname screen is displayed press the buttons to choose OK and then press the button Saving Images to a Connected Computer Connect to your access point via Wi Fi as follows Also refer to the access point user manual Confirming Access Point Compatibility Confirm that the Wi Fi router or base station conforms to the Wi Fi standards in Camera 135 Connection methods vary depending on whether the acc...

Страница 79: ...8 Choose the target device z z Press the buttons to choose the target device name and then press the button 9 Install a driver first Windows connection only z z When this screen is displayed on the camera click the Start menu on the computer click Control Panel and then click Add a device 3 Choose z z Press the buttons to choose and then press the button 4 Choose Add a Device z z Press the buttons...

Страница 80: ... screen For further details refer to the user manual included with your access point Connecting to Listed Access Points 1 View the listed access points z z View the listed networks access points as described in steps 1 4 of Using WPS Compatible Access Points 78 2 Choose an access point z z Press the buttons to choose a network access point and then press the button z z Double click the connected c...

Страница 81: ...ts 80 from step 2 3 Enter the access point password z z Press the button to access the keyboard and then enter the password 22 z z Press the buttons to choose Next and then press the button 4 Choose Auto z z Press the buttons to choose Auto and then press the button z z To save images to a connected computer follow the procedure from step 8 in Using WPS Compatible Access Points 78 To determine the...

Страница 82: ...layed press the buttons to choose I Agree and then press the button Sending Images to a Registered Web Service Registering Web Services Use a smartphone or computer to add to the camera Web services that you want to use A smartphone or computer with a browser and Internet connection is required to complete camera settings for CANON iMAGE GATEWAY and other Web services Check the CANON iMAGE GATEWAY...

Страница 83: ...notification message z z Follow the instructions to complete the settings on the camera link settings page 4 Establish a connection with an access point z z Connect to the access point as described in steps 5 7 in Using WPS Compatible Access Points 78 or in steps 2 4 in Connecting to Listed Access Points 80 5 Enter your email address z z Once the camera is connected to CANON iMAGE GATEWAY via the ...

Страница 84: ...press the button z z The Web service settings are now updated If any configured settings change follow these steps again to update the camera settings 9 Complete CANON iMAGE GATEWAY settings on the camera z z Press the buttons to choose and then press the button z z 91 and CANON iMAGE GATEWAY are now added as destinations z z You can add other Web services as needed In this case follow the instruc...

Страница 85: ...p Download and install the Canon Online Photo Album app for iPhones or iPads from the App Store or for Android devices from Google Play Uploading Images to Web Services 1 Access the Wi Fi menu z z Press the button 2 Choose the destination z z Press the buttons to choose the icon of the Web service to connect to and then press the button z z If multiple recipients or sharing options are used with a...

Страница 86: ...password field enter the password displayed on the camera 5 Choose the printer z z Press the buttons to choose the printer name and then press the button Printing Images Wirelessly from a Connected Printer Connect the camera to a printer via Wi Fi to print as follows These steps show how to use the camera as an access point but you can also use an existing access point 75 1 Access the Wi Fi menu z...

Страница 87: ... an image z z Press the button choose and press the button again z z Press the buttons to choose Print and then press the button z z For detailed printing instructions see Printing Images 112 z z To end the connection press the button press the buttons on the confirmation screen to choose OK and then press the button Connections require that a memory card with saved images be in the camera Once yo...

Страница 88: ...ettings Wi Fi Settings Target History Off You can also send multiple images at once and change the image size before sending 89 You can send the current image by choosing Send this image on the screen in step 4 4 Send an image z z Press the buttons to choose Select and send and then press the button z z Press the buttons to choose Select and then press the button z z Press the buttons to choose an...

Страница 89: ...es is displayed If you prefer not to include an image choose the image and press the button to remove z z Press the button z z Press the buttons to choose OK and then press the button 2 Send the images z z Press the buttons to choose Send and then press the button Image Sending Options You can choose multiple images to send at once and change the image recording pixel setting size before sending S...

Страница 90: ...Web service 1 Access the screen for adding comments z z On the image transfer screen choose by pressing the buttons and then press the button 2 Add a comment 22 3 Send the image When a comment is not entered the comment set in CANON iMAGE GATEWAY is automatically sent You can also annotate multiple images before sending them The same comment is added to all images sent together In step 1 Favorite ...

Страница 91: ...n the menu bar click and then click Add new camera z z A list of cameras linked to CANON iMAGE GATEWAY is displayed Choose the camera from which images are to be sent z z Once the camera is registered and the computer is ready to receive images the icon changes to Sending Images Automatically Image Sync Images on the memory card that have not been transferred already can be sent to a computer or W...

Страница 92: ...ge Sync settings cannot be accessed this way For Canon Online Photo Album instructions refer to Canon Online Photo Album Help Sending Images Images sent from the camera are automatically saved to the computer If the computer that you intend to send images to is turned off the images will be stored temporarily on the CANON iMAGE GATEWAY server Stored images are regularly erased so make sure to turn...

Страница 93: ...n the camera and all operations except pressing the power button are disabled 4 Shoot z z Use the smartphone to shoot Using a Smartphone to View Camera Images and Control the Camera You can do the following with the dedicated smartphone app Camera Connect Browse images on the camera and save them to the smartphone Geotag images on the camera 93 Shoot remotely 93 In camera settings the smartphone m...

Страница 94: ...button 2 Choose Edit a Device z z Press the buttons to choose Edit a Device and then press the button 3 Choose a device to edit z z Press the buttons to choose the device to edit and then press the button The camera works in mode during remote shooting However some FUNC and MENU settings you have configured in advance may be changed automatically Movie shooting is not available Any jerky subject m...

Страница 95: ...sired 1 Choose Wireless settings z z Press the button and choose Wireless settings on the tab 21 2 Choose Nickname z z Press the buttons to choose Nickname and then press the button 4 Choose an item to edit z z Press the buttons to choose the item to edit and then press the button z z The items you can change depend on the device or service Configurable Items Connection Web Services Change Device ...

Страница 96: ... 22 and then enter a nickname A message is displayed if the nickname you enter begins with a symbol or space Press the button and enter a different nickname You can also change the nickname from the Nickname screen displayed when you first use Wi Fi In this case select the text box press the button to access the keyboard and then enter a new nickname Returning the Wi Fi Settings to Default Return ...

Страница 97: ...ions 98 Silencing Camera Operations 98 Adjusting the Volume 98 Hiding Hints and Tips 98 Date and Time 99 World Clock 99 Lens Retraction Timing 99 Using Eco Mode 100 Power Saving Adjustment 100 Screen Brightness 101 Hiding the Start Up Screen 101 Formatting Memory Cards 101 File Numbering 102 Date Based Image Storage 103 Metric Non Metric Display 103 Checking Certification Logos 103 Display Languag...

Страница 98: ...nd then choose On Operation can also be silenced by holding down the button as you turn the camera on Sound is not played during movies 56 if you mute camera sounds To restore sound during movies press the button Adjust volume with the buttons as needed Adjusting the Volume Adjust the volume of individual camera sounds as follows z z Choose Volume and then press the button z z Choose an item and t...

Страница 99: ...zone as described in Setting the Date and Time 12 1 Specify your destination z z Choose Time Zone and then press the button z z Press the buttons to choose World and then press the button z z Press the buttons to choose the destination z z To set daylight saving time 1 hour ahead choose by pressing the buttons and then choose by pressing the buttons z z Press the button 2 Switch to the destination...

Страница 100: ...g the screen turns off The camera turns off after approximately three minutes of inactivity 2 Shoot z z To activate the screen and prepare for shooting when the screen is off but the lens is still out press the shutter button halfway Power Saving Adjustment Adjust the timing of automatic camera and screen deactivation Auto Power Down and Display Off respectively as needed 18 z z Choose Power Savin...

Страница 101: ...mage and then choose Off Formatting Memory Cards Before using a new memory card or a card formatted in another device you should format the card with this camera Formatting erases all data on a memory card Before formatting copy images on the memory card to a computer or take other steps to back them up 1 Access the Format screen z z Choose Format and then press the button 2 Choose OK z z Press th...

Страница 102: ...ow steps 2 3 in Formatting Memory Cards 101 to continue with the formatting process Low level formatting takes longer than Formatting Memory Cards 101 because data is erased from all storage regions of the memory card You can cancel low level formatting in progress by choosing Stop In this case all data will be erased but the memory card can be used normally File Numbering Your shots are automatic...

Страница 103: ... Language and then press the button z z Press the buttons to choose a language and then press the button You can also access the Language screen in Playback mode by pressing and holding the button and immediately pressing the button Date Based Image Storage Instead of saving images in folders created each month you can have the camera create folders each day you shoot to store shots taken that day...

Страница 104: ...ult Camera Settings If you accidentally change a setting you can restore default camera settings 1 Access the Reset All screen z z Choose Reset All and then press the button 2 Restore default settings z z Press the buttons to choose OK and then press the button z z Default settings are now restored The following functions are not restored to default settings tab settings Date Time 99 Time Zone 99 ...

Страница 105: ...ately System Map 106 Optional Accessories 107 Power Supplies 107 Flash Unit 107 Other Accessories 107 Printers 107 Photo and Movie Storage 108 Using Optional Accessories 108 Playback on a TV 108 Using the Software 109 Checking Your Computer Environment 109 Installing the Software 110 Saving Images to a Computer 110 Printing Images 112 Easy Print 112 Configuring Print Settings 113 Printing Movie Sc...

Страница 106: ...ne Canon accessories e g a leakage and or explosion of a battery pack Please note that any repairs your Canon product may require as a result of such malfunction are not covered under warranty and will incur a fee System Map AV Cable AVC DC400 Wrist Strap Battery Pack NB 11L Battery Charger CB 2LF CB 2LFE 1 USB Cable camera end Mini B 2 Memory Card Card Reader Computer TV Video System Connect Stat...

Страница 107: ...on an uncharged battery pack Battery Pack NB 11L is also supported Battery Charger CB 2LD is also supported The battery charger can be used in areas with 100 240 V AC power 50 60 Hz For power outlets in a different format use a commercially available adapter for the plug Never use an electrical transformer designed for traveling which may damage the battery pack Flash Unit High Power Flash HF DC2 ...

Страница 108: ...ll Images Movies Playback on a TV Connecting the camera to a TV with the AV Cable AVC DC400 sold separately enables you to view your shots on the larger screen of the TV as you control the camera For details on connection or how to switch inputs refer to the TV manual Some information may not be displayed when viewing images on a TV 128 1 Make sure the camera and TV are off 2 Connect the camera to...

Страница 109: ...put format NTSC or PAL matches the TV format To change the video output format press the button and choose Video System on the tab For Japan choose NTSC Using the Software To utilize the features of the following software download the software from the Canon website and install it on your computer CameraWindow Import images to your computer Image Transfer Utility Set up Image Sync 91 and receive i...

Страница 110: ... Select Start menu All Programs Canon Utilities and then choose the software for uninstallation Mac OS In the Canon Utilities folder within the Applications folder drag the folder of the software for uninstallation to the Trash and then empty the Trash Saving Images to a Computer Using a USB cable sold separately camera end Mini B you can connect the camera to the computer and save images to the c...

Страница 111: ...einstalled or commonly available software compatible with images captured by the camera Windows 7 If the screen in step 2 is not displayed click the icon in the taskbar Mac OS If CameraWindow is not displayed after step 2 click the CameraWindow icon in the Dock Although you can save images to a computer simply by connecting your camera to the computer without using the software the following limit...

Страница 112: ...parately with the USB cable 1 Make sure the camera and printer are off 2 Connect the camera to the printer z z Open the terminal cover Holding the smaller cable plug in the orientation shown insert the plug fully into the camera terminal z z Connect the larger cable plug to the printer For other connection details refer to the printer manual 3 Turn the printer on 4 Turn the camera on z z Press the...

Страница 113: ...e the number of copies to print Cropping Specify a desired image area to print 113 Paper Settings Specify the paper size layout and other details 114 Still Images Cropping Images before Printing By cropping images before printing you can print a desired image area instead of the entire image 1 Choose Cropping z z After following step 1 in Configuring Print Settings 113 to access the printing scree...

Страница 114: ...oose a type of paper z z Press the buttons to choose an option and then press the button 4 Choose a layout z z Press the buttons to choose an option z z When choosing N up press the buttons to specify the number of images per sheet z z Press the button 5 Print the image Available Layout Options Default Matches current printer settings Bordered Prints with blank space around the image Borderless Bo...

Страница 115: ...vie Scenes 1 Access the printing screen z z Follow steps 1 6 in Easy Print 112 to choose a movie The screen at left is displayed 2 Choose a printing method z z Press the buttons to choose and then press the buttons to choose the printing method 3 Print the image Movie Printing Options Single Prints the current scene as a still image Sequence Prints a series of scenes a certain interval apart on a ...

Страница 116: ...ed 21 Print Type Standard One image is printed per sheet Index Smaller versions of multiple images are printed per sheet Both Both standard and index formats are printed Date On Images are printed with the shooting date Off File No On Images are printed with the file number Off Clear DPOF data On All image print list settings are cleared after printing Off Not all of your DPOF settings may be appl...

Страница 117: ...number of prints repeat steps 2 3 z z Printing quantity cannot be specified for index prints You can only choose which images to print by following step 2 z z When finished press the button to return to the menu screen Still Images Setting Up Printing for a Range of Images z z Following step 1 in Setting Up Printing for Individual Images 117 choose Select Range and press the button z z Follow step...

Страница 118: ... computer where they are stored in their own folder This is convenient when ordering printed photobooks online or printing photobooks with your own printer Choosing a Selection Method z z Press the button choose Photobook Set up on the tab and then choose how you will select images may be displayed on the camera to warn you that the memory card has print settings that were configured on another ca...

Страница 119: ...Photobook z z Following the procedure in Choosing a Selection Method 118 choose Select All Images and press the button z z Press the buttons to choose OK and then press the button Still Images Removing All Images from a Photobook z z Following the procedure in Choosing a Selection Method 118 choose Clear All Selections and press the button z z Press the buttons to choose OK and then press the butt...

Страница 120: ...n when using the camera Troubleshooting 121 On Screen Messages 124 On Screen Information 127 Shooting Information Display 127 Playback Detailed Information Display 128 Functions and Menu Tables 129 Functions Available in Each Shooting Mode 129 FUNC Menu 130 Shooting Tab 132 Set Up Tab 134 Playback Tab 134 Print Tab 134 Playback Mode FUNC Menu 134 Handling Precautions 135 Specifications 135 ...

Страница 121: ... again 11 The battery pack is swollen Battery swelling is normal and does not pose any safety concerns However if battery swelling prevents the battery pack from fitting in the camera contact a Canon Customer Support Help Desk Display on a TV Camera images look distorted or are not displayed on a TV 109 Shooting Cannot shoot In Playback mode 55 press the shutter button halfway 19 Strange display o...

Страница 122: ... light from the flash reflecting off dust or airborne particles Shots look grainy Lower the ISO speed 45 High ISO speeds in some shooting modes may cause grainy images 45 Subjects are affected by red eye Set Lamp Setting to On 35 to light the red eye reduction lamp 3 for flash shots Note that while the red eye reduction lamp is lit for about one second it is not possible to shoot because the lamp ...

Страница 123: ...f connection information can be added to the camera Erase unneeded connection information from the camera first and then add new devices destinations 94 Use a computer or smartphone to register Web services 82 To add a smartphone first install the dedicated application Camera Connect on your smartphone 70 To add a computer first install the software CameraWindow on your computer Also check your co...

Страница 124: ...ceive the notification message Want to erase Wi Fi connection information before disposing of the camera or giving it to someone else Reset the Wi Fi settings 96 On Screen Messages If an error message is displayed respond as follows Shooting or Playback No memory card The memory card may be inserted facing the wrong way Reinsert the memory card facing the correct way 11 Memory card locked The writ...

Страница 125: ...camera damage In this case contact a Canon Customer Support Help Desk A camera error was detected error number If this error message is displayed immediately after a shot the image may not have been saved Switch to Playback mode to check for the image Frequent display of this error message may indicate camera damage In this case write down the error number Exx and contact a Canon Customer Support ...

Страница 126: ...ry card facing the correct way contact a Canon Customer Support Help Desk Receiving failed Insufficient space on card There is not enough free space on the memory card in the target camera to receive images Erase images to create space on the memory card or insert a memory card with sufficient space Receiving failed Memory card locked The write protect switch of the memory card in the camera to re...

Страница 127: ...aining time 137 Digital zoom magnification 28 AF frame 48 Spot AE point frame 45 Focus range 47 48 IS mode icon 27 Shooting mode 129 Scene icon 27 Flash mode 32 51 Date stamp 32 ISO speed 45 i Contrast 46 Grid lines 52 AE lock 44 Shutter speed Aperture value Exposure compensation level 44 Zoom bar 24 Time zone 99 Image stabilization 54 Battery Level An on screen icon or message indicates the batte...

Страница 128: ...tinue skipping forward keep holding down the button Shown when the camera is connected to a PictBridge compatible printer 112 Displays the frame approx 4 sec before or after the current frame To skip forward or back during movie playback press the buttons Playback Detailed Information Display Movies 24 56 Shooting mode 129 ISO speed 45 Playback speed 39 Exposure compensation level 44 White balance...

Страница 129: ...ns and Menu Tables Functions Available in Each Shooting Mode Shooting Mode Function Flash 32 51 O O O O O O O O O O O O O O O O O O O O O 1 O O O O O O O O O O O O O O Screen Display 19 No Information Display O O O O O O O O O O O O O Information Display O O O O O O O O O O O O O 1 Not available but switches to in some cases O Available or set automatically Not available ...

Страница 130: ... 400 800 1600 O O Exposure Compensation 44 O O O O O O O O O O Self Timer 30 O O O O O O O O O O O O O O O O O O O O O O O O O Self Timer Settings 31 Delay 1 O O O O O O O O O O O O Shots 2 O O O O O O O O O O O O Focus Range 47 48 O O O O O O O O O O O O O O O O O O O O O O O Drive Mode 33 O O O O O O O O O O O O O O O O O O O O O O O O 1 Cannot be set to 0 seconds in modes without selection of t...

Страница 131: ...ting Menu Wi Fi Functions Accessories Appendix Index Shooting Mode Function Recording pixels 34 O O O O O O O O O O O O O O O O O O O O O O O O O O Movie Quality 34 O O O O O O 1 O O O O O O 1 Synchronizes with the recording pixel setting and is automatically set 39 O Available or set automatically Not available ...

Страница 132: ...oom 50 On O O O O O O O O Off O O O O O O O O O O O O O Servo AF 49 On O O O O O O Off 1 O O O O O O O O O O O O Continuous AF 51 On O O O O O O O O O O O Off O O O O O O O O O O O Lamp Setting 35 On O O O O O O O O O O O O Off O O O O O O O O O O O O O i Contrast 46 Auto O O O Off O O O O O O O O O O O Review image after shooting 53 Display Time Off Quick 2 sec 4 sec 8 sec Hold O O O O O O O O O ...

Страница 133: ...ing Mode Function Grid Lines 52 On O O O O O O O O O O O O Off O O O O O O O O O O O O O IS Settings 54 IS Mode Off Continuous O O O O O O O O O O O O O Shoot Only O O O O O O O O O O O O Dynamic IS 1 O O O O O O O O O O O O 2 O O O O O O O O O O O O O Date Stamp 32 Off O O O O O O O O O O O O O Date Date Time O O O O O O O Available or set automatically Not available ...

Страница 134: ...60 Image Search 58 Favorites 66 Slideshow 59 Print 112 Set Up Tab Item Reference Page Item Reference Page Mute 98 Format 101 Volume 98 File Numbering 102 Hints Tips 98 Create Folder 103 Date Time 99 Units 103 Time Zone 99 Video System 109 Lens Retraction 99 Wireless settings 69 Eco Mode 100 Certification Logo Display 103 Power Saving 18 100 Language 13 Disp Brightness 101 Reset All 104 Start up Im...

Страница 135: ...airtight resealable plastic bag and let it gradually adjust to the temperature before removing it from the bag If condensation does form on the camera stop using it immediately Continuing to use the camera in this state may damage it Remove the battery pack and memory card and wait until the moisture has evaporated before resuming use Store unused battery packs in a plastic bag or other container ...

Страница 136: ... 5 4 3 2 2 5 2 1 6 1 3 1 Aperture F Number 3 0 9 0 W 6 9 20 T AF AF Frame Face Detect AiAF number of AF frames max 9 Tracking AF Center File Format Design rule for Camera File system DCF compliant DPOF version 1 1 compatible Data Type Still Images Image File Format Exif 2 3 DCF 2 0 Image Type JPEG Data Type Movies Recording Format MP4 Video MPEG 4 AVC H 264 Audio MPEG 4 AAC LC Monaural Power Suppl...

Страница 137: ...ooting Range Shooting Mode Focus Range Maximum Wide Angle Maximum Telephoto 1 cm 0 4 in infinity 1 0 m 3 3 ft infinity Other modes 5 cm 2 0 in infinity 1 0 m 3 3 ft infinity 1 50 cm 0 4 in 1 6 ft 3 0 m 9 8 ft infinity 3 0 m 9 8 ft infinity Number of Shots per Memory Card Number of shots per 16 GB memory card approx shots 3017 5925 16755 10798 80988 4015 The values in the table are based on Canon m...

Страница 138: ... 300 times Operating Temperatures 0 40 C 32 104 F Battery Charger CB 2LF CB 2LFE Rated Input 100 240 V AC 50 60 Hz Rated Output 4 2 V DC 0 41 A Charging Time Approx 2 hours Operating Temperatures 5 40 C 41 104 F Size weight and number of shots available are based on measurement guidelines of the Camera Imaging Products Association CIPA Under some shooting conditions the number of shots and recordi...

Страница 139: ...ting mode 44 Package contents 2 Photobook set up 118 PictBridge 107 112 Playback Viewing Portrait shooting mode 37 Poster effect shooting mode 38 A Accessories 107 AE lock 44 AF frames 48 AUTO mode shooting mode 14 24 AV cable 107 108 B Batteries Date time date time battery Battery charger 2 107 Battery pack Charging 10 Eco mode 100 Level 127 Power saving 18 C Camera Reset all 104 Camera access po...

Страница 140: ...8 T Terminal 108 112 Toy camera effect shooting mode 40 Tracking AF 49 Traveling with the camera 99 Troubleshooting 121 TV display 108 V Viewing 15 56 Image search 58 Index display 57 Magnified display 59 Single image display 15 56 Slideshow 59 TV display 108 Power 107 Battery pack Battery charger Power saving 18 Printing 112 Program AE 44 Protecting 60 R Recording pixels image size 34 Red eye cor...

Страница 141: ...s or static electricity or accident or malfunction Be sure to make notes of wireless LAN settings as a precaution Please note that Canon accepts no responsibility for direct or indirect damages or loss of earnings resulting from a degradation or disappearance of content When transferring this product to another person disposing of it or sending it for repair be sure to note the wireless LAN settin...

Страница 142: ... provide MPEG 4 compliant video No license is granted or implied for any other use for MPEG 4 standard Security Precautions Because Wi Fi uses radio waves to transmit signals security precautions more stringent than when using a LAN cable are required Keep the following points in mind when using Wi Fi Only use networks you are authorized to use This product searches for Wi Fi networks in the vicin...

Страница 143: ...ized reproduction of this guide is prohibited All measurements based on Canon testing standards Information subject to change without notice as are product specifications and appearance Illustrations and screenshots in this guide may differ slightly from the actual equipment The above items notwithstanding Canon cannot be held liable for any loss arising from the use of this product ...

Отзывы: