


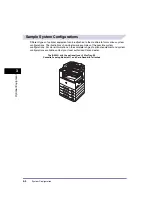


System Configuration
3-3
3
O
p
ti
ona
l E
q
u
ipm
ent
a
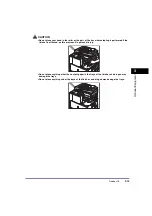
Platen Cover Type J
The Platen Cover Type J secures the originals placed on
the platen glass.
b
Inner 2 Way Tray-E2
Attaching the Inner 2 Way Tray-E2 enables you to have two
output trays.
c
Cassette Feeding Module-P1
(For the iR2018i Only)
The Cassette Feeding Module-P1 provides an additional
paper source for printing jobs. The paper drawer holds up
to 250 sheets of paper (80 g/m
2
).
d
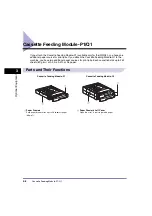
Cassette Feeding Module-Q1
The Cassette Feeding Module-Q1 provides two additional
paper sources for printing jobs.
Each paper drawer holds up to 250 sheets of paper
(80 g/m
2
).
e
Duplex Unit-B1
The Duplex Unit-B1 enables you to use the 2-Sided mode
for copying or printing.
f
Feeder (DADF-P2)
Originals placed in the feeder are automatically fed sheet
by sheet to the scanning area of the platen glass. The
feeder also automatically turns over two-sided originals to
make one- or two-sided copies.
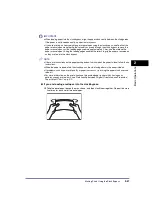
g
Document Tray-J1
Located on the top right side of the machine, and can be
used for originals waiting to be scanned, or that have
already been scanned. You can also use the document tray
for storing the manuals required for operating the machine
inside.
h
Card Reader-E1
The Card Reader-E1 enables Department ID Management
to be performed automatically.
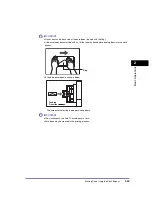
i
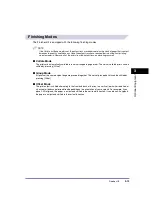
Additional Finisher Tray-C1
The Additional Finisher Tray-C1 can be attached to the
optional Finisher-U2 to provide an additional paper output
tray.
j
Finisher-U2
The Finisher-U2 is equipped with the following features:
Collate, Group, Offset, and Staple (Corner).
NOTE
•
The Duplex Unit-B1 is standard equipment for the iR2030/iR2025.
•
The optional Inner 2 Way Tray-E2 cannot be used with the optional Finisher-U2.
Содержание iR2018i
Страница 2: ...iR2030 iR2025 iR2022i iR2018i Reference Guide 0 Ot ...
Страница 115: ...Available Paper Stock 2 58 2 Basic Operations ...
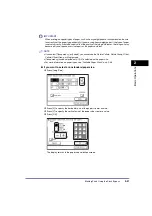
Страница 144: ...Card Reader E1 3 29 3 Optional Equipment 11 Press OK ...
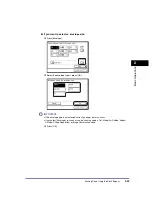
Страница 151: ...Card Reader E1 3 36 3 Optional Equipment 4 Press Done 5 Press OK ...
Страница 154: ...Card Reader E1 3 39 3 Optional Equipment 5 Press Done 6 Press OK ...
Страница 215: ...Timer Settings 4 60 4 Customizing Settings 1 Press Additional Functions Timer Settings 2 Press Date Time Settings ...
Страница 241: ...Cleaning and Adjusting the Machine 4 86 4 Customizing Settings ...
Страница 346: ...Drum Unit 7 29 7 Routine Maintenance 2 Open the front cover 3 Release the unlock lever to its horizontal position ...
Страница 443: ...Index 9 16 9 Appendix ...