Chapter 14
14-2
2. Enter the flicker adjustment value of the control panel
1) Using the service mode, check the flicker value of the control panel.
TESTMODE> PANEL> FLICKER CHECK START> FLICKER AD-
JUST
2) Replace the main controller PCB.
3) Using the service mode, enter the adjustment value checked in Step 1).
TESTMODE> PANEL> FLICKER CHECK START> FLICKER AD-
JUST
4) Using the user mode, execute automatic gradation correction (full correc-
tion).
Initial Setting/Registration> Adjustment/Cleaning> Automatic Gradation
Correction> Full Correction
14.3.4 Procedure after Replacing the Control Panel
0020-4995
After replacing the control panel, adjust the flicker value of the control panel
using the service mode.
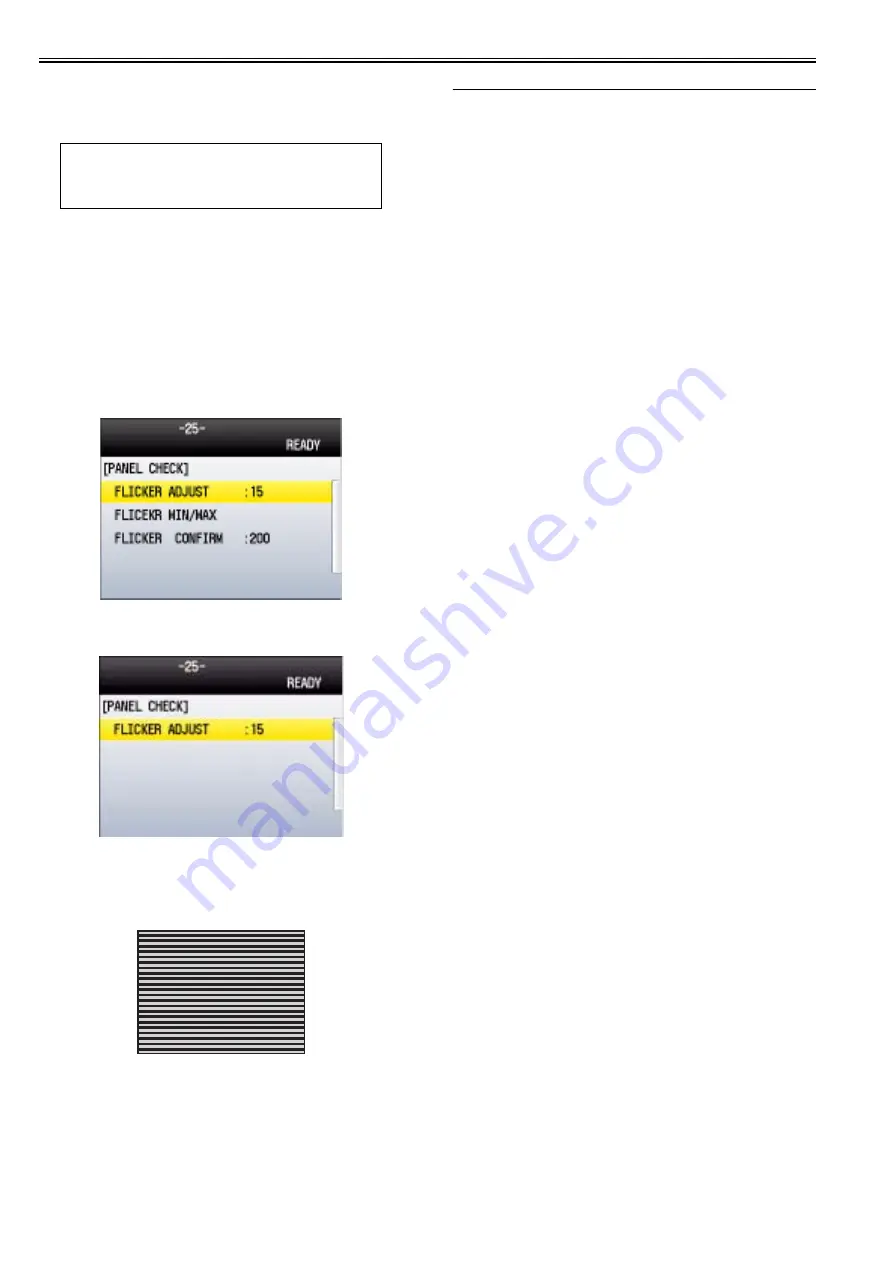
1) Using the service mode, make the machine display the flicker value ad-
justment screen for the control panel.
TESTMODE> PANEL> FLICKER CHECK START
F-14-3
2) Press the [OK] key.
The flicker value entry screen is displayed.
F-14-4
3) Press the [OK] key.
The flicker adjustment pattern (a pattern with horizontal stripes) is dis-
played in the LCD.
Pressing the right/left arrow keys, search for the area with the minimum
flicker.
F-14-5
4) Press the [OK] key.
5) Press the [Back] key.
The service mode operation is terminated.
14.4 ADF
14.4.1 Outline
14.4.1.1 Procedure after Replacing the ADF Unit
0020-4994
After replacing the ADF unit, execute automatic detection of the CCD read-
ing position at ADF stream reading in the following service mode.
COPIER> FUNCTION> INSTALL> STRD-POS
[Operation]
Adjust the reading position by moving the scanner in increments of 0.1
mm.
[Time]
When the lamp is turned on: Adjustment time; 10 seconds
When the lamp is not turned on: Lamp adjustment time; 10 to 30 seconds
+ Adjustment time; 10 seconds
MEMO:
The flicker adjustment value can be also checked in the spec list (FLICKER
ADJ PRM).
How to output the spec list: COPIER> FUNCTION> MISC-P> OUTPUT>
SPEC
Содержание iR C1020 Series
Страница 1: ...Sep 8 2008 Service Manual iR C1020 Series iR C1021i ...
Страница 2: ......
Страница 6: ......
Страница 18: ...Contents ...
Страница 19: ...Chapter 1 Introduction ...
Страница 20: ......
Страница 22: ......
Страница 57: ...Chapter 2 Installation ...
Страница 58: ......
Страница 60: ......
Страница 73: ...Chapter 3 Basic Operation ...
Страница 74: ......
Страница 76: ......
Страница 81: ...Chapter 4 Main Controller ...
Страница 82: ......
Страница 84: ......
Страница 97: ...Chapter 5 Original Exposure System ...
Страница 98: ......
Страница 100: ......
Страница 112: ......
Страница 113: ...Chapter 6 Original Feeding System ...
Страница 114: ......
Страница 116: ......
Страница 132: ......
Страница 133: ...Chapter 7 Laser Exposure ...
Страница 134: ......
Страница 136: ......
Страница 143: ...Chapter 8 Image Formation ...
Страница 144: ......
Страница 146: ......
Страница 180: ......
Страница 181: ...Chapter 9 Pickup and Feed System ...
Страница 182: ......
Страница 213: ...Chapter 9 9 29 F 9 79 1 2 3 ...
Страница 214: ......
Страница 215: ...Chapter 10 Fixing System ...
Страница 216: ......
Страница 218: ......
Страница 233: ...Chapter 11 External and Controls ...
Страница 234: ......
Страница 263: ...Chapter 12 e maintenance imageWARE Remote ...
Страница 264: ......
Страница 266: ......
Страница 275: ...Chapter 12 12 9 F 12 27 ...
Страница 280: ......
Страница 281: ...Chapter 13 Maintenance and Inspection ...
Страница 282: ......
Страница 284: ......
Страница 286: ......
Страница 287: ...Chapter 14 Measurement and Adjustments ...
Страница 288: ......
Страница 290: ......
Страница 293: ...Chapter 15 Correcting Faulty Images ...
Страница 294: ......
Страница 296: ......
Страница 304: ...Chapter 15 15 8 15 3 2 2 Fans 0019 5064 F 15 11 T 15 3 Notation Name FM1 main unit fan FM2 duplex fan FM2 FM1 ...
Страница 313: ...Chapter 15 15 17 F 15 19 21 22 28 29 30 31 24 14 15 16 23 26 25 32 27 20 19 18 17 2 13 6 10 33 1 8 4 3 12 11 5 7 9 ...
Страница 317: ...Chapter 16 Error Code ...
Страница 318: ......
Страница 320: ......
Страница 331: ...Chapter 16 16 11 ...
Страница 332: ......
Страница 333: ...Chapter 17 Special Management Mode ...
Страница 334: ......
Страница 336: ......
Страница 343: ...Chapter 17 17 7 ...
Страница 344: ......
Страница 345: ...Chapter 18 Service Mode ...
Страница 346: ......
Страница 348: ......
Страница 388: ......
Страница 389: ...Chapter 19 Upgrading ...
Страница 390: ......
Страница 392: ......
Страница 396: ...Chapter 19 19 4 3 Click Next F 19 4 4 Select a USB connected device and click Next F 19 5 ...
Страница 397: ...Chapter 19 19 5 5 Click Start F 19 6 6 Click Yes F 19 7 Download will be started F 19 8 ...
Страница 399: ...Chapter 19 19 7 ...
Страница 400: ......
Страница 401: ...Chapter 20 Service Tools ...
Страница 402: ......
Страница 404: ......
Страница 407: ...Sep 8 2008 ...
Страница 408: ......


