background image

Main Unit

1-5

1

Routine Maintenance


  Adjusting a Paper Drawer to Hold a Different Paper Size 

 If you want to load a different paper size into Paper Drawer 3 or 4, follow the procedure described below to adjust the paper 
drawer guides. 


 You can adjust the paper drawers to hold the following standard paper sizes: 11” x 17”, LGL, LTR, LTRR, or STMTR. 


 Only the paper sizes of Paper Drawer 3 and 4 can be changed.  


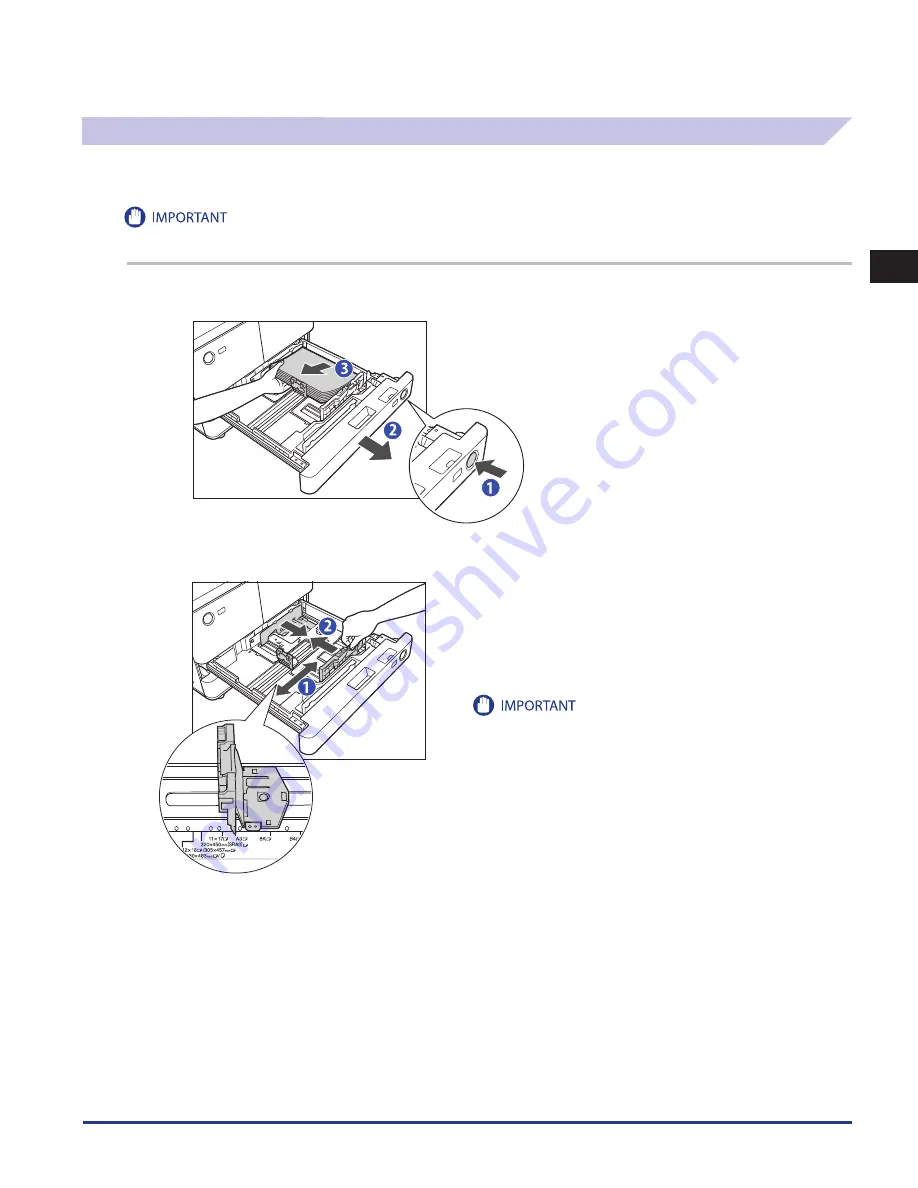
 1


Remove all of the remaining paper in the paper drawer. 

1. Press the button.

2. Pull out the paper drawer. 

3. Remove all of the remaining paper.

 2


Adjust the position of the left and front guides.  

1. Squeeze the upper part of the   left guide. Without releasing it, 
slide the left guide to align it with the mark for the desired paper 
size.

2. Squeeze the upper part of the   front guide. Without releasing 
it, slide the front guide to align it with the mark for the desired 
paper size.

Slide the guides until it clicks into place. If the left and front guides are 
not adjusted properly for the paper size loaded in the paper drawer, 
the correct paper size may not appear on the touch panel display. 
Adjust the left and front guides correctly to avoid causing a paper jam, 
dirty prints, or make the inside of the machine dirty.


Содержание imageRUNNER ADVANCE 6055

Страница 1: ...ENG Please read this guide before operating this product After you finish reading this guide store it in a safe place for future reference Maintenance Guide...

Страница 2: ......

Страница 3: ...imageRUNNER ADVANCE 6075 6065 6055 Maintenance Guide...

Страница 4: ...ul Operations Quick Reference CD ROM Maintenance and Troubleshooting Maintenance Guide This Document CD ROM Frequently Asked Questions and Answers Frequently Asked Questions CD ROM Windows Printer Dri...

Страница 5: ...urpose Classified Links Copy Fax Scan and Send Scan and Store Access Stored Files Fax I Fax Inbox Secured Print Scanner Web Access Quick Menu Status Monitor Cancel Print Network Remote UI MEAP Securit...

Страница 6: ...r 2 Troubleshooting Chapter 3 Appendix Includes the index Considerable effort has been made to ensure that this manual is free of inaccuracies and omissions However as we are constantly improving our...

Страница 7: ...Unit A1 Paper Deck Unit D1 Optional 1 16 Loading Paper 1 16 Changing the Paper Size for the Paper Deck Unit D1 1 18 Document Insertion Folding Unit H1 Document Insertion Unit L1 Optional 1 24 Loading...

Страница 8: ...27 External 2 3 Hole Puncher A1 Optional 2 30 Staple Finisher E1 Booklet Finisher E1 Optional 2 34 Inside the Top Cover 2 34 Output Area 2 35 Booklet Finisher E1 Optional 2 38 Front Cover 2 38 Saddle...

Страница 9: ...rations that may lead to death or injury to persons if not performed correctly To use the machine safely always pay attention to these warnings Indicates a caution concerning operations that may lead...

Страница 10: ...optional Super G3 FAX Board Upright Control Panel Duplex Color Image Reader Unit and Copy Tray are attached to the imageRUNNER ADVANCE 6075 Note that functions that cannot be used depending on the mo...

Страница 11: ...hen the optional Upright Control Panel Duplex Color Image Reader Unit and Copy Tray are attached to the imageRUNNER ADVANCE 6075 Abbreviations Used in This Manual In this manual product names and mode...

Страница 12: ...cal including photocopying and recording or by any information storage or retrieval system without the prior written permission of Canon Inc Disclaimers The information in this document is subject to...

Страница 13: ...Unit A1 Paper Deck Unit D1 Optional 1 16 Loading Paper 1 16 Changing the Paper Size for the Paper Deck Unit D1 1 18 Document Insertion Folding Unit H1 Document Insertion Unit L1 Optional 1 24 Loading...

Страница 14: ...a dry place away from direct sunlight If you print on the paper which has absorbed moisture steam may come out from the output area of the machine This is because the moist on the paper evaporates wh...

Страница 15: ...e than 80 lb cover 220 g m2 coated paper transparencies labels and tracing paper The following paper sizes can be loaded into Paper Drawers 1 2 3 and 4 Paper Drawers 1 and 2 LTR Paper Drawers 3 and 4...

Страница 16: ...r drawer When the paper is loaded into the paper drawer the side facing down is the one printed on 2 Gently push the paper drawer back into the machine until it clicks into place in the closed positio...

Страница 17: ...3 Remove all of the remaining paper 2 Adjust the position of the left and front guides 1 Squeeze the upper part of the left guide Without releasing it slide the left guide to align it with the mark fo...

Страница 18: ...closed position Loading Tab Paper Tab paper can be loaded into Paper Drawer 3 or 4 Follow the procedure described below to adjust the paper drawer to hold tab paper Only LTR Tab Paper can be used Whe...

Страница 19: ...clicks into place If the front guide is not adjusted properly for the paper size loaded in the paper drawer the correct paper size may not appear on the touch panel display Adjust the front guide cor...

Страница 20: ...exceed the loading limit mark at the back of the paper drawer 2 Gently push the paper drawer back into the machine until it clicks into place in the closed position Never place paper or any other ite...

Страница 21: ...not load transparencies into a paper source while a print job is in progress This may cause paper jams Only use transparencies that are specially recommended for use in this machine Other transparenc...

Страница 22: ...in burns or a fire Keep toner out of the reach of small children If toner is ingested consult a physician immediately Take care not to allow toner to come into contact with your hands or clothing If t...

Страница 23: ...s on the touch panel display this step is not necessary 2 Push the toner replacement cover as shown below The toner replacement cover is open 3 Turn the locking lever to the right until it stops Make...

Страница 24: ...ignite resulting in burns or a fire Never touch the tip of the toner cartridge or subject it to shock by hitting it Doing so may cause the toner cartridge to leak 5 Take the new toner cartridge out o...

Страница 25: ...in this machine because the shape of the toner cartridge does not match the toner supply port of the machine Insert the toner cartridge horizontally into the machine Otherwise the toner cartridge may...

Страница 26: ...ot to allow toner to come into contact with your hands or clothing If toner gets onto your hands or clothing wash it off immediately with cold water Replacing the Stamp Cartridge 1 Open the feeder and...

Страница 27: ...stamp cartridge properly or paper jams may occur 4 Close the stamp cover 5 Close the cover of the scanning area and the feeder 1 Close the cover of the scanning area 2 Close the feeder When closing t...

Страница 28: ...local authorized Canon dealer Loading Paper If you select the paper deck when it has no paper or if the paper deck runs out of paper during a print job a screen prompting you to load paper appears on...

Страница 29: ...ied onto as this may result in a malfunction or damage to the copier Always use the Multi Purpose Tray to feed paper when you want to copy onto the back of a sheet of paper that already has something...

Страница 30: ...1 Register the desired paper size for the paper deck in Register Sizes for Side Paper Deck in Common Settings from the Settings Registration screen For instructions on registering the paper size for...

Страница 31: ...5 Remove the white screw on the back size switch plate B Back Size Switch Plate B 6 Remove the back size switch plate B 7 Align the back size switch plate B with the marks for the desired paper size 1...

Страница 32: ...LTR A3 A4 A4 B4 B5 A3 11x17 B4 LGL LGL LTR LTR A4 B5 B4 A4 A3 LTR 11x17 LTR A4 10 Fix the back size switch plate A with the white screw by turning it clockwise If the back size switch plates A and B a...

Страница 33: ...the white screw on the front size switch plate by turning it counterclockwise Front Size Switch Plate 12 Remove the front size switch plate 13 Align the front size switch plate with the marks for the...

Страница 34: ...r size loaded in the paper deck the correct paper size may not appear on the touch panel display Adjust the front size switch plate correctly to avoid causing a paper jam dirty prints or make the insi...

Страница 35: ...Paper Deck Unit A1 Paper Deck Unit D1 Optional 1 23 1 Routine Maintenance 17 Place a size sticker indicating the new paper size that is loaded in the paper deck 18 Close the paper deck...

Страница 36: ...de guides to fit the paper size 2 Load the paper stack into the document insertion unit Load the paper face up Only load paper for use as a cover You cannot make copies or prints on paper that is load...

Страница 37: ...paper size press Inch Size 4 Select the desired paper type press OK When printing on special types of paper such as heavy paper be sure to correctly set the paper type If the type of paper is not set...

Страница 38: ...ide as shown in the illustration below Feeding Direction You cannot make copies or prints on Tab Paper that is loaded in the document insertion unit of Document Insertion Folding Unit or Document Inse...

Страница 39: ...e in the Stapler Unit When the Staple Finisher or Booklet Finisher is out of staples and the staple cartridge in the stapler unit must be replaced a screen prompting you to replace the staple cartridg...

Страница 40: ...cover of the finisher Staple Finisher Booklet Finisher 2 Lift and pull out the staple case from the stapler unit holding it by its green tab 3 Place the staple case as shown below press the area indic...

Страница 41: ...ridge PUSH 5 Insert the new staple cartridge Press the spring loaded case down until it clicks into place PUSH PUSH Only one staple cartridge can be inserted at a time 6 Remove the seal holding the st...

Страница 42: ...aintenance 7 Gently push the staple case into the stapler unit until it is securely in place 8 Close the front cover of the finisher If there are no staples ready for stapling after the cover is close...

Страница 43: ...ridge appears on the touch panel display Follow the procedure described below to replace the staple cartridge Use only staple cartridges intended for use with this machine If necessary remove all of t...

Страница 44: ...the stapler unit towards you and then push up the stapler unit 1 2 1 Grip the saddle stitcher unit by its handle and pull it out of the finisher until it stops 2 Pull the stapler unit of the saddle s...

Страница 45: ...ridge can be inserted at a time 5 Pull the stapler unit of the saddle stitcher unit towards you and then push it down into its original position 1 Pull the stapler unit of the saddle stitcher unit tow...

Страница 46: ...punch waste appears on the touch panel display Follow the procedure described below to remove the punch waste This procedure is necessary only if the External 2 3 Hole Puncher is attached 1 Open the...

Страница 47: ...turn the punch waste tray to its original position and close the front cover of the punch waste tray 1 Return the punch waste tray to its original position If the punch waste tray is not securely in p...

Страница 48: ...g Drum Cleaning When cleaning the machine first turn OFF the main power switch and disconnect the power cord Failure to observe these steps may result in a fire or electrical shock Do not use alcohol...

Страница 49: ...the Touch Panel Display Follow the procedure below to clean the touch panel display 1 Wipe the touch panel display with a cloth dampened in water or a mild cleaning agent and then wipe the area clean...

Страница 50: ...pen the cloth too much as this may damage the original or break the machine Manual Feeder Cleaning If originals that have been fed through the feeder have streaks or appear dirty clean the feeder s sc...

Страница 51: ...eft 3 Clean the feed scanning area thin glass strip with a cloth dampened in water or a mild detergent and then wipe the area with a soft dry cloth 4 Close the covers and the feeder 1 Close the inner...

Страница 52: ...n the rollers a total of five places inside the feeder cover with a cloth dampened with water Then wipe the area with a soft dry cloth 3 Open the inner cover and clean the rollers 1 Open the inner cov...

Страница 53: ...the resin roller 1 Open the feeder 2 Clean the feeder scanning area with a cloth dampened with water Then wipe the area with a soft dry cloth 3 Clean the left side of the rubber roller with a cloth d...

Страница 54: ...ppear on printed output or random parts of the printed image are missing clean the corona assembly wires inside the main unit It takes approximately 35 seconds to clean the wire Wire cleaning cannot b...

Страница 55: ...ies recommended for this machine tracing paper labels and other types of paper stock are available For more information contact your local authorized Canon dealer Do not store paper in places exposed...

Страница 56: ...s exposed to open flames as this may cause the toner to ignite resulting in burns or a fire Keep toner and other consumables out of the reach of small children If these items are ingested consult a ph...

Страница 57: ...mp cartridge Genuine Supplies Canon has developed and manufactured Toner Parts and Supplies specifically for use in this machine For optimal print quality and for optimal machine performance and produ...

Страница 58: ...Consumables 1 46 1 Routine Maintenance...

Страница 59: ...ertion Unit and Document Insertion Unit L1 Optional 2 22 Document Insertion Folding Unit H1 Folding Unit Optional 2 27 External 2 3 Hole Puncher A1 Optional 2 30 Staple Finisher E1 Booklet Finisher E1...

Страница 60: ...paper which has become jammed inside the machine remove the jammed paper gently to prevent the toner on the paper from scattering and getting into your eyes or mouth If the toner gets into your eyes...

Страница 61: ...per are attached Paper is already curled Step 3 2 Align the edges of paper and reload it Remove the paper with a problem Check that the machine operates normally Finish 3 Fan all four borders of paper...

Страница 62: ...mple of a Screen Indicating How to Clear the Paper Jam The fixing unit and its surroundings inside the machine may become hot during use When removing jammed paper or when inspecting the inside of the...

Страница 63: ...aper jams in the paper drawers is not possible after the power is turned back ON Clear paper jams without turning the power OFF Some areas that are shown to have paper jams may not actually have paper...

Страница 64: ...tional unit see the instructions in the following sections Feeder Duplex Color Image Reader Unit Feeder Duplex Color Image Reader Unit C1 Optional Paper Deck Unit A1 Paper Deck Unit A1 Paper Deck Unit...

Страница 65: ...g Unit Document Insertion Folding Unit H1 Insertion Unit and Document Insertion Unit L1 Optional Document Insertion Folding Unit H1 Folding Unit Optional Document Insertion Unit Document Insertion Fol...

Страница 66: ...ms 2 8 2 Troubleshooting External 2 3 Hole Puncher External 2 3 Hole Puncher A1 Optional Staple Finisher Staple Finisher E1 Booklet Finisher E1 Optional Booklet Finisher Staple Finisher E1 Booklet Fin...

Страница 67: ...uch panel display Once you have removed all of the jammed paper in locations other than the feeder printing or copying resumes If there is paper that still needs to be removed a screen indicating how...

Страница 68: ...use When removing jammed paper or when inspecting the inside of the machine do not touch the fixing unit and its surroundings as doing so may result in burns or electrical shock If the Copy Tray is at...

Страница 69: ...y force as this may leave torn pieces inside the machine and cause the machine to malfunction 4 Remove any jammed paper from the lower guide 1 Open the lower guide holding by the green tab 2 Remove an...

Страница 70: ...l display Check the location of the paper jam and follow the procedure described below and the procedure that appears on the touch panel display to remove the jammed paper 1 Open the upper right cover...

Страница 71: ...right cover 1 Remove any jammed paper 2 Close the upper right cover If the Paper Deck Unit A1 or the Paper Deck Unit D1 has been moved away from the main unit reconnect either of them to the main uni...

Страница 72: ...d to the main unit press the release button and move the Paper Deck Unit A1 or the Paper Deck Unit D1 away from the main unit before proceeding with this procedure For more information see e Manual Op...

Страница 73: ...wer 2 you can remove the jammed paper by following the procedure described below This manual uses the Paper Drawer 1 as an example 1 Pull out the Paper Drawer 1 1 Press and release the button 2 Pull o...

Страница 74: ...procedure that appears on the touch panel display to remove the jammed paper 1 Pull out the paper drawer indicated on the touch panel display 1 Press and release the button 2 Pull out the paper drawe...

Страница 75: ...tion of the paper jam and follow the procedure described below and the procedure that appears on the touch panel display to remove the jammed paper 1 Remove originals from the original supply tray 2 R...

Страница 76: ...en the inner cover holding by its tab 4 Turn the green feed dial and remove any jammed originals 1 Turn the green feed dial 2 Remove any jammed originals 5 Close the inner cover and the feeder cover 1...

Страница 77: ...Paper Deck Unit A1 Paper Deck Unit D1 Optional If a paper jam occurs in the Paper Deck Unit A1 or Paper Deck Unit D1 a screen similar to the one shown below appears on the touch panel display Check t...

Страница 78: ...jammed paper from the feeding slot 2 Open the paper deck and remove any jammed paper 1 Press the open button 2 Open the paper deck The inside lifter descends automatically If the machine is in the Sle...

Страница 79: ...Unit A1 to the main unit 1 Close the paper deck 2 Reconnect the Paper Deck Unit A1 to the main unit If you are using Paper Deck Unit D1 place your hand where the hand symbol is located on the paper de...

Страница 80: ...jam and follow the procedure described below and the procedure that appears on the touch panel display to remove the jammed paper Insertion Unit Document Insertion Folding Unit Document Insertion Unit...

Страница 81: ...ument Insertion Folding Unit or Document Insertion Unit 2 Remove any jammed paper from the top cover 1 Remove all of the paper that is not jammed 2 Remove any jammed paper 3 Close the top cover 3 Open...

Страница 82: ...2 Remove any jammed paper 3 Close the delivery unit 5 Close the insertion unit and the front cover 1 Close the insertion unit 2 Close the front cover 6 Follow the instructions on the touch panel displ...

Страница 83: ...Clearing Paper Jams 2 25 2 Troubleshooting 2 Open the upper delivery guide 3 Remove any jammed paper 4 Close the upper delivery guide...

Страница 84: ...eshooting 5 Open the lower delivery guide 6 Remove any jammed paper from the lower delivery guide 1 Remove any jammed paper 2 Close the lower delivery guide 7 Close the front cover 8 Follow the instru...

Страница 85: ...ow the procedure described below and the procedure that appears on the touch panel display to remove the jammed paper The insertion unit of the Document Insertion Folding Unit or the Document Insertio...

Страница 86: ...it 4 Remove any jammed paper from the exit slot 1 Push out any jammed paper toward the exit slot 2 Remove any jammed paper 5 Remove any jammed paper from the left guide 1 Open the left guide 2 Remove...

Страница 87: ...o its original position 1 Close the left guide 2 Return the Document Insertion Folding Unit to its original position When returning the Document Insertion Folding Unit to its original position be case...

Страница 88: ...r a screen similar to the one shown below appears on the touch panel display Check the location of the paper jam and follow the procedure described below and the procedure that appears on the touch pa...

Страница 89: ...ooting 3 Open the front cover of the finisher Staple Finisher Booklet Finisher 4 Open the top cover of the finisher If the Document Insertion Folding Unit unit is attached lift the insertion unit 5 Op...

Страница 90: ...Clearing Paper Jams 2 32 2 Troubleshooting 6 Open the top cover of the puncher unit 7 Remove any jammed paper from the puncher unit and the finisher 8 Close the delivery guide...

Страница 91: ...Close the front cover of the finisher 2 Close the top cover of the puncher unit If the Document Insertion Folding Unit or Document Insertion Unit is attached to the main unit close the insertion unit...

Страница 92: ...Check the location of the paper jam and follow the procedure described below and the procedure that appears on the touch panel display to remove the jammed paper Staple Finisher Booklet Finisher Insid...

Страница 93: ...the front cover of the finisher 5 Follow the instructions on the touch panel display Output Area 1 Open the output slot on the outside of the finisher and remove any jammed paper that is visible If y...

Страница 94: ...finisher Staple Finisher Booklet Finisher If the Document Insertion Folding Unit or Document Insertion Unit is attached open the insertion unit See e Manual Optional Products Software 3 Open the top...

Страница 95: ...ful not to get your fingers caught as this may result in personal injury 7 Close the top cover and front cover of the finisher 1 Close the top cover If you open the Document Insertion Folding Unit or...

Страница 96: ...touch panel display Check the location of the paper jam and follow the procedure described below and the procedure that appears on the touch panel display to remove the jammed paper Front Cover 1 Ope...

Страница 97: ...uide be careful not to get your fingers caught as this may result in personal injury 4 Remove any jammed paper from the lower delivery guide 1 Tilt the lower delivery guide to the right 2 Remove any j...

Страница 98: ...e front cover of the finisher 2 Turn the small knob on the right in the direction of the arrow counterclockwise 3 While pushing in the larger knob on the left turn it in the direction of the arrow clo...

Страница 99: ...imilar to the one shown below appears on the touch panel display Check the location of the paper jam and follow the procedure described below and the procedure that appears on the touch panel display...

Страница 100: ...per can be seen a little you may not be able to pull out the paper from the output tray In this case turn the knob to the left twice or three times until the edge of the paper cannot be seen completel...

Страница 101: ...xing transport unit 5 Remove any jammed paper from the left guide 1 Open the left guide 2 Remove any jammed paper 6 Remove any jammed paper from the fixing unit If you cannot pull out the jammed paper...

Страница 102: ...aper from the fixing unit 1 Pull the paper gently 2 While pulling the paper turn the knob to the left 3 Close the left guide 9 Push the fixing transport unit back into its original position and close...

Страница 103: ...Booklet Finisher a screen prompting you to remove the jammed staples appears on the touch panel display Check the location of the staple jam and follow the procedure described below and the procedure...

Страница 104: ...he staples that slide from the staple case 2 Return the tab on the staple case to its original position 5 Gently push the staple case back into the stapler unit until it is securely in place 6 Close t...

Страница 105: ...ttached 1 Open the front cover of the finisher 2 Pull out the saddle stitcher unit pull the stapler unit towards you and then push it up 1 2 1 Grip the saddle stitcher unit by its handle and pull it o...

Страница 106: ...Jams 2 48 2 Troubleshooting 4 On the staple case push down Part A and push up Part B A B 5 Remove any jammed staples and return Part B to its original position B 6 Return the staple cartridge to its o...

Страница 107: ...al position 1 Push the stapler unit of the saddle stitcher unit towards you and then push it down into its original position 2 Gently push the saddle stitcher unit back into its original position 8 Cl...

Страница 108: ...ine has run out of paper No more prints can be made Remedy Load paper See Loading Paper on p 1 3 Cause 2 The paper drawer is not correctly inserted Remedy Insert the paper drawer as far as it will go...

Страница 109: ...uires that the original be placed on the platen glass but there is no original on the platen glass Remedy Place the original on the platen glass Remove the original from the platen glass Cause An orig...

Страница 110: ...job remains in the output area of the Document Insertion Folding Unit Remedy Remove the paper in the output area of the Document Insertion Folding Unit Check covers are closed Cause The cover of the o...

Страница 111: ...aste on p 1 34 Load staples into the saddle stitcher unit Cause There are no staples in the staple cartridge of the Booklet Finisher saddle stitcher unit Remedy Replace the staple cartridge of the Boo...

Страница 112: ...de and then try scanning again 009 Cause 1 There is no paper Remedy Load paper See Loading Paper on p 1 3 Loading Paper on p 1 16 Cause 2 The paper is not loaded correctly in the paper source Remedy S...

Страница 113: ...itten was removed The Advanced Box where the data was being written was deleted The Network Place Advanced Box of another machine where the data was being written was deleted Remedy Confirm that the m...

Страница 114: ...dy 2 Erase files stored in the Mail Box and the Fax I Fax Inbox If the machine still does not operate normally turn the main power OFF and then back ON again See e Manual Before You Start Using This M...

Страница 115: ...with the cascade copy printer contact your System Manager 825 Cause 1 The Department ID and password set on the host machine do not match those registered in the cascade copy printers Remedy 1 Regist...

Страница 116: ...es 852 Cause An error occurred because the main power was turned OFF due to an unspecified cause while a job was being processed Remedy Check to see that the power plug is firmly inserted into the pow...

Страница 117: ...Check that the network is functioning properly and then try printing again 858 Cause There is a problem with the print data sent from an external application Remedy Check the settings of the data sen...

Страница 118: ...863 Cause An error occurred while processing PDL data or image data Remedy Check the settings and try printing again 865 Cause A function related to performing jobs is restricted Remedy Contact your S...

Страница 119: ...memory required for files stored in the Mail Box and Fax I Fax Inbox and jobs that are in the print queue If memory becomes full during the scanning of originals the following message will appear on t...

Страница 120: ...riginals No The pages scanned into memory are not sent For the Scan and Store function 1 Follow the directions below based on the message that appears on the touch panel display If the message Scannin...

Страница 121: ...Local Authorized Canon Dealer If a message like the one shown below appears follow the procedure described below Do not connect or disconnect the power cord with wet hands as this may result in electr...

Страница 122: ...to I side When operating the main power switch open the main power switch cover 3 If the machine still does not operate normally follow the procedure below and then contact your local authorized Cano...

Страница 123: ...r after the Limited Functions Mode is deactivated the Service Call Message screen may appear again unless the cause of the malfunction is removed If you shutdown the machine when there is a job waitin...

Страница 124: ...the main power switch open the main power switch cover 4 Wait at least 10 seconds after the main power indicator is turned off and then turn the main power switch back to I side When operating the ma...

Страница 125: ...l service representative You can use the following functions even when the Print and Scan functions are restricted Main Menu Screen Available Unavailable Available Functions When the Print function is...

Страница 126: ...h MEAP application May not be available depending on the restricted functions 5 The registered button may not be available depending on the restricted functions 6 Print List on the Job Log screen and...

Страница 127: ...are both turned ON always check that the breaker is not in the OFF position If the breaker is in the OFF position contact your local authorized Canon dealer without turning the breaker back ON ON OFF...

Страница 128: ...g 2 70 2 Troubleshooting Printer Fax Driver Troubleshooting See the Troubleshooting in the driver help to resolve problems when using a printer driver or fax driver for Windows In this section screens...

Страница 129: ...3 1 CHAPTER 3 Appendix This section includes the index Index 3 2...

Страница 130: ...the stamp cartridge 1 14 E Error messages Error codes without messages 2 54 Self diagnostic display 2 50 External 2 3 Hole Puncher Clearing paper jams 2 30 Removing punch waste 1 34 F Fixing Transport...

Страница 131: ...rs 1 and 2 2 15 Paper Drawers 3 and 4 2 16 Reducing the frequency of paper jams 2 2 Saddle stitcher unit of the Booklet Finisher 2 38 Screens indicating the locations of paper jams 2 4 Printer Fax Dri...

Страница 132: ...Index 3 4 3 Appendix...

Страница 133: ......

Страница 134: ...tp www canon europe com for details on your regional dealer CANON LATIN AMERICA INC 703 Waterford Way Suite 400 Miami Florida 33126 U S A CANON AUSTRALIA PTY LTD 1 Thomas Holt Drive North Ryde Sydney...

Отзывы: