background image

Scanning Originals into a Box

4-27

4

Using the Mail Bo

x Functions

Scanning Facing Pages in a Book onto Two Separate Sheets 
in One Step (Two-page Separation)

This feature enables you to scan facing pages in a book or a magazine on separate sheets of paper.

IMPORTANT

• In the Two-page Separation mode, combined use with the Two-sided Original, Booklet Scanning, Different 

Size Originals, Binding Erase, and Image Combination modes cannot be set.

• Place your originals on the platen glass. You cannot scan originals placed in the feeder using the 

Two-page Separation mode.

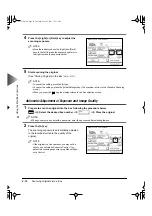
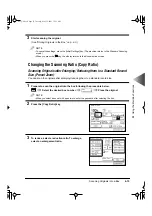
1

Prepare to scan the original into the box following the procedure below.

Select the desired box number

Place the original

NOTE

• When you select a box set with a password, enter the password after selecting the box.
• If you want to record in page order, begin scanning from the first page and work your way forward.
• Place the original face down so that the original’s top edge is against the back edge of the platen glass.

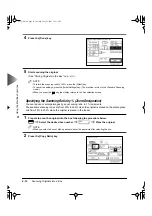
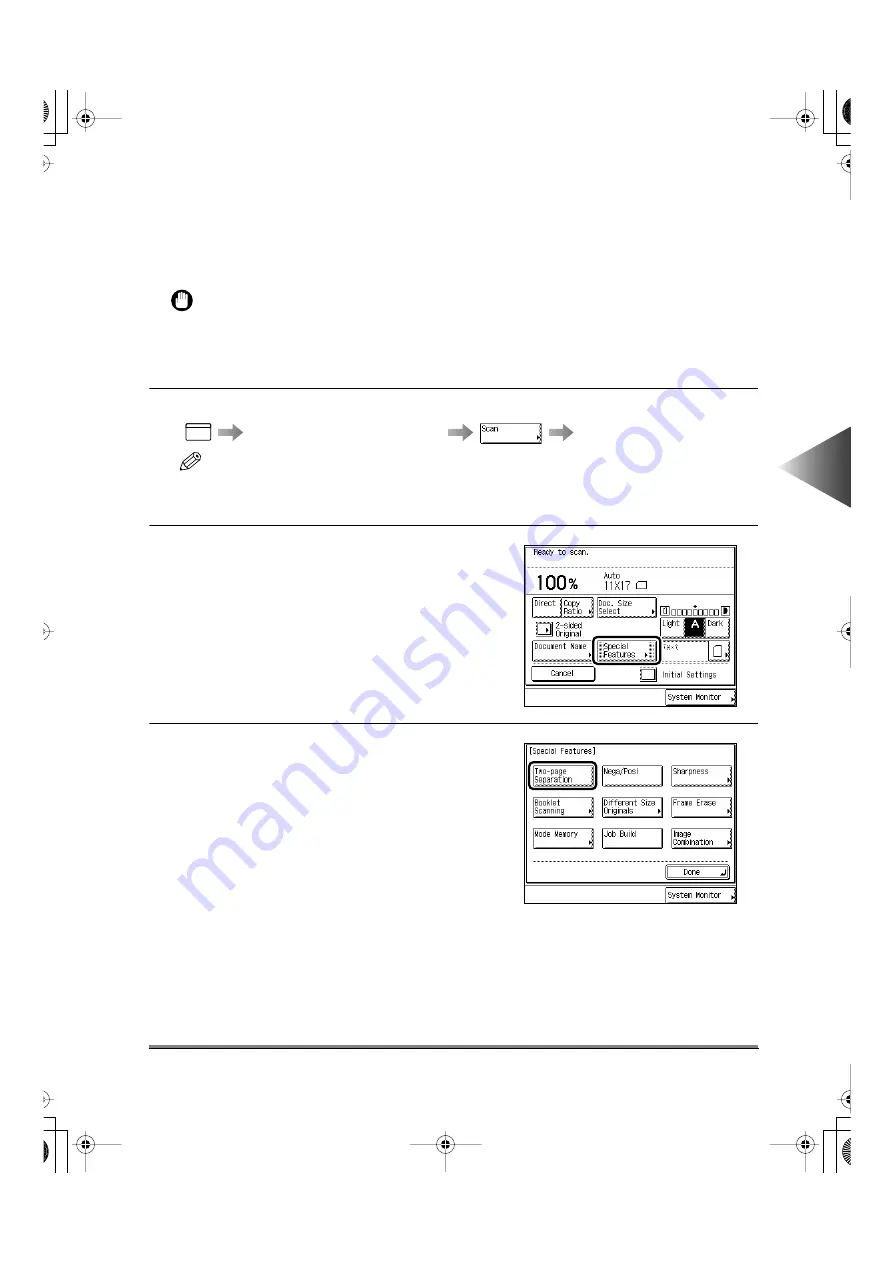
2

Press the [Special Features] key.

3

Press the [Two-page Separation] key.

MAIL BOX

Two-page Sep-
aration

E82_US.book  Page 27  Tuesday, May 22, 2001  12:11 AM

Содержание ImageRunner 5000 Series

Страница 1: ......

Страница 2: ...imageRUNNER 5000 Series User s Guide Series E82_US book Page 1 Tuesday May 22 2001 12 11 AM ...

Страница 3: ...rtner Canon USA Inc has determined that this copier model meets the ENERGY STAR Program for energy efficiency The International ENERGY STAR Office Equipment Program is an international program that promotes energy saving through the use of computers and other office equipment The program backs the development and dissemination of products with functions that effectively reduce energy consumption I...

Страница 4: ...he default settings and how to change them to suit your needs Loading Paper and Adding Toner This chapter describes how to load paper and add toner Troubleshooting This chapter describes what to do when there is a paper jam or a problem with print quality Handling Options This chapter describes the use of options and what to do if there is a paper jam in an optional unit Operation When User Restri...

Страница 5: ...e is mandatory for products marketed in the United States The label shown below indicates compliance with the CDRH regulations and must be attached to laser products marketed in the United States CAUTION Use of controls adjustments or performance of procedures other than those specified in the man ual may result in hazardous radiation exposure DANGER INVISIBLE LASER RADIATION WHEN OPEN AVOID DIREC...

Страница 6: ... with option equipment are included in the list above Depending on the system configuration and product purchased some manuals may be unavailable irrelevant Specifications are subject to change without notice for product improvement or future release How to Use this Machine Troubleshooting User s Guide This Document Remote UI Guide For Remote UI Use Setup Guide For setting up the network connectio...

Страница 7: ...ly copies but also various kinds of prints may sometimes have to wait their turn before they can be output To avoid confusion when reading this manual the terms scanning printing and copying used in this manual are defined as set out below There are some cases in which the scanning of an original when making a copy and the process of making a print are described separately Scanning Scanning an ori...

Страница 8: ...ace 30 Moving the Machine 30 Handling Precautions 31 Legal Limitations on Scanner Usage and the Use and Printing of Scanned Images 32 What the imageRUNNER 5000 Series Can Do 33 Various Kinds of Copies 33 You can Store Data and Print it at Your Convenience 40 You can Check Change and Cancel the Print Jobs 42 Setting the Specifications According to the Method of Use 43 Displaying a Guide Screen 44 Y...

Страница 9: ... Canceling with the Key 2 7 Selecting the Copy Paper Size Paper Select 2 9 Automatic Paper Selection Auto 2 9 Manual Paper Selection 2 10 Making Copies Using the Stack Bypass 2 12 Changing the Copy Ratio Copy Ratio 2 16 Enlarging Reducing Originals to a Standard Size Preset Zoom 2 16 Specifying the Copy Ratio by Zoom Designation 2 18 Automatically Setting the Copy Ratio Based on the Original and C...

Страница 10: ...et 3 9 Making Copies with Sheets of Paper Interleaved between Transparencies Transparency Interleaving 3 13 Making Copies with Original Image Shifted Shift 3 16 Making Copies with Original Image Shifted to the Center or a Corner 3 17 Making Copies with Original Image Using the Numeric Keys 3 18 Making Copies with Margins Margin 3 21 Erasing Shadows and Frame Lines from Copies Frame Erase 3 24 Maki...

Страница 11: ... Erase 4 31 Reducing Two Four or Eight Originals to Fit on a Single Print Sheet and Storing it Image Combination 4 39 Scanning Different size Originals Together in the Feeder Different Size Originals 4 43 Scanning Originals Separately Set as One Document Job Build 4 45 Inverting Original Images Nega Posi 4 47 Scanning Originals after Making them Sharply Contrasted Sharpness 4 49 Storing Recalling ...

Страница 12: ... Canceling Spool Status 5 21 Checking the Printing History 5 25 Checking the Device Status 5 27 Chapter 6 Setting and Adjusting Common Settings to Suit Your Needs Additional Functions Settings Table 6 3 Setting Specifications that are Common to Each Function Common Settings 6 6 Selecting the Initial Function at Power ON 6 6 Selecting the Default Display After Auto Clear 6 7 Setting Entry Tone Erro...

Страница 13: ... to On Off 6 38 Setting the Job Duration Display 6 39 Setting Auto Orientation to On Off 6 40 Setting the Photo Mode of the Copy Function 6 41 Changing the Current Standard Settings 6 42 Restoring Settings to Default Copy Settings 6 45 Setting Specifications of the Mail Box Function Mail Box Settings 6 46 Setting Storing the Box 6 46 Initializing a Box 6 49 Setting the Photo Mode of the Mail Box F...

Страница 14: ...32 If Memory Becomes Full During Scanning 8 35 When the Power does not Turn ON 8 36 Service Call Message 8 37 Chapter 9 Handling Options System Configuration 9 2 Paper Deck G1 9 3 Parts and Their Functions 9 3 Removing Paper Jams in the Paper Deck 9 4 Loading Paper in the Paper Deck 9 6 Finisher F1 Saddle Finisher F2 Puncher Unit B1 9 8 Parts and Their Functions 9 8 Collate Mode 9 9 Group Mode 9 9...

Страница 15: ...he Department ID and Password 10 4 Operations after Turning the Power ON 10 4 Operations after Using Copy Functions 10 5 Entering Characters on the Touch Panel Display 10 6 Entering Alphabet Characters 10 6 Entering Special Letters 10 7 Setting in Inches 10 8 Chapter 11 Appendix Specifications 11 2 Main Unit 11 2 Feeder 11 5 Paper Deck G1 11 5 Finisher F1 Saddle Finisher F2 11 6 Puncher Unit B1 11...

Страница 16: ...ce the original on the platen glass You cannot place the original in the feeder and copy it in the Two page Separation mode In the Two page Separation mode combined use with the Saddle Stitch Two sided Cover Sheet Insertion Booklet Transparency Interleaving Different Size Originals Image Combination Image Separation and Image Repeat modes cannot be set When copying facing pages with the two sided ...

Страница 17: ...dicates operational warnings and restrictions Be certain to read these items to operate the machine correctly and to avoid damage to the machine Indicates notes for operation or additional explanations Reading these is recommended The following symbols key names and unit names are used in this manual Unless otherwise mentioned screenshots of the touch panel display and illustrations used in this m...

Страница 18: ...these items are dropped or spilled inside the machine immediately turn OFF the main power switch and unplug the power plug from the out let Then contact your service representative CAUTION Do not install the machine in unstable locations such as on unsteady platforms or on inclined floors or in locations which are subject to exces sive vibrations as this may cause the machine to fall or tip over r...

Страница 19: ...after the machine has been installed as this may cause the machine to fall or tip over resulting in personal injury Power Supply WARNING Do not damage or modify the power cord Also do not place heavy objects on the power cord or pull on or excessively bend it as this could cause electrical damage and result in a fire or electrical shock Do not insert or unplug the power plug with wet hands as this...

Страница 20: ...ult in a fire or electrical shock Do not use power cords other than the provided power cord as this may result in a fire or electri cal shock As a general rule do not use extension cords Using an extension cord may result in a fire or electrical shock If an extension cord must be used however untie the cord binding and insert the power plug completely into the extension cord outlet to ensure a fir...

Страница 21: ...rical shock Always grasp the plug portion when unplugging the power plug Pulling on the power cord may expose or snap the core wire or otherwise dam age the power cord If the cord is damaged this could cause an electricity leak and result in a fire or electrical shock Leave sufficient space around the power plug so that it can be unplugged easily If objects are placed around the power plug you wil...

Страница 22: ...tch and then unplug the power plug Failure to do so will damage the power cord which may cause a fire or electrical shock Do not drop paper clips staples or other metal objects inside the machine Also do not spill water liquids or flammable substances alcohol benzene paint thinner etc inside the machine If these items come into contact with a high volt age area inside the machine this may result i...

Страница 23: ... stapling is performed while a Finisher is attached as this may result in personal injury Maintenance and Inspections WARNING When cleaning the machine first turn OFF the main power switch and unplug the power plug Failure to observe these steps may result in a fire or electrical shock Clean the machine using a firmly wrung out cloth dampened with a mild cleansing detergent Do not use alcohol benz...

Страница 24: ...re When removing jammed paper or when inspect ing the inside of the machine do not allow neck laces bracelets or other metal objects to touch the inside of the machine as this may result in burns or electrical shock When removing paper which has become jammed inside the machine take care not to allow the toner on the jammed paper to come into contact with your hands or clothing as this will dirty ...

Страница 25: ...an Consumables WARNING Do not throw toner bottles into open flames as this may cause the toner to ignite and result in burns or a fire Do not store toner bottles or paper in places exposed to open flames as this may cause the toner or paper to ignite and result in burns or a fire When discarding the toner bottles put the bot tles in a bag to prevent the toner from scattering and dispose of it as a...

Страница 26: ...e laser light escapes from the machine exposure may cause serious damage to your eyes DANGER Laser radiation when open and interlock defeated AVOID DIRECT EXPOSURE TO BEAM DANGER Laser radiation when open AVOID DIRECT EXPOSURE TO BEAM DANGER Laser radiation when open AVOID DIRECT EXPOSURE TO BEAM DANGER Laser radiation when open AVOID DIRECT EXPOSURE TO BEAM E82_US book Page 25 Tuesday May 22 2001...

Страница 27: ...d at the bottom left of this machine NOTE Push the test button with the tip of the ball point pen etc For details of the location of the breaker when the Finisher is attached see Internal View on p 1 3 2 The breaker lever automatically goes to OFF side Confirm that the power is cut OFF IMPORTANT Do not use the test button to turn the power ON and OFF If the breaker lever does not go to OFF side re...

Страница 28: ...Breaker 4 Move the breaker lever to ON I side 5 Press the main power switch to ON I side 6 Fill in the check sheet for the periodic inspection of the breaker at the end of this manual E82_US book Page 27 Tuesday May 22 2001 12 11 AM ...

Страница 29: ...achine in the direct sunlight If unavoidable shade the machine using cur tains Avoid poorly ventilated locations During use the machine generates ozone However the amount of ozone generated is not enough to affect the human body Neverthe less if the machine is used for a prolonged period of time in a poorly ventilated room or when making a large quantity of prints be sure to ventilate the room to ...

Страница 30: ...e and vibrations generated by the machine during printing can adversely affect the operation of such equipment Avoid installing the machine near televi sions radios or other similar electronic equipment The machine might interfere with sound and picture signal reception etc Plug the machine into a dedicated power outlet and maintain as much space as possible between the machine and other electroni...

Страница 31: ...amaged power cable can lead to an accident Provide Adequate Installation Space Provide enough space on each side of the machine for unrestricted operation Moving the Machine If you intend to move the machine contact your service representative beforehand When the Paper Deck G1 the Saddle Finisher F2 and the Puncher Unit B1 are attached Each option in extended condition When the Copy Tray C3 is att...

Страница 32: ...never nec essary Do not turn the main power switch OFF or open the front door during the operation This might result in paper jams To avoid danger of ignition do not use flam mable aerosol products near the machine If the machine will not be used for a pro longed period of time for example during the night turn the main power switch OFF There may be an accident or a defect with the hard disk in th...

Страница 33: ... to reproduce any particular document and or the printing and use of such reproductions you should consult in advance with your legal advisor for guidance Paper money Travelers Cheques Money Orders Food Stamps Certificates of Deposit Passports Postage Stamps canceled or uncanceled Immigration Papers Identifying badges or insignias Internal Revenue Stamps canceled or uncanceled Selective Service or...

Страница 34: ...of Copies Basic Features Screen The screen below which appears when the machine is ready to make copies is called the Basic Features screen Job Print monitor area Displays the current status of the copy job or other functions Press to make copies at a different copy ratio See Changing the Copy Ratio Copy Ratio on p 2 16 Press to select the paper and the feeding posi tion of the paper See Selecting...

Страница 35: ...ENE SCENE Press to copy originals specifying the image quality text only text and photo photo only You can also select the type of photo printed image photo when you set the photo mode in the Additional Functions beforehand See Selecting Image Quality on p 2 33 The world s coral reefs where brilliantly colored fish and a myriad of other tropical creatures come together Aptly nicknamed Tropical For...

Страница 36: ...he key after selecting a function brings up a help screen with guidance information Guide Special Features Screen 1 2 Press to select or cancel the Two page Sepa ration mode This mode enables you to copy two pages of an opened book onto separate copy sheets See Making Copies of Facing Pages in a Book onto Two Separate Copy Sheets Two page Separation on p 3 2 1 1 Press to add covers Also press to a...

Страница 37: ...s of Paper Interleaved be tween Transparencies TransparencyInterleaving on p 3 13 R E P O R T R E P O R T R E P O R T Interleaf sheet Transparency Press to select or cancel the Shift mode This mode enables you to shift the position of the original image on the copy sheet See Making Copies with Original Image Shifted Shift on p 3 16 When you select the Center Shift Corner Shift key Press to select ...

Страница 38: ...wo Four or Eight Originals to Fit on a Single Copy Sheet Image Combination on p 3 33 When you select the 2 On 1 key 2 1 1 2 Press to select or cancel the Image Separation mode This mode enables you to divide an original into 2 or 4 sections and enlarge each section onto a copy sheet of specified size See Dividing an Original Into Equal Sections and Enlarging Each Section on a Separate Copy Sheet I...

Страница 39: ... parts and scan them then subsequently print them all together This is convenient when you can not load all of the originals that you want to copy at one time See Copying Separately Set Originals Job Build on p 3 45 Press to store or recall copy jobs See Stor ing Recalling Often Used Copy Settings in Memory Mode Memory on p 3 48 E82_US book Page 38 Tuesday May 22 2001 12 11 AM ...

Страница 40: ...rection See Making Copies with the Original Image Repeated Image Repeat on p 3 62 CITY CITY CITY Press to copy the image of the original re versed as reflection of the mirror See Mak ing Copies with Image Reversed Mirror Image on p 3 65 Press to select or cancel the Sharpness mode This mode enables you to make copies of orig inal images with the contrast reproduced more sharply See Making Sharp Co...

Страница 41: ... 4 Using the Mail Box Functions When you press the key the Box selection screen appears The Mail Box function enables you to store data scanned using this machine or data sent from a personal computer as if storing documents in binders The documents data stored in a box can be printed whenever necessary Also when you set the Merge Doc uments mode you can print documents stored separately together ...

Страница 42: ... of the Mail Box Function Mail Box Settings on p 6 46 Originals scanned in the same way as a Copy function or doc uments sent from a personal computer are stored in a box Prints documents stored in a box When you press the Change P Settings key you can change the print settings See Printing Doc uments Stored in the Box on p 4 6 You can set various settings when scanning originals See Storing Origi...

Страница 43: ...the printing priority When you press the Secured Print key you can print the document sent from a computer with a password To print the document with a password you need to enter that password As these documents will not be printed unless the password is entered you can print classified documents preventing other people from ob serving them See Printing Secured Docu ments on p 5 20 When you press ...

Страница 44: ... UI and Clear Message Board keys are not displayed When the Network Scan function is not enabled the Auto Offline key is not displayed For details of the following settings refer to the instruction manual for the relevant function Printer Settings See the PS PCL Reference Guide Remote UI On Off See the Remote UI Guide Network Settings See the Network Guide When you press the key the Additional Fun...

Страница 45: ...ny functions To find the right function for your particular needs or to find a simple description of a function press the key while the Basic Features screen or Special Features screen is dis played The Information Guide screen appears in the touch panel display as shown on the right Example When copying photo originals Press the Various originals key You can display simple explanations of the var...

Страница 46: ...ain power is turned back ON or after Auto Clear has taken place You can set the Auto Clear Time from 0 to 9 minutes in one minute increments You can also cancel this function See Setting the Time Taken for Display to Return to Basic Screen after Finishing Operations on p 6 27 A message board which the message appears in the Job Print monitor area NOTE For details on how to erase the message board ...

Страница 47: ...be used for a long time you can press the key to put the machine in Energy Saver mode This reduces the temperature of machine s fixing unit and thereby conserves energy To start op erations again press the key once more Pressing the control panel power switch also reactivates the machine Energy Saver Energy Saver If the machine is not operated no keys are pressed for a period of about 15 minutes a...

Страница 48: ...orter than that of the Low Power mode the Auto Sleep mode has priority The machine enters the Sleep mode Even when the machine is in the Low Power mode the Daily Timer will be performed at the time and day of the week set with the Daily Timer The machine enters the Sleep mode Even before the time set with the Auto Sleep mode the Daily Timer will be performed at the time and day of the week set wit...

Страница 49: ...cy Interleaving Cover Sheet Insertion Different Size Originals Rotate Collating and Rotate Grouping modes or when the copy waiting time is less than one minute See Setting the Job Duration Display on p 6 39 If a paper drawer runs out of paper during printing the machine automatically locates another paper drawer loaded with the same size paper and begins feeding paper from that paper drawer If the...

Страница 50: ...w Display when selecting paper Display Remaining paper Paper drawer is approximately 50 100 full Paper drawer is approximately 10 50 full Paper drawer is less than approximately 10 full Paper drawer is empty Display when paper has run out Paper Supply indicator When scanning and printing one original and when printing on free size paper or other available paper set in the stack bypass the papers a...

Страница 51: ...E82_US book Page 50 Tuesday May 22 2001 12 11 AM ...

Страница 52: ... and Control Panel Power 1 6 Turning the Power ON 1 6 Control Panel Power Switch 1 8 Using the Touch Panel Display 1 9 Frequently used Keys on the Touch Panel Display 1 9 Touch Panel Key Display 1 10 Adjusting the Brightness of the Touch Panel 1 10 Placing Originals 1 11 Orientation of Originals 1 12 Placing an Original on the Platen Glass 1 13 Placing Originals in the Feeder 1 15 Available Paper ...

Страница 53: ...2 Paper drawer 3 4 Each paper drawer holds up to 550 sheets of paper 20 lb bond 80 g m2 You can adjust the paper drawer 3 to hold the following standard paper sizes 11 x17 LGL LTR LTRR STMTR Stack bypass Feeds transparencies and non standard size paper stock See Making Copies Using the Stack Bypass on p 2 12 Main power switch Press to the I side to turn the power ON See Main Power and Control Pane...

Страница 54: ...r supply cover Front cover Fixing Transport unit Duplexing Transport unit Breaker Platen glass Rear side of platen glass cover Front cover Duplexing Transport unit Unit 2 Fixing Transport unit Unit 1 Toner supply cover Breaker See Periodic Inspection of the Breaker on p 26 Test button E82_US book Page 3 Tuesday May 22 2001 12 11 AM ...

Страница 55: ...d on the original supply tray ON OFF 1 2 3 4 5 6 7 8 0 ID 9 C Start Stop Reset Guide Additional Functions Interrupt COPY MAIL BOX SCAN Processing Data Error Power Counter Check Display Contrast Energy Saver Clear Touch panel display 2 Display contrast dial 1 Counter Check key 3 COPY key 4 MAIL BOX key 5 SCAN key 6 Numeric keys 7 Energy Saver key 8 Control panel power switch sub power supply 9 Stop...

Страница 56: ...n the settings to the Standard mode Press to display explanations of modes or functions in the touch panel display Press to set additional functions Press to interrupt a continuous copy job when you need to make priority copies Press when setting the Department ID Management function Flashes when this machine is performing operations Flashes or lights when there is trouble in this machine When the...

Страница 57: ... panel lights when the main power switch is turned ON WARNING Never remove or insert the power plug with wet hands This can cause electrical shock IMPORTANT If you turn OFF the main power wait at least three seconds before turning the main power back ON If the main power indicator on the control panel does not light even though the main power switch is ON be sure to check the breaker to see if it ...

Страница 58: ... above for the machine to become ready to print NOTE The standard copy settings are as follows Copy ratio Direct 100 Paper selection Auto Paper Selection Copy exposure Auto Exposure Control Copy quantity 1 Copy function 1 1 sided copy You can change the standard copy settings See Changing the Current Standard Settings on p 6 42 You can choose which functions to display in the Basic Features screen...

Страница 59: ...r the Department ID and Password See Operations after Turning the Power ON on p 10 4 Control Panel Power Switch Press the control panel power switch to cancel the Sleep mode and resume normal machine operations NOTE The machine can receive documents from a per sonal computer and print them out even in the Sleep mode E82_US book Page 8 Tuesday May 22 2001 12 11 AM ...

Страница 60: ...ither being set or has already been set in screens other than the Additional Functions screen key Press to set the function mode and proceed to the next setting procedure key Press to go back to the previous procedure saving the setting already set when setting a function mode key Press to close the present screen key Press to decide the setting of a function mode key The mark in some keys indicat...

Страница 61: ... from the display When you set a certain function mode the characters on some keys may become difficult to see You cannot press these keys displayed in this way which means that you cannot set these functions in combination with the presently set function mode Adjusting the Brightness of the Touch Panel If the touch panel display is hard to view use the display contrast dial on the control panel t...

Страница 62: ...htweight paper and transparencies Feeder Place a stack of originals in the feeder then press the key and the machine automatically scans them into memory Two sided originals can also be automatically turned over and scanned as two sided image data NOTE If the original has too many pages to be placed in the feeder all at once set the Job Build mode See Copying Separately Set Originals Job Build on ...

Страница 63: ...riginals can be placed vertically or horizontally However the scanning speed for hori zontally placed originals is somewhat slower than that for vertically placed originals You can place origi nals horizontally when printing with Preset Zoom mode such as LTR 11 x17 Horizontally placed LTR STMT size originals are referred to as LTRR STMTR 11 x17 LGL size originals must be placed horizontally Place ...

Страница 64: ...nal supply tray is pulled up 2 Place your original The surface that you want to scan into memory must be placed face down Align the corner of the original with the top left corner of the platen glass NOTE Place books and other bound originals on the platen glass in the same way When enlarging LTR STMT size originals to 11 x17 LGL size paper place the original hori zontally on the platen glass and ...

Страница 65: ...laten glass and cause personal injury NOTE When placing originals on the platen glass the size of the original is detected after the feeder has been lowered Be sure to lower the feeder before copy ing Postcards cannot be detected Follow the instruc tions on the display which appears after pressing the key and specify the original size or select the paper manually Remove the original from the plate...

Страница 66: ...ly curled originals or originals with sharp folds Clipped or stapled originals Carbon backed paper or other originals which might not feed smoothly Transparencies and other highly transparent originals Check the condition of originals which have been fed through the feeder 30 times Originals which have been fed through the feeder 30 times can become folded or wrinkled and might not be fed smoothly...

Страница 67: ...ally You can place different size originals i e LTR and 11 x17 STMT and LTRR together in one group in the feeder when you set the Different Size Orig inals mode See Feeding Different size Origi nals Together in the Feeder Different Size Originals on p 3 43 The scanned originals are output face down to the original output area When scanning is completed remove the original sequentially from the ori...

Страница 68: ...pers with logos or patterns 4 When copying on Letterhead or 3 Hole Punch papers we recommend that you set the Image Orienta tion Priority to On in the Additional Functions See Setting Image Orientation Priority to On Off on p 6 38 5 The 3 Hole Punch papers can only be set vertically LTR Set the papers with the holes on the left side when loading in the paper drawers When loading in the stack bypas...

Страница 69: ...ing Paper in the Paper Deck See p 9 4 Stack bypass Making Copies Using the Stack Bypass See p 2 12 11 x17 LGL LTR LTRR STMTR Free Size 11 x 17 8 1 2 x 14 11 x 8 1 2 8 1 2 x 11 5 1 2 x 8 1 2 Paper drawer 1 2 Paper Size Length x Width Paper drawer 3 4 Stack bypass Paper Deck Available Loading Place Paper Set Place 4 x 5 7 8 to 11 5 8 x 17 E82_US book Page 18 Tuesday May 22 2001 12 11 AM ...

Страница 70: ... from Being Cut Entire Image 2 22 Calculating the Copy Ratio Based on the Original and Copy Paper Sizes Zoom Program 2 23 Enlarging Reducing Originals with Copy Ratios Set Independently for X andY Axes XY Zoom 2 28 Adjusting Exposure and Image Quality Copy Exposure 2 32 Adjusting Copy Exposure 2 32 Selecting Image Quality 2 33 Automatic Adjustment of Exposure and Image Quality 2 35 Entering the Co...

Страница 71: ...es Finisher 2 48 Checking a Sample Set Before Copying Sample Set 2 54 Checking the Copy Mode Settings Setting Confirmation 2 56 Changing or Canceling a Selected Copy Mode Setting Confirmation Cancel 2 57 E82_US book Page 2 Tuesday May 22 2001 12 11 AM ...

Страница 72: ...ner See Chapter 7 Routine Cleaning See p 8 25 1 Press the key NOTE If the message You must insert a control card appears insert a Control Card See Opera tions before Using Copy or Mail Box Functions on p 10 3 If the message Enter the Department ID and Pass word using the numeric keys appears enter the Department ID and Password See Operations after Turning the Power ON on p 10 4 COPY MAIL BOX SC y...

Страница 73: ...e Basic Features screen you can select the copy paper size set exposure image quality copy ratio and two sided mode and select the desired collating function 4 Set the copy mode in the Special Features screen You can continue setting other available modes See Chapter 3 Useful Copy Functions NOTE The Special Features screen is divided into two screens Press the or key to select the desired mode 5 E...

Страница 74: ...original When scanning is completed press the Done key When you want to copy a different original while copying You can set the next job while copying See Reserving a Copy Operation during Printing Reserve Copy on p 5 7 When you want to stop copy job before it is completed press the key See Canceling a Copy Job on p 2 7 NOTE After you have pressed the key several copies may be output from the mach...

Страница 75: ...he tray NOTE If the optional Control Card is attached remove the Control Card See Operations after Using Copy or Mail Box Functions on p 10 3 If you have set Department ID Management press the key See Operations after Using Copy Functions on p 10 5 Processing Data Error Guide Additional Functions Interrupt 1 2 3 4 5 6 7 8 0 ID 9 C Clea Interrupt Processing Data Clear Guide Additional Functions Int...

Страница 76: ... you canceled a job during scanning remove the original of that job Canceling with the Key 1 Press the key NOTE When canceling a job which is being printed press the Cancel key on the touch panel which appears during printing 2 Select the job you want to cancel from the list and press the Cancel key The selected job is canceled NOTE To continue the job press the Resume Copy key You cannot cancel m...

Страница 77: ...2 Basic Copying Canceling a Copy Job 2 8 3 Press the Resume Copy key E82_US book Page 8 Tuesday May 22 2001 12 11 AM ...

Страница 78: ...mage mode the copied image is automatically reduced slightly based on the copy paper size and copy image size As a result the entire original image is reproduced on the copy paper without its periphery being cut off See Slightly Reducing Images to Prevent the Original Periphery from Being Cut Entire Image on p 2 22 Automatic Paper Selection Auto NOTE Auto is the Standard mode setting 1 Place your ...

Страница 79: ...ze Originals mode in combination with the Shift mode or the Cover Sheet Insertion mode You cannot use Automatic Paper Selection when copying the following types of originals Copy these using Manual Paper Selection Non standard size originals Highly transparent originals such as transparencies Originals with an extremely dark background Originals smaller than STMT in size Manual Paper Selection You...

Страница 80: ...y The paper sizes are displayed in the order in which they are loaded in the paper drawers The paper sizes which are loaded in the paper drawers are shown in the display The type of paper color recycled loaded in the paper drawers can be indicated by the icons See Identifying the Type of Paper in a Paper Drawer on p 6 12 The display returns to the Basic Features screen and the selected paper size ...

Страница 81: ...io Entire Image Staple Hole Punch 1 2 Sided 2 2 Sided Book 2 Sided Two page Separation Cover Sheet Insertion Shift Booklet Trans parency Interleaving Image Combination Image Separation and Image Repeat modes cannot be set NOTE When copying the following originals you cannot use Automatic Paper Selection Use Manual Paper Selection with these types of paper Highly transparent originals such as trans...

Страница 82: ...pass Align the required number of sheets of paper with the slide guides The surface that you want to copy on opened surface must be placed face up Insert the paper into the machine until it stops The screen of step 4 appears in the display IMPORTANT Make sure that the height of the paper stack does not exceed the limit mark Slide Guide Auxiliary tray E82_US book Page 13 Tuesday May 22 2001 12 11 A...

Страница 83: ...size press the Free Size key NOTE To select A or B series paper size press the A B size key If the screen on the right is displayed adjust the width of the slide guides to match the paper size 5 Select the type of paper Plain Heavy etc and press the OK key IMPORTANT Select the correct paper type to avoid a paper jam NOTE For details of paper types see Available Paper Stock on p 1 17 E82_US book Pa...

Страница 84: ...e Reserving Print Jobs on p 5 10 7 Place your originals and program the copy set tings NOTE When there is no reserved job continue the proce dure from step 2 8 Proceed to make copies in the usual way NOTE You can cancel the mode by pressing the key The machine returns to the Standard mode Paper size loaded presently Paper size selected Reset E82_US book Page 15 Tuesday May 22 2001 12 11 AM ...

Страница 85: ...lass IMPORTANT Place your originals horizontally in following cases When enlarging LTR size originals to 11 x17 LGL size paper When enlarging STMT size originals to11 x17 size paper When reducing 11 x17 LGL size originals to LTR size with Image Orientation Priority set to Off select LTRR size paper NOTE Placing an original horizontally means setting with the longer side of the original sideways 1 ...

Страница 86: ...Press the Copy Ratio key 4 To reduce select a reduction ratio To enlarge select an enlargement ratio 5 Press the Done key The display returns to the Basic Features screen and the selected copy ratio is displayed E82_US book Page 17 Tuesday May 22 2001 12 11 AM ...

Страница 87: ...os are from 25 to 400 when the original is placed on the platen glass and from 25 to 200 when the original is placed in the feeder 1 Place your originals and press the Copy Ratio key 2 Enter the copy ratio with the or key or the Numeric keys in 1 increments NOTE Even if you entered the ratio with the Numeric keys you can change the entered values with the and keys If you make a mistake when enteri...

Страница 88: ...ropriate value will appear on the screen The display returns to the Basic Features screen and the selected copy ratio is displayed 4 Proceed to make copies in the usual way NOTE To return the copy ratio to 100 press the Direct key You can cancel the mode by pressing the key The machine returns to the Standard mode Reset E82_US book Page 19 Tuesday May 22 2001 12 11 AM ...

Страница 89: ... Auto mode Use the Preset Zoom or Zoom Designation modes To use the Auto mode your originals must conform to a standard paper size NOTE If an error occurs between the Auto copy ratio and the actual copy size you can adjust this with the Zoom Fine Adjustment function See Fine adjusting Zoom When Differences in Original Image and Print Image Occur on p 6 31 The paper sizes that can be used with Auto...

Страница 90: ...n the copy ratio to 100 press the Direct key To cancel the setting press the Copy Ratio and Auto keys in that order You can also cancel the mode by pressing the key The machine returns to the Standard mode If the original was placed on the platen glass the zoom ratio appears when the feeder is lowered pro vided that the original size can be detected If the original was placed in the feeder the zoo...

Страница 91: ...t the entire image is reproduced on the copy without its periphery being cut off IMPORTANT In the Entire Image mode combined use with the Booklet Frame Erase Image Combination Image Sep aration Image Repeat and Mirror Image modes cannot be set 1 Place your originals and press the Copy Ratio key 2 Press the Entire Image key and press the Done key 3 Proceed to make copies in the usual way NOTE To ca...

Страница 92: ... 25 to 200 when the original is placed in the feeder Making copies with the same XY copy ratio Zoom Designate the same copy ratio for the vertical and horizontal directions Making copies with different XY copy ratios XY Zoom Designate different copy ratios for the vertical and horizontal directions NOTE The designated sizes are converted to the copy ratio as follows copy ratio copy size original s...

Страница 93: ...py Ratio Copy Ratio 2 24 Making Copies with the Same XY Copy Ratio Zoom 1 Place your originals and press the Copy Ratio key 2 Press the Other Zoom key 3 Press the Zoom Program key Zoom E82_US book Page 24 Tuesday May 22 2001 12 11 AM ...

Страница 94: ... vertical direction Y independently press the XY Zoom key If the zoom ratio is less than 25 a message tell ing you that the ratio will be adjusted to 25 will appear If it is more than 400 a message telling you that the ratio will be adjusted to 400 will appear 5 Proceed to make copies in the usual way NOTE Place the original on the platen glass if the zoom ratio is more than 200 To return the copy...

Страница 95: ...2 Basic Copying Changing the Copy Ratio Copy Ratio 2 26 2 Press the Other Zoom key 3 Press the Zoom Program key 4 Press the XY Zoom key E82_US book Page 26 Tuesday May 22 2001 12 11 AM ...

Страница 96: ...s on p 10 8 To set the same values for the X and Y axes press the Zoom key If the zoom ratio is less than 25 a message tell ing you that the ratio will be adjusted to 25 will appear If it is more than 400 a message telling you that the ratio will be adjusted to 400 will appear 6 Enter all the values and press the OK key 7 Proceed to make copies in the usual way NOTE Place the original on the plate...

Страница 97: ...rom 25 to 400 when the original is placed on the platen glass and from 25 to 200 when the original is placed in the feeder Manually specifying the copy ratio XY Zoom You can manually specify the XY copy ratios in 1 increments NOTE If you set the copy ratio with the XY Zoom mode the copy image computed from the original size copy ratio etc is automatically rotated and copied to match the paper X 12...

Страница 98: ...ize of the paper set in a certain paper drawer If you specify a magnification of smaller than 25 a message telling you to set it to 25 will appear If it is larger than 400 a message telling you to set it to 400 will appear If an error occurs between the Auto XY Zoom copy ratio and the actual copy size you can adjust this with the Zoom Fine Adjustment function See Fine adjusting Zoom When Differenc...

Страница 99: ...set to the size of the paper in a certain paper drawer You can enter the value using the Numeric keys on the control panel If you make a mistake when entering values press the C key on the touch panel and enter the cor rect values Even if you entered the copy ratio with the Numeric keys you can change the entered values with the and keys If you enter a value outside the setting range a message pro...

Страница 100: ...s placed in the feeder When the original whose size cannot be detected is placed on the platen glass 5 Proceed to make copies in the usual way NOTE Place the original on the platen glass if the zoom ratio is more than 200 To return the copy ratio to 100 press the Direct key To cancel the setting press the Copy Ratio Other Zoom XY Zoom and Cancel keys in that order You can also cancel the mode by p...

Страница 101: ... 2 Adjusting Copy Exposure You can manually adjust the exposure to the most appropriate level for the original 1 Place your originals and press the Light or Dark key NOTE Move the indicator above the Light and Dark keys to the left to make the exposure lighter or to the right to make the exposure darker 2 Proceed to make copies in the usual way NOTE You can cancel the mode by pressing the key The ...

Страница 102: ...f these three modes cannot be set If you select one of these modes the previously set mode is canceled NOTE When you have selected the Text Text Photo or Photo mode the exposure can be adjusted only by Man ual Exposure Control Automatic Exposure Control cannot be selected When the Photo Mode of Copy Settings is On you can select printed image or photo after pressing the key See Setting the Photo M...

Страница 103: ...ode of Copy Settings is set to On you can select the Printed Img or Photo key See Setting the Photo Mode of the Copy Function on p 6 41 3 Press the Light or Dark key to adjust the copy exposure NOTE Move the indicator above the Light and Dark keys to the left to make the exposure lighter or to the right to make the exposure darker E82_US book Page 34 Tuesday May 22 2001 12 11 AM ...

Страница 104: ...ality 1 Place your originals and press the A key The exposure is automatically adjusted to the level best suited to the quality of the original NOTE If the original is a transparency you may not be able to use Automatic Exposure Control If so adjust the exposure using Manual Exposure Con trol 2 Proceed to make copies in the usual way NOTE You can cancel the mode by pressing the key The machine ret...

Страница 105: ...e representative 1 Press the Numeric keys to enter the desired copy quantity 1 to 999 IMPORTANT You cannot change the copy quantity during copy ing NOTE The maximum copy quantity varies according to the copy job settings The copy quantity appears in the upper right side of the touch panel display Start Clear Reset Guide Additional Functions Interrupt 1 2 3 4 5 6 7 8 0 ID 9 C 0 9 E82_US book Page 3...

Страница 106: ...s to enter the copy quantity again 1 to 999 IMPORTANT You cannot change the copy quantity during copy ing NOTE The copy quantity appears in the upper right side of the touch panel display Start Stop Processing Data Error Power Clear Guide nal Functions nterrupt 1 2 3 4 5 6 7 8 0 ID 9 C C Clear 0 9 E82_US book Page 37 Tuesday May 22 2001 12 11 AM ...

Страница 107: ... weight 17 lb bond to 110 lb index 64 g m2 to 200 g m2 There are some types of paper which may meet the above specifications but cannot be used to make two sided copies Making Two sided Copies from One sided Originals 1 2 Sided This feature enables you to make two sided copies from one sided originals IMPORTANT Place the original horizontally when copying originals such as LTRR STMTR size original...

Страница 108: ... 2 39 1 Place your originals and press the Two sided Mode key 2 Press the 1 2 Sided key When you select the Option key Select the type of two sided orientation and press the Done key 3 Press the OK key E82_US book Page 39 Tuesday May 22 2001 12 11 AM ...

Страница 109: ...en and press the key once for each original When scanning is completed press the Done key To cancel the setting press the Two sided Mode and Cancel keys in that order You can also cancel the mode by pressing the key The machine returns to the Standard mode Making Two sided Copies from Two sided Originals 2 2 Sided This feature automatically turns over two sided originals placed in the feeder to ma...

Страница 110: ...e Collate mode or the Offset Collate mode is automatically set at the point when you place the originals in the feeder See Setting Automatic Collate On Off on p 6 37 2 Press the 2 2 Sided key When you select the Option key Select the type of two sided orientation for origi nal and copy paper and press the Done key E82_US book Page 41 Tuesday May 22 2001 12 11 AM ...

Страница 111: ...y NOTE When the original is placed on the platen glass follow the instructions that appear on the screen and press the key once for each original When scanning is completed press the Done key To cancel the setting press the Two sided Mode and Cancel keys in that order You can also cancel the mode by pressing the key The machine returns to the Standard mode Start Reset E82_US book Page 42 Tuesday M...

Страница 112: ...opy will be printed upside down NOTE When copying two sided original placed on the platen glass on one side of different sheets set the Job Build mode See Copying Separately Set Originals Job Build on p 3 45 1 Place your originals in the feeder and press the Two sided Mode key NOTE When Auto Collate is set to On the Collate mode or the Offset Collate mode is automatically set at the point when you...

Страница 113: ...ay returns to the Basic Features screen and 2 1 Sided is displayed above the Two sided Mode key 4 Proceed to make copies in the usual way NOTE To cancel the setting press the Two sided Mode and Cancel keys in that order You can also cancel the mode by pressing the key The machine returns to the Standard mode Reset E82_US book Page 44 Tuesday May 22 2001 12 11 AM ...

Страница 114: ...ck Two sided IMPORTANT Place the originals on the platen glass You cannot place the original in the feeder and copy it in the Book 2 Sided mode When using this feature select LTR size paper When copying with Front Back Two sided the front side of the first two sided page and the back side of the last two sided page are left blank The machine s counter does not count the blank page as a copy Book 2...

Страница 115: ...2 Sided key and press the Next key 3 Select the type of layout and press the OK key NOTE If you select the Left Right Two sided key the fac ing pages are copied onto the front and back sides of a single sheet If you select the Front Back Two sided key the front and back sides of the left page or the front and back sides of the right page are copied onto the front and back sides of a single sheet T...

Страница 116: ...ages place the original and press the key again When scanning is completed press the Done key NOTE To cancel the setting press the Two sided Mode and Cancel keys in that order You can also cancel the mode by pressing the key The machine returns to the standard mode Start Reset E82_US book Page 47 Tuesday May 22 2001 12 11 AM ...

Страница 117: ...trays as follows When Staple is set Copies are automatically collated into sets arranged in page order output onto the trays as shown below and then automatically stapled When you select the Corner TopLeft key Collate Finisher 4 3 2 1 4 3 2 1 4 3 2 1 4 3 2 1 Three sets of copies specified Originals Copy set 1 Copy set 2 Copy set 3 Group 3 3 3 2 2 2 4 3 2 1 1 1 1 4 4 4 Originals Grouped copies of p...

Страница 118: ...s that can be bound at a time is 15 NOTE Place the originals to be finished into a booklet as shown in the illustration above See Making Copies for Use as a Booklet Booklet on p 3 9 Saddle Stitch can only be set when the 1 2 Sided or 2 2 Sided mode is selected See Two sided Copying Two sided Mode on p 2 38 When Non collate is set none of the above Collate Group or Staple are set Staple 4 3 2 1 1 1...

Страница 119: ...ls and 3 hole punch When Rotate is set When originals of the same size are placed the pages are aligned and the copy sets are deliv ered in alternating directions IMPORTANT You can only select LTR LTRR size paper Rotate can only be specified when the machine is not equipped with the Finisher option When Offset is set Copies are shifted to the front and back respectively IMPORTANT Offset can only b...

Страница 120: ...ars when the Finisher option is not attached The Hole Punch key only appears when a Puncher Unit B1 is attached to the Finisher The Offset key only appears when the Finisher option is attached When you select the Staple key Select the type of stapling Corner Double Saddle Stitch and the position to be stapled and press the OK key IMPORTANT The maximum number of papers which can be stapled at a tim...

Страница 121: ...the saddle stitch position See Changing the Saddle Stitch Position on p 6 33 Select the paper size and press the OK key When you select the Rotate key When the Automatic Paper Selection is set press the Next key Then select the LTR or LTRR size paper and press the OK key NOTE Press the OK key after selecting the Rotate key in the following cases Available paper size is selected manually Available ...

Страница 122: ...Features screen and the selected feature is displayed above the Finisher key 3 Proceed to make copies in the usual way NOTE When the original is placed on the platen glass follow the instructions that appear on the screen and press the key once for each original When scanning is completed press the Done key To cancel the setting press the Finisher and Cancel keys in that order You can also cancel ...

Страница 123: ...unts the sample print as a print 1 Place your originals and program the copy set tings NOTE The Sample Set key is displayed when you set a multiple number of copy sets in the Collate Staple or Cover Sheet Insertion modes This key is not displayed when you set the Group mode 2 Press the Sample Set key then press the key Sample Set copying starts and one copy set is made Sample Set Start E82_US book...

Страница 124: ... keys To change the exposure press the Light or Dark key To make two sided copy press the 2 Sided Copy key To select the copy paper press the Paper Select key See Selecting the Copy Paper Size Paper Select on p 2 9 To collate the copied papers press the Finisher key See Collating Copies Finisher on p 2 48 To set a margin for binding press the Margin key See Making Copies with Margins Mar gin on p ...

Страница 125: ... key on the Basic Features screen The display shows the selected copy mode settings 2 Check the settings then press the Done key The display returns to the Basic Features screen NOTE When ten or more copy modes have been set use the key to bring up the next screen To return to the previous screen press the key The mark in some keys indicates that those keys have another screen to set their functio...

Страница 126: ...ange or cancel The copy mode settings screen appears NOTE When ten or more copy modes have been set use the key to bring up the next screen To return to the previous screen press the key The mark in some keys indicates that those keys have another screen to set their functions Keys which do not have the mark on the bot tom right can be canceled by pressing the keys again To change a mode example S...

Страница 127: ...py Mode Setting Confirmation Cancel 2 58 To cancel a mode Press the Cancel key The display returns to the Setting Confirmation screen 3 Press the Done key The display returns to the Basic Features screen E82_US book Page 58 Tuesday May 22 2001 12 11 AM ...

Страница 128: ...he Frame of the Originals 3 26 Making Copies Erasing the Book Frame 3 28 Making Copies Erasing Binding holes etc 3 31 Reducing Two Four or Eight Originals to Fit on a Single Copy Sheet Image Combination 3 33 Dividing an Original Into Equal Sections and Enlarging Each Section on a Separate Copy Sheet Image Separation 3 38 Feeding Different size Originals Together in the Feeder Different Size Origin...

Страница 129: ...eat modes cannot be set Place the original on the platen glass You cannot place the original in the feeder and copy it in the Two page Separation mode When copying facing pages with the two sided mode copy them with the Book 2 Sided mode See Making Two sided Copies from Facing Pages in a Book Book 2 Sided on p 2 45 1 Place your original on the platen glass and press the Special Features key NOTE I...

Страница 130: ... make copies in the usual way For the next two facing pages place the original and press the key again When scanning is completed press the Done key NOTE To cancel the setting press the Special Features Two page Separation and Cancel keys in that order You can also cancel the mode by pressing the key The machine returns to the Standard mode Start Reset E82_US book Page 3 Tuesday May 22 2001 12 11 ...

Страница 131: ...Combina tion Image Separation Image Repeat and Mirror Image modes cannot be set Stapling is not possible when the total number of output papers including insertion sheets exceeds 30 sheets for 11 x17 LGL LTRR size or 50 sheets for LTR size NOTE When copying on the front and back covers insertion sheets those sheets are included in the count of the total number of copies Chapter pages are included ...

Страница 132: ...is always copied on one side it is useful when you want to divide the copy by chapter 1 Place your originals in the feeder and press the Special Features key NOTE When Auto Collate is set to On the Collate mode or the Offset Collate mode is automatically set at the point when you place the originals in the feeder See Setting Automatic Collate On Off on p 6 37 R E P O R T R E P O R T Originals Copy...

Страница 133: ...e proceed to step 5 When you select the Sheet Insertion or Chapter Page mode NOTE You cannot select the Sheet Insertion and Chap ter Page modes at the same time You can cancel a mode by pressing the mode key again 4 When copying onto the front cover back cover or insertion sheet press the Printed key and press the Next key NOTE The display will vary depending on the setting in step 3 The chapter p...

Страница 134: ... the sheet is to be inserted into the copies and press the Next key Specify the sheet insertion positions with the Numeric keys NOTE You can insert up to 20 insertion sheets or chapter pages If you want to insert 6 or more sheets use the or keys to scroll to the insertion positions You cannot specify the sheet insertion position to the first page Set the position starting from the second page To c...

Страница 135: ...ding on the mode selected 7 Press the Done key The display returns to the Basic Features screen 8 Proceed to make copies in the usual way NOTE When the original is placed on the platen glass follow the instructions that appear on the display and press the key once for each original When scanning is completed press the Done key To cancel the setting press the Special Features Cover Sheet Insertion ...

Страница 136: ...s cannot be set When you place the originals used in the vertical direction horizontally and scan them the images of the even number pages will be printed upside down Saddle stitching will not be performed when there is only one sheet The sheet will only be folded 1 Place your originals in the feeder and press the Special Features key NOTE When Auto Collate is set to On the Collate mode or the Off...

Страница 137: ...e original size and press the Next key NOTE To copy two sided originals also press the 2 Sided Original key To select A or B series paper size press the A B size key When you select the 2 Sided Original key Select the type of the original and press the OK key E82_US book Page 10 Tuesday May 22 2001 12 11 AM ...

Страница 138: ...n 110 lb index 200 g m2 When you select the Add Cover key you cannot set the paper used for the main text in the stack bypass NOTE To add a cover page press the Add Cover key Place the paper face down for the cover page in the stack bypass The cover page can only be copied on the front 11 x17 LTRR size paper can be selected When you select the Add Cover key Select the On or Off key to set whether ...

Страница 139: ...25 sets 6 10 15 sets 11 15 10 sets Saddle stitching will not be performed when there is only one sheet The sheet will only be folded 6 Press the Done key The display returns to the Basic Features screen NOTE When you set the Booklet mode the Shift mode is automatically set 7 Proceed to make copies in the usual way NOTE When the original is placed on the platen glass follow the instructions that ap...

Страница 140: ... interleaf sheets selected in the Transparency Interleaving mode IMPORTANT In the Transparency Interleaving mode combined use with the Finisher Two sided Two page Separation Cover Sheet Insertion Booklet Image Combination Image Separation and Image Repeat modes cannot be set You cannot make more than one set of copies at a time in the Transparency Interleaving mode Even if your machine is equipped...

Страница 141: ... Auto Collate is set to On the Collate mode or the Offset Collate mode is automatically set at the point when you place the originals in the feeder See Setting Automatic Collate On Off on p 6 37 2 Press the Transparency Interleaving key 3 Select the size of the transparencies and press the Next key 4 Select the size of interleaf sheet and press the Next key E82_US book Page 14 Tuesday May 22 2001 ...

Страница 142: ...pies Using the Stack Bypass on p 2 12 NOTE When the original is placed on the platen glass fol low the instructions that appear on the display and press the key once for each original When scanning is completed press the Done key In the Transparency Interleaving mode the trans parencies are fed from the stack bypass and the interleaf sheets are fed from the paper drawer The copies are output with ...

Страница 143: ...ith the Numeric keys NOTE In the Shift mode combined use with the Image Repeat and Mirror Image modes cannot be set The Shift mode cannot be selected when you set the Different Size Originals mode in combination with the Automatic Paper Selection Shift Copy with original image shifted to the center Copy with original image shifted to a corner Original CITY CITY 4 3 4 120mm 3 1 8 80mm Movetodesigna...

Страница 144: ...ul Copy Functions 3 Making Copies with Original Image Shifted to the Center or a Corner 1 Place your original and press the Special Fea tures key 2 Press the Shift key 3 Press the Center Shift Corner Shift key E82_US book Page 17 Tuesday May 22 2001 12 11 AM ...

Страница 145: ...al document that you want to scan is viewed as face up and situated in the center of the copy page The center position is the default 5 Press the Done key The display returns to the Basic Features screen 6 Proceed to make copies in the usual way NOTE To cancel the setting press the Special Features Shift and Cancel keys in that order You can also cancel the mode by pressing the key The machine ret...

Страница 146: ...o scan is viewed as face up and situated in the center of the copy page The center position is the default If you enter a value outside the setting range a message prompting you to enter the appropriate value will appear on the screen To change an entered value select the direction and enter the desired value again If you make a mistake when entering values press the key on the touch panel and ent...

Страница 147: ...direction Press the key on the upper or lower side to enter the value Next press the key on the right or left side to enter the value and press the OK key 5 Press the Done key The display returns to the Basic Features screen 6 Proceed to make copies in the usual way NOTE To cancel the setting press the Special Features Shift and Cancel keys in that order You can also cancel the mode by pressing th...

Страница 148: ...n mode combined use with the Booklet Image Repeat and Mirror Image modes cannot be set When the Margin mode is set the entire original image is shifted to the left right top or bottom by a selected width then copied When copying an original image that extends to the edge of the sheet part of that image will be cut off 1 Place your original and press the Special Fea tures key 2 Press the Margin key...

Страница 149: ...h the front and back 2 2 sided Set the margin for both the front and back 2 1 sided Set the margin for both the front and back When you select the Left Margin or Right Mar gin key Use the and keys to set the margin for the front and back 0 to 13 16 0 to 20 mm Then press the OK key NOTE If you want to enter values in millimeters press the mm key The default setting is 3 8 10 mm When you select the ...

Страница 150: ...to the Basic Features screen 5 Proceed to make copies in the usual way NOTE To cancel the setting press the Special Features Margin and Cancel keys in that order You can also cancel the mode by pressing the key The machine returns to the Standard mode Reset E82_US book Page 23 Tuesday May 22 2001 12 11 AM ...

Страница 151: ...iously set mode is canceled Original Frame Erase Erases the dark borders and frame lines that appear around the printed paper when the original is smaller than the selected paper size Also creates a blank border around the edge of the print paper IMPORTANT In the Original Frame Erase mode combined use with the Entire Image Booklet Image Combination Image Separation Image Repeat and Mirror Image mo...

Страница 152: ...e modes cannot be set Binding Erase Erases the shadows that appear in copies from binding holes in originals IMPORTANT In the Binding Frame Erase mode combined use with the Entire Image Book 2 Sided Two page Sepa ration Booklet Image Separation Image Repeat and Mirror Image modes cannot be set Do not place originals with binding holes in the feeder as this may damage the originals Original Book Fr...

Страница 153: ...ures key 2 Press the Frame Erase key 3 Press the Original Frame Erase key and press the Next key 4 Select the size of the original and press the Next key NOTE You can set the Original Frame Erase mode only on original sizes shown in the touch panel display To select A or B series paper size press the A B size key Original Frame Erase E82_US book Page 26 Tuesday May 22 2001 12 11 AM ...

Страница 154: ...ric keys and the key on the control panel If you enter a value outside the setting range a message prompting you to enter the appropriate value will appear on the screen Even when you enter the values with the Numeric keys you can change the values with the or key If you want to enter values in millimeters press the mm key The default setting is 1 8 4 mm When you select the Adjust Each Dim key Sel...

Страница 155: ...Frame Erase and Cancel keys in that order You can also cancel the mode by pressing the key The machine returns to the Standard mode Making Copies Erasing the Book Frame 1 Place your originals and press the Special Features key 2 Press the Frame Erase key 3 Press the Book Frame Erase key and press the Next key Reset Book Frame Erase E82_US book Page 28 Tuesday May 22 2001 12 11 AM ...

Страница 156: ... NOTE When entering values in millimeters you can use the Numeric keys and the key on the control panel If you enter a value outside the setting range a message prompting you to enter the appropriate value will appear on the screen Even when you enter the values with the Numeric keys you can change the values using the or key If you want to enter values in millimeters press the mm key The default ...

Страница 157: ...returns to the Basic Features screen 7 Proceed to make copies in the usual way NOTE To cancel the setting press the Special Features Frame Erase and Cancel keys in that order You can also cancel the mode by pressing the key The machine returns to the Standard mode Reset E82_US book Page 30 Tuesday May 22 2001 12 11 AM ...

Страница 158: ...ress the Binding Erase key and press the Next key 4 Specify the binding erase feature and press the Next key NOTE The position of the binding holes does not refer to the position in which the original is placed on the platen glass but to the position of the binding holes viewed when the surface of the original that you want to scan is face up with the top edge at the top Binding Erase E82_US book ...

Страница 159: ...appear on the screen Even when you enter the values with the Numeric keys you can change the values using the or key If you want to enter values in millimeters press the mm key The default setting is 3 4 18 mm 6 Press the Done key The display returns to the Basic Features screen 7 Proceed to make copies in the usual way NOTE To cancel the setting the Special Features Frame Erase and Cancel keys in...

Страница 160: ...leaving Original Frame Erase Book Frame Erase Dif ferent Size Originals Image Separation Image Repeat and Mirror Image modes cannot be set Originals copied in the Image Combination mode must all be the same size You cannot use the Image Combination mode with the Different Size Originals mode NOTE The reduction ratio is automatically set so that the originals fit on the selected paper size 2 On 1 R...

Страница 161: ...ls in the feeder and press the Special Features key NOTE When Auto Collate is set to On the Collate mode or the Offset Collate mode is automatically set at the point when you place the originals in the feeder See Setting Automatic Collate On Off on p 6 37 2 Press the Image Combination key 4 3 2 1 8 7 6 R E P O R T 5 4 3 2 8 7 6 R E P O R T 5 1 R E P O R T 8 7 3 1 7 5 Originals Copy or E82_US book ...

Страница 162: ...iginal key after selecting the original size To select A or B series paper size press the A B size key When you select the 2 Sided Original key Select the type of original and press the OK key 4 Select the desired Image Combination feature and press the Next key NOTE To make a two sided copy press the 2 Sided Copy key When you select the 2 Sided Copy key Select the type of two sided orientation an...

Страница 163: ... display returns to the Special Features screen IMPORTANT You cannot set Automatic Paper Selection in the Image Combination mode NOTE The machine automatically selects the copy ratio depending on the selected paper size 6 Press the Done key The display returns to the Basic Features screen NOTE When you set the Image Combination mode the Shift mode is automatically set 2 On 1 4 On 1 8 On 1 E82_US b...

Страница 164: ...platen glass follow the instructions that appear on the display and press the key once for each original When scanning is completed press the Done key To cancel the setting press the Special Features Image Combination and Cancel keys in that order You can also cancel the mode by pressing the key The machine returns to the Standard mode Start Reset E82_US book Page 37 Tuesday May 22 2001 12 11 AM ...

Страница 165: ...Image Separation mode must all be the same size You cannot use the Different Size Originals mode in combination with the Image Separation mode Place the original on the platen glass You cannot place the original in the feeder and copy it in the Image Separation mode The following Image Separation features are available 1 to 2 1 to 4 2 Sided 1 to 2 and 2 Sided 1 to 4 NOTE The enlargement ratio is a...

Страница 166: ...equal sections and outputs the sections in enlarged form as four 1 sided copies or two 2 sided copies NOTE You can place LTR size originals horizontally or vertically when using this feature 1 Place your originals on the platen glass and press the Special Features key 2 Press the Image Separation key 4 3 3 2 1 4 3 2 1 1 Original Copy or E82_US book Page 39 Tuesday May 22 2001 12 11 AM ...

Страница 167: ...e Next key NOTE To make two sided copy press the 2 Sided Copy key When you select the 2 Sided Copy key Select the appropriate orientation and press the OK key 4 Select the layout for the last original and press the Next key NOTE You can reduce the output of pages without images blank output by setting the layout of the last origi nal 1 To 2 1 To 4 E82_US book Page 40 Tuesday May 22 2001 12 11 AM ...

Страница 168: ...Done key 5 Select the paper size and press the OK key The display returns to the Special Features screen IMPORTANT You cannot select the Automatic Paper Selection in the Image Separation mode NOTE The machine automatically selects the copy ratio depending on the selected paper size 6 Press the Done key The display returns to the Basic Features screen 1 To 2 1 To 4 E82_US book Page 41 Tuesday May 2...

Страница 169: ...multiple originals follow the instructions that appear on the display and press the key once for each original When scanning is completed press the Done key To cancel the setting press the Special Features Image Separation and Cancel keys in that order You can also cancel the mode by pressing the key The machine returns to the Standard mode Start Reset E82_US book Page 42 Tuesday May 22 2001 12 11...

Страница 170: ... LTR and LTRR When you place different width originals the originals may slightly be moved when fed to the platen glass and as a result the images may be scanned and copied slantwise You cannot select the Shift mode when you set the Automatic Paper Selection in combination with the Dif ferent Size Originals mode You cannot set the Staple mode when placing different width originals The Auto Orienta...

Страница 171: ...idth key 4 Press the Done key The display returns to the Basic Features screen 5 Proceed to make copies in the usual way NOTE When the original is placed on the platen glass follow the instructions that appear on the display and press the key once for each original When scanning is completed press the Done key To cancel the setting press the Special Features Different Size Originals and Cancel key...

Страница 172: ...original output area when scanning is completed When you place different size originals in the feeder set the Different Size Originals mode NOTE When you want to copy one sided and two sided originals as two sided set the 1 2 Sided mode before hand if the first batch of originals is one sided If the first batch is two sided set the 2 2 Sided mode beforehand To scan next original s set or cancel th...

Страница 173: ...Copy Exposure on p 2 32 You can change the setting of the original type One sided Two sided See Two sided Copy ing Two sided Mode on p 2 38 You can change the number of copy sets See Entering the Copy Quantity on p 2 36 To cancel scanning press the Cancel key or the key When scanning Two sided originals Press the 2 Sided key IMPORTANT Do not forget to set or cancel the Two sided Origi nal mode acc...

Страница 174: ...is completed set the next original 6 Repeat steps 4 and 5 until the last original is scanned then press the Done key NOTE To cancel the setting press the Special Features and Job Build keys in that order You can also cancel the mode by pressing the key The machine returns to the Standard mode Reset E82_US book Page 47 Tuesday May 22 2001 12 11 AM ...

Страница 175: ...e Copy functions used frequently NOTE The copy jobs stored in memory will not be erased even if you turn the power OFF You can store all functions modes except for the Interrupt mode Storing Copy Settings for a Copy Mode 1 Program the copy job that you want to store in the Basic Features or Special Features screen NOTE In the display on the right the Two page Separation and Margin modes are set 2 ...

Страница 176: ...lected a memory key to which a copy mode has already been stored its settings are dis played If there are more stored copy modes than currently displayed you can scroll the list using the or keys If you selected a memory key to which a copy mode has not yet been stored The message to confirm whether or not you want to store the new copy setting is displayed To store Select the Yes key The new copy...

Страница 177: ...elect the Yes key The contents of the memory key are replaced with the new copy setting To cancel storing Select the No key then select another mem ory key When storing is completed the message Stored in memory appears for about two seconds 6 When the copy settings are stored the mem ory key storing the copy mode is highlighted and the stored settings are displayed 7 Press the OK key The display r...

Страница 178: ...ory Mode Memory 3 51 Useful Copy Functions 3 8 Press the Done key The display returns to the Basic Features screen Storing a Memory Key Name 1 Press the Special Features key 2 Press the Mode Memory key E82_US book Page 51 Tuesday May 22 2001 12 11 AM ...

Страница 179: ...ght corner of the key If you selected a memory key to which a copy mode has already been stored its settings are dis played 6 Enter the new name and press the OK key NOTE For details on how to enter characters on the touch panel display see Entering Characters on the Touch Panel Display on p 10 6 The maximum number of characters you can assign for the name is 10 If you press the OK key without any...

Страница 180: ...3 Useful Copy Functions 3 7 Press the OK key The display returns to the Special Features screen 8 Press the Done key The display returns to the Basic Features screen Recalling a Copy Mode 1 Press the Special Features key E82_US book Page 53 Tuesday May 22 2001 12 11 AM ...

Страница 181: ...key If the contents are correct press the OK key The display returns to the Special Features screen NOTE Recalling a copy job from memory cancels the cur rent copy mode After recalling a copy job from memory you can change its settings and make copies If you press another memory key the copy mode stored in that key is recalled 5 Press the Done key The display returns to the Basic Features screen E...

Страница 182: ...ttings in Memory Mode Memory 3 55 Useful Copy Functions 3 Erasing a Copy Mode 1 Press the Special Features key 2 Press the Mode Memory key 3 Press the Store Erase key 4 Press the Erase key E82_US book Page 55 Tuesday May 22 2001 12 11 AM ...

Страница 183: ...h a copy mode has already been stored its settings are dis played If there are more stored copy modes than currently displayed you can scroll the list using the or keys 6 The message on the right appears to confirm that you want to erase the copy mode Select the Yes key The stored copy mode is erased NOTE The name of the memory key is not erased For details on how to change the name see Storing a ...

Страница 184: ... in Memory Mode Memory 3 57 Useful Copy Functions 3 7 Press the Cancel key The display returns to the Special Features screen 8 Press the Done key The display returns to the Basic Features screen E82_US book Page 57 Tuesday May 22 2001 12 11 AM ...

Страница 185: ... Clear function is on or by calling up a copy job stored in memory If one of these keys was not pressed or if the Auto Clear function is not active calling up a copy job by pressing the Recall key is not possible Once stored the three copy jobs are held in memory even if the power is turned OFF The Standard mode is not stored Copy modes already stored is not stored 1 Place your originals and press...

Страница 186: ... and press the OK key The display returns to the Special Features screen NOTE You can also check which copy modes are stored to memory other than the currently displayed copy mode by pressing the or key 4 Press the Done key The display returns to the Basic Features screen 5 Proceed to make copies in the usual way E82_US book Page 59 Tuesday May 22 2001 12 11 AM ...

Страница 187: ...i This function enables you to make copies of the original inverting the black and the white areas 1 Place your originals and press the Special Features key 2 Press the key to display the Special Fea tures screen 2 2 Nega Posi SCENE SCENE Original Copy E82_US book Page 60 Tuesday May 22 2001 12 11 AM ...

Страница 188: ...display returns to the Basic Features screen 5 Proceed to make copies in the usual way NOTE To cancel the setting press the Special Features and Nega Posi keys in that order You can also cancel the mode by pressing the key The machine returns to the Standard mode Reset E82_US book Page 61 Tuesday May 22 2001 12 11 AM ...

Страница 189: ...opied for the specified number of times IMPORTANT In the Image Repeat manual setting mode combined use with the Entire Image Book 2 Sided Two page Separation Cover Sheet Insertion Shift Booklet Transparency Interleaving Margin Frame Erase Different Size Originals Image Combination Image Separation and Mirror Image modes cannot be set In the Image Repeat auto setting mode combined use with the Auto...

Страница 190: ...Press the Image Repeat key 4 Set the number of Image repeat times for each of the lengthwise and widthwise directions Automatic setting Press the Auto key NOTE To make repeated copies with the number of repeats automatically set select the paper size The original image is then copied so that the maxi mum possible number of copies fit in the selected paper size E82_US book Page 63 Tuesday May 22 20...

Страница 191: ... how many times you have manually set it to be repeated 5 Press the OK key The display returns to the Special Features screen 2 2 6 Press the Done key The display returns to the Basic Features screen 7 Proceed to make copies in the usual way NOTE To cancel the setting press the Special Features Image Repeat and Cancel keys in that order You can also cancel the mode by pressing the key The machine ...

Страница 192: ...ing the right and left sides IMPORTANT In the Mirror Image mode combined use with the Cover Sheet Insertion Shift Booklet Margin Frame Erase Image Combination and Image Repeat modes cannot be set 1 Place the original and press the Special Fea tures key 2 Press the key to display the Special Fea tures screen 2 2 Mirror Image Original Copy E82_US book Page 65 Tuesday May 22 2001 12 11 AM ...

Страница 193: ... The display returns to the Basic Features screen 5 Proceed to make copies in the usual way NOTE To cancel the setting press the Special Features and Mirror Image keys in that order You can also cancel the mode by pressing the key The machine returns to the Standard mode Reset E82_US book Page 66 Tuesday May 22 2001 12 11 AM ...

Страница 194: ...rld s coral reefs where brilliantly colored fish and a myriad of other tropical creatures come together Original Copy Low set Low not set The world s coral reefs where brilliantly colored fish and a myriad of other tropical creatures come together Aptly nicknamed Tropical Forests under the sea these spots of breathtaking beauty serve as home to countless varieties of life and to us of the land thi...

Страница 195: ...Special Fea tures screen 2 2 3 Press the Sharpness key 4 Use the Low or High key to adjust the sharpness and press the OK key The display returns to the Special Features screen 2 2 NOTE To copy text and lines clearly the setting should be towards High To copy photographs etc the set ting should be towards Low E82_US book Page 68 Tuesday May 22 2001 12 11 AM ...

Страница 196: ... to the Basic Features screen 6 Proceed to make copies in the usual way NOTE To cancel the setting press the Special Features Sharpness and Cancel keys in that order You can also cancel the mode by pressing the key The machine returns to the Standard mode Reset E82_US book Page 69 Tuesday May 22 2001 12 11 AM ...

Страница 197: ...3 Useful Copy Functions Making Sharp Contrast Copies Sharpness 3 70 E82_US book Page 70 Tuesday May 22 2001 12 11 AM ...

Страница 198: ... and Frame Lines Frame Erase 4 31 Reducing Two Four or Eight Originals to Fit on a Single Print Sheet and Storing it Image Combination 4 39 Scanning Different size Originals Together in the Feeder Different Size Originals 4 43 Scanning Originals Separately Set as One Document Job Build 4 45 Inverting Original Images Nega Posi 4 47 Scanning Originals after Making them Sharply Contrasted Sharpness 4...

Страница 199: ...ecking the Print Result or the Image of the Stored Document Sample Print 4 88 Checking the Document s Detailed Information 4 90 Changing the Name of a Document 4 91 Moving a Document 4 93 Erasing a Document from a Box 4 95 E82_US book Page 2 Tuesday May 22 2001 12 11 AM ...

Страница 200: ... making copies First place the originals you want to store in the feeder or on the platen glass then set the desired modes When the machine is used as a network printer you can store data into the box from a computer 1 Press the key 2 Select the desired box number NOTE When the desired box is not displayed press the or key When you enter the box number using the Numeric keys press the OK key after...

Страница 201: ...ored this operation is not necessary 4 Press the Scan key 5 Place your originals See Placing Originals on p 1 11 6 Specify the scanning mode NOTE You can set various modes when scanning the original as when making copies When storing by designating the document name when scanning press the Document Name key See Giving a Name to the Document to be Scanned Document Name on p 4 9 E82_US book Page 4 T...

Страница 202: ...e Two sided One sided modes Image Quality and Scanning Exposure 8 When scanning is completed the scanned data is stored in the selected box NOTE The stored document without designating the name of document is automatically stored with the name of year month date and time For example when the data was scanned at 1 35 PM 41 sec onds on August 12 2000 its name is 20000812133541 You can also change th...

Страница 203: ...stored in the same box To print multiple documents stored in different boxes you need to move the documents to one of the boxes beforehand See Moving a Document on p 4 93 When documents are printed without changing the settings the documents sent from computers are printed with the settings set from the computers and the documents scanned into memory are printed with the standard Local Print setti...

Страница 204: ...he or key to display the other docu ments You can select multiple documents stored in the box The selected documents are numbered in the order specified and are printed in the order numbered When you press the Select All key you can select all documents in the box The key changes to the Clear Selection key You can cancel the selection by pressing the docu ment again When you press the Clear Select...

Страница 205: ...Printing a Document Stored in a Box after Changing the Set tings on p 4 61 When you press the Print Erase key you can delete the printed data When you select multiple documents and press the Change The Copies key you can change the number of prints You can change the exposure or cancel the printing during printing See Chapter 5 Printing Effi ciently When printing starts the screen on the right app...

Страница 206: ...dure below Select the desired box number Place the original NOTE When you select a box set with a password enter the password after selecting the box 2 Press the Document Name key 3 Enter the name and press the OK key NOTE For details on how to enter the characters see Entering Characters on the Touch Panel Display on p 10 6 The maximum number of characters you can assign for a name is 24 MAIL BOX...

Страница 207: ...pecifying Document Size Doc Size Select You can select the document size when scanning transparencies or when specifying the document size before scanning NOTE The default setting is Auto 1 Prepare to scan the original into the box following the procedure below Select the desired box number Place the original NOTE When you select a box set with a password enter the password after selecting the box...

Страница 208: ... B series paper size press the A B size key 4 Start scanning the original See Storing Originals in the Box on p 4 3 NOTE To cancel the settings press the Initial Settings key The machine returns to the Standard Scanning mode When you press the key the display returns to Box selection screen Adjusting the Exposure and Image Quality before Scanning the Originals Scanning Exposure Manual Adjustment o...

Страница 209: ...os Photo mode This mode is best suited for scanning photos printed on photographic paper or photo originals containing half tones i e printed photos IMPORTANT If you scan an original containing half tones such as a printed photograph using the Photo mode moiré may occur If this happens you can soften this morié effect by using the Sharpness mode See Scan ning Originals after Making them Sharply Co...

Страница 210: ...u select a box set with a password enter the password after selecting the box 2 Press the key 3 Select the type of your original Text Text Photo Photo When the Photo Mode of Mail Box Settings is set to On you can select the Printed Img or Photo key See Setting the Photo Mode of the Mail Box Function on p 6 51 MAIL BOX Text Text Photo Photo Printed Img E82_US book Page 13 Tuesday May 22 2001 12 11 ...

Страница 211: ...de When you press the key the display returns to the Box selection screen Automatic Adjustment of Exposure and Image Quality 1 Prepare to scan the original into the box following the procedure below Select the desired box number Place the original NOTE When you select a box set with a password enter the password after selecting the box 2 Press the A key The scanning exposure is automatically adjus...

Страница 212: ...Originals after Enlarging Reducing them to a Standard Record Size Preset Zoom You can scan the originals after enlarging reducing them to a standard record size 1 Prepare to scan the original into the box following the procedure below Select the desired box number Place the original NOTE When you select a box set with a password enter the password after selecting the box 2 Press the Copy Ratio key...

Страница 213: ...pecifying the Scanning Ratio by Zoom Designation You can reduce or enlarge images by any scanning ratio in 1 increments The available scanning ratios are from 25 to 400 when the original is placed on the platen glass and from 25 to 200 when the original is placed in the feeder 1 Prepare to scan the original into the box following the procedure below Select the desired box number Place the original...

Страница 214: ... the Done key NOTE If you enter a value outside the setting range a message prompting you to enter the appropriate value will appear on the screen 5 Start scanning the original See Storing Originals in the Box on p 4 3 NOTE To return the scanning ratio to 100 press the Direct key To cancel the settings press the Initial Settings key The machine returns to the Standard Scanning mode When you press ...

Страница 215: ... an error occurs between the Auto scanning ratio and the actual scanning size you can adjust this with the Zoom Fine Adjustment function See Fine adjusting Zoom When Differences in Original Image and Print Image Occur on p 6 31 The record sizes that can be used with Auto are 11 x17 LGL LTR LTRR STMT STMTR However when scanning STMT size original using the platen glass you need to set the LTRR STMT...

Страница 216: ...ars when the key is pressed The zoom ratio can be set within the range of 25 to 400 Calculating the Scanning Ratio Based on the Original and Record Size Zoom Program If you enter measurements for the original and desired scan images or sheets the machine will automatically calculate and set the appropriate scanning ratio The following two Zoom Program modes are available The available scanning rat...

Страница 217: ...l into the box following the procedure below Select the desired box number Place the original NOTE When you select a box set with a password enter the password after selecting the box 2 Press the Copy Ratio key 3 Press the Other Zoom key 4 Press the Zoom Program key MAIL BOX Zoom Program Zoom E82_US book Page 20 Tuesday May 22 2001 12 11 AM ...

Страница 218: ...ll be adjusted to 25 will appear If it is more than 400 a message telling you that the ratio will be adjusted to 400 will appear 6 Start scanning the original See Storing Originals in the Box on p 4 3 NOTE Place the original on the platen glass if the zoom ratio is more than 200 To return the scanning ratio to 100 press the Direct key To cancel the setting press the Zoom Other Zoom Zoom Program an...

Страница 219: ...e Mail Box Functions Scanning Originals into a Box 4 22 2 Press the Copy Ratio key 3 Press the Other Zoom key 4 Press the Zoom Program key 5 Press the XY Zoom key E82_US book Page 22 Tuesday May 22 2001 12 11 AM ...

Страница 220: ...ess the Zoom key If the zoom ratio is less than 25 a message tell ing you that the ratio will be adjusted to 25 will appear If it is more than 400 a message telling you that the ratio will be adjusted to 400 will appear 7 Enter all values and press the OK key 8 Start scanning the original See Storing Originals in the Box on p 4 3 NOTE Place the original on the platen glass if the zoom ratio is mor...

Страница 221: ...ighly transparent originals such as transparencies in the XY Zoom mode Specify the scanning ratio NOTE If an error occurs between the XY Zoom scanning and the actual scanning size you can adjust this with the Zoom Fine Adjustment function See Fine adjusting Zoom When Differences in Original Image and Print Image Occur on p 6 31 1 Prepare to scan the original into the box following the procedure be...

Страница 222: ...E To return the scanning ratio to 100 press the Direct key To cancel the setting press the Copy Ratio Other Zoom XY Zoom and Cancel keys in that order To cancel the settings press the Initial Settings key The machine returns to the Standard Scanning mode When you press the key the display returns to the Box selection screen Scanning Two sided Originals Two sided Original This feature automatically...

Страница 223: ...nning the original See Storing Originals in the Box on p 4 3 NOTE When the original is placed on the platen glass follow the instructions that appear on the display and press the key once for each original When scanning is completed press the Done key To cancel the setting press the 2 sided Original and Cancel keys in that order To cancel the settings press the Initial Settings key The machine ret...

Страница 224: ...he platen glass You cannot scan originals placed in the feeder using the Two page Separation mode 1 Prepare to scan the original into the box following the procedure below Select the desired box number Place the original NOTE When you select a box set with a password enter the password after selecting the box If you want to record in page order begin scanning from the first page and work your way ...

Страница 225: ...ch a way that when printing the scanned data the output papers can be easily made into a booklet Specify the Booklet mode when printing the scanned data See Making Prints for Use as a Booklet Booklet on p 4 72 IMPORTANT In the Booklet Scanning mode combined use with the Two page Separation Different Size Originals Frame Erase and Image Combination modes cannot be set When you place the originals u...

Страница 226: ... the original size and press the Next key NOTE To scan two sided originals also press the 2 Sided Original key To select A or B series paper size press the A B size key When you select the 2 Sided Original key Select the type of the original and press the OK key Booklet Scan ning Frame Erase E82_US book Page 29 Tuesday May 22 2001 12 11 AM ...

Страница 227: ...4 3 NOTE When the original is placed on the platen glass follow the instructions that appear on the display and press the key once for each original When scanning is completed press the Done key To cancel the setting press the Special Features Booklet Scanning and Cancel keys in that order To cancel the settings press the Initial Settings key The machine returns to the Standard Scanning mode When ...

Страница 228: ...ic Document Size Select Booklet Scanning Different Size Originals and Image Combination modes cannot be set Book Frame Erase Erases the dark borders as well as center and contour lines that appear when printing facing pages in a bound original onto a single record paper then records them IMPORTANT In the Book Frame Erase mode combined use with the Automatic Document Size Select Booklet Scan ning D...

Страница 229: ...l into the box following the procedure below Select the desired box number Place the original NOTE When you select a box set with a password enter the password after selecting the box 2 Press the Special Features key 3 Press the Frame Erase key 4 Press the Original Frame Erase key and press the Next key MAIL BOX E82_US book Page 32 Tuesday May 22 2001 12 11 AM ...

Страница 230: ... right sides of the original independently press the Adjust Each Dim key NOTE When entering values in millimeters you can use the Numeric keys and the key on the control panel If you enter a value outside the setting range a message prompting you to enter the appropriate value will appear on the screen Even when you enter the values with the Numeric keys you can change the values using the or key ...

Страница 231: ...he machine returns to the Standard Scanning mode When you press the key the display returns to the Box selection screen Erasing the Book Frame and Storing the Original Book Frame Erase 1 Prepare to scan the original into the box following the procedure below Select the desired box number Place the original NOTE When you select a box set with a password enter the password after selecting the box 2 ...

Страница 232: ...ress the Frame Erase key 4 Press the Book Frame Erase key and press the Next key 5 Select the size of the book when opened and press the Next key NOTE To select A or B series paper size press the A B size key Binding Erase E82_US book Page 35 Tuesday May 22 2001 12 11 AM ...

Страница 233: ...n the control panel If you enter a value outside the setting range a message prompting you to enter the appropriate value will appear on the screen Even when you enter the values with the Numeric keys you can change the values using the or key If you want to enter values in millimeters press the mm key The default settings are 3 8 10 mm for Center and 1 8 4 mm for Top Left Right and Bot tom When y...

Страница 234: ...hen you press the key the display returns to the Box selection screen Erasing the Shadows of Binding Holes and Storing the Original Binding Erase 1 Prepare to scan the original into the box following the procedure below Select the desired box number Place the original NOTE When you select a box set with a password enter the password after selecting the box Place the original on the platen glass 2 ...

Страница 235: ...n is face up with the top edge at the top 6 Set the desired binding erase width using the or key and press the OK key NOTE When entering values in millimeters you can use the Numeric keys and the key on the control panel If you enter a value outside the setting range a message prompting you to enter the appropriate value will appear on the screen Even when you enter the values with the Numeric key...

Страница 236: ...ge Combination mode combined use with the Automatic Document Size Select Two page Sep aration Booklet Scanning Different Size Originals Original Frame Erase and Book Frame Erase modes cannot be set Originals printed in the Image Combination mode must all be the same size You cannot use the Image Combination mode in combination with the Different Size Originals mode NOTE The reduction ratio is auto...

Страница 237: ... box set with a password enter the password after selecting the box 2 Press the Special Features key 3 Press the Image Combination key 4 Select the size of the originals and press the Next key NOTE When reducing a two sided original press the 2 Sided Original key after selecting the original size To select A or B series paper size press the A B size key MAIL BOX E82_US book Page 40 Tuesday May 22 ...

Страница 238: ... 2 Sided Original key Select the type of original and press the OK key 5 Select the desired Image Combination feature and press the Next key When you select the Option key Select the image order and press the Done key 2 On 1 4 On 1 8 On 1 E82_US book Page 41 Tuesday May 22 2001 12 11 AM ...

Страница 239: ...inals in the Box on p 4 3 NOTE When the original is placed on the platen glass follow the instructions that appear on the display and press the key once for each original When scanning is completed press the Done key To cancel the setting press the Special Features Image Combination and Cancel keys in that order To cancel the settings press the Initial Settings key The machine returns to the Stand...

Страница 240: ...the top edge of the originals with the back edge of the feeder when placing different width originals Set the different size originals with different width with the combinations as follows Other combinations may damage the originals 11 x17 and LGL LTR and LGL LTR and LTRR When you place different width originals the originals may slightly be moved when fed to the platen glass and as a result the i...

Страница 241: ... in the Box on p 4 3 NOTE When the original is placed on the platen glass follow the instructions that appear on the display and press the key once for each original When scanning is completed press the Done key To cancel the setting press the Special Features Different Size Originals and Cancel keys in that order To cancel the settings press the Initial Settings key The machine returns to the Sta...

Страница 242: ... place different size originals in the feeder set the Different size Originals mode NOTE When you want to scan one sided and two sided originals as two sided set the Two sided Original mode beforehand if the first batch of originals is two sided To scan next original s set or cancel the Two sided Original mode according to the type of original It is useful to store originals in a box and print the...

Страница 243: ...ng the Originals Scanning Exposure on p 4 11 You can change the setting of the original type One sided Two sided See Scanning Two sided Originals Two sided Original on p 4 25 To cancel scanning press the Cancel key or the key When scanning Two sided originals Press the 2 sided Original key IMPORTANT Do not forget to set or cancel the Two sided Origi nal mode according to the type of original 3 6 9...

Страница 244: ...gs press the Initial Settings key The machine returns to the Standard Scan ning mode When you press the key the display returns to the Box selection screen Inverting Original Images Nega Posi This function enables you to record the original inverting the black and the white areas 1 Prepare to scan the original into the box following the procedure below Select the desired box number Place the origi...

Страница 245: ... original See Storing Originals in the Box on p 4 3 NOTE To cancel the setting press the Special Features and Nega Posi keys in that order To cancel the settings press the Initial Settings key The machine returns to the Standard Scanning mode When you press the key the display returns to the Box selection screen Reset E82_US book Page 48 Tuesday May 22 2001 12 11 AM ...

Страница 246: ...ing the Photo mode moiré or screen clash may occur However by using the Low key you can soften this moiré effect so that the print is easier on the eyes High This feature enhances the edges of original images so that faint or fine text is reproduced more sharply This is particularly suited to blueprints or faint pencil drawn originals 1 Prepare to scan the original into the box following the proce...

Страница 247: ...ing should be towards Low 5 Press the Done key 6 Start scanning the original See Storing Originals in the Box on p 4 3 NOTE To cancel the setting press the Special Features Sharpness and Cancel keys in that order To cancel the settings press the Initial Settings key The machine returns to the Standard Scanning mode When you press the key the display returns to the Box selection screen Reset E82_US...

Страница 248: ...Exposure Image Quality Copy Ratio 2 sided Original Document Name Two page Separation Booklet Scanning Differ ent Size Originals Job Build Nega Posi Sharpness Frame Erase and Image Combination Storing Scanning Modes 1 Call up the Scanning screen as follows Select the desired box number NOTE When you select a box set with a password enter the password after selecting the box 2 Program the scan setti...

Страница 249: ...ory key to which a scanning mode has already been stored its settings are dis played If there are more stored scanning modes than cur rently displayed you can scroll the list using the or keys If you selected a memory key in which a scan ning mode has not yet been stored The message to confirm whether or not you want to store the new scanning job is displayed To store Select the Yes key The new sc...

Страница 250: ...mory key are replaced with the new scanning setting To cancel storing Select the No key then select another memory key When storing is completed the message Stored in memory appears for about two seconds 7 When the scan settings are stored the mem ory key storing the scanning mode is high lighted and the stored settings are displayed 8 Press the OK key The display returns to the Special Features s...

Страница 251: ...e Scanning screen as follows Select the desired box number NOTE When you select a box set with a password enter the password after selecting the box 2 Press the Special Features key 3 Press the Mode Memory key 4 Press the Store Erase key MAIL BOX Nega Posi E82_US book Page 54 Tuesday May 22 2001 12 11 AM ...

Страница 252: ...nning mode has already been stored its settings are dis played 7 Enter the new name and press the OK key NOTE For details on how to enter characters on the touch panel display see Entering Characters on the Touch Panel Display on p 10 6 The maximum number of characters you can assign for the name is 10 If you press the OK key without any characters entered the name of the memory key will revert ba...

Страница 253: ... screen Recalling a Scanning Mode 1 Call up the Scanning screen as follows Select the desired box number NOTE When you select a box set with a password enter the password after selecting the box 2 Press the Special Features key 3 Press the Mode Memory key MAIL BOX Nega Posi E82_US book Page 56 Tuesday May 22 2001 12 11 AM ...

Страница 254: ...m memory cancels the current scanning mode After recalling a scanning mode from memory you can change its settings and scan If you press another memory key the scanning mode stored in that key is recalled 6 Press the Done key The display returns to the Scanning screen Erasing a Scanning Setting 1 Call up the Scanning screen as follows Select the desired box number NOTE When you select a box set wi...

Страница 255: ...Mail Box Functions Scanning Originals into a Box 4 58 2 Press the Special Features key 3 Press the Mode Memory key 4 Press the Store Erase key 5 Press the Erase key E82_US book Page 58 Tuesday May 22 2001 12 11 AM ...

Страница 256: ... already been stored its settings are dis played If there are more stored scanning modes than cur rently displayed you can scroll the list using the or keys 7 The message on the right appears to confirm that you want to erase the scanning mode Select the Yes key The stored scanning mode is erased NOTE The name of the memory key is not erased For details on how to change the name see Storing a Memo...

Страница 257: ...tions Scanning Originals into a Box 4 60 8 Press the Cancel key The display returns to the Special Features screen 9 Press the Done key The display returns to the Scanning screen E82_US book Page 60 Tuesday May 22 2001 12 11 AM ...

Страница 258: ...cument following procedure below Select the desired box number then the desired document NOTE When you select a box set with a password enter the password after selecting the box 2 Press the Change P Settings key 3 Press the Paper Select key NOTE When you press the Initial Settings key the docu ment recorded from a personal computer returns to the former settings and the scanned document returns t...

Страница 259: ...and set the desired paper To select A or B series paper size press the A B size key Select the paper type and press the OK key 5 Press the Start Print key If there is a current job or a previously reserved job the machine will start printing after that job is completed See Printing Documents Stored in the Box on p 4 6 NOTE To cancel the settings press the Initial Settings key The machine returns t...

Страница 260: ...procedure below Select the desired box number then the desired document NOTE When you select a box set with a password enter the password after selecting the box 2 Press the Change P Settings key 3 Press the Finisher key NOTE When you press the Initial Settings key the docu ment recorded from a personal computer returns to the former settings and the scanned document returns to the standard mode o...

Страница 261: ...key only appears when the Finisher option is attached When you select the Staple key Select the type of stapling Corner Double Saddle Stitch and press the OK key IMPORTANT You cannot set the Staple mode when printing on transparencies tracing papers labels and 3 hole punch The maximum number of papers which can be sta pled at a time is as follows 11 x17 LGL LTRR 30 sheets LTR 50 sheets When you se...

Страница 262: ...s the Next key IMPORTANT You cannot select the Saddle Stitch key when the Saddle Finisher F2 option is not attached LGL LTR STMTR size paper cannot be saddle stitched NOTE You can set the Saddle Stitch key when you select the Two sided Printing key See Two sided Print ing Two sided Printing on p 4 67 You can adjust the saddle stitch position See Changing the Saddle Stitch Position on p 6 33 Select...

Страница 263: ...he printed sheets IMPORTANT The machine automatically selects the type of hole punch 2 or 3 holes depending on the selected paper size 2 holes LGL LTRR 3 holes 11 x17 LTR You cannot punch holes in STMTR size paper Holes cannot be punched in transparencies trac ing papers labels and 3 hole punch 5 Press the Start Print key If there is a current job or a previously reserved job the machine will star...

Страница 264: ...ank page as a print Two sided printing printing on both sides of paper when there are different sized originals for the front and back sides will result in each original being printed on one side of paper that matches its size When you want to make prints on both sides of the paper with different sized originals make sure to select the paper size you want to print on before printing 1 Specify the ...

Страница 265: ...t inserting any blank pages between the documents press the Continuous key 5 Press the Start Print key If there is a current job or a previously reserved job the machine will start printing after that job is completed See Printing Documents Stored in the Box on p 4 6 NOTE To cancel the setting press the Two sided Print ing and Cancel keys in that order To cancel the settings press the Initial Sett...

Страница 266: ...emory Col lating Memory Grouping and Booklet modes cannot be set You cannot print on front covers back covers or job separator sheets Stapling is not possible when the total number of output papers including insertion sheets exceeds 30 sheets for 11 x17 LGL LTRR size or 50 sheets for LTR size 1 Specify the desired documents following procedure below Select the desired box number then the desired d...

Страница 267: ...re and press the Next key NOTE You cannot print on front covers back covers or job separator sheets You can cancel a mode by pressing the mode key again 7 Select the paper source for each insertion sheet and press the OK key NOTE Select the same paper size for the front and back covers and the job separator sheets The display will vary depending on the mode selected E82_US book Page 70 Tuesday May...

Страница 268: ...start printing after that job is completed See Printing Documents Stored in the Box on p 4 6 NOTE To cancel the setting press the Cover Job Separa tor and Cancel keys in that order To cancel the settings press the Initial Settings key The machine returns to the standard mode of the Local Printing When you press the key the display returns to the Box selection screen Reset E82_US book Page 71 Tuesd...

Страница 269: ...nt document for use as a booklet we recommend that you scan the original with the Booklet Scanning mode beforehand See Scanning Originals for Use as a Booklet Booklet Scanning on p 4 28 1 Specify the desired document following procedure below Select the desired box number then the desired document NOTE When you select a box set with a password enter the password after selecting the box 2 Press the...

Страница 270: ... 64 g m2 to 80 g m2 The paper used for the cover page must not be heavier than 110 lb index 200 g m2 You cannot print on the cover pages When you select the Add Cover key you cannot set the paper used for the main text in the stack bypass NOTE To add a cover page press the Add Cover key Place the paper face down for the cover page in the stack bypass 11 x17 LTRR size paper can be selected When you...

Страница 271: ...er of sheets Number of load 1 5 25 sets 6 10 15 sets 11 15 10 sets Saddle Stitching will not be performed when there is only one sheet The sheet will only be folded 7 Press the Done key 8 Press the Start Print key If there is a current job or a previously reserved job the machine will start printing after that job is completed See Printing Documents Stored in the Box on p 4 6 NOTE To cancel the se...

Страница 272: ...cuments the settings for each document are cleared and prints are made with the Standard mode settings When printing is completed the settings of each docu ment return to the settings set when stored You can change the settings of the Standard mode See Setting a Standard Mode for Local Printing on p 6 21 1 Specify the desired box following procedure below Select the desired box number NOTE When yo...

Страница 273: ...rinting after that job is completed See Printing Documents Stored in the Box on p 4 6 NOTE When printing multiple documents as one docu ment name of document displayed during print will only display the first specified document name To cancel the settings press the Initial Settings key The machine returns to the standard mode of the Local Printing When you press the key the display returns to the ...

Страница 274: ...ory key is The number of printouts Two sided Print Finisher Booklet Cover Job Separator Sample Print Merge Documents and Delete After Printing Storing Print Settings 1 Specify the desired document following procedure below Select the desired box number then the desired document NOTE When you select a box set with a password enter the password after selecting the box 2 Press the Change P Settings k...

Страница 275: ...s Printing a Document Stored in a Box after Changing the Settings 4 78 4 Press the Special Features key 5 Press the Mode Memory key 6 Press the Store Erase key 7 Press the Store key E82_US book Page 78 Tuesday May 22 2001 12 11 AM ...

Страница 276: ...whether or not you want to store the new print setting is displayed To store Select the Yes key The new print set ting is stored into the memory key To cancel storing Select the No key then select another key If you selected a memory key in which a print mode has already been stored The message to confirm that you want to replace the old print setting with the new print setting is displayed To ove...

Страница 277: ...he Done key The display returns to the Print Settings screen Storing a Memory Key Name 1 Specify the desired document following procedure below Select the desired box number then the desired document NOTE When you select a box set with a password enter the password after selecting the box 2 Press the Change P Settings key MAIL BOX E82_US book Page 80 Tuesday May 22 2001 12 11 AM ...

Страница 278: ... Box after Changing the Settings 4 81 4 Using the Mail Box Functions 3 Press the Special Features key 4 Press the Mode Memory key 5 Press the Store Erase key 6 Press the Store Name key E82_US book Page 81 Tuesday May 22 2001 12 11 AM ...

Страница 279: ...ed its settings are displayed 8 Enter the new name and press the OK key NOTE For details on how to enter characters on the touch panel display see Entering Characters on the Touch Panel Display on p 10 6 The maximum number of characters you can assign for the name is 10 If you press the OK key without any characters entered the name of the memory key will revert back to its default setting e g M1 ...

Страница 280: ...desired document following procedure below Select the desired box number then the desired document NOTE When you select a box set with a password enter the password after selecting the box 2 Press the Change P Settings key 3 Press the Special Features key 4 Press the Mode Memory key MAIL BOX E82_US book Page 83 Tuesday May 22 2001 12 11 AM ...

Страница 281: ...ontents are correct press the OK key The display returns to the Special Features screen NOTE Recalling a print mode from memory cancels the current print mode After recalling a print mode from memory you can change its settings and make print If you press another memory key the print mode stored in that key is recalled 7 Press the Done key The display returns to the Print Settings screen E82_US bo...

Страница 282: ...esired document following procedure below Select the desired box number then the desired document NOTE When you select a box set with a password enter the password after selecting the box 2 Press the Change P Settings key 3 Press the Special Features key 4 Press the Mode Memory key MAIL BOX E82_US book Page 85 Tuesday May 22 2001 12 11 AM ...

Страница 283: ...PORTANT Check the print settings before you erase them NOTE The mode memory key where print settings are already stored shows a small black square in the lower right corner of the key If you selected a memory key to which a printing job has already been stored its settings are dis played If there are more stored print modes than currently displayed you can scroll the list using the or keys E82_US ...

Страница 284: ... The name of the memory key is not erased For details on how to change the name see Storing a Memory Key Name on p 4 80 If you want to cancel erasing select the No key The message Erased is displayed for about two seconds on the touch panel display 9 Press the Cancel key The display returns to the Special Features screen 10Press the Done key The display returns to the Print Settings screen E82_US ...

Страница 285: ...the Merge Documents mode NOTE You can make a sample print even when the number of print sets is one 1 Specify the desired document following procedure below Select the desired box number then the desired document NOTE When you select a box set with a password enter the password after selecting the box 2 Press the Sample Print key and press the Start Print key Sample set printing starts and one pri...

Страница 286: ... returns to the standard mode of the Local Printing 4 Press the Start Print key If there is a current job or a previously reserved job the machine will start printing after that job is completed See Printing Documents Stored in the Box on p 4 6 NOTE When you want to check the changed settings press the Sample Print key again When selecting one document and printing without changing the settings Wh...

Страница 287: ...e desired box number Select the desired document NOTE When you select a box set with a password enter the password after selecting the box When you select multiple documents and press the Details key only the details of the selected high lighted document are displayed 2 Press the Details key 3 Check the detailed information and press the Done key Repeat this until the Box selection screen appears ...

Страница 288: ...ect multiple documents and press the Details key only the details of the selected high lighted document are displayed 2 Press the Details key 3 Press the Change document name key 4 Enter the document name that you want to change and press the OK key NOTE For details on how to enter the characters see Entering Characters on the Touch Panel Display on p 10 6 The maximum number of characters you can ...

Страница 289: ...4 Using the Mail Box Functions Changing the Name of a Document 4 92 5 Press the Done key Repeat this until the Box selection screen appears again E82_US book Page 92 Tuesday May 22 2001 12 11 AM ...

Страница 290: ...the desired document NOTE When you select a box set with a password enter the password after selecting the box If you press the Select All key you can select all documents in a box The key changes to the Clear Selection key 2 Press the Move Document key 3 Specify the box to which you want to move the document NOTE You cannot move a document to multiple boxes MAIL BOX E82_US book Page 93 Tuesday Ma...

Страница 291: ... message telling you that you cannot move the document will be displayed If a document cannot be moved it will remain in the original box If an error occurs while moving multiple documents the number of documents which have been moved is displayed 5 Press the Done key The display returns to the Box selection screen E82_US book Page 94 Tuesday May 22 2001 12 11 AM ...

Страница 292: ...TE When you select a box set with a password enter the password after selecting the box If you press the Select All key you can select all documents in a box The key changes to the Clear Selection key 2 Press the Erase key 3 Check the document and press the Yes key NOTE If you do not want to erase the document press the No key 4 Press the Done key The display returns to the Box selection screen MA...

Страница 293: ...E82_US book Page 96 Tuesday May 22 2001 12 11 AM ...

Страница 294: ...ing Up Auto Print 5 6 Reserving the Next Job during Printing 5 7 Reserving a Copy Operation during Printing Reserve Copy 5 7 Reserving a Box Print while Printing Reserve Print 5 9 Using the Stack Bypass while Reserving Print Jobs 5 10 Checking and Changing Printing Status 5 13 Checking Detailed Information for Printing Documents 5 13 Canceling Printing 5 15 Priority Printing 5 16 Operating Print J...

Страница 295: ...t and Dark keys to the left to make the exposure lighter or to the right to make the exposure darker When printing is completed the display returns to the Basic Features screen if the last used function was the Copy function or to the Box selection screen if it was the Mail Box function NOTE Adjusting the exposure after printing has started will produce a different result from the result before sc...

Страница 296: ...being scanned into memory or into a box 1 Press the key The key remains constantly lit NOTE When you want to copy after changing the Department ID while the Department ID Man agement is enabled press the key and enter the Department ID and Password See Entering the Department ID and Password on p 10 4 Even when you press the key the job currently being output will not be interrupted until the inte...

Страница 297: ...ashing 4 Once the original is scanned remove it from the machine IMPORTANT When the interrupt copy job is completed the inter rupted printing operation restarts If you want to continue the interrupt copy wait until the current interrupt copy job is completed end of printing 3 6 9 C Start Stop Clear Start Interrupt E82_US book Page 4 Tuesday May 22 2001 12 11 AM ...

Страница 298: ...ubleshooting job Making a Copy Reservation while the Machine is Warming Up Auto Start 1 Place your originals and select the desired copy mode NOTE While the machine is warming up you can reserve up to five copy jobs including the currently scan ning original However an interrupt copy job is not counted You can set a different mode for each job 2 Press the key The message Scanning appears on the di...

Страница 299: ...e desired document NOTE When you select a box set with a password enter the password after selecting the box 2 To print without changing the settings press the Start Print key If you want to change set tings before making a print press the Change P Settings key and set the desired mode then press the Start Print key NOTE To make a sample print press the Sample Print key See Checking the Print Resu...

Страница 300: ... copy jobs are not counted You can set a different mode for each job Reserving a Copy Operation during Printing Reserve Copy IMPORTANT When reserving a copy job while the user restrictions are enabled with the control card do not remove that control card after that job is completed If you remove the control card during printing the job reserva tion will be canceled 1 Press the Done key on the righ...

Страница 301: ...Printing 5 8 3 Press the key and start scanning origi nals NOTE If the screen on the right appears press the OK key and repeat the operation after the current job is completed 3 6 9 C Start Stop Clear Start E82_US book Page 8 Tuesday May 22 2001 12 11 AM ...

Страница 302: ...ith the procedure below Select the desired box number then the desired document NOTE When you select a box set with a password enter the password after selecting the box If the Box selection screen appears after step 1 specify the desired box number To print without changing the settings press the Start Print key If you want to change settings before making a print press the Change P Settings key ...

Страница 303: ...you can designate the paper size by pulling it out and re inserting it NOTE When Standard Stack Bypass Settings is set to On and the Stack Bypass key is selected the paper stored in the standard settings is displayed See Setting the Standard Paper for the Stack bypass on p 6 19 2 Select the paper size and press the Next key NOTE To select A or B series paper size press the A B size key When storin...

Страница 304: ... are displayed as shown in the screen on the right 4 Press the Done key Finish the reserved print settings 5 Press the key NOTE When reserving jobs of the Mail Box function press the Start Print key Paper size loaded presently Paper size selected 3 6 9 C Start Stop Clear Start E82_US book Page 11 Tuesday May 22 2001 12 11 AM ...

Страница 305: ... comes to print NOTE The specified paper size is displayed when its turn comes to print 7 Select the paper size and press the Next key NOTE To select A or B series paper size press the A B size key 8 Select the paper type and press the OK key The machine starts printing E82_US book Page 12 Tuesday May 22 2001 12 11 AM ...

Страница 306: ...tc using the System Monitor screen Checking Detailed Information for Printing Documents 1 Press the System Monitor key 2 Select the Copy or Print key NOTE When checking the print status for copy jobs press the Copy key When checking the print status for all jobs press the Print key 3 Select the Status key System Monitor E82_US book Page 13 Tuesday May 22 2001 12 11 AM ...

Страница 307: ...f each icon displayed in the screen is as follows Operating Waiting Error Paused Canceling Secured job Copy job Mail Box job Printer job Report job 5 Check the detailed information and press the Done key Repeating this operation returns the display to the Basic Features screen Details of a Copy document Details of a Box document E82_US book Page 14 Tuesday May 22 2001 12 11 AM ...

Страница 308: ...ey NOTE When checking the print status for copy jobs press the Copy key When checking the print status for all jobs press the Print key 3 Select the Status key 4 Select the document to be canceled and press the Cancel key NOTE You cannot select multiple documents and cancel them all in one action E82_US book Page 15 Tuesday May 22 2001 12 11 AM ...

Страница 309: ...ayed as NG on the Print Log screen 6 Press the Done key Repeating this operation returns the display to the Basic Features screen Priority Printing NOTE When you set the priority printing the machine starts printing it after the currently printing document is completed 1 Press the System Monitor key Priority Printing E82_US book Page 16 Tuesday May 22 2001 12 11 AM ...

Страница 310: ...ng Efficiently 2 Press the Print key 3 Select the Status key 4 Select the document for priority printing and press the Print Next key 5 Press the Done key The display returns to the Basic Features screen E82_US book Page 17 Tuesday May 22 2001 12 11 AM ...

Страница 311: ...perating Print Jobs Sent from a Computer You can temporarily stop the print job sent from a computer or skip an error when a print error occurs 1 Press the System Monitor key 2 Press the Print key 3 Select the Status key E82_US book Page 18 Tuesday May 22 2001 12 11 AM ...

Страница 312: ...key printing restarts You can continue the print job even when a print error occurred by pressing the Auto Continue key depending on the type of error However the print output may not be the same as expected When printing is canceled from the computer or when the data is less than the volume of one page that job may not be correctly performed When you press the Form Feed key you can force the prin...

Страница 313: ...number To print these documents you need to enter a password which prevents other people who do not know the password from observing the contents IMPORTANT If the main power is turned OFF the secured documents are erased The secured document will be erased after the printing is completed You cannot change the settings of the secured document 1 Press the System Monitor key 2 Press the Print key 3 S...

Страница 314: ...PORTANT Enter the same password set in the operation from the computer The machine becomes ready to print the document NOTE To cancel the printing press the Cancel key Checking and Canceling Spool Status When print data is sent to this machine from a computer the machine will process the input output data after temporarily storing it NOTE Spool Status will be displayed only when the printer functi...

Страница 315: ...ciently Checking and Changing Printing Status 5 22 2 Press the Print key 3 Select the Spool Status key 4 Press the key When you cancel spool job Select the Status key E82_Chap05 US Page 22 Tuesday May 29 2001 4 04 PM ...

Страница 316: ...and press the Cancel key Press the Yes key NOTE To cancel the cancellation press the No key When you check the detailed information Select the Status or Log key Select the document you want to check the detailed information for and press the Details key E82_US book Page 23 Tuesday May 22 2001 12 11 AM ...

Страница 317: ...king and Changing Printing Status 5 24 5 Check the detailed information and press the Done key The display return to the Basic Features screen Details of a status Details of a log E82_US book Page 24 Tuesday May 22 2001 12 11 AM ...

Страница 318: ...g Printing Status 5 25 5 Printing Efficiently Checking the Printing History 1 Press the System Monitor key 2 Press the Print key 3 Press the Log key 4 Press the Job Type key E82_US book Page 25 Tuesday May 22 2001 12 11 AM ...

Страница 319: ...e display returns to the Basic Features screen NOTE When the document has been printed correctly OK is shown NG is shown for documents of which printing has been canceled In the Log the printing job history of up to 40 docu ments can be displayed When you select the Details key The screen on the right appears Check the detailed information and press the Done key Repeat this until the Basic Feature...

Страница 320: ...System Monitor key 2 Select the Device key 3 After checking the device status press the Done key The display returns to the Basic Features screen NOTE The Paper Jams Staple Loading Staple Jams Adding Toner or Punch Waste key appears below the Recovery Steps depending on each status When you press each key the display shows how to remove the jammed paper how to add toner etc Device Sta tus E82_US b...

Страница 321: ...5 Printing Efficiently Checking and Changing Printing Status 5 28 E82_US book Page 28 Tuesday May 22 2001 12 11 AM ...

Страница 322: ...d Paper for the Stack bypass 6 19 Setting a Standard Mode for Local Printing 6 21 Returning the Common Settings to Their Defaults 6 23 Setting the Timer Timer Settings 6 24 Setting the Current Date and Time 6 24 Setting the Time to Initiate Auto Sleep after Finishing Operations 6 26 Setting the Time Taken for Display to Return to Basic Screen after Finishing Operations 6 27 Setting the Time Taken ...

Страница 323: ...ting Storing the Box 6 46 Initializing a Box 6 49 Setting the Photo Mode of the Mail Box Function 6 51 Setting the Standard mode for Scanning 6 52 Setting Specifications of the System Management ID System Settings 6 55 Setting Changing the System Manager ID and Password 6 55 Setting the Department ID Management 6 58 Setting Device Information 6 72 Erasing a Message Board 6 73 Setting the Auto Offl...

Страница 324: ...ey Wake Up Energy Consumption in Sleep Mode LTRR STMT Original Selection Tray Designation Printing Priority Standard Stack Bypass Settings Copy Mail Box Set System Monitor Screen as initial function On Off Set Device as the default for System Monitor On Off Initial Function Selected Function Entry Tone Error Tone Job Done Tone All On Off On Off Copy Printer Mail Box Other Stack bypass On Off Drawe...

Страница 325: ...s On Off 10 15 20 30 40 50 min 1 hour 90 min 2 3 4 hours 0 no setting 1 to 9 min 2 min 0 no setting 1 to 9 min 1 min Sunday to Saturday 00 00 to 23 59 in one minute increments 10 15 20 30 40 50 min 1 hour 90 min 2 3 4 hours X Y 0 1 0 to 1 0 in 0 1 increments Press the Start key 2 0 mm to 2 0 mm 0 mm in 0 25 mm increments 9 Steps 5 Press the Start key Press the Start key p 6 21 p 6 23 p 6 24 p 6 26...

Страница 326: ...haracters max Comment 32 characters max Department ID Management On Off Store Dept ID Password Print Totals Accept Jobs with unknown ID On Off Device Name 32 characters Location 32 characters Erase On Off Print p 6 35 p 6 37 p 6 38 p 6 39 p 6 40 p 6 41 p 6 42 p 6 45 p 6 46 p 6 51 p 6 52 p 6 55 p 6 58 p 6 72 p 6 73 p 6 74 p 6 75 Copy Settings Standard Key 1 2 Settings Auto Collate Image Orientation...

Страница 327: ...ff Set Device as the default for System Monitor On 1 Call up the desired screen as follows 2 Select the Copy or Mail Box key and press the OK key When you select the Copy key The Copy Basic Features screen is displayed when the main power is turned ON or after Auto Clear When you select the Mail Box key The Mail Box selection screen is displayed when the main power is turned ON or after Auto Clear...

Страница 328: ...tial Function or Selected Func tion key and press the OK key When you select the Initial Function key The screen set under Initial Function is dis played after Auto Clear has taken place For example if Copy is set under Initial Function and Auto Clear takes place after setting the Mail Box function the display returns to the Copy Basic Features screen When you select the Selected Function key The ...

Страница 329: ...l or keys in the touch panel display Error Tone When a malfunction occurs e g paper jam or operational error Job Done Tone After the last copy has been made e g outputting or stapling is completed NOTE The default setting is On for all tones 1 Call up the desired screen as follows 2 Select the On or Off keys for Entry Tone Error Tone and Job Done Tone and press the OK key 3 Press the Done key Repe...

Страница 330: ...can display the keys for entering values in inches in the numeric entry screen NOTE The default setting is On 1 Call up the desired screen as follows 2 Select the On or Off key and press the OK key 3 Press the Done key Repeat this until the Basic Features screen appears again Inch Entry key Additional Functions E82_US book Page 9 Tuesday May 22 2001 12 11 AM ...

Страница 331: ...s the appropriate paper size paper drawer for the size of the original and the set ratio Auto Drawer Switching ADS If a paper drawer runs out of paper during a continuous printing job the machine automatically selects another paper drawer with the same paper size and begins feeding paper from that paper drawer The default settings are Off for the stack bypass and On for the paper drawers 1 to 4 1 ...

Страница 332: ...aper runs out during printing unless other loaded papers suit the size and stored type For details of stored paper types see Identifying the Type of Paper in a Paper Drawer on p 6 12 If you set the Consider Paper Type key to Off paper will be fed from another paper drawer when paper runs out during printing if the same paper size is loaded in that paper drawer When you select the Printer key the S...

Страница 333: ...t the paper drawer for which you want to store the paper type 3 Select the paper type loaded in the paper drawer and press the OK key NOTE Load the same type of paper as set in each paper drawer For details of paper types see Available Paper Stock on p 1 17 The number of each paper drawer indicates the fol lowing places Store Paper Type key Additional Functions Paper Drawer 1 Paper Drawer 2 Paper ...

Страница 334: ...ting and Adjusting Common Settings to Suit Your Needs 4 Press the Done key Repeat this until the Basic Features screen appears again NOTE The paper types stored here are displayed when selecting paper in each mode as shown on the right E82_US book Page 13 Tuesday May 22 2001 12 11 AM ...

Страница 335: ...K key NOTE The approximate energy savings figures for each mode and the approximate delay times from power ON to ready to print status are listed below 10 mode 10 less power approx 50 sec 25 mode 25 less power approx 90 sec 50 mode 50 less power approx 180 sec None 2 less power approx 0 sec The figures in parenthesis show the approxi mate time it takes for the machine to return to the ready to pri...

Страница 336: ... Setting the Energy Consumption in the Sleep Mode You can set the amount of energy consumption when the machine is in the Sleep mode NOTE In the following cases the energy consumption when the machine enters the Sleep mode will be High regardless of this setting For details such as setting each function see the Network Guide or the Printer Guide Function Key Wake Up ON TCP IP Settings IP Address D...

Страница 337: ...lt setting is Use LTRR Format 1 Call up the desired screen as follows 2 Select the Distinguish Manually Use LTRR Format or Use STMT Format key and press the OK key When you select the Distinguish Manually key If you place LTRR or STMT size original on the platen glass a display to select the original size appears when scanning When you select the Use LTRR Format key If you place LTRR or STMT size ...

Страница 338: ...the supplied labels to the trays for identifying their respective use Blank labels are also provided which you can fill out yourself 1 Call up the desired screen as follows 2 Select the functions of dedicated output trays A and B and press the OK key NOTE You can select the Printer key only when the net work printer function is enabled Prints of the Mail Box and Report are output as Other When the...

Страница 339: ... However if the current job is paused printing of the job from a function with higher priority may be started depending on the settings set 1 Call up the desired screen as follows 2 Select the printing priority and press the OK key Setting 1 sets the highest printing priority NOTE You can select the Printer key only when the net work printer function is enabled Prints of the Mail Box and Report ar...

Страница 340: ...ce for the Copy and Mail Box functions you must select the stack bypass as the Auto Paper Drawer Selection 1 Call up the desired screen as follows 2 Select the On or Off key NOTE When you select the On key the mode returns to the stored standard paper mode when you press the key or after Auto Clear has taken place When you select the Off key Proceed to step 3 When you select the On key Press the S...

Страница 341: ...ting Specifications that are Common to Each Function Common Settings 6 20 Select the paper type and press the OK key 3 Press the OK key 4 Press the Done key Repeat this until the Basic Features screen appears again E82_US book Page 20 Tuesday May 22 2001 12 11 AM ...

Страница 342: ...inisher Do not Collate Collate Offset Collate Group Offset Group Staple Corner TopLeft BtmLeft TopRight BtmRight Double Left Right With the Finisher Puncher Unit B1 Do not Collate Collate Offset Collate Group Offset Group Staple Corner TopLeft BtmLeft TopRight BtmRight Double Left Right Hole Punch With the Copy Tray C3 Do not Collate Collate Rotate Collate Group Rotate Group Two sided Print On Off...

Страница 343: ...r Set the type of collating Two sided Print Set whether or not to perform two sided print ing Erase Document After Printing Set whether or not to erase the document after printing Merge Documents Set whether or not to merge documents when you select multiple documents 3 Once you have completed all settings press the Done key 4 Press the Done key Repeat this until the Basic Features screen appears ...

Страница 344: ... you to return the common settings to their defaults initial settings 1 Call up the desired screen as follows 2 Select the Yes key NOTE To cancel initialization select the No key This screen is displayed for about two seconds 3 Press the Done key Repeat this until the Basic Features screen appears again Initialize Common Settings Additional Functions key E82_US book Page 23 Tuesday May 22 2001 12 ...

Страница 345: ... Numeric keys and press the OK key NOTE Enter the date as four digits without a space Example March 25 0325 Enter all the four digits for the year Enter the time in 24 hour notation as four digits without a space Example 7 05 a m 0705 11 18 p m 2318 If you make a mistake when entering values press the key and enter the values again starting with the year When setting the Time Zone Settings Press t...

Страница 346: ...eys to set the time Set the month week day time to start and end the Daylight Saving Time settings and press the OK key NOTE You can set the time from 0 23 in 1 hour incre ments The default setting is Off When you set the Daylight Saving Time the machine automatically sets the standard time of the machine one hour forward 3 Press the Done key Repeat this until the Basic Features screen appears aga...

Страница 347: ...s OFF to save power The machine then enters the Sleep mode NOTE The default setting is 1 hour 1 Call up the desired screen as follows 2 Enter the desired Auto Sleep Time with the or key and press the OK key The Auto Sleep Time settings are 10 15 20 30 40 50 minutes 1 hour 90 minutes and 2 to 4 hours in one hour increments 3 Press the Done key Repeat this until the Basic Features screen appears aga...

Страница 348: ...me Auto Clear Time can be set from 1 to 9 minutes in one minute increments Auto Clear Time can also be set to Off NOTE The default setting is 2 minutes When 0 is set Auto Clear function is not set 1 Call up the desired screen as follows 2 Enter the desired time period with the Numeric keys or and keys and press the OK key The Auto Clear Time settings are from 0 to 9 minutes in one minute increment...

Страница 349: ...the amount of time that must elapse prior to entering the Quiet mode NOTE The default setting is 1 minute When 0 is set the Quiet mode is not set 1 Call up the desired screen as follows 2 Enter the desired time period with the Numeric keys or and keys and press the OK key The Quiet mode settings are from 0 to 9 minutes in one minute increments 3 Press the Done key Repeat this until the Basic Featu...

Страница 350: ...er are both set Auto Clear Time has priority 1 Call up the desired screen as follows 2 Select the day of the week enter the time with the Numeric keys and press the OK key NOTE Enter the time in 24 hour notation as four digits without a space Example 7 05 a m 0705 11 18 p m 2318 If you make a mistake when entering the time choose the day of the week again then enter a four digit number If you do n...

Страница 351: ...u can easily change the time for the machine to enter the Low Power mode NOTE The default setting is 15 minutes 1 Call up the desired screen as follows 2 Select the Low Power Mode Time by pressing the or key and press the OK key The Low Power Mode Time settings are 10 15 20 30 40 50 minutes 1 hour 90 minutes and 2 to 4 hours in one hour increments 3 Press the Done key Repeat this until the Basic F...

Страница 352: ...Image Occur When you print a copy or a document in a box if a slight difference occurs between the size of the original image and the size of the print image you can perform fine adjustment so as to reduce this error 1 Call up the desired screen as follows 2 Press the or key to adjust the percent age and press the OK key The adjustment range for both the X left right direction and the Y up down di...

Страница 353: ...mediately available for the next job IMPORTANT This function cannot be set when the Saddle Finisher F2 is not attached NOTE The required paper is fed automatically The following paper sizes can be used for this function 11 x17 LTRR 1 Call up the desired screen as follows 2 Press the Start key NOTE To cancel the staple repositioning press the Can cel key 3 Press the Done key Repeat this until the B...

Страница 354: ...all up the desired screen as follows 2 Select the paper size for which you want to change the saddle stitch position NOTE Some of the paper sizes displayed may not be available in certain countries 3 Use the and keys to adjust the saddle stitch position and press the OK key The setting range is from 2 0 mm to 2 0 mm in 0 25 mm increments 4 Press the Done key Repeat this until the Basic Features sc...

Страница 355: ... between the image in the original and the print occur when printing an original free from smudges or dirty marks with the exposure scale set in the middle NOTE The default setting is 5 1 Call up the desired screen as follows 2 Press the Light or Dark keys to adjust the exposure and press the OK key 3 Press the Done key Repeat this until the Basic Features screen appears again key Additional Funct...

Страница 356: ...yed in this manual Setting Standard Keys You can store up to two Standard keys from the Copy Ratio Finisher and Two sided Mode keys on the Basic Features screen the keys in the Special Features screen or the memory keys containing copy jobs stored in the Mode Memory 1 Call up the desired screen as follows 2 Press the or key and press the group of the function that you want to store as your favorit...

Страница 357: ...y Function Copy Settings 6 36 4 Press the Done key Repeat this until the Basic Features screen appears again Example Standard keys 1 and 2 are displayed in the touch panel display as shown on the right Selected mode Standard key 1 Standard key 2 E82_US book Page 36 Tuesday May 22 2001 12 11 AM ...

Страница 358: ...the user does not need to remember to select the Finisher mode NOTE When Auto Collate is set to On with the Finisher option attached the Offset Collate mode will be set Without any output option attached the Collate mode will be set The default setting is On 1 Call up the desired screen as follows 2 Select the On or Off key and press the OK key 3 Press the Done key Repeat this until the Basic Feat...

Страница 359: ... can set whether or not to copy the image in the same direction as the original NOTE The default setting is Off When the Image Orientation Priority is On the first copy time will take longer 1 Call up the desired screen as follows 2 Select the On or Off key and press the OK key 3 Press the Done key Repeat this until the Basic Features screen appears again Image Orientation Priority key Additional ...

Страница 360: ... not displayed for some copy modes NOTE The default setting is Off The job duration time is not displayed for the Transparency Interleaving Cover Sheet Insertion Different Size Originals Rotate Collating and Rotate Grouping modes or when the copy waiting time is less than one minute 1 Call up the desired screen as follows 2 Select the On or Off key and press the OK key 3 Press the Done key Repeat ...

Страница 361: ...p the desired screen as follows 2 Select the On or Off key and press the OK key NOTE Only standard size originals up to LTR for direct zoom ratio can be rotated The Auto Orientation will not be performed when you set Enlarging When Automatic Paper Selection is selected the paper matching the width will be displayed as the optimum size if there is no paper with the optimum length 3 Press the Done k...

Страница 362: ...e Copy function When the Photo Mode is On you can select the Printed Img and Photo keys when making copies with the image quality setting NOTE The default setting is Off 1 Call up the desired screen as follows 2 Select the On or Off key and press the OK key 3 Press the Done key Repeat this until the Basic Features screen appears again Photo Mode key Additional Functions E82_US book Page 41 Tuesday...

Страница 363: ...Standard Settings can also be returned to their default settings NOTE The default settings are as follows Copy quantity 1 Paper selection Automatic Paper Selection Exposure Image quality A Copy Ratio Direct 100 Copy function 1 1 sided copy Storing the Standard Settings for Copying NOTE To change the Standard Settings Copy settings must already have been stored as the Standard Settings beforehand S...

Страница 364: ... to display copy modes that do not fit in the display area To cancel storing the currently displayed settings as the Standard Settings press the No key The display returns to the screen in step 2 This screen is displayed for about two seconds 4 Press the Done key Repeat this until the Basic Features screen appears again Initializing the Standard Settings 1 Call up the desired screen as follows 2 P...

Страница 365: ...etting and press the Yes key The Standard Settings are initialized NOTE To cancel the initialization press the No key The display returns to the screen in step 2 This screen is displayed for about two seconds 4 Press the Done key Repeat this until the Basic Features screen appears again E82_US book Page 44 Tuesday May 22 2001 12 11 AM ...

Страница 366: ...their default settings 1 Call up the desired screen as follows 2 Press the Yes key Proceed to step 3 NOTE To cancel the initialization of copy settings press the No key The display returns to Copy Setting screen This screen is displayed for about two seconds 3 Press the Done key Repeat this until the Basic Features screen appears again Initialize Copy Settings key Additional Functions E82_US book ...

Страница 367: ... 100 items Box number 00 to 99 1 Call up the desired screen as follows 2 Press the desired box number NOTE When entering the box number using the Numeric keys press the OK key after entering the box number 3 Enter the password and press the OK key NOTE Enter the password stored under Box Set Store setting This step is not required when setting the box for the first time or if a password is not sto...

Страница 368: ... Enter the password with the Numeric keys IMPORTANT Since there is no way to check the password stored please record the password you stored and keep it separately NOTE If no password is stored proceed to step 7 You can delete the number you entered by pressing the key To cancel storing press the Cancel key 7 Set the amount of time to elapse before received documents are automatically deleted by p...

Страница 369: ...s to Suit Your Needs Setting Specifications of the Mail Box Function Mail Box Settings 6 48 8 Press the Done key 9 Press the Done key Repeat this until the Basic Features screen appears again E82_US book Page 48 Tuesday May 22 2001 12 11 AM ...

Страница 370: ...follows 2 Select the box that you want to initialize NOTE When entering the box number using the Numeric keys press the OK key after entering the box number 3 Enter the password and press the OK key NOTE Enter the password used when the box was stored See Setting Storing the Box on p 6 46 If a password is not stored this operation is not required 4 Press the Initialize key key Additional Functions...

Страница 371: ...the Mail Box Function Mail Box Settings 6 50 5 Press the Yes key The box is initialized NOTE To cancel the initialization press the No key 6 Press the Done key 7 Press the Done key Repeat this until the Basic Features screen appears again E82_US book Page 50 Tuesday May 22 2001 12 11 AM ...

Страница 372: ...ode in the Mail Box Function When the Photo Mode is On you can select the Printed Img and Photo keys when scanning documents with the image quality setting NOTE The default setting is Off 1 Call up the desired screen as follows 2 Select the On or Off key and press the OK key 3 Press the Done key Repeat this until the Basic Features screen appears again key Additional Functions E82_US book Page 51 ...

Страница 373: ... change the Standard Settings Scan settings must already have been stored as the Standard Settings beforehand See Storing Originals in the Box on p 4 3 1 Call up the desired screen as follows 2 Press the Store key 3 Press the Yes key The settings currently displayed are stored NOTE The settings displayed here are the currently set scan settings Press the or key to display the scan modes that do no...

Страница 374: ...s until the Basic Features screen appears again Initializing the Standard mode for Scanning 1 Call up the desired screen as follows 2 Select the Initialize key 3 Check the settings and press the Yes key The Standard Settings are initialized NOTE To cancel the initialization press the No key The display returns to the screen in step 2 key Additional Functions E82_US book Page 53 Tuesday May 22 2001...

Страница 375: ...r Needs Setting Specifications of the Mail Box Function Mail Box Settings 6 54 This screen is displayed for about two seconds 4 Press the Done key Repeat this until the Basic Features screen appears again E82_US book Page 54 Tuesday May 22 2001 12 11 AM ...

Страница 376: ...on how to enter the characters see Entering Characters on the Touch Panel Display on p 10 6 The maximum number of characters you can assign for a name contact and comment is 32 and for a E mail address is 64 The maximum number of numbers you can store for the System Manager ID and Password is seven If you store them with less than seven digits the machine stores them as follows Example When 321 is...

Страница 377: ...cel storing press the Cancel key 4 Press the System Password key and enter the number within seven digits with the Numeric keys as the new System Password Then press the Next key NOTE You cannot store a System Password with only the number 0 such as 0000000 Press the Next key when not setting the System Password To erase the entered character number press the key To cancel storing press the Cancel...

Страница 378: ...ting Common Settings to Suit Your Needs 7 Press the Comment key then enter a com ment for the system manager 8 Once you have completed all settings press the OK key 9 Press the Done key Repeat this until the Basic Features screen appears again E82_US book Page 57 Tuesday May 22 2001 12 11 AM ...

Страница 379: ...y manage the Department ID When the Card Reader C1 is attached you do not need to store a password but you can change the password NOTE The default setting is Off The maximum number of numbers you can store for the Department ID and Password is seven If you store them with less than seven digits the machine stores them as follows Example When 321 is entered 0000321 is stored Storing the Department...

Страница 380: ...th the Numeric keys NOTE You cannot store a Password with only the number 0 such as 0000000 When a password is not stored you can use this machine by entering only the Department ID 6 Press the Impression Limit key and enter the impression limit with the Numeric keys NOTE Impression limits can be set from 0 to 999 999 Printing pages in excess of this limit is not permit ted Impression limits apply...

Страница 381: ...he print restrictions the Impression Limit needs to be specified in step 6 It is not possible to enable and disable Limit Impressions for individual departments 9 Press the OK key NOTE When you select the On key Department ID Man agement is enabled See Entering the Depart ment ID and Password on p 10 4 10Press the Done key Repeat this until the screen on the right appears For details on how to ent...

Страница 382: ...en press the key Set the Control Card when the Card Reader C1 option is attached before proceeding to step 1 See Inserting the Control Card on p 10 2 2 Press the On key and press the Store Dept ID Password key NOTE You do not need to operate the On Off key when the Card Reader C1 is attached Press the Store Dept ID Password key when the Card Reader C1 is attached 3 Use the and keys to display the ...

Страница 383: ...OTE You cannot store a password with only the number 0 such as 0000000 5 Press the Impression Limit key and enter the impression limit with the Numeric keys Then press the OK key 6 Press the Done key When the Card Reader C1 option is attached you can display the number of restricted sides on the basic features screen by pressing Display Imp Limit 0 9 0 9 E82_US book Page 62 Tuesday May 22 2001 12 ...

Страница 384: ...ils on how to enter the Department ID and Password see Entering the Department ID and Password on p 10 4 Erasing the Department ID and Password IMPORTANT You cannot erase the Department ID when the Card Reader C1 is attached 1 Call up the desired screen as follows NOTE When the System Manager ID Password is set enter the System Manager ID and System Password after pressing the System Settings key ...

Страница 385: ...u want to erase Then select the Department and press the Erase key 4 Press the Yes key The Department ID and Password are erased NOTE To cancel erasing press the No key 5 Press the Done key 6 Press the OK key NOTE When you select the On key Department ID Man agement is enabled See Entering the Depart ment ID and Password on p 10 4 E82_US book Page 64 Tuesday May 22 2001 12 11 AM ...

Страница 386: ...was used by each department 1 Call up the desired screen as follows NOTE When the System Manager ID Password is set enter the System Manager ID and System Password after pressing the System Settings key Then press the key Set the Control Card when the Card Reader C1 option is attached before proceeding to step 1 See Inserting the Control Card on p 10 2 2 Select the On key and press the PrintTotals...

Страница 387: ...ent with a stored Department ID unknown ID When only checking the counter Press the or key to display the desired Department and check the print totals When printing the displayed list Press the Print List key The screen shown at right appears Press the Yes key NOTE If you do not want to print press the No key The screen on the right appears during printing NOTE To cancel printing press the Cancel...

Страница 388: ... OK key NOTE When you select the On key Department ID Man agement is enabled See Entering the Depart ment ID and Password on p 10 4 6 Press the Done key Repeat this until the screen on the right appears For details on how to enter the Department ID and Password see Entering the Department ID and Password on p 10 4 E82_US book Page 67 Tuesday May 22 2001 12 11 AM ...

Страница 389: ...he System Manager ID and System Password after pressing the System Settings key Then press the key Set the Control Card when the Card Reader C1 option is attached before proceeding to step 1 See Inserting the Control Card on p 10 2 2 Select the On key and press the PrintTotals key NOTE You do not need to operate the On Off key when the Card Reader C1 is attached Press the Print Totals key when the...

Страница 390: ...by Department Select the Department you want to erase then press the Clear key When Erasing All Counts Press the Clear All Totals key 4 Select the Yes key NOTE If you do not want to erase the counter press the No key The message Erased is displayed in the touch panel display for about two seconds E82_US book Page 69 Tuesday May 22 2001 12 11 AM ...

Страница 391: ... OK key NOTE When you select the On key Department ID Man agement is enabled See Entering the Depart ment ID and Password on p 10 4 7 Press the Done key Repeat this until the screen on the right appears For details on how to enter the Department ID and Password see Entering the Department ID and Password on p 10 4 E82_US book Page 70 Tuesday May 22 2001 12 11 AM ...

Страница 392: ...er the System Manager ID and System Password after pressing the System Settings key Then press the key Set the Control Card when the Card Reader C1 option is attached before proceeding to step 1 See Inserting the Control Card on p 10 2 2 Select the On key NOTE When you select the On key Department ID Man agement is enabled See Entering the Depart ment ID and Password on p 10 4 You do not need to o...

Страница 393: ...em Manager ID Password is set enter the System Manager ID and System Password after pressing the System Settings key Then press the key 2 Press the Device Name and Location keys then enter the name of this machine and the location where this machine is placed Then press the OK key NOTE For details on how to enter the characters see Entering Characters on the Touch Panel Display on p 10 6 The maxim...

Страница 394: ...message board is only displayed when the network printer function is enabled 1 Call up the desired screen as follows NOTE When the System Manager ID Password is set enter the System Manager ID and System Password after pressing the System Settings key Then press the key 2 Select the Yes or No key When you select the Yes key The message is not displayed When you select the No key The message remain...

Страница 395: ...ault setting is Off 1 Call up the desired screen as follows NOTE When the System Manager ID Password is set enter the System Manager ID and System Password after pressing the System Settings key Then press the key 2 Select the On or Off key and press the OK key NOTE If Auto Offline is set to ON the machine automati cally goes offline with time set by Auto Clear If Auto Clear Time is set to None 0 ...

Страница 396: ...k printer function is enabled 1 Call up the desired screen as follows 2 Press the Yes key NOTE When you do not want to print press the No key The screen on the right appears during the report printing NOTE To cancel the report print press the Cancel key To close the screen press the Done key 3 Press the Done key Repeat this until the Basic Features screen appears again Report Settings User s Data ...

Страница 397: ...6 Setting and Adjusting Common Settings to Suit Your Needs Printing the Report 6 76 E82_US book Page 76 Tuesday May 22 2001 12 11 AM ...

Страница 398: ...s how to load paper and add toner Loading Paper 7 2 Loading Paper in the Paper Drawers 7 2 Adjusting a Paper Drawer to Hold a Different Paper Size 7 6 Adding Toner 7 8 Consumables and Options 7 12 Consumables 7 12 Options 7 13 7 C H A P T E R E82_US book Page 1 Tuesday May 22 2001 12 11 AM ...

Страница 399: ...paper during printing the display prompting you to load paper appears CAUTION When loading paper take care not to cut your hands on the edges of the paper IMPORTANT The message will also appear if the selected paper drawer is not fully inserted into the machine Prop erly insert the paper drawer NOTE You can check the amount of paper remaining in the paper drawer by looking at the remaining paper q...

Страница 400: ...he paper drawer in which you want to load paper 2 Grip the handle and pull out the paper drawer until it stops NOTE If the drawer seems to be stuck halfway do not pull it out by force Push it back into the copier and then try pressing the release button and pulling it out again E82_US book Page 3 Tuesday May 22 2001 12 11 AM ...

Страница 401: ... and 4 hold up to about 550 sheets of paper each 20 lb bond 80 g m2 For high quality prints we recommend using paper recommended by Canon 4 Turn the paper stack over and place it in the paper drawer Even out the edges of the paper stack Load the paper stack against the right wall of the paper drawer IMPORTANT If the paper is curled curl it down before placing it in the paper drawer Make sure that ...

Страница 402: ...ot to get your fingers caught as this may result in personal injury IMPORTANT Never place paper or any other items in the open part of the paper drawer next to the paper stack Doing so may cause paper jams NOTE When paper runs out during printing load paper and follow the instructions in the touch panel dis play The machine automatically restarts the remaining print E82_US book Page 5 Tuesday May ...

Страница 403: ... in the paper drawer 3 can be changed The paper sizes loaded in the paper drawer 4 can be changed by your service representative For more details contact your service representative When setting STMT size paper place it horizontally STMTR 1 Squeeze the lever on the length guide as shown in the figure and slide the length guide to align it with the mark for the desired paper size When loading 11 x1...

Страница 404: ...properly for the paper size loaded in the paper drawer then the correct paper sizes might not appear in the display Not adjusting the guides cor rectly might cause paper jams dirty prints or make the inside of the machine dirty To prevent these problems from occurring make certain that the guides are adjusted correctly for the loaded paper size 3 Change the paper drawer s size plate so that it mat...

Страница 405: ... upon the original it is recommended that the toner be added as soon as possible When the toner has run out and prints can no longer be made the message describing how to add toner appears in the display Add toner following the described procedure IMPORTANT The screen prompting you to add toner is displayed until you press the Recover Later Done key Use only the toner bottle recommended for use on...

Страница 406: ...toner inside the bottle 3 Align the protrusions of the toner bottle with the slots on the toner supply port Gently press the toner bottle down onto the toner supply port until you hear a click The toner bottle is now locked onto the toner supply port 4 Press down lightly on the toner bottle with one hand and pull out the black shutter of the toner supply port as far as it will go E82_US book Page ...

Страница 407: ...toner box 7 Push back the shutter of the toner bottle 8 Make sure you hear a click when the black shutter of the toner supply port has been pushed back in as far as the position When the toner bottle starts to come loose from the toner supply port lightly hold it so that it does not fall over CAUTION Never try to remove the toner bottle before you hear the click doing so can damage the toner suppl...

Страница 408: ... CAUTION When removing used toner bottles from the toner supply port remove the bottles carefully to prevent toner from scattering and entering your eyes or mouth If toner enters your eyes or mouth wash immediately with cold water and consult a physician 10Close the toner supply cover NOTE Press the Recover Later Done key to close the screen prompting you to add toner 11Follow the instructions in ...

Страница 409: ... recommend using paper recommended by Canon To prevent moisture build up store any remaining paper tightly wrapped in its original package Black toner When the Add toner message appears in the touch panel display add toner which has been approved for use with this machine Only black toner can be used with this machine WARNING Never dispose of waste toner in a fire or incin erator Doing so may resu...

Страница 410: ... dealer or service provider for Canon GENUINE brand parts supplies and GPR 4 Toner We recommend that you order paper stock and toner from your service representative before they run out Options Cassette The paper drawer can be adjusted to hold the paper size you want to load For instructions on how to adjust paper drawers for paper sizes see Adjusting a Paper Drawer to Hold a Different Paper Size ...

Страница 411: ...E82_US book Page 14 Tuesday May 22 2001 12 11 AM ...

Страница 412: ...r 2 8 15 Removing Paper Jams in Paper Drawer 3 or 4 8 18 Removing Paper Jams in the Stack Bypass 8 20 Removing Paper Jams in the Feeder 8 22 Routine Cleaning 8 25 Cleaning the Platen Glass Rear Side of Platen Glass 8 25 Cleaning the Feeder 8 26 Original Scanned Using the Feeder Becomes Dirty Feeder Cleaning 8 30 Output Sheets are Dirty Wire Cleaning 8 31 Self diagnostic Error Display 8 32 If Memor...

Страница 413: ...per jam CAUTION When removing jammed originals or paper take care not to cut your hands on the edges of the original or paper When removing jammed paper or when inspecting the inside of the machine do not allow neck laces bracelets or other metal objects to touch the inside of the machine as this may result in burns or electrical shock When removing paper which has become jammed inside the machine...

Страница 414: ...e being removed be sure to remove any remaining pieces from inside the machine 2 If a paper jam occurs within the optional units see the description on the pages for each option Feeder See p 8 22 Main unit See p 8 5 Paper drawer 2 See p 8 15 Stack bypass See p 8 20 Right cover See p 8 10 Paper drawer 3 or 4 See p 8 18 Paper drawer 1 See p 8 12 Exit slot Remove the protruding jammed paper Finisher ...

Страница 415: ... 4 Continue operations following the instructions displayed in the touch panel display If there is remaining paper to be removed The display indicating how to clear the paper jam appears in the touch panel display Repeat the procedure from step 1 NOTE Once you have cleared the paper jam in locations other than the Feeder print operation restarts E82_US book Page 4 Tuesday May 22 2001 12 11 AM ...

Страница 416: ...ay Check where the jam occurred and follow the procedure below and the procedure that appears in the touch panel display to remove the jammed paper 1 Open the front cover of the main unit 2 Move the green lever in the direction of the arrow 3 Grip the lever and pull out the fixing unit The fixing unit and duplexing unit are pulled out together E82_US book Page 5 Tuesday May 22 2001 12 11 AM ...

Страница 417: ...the arrow and remove any jammed paper CAUTION The parts located around the cover are subject to high temperatures When removing jammed paper take care not to touch anything in this area except this cover 7 Turn the duplexing unit knob in the direction of the arrow displayed on the screen and remove any jammed paper E82_US book Page 6 Tuesday May 22 2001 12 11 AM ...

Страница 418: ...jury 9 Gently push the fixing unit back into its origi nal position CAUTION When returning the fixing unit to its original position be careful not to get your fingers caught as this may result in personal injury 10Return the green lever to its original position 11Remove any remaining jammed paper from the duplexing unit E82_US book Page 7 Tuesday May 22 2001 12 11 AM ...

Страница 419: ...the right cover as shown in the illustration 14Open the duplexing transport unit and remove any jammed papers 15Gently push the duplexing unit back to its original position CAUTION When returning the duplexing unit to its origi nal position be careful not to get your fingers caught as this may result in personal injury E82_US book Page 8 Tuesday May 22 2001 12 11 AM ...

Страница 420: ...the front cover CAUTION When closing the cover be careful not to get your fingers caught as this may result in per sonal injury 17Follow the instructions in the touch panel display See Display Indicating How to Clear the Jam on p 8 2 E82_US book Page 9 Tuesday May 22 2001 12 11 AM ...

Страница 421: ...d the procedure that appears in the touch panel display to remove the jammed paper NOTE When the Paper Deck G1 option is attached move the paper deck away from the main unit See Paper Deck G1 on p 9 3 1 Open the right cover upper of the main unit 2 Remove any jammed paper 3 Close the right cover upper CAUTION When closing the cover be careful not to get your fingers caught as this may result in pe...

Страница 422: ...med paper 6 Close the right cover lower CAUTION When closing the cover be careful not to get your fingers caught as this may result in per sonal injury 7 Follow the instructions in the touch panel display See Display Indicating How to Clear the Jam on p 8 2 E82_US book Page 11 Tuesday May 22 2001 12 11 AM ...

Страница 423: ...cedure that appears in the touch panel display to remove the jammed paper NOTE When the Paper Deck G1 option is attached move the paper deck away from the main unit See Paper Deck G1 on p 9 3 1 Open the right cover upper of the main unit 2 Remove any jammed paper 3 Close the right cover upper of the main unit CAUTION When closing the cover be careful not to get your fingers caught as this may resu...

Страница 424: ...r seems to be stuck halfway do not pull it out by force Push it back into the copier and then try pressing the release button and pulling it out again 6 Remove any jammed paper 7 Return the paper drawer to its original posi tion CAUTION When returning the paper drawer to its original position be careful not to catch your fingers between the edge of the paper drawer and the main unit E82_US book Pa...

Страница 425: ...Removing Paper Jams 8 14 8 Troubleshooting 8 Follow the instructions in the touch panel display See Display Indicating How to Clear the Jam on p 8 2 E82_US book Page 14 Tuesday May 22 2001 12 11 AM ...

Страница 426: ...nel display Check where the jam occurred and follow the procedure below and the procedure that appears in the touch panel display to remove the jammed paper 1 Open the front cover of the main unit 2 Turn the green knob in the direction of the arrow so as to feed the jammed paper to the duplexing unit 3 Gently pull out the duplexing unit E82_US book Page 15 Tuesday May 22 2001 12 11 AM ...

Страница 427: ...osition be careful not to get your fingers caught as this may result in personal injury 6 Close the front cover of the main unit CAUTION When closing the cover be careful not to get your fingers caught as this may result in per sonal injury 7 Press then release the paper drawer release button of the paper drawer indicated on the touch panel display until the paper drawer comes out E82_US book Page...

Страница 428: ...n and pulling it out again 9 Remove any jammed paper 10Return the paper drawer to its original posi tion CAUTION When returning the paper drawer to its original position be careful not to catch your fingers between the edge of the paper drawer and the main unit 11Follow the instructions in the touch panel display See Display Indicating How to Clear the Jam on p 8 2 E82_US book Page 17 Tuesday May ...

Страница 429: ...ure that appears in the touch panel display to remove the jammed paper 1 Press then release the paper drawer release button of the paper drawer indicated in the touch panel display until the paper drawer comes out 2 Pull out the paper drawer NOTE If the drawer seems to be stuck halfway do not pull it out by force Push it back into the copier and then try pressing the release button and pulling it ...

Страница 430: ... When returning the paper drawer to the original position be careful not to catch your fingers between the top of the paper drawer and the main unit 5 Follow the instructions in the touch panel display See Display Indicating How to Clear the Jam on p 8 2 E82_US book Page 19 Tuesday May 22 2001 12 11 AM ...

Страница 431: ...e the jam occurred and follow the procedure below and the procedure that appears in the touch panel display to remove the jammed paper NOTE When the Paper Deck G1 option is attached move the paper deck away from the main unit See Paper Deck G1 on p 9 3 1 Open the right cover upper of the main unit 2 Remove all paper from the stack bypass 3 Remove any jammed paper E82_US book Page 20 Tuesday May 22...

Страница 432: ...per CAUTION When closing the cover be careful not to get your fingers caught as this may result in per sonal injury 5 Follow the instructions in the touch panel display See Display Indicating How to Clear the Jam on p 8 2 E82_US book Page 21 Tuesday May 22 2001 12 11 AM ...

Страница 433: ...ight appears in the touch panel display Check where the jam occurred and follow the procedure below and the procedure that appears in the touch panel display to remove the jammed paper 1 Open the upper cover of the feeder 2 Remove any jammed original 3 Open the middle cover holding the knob in the back E82_US book Page 22 Tuesday May 22 2001 12 11 AM ...

Страница 434: ...ght as this may result in per sonal injury 6 Turn the knob in the direction of the arrow then remove the jammed original 7 Once you have removed the entire jammed original close the upper cover of the feeder CAUTION When closing the cover be careful not to get your fingers caught as this may result in per sonal injury E82_US book Page 23 Tuesday May 22 2001 12 11 AM ...

Страница 435: ...ubleshooting 8 Open the feeder and remove any jammed paper 9 Close the feeder 10Follow the instructions in the touch panel display See Display Indicating How to Clear the Jam on p 8 2 E82_US book Page 24 Tuesday May 22 2001 12 11 AM ...

Страница 436: ...formed CAUTION Unplug the power plug from the outlet at least once a year and clean the area around the base of the plug s metal pins to ensure all dust is removed If dust accumulates in this area it may result in a fire Do not dampen the cloth too much as this may damage the original or break the machine Cleaning the Platen Glass Rear Side of Platen Glass Clean the platen glass or the rear side o...

Страница 437: ...der scanning area white plate and roller following the procedure below IMPORTANT If the feeder scanning area is dirty it may result in a paper jam or dirty print output Spin the roller while cleaning it 1 Open the feeder cover 2 Clean the roller total of 8 places at the rear side of the feeder cover with a cloth dampened with water then wipe with a dry cloth E82_US book Page 26 Tuesday May 22 2001...

Страница 438: ...th water then wipe with a dry cloth 4 Open the middle cover holding the knob in the back 5 Clean the roller total of 5 places with a cloth dampened with water then wipe with a dry cloth 6 Clean the roller total of 4 places with a cloth dampened with water then wipe with a dry cloth E82_US book Page 27 Tuesday May 22 2001 12 11 AM ...

Страница 439: ...t as this may result in per sonal injury 8 Close the feeder cover CAUTION When closing the cover be careful not to get your fingers caught as this may result in per sonal injury 9 Open the feeder 10Clean the feeder scanning area with a cloth dampened with water then wipe with a dry cloth E82_US book Page 28 Tuesday May 22 2001 12 11 AM ...

Страница 440: ...shooting 11Clean the white plate with a cloth dampened with water then wipe with a dry cloth IMPORTANT Do not push the white plate hard since the white plate is soft 12Close the feeder E82_US book Page 29 Tuesday May 22 2001 12 11 AM ...

Страница 441: ...eys to scroll to the desired screen and make the required settings When the or key should be pressed the indication is displayed in this manual It takes about 10 seconds to clean the feeder 1 Call up the desired screen as follows 2 Place 10 blank LTR size paper in the feeder then press the Start key NOTE To cancel Feeder Cleaning press the Cancel key When the feeder is being cleaned the message on...

Страница 442: ...nds to clean the wire 1 Call up the desired screen as follows 2 Press the Start key NOTE To cancel Wire Cleaning press the Cancel key While wire cleaning is being performed the message to the right appears in the touch panel display 3 Press the Done key Repeat this until the Basic Features screen appears again Wire Cleaning key Additional Functions E82_US book Page 31 Tuesday May 22 2001 12 11 AM ...

Страница 443: ...essage is displayed print will be made with the currently selected paper size If the message remains even when the indicated paper is loaded set the Drawer Eligibility of that paper drawer to On See Setting a Paper Drawer for Auto Paper Selection Auto Drawer Switching on p 6 10 Add paper The machine has run out of paper No more prints can be made The paper drawer is not correctly inserted Load pap...

Страница 444: ...s occurred preventing you from making prints Remove paper from the machine following the guidance messages in the touch panel display See Removing Paper Jams on p 8 2 Add toner There is not enough toner to print Add toner using the toner bottle recommended for use on this machine See Adding Toner on p 7 8 Remove the paper from the output tray Prints from the previous job remain in the output tray ...

Страница 445: ...the originals on the platen glass Remove the original from the platen glass The original remains on the platen glass Remove the original from the platen glass then place the original again Remove the original from the feeder Original is placed both in the feeder and on the platen glass with the mode which the original cannot be placed in the feeder set Remove the original from the feeder E82_US bo...

Страница 446: ...standard mode If the message asking whether to print the original pages scanned into memory appears select the Yes or No key as appropriate When you select the Yes key Pages in memory are printed and remaining originals are then scanned When you select the No key Pages in memory are not printed When processing is completed the display returns to the Basic Features screen If the screen displayed on...

Страница 447: ... both ON be sure to check the breaker on the main unit to see if it is OFF If the breaker has gone OFF do not turn it ON Instead contact your service representative WARNING If the breaker is OFF position do not switch the current leakage breaker back ON Doing so may lead to a fire electrical shock smoke or the tripping of other breakers in the facility I Side Side E82_US book Page 36 Tuesday May 2...

Страница 448: ...may result in electrical shock CAUTION Always grasp the plug portion when unplugging the power cord Pulling on the power cord may expose or snap the core wire or otherwise damage the power cord If the cord is damaged this could cause an electricity leak and result in a fire or electrical shock IMPORTANT If you turn the main power switch OFF when there is a reserved print job that job will be erase...

Страница 449: ... 2 If the machine still does not operate normally carry out the following procedure then con tact your service representative Turn the main power switch OFF Unplug the power cable from the outlet E82_US book Page 38 Tuesday May 22 2001 12 11 AM ...

Страница 450: ... 9 Staple Mode 9 9 Saddle Stitching Mode 9 11 Punch Mode 9 12 Removing Paper Jams in the Finisher 9 13 Replacing the Staple Case in the Stapler Unit 9 15 Removing Jammed Staples from the Stapler Unit 9 18 Removing Paper Jams in the Saddle Stitcher Unit 9 21 Replacing the Saddle Stitcher Unit Staple Cartridge 9 24 Removing Jammed Staples from the Saddle Stitcher Unit 9 26 Removing Paper Jams in the...

Страница 451: ...ptions can be attached to the machine NOTE Before using the touch panel peel off the protective film from the display Main Unit Control Card IVN Card Reader C1 Finisher F1 Puncher Unit B1 Copy Tray C3 Paper Deck G1 Saddle Finisher F2 E82_US book Page 2 Tuesday May 22 2001 12 11 AM ...

Страница 452: ...e Main Power indicator are lit you may not be able to open the paper deck In this case press the key beforehand to reactivate the machine then press the Open button NOTE Paper size of the Paper Deck is fixed to LTR Parts and Their Functions Energy Saver Energy Saver Release Lever Press to remove the Paper Deck from the Main Unit Open button Press to load paper or to check for a paper jam Paper Sup...

Страница 453: ...ne as this may result in burns or electrical shock When removing paper which has become jammed inside the machine take care not to allow the toner on the jammed paper to come into contact with your hands or clothing as this will dirty your hands or clothing If they become dirty wash them immediately with cold water Washing with warm water will set the toner and make it impossible to remove the ton...

Страница 454: ... press the key beforehand to reactivate the machine then press the Open button 4 Remove any jammed paper 5 Close the Paper Deck and reconnect it to the main unit CAUTION When reconnecting the Paper Deck to the main unit be careful not to get your fingers caught as this may result in personal injury 6 Follow the instructions in the touch panel display See Display Indicating How to Clear the Jam on ...

Страница 455: ...take care not to cut your hands on the edges of the paper IMPORTANT Rewrap any remaining paper in its original pack age and store it in a dry place away from direct sunlight Do not copy on the following types of paper stock Doing so may cause a paper jam Severely curled or wrinkled paper Transparencies Paper which has been copied on using a digital full color copier do not copy on the reverse side...

Страница 456: ...the limit mark at the back of the paper drawer 4 Close the Paper Deck CAUTION When returning the Paper Deck to its original position be careful not to get your fingers caught as this may result in personal injury NOTE For details of print direction of paper already printed with logos or patterns see Relation of Original Orientation and Paper Orientation on p 11 9 E82_US book Page 7 Tuesday May 22 ...

Страница 457: ...artridge See Removing Paper Jams in the Saddle Stitcher Unit on p 9 21 Replacing the Saddle Stitcher Unit Staple Car tridge on p 9 24 and Removing Jammed Staples from the Saddle Stitcher Unit on p 9 26 Only available in the Saddle Fin isher F2 Front cover of the puncher unit Open this cover when a paper jam occurs in the puncher unit or when removing the punch waste See Removing Paper Jams in the ...

Страница 458: ...ctions shift each set of output paper about 1 1 4 30 mm before delivery when the Collate function or Group function has been set and copies are made or prints output from a computer Staple Mode This function automatically collates print sets into page order staples the sets and outputs them CAUTION Do not put your hand in the tray s stapling area when the machine is equipped with the Finisher Doin...

Страница 459: ...orner staple STMTR size paper You cannot double staple LGL LTRR STMTR size paper Double staple area Corner staple area A B C A B C A B C A B C Upper left Upper right Lower right Lower left Upper left Upper right Lower right Lower left Left side Right side Left side Right side Double staple area Corner staple area ABC ABC ABC ABC Upper right Upper left Lower left Lower right Upper right Upper left ...

Страница 460: ... the center IMPORTANT This function is only available with the Saddle Finisher F2 The maximum number of sheets that can be bound is 15 60 pages The paper sizes that can be saddle stitched are 11 x17 and LTRR 6 5 4 3 4 3 2 1 3 8 7 6 5 8 7 2 1 6 8 1 The pages are folded with a roller to form a booklet Originals Saddle stitch Copy E82_US book Page 11 Tuesday May 22 2001 12 11 AM ...

Страница 461: ... LTRR 3 holes 11 x17 LTR Holes cannot be punched in transparencies tracing papers labels and 3 hole punch You cannot punch holes in STMTR size paper NOTE This function is only available when the Finisher is equipped with the Puncher Unit B1 The distance between the punch holes is as shown in the illustration ABC ABC V A B C V A B C Hole punched area Hole punched area Hole punched area Hole punched...

Страница 462: ...which has become jammed inside the machine take care not to allow the toner on the jammed paper to come into contact with your hands or clothing as this will dirty your hands or clothing If they become dirty wash them immediately with cold water Washing with warm water will set the toner and make it impossible to remove the toner stains When removing paper which has become jammed inside the machin...

Страница 463: ... result in per sonal injury 4 Lift cover 2 upward and remove any jammed paper NOTE When you pull up cover 2 cover 1 is pulled up together with it 5 Return cover 2 and close the top cover CAUTION When closing the cover be careful not to get your fingers caught as this may result in per sonal injury 6 Follow the instructions in the touch panel display See Display Indicating How to Clear the Jam on p...

Страница 464: ...placed The message on the right will appear in the touch panel display Follow the procedure described below to replace the staple case 1 Open the front cover upper of the Finisher 2 Push down the green lever The staple cartridge will slightly come out 3 Pull out the protruding staple cartridge hold ing it by its left and right sides E82_US book Page 15 Tuesday May 22 2001 12 11 AM ...

Страница 465: ...a tion then pull out the staple case 5 Insert the new staple case NOTE Only one staple case can be inserted at a time Use only the special staple case for use on this machine 6 Remove the seal fixing the staples by pulling it straight out 7 Gently push the staple cartridge back into the Finisher until the green lever returns to its original position E82_US book Page 16 Tuesday May 22 2001 12 11 AM...

Страница 466: ...se the front cover upper of the Finisher CAUTION When closing the cover be careful not to get your fingers caught as this may result in per sonal injury NOTE When you close the cover the staple unit automati cally performs a dry stapling operation several times to reposition the staples E82_US book Page 17 Tuesday May 22 2001 12 11 AM ...

Страница 467: ...e screen on the right appears Follow the procedure described below to remove any jammed staples 1 Open the front cover upper of the Finisher 2 Push down the green lever The staple cartridge will slightly come out 3 Pull out the protruding staple cartridge hold ing it by its left and right sides E82_US book Page 18 Tuesday May 22 2001 12 11 AM ...

Страница 468: ...le cartridge 5 Remove all of the staples that slide from the staple case 6 Return the knob of the staple cartridge to its original position 7 Gently push the staple cartridge back into the Finisher until the green lever returns to its original position E82_US book Page 19 Tuesday May 22 2001 12 11 AM ...

Страница 469: ...se the front cover upper of the Finisher CAUTION When closing the cover be careful not to get your fingers caught as this may result in per sonal injury NOTE When you close the cover the staple unit automati cally performs a dry stapling operation several times to reposition the staples E82_US book Page 20 Tuesday May 22 2001 12 11 AM ...

Страница 470: ...is may result in burns or electrical shock When removing paper which has become jammed inside the machine take care not to allow the toner on the jammed paper to come into contact with your hands or clothing as this will dirty your hands or clothing If they become dirty wash them immediately with cold water Washing with warm water will set the toner and make it impossible to remove the toner stain...

Страница 471: ...t CAUTION When returning the Finisher to its original posi tion be careful not to catch your fingers between the edge of the Finisher and the main unit 4 Open the front cover lower of the Finisher 5 Turn the knob on the right 6 Turn the knob on the left while pressing it E82_US book Page 22 Tuesday May 22 2001 12 11 AM ...

Страница 472: ... the front cover lower of the Finisher CAUTION When closing the cover be careful not to get your fingers caught as this may result in per sonal injury 9 Follow the instructions in the touch panel display See Display Indicating How to Clear the Jam on p 8 2 E82_US book Page 23 Tuesday May 22 2001 12 11 AM ...

Страница 473: ... screen on the right will appear in the touch panel display Follow the procedure described below to replace the staple cartridge NOTE This procedure is only required when the Saddle Fin isher F2 is attached 1 Open the front cover lower of the Finisher 2 Pull out the saddle stitcher unit 3 Pull the stapler unit of the saddle stitcher unit then push it up E82_US book Page 24 Tuesday May 22 2001 12 1...

Страница 474: ...apler unit of the saddle stitcher unit then return it to its original position 7 Push back the saddle stitcher unit then close the front cover lower CAUTION When closing the cover be careful not to get your fingers caught as this may result in per sonal injury IMPORTANT Once you have removed the jammed staples be sure to reposition staples for the saddle stitcher unit See Staple Repositioning for ...

Страница 475: ...n the right appears Follow the procedure described below to remove any jammed staples NOTE This procedure is only required when the Saddle Fin isher F2 is attached 1 Open the front cover lower of the Finisher 2 Pull out the saddle stitcher unit 3 Pull the stapler unit of the saddle stitcher unit then push it up E82_US book Page 26 Tuesday May 22 2001 12 11 AM ...

Страница 476: ...ft and right ends of the staple car tridge and remove the cartridge 5 Push down part A then pull up knob B 6 Remove the jammed staples then return knob B to its original position 7 Return the staple cartridge to its original posi tion A B E82_US book Page 27 Tuesday May 22 2001 12 11 AM ...

Страница 477: ...saddle stitcher unit then close the front cover lower CAUTION When closing the cover be careful not to get your fingers caught as this may result in per sonal injury IMPORTANT Once you have removed the jammed staples be sure to reposition staples for the saddle stitcher unit See Staple Repositioning for Saddle Fin isher on p 6 32 E82_US book Page 28 Tuesday May 22 2001 12 11 AM ...

Страница 478: ... metal objects to touch the inside of the machine as this may result in burns or electrical shock When removing paper which has become jammed inside the machine take care not to allow the toner on the jammed paper to come into contact with your hands or clothing as this will dirty your hands or clothing If they become dirty wash them immediately with cold water Washing with warm water will set the...

Страница 479: ...e careful not to get your fingers caught as this may result in per sonal injury 4 Open the top cover of the puncher unit 5 Remove any jammed paper 6 Close the top cover of the puncher unit CAUTION When closing the cover be careful not to get your fingers caught as this may result in per sonal injury E82_US book Page 30 Tuesday May 22 2001 12 11 AM ...

Страница 480: ...Saddle Finisher F2 Puncher Unit B1 9 31 Handling Options 9 7 Follow the instructions in the touch panel display See Display Indicating How to Clear the Jam on p 8 2 E82_US book Page 31 Tuesday May 22 2001 12 11 AM ...

Страница 481: ...ebris the screen on the right appear in the display Follow the procedure described below to remove the punch waste NOTE This procedure is only required when the Puncher Unit B1 is attached 1 Open the front cover of the puncher unit 2 Pull out the punch waste tray 3 Discard the punch waste E82_US book Page 32 Tuesday May 22 2001 12 11 AM ...

Страница 482: ...losing the cover be careful not to get your fingers caught as this may result in per sonal injury Consumables Staple cartridge Use only the staple cartridges recommended for use on this machine There is a space behind the front cover upper for storing staple cartridges equivalent to the space occupied by three staple unit staple cartridges We recommend that you order staple cartridges from your se...

Страница 483: ...g functions Collate Group Rotate IMPORTANT The paper size which can be selected when you set the Rotate mode are LTR LTRR Parts and Their Functions NOTE Adjust the auxiliary tray depending on the print paper size Copy Tray C3 Papers are output here E82_US book Page 34 Tuesday May 22 2001 12 11 AM ...

Страница 484: ...the inside of the machine as this may result in burns or electrical shock When removing paper which has become jammed inside the machine take care not to allow the toner on the jammed paper to come into contact with your hands or clothing as this will dirty your hands or clothing If they become dirty wash them immediately with cold water Washing with warm water will set the toner and make it impos...

Страница 485: ...E82_US book Page 36 Tuesday May 22 2001 12 11 AM ...

Страница 486: ...tions Are Enabled 10 2 Inserting the Control Card 10 2 Operations before Using Copy or Mail Box Functions 10 3 Operations after Using Copy or Mail Box Functions 10 3 Entering the Department ID and Password 10 4 Operations after Turning the Power ON 10 4 Operations after Using Copy Functions 10 5 Entering Characters on the Touch Panel Display 10 6 Entering Alphabet Characters 10 6 Entering Special ...

Страница 487: ... far as it can go Make sure that an unusable control card is not inserted NOTE For details on how to handle the Control Card IVN see the Control Card Instruction Manual For details on how to change the password and how to check print and erase the counting information with Card Reader C1 see Setting the Department ID Management on p 6 58 When the Card Reader C1 is attached you can use the followin...

Страница 488: ...or interrupt a job with Control Card IVN attached do not remove the control card If you remove the control card the reserved copy job will be canceled 2 The basic screen of the selected function is displayed Operations after Using Copy or Mail Box Functions After you finish using this machine remove the control card The touch panel display returns to the screen for inserting the control card IMPOR...

Страница 489: ...e card slot See Inserting the Control Card on p 10 2 Operations after Turning the Power ON NOTE For details on how to turn the power ON see Main Power and Control Panel Power on p 1 6 1 Press the Department ID key and enter the Department ID with the Numeric keys NOTE If you make a mistake when entering values press the key and enter the values again 2 Press the Password key and enter the pass wor...

Страница 490: ...tering the Department ID and Password appears To operate again enter the Department ID and Password again IMPORTANT If you do not press the key after finishing your operation any subsequent copies will be totaled under the same Department ID which you previ ously entered NOTE When operating is completed the screen for enter ing the Password automatically appears after the set time has elapsed if y...

Страница 491: ...case key the entry mode changes to the upper case mode and upper case characters can be entered 2 Enter canon NOTE The available modes and maximum number of let ters vary depending on the purpose To enter a space press the Space key To move the cursor press the or key If you make a mistake when entering characters use the or key and the Backspace key to delete the character Then enter the correct ...

Страница 492: ...vailable modes and maximum number of let ters vary depending on the purpose To enter a space press the Space key To move the cursor press the or key If you make a mistake when entering special let ters use the or key and the Backspace key to delete the character Then enter the correct character You can also delete all characters you have entered by pressing the key To continue entering alphabet ch...

Страница 493: ...e inch entry function to On in the Common Settings of the Additional Functions You can make entry in inches when you press the Inch key on the screen which requires number entry The example shows the inch entry in the Zoom Program mode Press the 1 _ 1 and 2 keys on the touch panel display in that order The entered values is displayed as shown on the right E82_US book Page 8 Tuesday May 22 2001 12 ...

Страница 494: ...le Finisher F2 11 6 Puncher Unit B1 11 8 Copy Tray C3 11 8 Card Reader C1 11 8 Relation of Original Orientation and Paper Orientation 11 9 Chart of Available Combination of Functions 11 10 Copy Function 11 10 Mail Box Function 11 14 Index 11 15 11 C H A P T E R E82_US book Page 1 Tuesday May 22 2001 12 11 AM ...

Страница 495: ...e paper stock Plain paper Paper drawer 1 2 17 lb bond to 110 lb index 64 g m2 to 200 g m2 Paper drawer 3 4 17 lb bond to 24 lb bond 64 g m2 to 90 g m2 Stack bypass 17 lb bond to 110 lb index 64 g m2 to 200 g m2 Transparency Tracing paper Labels Heavy Recycled Color Letterhead Bond 3 Hole Punch stack bypass selected Acceptable originals Sheet books 3 dimensional objects Up to 4 4 lb bond or 2 kg Ma...

Страница 496: ... standard until the machine is ready to copy after canceling the mode Activation time may vary depending on the conditions under which the machine is used In all cases at a room temperature of 68 F First copy time Platen glass selected 3 8 seconds max Copy speed Direct imageRUNNER 5000 11 x17 30 cpm LGL 36 cpm LTR 50 cpm LTRR 39 cpm STMTR 50 cpm Reduction 11 x17 STMTR 50 50 cpm 11 x17 LTRR 64 39 c...

Страница 497: ...ck bypass stack bypass tray 50 sheets 20 Ib bond 80 g m2 stack approx 1 4 5 mm high Exposure control Automatic exposure control or manual exposure control Multiple copies 999 sheets max Power source 120 V AC 60 Hz 15 A Max power consumption 1 5 kW Dimensions H x W x D 44 3 4 x 25 3 8 x 29 1 4 1 136 mm x 643 mm x 743 mm Installation space W x D 52 5 8 x 29 1 4 1 335 mm x 743 mm Dimensions of eject ...

Страница 498: ...nit Power consumption When active 48 W max When not active 2 5 W max Dimensions H x W x D 5 7 8 x 22 1 4 x 21 1 2 149 mm x 565 mm x 545 mm Weight Approx 30 8 lb 14 kg Paper Deck G1 Paper deck capacity 3 500 sheets 20 lb bond 80 g m2 Power source From main unit Power consumption 40 W Dimensions H x W x D 22 5 8 x 12 3 4 x 23 574 mm x 323 mm x 583 mm Weight Approx 101 lb 46 kg Acceptable paper size ...

Страница 499: ...ode LTR STMTR 5 3 4 147 mm equivalent to 1 000 sheets 20 lb bond 80 g m2 11 x17 LGL LTRR 2 7 8 74 mm equivalent to 500 sheets 20 lb bond 80 g m2 Staple mode LTR 30 sets or 4 3 8 110 mm equivalent to 750 sheets 20 lb bond 80 g m2 11 x17 LGL LTRR 30 sets or 2 7 8 74 mm equivalent to 500 sheets 20 lb bond 80 g m2 Non collate Collate Group with different paper size 1 3 4 44 mm equivalent to 300 sheets...

Страница 500: ...r 41 3 8 x 26 3 8 x 24 1 4 1 052 mm x 669 mm x 614 mm Finisher Puncher Unit B1 41 3 8 x 29 3 8 x 24 1 4 1 052 mm x 744 5 mm x 614 mm Installation location W x D Finisher F1 Saddle Finisher F2 61 3 8 x 29 1 4 1 559 mm x 743 mm Finisher F1 Saddle Finisher F2 Puncher Unit B1 64 3 8 x 29 1 4 1 634 mm x 743 mm Saddle Finisher F2 The width includes necessary space for removing paper jams 72 5 8 x 29 1 4...

Страница 501: ...nsumption 120W max Power source From the Finisher Dimensions H x W x D 34 7 8 x 3 x 24 1 4 886 mm x 75 5 mm x 614 4 mm Weight Approx 11 9 lb 5 4 kg Copy Tray C3 Capacity 250 sheets 20 lb bond 80 g m2 Dimensions H x W x D 4 x 18 3 8 x 13 3 8 100 mm x 465 mm x 340 mm Weight Approx 1 4 lb 670 g Card Reader C1 Card to be Used Magnetic type card Optical type card Card readout method Magnetic Optical re...

Страница 502: ...e n t i a l Confidential Confidential Confidential Orientation in paper drawer 1 2 Orientation in paper drawer 3 4 Orientation in stack bypass paper deck Orientation on the platen glass Orientation in the feeder Auto Orientation setting Staple setting Staple setting Original paper orientation settings Either On or Off Either On or Off Either On or Off Either On or Off Set to On when paper orientat...

Страница 503: ...ailable Priority to latter set mode Priority to Image Combination Image Separation and Booklet mode Ratio can be changed Z o o m D e s ig n a ti o n F u n c ti o n a lr e a d y s e t X Y Z o o m A u to Z o o m m o d e Z o o m P ro g ra m E n ti re Im a g e A u to m a ti c E x p o s u re C o n tr o l R e s e rv e C o p y B o o k 2 S id e d 2 1 S id e d 2 2 S id e d 1 2 S id e d In te rr u p t C o p...

Страница 504: ...In te rr u p t C o p y S ta p le S a d d le S ti tc h H o le P u n c h O ff s e t G ro u p O ff s e t C o ll a te R o ta te G ro u p in g R o ta te C o ll a ti n g G ro u p C o ll a te S ta c k B y p a s s A u to D ra w e r S w it c h in g A u to m a ti c P a p e r S e le c ti o n A u to O ri e n ta ti o n A u to m a ti c P a p e r S e le c ti o n T e x t P h o to T e x t P h o to P ri n te d Im a...

Страница 505: ... a ti o n Im a g e S e p a ra ti o n O ri g in a l F ra m e E ra s e B o o k F ra m e E ra s e B in d in g E ra s e N e g a P o s i Im a g e R e p e a t M ir ro r Im a g e S h a rp n e s s J o b B u il d D if fe re n t S iz e O ri g in a ls S a m p le S e t F ro n t C o v e r P ri n te d B la n k B o o k le t S a d d le S ti tc h B o o k le t T ra n s p a re n c y In te rl e a v in g C h a p te r ...

Страница 506: ...P o s i Im a g e R e p e a t M ir ro r Im a g e S h a rp n e s s J o b B u il d D if fe re n t S iz e O ri g in a ls S a m p le S e t A d d C o v e r P ri n te d B la n k B o o k le t S a d d le S ti tc h B o o k le t T ra n s p a re n c y In te rl e a v in g C h a p te r P a g e S h e e t In s e rt io n P ri n te d B la n k F ro n t C o v e r S h if t B o tt o m M a rg in T o p M a rg in L e ft M...

Страница 507: ...d s iz e A u to S e le c t R e c o rd s iz e M a n u a l S e le c t E n la rg e m e n t B o o k le t S c a n n in g N e g a P o s i S h a rp n e s s J o b B u il d D if fe re n t S iz e O ri g in a ls B in d in g E ra s e B o o k F ra m e E ra s e O ri g in a l F ra m e E ra s e Im a g e C o m b in a ti o n T w o p a g e S e p a ra ti o n 2 S id e d S c a n n in g 1 S id e d S c a n n in g T e x t...

Страница 508: ...6 3 Adjusting a Paper Drawer 7 6 Adjustment Cleaning 6 31 Audible Tones 6 8 Auto 2 20 4 15 Auto Clear Setting 6 7 Auto Collate 6 37 Auto Orientation 6 40 Auto Paper Selection 2 9 Auto Print 5 6 Auto Start 5 5 Auto XY Zoom 2 29 B Back Key 1 9 Basic Features Screen 33 Binding Erase 3 31 4 35 Black toner 7 12 Book Frame Erase 3 28 4 34 Book 2 Sided 2 45 Booklet 3 9 4 72 Booklet Scanning 4 29 Box Sele...

Страница 509: ...posure 2 32 COPY key 1 5 Copy Ratio 2 16 4 15 Copy Settings 6 37 Copy Tray C3 9 34 Counter Check key 1 5 Cover Job Separator 4 69 Cover Sheet Insertion 3 4 D Daily Timer Settings 6 29 Dark 2 32 4 12 Date Time Settings 6 24 Department ID Management 6 58 Device Information Settings 6 72 Device Status 5 27 Different Size Originals 3 43 4 43 Display contrast dial 1 5 Document Size Select 4 10 Done Key...

Страница 510: ...sport unit 1 3 Frame Erase 3 24 4 29 Front cover 1 3 Function Key Wake Up 6 15 G Group 2 48 Guide Function Screen 44 Guide key 1 5 H Hole Punch 2 50 I ID key 1 5 Image Combination 3 33 4 37 Image Orientation Priority 6 38 Image Repeat 3 62 Image Separation 3 38 Inch Entry 6 9 Initial Function 6 6 Initialize Common Settings 6 23 Initialize Copy Settings 6 45 Interrupt key 1 5 Interrupt Mode 5 3 E82...

Страница 511: ...ox Settings 6 46 Main Power indicator 1 5 Main power switch 1 2 Manual Paper Selection 2 10 Margin 3 21 Merge Documents 4 63 Mirror Image 3 65 Mode Memory 3 48 4 51 4 77 N Nega Posi 3 60 4 47 Next Key 1 9 Non collate 2 49 Numeric keys 1 5 O OK key 1 9 Options 7 13 Original Frame Erase 3 26 4 30 Original output area 1 4 Original supply tray 1 4 E82_US book Page 18 Tuesday May 22 2001 12 11 AM ...

Страница 512: ...ncher Unit B1 9 8 R Rear side of platen glass cover 1 3 Recall 3 58 Report Settings 6 75 Reserve Copy 5 7 Reserve Print 5 9 Reset key 1 5 Right cover 1 2 Rotate 2 50 S Saddle Finisher F2 9 8 Saddle Stitch Position Adjustment 6 33 Saddle Stitcher Staple Repositioning 6 32 Sample Print 4 88 Sample Set 2 54 SCAN key 1 5 Secured Documents 5 20 Self diagnostic Error Display 8 32 Service Call Message 8 ...

Страница 513: ...Staple 2 49 Start key 1 5 Stop key 1 5 Store Paper Type 6 12 System Manager Settings 6 55 System Monitor 5 13 System Monitor Screen 42 System Settings 6 55 T Text 2 33 4 13 Text Photo 2 33 4 13 Time Until Unit Quiets Down 6 28 Timer Settings 6 24 Toner supply cover 1 3 Transparency Interleaving 3 13 Tray Designation 6 17 Two page Separation 3 2 4 27 Two sided Mode 2 38 Two sided Originals 4 23 Two...

Страница 514: ...Index 11 21 Appendix 11 X XY Zoom 2 25 4 21 Z Zoom 2 24 4 20 Zoom Designation 2 18 4 16 Zoom Fine Adjustment 6 31 Zoom Program 2 23 4 20 E82_US book Page 21 Tuesday May 22 2001 12 11 AM ...

Страница 515: ...E82_US book Page 22 Tuesday May 22 2001 12 11 AM ...

Страница 516: ...e System Management mode The operations which can be done in the System Management mode are as follows Box Document Management Box Setting Management Entering the System Management Mode When Department ID Management is Enabled Enter the System Manager ID in the Depart ment ID and the System Password in the Password with the Numeric keys and press the key The machine enters the System Management Mo...

Страница 517: ...stem Man ager ID and Password on p 6 55 Canceling the System Management Mode Press the key The System Management Mode is canceled NOTE The System Management Mode is also canceled even when Auto Clear has taken place The display returns to the screen of the function selected in the Auto Clear Setting 0 9 ID 1 2 3 4 5 6 7 8 0 ID 9 C Guide Additional Functions Interrupt Error Clear Processing Data ID...

Страница 518: ... password erase unnecessary documents or in case of need access to box documents of other users 1 Enter the System Management Mode 2 Press the key 3 Proceed to operate the box See Chapter 4 Using the Mail Box Functions 1 2 3 4 5 6 7 8 0 ID 9 C Reset Guide Additional Functions Interrupt Cle COPY MAIL BOX SCAN MAIL BOX E82_US book Page iii Tuesday May 22 2001 12 11 AM ...

Страница 519: ...ady in the System Man agement mode press the key and proceed to step 5 When Department ID Management is enabled enter the System Manager ID in the Department ID and the System Password in the Password with the Numeric keys and press the key 2 Press the System Settings key 1 2 3 4 5 6 7 8 0 ID 9 C Reset Guide Additional Functions Interrupt Cle Additional Functions Additional Functions 0 9 ID E82_US...

Страница 520: ...er System Manager Settings See Setting Changing the System Man ager ID and Password on p 6 55 4 Press the Done key The display returns to the Additional Functions screen 5 Press the Mail Box Settings key and change the settings See Setting Specifications of the Mail Box Function Mail Box Settings on p 6 46 0 9 ID E82_US book Page v Tuesday May 22 2001 12 11 AM ...

Страница 521: ...E82_US book Page vi Tuesday May 22 2001 12 11 AM ...

Страница 522: ...ibed in the Periodic Inspection of the Breaker on p 26 of the imageRUNNER 5000 Series User s Guide once or twice a month How to Fill in this Check Sheet Fill in the date of inspection and the name of inspector When the inspection finished normally write a check mark under OK If not contact your service representative Also write a check mark under NG Date of Inspection Inspector Result OK NG Date o...

Страница 523: ......

Отзывы: