background image

User Settings

5-11

5

Customizin

g F

a

x Se

tting

s


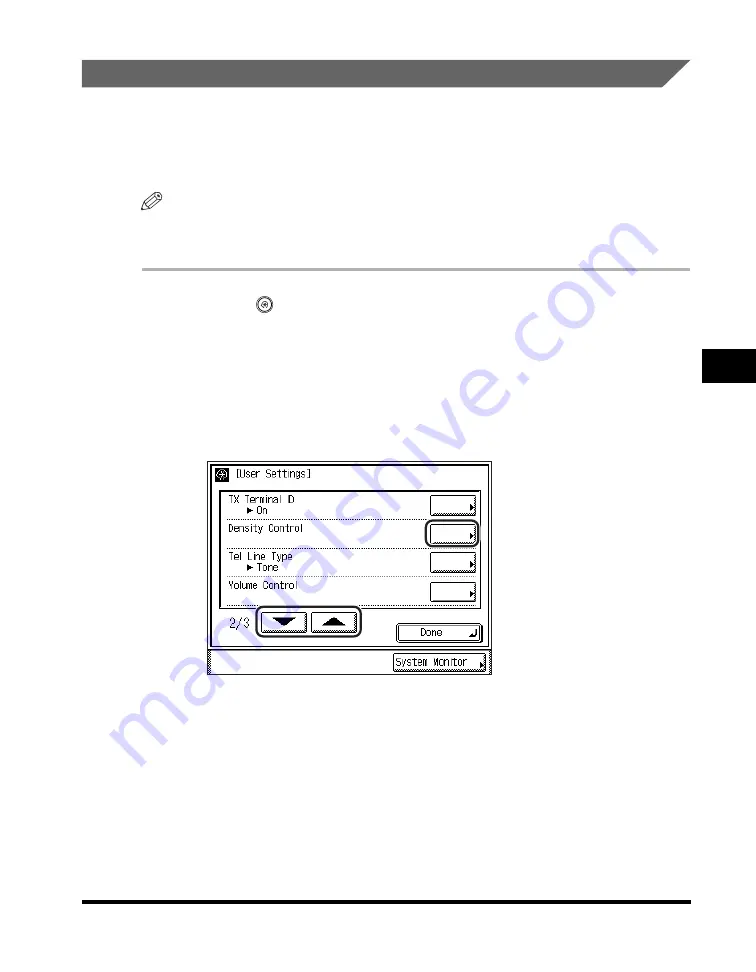
Setting the Standard Density

Setting the standard density enables you to scan all of your documents with the 
same density. For example, if you frequently scan documents with text or fine lines, 
the setting should be towards [Dark]. However, if you frequently scan documents 
containing printed images or halftones, the setting should be towards [Light].

NOTE


The resolution (sharpness of the image) does not change even if you change the density.

The default setting is in the middle (5) on a scale of 1 to 9.

1

Press 

 (Additional Functions) 

 [Custom Fax Settings] 


[User Settings].

If necessary, see the screen shots in steps 1 and 2 of "Registering the Standard 
Key," on
 p. 5-4.

2

Press [

] or [

] until [Density Control] appears 

 press 

[Density Control].

Содержание imageRUNNER 2830

Страница 1: ...Please read this guide before operating this equipment After you finish reading this guide store it in a safe place for future reference ENG Facsimile Guide Facsimile Guide...

Страница 2: ......

Страница 3: ...imageRUNNER 3530 2830 2230 Facsimile Guide 0 Ot...

Страница 4: ...Setting Up the Network Connection and Installing the CD ROM Software Network Quick Start Guide Remote User Interface Instructions Remote UI Guide CD ROM Network Connectivity and Setup Instructions Ne...

Страница 5: ...tem Manager Settings Chapter 7 Printing Communication Reports Chapter 8 Troubleshooting Chapter 9 Appendix Includes the report samples glossary specifications and index How This Manual Is Organized Co...

Страница 6: ...aimers xxi Chapter 1 Introduction to Fax Functions What This Machine Can Do 1 2 Overview of the imageRUNNER 3530 2830 2230 1 5 Things You Must Do Before Using This Machine 1 10 Setting the Display Lan...

Страница 7: ...nts 2 29 Receiving Documents 2 29 Receiving Documents into Memory 2 31 Forwarding Received Documents 2 33 Available Paper Sizes 2 35 Chapter 3 Special Fax Functions Delaying a Send Job 3 2 Memory Boxe...

Страница 8: ...5 4 Registering the Standard Key 5 4 Printing the TX Terminal ID 5 7 Setting the Standard Density 5 11 Adjusting the Alarm and Monitor Volume 5 12 Changing the Standard Fax Settings 5 14 Storing the...

Страница 9: ...c Forwarding of Received Documents 6 16 PIN Code Access 6 28 Reception Password 6 30 Restricting New Addresses 6 33 Chapter 7 Printing Communication Reports Report Settings Table 7 2 Specifying Report...

Страница 10: ...amples 9 2 TX Report Error TX Report 9 2 Multiple Communication Result Report 9 4 RX Report 9 5 Memory Inbox Reception Report 9 6 Activity Report 9 8 Address Book List 9 10 User s Data List 9 11 Speci...

Страница 11: ...ing operations that may lead to death or injury to persons if not performed correctly In order to use the machine safely always pay attention to these warnings CAUTION Indicates a caution concerning o...

Страница 12: ...amples of how keys to be pressed are expressed in this manual Hereafter the following name substitutions take place Touch Panel Display Keys Key Name Examples Cancel Done Control Panel Keys Key icon K...

Страница 13: ...inter Kit Finisher S1 Additional Finisher Tray B1 and Cassette Feeding Unit Y2 Note that functions that cannot be used depending on the model or options are not displayed on the touch panel display Th...

Страница 14: ...inisher S1 Additional Finisher Tray B1 and Cassette Feeding Unit Y2 Abbreviations Used in This Manual In this manual product names and model names are abbreviated as follows Microsoft Windows NT opera...

Страница 15: ...rrect the interference at his own expense Use of shielded cables are required to comply with Class A limits in Subpart B of Part 15 of the FCC Rules Do not make any changes or modifications to the equ...

Страница 16: ...ts Connection of the Equipment This equipment complies with Part 68 of the FCC rules and the requirements adopted by the ACTA On the rear panel of this equipment is a label that contains among other i...

Страница 17: ...equate prior notice to the user However if advance notice is not possible the telephone company will notify the customer as soon as possible Also the customer will be advised of his her right to file...

Страница 18: ...ect Distance Dial line or IDDD International Direct Distance Dial line if you communicate overseas NOTE Canon recommends an individual line following industry standards such as 2500 touch tone or 500...

Страница 19: ...interface may consist of any combination of devices subject only to the requirement that the sum of the RENs of all the devices does not exceed five The REN of this product is 1 0 Repairs to certified...

Страница 20: ...Ligne automatique interurbaine ou Ligne automatique internationale si vous communiquez avec les pays trangers NOTE Canon vous conseille d utiliser une ligne individuelle conforme aux normes industrie...

Страница 21: ...ister en une combinaison quelconque de dispositifs la seule condition que la somme d indices d quivalence de la sonnerie de tous les dispositifs n exc de pas 5 Le nombre d quivalents sonnerie REN de c...

Страница 22: ...eir respective owners Copyright Copyright 2004 by Canon Inc All rights reserved No part of this publication may be reproduced or transmitted in any form or by any means electronic or mechanical includ...

Страница 23: ...XPRESS OR IMPLIED EXCEPT AS PROVIDED HEREIN INCLUDING WITHOUT LIMITATION THEREOF WARRANTIES AS TO MARKETABILITY MERCHANTABILITY FITNESS FOR A PARTICULAR PURPOSE OF USE OR AGAINST INFRINGEMENT OF ANY P...

Страница 24: ...xxii...

Страница 25: ...e 1 11 Selecting the Type of Telephone Line 1 12 Setting the Current Date and Time 1 14 Registering Your Machine s Fax Number 1 19 Registering Sender Names 1 21 Registering the Unit s Name 1 23 Flow o...

Страница 26: ...per G3 fax function is compatible with most Super G3 fax machines used in office environments Compared to ordinary fax machines Super G3 enables high speed fax transmissions which results in reduced t...

Страница 27: ...ty Images This machine s fax function is compatible with ECM Error Correction Mode ECM corrects errors and distorted or poor quality fax transmissions that arise from line noise It also enables you to...

Страница 28: ...ax Functions Automatic Forwarding The machine can be set to automatically forward received fax documents that match the specified forwarding conditions to any destination Automatic forwarding can also...

Страница 29: ...uction to Fax Functions Overview of the imageRUNNER 3530 2830 2230 If you press FAX the Fax Basic Features screen appears The Fax function enables you to scan documents and send them to specified dest...

Страница 30: ...2 See p 2 5 Press to send faxes directly to the recipient See Direct Sending on p 2 5 See p 2 14 Press to stamp sent or scanned originals See Stamping Originals on p 2 14 See p 3 35 Press to send faxe...

Страница 31: ...ress on p 3 33 See p 3 41 Press to dial fax information services See Fax Information Services on p 3 41 See p 2 19 Press to select a destination from the Address Book or to search for a number registe...

Страница 32: ...ing a Special Features mode brings up a help screen containing guidance information This is useful when you want to know more about the mode See p 3 2 Press to specify a time to automatically send you...

Страница 33: ...Press to select a sender s name which will appear at the top of every document you send instead of the unit s name See Setting the Sender s Name as the Terminal ID on p 3 15 See p 3 17 Press to set t...

Страница 34: ...unction properly Use phone lines with modular jacks measuring 9 7 feet 3 meters or less to ensure optimum connection and sending speeds Setting the Telephone Line Type To set the type of telephone lin...

Страница 35: ...set to On See Printing the TX Terminal ID on p 5 7 If the machine is set so that the sending record is printed at the top of the recording paper and not all of the items are registered only the requir...

Страница 36: ...tion you must know if the machine is connected to a touch tone or rotary pulse telephone line The machine can be set to operate with either type of telephone line Be sure to check the type of telephon...

Страница 37: ...Things You Must Do Before Using This Machine 1 13 1 Introduction to Fax Functions 2 Press User Settings 3 Press or until Tel Line Type appears press Tel Line Type...

Страница 38: ...ions that require them NOTE You can also specify to automatically synchronize the date and time with a server on the network from the Additional Functions screen See Chapter 3 Using a TCP IP Network i...

Страница 39: ...Things You Must Do Before Using This Machine 1 15 1 Introduction to Fax Functions 1 Press Additional Functions Timer Settings 2 Press Date Time Settings...

Страница 40: ...luding zeros Enter all four digits of the year and the time in 24 hour notation as four digits including zeros without a space NOTE If you make a mistake when entering values press Clear enter the val...

Страница 41: ...e list If you are setting Daylight Saving Time Press DaylightSaving Time Settings On Start Date Select the month and day from the Month and Day drop down lists respectively Press or to enter the time...

Страница 42: ...me of the machine one hour forward at the specified date and time The default setting is On Between 2 00 a m on the first Sunday of April and 2 00 a m on the last Sunday of October You can also use nu...

Страница 43: ...f every document you send to the recipient Your machine s telephone number may also be displayed on the touch panel display of the recipient s machine depending on the model of their machine 1 Press A...

Страница 44: ...elected mode is set NOTE If you make a mistake when entering the number press Clear enter the correct number 4 Press Done repeatedly until the Fax Basic Features screen appears Space Press to insert a...

Страница 45: ...nd However depending on the model of the recipient s machine the sender s name may not be displayed NOTE You can set to display and print the sender s name instead of the name stored as the unit s nam...

Страница 46: ...to scroll to the desired number You can also enter and specify the number under which you want to register the sender s name using numeric keys To delete a registered sender s name select the number u...

Страница 47: ...nit s name a department name is optional For example When you send a document the recipient s machine displays or prints your name or company s name and department s name if applicable as the sender s...

Страница 48: ...ress or to scroll to the desired setting 3 Enter a name press OK You can enter up to 24 characters for the unit s name To cancel registering the unit s name press Cancel The selected mode is set NOTE...

Страница 49: ...Things You Must Do Before Using This Machine 1 25 1 Introduction to Fax Functions 4 Press Done repeatedly until the Fax Basic Features screen appears...

Страница 50: ...can handle is 64 However the actual number of send jobs that the machine can handle may be fewer than 64 if multiple documents are being sent at the same time You can print a report that contains the...

Страница 51: ...pears Press Department ID enter the Department ID using numeric keys Press Password enter the password using numeric keys Press ID The Basic Features screen is displayed NOTE For instructions on using...

Страница 52: ...our originals see Placing Originals on p 1 34 4 Specify the basic fax settings on the Fax Basic Features screen NOTE From the Fax Basic Features screen you can specify the sending method Direct Speed...

Страница 53: ...the Fax Basic Features screen appears For more information on the available functions on the Special Features screen see Chapter 3 6 Specify the destinations NOTE A maximum of 256 destinations can be...

Страница 54: ...the Address Book Press Address Book select the desired destination See Address Book on p 2 19 If a destination is not stored in the Address Book Enter the desired destination using numeric keys See N...

Страница 55: ...ction to Fax Functions If a destination is stored in the One Touch Speed Dialing Directory Press Coded Dialing enter the three digit one touch button code using numeric keys See Coded Speed Dialing on...

Страница 56: ...original is detected automatically However if the output paper in the recipient s machine is not equal to the scanned document size the original image may be reduced in size to match it 8 If you want...

Страница 57: ...hed remove the control card NOTE For instructions on using the optional Card Reader C1 see Chapter 3 Optional Equipment in the Reference Guide 11 If Department ID Management is set press ID NOTE For i...

Страница 58: ...automatically feeds the originals to the platen glass and scans them Two sided originals can also be automatically turned over and scanned as two sided documents IMPORTANT You can scan originals in th...

Страница 59: ...top edge of your original with the back edge of the platen glass by the arrow in the top left corner or the back edge of the feeder Platen Glass Vertical Placement Horizontal Placement Feeder Vertical...

Страница 60: ...e referred to as LTRR and STMTR 11 x 17 and LGL originals must be placed horizontally Platen Glass You should use the platen glass when scanning bound originals such as books and magazines heavy or li...

Страница 61: ...wn Align the top edge of your original with the back edge of the platen glass by the arrow in the top left corner Place books and other bound originals on the platen glass in the same way NOTE When yo...

Страница 62: ...own hard on the feeder platen cover when using the platen glass to scan thick books Doing so may damage the platen glass and result in personal injury IMPORTANT If you are placing the original on the...

Страница 63: ...nd scans them into memory Two sided originals can also be automatically turned over and scanned as two sided documents You can place the following originals into the feeder s original supply tray Weig...

Страница 64: ...ore placing them into the feeder 1 Adjust the slide guides to fit the size of your originals 2 Neatly place your originals with the side to be scanned face up in the original supply tray Place your or...

Страница 65: ...dd or remove originals while they are being scanned When scanning is complete remove the originals from the original output area to avoid paper jams NOTE The scanned originals are output to the origin...

Страница 66: ...panel display System Monitor screen or by pressing Stop on the control panel Using the Touch Panel Display You can cancel a fax job by pressing Cancel while the job is being scanned 1 Press Cancel on...

Страница 67: ...l a send job by pressing Stop while the job is being scanned 1 Press Stop The send job is canceled 2 Remove your originals Using the System Monitor Screen You can cancel a send job while it is waiting...

Страница 68: ...Canceling a Job 1 44 1 Introduction to Fax Functions 2 Press Fax 3 Select TX Job Status or RX Job Status...

Страница 69: ...isplayed press or to scroll through the list You cannot select multiple jobs and cancel them all at once Select and cancel one job at a time If a job is in the process of being sent it may not be canc...

Страница 70: ...one repeatedly until the Status screen appears press Cancel Press All or Only One If you select Only One the job that is currently being sent is canceled If you do not want to cancel any job of the Se...

Страница 71: ...Canceling a Job 1 47 1 Introduction to Fax Functions 6 Press Done The display returns to the Fax Basic Features screen...

Страница 72: ...Canceling a Job 1 48 1 Introduction to Fax Functions...

Страница 73: ...Memory Sending 2 5 Direct Sending 2 8 Sending Fax Documents Manually 2 10 Stamping Originals 2 14 Dialing Methods 2 16 Numeric Keys 2 16 Redialing 2 18 Address Book 2 19 Coded Speed Dialing 2 24 Grou...

Страница 74: ...ge clarity transmission may take longer than if the originals are sent in the Standard mode The default settings are Resolution Adjusts the resolution for documents with fine text and thin lines The h...

Страница 75: ...scanning The following three image quality modes are available 1 Place your originals press Resolution Density Image Quality NOTE For instructions on placing your originals see Placing Originals on p...

Страница 76: ...Dialing Methods on p 2 16 If you want to specify other sending conditions set them before specifying the destination See Sending Methods on p 2 5 and Chapter 3 Special Fax Functions If the original is...

Страница 77: ...he data in the machine s memory Direct Sending is slower than Memory Sending but since this method bypasses memory you can send a document ahead of other documents stored in memory Memory Sending All...

Страница 78: ...send settings see Resolution Density and Image Quality on p 2 2 Stamping Originals on p 2 14 Chapter 3 Special Fax Functions 3 Specify the destination For instructions on specifying the destination s...

Страница 79: ...t s size press OK To change the resolution density and image quality of the document while the machine is scanning press Resolution Density Image Quality on the pop up screen that appears while the ma...

Страница 80: ...e is no response from the recipient s machine or if a transmission error occurs the machine automatically redials the number and attempts to send the document again Automatic redialing is carried out...

Страница 81: ...ng an Activity Report or on the Log screen for Fax on the System Monitor screen If you cancel Direct Sending during transmission the originals that have already been scanned are sent 1 Place your orig...

Страница 82: ...e Transmission OK appears in the Job Monitor area for approximately two seconds After the original has been sent Direct Sending is canceled automatically NOTE To cancel scanning press Cancel on the to...

Страница 83: ...ending Methods 2 11 2 Basic Send and Receive Methods 1 Place your originals NOTE For instructions on placing your originals see Placing Originals on p 1 34 2 Make sure that the machine is ready to sen...

Страница 84: ...2 Basic Send and Receive Methods 3 Press On hook You should hear the dial tone 4 Specify the destination using numeric keys or by pressing One touch Dialing You can enter an extension number after di...

Страница 85: ...estination s telephone number and page number are displayed in the Job Monitor area RX Start This key is used only for receiving data from a fax information service It is not used when sending See Fax...

Страница 86: ...Document Size Other Size mode The Stamp mode cannot be used when sending a fax document in the Direct Sending mode NOTE The Stamp mode can be set only if the optional Feeder DADF N1 is attached 1 Plac...

Страница 87: ...ox to the left of Stamp NOTE To cancel the Stamp mode press Stamp again 3 Specify the destination press Start Scanning starts A stamp mark appears on the original NOTE For instructions on specifying t...

Страница 88: ...Dialing on the Fax Basic Features screen followed by a three digit code Using the Address Book Specify the destination by pressing Address Book on the Fax Basic Features screen and select a destinati...

Страница 89: ...ess to insert a pause of several seconds in the fax number that you are dialing If you insert a pause within the fax number the letter p is displayed between the numbers If you insert a pause at the e...

Страница 90: ...re sending several documents to the same destination IMPORTANT If Restrict New Addresses in System Settings from the Additional Functions screen is set to On when the machine is in the System Manageme...

Страница 91: ...press Done Scanning starts and the document is sent to the specified destination Address Book The Address Book is a directory for storing fax destinations A maximum of 200 destinations can be stored S...

Страница 92: ...20 2 Basic Send and Receive Methods 2 Make sure the machine is ready to send press Address Book select the destination If you want to select the destination using use the One Touch Speed Dialing keys...

Страница 93: ...nation press Done NOTE If you want to specify other destinations from the Address Book repeat the above procedure You can change the name of the index See Storing the Index Name on p 5 39 Each index c...

Страница 94: ...g Methods 2 22 2 Basic Send and Receive Methods If you want to select a destination in alphabetical order Press Alphabetic Order STU NOTE The Toronto Office is used as an example for this procedure Pr...

Страница 95: ...want to select other destinations in alphabetical order repeat the above procedure The Fax Basic Features screen appears and the fax numbers and names of the selected destinations are displayed 3 Pre...

Страница 96: ...be stored in the Address Book beforehand This enables you to dial other coded speed dialing numbers and send the document to a number of destinations in a single operation NOTE For instructions on st...

Страница 97: ...ame of the selected destination appear on the touch panel display NOTE If you enter an incorrect number press Clear Coded Dialing enter the correct number If you do not know the coded speed dialing nu...

Страница 98: ...d the same document to several destinations You can register up to 200 fax numbers in one group NOTE Sending a document to a number of destinations at the same time is called Sequential Broadcast Send...

Страница 99: ...keys containing the destinations for the group dial press Done To specify two or more destinations using Redial Coded Speed Dialing or numeric keys press Next consecutively specify the destinations I...

Страница 100: ...ss Start If the original is placed on the platen glass follow the instructions that appear on the touch panel display press Start once for each original When scanning is complete press Done Scanning s...

Страница 101: ...forward received fax documents to specified destinations For more information on automatically forwarding documents see Automatic Forwarding of Received Documents on p 6 16 Receiving Documents 1 When...

Страница 102: ...her the amount of available memory is low or paper needs to be loaded in a paper drawer 3 The document is printed The Processing Data indicator goes out when documents stored in memory are printed NOT...

Страница 103: ...llowing is true The numbers below may vary depending on the remaining capacity of the hard disk When a total of 2 000 documents have been stored in any or all of the inboxes When a total of 8 000 page...

Страница 104: ...assword see Reception Password on p 6 30 If you want to cancel the Memory Lock mode press Off 3 Press Done repeatedly until the Fax Basic Features screen appears During reception the transaction numbe...

Страница 105: ...To set the Forward mode press Additional Functions System Settings Communications Settings Forward Settings set the Forward mode to On See Automatic Forwarding of Received Documents on p 6 16 If you...

Страница 106: ...ess Done repeatedly until the Fax Basic Features screen appears The received documents are forwarded to the specified destination NOTE You can set whether to print received documents that have been fo...

Страница 107: ...ction The default setting is On except for the stack bypass See Chapter 4 Customizing Settings in the Reference Guide You can set the machine to reduce received documents from 75 to 97 in 1 increments...

Страница 108: ...Available Paper Sizes 2 36 2 Basic Send and Receive Methods...

Страница 109: ...Sender s Name as the Terminal ID 3 15 Changing the Reception Mode 3 17 Faxing Two Sided Originals 3 19 Document Size 3 21 Specifying the Document Size 3 22 Registering the Document Size 3 25 Changing...

Страница 110: ...n reserve may also be reduced if there are other jobs with no Delayed Send settings or if you select a group destination which includes several destinations with the Delayed Send mode Once the delayed...

Страница 111: ...ur digits of the time including zeros using 24 hour notation If you set a time earlier than the current time the document will be sent at that time on the next day NOTE If you make a mistake when ente...

Страница 112: ...When scanning is complete press Done Scanning starts The document is stored in memory and then sent to the specified destination at the specified time NOTE For instructions on specifying the destinat...

Страница 113: ...store confidential documents The sender of the confidential document must specify the subaddress and RX password of the target Confidential Memory Box that matches the subaddress RX password that has...

Страница 114: ...ts that would otherwise be incurred You can specify the time at which you want to send documents from the relay machine thus enabling you to select a time period when communication costs are low or wh...

Страница 115: ...ed time Batch sending enables you to send several documents at one time reducing the time it takes to send the documents and transmission costs You can reduce transmission costs even further by settin...

Страница 116: ...nts for printing or transmitting to other destinations IMPORTANT It is necessary to preset a memory box according to its use then register the necessary items including the password subaddress and RX...

Страница 117: ...ed memory box is not displayed press or to scroll through the list If you enter the memory box number using numeric keys make sure to enter a two digit number press OK If you make a mistake when enter...

Страница 118: ...hat memory box is displayed with the documents icon If a memory box is set with a password a locked icon is displayed next to the icon of that memory box If you make a mistake when selecting a memory...

Страница 119: ...ss Start once for each original When scanning is complete press Done Scanning starts The document is stored in the selected memory box and will be sent according to the memory box settings NOTE To can...

Страница 120: ...git number press OK If you make a mistake when entering the memory box number press Clear enter the correct number If the memory box has been set with a password enter the password using numeric keys...

Страница 121: ...ed document is not displayed press or to scroll through the list NOTE To cancel a selection press the selected document again You can select only one document to print or erase at a time To print a do...

Страница 122: ...14 3 Special Fax Functions To erase a document Press Erase Yes If you do not want to erase the selected document press No The selected document is erased 4 Press Done repeatedly until the Fax Basic Fe...

Страница 123: ...s see Registering Sender Names on p 1 21 IMPORTANT If TX Terminal ID in User Settings in Custom Fax Settings from the Additional Functions screen is set to Off the sender s name is not printed on the...

Страница 124: ...press or to scroll to the desired name You can also enter and specify the number of the sender s name using numeric keys If you select 00 from the Sender s Names list the stored unit s name is automa...

Страница 125: ...x machine NOTE To set the Memory Lock mode press Additional Functions System Settings Communications Settings Memory Lock Settings On See Saving Received Documents in Memory on p 6 7 Set a password to...

Страница 126: ...rward mode enter the password using numeric keys press OK The screen returns to the RX Mode screen NOTE For instructions on setting or changing the password for the Memory Lock or Forward mode see Sav...

Страница 127: ...cument Size Other Size or Long Original or Direct Sending mode When you are scanning originals with a horizontal landscape orientation such as LTRR make sure to place them horizontally into the feeder...

Страница 128: ...formation on specifying the destination see Dialing Methods on p 2 16 Scanning starts The scanned data is sent to the specified destination when scanning is complete NOTE To cancel this setting press...

Страница 129: ...transparencies Originals with an extremely dark background STMT or STMTR originals that are placed on the platen glass When using Direct Sending to send a fax if you place the originals into the feed...

Страница 130: ...ocument Size 1 Place your originals NOTE For instructions on placing your originals see Placing Originals on p 1 34 2 Press Special Features Document Size 3 Select the document size If you want to sca...

Страница 131: ...8 630 mm If you want to scan a registered document size Press Other Size Press Registered Size 1 or Registered Size 2 press OK NOTE To select a registered document size you must register the document...

Страница 132: ...ng Methods on p 2 16 If the original is placed on the platen glass follow the instructions that appear on the touch panel display press Start once for each original When scanning is complete press Don...

Страница 133: ...Document Size 3 25 3 Special Fax Functions Registering the Document Size 1 Press Special Features Document Size 2 Press Other Size...

Страница 134: ...ess or to specify the document size Press X horizontal axis press or to specify a value Press Y vertical axis press or to specify a value Press OK The document size is registered and the display retur...

Страница 135: ...c keys and Clear to clear your entries If you enter a value outside the setting range OK is grayed out and cannot be selected Enter an appropriate value 5 Press Cancel OK Done The display returns to t...

Страница 136: ...ize it may be cut off NOTE Even though you specify the size of the document you are sending it may be printed on different size paper depending on the recipient s machine To set the zoom ratio to 100...

Страница 137: ...io is used for the horizontal X and vertical Y axes Preset Zoom The machine offers you a variety of preset zoom ratios to reduce or enlarge standard size originals to another standard record size 1 Pl...

Страница 138: ...y the destination press Start For more information on specifying the destination see Dialing Methods on p 2 16 If the original is placed on the platen glass follow the instructions that appear on the...

Страница 139: ...ecial Features Zoom TX If necessary see the screen shot in step 2 of Preset Zoom on p 3 29 3 Press or to set the zoom ratio press Done Done You can also use numeric keys to enter the value and Clear t...

Страница 140: ...l is placed on the platen glass follow the instructions that appear on the touch panel display press Start once for each original When scanning is complete press Done Scanning starts The scanned data...

Страница 141: ...words successfully the subaddresses and passwords on the sending and receiving fax machines must match IMPORTANT If a subaddress is specified you cannot use the Auto Redial mode NOTE You can register...

Страница 142: ...d the display returns to the Fax Basic Features screen NOTE You can press Clear to clear your entries 4 Specify the destination press Start If the original is placed on the platen glass follow the ins...

Страница 143: ...ling a number to make a call or send a document by fax Depending on the requirements of the PBX system the PIN code may be entered either before the number as a prefix or after the number as a suffix...

Страница 144: ...de 3 36 3 Special Fax Functions 2 Press Communications Settings NOTE If the desired setting is not displayed press or to scroll to the desired setting 3 Press or until PIN Code Access appears press PI...

Страница 145: ...each item are shown below The selected mode is set Option Select if your PBX requires a PIN code depending on the destination If PIN Code Access is set to Option PIN Code appears on the Fax Basic Feat...

Страница 146: ...ctions on placing your originals see Placing Originals on p 1 34 2 Begin entering the fax number using numeric keys press PIN Code once in the desired position continue entering the rest of the fax nu...

Страница 147: ...PIN code appears as asterisks on the Enter PIN Code screen Dialing with a PIN Code Follow the procedure below when dialing with a PIN code in the Prefix or Suffix position 1 Place your originals make...

Страница 148: ...PIN Code 3 40 3 Special Fax Functions 2 Enter the fax number using numeric keys press Start 3 Enter the PIN Code using numeric keys press OK NOTE The PIN code appears as asterisks on the Enter PIN Cod...

Страница 149: ...d to a rotary pulse telephone line follow the procedure below to temporarily set the machine for tone dialing NOTE When you use fax information services you cannot use the Redial mode 1 Press On hook...

Страница 150: ...ch button s three digit number enter the three digit number using numeric keys For more information on specifying destinations using the one touch buttons see Address Book on p 2 19 2 When your call i...

Страница 151: ...fter you press Tone a T appears on the touch panel display 3 Enter the numbers requested by the information service using numeric keys and NOTE If you require more information about the service contac...

Страница 152: ...Fax Information Services 3 44 3 Special Fax Functions 4 Press RX Start if you require a faxed copy of the information If you do not require a faxed copy of the information press End...

Страница 153: ...e status of send and receive jobs Checking Changing the Status of Fax Jobs 4 2 Checking Fax Job Details 4 2 Printing the TX Job Status Log 4 6 Checking Changing the Status of Receive Jobs 4 8 Checking...

Страница 154: ...by registering a license key and Job Log Display in System Settings from the Additional Functions screen is set to Off Log is not displayed on the System Monitor screen The maximum number of jobs that...

Страница 155: ...Checking Changing the Status of Fax Jobs 4 3 4 Checking Changing the Fax Status 2 Press Fax 3 Select TX Job Status or Log...

Страница 156: ...detailed information you want to check press Details If the job that you want to select is not displayed press or to scroll to the desired job If you select Log Select the job whose detailed informat...

Страница 157: ...ions press Broadcast List check the status of each destination press Done NOTE You can erase documents that have been received in memory from the RX Job Status screen If the memory is full the machine...

Страница 158: ...result 1 Press System Monitor Fax If necessary see the screen shots in steps 1 and 2 of Checking Fax Job Details on p 4 2 2 Press Log Print List NOTE The TX Log can be printed only if 11 x 17 LGL LTR...

Страница 159: ...hanging the Status of Fax Jobs 4 7 4 Checking Changing the Fax Status 3 Press Yes To cancel printing press No The TX Activity Report is printed 4 Press Done The display returns to the Fax Basic Featur...

Страница 160: ...ck the details of received documents stored in memory as well as the status of receive jobs NOTE The receive job log Activity Report RX screen displays up to 100 jobs Checking Receive Job Details You...

Страница 161: ...Checking Changing the Status of Receive Jobs 4 9 4 Checking Changing the Fax Status 2 Press Fax 3 Press RX Job Status...

Страница 162: ...tatus 4 Select the job whose detailed information you want to check press Details If the job that you want to select is not displayed press or to scroll to the desired job 5 Check the details of the s...

Страница 163: ...screen shots in steps 1 and 2 of Checking Receive Job Details on p 4 8 2 Press RX Job Status If necessary see the screen shot in step 3 of Checking Receive Job Details on p 4 8 3 Select the job that...

Страница 164: ...ed document is erased 5 Press Done The display returns to the Fax Basic Features screen Forwarding Received Documents You can forward received documents that have been stored in memory from the System...

Страница 165: ...eive Jobs 4 13 4 Checking Changing the Fax Status 3 Select the job that you want to forward press Details If the job that you want to forward is not displayed press or to scroll to the desired job 4 C...

Страница 166: ...see Dialing Methods on p 2 16 The selected document is forwarded to the specified destination IMPORTANT If Restrict New Addresses in System Settings from the Additional Functions screen is set to On...

Страница 167: ...5 19 Storing One Touch Speed Dialing Keys 5 19 One Touch Speed Dialing Settings 5 26 Storing Group Destinations 5 33 Storing the Index Name 5 39 Transmission Settings 5 41 ECM Transmission 5 41 Pause...

Страница 168: ...5 4 Unit Telephone 20 digits maximum p 1 19 Unit Name 24 characters maximum p 1 23 Sender s Names TTI 01 to 99 Register Erase p 1 21 TX Terminal ID On 1 Option Printing Position p 5 7 Inside Outside...

Страница 169: ...ial Interval 2 to 99 minutes 2 minutes 1 Off Printer Settings Select Cassette Switch A On 1 Off Switch B On 1 Off Switch C On 1 Off Switch D On 1 Off p 5 54 Receive Reduction On 1 RX Reduction p 5 58...

Страница 170: ...which includes the telephone number and the date and time that prints on the documents you send You can also set alarms and the scan density Registering the Standard Key You can store frequently used...

Страница 171: ...User Settings 5 5 5 Customizing Fax Settings 2 Press User Settings 3 Press Standard Key Settings NOTE If the desired setting is not displayed press or to scroll to the desired setting...

Страница 172: ...e is set NOTE To cancel a Standard Key setting press No Settings OK Done repeatedly until the Fax Basic Features screen appears To cancel storing the setting press Cancel 5 Press Done repeatedly until...

Страница 173: ...deral Communications Commission on p xiii and Things You Must Do Before Using This Machine on p 1 10 for details on FCC rules governing the use of facsimile equipment in the United States NOTE If you...

Страница 174: ...User Settings 5 8 5 Customizing Fax Settings 2 Press or until TX Terminal ID appears press TX Terminal ID 3 Select On or Off...

Страница 175: ...sition Display Destination Name Telephone Mark Inside The Terminal ID information is printed inside the image area on the recipient s paper Outside The Terminal ID information is printed outside the i...

Страница 176: ...set If you select Off Press OK The selected mode is set 4 Press Done repeatedly until the Fax Basic Features screen appears Example If you set TX Terminal ID and Display Destination Name to On the Ter...

Страница 177: ...r if you frequently scan documents containing printed images or halftones the setting should be towards Light NOTE The resolution sharpness of the image does not change even if you change the density...

Страница 178: ...olume for the alarm and monitor tones that this machine sounds during a fax transmission NOTE The alarm tone sounds when sending or receiving is canceled The monitor tone sounds when the machine conne...

Страница 179: ...ume Control 3 Press or to set the Alarm Volume and Monitor Volume press OK You can set the volume to any level on a scale of 0 to 8 If you set the volume to 0 the volume is muted and no tone will soun...

Страница 180: ...transmission and document stamp modes NOTE The default settings are as follows Storing the Standard Settings 1 Press Additional Functions Custom Fax Settings User Settings If necessary see the screen...

Страница 181: ...User Settings 5 15 5 Customizing Fax Settings 3 Press Store 4 Select Resolution Density Image Quality Direct or Stamp specify the desired settings...

Страница 182: ...ect Sending on p 2 8 For instructions on setting the Stamp mode see Stamping Originals on p 2 14 To cancel setting the standard fax settings press Cancel 5 Press OK The selected mode is set 6 Press Do...

Страница 183: ...User Settings 5 17 5 Customizing Fax Settings 2 Press or until Standard Settings appears press Standard Settings 3 Press Initialize...

Страница 184: ...Yes To cancel initializing the Standard Settings press No The message Initialized appears for approximately two seconds on the touch panel display The Standard settings are initialized 5 Press Done r...

Страница 185: ...sending an original The Address Book directory contains 14 indexes each of which can store up to 15 destinations IMPORTANT Changes made to the contents of a one touch speed dialing key while documents...

Страница 186: ...Storing Destinations 5 20 5 Customizing Fax Settings 1 Press Additional Functions Custom Fax Settings 2 Press Register Destinations...

Страница 187: ...g Destinations 5 21 5 Customizing Fax Settings 3 Press Index 4 Select the index in which you want to store the destination If the desired index is not displayed press or to scroll to the desired index...

Страница 188: ...dialing key in which you want to store the destination 6 Press Register NOTE For instructions on storing a group dialing destination see Storing Group Destinations on p 5 33 If you select a one touch...

Страница 189: ...e and at the end of the telephone number See Pause Time on p 5 43 Tone Press when you want to directly call an extension line that is connected to a PBX Private Branch Exchange which accepts only tone...

Страница 190: ...press Clear to clear your entry 8 Enter the name of the destination press Next You can enter up to 24 characters for the destination s name If you press Shift you can enter uppercase characters NOTE...

Страница 191: ...n enter up to 12 characters for the one touch speed dialing key s name If you press Shift you can enter uppercase characters The registered destination information is displayed NOTE For instructions o...

Страница 192: ...mode enables you to dial long distance numbers Select Long Distance 1 if transmission errors frequently occur when you make overseas calls when the overseas telephone number is registered in the Addre...

Страница 193: ...ining the destination for which you want to set optional settings If the desired one touch speed dialing key is not displayed press Index 3 Press Register Press or to display the prior or subsequent o...

Страница 194: ...5 Customizing Fax Settings 4 Press Option The Option screen appears NOTE To cancel storing optional settings press Cancel 5 If necessary specify the desired optional settings If you want to set the s...

Страница 195: ...can store up to five different start times Enter all four digits of the time including zeros using 24 hour notation NOTE If you make a mistake when entering the time press Clear to clear your entry en...

Страница 196: ...Storing Destinations 5 30 5 Customizing Fax Settings Select the desired sending speed press OK If you want to specify long distance settings Press Long Distance...

Страница 197: ...ong Distance 1 if communication errors frequently occur when you make overseas calls when the overseas telephone number is registered in the Address Book If errors persist try selecting Long Distance...

Страница 198: ...e last digit you entered If the recipient did not set a password for the target subaddress you do not need to enter a password IMPORTANT If you want to attach a subaddress to your send job make sure t...

Страница 199: ...o register several destinations in a one touch speed dialing key so that you can dial a large group of numbers at one time Destinations must be registered for one touch or coded speed dialing before y...

Страница 200: ...9 2 Select the one touch speed dialing key that you want to register as a group destination If the desired one touch speed dialing key is not displayed press Index select the index which contains the...

Страница 201: ...Dialing If you want to select a destination from the Address Book Press Address Book select the desired one touch speed dialing keys that you want to include in the group destination press Done The se...

Страница 202: ...pears on the Store Destinations screen IMPORTANT You cannot select a destination that is already stored in a group destination NOTE For more information on specifying coded speed dialing numbers see C...

Страница 203: ...mission times Enter all four digits of the time including zeros using 24 hour notation NOTE If you make a mistake when entering the time press Clear to clear your entry enter another four digit number...

Страница 204: ...up destination s one touch speed dialing key press OK You can enter up to 12 characters for the one touch speed dialing key s name If you press Shift you can enter uppercase characters The registered...

Страница 205: ...ndices each of which can contain up 15 destinations Follow the procedure below to assign a name to an index 1 Press Additional Functions Custom Fax Settings Register Destinations If necessary see the...

Страница 206: ...want to change the name of an index that has already been named press Clear enter the new name press OK NOTE For instructions on entering characters see Chapter 2 Basic Operations in the Reference Gu...

Страница 207: ...e does not support ECM this setting is ignored If transmission speed appears to be extremely slow you may be able to speed up the transmission time by turning ECM Off IMPORTANT If you want to transmit...

Страница 208: ...Transmission Settings 5 42 5 Customizing Fax Settings 2 Press TX Settings 3 Press ECM TX...

Страница 209: ...umber all at once In such cases insert a pause after the international access code When the machine dials the number it will pause where the pause was inserted in the number This helps to improve the...

Страница 210: ...ss OK The pause time can be set from 1 to 15 seconds in one second increments You can also use numeric keys to enter the value You can change the value by pressing or even if you entered the value usi...

Страница 211: ...f If you set Auto Redial to On you can set how many times the machine redials the number the redial interval and whether the document should be resent due to an error NOTE The default settings are 1 P...

Страница 212: ...Transmission Settings 5 46 5 Customizing Fax Settings 3 Select On or Off If you select On Press Option...

Страница 213: ...Auto Redial settings If you want to set the number of times the machine redials the number Press Redial Times Press or to set the number of redial times press OK The machine can redial from 1 to 10 t...

Страница 214: ...ssion error Press TX Error Resend Select how the machine should handle a transmission error press OK OK TX Error Resend Error and 1st page Auto Redial takes place if a sending error occurs The first p...

Страница 215: ...Transmission Settings 5 49 5 Customizing Fax Settings If you select Off Press OK The selected mode is set 4 Press Done repeatedly until the Fax Basic Features screen appears...

Страница 216: ...reception speed appears to be extremely slow you may be able to speed up the reception time by turning ECM Off IMPORTANT If you want to communicate using ECM it is necessary that ECM Reception be set...

Страница 217: ...Reception Settings 5 51 5 Customizing Fax Settings 2 Press RX Settings 3 Press ECM RX...

Страница 218: ...es screen appears Printing Footer Information on a Received Document You can set whether the machine prints the date day and time received transaction number and page number at the bottom of the recei...

Страница 219: ...Functions Custom Fax Settings RX Settings If necessary see the screen shots in steps 1 and 2 of ECM Reception on p 5 50 2 Press Received Page Footer 3 Select On or Off press OK The selected mode is se...

Страница 220: ...ocuments when there is no paper matching the size of the received document There are four printing methods Switches A B C and D Switch A The image is printed over two sheets of paper that have the sam...

Страница 221: ...ustomizing Settings in the Reference Guide The default setting for all switches is On Switch C The image is reduced and printed on paper that differs in width from the received document Switch D The i...

Страница 222: ...Printing Received Documents 5 56 5 Customizing Fax Settings 1 Press Additional Functions Custom Fax Settings 2 Press Printer Settings...

Страница 223: ...d Documents 5 57 5 Customizing Fax Settings 3 Press Select Cassette 4 Select On or Off for the respective switches press OK The selected mode is set 5 Press Done repeatedly until the Fax Basic Feature...

Страница 224: ...at the whole document is printed within the printable area of the paper NOTE The default settings are 1 Press Additional Functions Custom Fax Settings Printer Settings If necessary see the screen shot...

Страница 225: ...printed onto separate sheets of paper However if the size of the received document exceeds the recording paper slightly 1 2 12 mm or less the part of the image that does not fit on the paper is not pr...

Страница 226: ...NOTE You can also use numeric keys to enter the value You can change the value by pressing or even if you entered the value using numeric keys Select Ver Hor or Vertical Only for Reduce Direction pre...

Страница 227: ...ntil the Fax Basic Features screen appears Two Sided Printing You can print received documents on both sides of the paper This enables you to save paper NOTE The default setting is Off 1 Press Additio...

Страница 228: ...inting Received Documents 5 62 5 Customizing Fax Settings 2 Press Two sided Print 3 Select On or Off press OK The selected mode is set 4 Press Done repeatedly until the Fax Basic Features screen appea...

Страница 229: ...onsecutive pages to be printed Example If the LTR paper drawer is empty but the 11 x 17 paper drawer is loaded you can print two LTR documents onto a single sheet of 11 x 17 paper NOTE When the 2 On 1...

Страница 230: ...Printing Received Documents 5 64 5 Customizing Fax Settings 3 Select On or Off press OK The selected mode is set 4 Press Done repeatedly until the Fax Basic Features screen appears...

Страница 231: ...e the different types of memory boxes in advance There are three types of memory boxes Confidential Relay and Batch Sending For more information on using memory boxes see Using a Memory Box on p 3 8 I...

Страница 232: ...e important documents that you do not want unauthorized people to see See Memory Boxes on p 3 5 A document received in a Confidential Memory Box cannot be printed until you enter the password set for...

Страница 233: ...ory box number press Register If the desired memory box is not displayed press or to scroll to the desired memory box If you enter the memory box number using numeric keys make sure to enter a two dig...

Страница 234: ...Setting Up Memory Boxes 5 68 5 Customizing Fax Settings 5 Select Confidential press Next NOTE If you want to cancel setting up the selected memory box press Cancel 6 Press Register Name...

Страница 235: ...Basic Operations in the Reference Guide If you make a mistake press Clear to clear the entire entry enter the correct name If you want to cancel entering the memory box name press Cancel 8 If you wan...

Страница 236: ...ubaddress enter the subaddress Press Password enter the password Press OK You can enter up to 20 digits for both the subaddress and password Press Space to insert a space Press Backspace to delete the...

Страница 237: ...ting Memory Box Name Sets the memory box name Relay 1 24 characters maximum Password Sets a password to control the memory box It is necessary to enter the password to change the contents of the memor...

Страница 238: ...Memory Box on p 5 66 Item Description Setting Org Relay Unit Restriction Sets whether to restrict the original relay source machine from sending you a transmission request On Off 1 If On is selected t...

Страница 239: ...splayed press or to scroll the desired memory box If you enter the memory box number using numeric keys make sure to enter a two digit number press OK If you make mistake when entering the memory box...

Страница 240: ...press OK You can enter up to 24 characters for the Relay Memory Box name NOTE For instructions on entering characters see Chapter 2 Basic Operations in the Reference Guide If you make a mistake press...

Страница 241: ...s Next proceed to step 8 You cannot store a password with only zeros as the number such as 0000000 IMPORTANT Since there is no way to check a stored password make sure that you write it down and keep...

Страница 242: ...ubaddress This setting is required All documents must be sent and relayed with this subaddress If the subaddresses do not match the documents will not be received An RX password is optional However if...

Страница 243: ...d Dialing If you want to select a destination from the Address Book Press Address Book select the desired one touch speed dialing keys that you want to store as relay destinations press Done The selec...

Страница 244: ...dialing number 001 200 using numeric keys The selected destination appears on the Register Destinations screen NOTE For more information on specifying coded speed dialing numbers see Coded Speed Diali...

Страница 245: ...ion Specify the destination press OK If you do not want to set a restriction press Off You can also specify the relay destination using numeric keys If the desired destination is not displayed press o...

Страница 246: ...received document Press On for Print RX Document If you do not want to print the received document press Off If you want to specify the relay start time Press On for Relay Start Time NOTE If you sele...

Страница 247: ...ancel NOTE If you make a mistake when entering the time press Clear to clear your entry enter another four digit number 12 When all settings are complete press OK The selected modes are set 13 Press D...

Страница 248: ...shots in steps 1 and 2 of Confidential Memory Box on p 5 66 2 Press Memory Inboxes Settings If necessary see the screen shot in step 3 of Confidential Memory Box on p 5 66 Item Description Setting Me...

Страница 249: ...ed press or to scroll to the desired memory box If you enter the memory box number using numeric keys make sure to enter a two digit number press OK If you make mistake when entering the memory box nu...

Страница 250: ...press OK You can enter up 24 characters for the Batch Sending Memory Box name NOTE For instructions on entering characters see Chapter 2 Basic Operations in the Reference Guide If you make a mistake...

Страница 251: ...zeros as the number such as 0000000 If you do not want to set a password press Next proceed to step 8 IMPORTANT Since there is no way to check a stored password make sure that you write it down and ke...

Страница 252: ...d Dialing If you want to select a destination from the Address Book Press Address Book select the desired one touch speed dialing keys that you want to store as batch sending destinations press Done T...

Страница 253: ...number 001 200 using numeric keys The selected destination appears on the Register Destinations screen NOTE For more information on specifying coded speed dialing numbers see Coded Speed Dialing on p...

Страница 254: ...TX start time press Cancel Enter all four digits of the time including zeros using 24 hour notation The selected mode is set NOTE If you make a mistake when entering the time press Clear to clear your...

Страница 255: ...1 and 2 of Confidential Memory Box on p 5 66 2 Press Memory Inboxes Settings If necessary see the screen shot in step 3 of Confidential Memory Box on p 5 66 3 Select the memory box that you want to er...

Страница 256: ...box number press Clear enter the correct number 4 Press Yes If you do not want to erase the selected memory box press No The message Erased appears for approximately two seconds on the touch panel di...

Страница 257: ...anager the person in charge of the machine System Settings Table 6 2 Communications Settings 6 3 Send Start Speed 6 3 Receive Start Speed 6 6 Saving Received Documents in Memory 6 7 Automatic Forwardi...

Страница 258: ...on setting the modes not described in this manual refer to the other manuals listed in Manuals for the Machine on p ii Item Settings Applicable Page Communications Settings Send Start Speed 33600 bps...

Страница 259: ...also describes how to set change and erase settings for forwarding received documents Send Start Speed Setting the send start speed enables you to set the desired speed of transmission NOTE The defau...

Страница 260: ...er Settings 2 Press Communications Settings NOTE If the desired setting is not displayed press or to scroll to the desired setting 3 Press Send Start Speed NOTE If the desired setting is not displayed...

Страница 261: ...d mode is set NOTE If your document transmission is slow in starting this may mean that the telephone lines in your area are in poor condition Select a slower speed You can select 33600 bps 14400 bps...

Страница 262: ...munications Settings If necessary see the screen shots in steps 1 and 2 of Send Start Speed on p 6 3 If the System Manager ID and System Password have been set enter the System Manager ID and System P...

Страница 263: ...ts as soon as you receive it However there may be occasions when you want the machine to store all incoming documents in memory until you are ready to print them Locking the machine to receive and sto...

Страница 264: ...ed You can enter up to seven digits for the password If you enter fewer that seven digits the machine stores the password with leading zeros Example If 321 is entered 0000321 is stored The default set...

Страница 265: ...ettings screen enter the password using numeric keys press Next NOTE If the desired setting is not displayed press or to scroll to the desired setting 3 Select On press Option If you do not want to se...

Страница 266: ...hange the Memory Lock mode settings or cancel the Memory Lock mode If you do not want to set a password press Next proceed to step 5 You cannot store a password with only zeros as the number such as 0...

Страница 267: ...sult Report and Transmission Management Report Press On for Report Print If you do not want to print these reports press Off NOTE For an example of the Received Result Report and Transmission Manageme...

Страница 268: ...Days or Off If Everyday is selected press Next select a number 1 to 5 enter the start time using numeric keys press OK You can store up to five different start times Enter all four digits of the time...

Страница 269: ...t start automatically at a specified time You can manually switch the machine into the Memory Lock mode using the RX mode from the Special Features screen See Changing the Reception Mode on p 3 17 NOT...

Страница 270: ...you want to specify the Memory Lock end time Press Memory Lock End Time Select Everyday Select Days or Off If Everyday is selected press Next select a number 1 to 5 enter the end time using numeric k...

Страница 271: ...mode will not end automatically at a specified time You can manually turn off the Memory Lock mode using the RX mode from the Special Features screen See Changing the Reception Mode on p 3 17 NOTE You...

Страница 272: ...o the Forward mode If you want to use the Forward mode you must first set the forwarding destination IMPORTANT If Forward Setting is set to Off your machine will not forward received documents You can...

Страница 273: ...end Start Speed on p 6 3 If the System Manager ID and System Password have been set enter the System Manager ID and System Password using numeric keys press ID NOTE If the desired setting is not displ...

Страница 274: ...ed to step 9 NOTE To cancel this setting press Cancel 4 If you want to set a password for the Forward mode enter a password using numeric keys press Next If you set a password it will be necessary to...

Страница 275: ...NOTE If you make a mistake when entering the password press Clear to clear the entire entry enter the correct password If you want to cancel setting the Forward mode press Cancel 5 Select the desired...

Страница 276: ...Press Coded Dialing enter the coded speed dialing number 001 200 using numeric keys The selected destination appears on the Register Destinations screen NOTE For more information on specifying coded s...

Страница 277: ...press OK If you do not want to restrict the reception of forwarded documents press Off You can also specify source the forward destination using numeric keys If the desired destination is not displaye...

Страница 278: ...Settings If you want to print the forwarded document Press On for Print RX Document If you do not want to print the received document press Off NOTE The default setting is Off If you want to specify t...

Страница 279: ...ys or Off If Everyday is selected press Next select a number 1 to 5 enter the send start time using numeric keys press OK You can store up to five different start times Enter all four digits of the ti...

Страница 280: ...rt automatically at a specified time You can manually switch the machine into the Forward mode using the RX mode from the Special Features screen See Changing the Reception Mode on p 3 17 NOTE You can...

Страница 281: ...Communications Settings 6 25 6 System Manager Settings If you want to specify the forward end time Press Forward End Time Select Everyday Select Days or Off...

Страница 282: ...f the week Sun to Sat select a number 1 to 5 enter the end times using numeric keys press OK You can store up to five different end times for each day of the week Enter all four digits of the time inc...

Страница 283: ...four digit number If the end time is set earlier than the start time received documents will stop being forwarded at the specified end time on the following day For example Start time 22 00 end time 2...

Страница 284: ...to enter the PIN code when you press Start The default setting is Off 1 Press Additional Functions System Settings Communications Settings If necessary see the screen shots in steps 1 and 2 of Send S...

Страница 285: ...of each item are shown below The selected mode is set Option Select if your PBX requires a PIN code depending on the destination If PIN Code Access is set to Option PIN Code appears on the Fax Basic...

Страница 286: ...the RX password is not attached to the document the document cannot be received IMPORTANT RX passwords are ignored if documents are being received in a memory box that is set with a password The memo...

Страница 287: ...word NOTE If the desired setting is not displayed press or to scroll to the desired setting 3 Enter the receive password using numeric keys and press OK You can enter up to 20 digits for the receive p...

Страница 288: ...ager Settings NOTE If you make a mistake when entering the password press Clear to clear your entry enter the correct password To cancel setting the RX password press Cancel 4 Press Done repeatedly un...

Страница 289: ...n the RX Job Status screen Redialing the last destination Registering destinations in the Address Book Sending faxes from a computer using the fax driver IMPORTANT Restrict New Addresses can only be s...

Страница 290: ...Restricting New Addresses 6 34 6 System Manager Settings 2 Select On or Off press OK The selected mode is set 3 Press Done repeatedly until the Fax Basic Features screen appears...

Страница 291: ...thod of setting the contents of a communications report and printing lists Report Settings Table 7 2 Specifying Report Settings 7 3 TX Report 7 3 Activity Report 7 6 RX Report 7 10 Memory Inbox RX Rep...

Страница 292: ...manual refer to the other manuals listed in Manuals for the Machine on p ii Item Settings Applicable Page Fax TX Report On For Error Only 1 Off p 7 3 Report With TX Image On 1 Off Activity Report p 7...

Страница 293: ...the Reference Guide TX Report The TX Report enables you to check whether documents were sent correctly to their intended destinations A TX Report can be printed automatically after the documents are...

Страница 294: ...Specifying Report Settings 7 4 7 Printing Communication Reports 2 Press Fax under Custom Settings 3 Press TX Report NOTE If the desired setting is not displayed press or to scroll the desired setting...

Страница 295: ...Error Only or On Select On or Off for Report With TX Image press OK Report With TX Image The selected mode is set If you select Off Press OK The TX Report is not printed The selected mode is set On Pa...

Страница 296: ...Job Status Log on p 4 6 NOTE If the optional iR Security Kit is activated and Job Log Display in System Settings from the Additional Functions screen is set to Off Activity Report is not displayed If...

Страница 297: ...not displayed press or to scroll the desired setting 3 Select On or Off for Auto Print Auto Print On The Activity Report is automatically printed when the number of send and receive transactions reach...

Страница 298: ...d and receive logs separately press On If it is not necessary to print the send and receive logs separately press Off 5 Select On or Off for Daily Activity Report Time press OK Daily Activity Report T...

Страница 299: ...the number of send and receive transactions exceeds 40 before the specified time an Activity Report of the most recent 40 transactions is printed NOTE If you make a mistake when entering the time pres...

Страница 300: ...lly after documents are received and you can also set the machine to print an RX Report only when a reception error occurs NOTE For an example of an RX Report see RX Report on p 9 5 The default settin...

Страница 301: ...or Off press OK Details of each item are shown below The selected mode is set 4 Press Done repeatedly until the Fax Basic Features screen appears For Error Only Prints a report only when a reception e...

Страница 302: ...ents in memory boxes NOTE For an example of a Memory Inbox RX Report see Memory Inbox Reception Report on p 9 6 The default setting is On 1 Press Additional Functions Report Settings Fax under Custom...

Страница 303: ...Specifying Report Settings 7 13 7 Printing Communication Reports 3 Select On or Off press OK The selected mode is set 4 Press Done repeatedly until the Fax Basic Features screen appears...

Страница 304: ...is loaded in the paper sources whose settings in Fax in Drawer Eligibility For APS ADS in Common Settings from the Additional Functions screen are set to On See Chapter 4 Customizing Settings in the R...

Страница 305: ...Printing Lists 7 15 7 Printing Communication Reports 2 Press Fax under Print List 3 Press Address Book List...

Страница 306: ...asic Features screen appears User s Data List You can print a list of Fax settings that have been specified from the Additional Functions screen NOTE For an example of a User s Data List see User s Da...

Страница 307: ...Lists 7 17 7 Printing Communication Reports 2 Press User s Data List 3 Press Yes To cancel printing press No The User s Data List is printed 4 Press Done repeatedly until the Fax Basic Features screen...

Страница 308: ...Printing Lists 7 18 7 Printing Communication Reports...

Страница 309: ...The end of the chapter shows you how to respond to error messages and contains a list of frequently asked questions and answers When Problems Occur 8 2 Sending Documents 8 2 Receiving Documents 8 4 Ot...

Страница 310: ...n if you press Cancel See Using the System Monitor Screen on p 1 43 Q Are you sending a fax document using the Direct Sending mode A Press Stop on the control panel or press Cancel on the touch panel...

Страница 311: ...documents with errors from memory See Printing and Erasing Documents on p 3 11 and Chapter 5 Using Arranging Documents Stored in an Inbox in the Mail Box Guide The document does not print clearly on...

Страница 312: ...machine is slow to switch over to the receiving mode and errors always occur Q Is a pause inserted in the fax number A If you are sending to a machine that is slow in switching over to fax receiving i...

Страница 313: ...o a stored memory box A Check the set subaddress and RX password and contact the sending party with this information Documents can only be received in memory boxes if the sender sends the documents wi...

Страница 314: ...t See Fax Information Services on p 3 41 Documents cannot be sent overseas error code 18 Q Is a pause inserted in the fax number A Insert a pause after the country code or after the fax number of the...

Страница 315: ...some action during scanning or printing When you need to make a decision or take some action while browsing the network The following is a list of self diagnostic error messages along with their possi...

Страница 316: ...IP Settings in Network Settings in System Settings from the Additional Functions screen See Chapter 3 Using a TCP IP Network in the Network Guide Remedy 2 Check whether the DNS server s DNS settings...

Страница 317: ...to either reduce the resolution at which the document is scanned or divide the document into two or more parts before sending it 005 Cause 1 The other party did not answer within 35 seconds Remedy Co...

Страница 318: ...and try again Cause 4 No pause was included in the telephone number when sending a fax overseas Remedy 1 Insert a pause after the country code or after the fax number of the other party and then dial...

Страница 319: ...t set a subaddress 081 Cause A password is not set in the remote machine Remedy Try sending the document to the remote machine without a password 099 Cause Sending was interrupted Remedy Try sending a...

Страница 320: ...Remedy 2 Erase documents stored in inboxes If the machine still does not operate normally turn the main power OFF and then back ON 704 Cause An error occurred while reading address information from th...

Страница 321: ...Erasing Documents on p 3 11 and Chapter 5 Using Arranging Documents Stored in an Inbox in the Mail Box Guide 851 Cause 1 There is insufficient memory remaining in the system Remedy Check the system s...

Страница 322: ...Error Messages 8 14 8 Troubleshooting 995 Cause Reserved communication jobs were cleared Remedy Reserve the jobs again if necessary...

Страница 323: ...e s memory and will be printed automatically when you finish copying You can change the order in which these documents print See Chapter 4 Customizing Settings in the Reference Guide Q I frequently se...

Страница 324: ...d document using the Remote UI User Interface or store the received documents in memory and then send them to a desired destination See Forwarding Received Documents on p 2 33 and Chapter 2 Checking a...

Страница 325: ...ns glossary and index Report and List Samples 9 2 TX Report Error TX Report 9 2 Multiple Communication Result Report 9 4 RX Report 9 5 Memory Inbox Reception Report 9 6 Activity Report 9 8 Address Boo...

Страница 326: ...k whether the documents were sent correctly to the intended destination You can set whether to automatically print a TX Report after sending documents See TX Report on p 7 3 NOTE You can also print a...

Страница 327: ...the remote party is printed ST TIME Start Time The date and time in 24 hour notation at which the document started to transmit are printed The start time is printed only for send jobs that have been...

Страница 328: ...O The four digit number that is automatically assigned when the document is accepted for sending is printed DEPT ID If Department ID Management is set the Department ID is printed PGS The number of pa...

Страница 329: ...ted when the reception of the document is completed successfully and also when a receiving error occurs MESSAGE A message describing the reception result is printed JOB NO The four digit number that i...

Страница 330: ...cessfully OK is printed If a reception error occurred NG No Good is printed If a reception error occurred the page number in which the error occurred and the error code number are printed Memory Inbox...

Страница 331: ...he name of the sender is printed ST TIME Start Time The date and time in 24 hour notation at which the document started to be received are printed USAGE T The time taken in minutes and seconds to rece...

Страница 332: ...rt on p 7 6 NOTE The default setting is On If a field exceeds its display capacity only those characters that fit in the display are printed DEPT ID If Department ID Management is set the Department I...

Страница 333: ...nsmission time are printed If the document has been successfully sent to the recipient OK is printed If a sending error occurred NG is printed the number of pages that were sent successfully and the e...

Страница 334: ...E The registered one touch speed dialing numbers 001 to 200 are printed on the first line and the registered destination names are printed on the second line CLASS The specified destination s class tr...

Страница 335: ...Data List The User s Data List prints out the Fax Settings made in Custom Fax Settings Report Settings and System Settings from the Additional Functions screen Manually print the User s Data List whe...

Страница 336: ...uper Fine Ultra Fine 8 pels 1 mm x 3 85 line mm 8 pels 1 mm x 7 7 line mm 8 pels 1 mm x 15 4 line mm 16 pels 1 mm x 15 4 line mm Transmission Speed Super G3 33 6 kbps G3 14 4 kbps Compression Method M...

Страница 337: ...Redial is set to On the machine automatically redials the recipient s facsimile number if the line was busy or if there was a sending error The machine will wait two minutes default after the initial...

Страница 338: ...mory Numbers up to 20 digits including spaces asterisks and pound signs can be used for the RX Password The machine prints a Confidential RX Report when you receive a confidential document in your Con...

Страница 339: ...until it confirms that all the data within the block has been transmitted successfully In this way ECM guarantees that a good image can be received at the receiving end ECM is very effective where th...

Страница 340: ...and photorealistic image files The image compression method used involves some loss of information and so reduces image quality Files containing photographic images in Web pages are generally compress...

Страница 341: ...icient than other protocols such as TCP IP It is supported natively by IBM operating systems and Microsoft Windows to provide services such as file sharing and printing NetBIOS Network Basic Input Out...

Страница 342: ...instruments such as paging systems and automatic callback and dialing PIN Code Personal Identification Number To prevent unauthorized access to telephone lines some PBX Private Branch Exchange systems...

Страница 343: ...ax is not transmitted Numbers of up to 20 digits including spaces asterisks and pound signs can be used for the RX Password S Scanning Area The area that is actually scanned is slightly smaller than t...

Страница 344: ...rd confidential or relayed communications are possible by attaching a subaddress and a password in advance Super Fine A resolution mode for sending originals at four times the detail of the Standard r...

Страница 345: ...ide is not the total time required for the entire transmission but only the time taken for the message to transmit TTI Transmit Terminal Identification Also called the TX Terminal ID The TTI is the na...

Страница 346: ...e 1 14 Setting the display language 1 11 Setting the line type 1 10 Things to do 1 10 bps 9 13 C Canceling jobs Using the Stop key 1 43 Using the System Monitor screen 1 43 Using the touch panel displ...

Страница 347: ...1 3 5 41 5 50 9 15 Error lamp 9 15 Error messages 8 7 Error code list 8 8 Self diagnostic display 8 7 F Fax Basic Features Screen 1 6 Fax information services 3 41 Fax jobs Checking fax job details 4...

Страница 348: ...ation Result Report sample 9 4 N NetBEUI 9 17 NetBIOS 9 17 NetWare 9 17 O On hook key 1 7 Orientation Horizontal placement 1 35 Vertical placement 1 35 OS 2 9 17 Overview 1 5 P Paper sizes 2 35 Pause...

Страница 349: ...password 9 19 RX report sample 9 5 RX Settings 5 50 ECM reception 5 50 Printing footer information 5 52 S Samples Activity Report 9 8 Address book list 7 14 Memory Inbox Reception Report 9 6 Multiple...

Страница 350: ...sages 8 7 Other situations 8 5 Q A 8 15 Receiving documents 8 4 Sending documents 8 2 TTI 9 21 TX 9 21 TX report error TX report sample 9 2 TX Settings 5 41 Auto redial 5 45 ECM transmission 5 41 Paus...

Страница 351: ......

Страница 352: ...atch Reigate Surrey RH2 8BF United Kingdom CANON DEUTSCHLAND GmbH Europark Fichtenhain A10 47807 Krefeld Germany CANON ITALIA S p A Via Milano 8 20097 San Donato Milanese MI Italy CANON LATIN AMERICA...

Отзывы: