background image

Updates Regarding Additional Functions

7

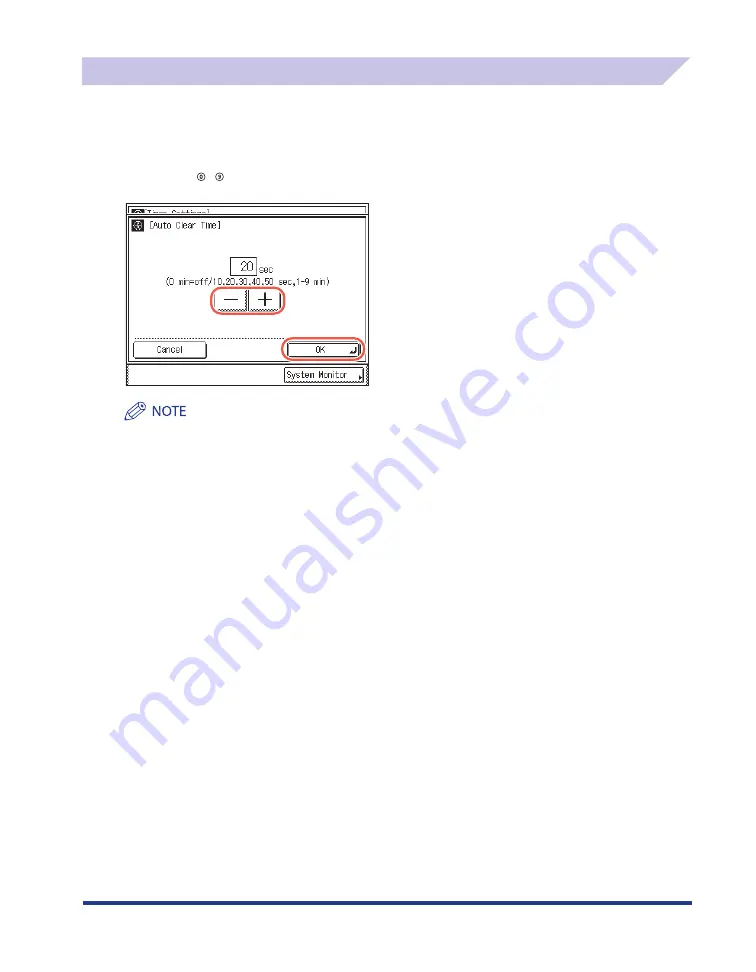
Auto Clear Time

If the machine remains idle for a certain period of time, the display returns to the default top screen 
or the top screen of the selected function. This period of time is called the “Auto Clear Time.”
The Auto Clear Time can be set to between 10 and 50 seconds (in ten second increments), in 
addition to the already available setting range of zero (Off) and one to nine minutes (in one minute 
increments).   -   (numeric keys) cannot be used to enter values. Press [-] or [+] to select the setting.


To disable the Auto Clear Time setting, select <0> 

 press [OK].

For more information on the Auto Clear Time setting, see Chapter 3, “Configuring the Machine’s Basic 

Settings,” in the 

Reference Guide.

Содержание imageRUNNER 2545i

Страница 1: ...reference Notification of New and Enhanced Functions Notification of New and Enhanced Functions ENG Please read this guide before operating this product After you finish reading this guide store it in...

Страница 2: ......

Страница 3: ...Notification of New and Enhanced Functions Notification of New and Enhanced Functions...

Страница 4: ...ability of the functions described in this notification may vary depending on the machine configuration and on the version or settings of the software such as printer drivers For more information cont...

Страница 5: ...ort Numbers 17 Setting the Secure Printing Function 18 Displaying an Alert Message When the Available Memory Gets Low 21 Updates Regarding the Printer Drivers 23 The Default Setting of the Printer Dri...

Страница 6: ...nese Traditional Croatian Czech Danish Dutch English Estonian Finnish French German Greek Hungarian Italian Japanese Korean Latvian Lithuanian Norwegian Polish Portuguese Romanian Russian Slovak Slove...

Страница 7: ...FR United Kingdom GB Greece GR Hungary HU Italy IT Japan JP Korea KR Netherlands NL Norway NO Poland PL Portugal PT Russia RU Sweden SE Singapore SG Slovenia SI Taiwan TW United States US Other two l...

Страница 8: ...ings and Remote UI On Off Item Settings Default Setting Reference Page Port Number Settings LPD 515 RAW 9100 HTTP 80 SMTP Receive 25 POP3 Receive 110 FTP Sending 21 SMTP Sending 25 SNMP 161 WSD 3702 H...

Страница 9: ...Auto Clear Time can be set to between 10 and 50 seconds in ten second increments in addition to the already available setting range of zero Off and one to nine minutes in one minute increments numeric...

Страница 10: ...l certificates sent from other devices such as servers client computers etc Up to 10 CA certificates including two pre installed CA certificates can be registered Certificates must meet the following...

Страница 11: ...emote UI generate a key pair file as described below To make changes to the System Settings enter the System Management mode For details see Chapter 1 Before You Start in the System Settings Guide 1 P...

Страница 12: ...6 Specify the signature algorithm and the key length Press the Signature Algorithm drop down list press SHA1 SHA256 SHA384 or SHA512 to select the desired hash algorithm Press the Key Length drop dow...

Страница 13: ...ear from which the certificate is valid using numeric keys Press Validity End Date enter the date day month and year to which the certificate is valid using numeric keys Press Next The date set for Va...

Страница 14: ...state name up to 24 characters using the on screen keyboard City Press to enter the city name up to 24 characters using the on screen keyboard Organization Press to enter the organization name up to 2...

Страница 15: ...or SSL communications Before you start setting the default key for SSL communications make sure to perform the following Generate an SSL key pair See Generating a Key Pair for SSL Communications on p...

Страница 16: ...e SSL setting is set to Off See Restricting the Use of Remote UI on p 15 If you want to check the details of each certificate select the desired key pair and press Cert Details On the Certificate Deta...

Страница 17: ...ed communications To make changes to the System Settings enter the System Management mode For details see Chapter 1 Before You Start in the System Settings Guide Changes made to Remote UI On Off becom...

Страница 18: ...L Communications on p 9 and Setting the Default Key for SSL Communications on p 13 If you want to enable the Remote UI and access the machine without using SSL Press On Press Off for Use SSL Press OK...

Страница 19: ...the page containing the key for the desired protocol Changes made to Port Number Settings become effective when the machine is restarted To restart the machine turn it OFF wait at least 10 seconds and...

Страница 20: ...automatically discarded from the machine s memory after the timeout period elapses You can also set the machine to accept only the secure print jobs when documents are printed from a computer To make...

Страница 21: ...ction To change the timeout setting Press Delete Timeout Press or to enter the desired timeout period press OK You can also enter values using numeric keys The timeout period can be set from 10 to 240...

Страница 22: ...ecure print jobs when documents are printed from a computer Press Only allow secure print jobs Press On OK To disable the setting press Off OK 4 Press Reset to return to the top screen For instruction...

Страница 23: ...an alert message can be specified to your preference in units of percentage This helps you confirm the amount of memory consumed when the message appears and avoid using up memory unnecessarily This...

Страница 24: ...Press OK to complete the procedure 4 Press or to decide the memory consumption level for an alert message press OK Press to decrease the memory consumption level minimum 60 or press to increase it max...

Страница 25: ...int from a Mac Computer you must install the printer driver and set up the printer configuration using the Mac printer driver The Mac OS driver may not be included in the supplied CD ROMs For more inf...

Страница 26: ...s For Mac Features of the Printer Driver UFR II Printer Driver Using the UFR II printer driver the various data processing tasks conventionally executed within the printer are appropriately divided be...

Страница 27: ...allation guide may vary depending on the type and version of the printer driver To Start the Installation In the installation folder double click the installation icon To Display the Installation Guid...

Страница 28: ...ates Regarding the Printer Drivers 26 Viewing the Online Help You can display the online help by clicking in the Printer Driver The online help includes additional information about every printing opt...

Страница 29: ...inting function connect the machine and computer via a network If you cannot select Secured Print for Output Method display the Device Settings sheet and select the Allow Use of Secured Print check bo...

Страница 30: ...Computer 28 4 Select Secured Print from Output Method and click Yes or No If the screen below appears specify the desired settings User Name Enter a name up to 32 characters Password Enter a number u...

Страница 31: ...for the secure print job and click OK If User Name and Password have been set earlier they will be displayed here Document Name Enter a name up to 32 characters User Name Enter a name up to 32 charac...

Страница 32: ...omputer 30 Entering the Password at the Machine for Printing 1 Press SCAN OPTIONS 2 Press Secure Print 3 Select the document that you want to print and press Print To print all documents press Select...

Страница 33: ...ting starts For instructions on how to make settings for Secure Printing Function see Setting the Secure Printing Function on p 18 Depending on the user operating conditions secured documents may not...

Страница 34: ...obs are complete and then try again 0853 Cause A print job sent from a computer via a printer driver is canceled since Only allow secure print jobs is set to On Remedy 1 Set Only allow secure print jo...

Страница 35: ...ystem Settings which was available only on the machine s control panel can now be specified both on the machine s control panel and on the Remote UI in the System Manager mode For information on how t...

Страница 36: ...a new key pair and set it as the default key See Chapter 3 Setting up the Machine for Your Network Environment and Chapter 2 Connecting the Machine to a TCP IP Network in the System Settings Guide Th...

Страница 37: ...9 F The Metropolis Tower 10 Metropolis Drive Hunghom Kowloon Hong Kong USRM2 0818 00 CANON INC 2011 CANON INC 30 2 Shimomaruko 3 chome Ohta ku Tokyo 146 8501 Japan CANON U S A INC One Canon Plaza Lake...

Отзывы: