


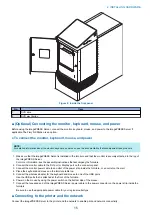


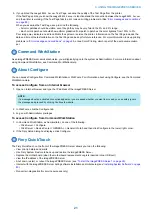


● To connect to the printer
1. Make sure that the imagePRESS Server and the printer are powered off.
2. Locate the printer interface cable.
3. Connect one end of the printer interface cable to the printer interface port on the back of the imagePRESS Server (see
“Connecting the imagePRESS Server” on page 13
4. Connect the other end of the printer interface cable to the printer.
5. Connect the crossover Ethernet cable to the lower RJ-45 port on the imagePRESS Server and the printer.
IMPORTANT:
The straight-through network cable at the customer site and the crossover Ethernet cable included with the
imagePRESS Server look similar, but are not interchangeable. Make sure that you connect the crossover Ethernet
cable to the Lower RJ-45 port on the back of the imagePRESS Server.
1
2
3
4
1
2
3
4
1
2
3
4
3
4
1
2
=
=
1
2
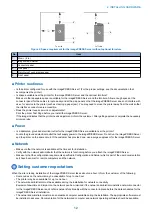
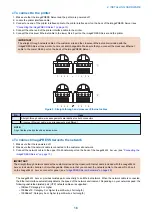
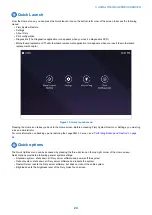
Figure 5: Straight-through and crossover Ethernet cables
No.
Item
1
Straight-through cable: wire arrangements are identical on both connectors
2
Crossover Ethernet cable: wire arrangements are different
NOTE:
Align Cables side by side and examine wires.
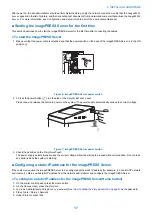
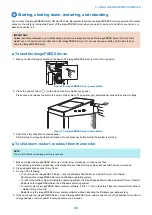
● To connect imagePRESS Serverto the network
1. Make sure that the is powered off.
2. Make sure that the network cable is connected to the customer site network.
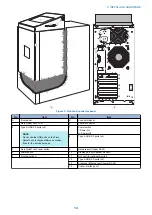
3. Connect the network cable to the upper RJ-45 network port on the back of the
imagePRESS Server
IMPORTANT:
The straight-through network cable at the customer site and the crossover Ethernet cable included with the
imagePRESS
Server
look similar, but are not interchangeable. Make sure that you connect the network cable to the upper RJ-45 port
on the
imagePRESS Server
connector panel. (see
“imagePRESS Server hardware” on page 29
)
The
imagePRESS Server
provides twisted pair connectivity to an Ethernet network. When the network cable is connected,
the Ethernet interface automatically detects the speed of the network environment. Depending on your network speed, the
following unshielded twisted pair (UTP) network cables are supported:
• 10BaseT: Category 3 or higher
• 100BaseTX: Category 5 or higher (4-pair/8-wire, short-length)
• 1000BaseT: Category 5e or higher (4-pair/8-wire, short-length)
2. INSTALLING HARDWARE
16
Содержание ImagePRESS Server H350 V2
Страница 8: ...Introduction 1 Introduction 2 Specifications 7 ...
Страница 17: ...INSTALLING HARDWARE 2 Installing Hardware 11 ...
Страница 26: ...USING THE IMAGEPRESS SERVER 3 Using the imagePRESS Server 20 ...
Страница 35: ...REPLACING PARTS 4 Replacing parts 29 ...
Страница 38: ...1 2 Figure 19 Inside the front panel No Item 1 DVD drive 2 DVD eject button 4 REPLACING PARTS 31 ...
Страница 86: ...INSTALLING SYSTEM SOFTWARE 6 Installing System Software 80 ...
Страница 91: ...TROUBLESHOOTI NG 7 Troubleshooting 85 ...
Страница 104: ...INSTALLATION PROCEDURE 8 Installation 98 Removable HDD Kit B5 108 ...