1
2
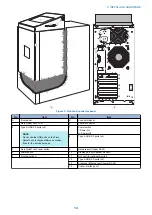
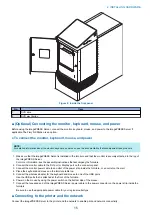
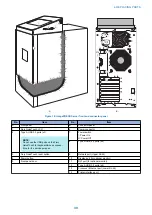
Figure 4: Inside the front panel
No.
Item
1
DVD drive
2
DVD eject button
■ (Optional) Connecting the monitor, keyboard, mouse, and power
Before using the imagePRESS Server, connect the monitor, keyboard, mouse, and power to the imagePRESS Server if
applicable.The Fiery NX Station is an option.
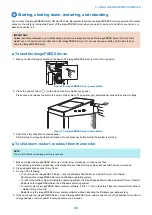
● To connect the monitor, keyboard, mouse, and power
NOTE:
For detailed information about the monitor, keyboard, and mouse, see the documentation that accompanies those products.
1. Make sure that the imagePRESS Server is installed in the furniture and that the monitor is securely attached to the top of
the imagePRESS Server.
For more information, see the assembly instructions that accompany the furniture.
2. Connect the monitor cable to the DVI port or Display port on the connector panel.
3. Connect the monitor power cable to an outlet of the power strip inside the furniture, or an outlet on the wall.
4. Place the keyboard and mouse on the furniture table top.
5. Connect the wireless adapter for the keyboard and mouse to one of the USB ports.
Use the USB ports that is attached at the front of the furniture.
6. Power on the mouse by using the power switch on the bottom side of the mouse.
7. Connect the recessed end of the imagePRESS Server power cable to the power connector on the power strip inside the
furniture.
Be sure to use the appropriate power cable for your regional outlet type.
■ Connecting to the printer and the network
Connect the imagePRESS Server to the printer and the network to enable print and network connectivity.
2. INSTALLING HARDWARE
15
Содержание ImagePRESS Server H350 V2
Страница 8: ...Introduction 1 Introduction 2 Specifications 7 ...
Страница 17: ...INSTALLING HARDWARE 2 Installing Hardware 11 ...
Страница 26: ...USING THE IMAGEPRESS SERVER 3 Using the imagePRESS Server 20 ...
Страница 35: ...REPLACING PARTS 4 Replacing parts 29 ...
Страница 38: ...1 2 Figure 19 Inside the front panel No Item 1 DVD drive 2 DVD eject button 4 REPLACING PARTS 31 ...
Страница 86: ...INSTALLING SYSTEM SOFTWARE 6 Installing System Software 80 ...
Страница 91: ...TROUBLESHOOTI NG 7 Troubleshooting 85 ...
Страница 104: ...INSTALLATION PROCEDURE 8 Installation 98 Removable HDD Kit B5 108 ...


