


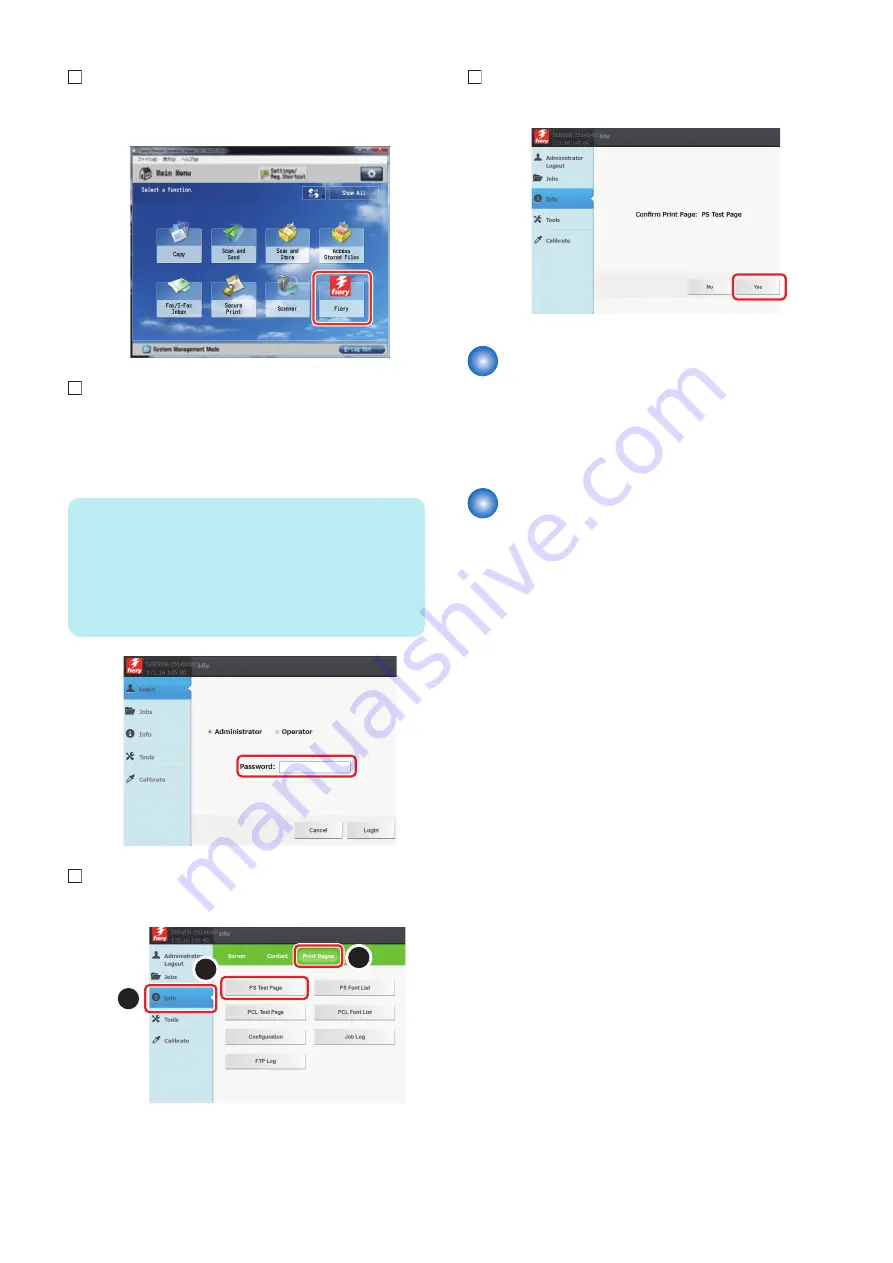
1. Select [Fiery] from the main menu on the host
machine's LCD.
2. Select [Login] to log in as a system administrator.
A password input screen is displayed at the time of
installation. Entering "
Fiery password
" in the password
field displays the setting screen.
NOTE:
On the Fiery Server Configuration page, look
for ID in the BIOS Setup section. The
alphanumeric characters in the ID field is the
default password.(Print the Configuration
page: Press the Fiery logo, then press [Info]
> [Print Pages] > [Configuration].)
3. Select [Info] > [Print Pages] > [PS Test Page].
1
2
3
4. Press [Yes].
Connecting to the Network
Ask the network administrator to connect to the network,
make settings and output the test print.
Refer to "Configuration and Setup" in User's Manual for
details of checking work.
Executing Image Quality
Adjustment
Execute the image quality adjustment shown below at
installation. (Refer to "Installation" in Service Manual for host
machine.)
• Auto Gradation Adjustment
• Register Paper to Adjust
• Execution of Correct Shading
• Auto Correct Color Tone Settings (Only when installing
the Image Reader Unit)
6. INSTALLATION PROCEDURE
93
Содержание imagePRESS Server G250 V2
Страница 7: ...Introduction 1 Introduction 2 Specifications 7 ...
Страница 16: ...Using the imagePRESS Server 2 Using the imagePRESS Server 11 ...
Страница 20: ...REPLACING PARTS 3 Replacing Parts 15 ...
Страница 52: ...INSTALLING SYSTEM SOFTWARE 4 Installing System Software 47 ...
Страница 74: ...TROUBLESHOOTI NG 5 Troubleshooting 69 ...
Страница 86: ...INSTALLATION PROCEDURE 6 Before Connection 81 Installation Procedure 83 Settings After Installation 91 ...
Страница 94: ...9 10 11 2x 1x 12 1x Cross Ethernet Cable 1x 6 INSTALLATION PROCEDURE 88 ...