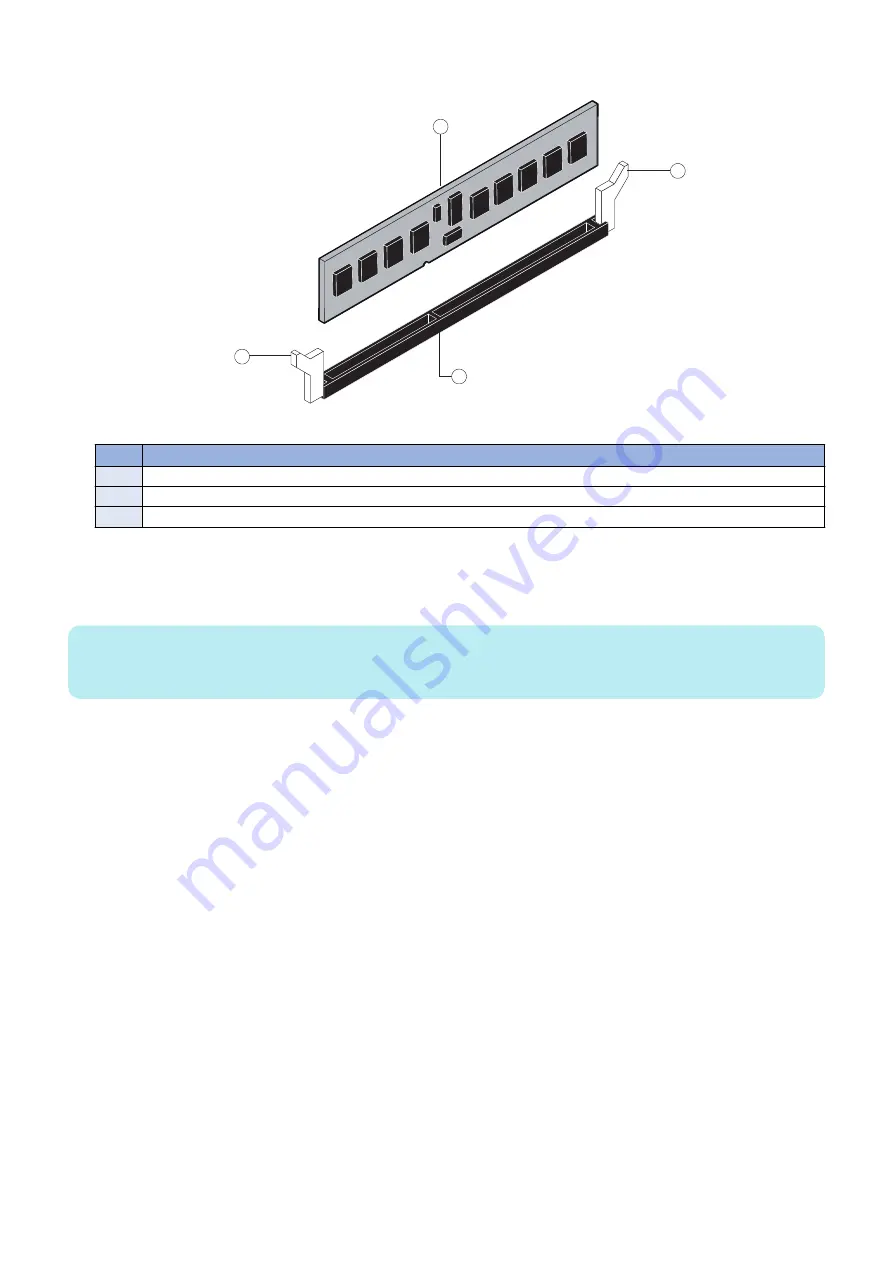
2. To release a DIMM, push outward on the levers on each side of the DIMM (see below figure).
1
2
3
1
Figure 11: Releasing a DIMM
No.
Name
1
Lever
2
DIMM
3
Slot notch
3. Lift the DIMM straight out of the slot.
4. To replace a DIMM, position the DIMM in the DIMM-A0 slot and press the DIMM straight down into the slot, so that
the levers lock the DIMM into place (see above figure).
NOTE:
DIMM fits in the slot only one way. The notch on the bottom of the DIMM should line up with the notch in the slot. Make sure that
the levers close securely around the ends of the DIMM and that the DIMM is fully seated in its slot.
5. Reassemble the
imagePRESS Server
and verify its functionality (see
“Restoring imagePRESS Server functionality
■ Motherboard
This section describes the battery and default jumper settings on the
imagePRESS Server
motherboard, as well as procedures
for removing and replacing the motherboard.
If you are replacing the motherboard with a new one, ask the site administrator for the Fiery ID to unlock the Fiery User Data
Encryption. (see
“How to obtain the Fiery password” on page 8
)
By unlocking the encryption, the new motherboard can read the necessary information and user data stored on the HDD. (see
The default Fiery ID for User Data Encryption is the Fiery password printed on the Configuration Page.
For details, see
“How to obtain the Fiery password” on page 8
. The site administrator can change the Fiery ID using Configure
WebTools (by selecting Security > User Data Encryption).
● Battery
The battery is located on the motherboard. Spare batteries are not provided by your authorized service/support center.
If you must replace the battery, use a 3V manganese dioxide lithium coin cell battery (Panasonic CR2032 or equivalent).
3. REPLACING PARTS
23
Содержание imagePRESS Server G250 V2
Страница 7: ...Introduction 1 Introduction 2 Specifications 7 ...
Страница 16: ...Using the imagePRESS Server 2 Using the imagePRESS Server 11 ...
Страница 20: ...REPLACING PARTS 3 Replacing Parts 15 ...
Страница 52: ...INSTALLING SYSTEM SOFTWARE 4 Installing System Software 47 ...
Страница 74: ...TROUBLESHOOTI NG 5 Troubleshooting 69 ...
Страница 86: ...INSTALLATION PROCEDURE 6 Before Connection 81 Installation Procedure 83 Settings After Installation 91 ...
Страница 94: ...9 10 11 2x 1x 12 1x Cross Ethernet Cable 1x 6 INSTALLATION PROCEDURE 88 ...


