background image

Getting the Best Colors from Your Machine

41

imagePRESS C850/C750/C650/C65

When Creating a Custom Output Profile, How Do I Do? 

If you create a custom output profile using profile creation software, you need to output the chart for 
color measurement from the imagePRESS Server� Specify the job properties for the outputting chart in the 
Command WorkStation as follows�

IMPORTANT

Make sure to do the following procedure� If the job properties are not specified properly, the chart for color 
measurement may not be output correctly�

NOTE

For information on how to create a custom output profile, see the user manual or the Help for the profile 
creation software you are using�

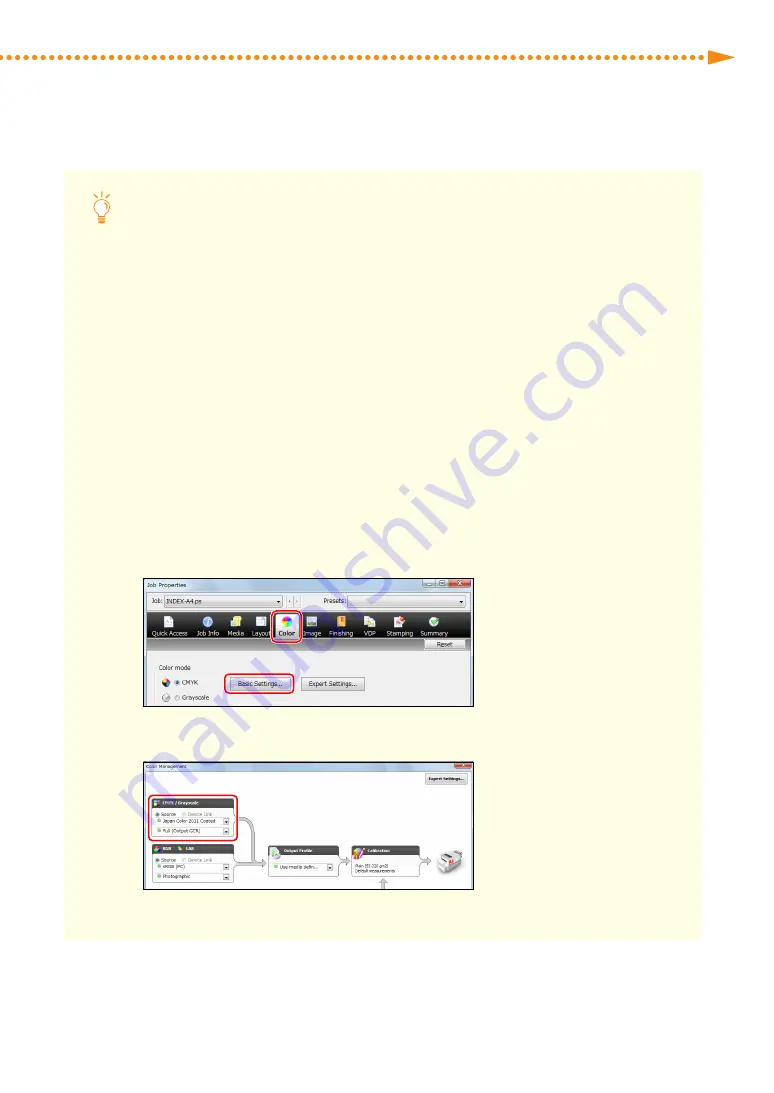
1

Double-click the job for which you want to output a chart�

•  [Job Properties] is displayed�

2

Select the [Color] tab, and then click [Basic Settings]�

3

Select [Bypass conversion] in [CMYK/Grayscale] on the <Color Management> screen�

Содержание imagePRESS C850

Страница 1: ...and solutions to common printing problems We recommend you read this document and the User s Guide USRMA 0684 00 Copyright CANON INC 2016 Practical Guide for Advanced Printing You can access canon co...

Страница 2: ......

Страница 3: ...h Fold Position to the Center of the Booklet 97 Improving the Finish of Booklets 98 Step 1 Confirming the Basic Settings 98 Step 2 Confirming the Position of Text and Images on the Page 100 Step 3 Adj...

Страница 4: ...ds If you want to calibrate the colors quickly and easily 1 Simple Calibration p 4 If you want to calibrate the colors as precisely as possible even if it takes time and effort Enhanced Calibration p...

Страница 5: ...ule Make sure to do automatic gradation calibration prior to doing either one of the following calibrations If you are using the imagePRESS Server and a spectrophotometer such as an X Rite i1 Pro you...

Страница 6: ...the premise that the environment temperature and humidity in which the machine is installed satisfies the recommended range If the environment does not satisfy this range do Enhanced Calibration p 5 P...

Страница 7: ...up the paper you want to print on is categorized and then select the corresponding type of paper you can use for calibration To keep making corrections precisely calibrate the machine for the paper yo...

Страница 8: ...or Select Paper to Adjust Adjustment for Image Quality and Finishing Calibration Automatic Gradation Adjustment Selecting Paper for Calibration in the User s Guide 4 Do automatic gradation calibration...

Страница 9: ...ion in the User s Guide 4 Do automatic gradation calibration full calibration Adjustment for Image Quality and Finishing Calibration Automatic Gradation Adjustment Full Adjustment in the User s Guide...

Страница 10: ...automatic gradation calibration full calibration Adjustment for Image Quality and Finishing Calibration Automatic Gradation Adjustment Full Adjustment in the User s Guide 5 If you are using the image...

Страница 11: ...ustment Maintenance Adjust Image Quality Auto Adjust Gradation Thin 1 Plain Heavy 1 4 3 Select the paper you loaded for calibration for group A for Select Paper to Adjust Adjustment for Image Quality...

Страница 12: ...r Copy Digital 28 lb 105 g m2 Type of paper you want to print on is Thick 221 256 gm2 Mohawk Options Navajo Smooth Brilliant White 90 lb Cover 243 g m2 Type of paper you want to print on is Coated 106...

Страница 13: ...Gradation Adjustment Full Adjustment in the User s Guide 8 If you are using the imagePRESS Server do steps 1 to 8 in Calibrations on the imagePRESS Server in Required Calibrations p 22 Do calibration...

Страница 14: ...ent Maintenance Adjust Image Quality Auto Adjust Gradation Heavy 5 3 Select the paper you loaded for calibration for group B for Select Paper to Adjust Adjustment for Image Quality and Finishing Calib...

Страница 15: ...f paper you want to print on is Heavy Thick 257 300 gm2 Canon Oc Top Colour Paper 300 g m2 Type of paper you want to print on is Coated 106 180 gm2 OK Top Coat Plus 127 9 g m2 Type of paper you want t...

Страница 16: ...Color Copy Digital Cover 100 lb 271 g m2 2 Press Adjustment Maintenance Adjust Image Quality Auto Adjust Gradation Thin 1 Plain Heavy 1 4 3 Select the paper you loaded for calibration for group A for...

Страница 17: ...Pacific Regions Type of paper you want to print on is Plain 52 220 gm2 Canon Oc Top Colour Paper 100 g m2 Type of paper you want to print on is Thick 221 256 gm2 Canon Oc Top Colour Paper 250 g m2 Ty...

Страница 18: ...omatic gradation calibration For more information on Adjustment Level for automatic gradation calibration see Adjustment for Image Quality and Finishing Calibration Automatic Gradation Adjustment Chan...

Страница 19: ...form multiple calibrations perform in order as follows Every day Auto Gradation Adjustment As necessary Auto Color Tone Correction Auto Color Tone Correction Shading Correction Shading Correction Cali...

Страница 20: ...Paper 300 g m2 Type of paper you want to print on is Coated 106 180 gm2 OK Top Coat Plus 127 9 g m2 Type of paper you want to print on is Heavy Coated 181 300 gm2 Futura Gloss Cover 271 g m2 For the A...

Страница 21: ...g m2 Mohawk Options Navajo Smooth Brilliant White 90 lb Cover 243 g m2 Hammermill Color Copy Digital Cover 100 lb 271 g m2 If the paper name is described for the European and Asia Pacific regions in t...

Страница 22: ...per Settings Paper Settings to check the paper type 3 Select the paper that you want to correct then press Initialize When Using Full Adjust Adjustment for Image Quality and Finishing Calibration Auto...

Страница 23: ...omatic gradation calibration full calibration is finished for all paper types Return Adjustment Level to Same for All Paper Types after adjustment for all paper types is finished 6 Create and register...

Страница 24: ...ation values that you have registered 1 Click Job Center Calibrate in Command WorkStation 2 Select each item as follows and click Continue Calibrate for Select the paper you use for the calibration Se...

Страница 25: ...e the calibration paper on the top Focus the sensor of the spectrophotometer on the white area indicated by the red frame in the image 5 Hold the spectrophotometer button and scan the cyan strip Hold...

Страница 26: ...24 imagePRESS C850 C750 C650 C65 24 7 After Measurements completed successfully appears click Continue 8 Click Apply Close...

Страница 27: ...2 select one of the following types of paper for Calibrate for For the European and Asia Pacific Regions Canon Oc Top Colour Paper 100 g m2 Plain 52 220 gm2 Canon Oc Top Colour Paper 250 g m2 Thick 22...

Страница 28: ...g If this is the case use an uncoated paper that is as close as possible to the basis weight of the paper you are using for printing For more information see Types of Paper You Can Use for Calibration...

Страница 29: ...e paper drawer in which the paper you can use for calibration has been loaded as the paper source that is loaded with custom paper to be used as the paper type to adjust 4 Select the paper you registe...

Страница 30: ...ype of paper you can use for calibration as the paper type that you use for test printing Select the paper drawer in which the paper you can use for calibration has been loaded as the paper source for...

Страница 31: ...l spectrophotometer X Rite i1 Pro to calibrate the machine for the paper you want to print on You need to connect the spectrophotometer to a machine on which Command WorkStation is installed 1 Click t...

Страница 32: ...the calibration settings if you enter specific characteristics of the paper you are calibrating such as gloss value in addition to basis weight and paper type You can check the print settings by click...

Страница 33: ...50 C750 C650 C65 6 Follow steps 3 to 7 in Calibrations on the imagePRESS Server p 22 in Required Calibrations 7 Link the calibration setting with the output profile and click OK The calibration settin...

Страница 34: ...the Device Center tab in Command WorkStation Resources Profiles 9 Click Output Profiles to display a list of profiles An output profile with Copy appended to the name appears in the list as the output...

Страница 35: ...nter the items as shown below and click OK Profile Description Enter a simple description to distinguish this profile from other profiles Media Type Nothing needs to be selected Calibration Select the...

Страница 36: ...type or size of the paper Select the output profile you set in step 11 in Front Color Profile NOTE If the front and back surfaces of the paper are different you can select Back Color Profile and Front...

Страница 37: ...utput Profile How Do I Do p 41 Calibration Settings and Output Profiles You need to link the output profile to the calibration settings to use them for the paper you want to print on You can use a cal...

Страница 38: ...ob in the imagePRESS Server Follow the procedure below to use an arbitrary profile temporarily 1 Double click the job in Command WorkStation Job Properties is displayed 2 Select the Color tab and then...

Страница 39: ...100 g m2 or the paper you want to use for calibration which has been registered 2 Select the paper type you loaded in step 1 for Select Paper to Adjust Adjustment for Image Quality and Finishing Calib...

Страница 40: ...automatic gradation calibration full calibration and then perform shading correction and automatic color tone correction on the machine Doing so may improve the shades of colors If the wrong color ap...

Страница 41: ...drawer where you loaded the paper in step 1 as the paper source for test printing Shading Correction 4 Perform shading correction Adjustment for Image Quality and Finishing Calibration Shading Correct...

Страница 42: ...er you want to print on is Heavy Thick 257 300 gm2 Canon Oc Top Colour Paper 300 g m2 Type of paper you want to print on is Coated 106 180 gm2 OK Top Coat Plus 127 9 g m2 Type of paper you want to pri...

Страница 43: ...WorkStation as follows IMPORTANT Make sure to do the following procedure If the job properties are not specified properly the chart for color measurement may not be output correctly NOTE For informati...

Страница 44: ...f you want to change a calibration setting select the output profile which is linked with your desired calibration setting in Output Profile NOTE If you select Bypass conversion in CMYK Grayscale the...

Страница 45: ...Getting the Best Colors from Your Machine 43 imagePRESS C850 C750 C650 C65 6 Select the Image tab on the Job Properties screen clear the check box for Toner reduction 7 Click OK...

Страница 46: ...r a Job with the imagePRESS Server p 46 Step 1 Eliminating the Basic Causes Find the answers to your questions about how to solve your problems Q Do you calibrate the colors periodically A The density...

Страница 47: ...e on your machine or the simulation profile designated by your customer If you use some other simulation profile colors may change Solution Double click the job in Command WorkStation and click Color...

Страница 48: ...cribed in this section change overall colors If you want to change the colors of photos only see the following How to Print Clear Photos p 55 Printing a Spot Color Accurately p 46 Changing the Colors...

Страница 49: ...For detailed instructions for registration see the following help Command WorkStation Help Spot Colors About Spot Colors Creating a new spot color 4 Double click the job in Command WorkStation Job Pro...

Страница 50: ...colors so they are just a little bit lighter try the following procedure to adjust the entire palette of colors on the page 1 Right click the ripped job marked with in Command WorkStation click Image...

Страница 51: ...ange all the colors on the page so they appear the way you want For detailed instructions about adjusting colors see the help files for ImageViewer 3 To confirm if the colors are acceptable click File...

Страница 52: ...rofile by making fine adjustments to the CMYK tone curves in an existing profile NOTE If you use profile creation software instead of Command WorkStation to create custom profiles see the following re...

Страница 53: ...50 C650 C65 3 Adjust the CMYK tone curves and then click Save For detailed instructions on adjustments see the help files on the Color Editor screen 4 Enter an easy to understand description in Descri...

Страница 54: ...2 5 Click Close to close the Color Editor screen The created custom profile is added to the list 6 Print a test sheet using the custom profile you created to check the result If you are satisfied with...

Страница 55: ...nd a figure differences may appear in the printout as shown on the right follow the procedure below to solve the problem 1 Double click the job in Command WorkStation on the imagePRESS Server Job Prop...

Страница 56: ...harpness of text and lines We recommend Resolution for Printer s halftone The resolution setting is applied to photographs figures lines and text As a result you can reduce the differences in colors S...

Страница 57: ...tter photos 1 Right click the job in Command WorkStation on the imagePRESS Server click Image Enhance Visual Editor If Image Enhance Visual Editor is not displayed see When Image Enhance Visual Editor...

Страница 58: ...for Tone Color Sharpness and Red Eye Correction on the Image Enhance Visual Editor screen 3 Click File Proof Print to check the finished result If you are satisfied with the result click File Save to...

Страница 59: ...displayed 2 Click the Image tab and change the print settings for Image smoothing or Sharpness as necessary Reducing jagged edges and reducing noise Select the check box for Image smoothing This func...

Страница 60: ...are applied to future jobs as well as the current job Be sure to restore the settings to their defaults when you finish the job 1 Click the Device Center tab in Command WorkStation Workflows Image En...

Страница 61: ...ings screen select Automatic and click OK What to Do If After Printing Large Volumes of Text Documents Colors in Photos Are Inconsistent If you clean inside the main unit after printing large volumes...

Страница 62: ...roblems Q Are the letters or lines too small or too thin A If the letters or lines in the data you are printing are too small or too thin the printed letters and lines may appear faint Solution If pos...

Страница 63: ...of the changes that you make Printing figures lines and text with vivid clarity while keeping the smooth gradation of photographs Printing text with vivid clarity while keeping the smooth gradation of...

Страница 64: ...ailed information see Specifying the Settings for the Printout s Finish p 64 If you use this function colors of the edges on text and lines and colors of the text and lines themselves may look darker...

Страница 65: ...important Resolution This pattern is appropriate for producing text and thin lines Error diffusion This pattern is appropriate for producing text and thin lines because no jagged edges rough edges in...

Страница 66: ...64 imagePRESS C850 C750 C650 C65 64 Specifying the Settings for the Printout s Finish 1 Press Fiery 2 Press Tools Setup 3 Enter the password press Login...

Страница 67: ...Advanced smoothing Level 2 is more effective 6 Specify the settings for the text element If you want to make horizontal lines on the text thicker select Level 1 or Level 2 for Horizontal text width a...

Страница 68: ...and change the print settings in Black text and graphics according to what you are printing and how you want the printouts to appear Printing black text and lines clearly We recommend you select Pure...

Страница 69: ...g Clear Texts and Lines from Your Machine 67 imagePRESS C850 C750 C650 C65 4 Click OK OK Print a test sheet to check the sharpness of text and lines If you are satisfied with the result you can print...

Страница 70: ...t In these cases check the color mode of the data you are printing Is it RGB or CMYK Then follow the procedures described below This may help eliminate your problems For RGB Color Mode p 68 For CMYK C...

Страница 71: ...ransparency setting may be reduced However the colors may change and the image may become more dense overall Print a test sheet to check the finished result 1 Double click the job in Command WorkStati...

Страница 72: ...g the imagePRESS Server F200 Adobe PDF Print Engine is also available for direct printing of PDF files without using a printer driver You can avoid many problems by using an Adobe PDF Print Engine whi...

Страница 73: ...ne APPE 3 Click Save and close the Configure window 4 Click the Job Center tab in Command WorkStation and double click the job Job Properties is displayed 5 Click the Color tab and select the check bo...

Страница 74: ...t you expected because the top color does not knock out the area underneath because you set overprinting in the application by mistake Follow the procedure below to solve the problems 1 Double click t...

Страница 75: ...int the job If you are not satisfied with the result check the job and application settings Black Overprint You can specify the overprint setting for an object K black 100 on the imagePRESS Server wit...

Страница 76: ...ing and how you want the printouts to appear Overprinting text only Select Text Overprinting text figures and lines Select Text Graphics Not using overprint Select Off 4 Click OK OK Print a test sheet...

Страница 77: ...e printing start position based on the leading edge of the paper After the front side of the paper is printed the paper is reversed and the back side of the paper is printed from the trailing edge Bec...

Страница 78: ...For the appropriate temperature and humidity see the Installation and Operating Environment Guidelines or the Specialty Media Handling Guide Before you load paper place the package of paper near the...

Страница 79: ...again Make sure that the paper guide is placed in the correct position Q Did you register the paper type correctly A If you load a different brand of paper different from the one you have used before...

Страница 80: ...Solution Before you start a print job warm up the machine by printing 10 to 30 copies of a test page Step 2 Changing Settings on the Machine According to Paper Characteristics If Using the Scanner If...

Страница 81: ...st the position of the image by Do Not Use Scanner The Duplex Color Image Reader Unit H1 optional is required for this adjustment 1 Press Preferences Paper Settings Paper Type Management Settings Sele...

Страница 82: ...the paper type to adjust press Start Printing NOTE The test page is printed 5 Place the guide sheet on the platen glass with the arrows of the sheet and on the platen glass aligned 6 Align the mark on...

Страница 83: ...he test page over and then align the mark on the test page for the third scan operation with the mark on the guide sheet press Start Scanning 10 Turn the test page upside down and then align the mark...

Страница 84: ...nd pencil icon and change the settings for it After specifying the settings for the custom type of paper you made press Preferences Paper Settings Paper Settings and change a type of paper for the pap...

Страница 85: ...eferences Paper Settings Paper Type Management Settings select the brand of paper in which the image is misaligned press Details Edit Change for Adjust Image Position 2 Print a test page 3 Adjust the...

Страница 86: ...one to improve accuracy because the position of the images that are printed first is inconsistent If the humidity is high print about 30 copies of the test page and measure the final page If you are a...

Страница 87: ...stance in j Trapezoid Distortion Correction If the test page is so small that the distances b and h cannot be measured add c b and h as shown in the illustration on the right Enter these distances in...

Страница 88: ...ure to change the settings These settings can be changed for each job Front Back Front 2 mm 3 mm 1 mm Back 2 mm What you wanted to print What actually was printed 1 Double click the job in Command Wor...

Страница 89: ...nged for each job Front Back Front 2 mm 3 mm 1 mm Back 2 mm What you wanted to print What actually was printed 1 Double click the job in Command WorkStation on the imagePRESS Server Job Properties is...

Страница 90: ...lly X direction and vertically Y direction In this case enter the value for each direction as shown below Front X 1 00 mm Y 2 00 mm Back X 2 00 mm Y 3 00 mm 4 Click Print The machine starts printing C...

Страница 91: ...s is completed The laid out images on the two pages move together as a single image 2 mm 1 mm 2 mm 1 mm Possible Not Possible If you select Booklet in step 2 you can move the image toward the fore edg...

Страница 92: ...curl before printing Solution Keep the machine and paper in a room with steady temperature and humidity If the temperature and humidity are unstable it may cause the paper to expand or shrink resultin...

Страница 93: ...justing the values in small increments 1 Press Preferences Paper Settings Paper Type Management Settings Paper Type Management Adjusting the Level of Curl Correction in the User s Guide 2 Select the p...

Страница 94: ...f the paper such as moisture content the curl may not be corrected to your satisfaction If this happens see the following and adjust the level of the curl correction for the paper source in which you...

Страница 95: ...wrong position stapled papers may be misaligned Solution Align the edges of the paper and load it again Make sure that the paper guides are placed in the correct position Q Does the paper shrink when...

Страница 96: ...stapling If you select speed priority the precision for double stapling may fall Solution See the following and change the mode to Precision Priority Adjustment for Image Quality and Finishing Calibr...

Страница 97: ...ter of the Booklet p 95 Step 2 Adjusting the Saddle Stitch Fold Position to the Center of the Booklet p 97 NOTE Depending on the finisher you are using the functions mentioned in this section may not...

Страница 98: ...e stitch position to shift to the left while facing the printed side of the printout decrease the setting value 4 Make test prints and check the finish If the saddle stitch position is still not exact...

Страница 99: ...paper type that you want to edit from the list press Details Edit Change for Adj Saddle Stitch Fold Pos 3 Press or to adjust the saddle stitch fold position If you want the saddle stitch fold position...

Страница 100: ...to specify settings This section explains how to specify each setting to make a saddle stitch booklet that opens to the left left binding as an example Step 1 Confirming the Basic Settings p 98 Step...

Страница 101: ...example if you select A4 for Paper Size for 2 up the finished booklet size is A5 When making a saddle stitched booklet two pages of the original document are printed on each sheet of paper 2 up For e...

Страница 102: ...set the print position of each page is aligned to the center of the paper without a gutter When the pages are stitched together the printed image and text may be hidden Be sure to specify an appropri...

Страница 103: ...set to a negative value to move the margin to the gutter If you select At the center for Centering adjustment the images and text on both the left and right pages are centered on each page 4 mm X 2 m...

Страница 104: ...ser to the fore edges on some pages This is called creep compensation If the type area positions are inconsistent check that the creep compensation settings are correct Trimming Position 1 Without cre...

Страница 105: ...irst page of the main document is printed on the front cover even though you want to add a front cover using a pre printed cover The main document is printed on the inside of the front cover even thou...

Страница 106: ...50 C750 C650 C65 104 2 Click Define Cover to confirm the settings are appropriate Leaving the Inside of the Front Cover Blank 1 Confirm Front Back Separately is selected from the Content input drop do...

Страница 107: ...Improving the Finish of Booklets 105 imagePRESS C850 C750 C650 C65 2 Confirm Print on outside is selected from the Front cover drop down list...

Страница 108: ...ver and does not print on the inside of the front cover and then continues printing the second page of the print data on the page following the front cover If Print on inside is selected for the Front...

Страница 109: ...rint a job that has a total of 18 pages the pages are printed as shown below If the total number of pages in the print data does not match the settings for Front cover and Back cover unwanted blank pa...

Страница 110: ...ent Maintenance Adjust Action Finisher Tray A Alignment Adjustment or Finisher Tray B Alignment Adjustment Adjustment for Image Quality and Finishing Calibration Paper Alignment on Finisher Tray A B i...

Страница 111: ...to 63 g m2 14 lb bond to 16 lb bond paper compared with other types of paper due to the characteristics of the paper Setting Alignment Priority for Finisher Output Priority Settings Thin may improve t...

Страница 112: ...uctions described in the User s Guide to handle and prevent paper jams paper may be wrapping around the fixing belt Follow the procedures described in this section to solve the problems Step 1 Underst...

Страница 113: ...kind of paper is more likely to wrap around the fixing belt There Is a Very Dark Area Near the Leading Edge of the Paper A dense layer of toner is applied to print a dark area If the dark area is nea...

Страница 114: ...m with steady temperature and humidity Keep the paper in the same environment as that where the machine is located Before you load paper place the package of paper near the machine so it can fully acc...

Страница 115: ...dit Change for Adjust Gloss Fine Black adjust the value for Gloss toward the minus end Paper Type Management Adjusting the Gloss and Fine Black in the User s Guide Turn On the Toner Amount Reduction M...

Страница 116: ...ity mode as follows This may improve the situation However productivity falls overall because time is needed whenever the machine switches from one type of paper to another Press Function Settings Com...

Страница 117: ...uced the paper separates more easily from the surface of the fixing belt and other parts of the machine Enlarging the Leading Edge Margin Enlarge the width of the margin on the leading edge of the pap...

Страница 118: ...en Registered in the Machine Standard Paper Print Speed 52 g m2 to 220 g m2 14 lb bond to 80 lb cover Thin 1 or 2 Plain 1 or 2 Heavy 1 to 4 221 g m2 to 256 g m2 82 lb cover to 140 lb index Heavy 5 2 3...

Страница 119: ...temperature to adjust by printing on the thin paper first if you need to print on thin paper and heavy paper consecutively Order of Paper Used Fixing Unit Temperature Waiting Time Thin paper Thin pap...

Страница 120: ...Cartridge Replacement Replace toner cartridge Black The toner cartridge is empty but a little toner is left in the machine The machine continues to print jobs while toner is still left You can replac...

Страница 121: ...ngs Registration Output Tray Designation in the User s Guide High Volume Stack Mode If you set the High Volume Stack Mode to On the tray order to which printouts are output is fixed For example when y...

Страница 122: ...print 10 000 pages in a row using Plain 1 80 g m2 using the Multi drawer Paper Deck B1 The Multi drawer Paper Deck B1 has three paper sources the upper middle and lower drawers and each can stack up t...

Страница 123: ...tely runs out of paper Printing is interrupted for a slight moment during this paper source switching If you select the check box for Optimal Productivity the machine switches a paper source to anothe...

Страница 124: ...Select Group 2 press OK 6 In the same way that you change the setting for paper source change Group 1 to Group 2 for paper sources and NOTE Paper sources and are equivalent to the upper middle lower d...

Страница 125: ...below click OK Select by Select Paper Source Paper Source Select Drawer 4 Starting a Print Job As the machine starts printing paper is fed from the upper drawer of the Multi drawer Paper Deck B1 After...

Страница 126: ...rawers that contain the paper when you are using Auto Drawer Switching it switches paper sources in order of priority the highest priority first In the example described in this section the priority o...

Страница 127: ...a way to improve the overall productivity by roughly specifying priority for either heavy paper or thin paper Example To print on both Thin 1 64 g m2 and Plain 1 80 g m2 for a job Technically the tem...

Страница 128: ...more information see the following Settings Registration Productivity Image Quality Priority for Mixed Paper Type in the User s Guide Speeding Up a Print Job Manually When Printing on Heavy 5 Heavy 6...

Страница 129: ...ed paper the machine prints images more slowly to preserve the gloss of the image If you specify Productivity Priority in Coated Paper Productivity Gloss Priority you can force the machine to print fa...

Страница 130: ...ndicular to the direction of feed appear in the printout Feeding Direction Cause The intermediate transfer belt is warped Remedy If you have not used your machine for a long period of time the interme...

Страница 131: ...aper stock in extremely low humidity environments for a long period of time unless it is suitably wrapped Unwrap the paper immediately before you load it into the machine Keep unused paper in a closed...

Страница 132: ...ain unit several times Press Adjustment Maintenance Maintenance Clean Wire Maintenance Output Paper Becomes Dirty Wire Cleaning in the User s Guide Glossy streaks appear on both edges of the page para...

Страница 133: ...When paper with a longer width is used after copying or printing large volumes of paper with a shorter width colors on the left and right edges are faint Feeding Direction Cause The primary voltage th...

Страница 134: ...o Fix Curled Printouts p 90 To improve this situation when using paper that tends to curl adjust the value for Corr Tail End Toner Applic to match the specific characteristics of the paper Press Prefe...

Страница 135: ...Keep the paper in the same environment as that where the machine is located For the appropriate temperature and humidity see the Installation and Operating Environment Guidelines or the Specialty Medi...

Страница 136: ...Adj Secondary Transfer Volt to match the specific characteristics of the paper There are two types of problems type A and type B Adjust the value according to the problem with your printout Press Pref...

Страница 137: ...Paper Settings Paper Type Management Settings select the type of paper you are using that is having this problem press Details Edit Change for Adj Secondary Transfer Volt adjust the voltage value For...

Страница 138: ...y If paper loses moisture and the moisture content has become irregular the paper may become wavy Avoid storing paper stock in extremely low humidity environments for a long period of time unless it i...

Страница 139: ...temperature and humidity Keep the paper in the same environment as that where the machine is located For the appropriate temperature and humidity see the Installation and Operating Environment Guideli...

Страница 140: ...ific characteristics of the paper Press Preferences Paper Settings Paper Type Management Settings select the type of paper you are using that is having this problem press Details Edit Change for Adj P...

Страница 141: ...Temperature select High Adjustment for Image Quality and Finishing Calibration Adjusting Drum Temperature in the User s Guide White spots like blisters appear Feeding Direction Cause Temperature for f...

Страница 142: ...ing edge 174 mm 6 7 8 Bar of uneven glossiness Feeding Direction Cause Temperature for fixing toner does not match the specific characteristics of the paper Remedy To improve this situation adjust the...

Страница 143: ...pe of paper you are using that is having this problem press Details Edit Change for Adj Secondary Transfer Volt adjust the voltage value toward the minus end Paper Type Management Adjusting the Second...

Страница 144: ...of the developers Remedy To improve this situation adjust the voltage for the image development in Correct White Gap Press Adjustment Maintenance Adjust Image Quality Correct White Gap change the set...

Страница 145: ...aper 100 g m2 Thin 1 Plain 1 Plain 2 or Heavy 1 to 4 uncoated paper or custom paper with an equivalent finish and basis weight 64 g m2 to 220 g m2 Canon Oc Top Colour Paper 250 g m2 Heavy 5 uncoated p...

Страница 146: ...quivalent finish and basis weight 17 lb bond to 80 lb cover 64 g m2 to 220 g m2 Heavy5 uncoatedpaper orcustompaperwith anequivalentfinishandbasisweight 82lb coverto140lbindex 221g m2 to256g m2 Heavy 5...

Отзывы: