background image

1

2

3

4

5

6

7

8

9

10

11

Back

Previous

Next

TOP

11-14

Before Using the 
Machine

Document and Paper

Copying

Sending and 
Receiving

Printing and 
Scanning

Network

Remote UI

System Manager 
Settings

Maintenance

Troubleshooting

Appendix

Table of Contents

Index

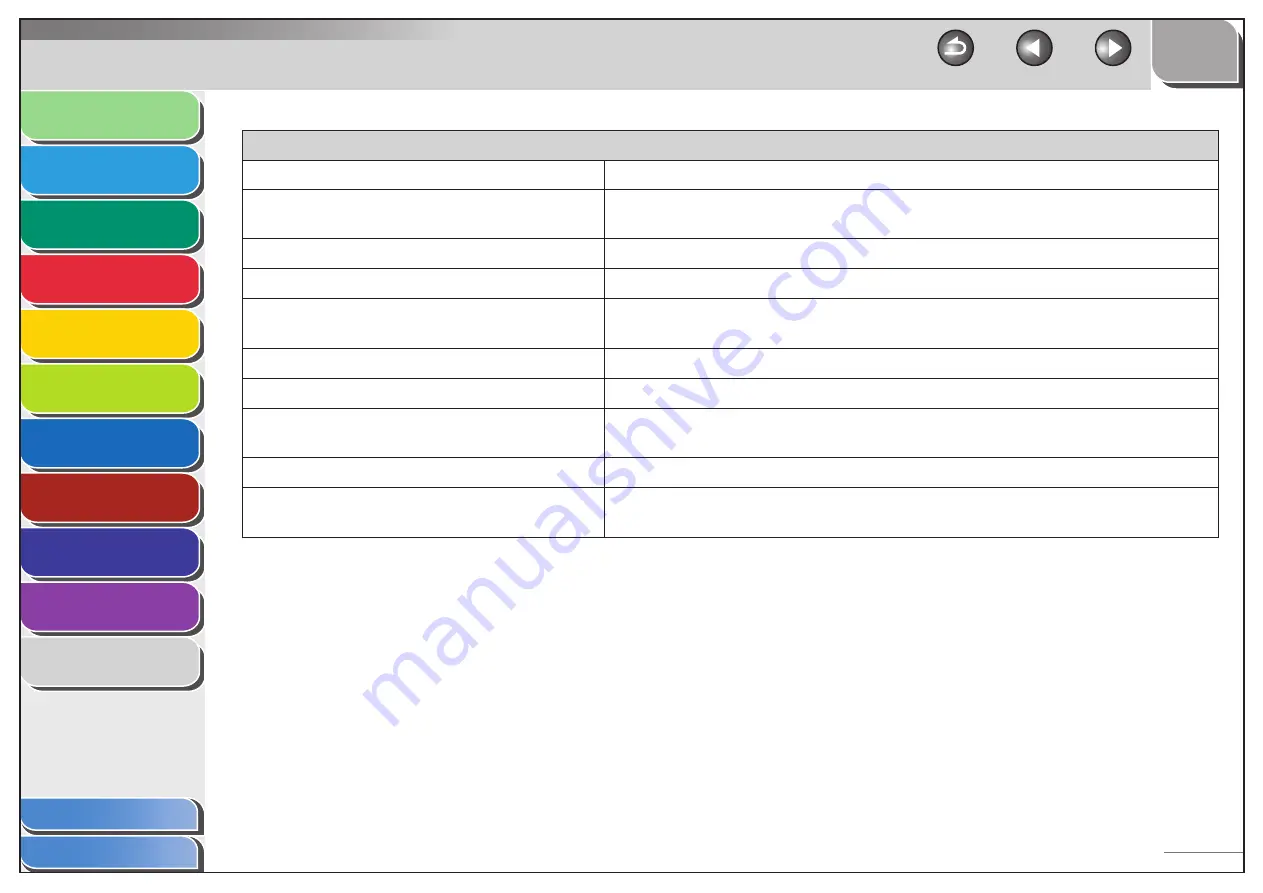
  ADDRESS  BOOK  SET.

Setting Item

Description

1.  1-TOUCH SPD DIAL

Registers recipients on one-touch speed dialing keys. Up to 8 recipients can be registered. (See 
“Storing/Editing One-Touch Speed Dialing Keys/Coded Speed Dialing Codes,” on p. 4-7.)

1.  NAME

Registers the recipient’s name (max. 20 characters, including spaces).

2.  TEL NUMBER ENTRY

Registers the recipient’s fax/telephone number (max. 50 digits, including spaces).

2.  CODED DIAL

Registers recipients for coded speed dialing codes. Up to 100 recipients can be registered. (See 
“Storing/Editing One-Touch Speed Dialing Keys/Coded Speed Dialing Codes,” on p. 4-7.)

1.  NAME

Registers the recipient’s name (max. 20 characters, including spaces).

2.  TEL NUMBER ENTRY

Registers the recipient’s fax/telephone number (max. 50 digits, including spaces).

3.  GROUP DIAL

Registers recipients in group dialing. Up to 8 groups can be registered. (See “Storing/Editing 
Recipients for Group Dialing,” on p. 4-9.)

NAME

Registers the group name (max. 20 characters, including spaces).

NO.0##=

Registers the recipient’s fax/telephone numbers stored under the one-touch speed dialing keys 
or coded speed dialing codes. Up to 50 recipients can be registered in a group.

Содержание ImageCLASS MF4270

Страница 1: ...nd Receiving Printing and Scanning Network Remote UI System Manager Settings Maintenance Troubleshooting Appendix How to Use This Guide Table of Contents Index Reference Guide Please read this guide before operating this product After you finish reading this guide store it in a safe place for future reference ...

Страница 2: ...t Adobe Reader Acrobat Reader Acrobat is required If Adobe Reader Acrobat Reader Acrobat is not installed on your system please download it from the Adobe Systems Incorporated website http www adobe com Considerable effort has been made to make sure that the manuals for the machine are free of inaccuracies and omissions However as we are constantly improving our products if you need an exact speci...

Страница 3: ...the type of image Image Quality p 3 3 Adjust the density level of scanned images Density p 3 3 Enlarge or reduce copied images Zoom Ratio p 3 4 Sort copies by page order Collate Copying p 3 6 Make two sided copies Two Sided Copy p 3 8 Copy two documents on one sheet 2 on 1 Combination p 3 7 Specify a recipient with a single key One Touch Speed Dialing Keys p 4 12 Specify a recipient with a two dig...

Страница 4: ...lar recipient Address Book Search p 4 14 Redial when the line is busy Redialing p 4 20 Send documents to multiple recipients Broadcasting p 4 17 Receive faxes in memory without printing out Memory Reception p 4 26 Reject faxes without their numbers Reception Restriction p 4 30 Send a fax from a PC PC Faxing Online Help Print a document from a PC Printing p 5 2 Sort printouts by page order Collate ...

Страница 5: ...UI System Manager Settings Maintenance Troubleshooting Appendix Table of Contents Index Make two sided printouts Two Sided Printing p 5 5 Specify detailed scanning options to suit various images Scanning Scanner Driver Guide Access and manage the machine from a PC Remote UI Chapter 7 Restrict the use of the machine with a password System Manager Settings p 8 2 ...

Страница 6: ...em Manager Settings Maintenance Troubleshooting Appendix Table of Contents Index Table of Contents Manuals for the Machine i Things You Can Do ii How to Use This Guide xx Using the Top Page xx Using the Chapter Topic List xxi Legal Notices xxiii 1 Before Using the Machine 1 1 Machine Components 1 3 Operation Panel 1 6 Main Operation Panel 1 6 Fax Operation Panel 1 9 ...

Страница 7: ...er Settings Maintenance Troubleshooting Appendix Table of Contents Index LCD Standby Mode 1 10 Copy Mode 1 10 Fax Mode 1 10 Scan Mode 1 10 Toner Cartridge 1 11 Maintaining the Toner Cartridge 1 12 Checking the Toner Level 1 13 Telephone Line Setting 1 14 Setting the Telephone Line Type 1 14 Timer Settings 1 15 Setting the Sleep Mode 1 15 Setting the Daylight Saving Time 1 16 ...

Страница 8: ...rk Remote UI System Manager Settings Maintenance Troubleshooting Appendix Table of Contents Index 2 Document and Paper 2 1 Document Requirements 2 2 Scanning Area 2 3 Loading Documents 2 4 On the Platen Glass 2 4 In the ADF 2 5 Paper Requirements 2 7 Printable Area 2 9 Loading Paper 2 10 Into the Multi Purpose Tray 2 10 Setting Paper Size and Type 2 13 ...

Страница 9: ...ng Network Remote UI System Manager Settings Maintenance Troubleshooting Appendix Table of Contents Index 3 Copying 3 1 Basic Copying Method 3 2 Scan Settings 3 3 Image Quality 3 3 Density 3 3 Zoom Ratio 3 4 Advanced Copy Features 3 6 Collate Copy 3 6 2 on 1 Combination 3 7 Two Sided Copy 3 8 Printing a Sample Page 3 10 Canceling Copy Jobs 3 11 ...

Страница 10: ...le of Contents Index 4 Sending and Receiving 4 1 Basic Sending Method 4 4 Scan Settings 4 5 Image Quality 4 5 Density 4 5 Storing Editing Address Book 4 6 Storing Editing One Touch Speed Dialing Keys Coded Speed Dialing Codes 4 7 Storing Editing Recipients for Group Dialing 4 9 Specifying Recipients 4 12 Using One Touch Speed Dialing Keys 4 12 Using Coded Speed Dialing Codes 4 13 Group Dialing 4 1...

Страница 11: ...ote UI System Manager Settings Maintenance Troubleshooting Appendix Table of Contents Index Manual Sending 4 16 Advanced Sending Features 4 17 Broadcasting 4 17 PC Faxing 4 18 Fax Dialing Features 4 19 Switching Temporarily to Tone Dialing 4 19 Redialing 4 20 Checking Dialing Line 4 21 Dialing an Overseas Number With Pauses 4 22 Basic Receiving Method 4 23 ...

Страница 12: ...ex Receiving Features 4 24 FAX TEL Optional Settings 4 24 DRPD Optional Settings 4 25 Manual Reception 4 25 Memory Reception 4 26 Memory Lock Reception 4 26 Remote Reception 4 28 Selecting the Receive Mode for Printing 4 29 Reception Restriction 4 30 Printing Received Documents 4 30 Canceling TX RX Jobs 4 32 Checking and Deleting Jobs 4 33 Checking Transmission Reception Results 4 33 Checking and ...

Страница 13: ...ubleshooting Appendix Table of Contents Index 5 Printing and Scanning 5 1 Printing Documents 5 2 Advanced Printing Features 5 3 Collate Printing 5 3 2 on 1 Combination 5 4 Two Sided Printing 5 5 Scanning to a Computer USB connection only 5 6 Canceling Scan Jobs 5 7 Canceling Scan Jobs to a Computer 5 7 Checking and Deleting Jobs 5 8 Checking and Deleting Print Jobs 5 8 Checking Print and Scan Coun...

Страница 14: ...nts Index 6 Network 6 1 System Requirements 6 3 Printing or Sending a Fax from a Computer 6 3 Basic Network Settings 6 4 IP Address Setting 6 4 Interface Settings 6 6 Communication Environment Setup 6 7 Setting Up a Computer for Printing Sending a Fax 6 10 Settings from the Operation Panel 6 10 Machine Connection Method LPD Raw 6 11 Print Server Settings 6 14 Additional Network Settings 6 15 TCP I...

Страница 15: ... Network Settings 6 18 Machine Management 6 19 Machine Management Using Web Browser Remote UI 6 19 Machine Management Using NetSpot Device Installer 6 19 7 Remote UI 7 1 System Requirements 7 3 Using the Remote UI 7 4 Starting the Remote UI 7 4 Displaying Device Status and Information 7 6 Job Management 7 7 Managing Print Jobs 7 7 Viewing the Activity Log 7 8 Managing the Address Book 7 9 Customiz...

Страница 16: ...ppendix Table of Contents Index Import Export Function 7 16 Saving the Address Book 7 16 Loading an Address Book 7 17 Device Custom Settings 7 19 8 System Manager Settings 8 1 Specifying the System Manager Settings 8 2 Restricting Access to Destinations 8 3 Confirming Entered Fax Numbers 8 3 Restricting Redial 8 4 9 Maintenance 9 1 Cleaning the Machine 9 2 Exterior 9 2 Interior 9 3 Fuser Roller 9 ...

Страница 17: ...ooting Appendix Table of Contents Index Replacing the Toner Cartridge 9 11 Redistributing Toner 9 11 Replacing the Toner Cartridge with a New One 9 15 Recycling Used Cartridges 9 20 The Clean Earth Campaign 9 20 U S A PROGRAM 9 21 CANADA PROGRAM CANADA PROGRAMME 9 23 Transporting the Machine 9 26 10 Troubleshooting 10 1 Clearing Jams 10 3 Document Jams 10 4 Paper Jams 10 6 LCD Messages 10 14 Error...

Страница 18: ...e Troubleshooting Appendix Table of Contents Index If LOAD CORRECT PAPER is displayed 10 22 Re loading the Paper 10 22 Changing the Paper Size Setting 10 22 General Problems 10 24 Paper Feeding Problems 10 26 Fax Problems 10 27 Sending Problems 10 27 Receiving Problems 10 31 Copying Problems 10 37 Printing Problems 10 40 Telephone Problems 10 43 Network Problems 10 44 If a Power Failure Occurs 10 ...

Страница 19: ...hooting Appendix Table of Contents Index If You Cannot Solve a Problem 10 47 Customer Support U S A 10 47 Customer Support Canada 10 47 11 Appendix 11 1 Machine Settings 11 3 Printing USER DATA LIST 11 3 Accessing the Setting Menu 11 3 Setting Menu 11 5 PAPER SETTINGS 11 5 VOLUME CONTROL 11 6 BROADCAST 11 7 COMMON SETTINGS 11 7 COPY SETTINGS 11 8 FAX SETTINGS 11 9 ADDRESS BOOK SET 11 14 PRINTER SE...

Страница 20: ...ettings Maintenance Troubleshooting Appendix Table of Contents Index TIMER SETTINGS 11 16 ADJUST CLEANING 11 17 REPORT SETTINGS 11 18 SYSTEM SETTINGS 11 20 Summary of Reports and Lists 11 25 Printing Reports Automatically 11 26 TX REPORT 11 26 RX REPORT 11 27 ACTIVITY REPORT 11 28 Printing Reports and Lists Manually 11 29 Checking Remaining Memory 11 30 Glossary 11 31 Index 11 41 ...

Страница 21: ...to Use This Guide Using the Top Page 1 2 3 4 5 6 7 8 9 10 11 Back Next Previous TOP Before Using the Machine Document and Paper Copying Sending and Receiving Printing and Scanning Network Remote UI System Manager Settings Maintenance Troubleshooting Appendix How to Use This Guide Table of Contents Index Please read this guide before operating this product After you finish reading this guide store ...

Страница 22: ...11 Back Previous Next TOP 1 1 Before Using the Machine Document and Paper Copying Sending and Receiving Printing and Scanning Network Remote UI System Manager Settings Maintenance Troubleshooting Appendix Table of Contents Index 1 Before Using the Machine Machine Components 1 3 Operation Panel 1 6 Main Operation Panel 1 6 Fax Operation Panel 1 9 LCD Standby Mode 1 10 Copy Mode 1 10 Fax Mode 1 10 S...

Страница 23: ...tes you should keep in mind when using the machine Indicates a warning that may lead to death or serious injury if not observed Explains how to avoid actions that could injure you or damage your machine Explains operating restrictions and how to avoid minor difficulties In addition this guide uses distinctive notations to identify keys and information in the LCD The keys you press appear in square...

Страница 24: ...007 by Canon Inc All rights reserved No part of this publication may be reproduced transmitted transcribed stored in a retrieval system or translated into any language or computer language in any form or by any means electronic mechanical magnetic optical chemical manual or otherwise without the prior written permission of Canon Inc Disclaimer The information in this document is subject to change ...

Страница 25: ...e UI System Manager Settings Maintenance Troubleshooting Appendix Table of Contents Index 1 Before Using the Machine Machine Components 1 3 Operation Panel 1 6 Main Operation Panel 1 6 Fax Operation Panel 1 9 LCD Standby Mode 1 10 Copy Mode 1 10 Fax Mode 1 10 Scan Mode 1 10 Toner Cartridge 1 11 Maintaining the Toner Cartridge 1 12 Checking the Toner Level 1 13 ...

Страница 26: ...ing Sending and Receiving Printing and Scanning Network Remote UI System Manager Settings Maintenance Troubleshooting Appendix Table of Contents Index Telephone Line Setting 1 14 Setting the Telephone Line Type 1 14 Timer Settings 1 15 Setting the Sleep Mode 1 15 Setting the Daylight Saving Time 1 16 ...

Страница 27: ...ing Appendix Index Table of Contents Machine Components A ADF Automatic Document Feeder Holds documents and feeds them automatically into the scanning area B Slide guides Adjust to the width of the document C Document feeder tray Holds documents D Document delivery tray Receives documents E Operation panel Controls the machine F Output tray Receives copies prints and faxes G Paper cassette Loads t...

Страница 28: ...the paper from falling off the output tray Open the paper stopper from its original position for LTR A4 paper For LGL paper pull out the output tray extension first and then open the paper stopper L Slide guides for multi purpose tray Adjust to the width of the paper M Paper guide rail Holds the paper supply N Dust cover Protects the paper supply in the paper cassette from the dirt and dust O Mult...

Страница 29: ...tem Manager Settings Maintenance Troubleshooting Appendix Index Table of Contents R Ethernet port Connect the network cable S USB port Connect the USB Universal Serial Bus cable T Rear cover Open this cover when clearing paper jams U Power socket Connect the power cord V Telephone line jack Connect the telephone cable W External device jack Connect an external device ...

Страница 30: ...peration Panel Main Operation Panel A System Monitor key Press to check fax transmission print copy or report output status B View Settings key Press to confirm settings of the copy function C COPY key Press to switch to the Copy mode D FAX key Press to switch to the Fax mode E SCAN key Press to switch to the Scan mode F Additional Functions key Press to select or cancel the modes in Additional Fu...

Страница 31: ...pying L Energy Saver key Press to set or cancel the Sleep mode manually The key lights green when the Sleep mode is set and goes off when the mode is canceled M Stop Reset key Press to stop a current job Also press to return the machine to the standby mode N Error indicator Flashes when an error has occurred O Processing Data indicator Flashes while sending or receiving faxes Lights when the machi...

Страница 32: ...T key Press to increase the value for various settings Also press to see the next item in the menu U OK key Press to accept a set function or mode Also press and hold to print a sample page when you are in the copy mode For details see Printing a Sample Page on p 3 10 V key Press to decrease the value for various settings Also press to see the previous item in the menu W LCD display Displays messa...

Страница 33: ...thout lifting up the handset of the external telephone B Redial Pause key Press to redial the last dialed number when fax is standing by or press to insert a pause when entering a fax number C Coded Dial key Press to specify recipients registered under coded speed dialing codes D Address Book key Press to search pre registered recipients under one touch speed dialing keys coded speed dialing codes...

Страница 34: ... Quantity D Density E Image quality Fax Mode 1 2 3 1 2 0 0 7 M O N 1 5 5 0 F a x O n l y S T A N D A R D A Date Time B Receive mode C Image quality Scan Mode S C A N N I N G M O D E Depending on your needs you can change the standby display which appears when the main power switch is turned on For details see Setting Menu on p 11 5 When the main power switch is turned on the LCD displays PLEASE WA...

Страница 35: ...ument contains a lot of graphics tables or charts the life of the toner cartridge will be shorter as they consume more toner When you are replacing a toner cartridge be sure to use a toner cartridge designed for this product To purchase the Canon genuine replacement toner cartridge contact your local Canon dealer or Canon Customer Care Center U S A 1 800 828 4040 Canada 1 800 652 2666 ISO IEC 1975...

Страница 36: ...drum protective shutter on the toner cartridge Print quality may deteriorate if the drum surface is exposed to light or is damaged Always hold the toner cartridge by its handle to avoid touching the drum protective shutter Do not stand the toner cartridge on end and do not turn it upside down If toner becomes caked in the toner cartridge it may become impossible to free it even by shaking the tone...

Страница 37: ...he amount of toner remaining in the toner cartridge by pressing the Toner Gauge key The toner level is displayed in the LCD at four levels If the toner gauge indicates that the toner is empty it is recommended that the toner cartridge be replaced See Replacing the Toner Cartridge on p 9 11 Toner full 0 1 0 0 T O N E R G A U G E Toner high 0 1 0 0 T O N E R G A U G E Toner low 0 1 0 0 T O N E R G A...

Страница 38: ... the Telephone Line Type The default setting is TOUCH TONE 1 Press Additional Functions 2 Press or to select FAX SETTINGS then press OK 3 Press or to select USER SETTINGS then press OK 4 Press or to select TEL LINE TYPE then press OK 5 Press or to select the telephone line type then press OK TOUCH TONE Tone dialing ROTARY PULSE Pulse dialing If you do not know the type of telephone line you use co...

Страница 39: ...interval from 3 to 30 minutes in one minute increments You can also enter values using numeric keys The default setting is 5 minutes 6 Press Stop Reset to return to the standby mode Energy Saver lights green when the machine enters the Sleep mode To enter the Sleep mode manually press Energy Saver on the operation panel The machine will not enter the Sleep mode when the machine is in operation the...

Страница 40: ...g Time The default setting is OFF 1 Press Additional Functions 2 Press or to select TIMER SETTINGS then press OK 3 Press or to select DAYLIGHT SV TIME then press OK 4 Press or to select ON then press OK 5 Press or to select START DATE TIME then press OK 6 Press or to select MONTH then press OK 7 Press or to select the month then press OK 8 Press or to select WEEK then press OK 9 Press or to select...

Страница 41: ...er Settings Maintenance Troubleshooting Appendix Index Table of Contents 14 Press or to select MONTH then press OK 15 Press or to select the month then press OK 16 Press or to select WEEK then press OK 17 Press or to select the week then press OK 18 Press or to select DAY then press OK 19 Press or to select the day then press OK 20 Press Stop Reset to return to the standby mode ...

Страница 42: ...work Remote UI System Manager Settings Maintenance Troubleshooting Appendix Table of Contents Index 2 Document and Paper Document Requirements 2 2 Scanning Area 2 3 Loading Documents 2 4 On the Platen Glass 2 4 In the ADF 2 5 Paper Requirements 2 7 Printable Area 2 9 Loading Paper 2 10 Into the Multi Purpose Tray 2 10 Setting Paper Size and Type 2 13 ...

Страница 43: ...6 x 356 mm Min 4 1 8 x 5 7 8 Min 105 x 148 5 mm Weight Max 4 4 lb 2 kg 11 to 28 lb bond 40 to 105 g m2 Quantity 1 sheet Max 35 sheets 2 Max 10 sheets for LGL documents 1 When copying a transparent document such as tracing paper or transparencies use a piece of plain white paper to cover the document after placing it face down on the platen glass 2 21 lb bond 80 g m2 paper Do not place the document...

Страница 44: ...ting and Scanning Network Remote UI System Manager Settings Maintenance Troubleshooting Appendix Index Table of Contents Scanning Area Make sure your document s text and graphics fall within the shaded area in the following diagram Note that the margin widths listed are approximate and there may be slight variations in actual use ...

Страница 45: ... Remote UI System Manager Settings Maintenance Troubleshooting Appendix Index Table of Contents Loading Documents On the Platen Glass 1 Lift up the ADF 2 Place your document face down 3 Align the document with the appropriate paper size marks If your document does not match any of the paper size marks align the center of your document with the arrow mark ...

Страница 46: ...ontents 4 Gently close the ADF The document is ready for scanning When closing the ADF be careful not to get your fingers caught as this may result in personal injury Do not press down the ADF forcefully as this may damage the platen glass and cause personal injury Remove the document from the platen glass when scanning is complete In the ADF 1 Fan the document stack and even the edges 2 Adjust th...

Страница 47: ...n the document feeder tray The document is ready for scanning Do not add or remove documents while they are being scanned When scanning is complete remove the documents from the document delivery tray to avoid paper jams Avoid using ADF to scan the same document more than 30 times When scanned repeatedly documents can become folded or torn which may cause paper jams If the feeder rollers are soile...

Страница 48: ...1 2 x 14 76 x 127 to 216 x 356 mm Weight 16 to 43 lb bond 60 to 163 g m2 Quantity Max 250 sheets Height max 1 25 mm Max 1 sheet Type Plain Paper Plain Paper L Heavy Paper Heavy Paper H Transparency The default paper size is LTR If you use a different paper size you must change the paper size settings See Setting Paper Size and Type on p 2 13 To prevent paper jams do not use any of the following Wr...

Страница 49: ...tents Make sure the paper is free from dust lint and oil stains Be sure to test paper before purchasing large quantities Store all paper wrapped and on a flat surface until ready for use Keep opened packs in their original packaging in a cool dry location Store paper at 64 4 F 75 2 F 18 C 24 C 40 60 relative humidity Use only the transparencies designed for laser printers Canon recommends you to u...

Страница 50: ...g Printing and Scanning Network Remote UI System Manager Settings Maintenance Troubleshooting Appendix Index Table of Contents Printable Area The shaded area indicates the approximate printable area of LTR paper and envelope Note that the margin widths listed are approximate and there may be slight variations in actual use ...

Страница 51: ...or print on the different paper which is in the paper cassette Load paper one by one in the multi purpose tray The paper in the multi purpose tray is fed prior to the paper in the paper cassette The recommended envelopes are COM10 10 MONARCH DL and ISO C5 Using other envelopes may affect the quality of the printout Make sure to set the correct paper size in the printer driver See Online Help When ...

Страница 52: ... Table of Contents 2 When setting paper gently insert the paper into the multi purpose tray with the print side up When you load paper with a logo on position the paper with the print side up logo side and insert it so that the top of the paper feeds first in the multi purpose tray When setting an envelope gently insert the envelope into the multi purpose tray with the print side up and the right ...

Страница 53: ...r Settings Maintenance Troubleshooting Appendix Index Table of Contents 3 Slide the paper guides so that they fit to both sides of the paper If the paper guides do not fit the size of the paper the print quality may be deteriorated 4 Specify the size and the type of the paper you load For details on how to specify the paper size and type see Setting Paper Size and Type on p 2 13 ...

Страница 54: ...step 3 and 6 1 Press Additional Functions 2 Press or to select PAPER SETTINGS then press OK 3 Press or to select CASSETTE or MP TRAY then press OK 4 Press or to select PAPER SIZE then press OK 5 Press or to select the paper size then press OK You can select from the following paper sizes LTR LGL A4 B5 A5 EXECUTIVE COM10 MONARCH DL ISO C5 OFICIO BRAZIL OFICIO MEXICO OFICIO FOLIO GOVERNMENT LETTER G...

Страница 55: ...llowing paper types PLAIN PAPER or PLAIN PAPER L 1 for Plain paper 17 lb to 24 lb 64 g m2 to 90 g m2 HEAVY PAPER or HEAVY PAPER H 2 for Heavy paper Paper cassette 28 lb to 34 lb 105 g m2 to 128 g m2 Multi purpose tray 28 lb to 43 lb 105 g m2 to 163 g m2 or Envelope TRANSPARENCY for Transparency 1 If paper curls excessively when printed with PLAIN PAPER selected select PLAIN PAPER L 2 If print fixi...

Страница 56: ...ning Network Remote UI System Manager Settings Maintenance Troubleshooting Appendix Table of Contents Index 3 Copying Basic Copying Method 3 2 Scan Settings 3 3 Image Quality 3 3 Density 3 3 Zoom Ratio 3 4 Advanced Copy Features 3 6 Collate Copy 3 6 2 on 1 Combination 3 7 Two Sided Copy 3 8 Printing a Sample Page 3 10 Canceling Copy Jobs 3 11 ...

Страница 57: ...ble of Contents Basic Copying Method Follow this procedure to make a copy 1 Set documents Place the document on the platen glass or load it in the ADF For documents you can copy see Document Requirements on p 2 2 2 Press COPY When you are in the copy mode and press and hold OK a sample page will be printed For details see Printing a Sample Page on p 3 10 3 Use the numeric keys to enter the desired...

Страница 58: ...set Image Quality The default setting is TEXT PHOTO 1 Press COPY 2 Press Image Quality repeatedly to select the document type TEXT PHOTO for documents that contain text and photos TEXT for text documents PHOTO for documents that contain fine text or photos TEXT PHOTO for documents that contain fine text and photos Copy density automatically changes to the manual mode when TEXT PHOTO PHOTO or TEXT ...

Страница 59: ...s press Stop Reset When you switch the mode by pressing the mode keys such as FAX all settings will be also canceled If you want to keep the settings set the density as follows Additional Functions COPY SETTINGS STANDARD SETTINGS DENSITY MANUAL See STANDARD SETTINGS on p 11 8 Zoom Ratio The default setting is 100 Preset Zoom You can enlarge or reduce documents from one standard paper size to anoth...

Страница 60: ...Contents Zoom Designation You can reduce or enlarge images by any copy ratio in 1 increments The available copy ratios are from 50 to 200 1 Press COPY 2 Press Enlarge Reduce twice 3 Enter the copy ratio with the numeric keys then press OK You can also use or to adjust the zoom ratio To increase the zoom ratio press To decrease the zoom ratio press To return the copy ratio to 100 press Enlarge Redu...

Страница 61: ... p 3 7 at the same time select COLLATE 2 ON 1 then press OK If you want to use with Two Sided Copy at the same time go to step 3 on p 3 8 4 Use the numeric keys to enter the desired copy quantity 1 to 99 5 Press Start When the documents are loaded in the ADF collate copying starts and no further operation is required 6 Place the next page of the document on the platen glass then press Start Repeat...

Страница 62: ...se 2 ON 1 with Collate Copy see p 3 6 at the same time select COLLATE 2 ON 1 then press OK If you want to use with Two Sided Copy at the same time go to step 3 on p 3 8 4 Use the numeric keys to enter the desired copy quantity 1 to 99 5 Press Start When you set the document on the platen glass press Start for each page When scanning is complete press OK If you press OK without scanning the second ...

Страница 63: ...tions Paper size LTR and A4 Paper weight 17 to 21 lb 64 to 80 g m2 1 Set documents Place the first page on the platen glass if you are not using the ADF 2 Press COPY 3 Press 2 Sided repeatedly to select ON then press OK 4 Press or to select BOOK TYPE or CALENDAR TYPE then press OK BOOK TYPE The front and back sides of the copy will have the same top bottom orientation CALENDAR TYPE The front and b...

Страница 64: ...y quantity 1 to 99 6 Press Start When you set the document on the platen glass press Start for each page When scanning is complete press OK To cancel all settings press Stop Reset When you switch the mode by pressing the mode keys such as FAX all settings will be also canceled If you want to keep the settings store the settings in STANDARD SETTINGS in COPY SETTINGS See STANDARD SETTINGS on p 11 8 ...

Страница 65: ...function to test how the printouts will look with current settings The paper size must be LTR The paper type must be Plain Paper 17 to 21 lb 64 to 80 g m2 If the paper setting is not appropriate or the paper is not loaded correctly printing does not start without any error massages You cannot cancel printing a sample page once printing has started You cannot use this function while making copies s...

Страница 66: ...nning Network Remote UI System Manager Settings Maintenance Troubleshooting Appendix Index Table of Contents Canceling Copy Jobs Follow this procedure to cancel an outgoing job 1 Press Stop Reset 2 When the CANCEL COPYING message appears press to select YES Y E S N O C A N C E L C O P Y I N G The job is canceled and the copy quantity is reset ...

Страница 67: ...Table of Contents Index 4 Sending and Receiving Basic Sending Method 4 4 Scan Settings 4 5 Image Quality 4 5 Density 4 5 Storing Editing Address Book 4 6 Storing Editing One Touch Speed Dialing Keys Coded Speed Dialing Codes 4 7 Storing Editing Recipients for Group Dialing 4 9 Specifying Recipients 4 12 Using One Touch Speed Dialing Keys 4 12 Using Coded Speed Dialing Codes 4 13 Group Dialing 4 14...

Страница 68: ...mote UI System Manager Settings Maintenance Troubleshooting Appendix Table of Contents Index Manual Sending 4 16 Advanced Sending Features 4 17 Broadcasting 4 17 PC Faxing 4 18 Fax Dialing Features 4 19 Switching Temporarily to Tone Dialing 4 19 Redialing 4 20 Checking Dialing Line 4 21 Dialing an Overseas Number With Pauses 4 22 Basic Receiving Method 4 23 ...

Страница 69: ...ex Receiving Features 4 24 FAX TEL Optional Settings 4 24 DRPD Optional Settings 4 25 Manual Reception 4 25 Memory Reception 4 26 Memory Lock Reception 4 26 Remote Reception 4 28 Selecting the Receive Mode for Printing 4 29 Reception Restriction 4 30 Printing Received Documents 4 30 Canceling TX RX Jobs 4 32 Checking and Deleting Jobs 4 33 Checking Transmission Reception Results 4 33 Checking and ...

Страница 70: ...t documents Place the first page on the platen glass if you are not using the ADF 2 Press FAX If you want to adjust the image quality and density see Scan Settings on p 4 5 3 Enter the fax number with the numeric keys You can also specify the fax number with one touch speed dialing keys coded speed dialing codes or Address Book key See Specifying Recipients on p 4 12 4 Press Start When you set the...

Страница 71: ...cuments 200 x 100 dpi FINE for fine print documents the resolution is twice that of STANDARD 200 x 200 dpi PHOTO for documents that contain photographs the resolution is twice that of STANDARD 200 x 200 dpi SUPER FINE for documents that contain fine print and images the resolution is four times that of STANDARD 200 x 400 dpi Density The default setting is 5 1 Press FAX 2 Press Density 3 Press or t...

Страница 72: ... You can register up to 8 one touch speed dialing keys including group dialing Using Coded Speed Dialing p 4 13 You can specify fax telephone numbers by pressing Coded Dial followed by two digit code You can register up to 100 coded speed dialing codes Using Group Dialing p 4 14 You can specify groups of fax telephone numbers registered in one touch speed dialing keys You can register up to 50 fax...

Страница 73: ... you want to register the fax telephone number then press OK You can also select a one touch speed dialing key or coded speed dialing code by pressing the corresponding one touch speed dialing key or Coded Dial followed by the desired two digit code 5 Enter the recipient name max 20 letters including spaces with the numeric keys then press OK N A M E A C a n Ex 6 Enter the fax telephone number you...

Страница 74: ... then press Clear To delete the entire entry press and hold Clear 6 Enter a new character with the numeric keys then press OK 7 Press repeatedly to go to the wrong digit then press Clear to delete it To delete the entire entry press and hold Clear 8 Enter a new number with the numeric keys then press OK 9 Press Stop Reset to return to the standby mode Deleting One Touch Speed Dialing Keys Coded Sp...

Страница 75: ...to select GROUP DIAL then press OK 4 Press or to select an empty one touch speed dialing key that you want to set as the group dialing then press OK You can also select a one touch speed dialing key by pressing the corresponding one touch speed dialing key 5 Enter the group name max 20 letters including spaces with the numeric keys then press OK To register another group repeat the procedure from ...

Страница 76: ...e touch speed dialing key 5 Press OK 6 Select the recipient you want to add to the group then press OK For details on specifying a recipient from Address Book see Registering Recipients for Group Dialing on p 4 9 7 Press Stop Reset to return to the standby mode Deleting Recipients from Group 1 Press Additional Functions 2 Press or to select ADDRESS BOOK SET then press OK 3 Press or to select GROUP...

Страница 77: ...ress repeatedly to go to the character you want to change then press Clear To delete the entire name press and hold Clear 6 Enter a new character with the numeric keys then press OK 7 Press OK 8 Press Stop Reset to return to the standby mode Deleting Group Dialing 1 Press Additional Functions 2 Press or to select ADDRESS BOOK SET then press OK 3 Press or to select GROUP DIAL then press OK 4 Press ...

Страница 78: ...ure you must register recipients in one touch speed dialing keys beforehand See Storing Editing Address Book on p 4 6 1 Set documents Place the first page on the platen glass if you are not using the ADF 2 Press FAX If you want to adjust the image quality and density see Scan Settings on p 4 5 3 Press the desired one touch speed dialing keys 01 to 08 If you pressed a wrong key press Stop Reset and...

Страница 79: ...nts in coded speed dialing codes beforehand See Storing Editing Address Book on p 4 6 1 Set documents Place the first page on the platen glass if you are not using the ADF 2 Press FAX If you want to adjust the image quality and density see Scan Settings on p 4 5 3 Press Coded Dial 4 Enter the desired two digit code 00 to 99 with the numeric keys 0 1 2 X X X X X X X 0 1 C A N O N Ex If you entered ...

Страница 80: ...p Reset and perform step 3 again 4 Press Start When you set the documents on the platen glass press Start for each document When scanning is complete press OK to start sending Using Address Book Key Address book dialing enables you to search for a particular recipient registered in the machine This is useful when you forget which one touch speed dialing key or coded speed dialing code the recipien...

Страница 81: ...cuments Place the first page on the platen glass if you are not using the ADF 2 Press FAX If you want to adjust the image quality and density see Scan Settings on p 4 5 3 Press Address Book If no recipient is registered for speed dialing NOT REGISTERED is displayed 4 Press or to select SEARCH then press OK 5 Use the numeric keys to enter up to 10 first characters of the recipient s name then press...

Страница 82: ...chine see Before FAX Setting in the Starter Guide 2 Load the document in the ADF 3 Press FAX If you want to adjust the image quality and density see Scan Settings on p 4 5 4 Press Hook or pick up the handset of your external telephone If you press Hook you can temporarily adjust the monitor tone volume with and 5 Dial the recipient s fax telephone number Make sure to confirm the dial tone before e...

Страница 83: ...d as a separate recipient If you frequently send documents to multiple recipients it is recommended that you store those recipients as a group 1 Set documents Place the first page on the platen glass if you are not using the ADF 2 Press Additional Functions 3 Press or to select BROADCAST then press OK 4 Specify the recipient s then press OK Use the numeric keys one touch speed dialing keys coded s...

Страница 84: ...the fax driver is installed To check if the driver is installed see Software Settings with Computer in the Starter Guide For details on the fax driver settings see Online Help How to display the print screen or items on the screen may vary depending on your application and or OS 1 From an open document on an application click File Print 2 Select the fax icon Canon MF4200 Series FAX then click Prin...

Страница 85: ...vations To talk to the other party you will need to connect an external telephone to the machine 1 Press FAX 2 Press Hook Make sure to confirm the dial tone before entering a fax number If you enter the number before the dial tone can be heard the call may not be connected or the wrong number may be dialed 3 Use the numeric keys to dial the required information service 4 When the recorded message ...

Страница 86: ...ge on the platen glass if you are not using the ADF 2 Press FAX 3 Press Redial Pause 4 Press Start When you set the documents on the platen glass press Start for each document When scanning is complete press OK to start dialing When RESTRICT REDIAL is set to ON in the ACCESS TO DEST of the SYSTEM SETTINGS menu redialing is not available Redialing Automatically The default settings are as follows A...

Страница 87: ...e redialing attempt if it does not detect a busy signal 7 Press or to select the time in minutes between redials then press OK R E D I A L I N T E R V A L 2 M I N Ex You can also enter values with the numeric keys 8 Press Stop Reset to return to the standby mode Checking Dialing Line Checking dialing line function enables you to configure the setting on whether to check for a dial tone The default...

Страница 88: ... to dial the international access code For details on international access codes contact your local telephone company 4 If necessary press Redial Pause to insert a pause 1 2 3 P Ex The letter P is displayed between the numbers P in the fax telephone number represents 2 5 second pause For a longer pause press Redial Pause again 5 Use the numeric keys to dial the country code the area code and the f...

Страница 89: ...s AnsMode Receives faxes automatically and records voice messages DRPD Distinctive Ring Pattern Detection Distinguishes between fax and voice calls using distinctive ring patterns Select the ring pattern assigned by your telephone company For optional settings see DRPD Optional Settings on p 4 25 FAX TEL Switches between fax and voice calls automatically if an external telephone is connected to th...

Страница 90: ...itional Functions 2 Press or to select FAX SETTINGS then press OK 3 Press or to select RX SETTINGS then press OK 4 Press or to select FAX TEL OPT SET then press OK 5 For RING START TIME use or the numeric keys to specify the duration 4 to 30 seconds for which the machine attempts to detect the fax tone before it starts ringing then press OK If the machine receives a fax the machine does not ring a...

Страница 91: ...OK 3 Press or to select RX SETTINGS then press OK 4 Press or to select DRPD SELECT FAX then press OK 5 Press or to select a ring pattern then press OK NORMAL RING DOUBLE RING SHORT SHORT LONG SHORT LONG SHORT OTHER RING TYPE 6 Press Stop Reset to return to the standby mode For DRPD subscription to a DRPD Distinctive Ring Pattern Detection service is required Contact your telephone company for avai...

Страница 92: ...geCLASS MF4270 with ITU T Standard Chart No 1 standard mode The maximum number of pages that the machine s memory can store differs depending on the other party s machine Once the pages are printed they are deleted from the memory If the memory becomes full you will not be able to receive the remaining pages Contact the other party and ask them to resend the remaining pages of the fax Memory Lock ...

Страница 93: ...8 7 Use the numeric keys to enter the memory lock reception password up to seven digits then press OK P A S S W O R D 1 2 3 4 5 6 7 Ex 8 If you want to specify MEMORY RX TIME press or to select MEMORY RX TIME then press OK If you need not set the timer for memory lock skip to step 12 9 Press or to select ON then press OK 10 For MEM RX START TIME use the numeric keys to enter the start time in 24 h...

Страница 94: ...eception enables you to use an external telephone connected to the machine to receive faxes manually This can be useful when the machine is not nearby or is being used by someone else The default settings are as follows REMOTE RX ON REMOTE RX ID 25 Registering Remote Reception ID Follow this procedure if you want to change the default remote reception ID of 25 1 Press Additional Functions 2 Press ...

Страница 95: ...ch to tone dialing before pressing the remote reception ID 3 When the reception is complete hang up the telephone Selecting the Receive Mode for Printing You can select whether the machine stores all received pages in the memory before printing them out or prints each page as it is received 1 Press Additional Functions 2 Press or to select FAX SETTINGS then press OK 3 Press or to select RX SETTING...

Страница 96: ... press OK 6 Press Stop Reset to return to the standby mode Printing Received Documents The machine provides the following printing features two sided printing and received image reduction Two Sided Printing You can print received documents on both sides of the paper The default setting is OFF You can print the received documents on both sides of the paper only when PAPER SIZE is set to LTR or A4 T...

Страница 97: ...s or to select FAX SETTINGS then press OK 3 Press or to select PRINTER SETTINGS then press OK 4 Press or to select RX REDUCTION then press OK 5 Press or to select desired setting then press OK ON Reduces the documents automatically depending on the length of the documents OFF Prints documents on a paper without reducing the size CUT Cuts off the end of a document that does not fit on one page up t...

Страница 98: ...dix Index Table of Contents Canceling TX RX Jobs Follow the procedure below to cancel an ongoing job sending or receiving 1 Press Stop Reset 2 When the CANCEL DURING TX RX message appears press to select YES Y E S N O C A N C E L D U R I N G T X R X For sending jobs remove any unscanned documents from the ADF If you are in the copy or scan standby mode and want to cancel a fax job press FAX to ret...

Страница 99: ... 2 Press or to select TX RX LOG then press OK 3 Press or to view the required transmission reception result 4 Press Stop Reset to return to the standby mode Checking and Deleting Sending Documents Stored in Memory 1 Press System Monitor 2 Press or to select TX STATUS then press OK 3 Press or to scroll through the job list If you want to delete the job go to step 4 Otherwise press Stop Reset to ret...

Страница 100: ...roubleshooting Appendix Table of Contents Index 5 Printing and Scanning Printing Documents 5 2 Advanced Printing Features 5 3 Collate Printing 5 3 2 on 1 Combination 5 4 Two Sided Printing 5 5 Scanning to a Computer USB connection only 5 6 Canceling Scan Jobs 5 7 Canceling Scan Jobs to a Computer 5 7 Checking and Deleting Jobs 5 8 Checking and Deleting Print Jobs 5 8 Checking Print and Scan Counts...

Страница 101: ...re that the printer driver is installed To check if the driver is installed see Software Settings with Computer in the Starter Guide For details on the printer driver settings see Online Help How to display the print screen or items on the screen may vary depending on your application and or OS 1 From an open document on an application click File Print 2 Select the printer icon for the machine Can...

Страница 102: ...e Printing You can print documents collated into sets arranged in page order For example when printing multiple copies of a 3 page document the print order is 1 2 3 1 2 3 and so on 1 From an open document on an application click File Print 2 Select the printer icon for the machine Canon MF4200 Series UFRII LT then click Preferences or Properties to open the dialog box 3 Click the Finishing tab 4 F...

Страница 103: ...he printer icon for the machine Canon MF4200 Series UFRII LT then click Preferences or Properties to open the dialog box 3 Click the Page Setup tab 4 For Page Layout select 2 Pages per Sheet then click OK 5 On the Print dialog box click Print or OK Other than 2 Pages per Sheet you can also select 4 Pages per Sheet 6 Pages per Sheet 8 Pages per Sheet 9 Pages per Sheet or 16 Pages per Sheet If you s...

Страница 104: ...ndix Index Table of Contents Two Sided Printing Two sided printing enables you to make two sided printouts 1 From an open document on an application click File Print 2 Select the printer icon for the machine Canon MF4200 Series UFRII LT then click Preferences or Properties to open the dialog box 3 Click the Finishing tab 4 For Print Style select 2 sided Printing then click OK 5 On the Print dialog...

Страница 105: ...omputer USB connection only Follow this procedure to scan a document to your computer Make sure that the scanner driver is installed To check if the driver is installed see Software Settings with Computer in the Starter Guide For details on the scanner driver settings see the Scanner Driver Guide in the User Software CD 1 Set documents 2 Press SCAN 3 Start MF Toolbox then select the scan format Th...

Страница 106: ...ding and Receiving Printing and Scanning Network Remote UI System Manager Settings Maintenance Troubleshooting Appendix Index Table of Contents Canceling Scan Jobs Follow the procedure below to cancel an ongoing scan job Canceling Scan Jobs to a Computer 1 Press Stop Reset 2 Click OK on the computer screen ...

Страница 107: ...bs are erased from the memory Checking and Deleting Print Jobs 1 Press System Monitor 2 Press or to select PRINT STATUS then press OK 3 Press or to scroll through the job list and check the status of the print jobs If you want to delete the job go to step 4 Otherwise press Stop Reset to return to the standby mode 4 Press or to select the desired job then press OK 5 Press to select YES If you do no...

Страница 108: ...ce Troubleshooting Appendix Table of Contents Index 6 Network System Requirements 6 3 Printing or Sending a Fax from a Computer 6 3 Basic Network Settings 6 4 IP Address Setting 6 4 Interface Settings 6 6 Communication Environment Setup 6 7 Setting Up a Computer for Printing Sending a Fax 6 10 Settings from the Operation Panel 6 10 Machine Connection Method LPD Raw 6 11 Print Server Settings 6 14 ...

Страница 109: ...g Network Remote UI System Manager Settings Maintenance Troubleshooting Appendix Table of Contents Index Additional Network Settings 6 15 TCP IP Settings 6 15 Startup Time Settings 6 17 Checking Network Settings 6 18 Machine Management 6 19 Machine Management Using Web Browser Remote UI 6 19 Machine Management Using NetSpot Device Installer 6 19 ...

Страница 110: ...environments with which the machine is compatible Printing or Sending a Fax from a Computer The following system environments are compatible when printing or sending a fax from a computer OS Microsoft Windows 2000 Server Microsoft Windows 2000 Professional Microsoft Windows XP Professional Microsoft Windows XP Home Edition Microsoft Windows Server 2003 Microsoft Windows Vista Computers Windows IBM...

Страница 111: ...e Starter Guide Specify the machine s IP address so that the machine and the network computer can communicate before making protocol settings Any of the following can be used to specify the settings Machine s operation panel Additional Functions menu NetSpot Device Installer Canon utility software included in the User Software CD IP Address Setting By default the IP address is assigned to the mach...

Страница 112: ... Press or to select IP ADDRESS then press OK 8 Use the numeric keys to enter the IP address then press OK I P A D D R E S S 0 0 0 0 0 0 0 0 0 0 0 0 Ex 9 Press or to select SUBNET MASK then press OK 10 Use the numeric keys to enter the subnet mask then press OK S U B N E T M A S K 0 0 0 0 0 0 0 0 0 0 0 0 Ex 11 Press or to select GATEWAY ADDRESS then press OK 12 Use the numeric keys to enter the gat...

Страница 113: ...hen press OK 5 Press or to select AUTO DETECT then press OK 6 Press or to select the desired detection method then press OK AUTO Automatically determines the communication mode Half duplex Full duplex and Ethernet type 10Base T 100BaseTX Skip to step 11 MANUAL You have to manually specify the communication mode and Ethernet type If you reconnect the network cable for example reconnect the cable to...

Страница 114: ...een the machine and computers on your network use the following procedure SNMP SNMP helps monitor the state of the machine and collects information on it The default setting is ON The following two items can be set COMMUNITY NAME Sets the SNMP community name You can specify up to two community names The default setting is public for COMMUNITY NAME 1 SNMP WRITABLE Enables the computers on the netwo...

Страница 115: ...es SNMP to obtain information OFF When you do not use an SNMP utility If you want to use a Canon printer driver or utility select ON for USE SNMP 7 Press or to select SNMP SETTINGS then press OK 8 Press or to select COMMUNITY NAME 1 then press OK 9 Use the numeric keys to enter the desired community name other than public then press OK 10 Press or to select SNMP SETTINGS then press OK 11 If you ne...

Страница 116: ...ce Troubleshooting Appendix Index Table of Contents 15 Press or to select ON then press OK 16 If you need to specify SNMP WRITABLE 2 press or to select SNMP SETTINGS then press OK If you need not specify SNMP WRITABLE 2 skip to step 19 17 Press or to select SNMP WRITABLE 2 then press OK 18 Press or to select ON then press OK 19 Press Stop Reset to return to the standby mode 20 Restart the machine ...

Страница 117: ... Settings with Computer in the Starter Guide Specify the machine s IP address so that the machine and the network computer can communicate before making protocol settings Any of the following can be used to specify the settings Machine s operation panel Additional Functions menu NetSpot Device Installer Canon utility software included in the User Software CD 3 Basic Network Settings Set up the bas...

Страница 118: ...a TCP IP Network All computers that use the machine must have TCP IP client software installed and must be enabled for TCP IP network use For details see the manuals provided with the operating system Installing the Printer Driver and Specifying the Machine Destination Setting To print from a computer you must install a printer driver and specify a setting for the machine destination The machine d...

Страница 119: ...ask bar Printers and Faxes For Windows XP Home Edition click start on the Windows task bar Control Panel Printers and Other Hardware Printers and Faxes 2 Right click the icon of the printer you installed select Properties 3 Display the Ports sheet by clicking the Ports tab 4 Open the Printer Ports dialog box by clicking Add Port 5 From Available ports types select Standard TCP IP Port click New Po...

Страница 120: ... Click Close to close the Printer Ports dialog box 10 In the printer properties dialog box click Configure Port Click LPR under Protocol enter a print queue in Queue Name under LPR Settings If you want to use Raw confirm Raw under Protocol is selected and proceed to step 11 You can specify a print queue in Queue Name The following three print queues are available LP The machine prints according to...

Страница 121: ...ws XP Professional Server 2003 click start on the Windows task bar Printers and Faxes For Windows XP Home Edition click start on the Windows task bar Control Panel Printers and Other Hardware Printers and Faxes 2 Right click the icon of the printer you installed select Sharing 3 For Windows Vista click Change sharing options For other operating systems skip to step 4 Click Continue to proceed if t...

Страница 122: ...llowing procedures TCP IP Settings HTTP Settings You can select whether or not to use HTTP for Remote UI The default setting is ON 1 Press Additional Functions 2 Press or to select SYSTEM SETTINGS then press OK If the System Password has been set enter the System Password using the numeric keys then press OK 3 Press or to select NETWORK SETTINGS then press OK 4 Press or to select TCP IP SETTINGS t...

Страница 123: ... Additional Functions 2 Press or to select SYSTEM SETTINGS then press OK If the System Password has been set enter the System Password using the numeric keys then press OK 3 Press or to select NETWORK SETTINGS then press OK 4 Press or to select TCP IP SETTINGS then press OK 5 Press or to select PORT NO SET then press OK 6 Press or to select the protocol of which you want to change the port number ...

Страница 124: ...ing with each other immediately after the machine connects to a switching hub In this case use the following procedure to delay the startup of network communication The default setting is 60SEC 1 Press Additional Functions 2 Press or to select SYSTEM SETTINGS then press OK If the System Password has been set enter the System Password using the numeric keys then press OK 3 Press or to select NETWOR...

Страница 125: ...ngs as follows 1 Press Additional Functions 2 Press or to select SYSTEM SETTINGS then press OK If the System Password has been set enter the System Password using the numeric keys then press OK Press or to select NETWORK SETTINGS then press OK 3 Press or to select NETWORK SETTINGS then press OK 4 Press or to select VIEW IP ADDRESS then press OK 5 Press or to select IP ADDRESS SUBNET MASK or GATEWA...

Страница 126: ...ility software included in the User Software CD Machine Management Using Web Browser Remote UI You can use Remote UI installed in the machine to manage it on a web browser For using Remote UI see Using the Remote UI on p 7 4 Machine Management Using NetSpot Device Installer NetSpot Device Installer is utility software for specifying the initial settings of Canon devices connected to a network Avai...

Страница 127: ...nning Network Remote UI System Manager Settings Maintenance Troubleshooting Appendix Table of Contents Index 7 Remote UI System Requirements 7 3 Using the Remote UI 7 4 Starting the Remote UI 7 4 Displaying Device Status and Information 7 6 Job Management 7 7 Managing Print Jobs 7 7 Viewing the Activity Log 7 8 Managing the Address Book 7 9 ...

Страница 128: ...Receiving Printing and Scanning Network Remote UI System Manager Settings Maintenance Troubleshooting Appendix Table of Contents Index Customizing System Settings 7 13 Customizing System Information 7 13 Import Export Function 7 16 Saving the Address Book 7 16 Loading an Address Book 7 17 Device Custom Settings 7 19 ...

Страница 129: ...ystem Manager Settings Maintenance Troubleshooting Appendix Index Table of Contents System Requirements The Remote UI has been confirmed to work in the following system environments OS Microsoft Windows 2000 Professional Microsoft Windows XP Microsoft Windows Vista Web Browser Microsoft Internet Explorer 5 01 SP4 or later Internet Explorer 6 or later is recommended ...

Страница 130: ...omputer Starting the Remote UI Before you start the Remote UI select VIEW IP ADDRESS in NETWORK SETTINGS located in the SYSTEM SETTINGS and verify the IP address of the machine If you do not know the IP address consult with your network administrator See Checking Network Settings on p 6 18 1 Start the web browser 2 Enter the IP address of the machine in Address or Location press Enter on the keybo...

Страница 131: ...tents 4 Click OK Device Status page is displayed when you logon the Remote UI A Displays the current status of the machine etc B Takes you to the Remote UI top page C Displays the online help for the Remote UI D Displays the current status of print jobs etc E Takes you back to the top of a current page F Displays a list of settings for the machine etc G Displays the Address Book data one touch spe...

Страница 132: ...s of the machine and any error messages To check details of errors click Error Information Information Displays information related to the machine such as the system manager s information and the location of the machine Features Displays the functions that are available with the current system configuration Network Displays information about the network interface and any network protocols that are...

Страница 133: ...You can use the Remote UI to manage print jobs that are being processed by the machine or are held in the print queue If Permit End User s Job Operation is not selected in Register Password in Edit in System Settings under Add Func you cannot delete any print jobs when the machine is in the End User Mode If Permit End User s Job Operation is selected you can delete print jobs for which you have ow...

Страница 134: ...ts 2 To delete a print job click Delete next to the desired job You cannot recover the job once it is deleted Viewing the Activity Log The Remote UI enables you to view the Transmissions of send jobs The Transmissions shows up to 25 recent transactions 1 Click Job Status select Transmissions from the menu that appears under Job Status The Transmissions appears displaying information about fax jobs...

Страница 135: ...ook The Remote UI enables you to view and modify the Address Book data You can also access these setting menus from the operation panel of the machine For details see Machine Settings on p 11 3 1 Click Address One touch Speed Dial or Coded Dial from the menu that appears under Address To view edit the registered addresses Click the number or the name to display the current address information You ...

Страница 136: ...anager Settings Maintenance Troubleshooting Appendix Index Table of Contents To edit the information click Edit make the necessary changes on the Change Address screen click OK To register a new address Click None or any number for which None is displayed as the name Click Edit Select Fax or Group from the drop down list press Select enter the necessary information click OK ...

Страница 137: ...ing Appendix Index Table of Contents For group dialing select Group from the drop down list press Select enter a group name in Group Name click Address Book under Members List Select One touch Speed Dial or Coded Dial from the drop down list press Select select the check box next to the number to register for the group dialing click OK Make sure that the registered addresses are displayed in Membe...

Страница 138: ...pying Sending and Receiving Printing and Scanning Network Remote UI System Manager Settings Maintenance Troubleshooting Appendix Index Table of Contents To delete the registered addresses Select the check box next to the number to delete click Delete You cannot recover the address once it is deleted ...

Страница 139: ...ting Appendix Index Table of Contents Customizing System Settings Customizing System Information The Remote UI enables you to specify the machine s system settings You can also access the system settings from the operation panel of the machine For details see Machine Settings on p 11 3 1 Click Add Func System Settings from the menu that appears under Add Func click Edit 2 Enter the necessary infor...

Страница 140: ...g Printing and Scanning Network Remote UI System Manager Settings Maintenance Troubleshooting Appendix Index Table of Contents To restrict the Send Function Click Restrict the Send Function Select the necessary settings click OK To set the System Manager password Click Register Password Specify the necessary fields click OK ...

Страница 141: ...nts Set Password Select this check box to set the System Manager password System Manager Password Enter a number seven digits maximum Confirm Enter the password again If the number you enter here is different from the number entered for System Manager Password an error dialog box appears Permit End User s Job Operation Select this check box to permit deleting print jobs for which you have owner pr...

Страница 142: ...ay take more than a few minutes to complete Do not turn the machine s main power off until the operation is complete Otherwise the machine may malfunction If the machine is in the Sleep mode press Energy Saver on the operation panel to cancel the Sleep mode before performing an Import operation During an Export operation the screen display does not change until the operation is complete Do not cli...

Страница 143: ...e you want to save the file The file is saved in the specified location Loading an Address Book You can load address books into the machine from saved files When you register the contents of a new file the currently registered addresses are overwritten by the new address list You can register up to 108 addresses in the Address Book Each address is treated as a separate item You cannot import the g...

Страница 144: ...Paper Copying Sending and Receiving Printing and Scanning Network Remote UI System Manager Settings Maintenance Troubleshooting Appendix Index Table of Contents 2 Click Import 3 Click Browse select the file to import click OK Do not import any files while the machine is executing other jobs ...

Страница 145: ...ontents Device Custom Settings The Remote UI enables you to edit the machine s custom settings You can also access these setting menus from the Operation Panel of the machine For details see Machine Settings on p 11 3 1 Click Add Func select Custom Settings from the menu that appears under Add Func click the type of custom setting that you want to specify 2 Specify all the necessary fields click O...

Страница 146: ...ing and Receiving Printing and Scanning Network Remote UI System Manager Settings Maintenance Troubleshooting Appendix Table of Contents Index 8 System Manager Settings Specifying the System Manager Settings 8 2 Restricting Access to Destinations 8 3 Confirming Entered Fax Numbers 8 3 Restricting Redial 8 4 ...

Страница 147: ...t restrictions can be placed on storing or changing the System Settings If you make a mistake when entering a number press Clear to clear the entire number enter the correct number 1 Press Additional Functions 2 Press or to select SYSTEM SETTINGS then press OK If the System Password has been set enter the System Password using the numeric keys then press OK 3 Press or to select SYS MANAGER INFO th...

Страница 148: ...You can specify whether or not to confirm the entered fax numbers each time you send a fax The default setting is OFF 1 Press Additional Functions 2 Press or to select SYSTEM SETTINGS then press OK If the System Password has been set enter the System Password using the numeric keys 3 Press or to select ACCESS TO DEST then press OK 4 Press or to select CONFIRM FAX NO then press OK 5 Press or to sel...

Страница 149: ...cting Redial You can specify whether or not to allow using Redial Pause The default setting is OFF 1 Press Additional Functions 2 Press or to select SYSTEM SETTINGS then press OK If the System Password has been set enter the System Password using the numeric keys 3 Press or to select ACCESS TO DEST then press OK 4 Press or to select RESTRICT REDIAL then press OK 5 Press or to select ON or OFF then...

Страница 150: ...oubleshooting Appendix Table of Contents Index 9 Maintenance Cleaning the Machine 9 2 Exterior 9 2 Interior 9 3 Fuser Roller 9 7 Scanning area 9 8 Replacing the Toner Cartridge 9 11 Redistributing Toner 9 11 Replacing the Toner Cartridge with a New One 9 15 Recycling Used Cartridges 9 20 The Clean Earth Campaign 9 20 U S A PROGRAM 9 21 CANADA PROGRAM CANADA PROGRAMME 9 23 Transporting the Machine ...

Страница 151: ... they can stick to the components or generate static charges Never use volatile liquids such as thinners benzene acetone or any other chemical cleaner to clean the machine These can damage the machine components When you turn off the main power switch the documents stored in memory will be erased To check the jobs stored in memory see the following Checking and Deleting Sending Documents Stored in...

Страница 152: ...g Appendix Index Table of Contents Interior Clean the machine s print area periodically to prevent toner powder and paper dust from accumulating inside 1 Turn off the main power switch and disconnect the power cord 2 Hold the front side of the operation panel with your hands 3 Lift the scanning platform A until it is locked You will hear an audible click 4 Hold the grip A on the right front side o...

Страница 153: ...toner cover 6 Remove the toner cartridge Do not touch the rollers and parts which have labels CAUTION Hot surface avoid contact on They become very hot during use To avoid exposing the toner cartridge to light place it in its protective bag or wrap it in a thick cloth Do not open the drum protective shutter A on the toner cartridge Print quality may deteriorate if the drum surface is exposed to li...

Страница 154: ...ebris from the machine s interior Do not touch the fixing assembly A as it becomes very hot during use Do not touch the transfer roller B as this can damage the machine If loose toner comes into contact with your skin or clothing wash with cold water Warm water will set the toner 8 Hold the toner cartridge by its handle A 9 Insert the toner cartridge so that the protrusion on the right side of the...

Страница 155: ...ntents 10 Push the toner cartridge to make sure it is properly set in the machine 11 Hold the grip A on the right front side of the toner cover 12 Close the toner cover 13 Lower the scanning platform Be careful not to get your fingers caught If you cannot close the toner cover do not force it to close Open the cover and make sure the toner cartridge is properly set in the machine 14 Reconnect the ...

Страница 156: ... in the following procedure The roller should also be cleaned each time the toner cartridge is replaced Load a sheet of blank LTR paper into the multi purpose tray and start cleaning Cleaning the roller takes approximately 130 seconds When some jobs are stored in memory this function is not available 1 Press Additional Functions 2 Press or to select ADJUST CLEANING then press OK 3 Load a sheet of ...

Страница 157: ... Appendix Index Table of Contents Scanning area Keep the scanning area clean to avoid dirty copies or faxes to be sent Platen glass 1 Open the ADF 2 Clean the platen glass and the underside of the ADF with a cloth dampened with water Then wipe the area with a soft dry cloth Do not dampen the cloth too much as this may tear the document or damage the machine 3 Close the ADF Be careful not to get yo...

Страница 158: ...nts have black streaks or appear dirty after copying them using the ADF this may be caused by pencil lead rubbing off the documents and onto the roller Clean the ADF scanning area and roller 1 Turn off the main power switch and disconnect the power cord 2 Open the ADF cover 3 Clean the rollers A inside the ADF with a cloth dampened with water Then wipe the area with a soft dry cloth Do not dampen ...

Страница 159: ...nd Paper Copying Sending and Receiving Printing and Scanning Network Remote UI System Manager Settings Maintenance Troubleshooting Appendix Index Table of Contents 4 Close the ADF cover Be careful not to get your fingers caught 5 Reconnect the power cord and turn on the main power switch ...

Страница 160: ...nting fax is interrupted and the received data will be stored in the memory If you set CONT PRINTING in PRINTER SETTINGS in FAX SETTINGS to ON you can keep printing fax documents or reports without replacing the toner cartridge The default setting for CONT PRINTING is OFF See CONT PRINTING on p 11 13 When CONT PRINTING is set to ON the printed documents may be light or blurred because of lack of t...

Страница 161: ...ttings Maintenance Troubleshooting Appendix Index Table of Contents 3 Hold the grip A on the right front side of the toner cover 4 Open the toner cover 5 Remove the toner cartridge Do not touch the rollers and parts which have labels CAUTION Hot surface avoid contact on They become very hot during use 6 Gently rock the toner cartridge several times to evenly distribute toner inside ...

Страница 162: ...by its handle A Do not open the drum protective shutter on the toner cartridge Print quality may deteriorate if the drum surface is exposed to light or is damaged Always hold the toner cartridge by its handle 8 Insert the toner cartridge so that the protrusion on the right side of the toner cartridge A fits into the guide B located on the right side of the machine and slide it down parallel to the...

Страница 163: ...nager Settings Maintenance Troubleshooting Appendix Index Table of Contents 10 Hold the grip A on the right front side of the toner cover 11 Close the toner cover 12 Lower the scanning platform Be careful not to get your fingers caught If you cannot close the toner cover do not force it to close Open the cover and make sure the toner cartridge is properly set in the machine ...

Страница 164: ...te UI System Manager Settings Maintenance Troubleshooting Appendix Index Table of Contents Replacing the Toner Cartridge with a New One 1 Hold the front side of the operation panel with your hands 2 Lift the scanning platform A until it is locked You will hear an audible click 3 Hold the grip A on the right front side of the toner cover 4 Open the toner cover ...

Страница 165: ... Scanning Network Remote UI System Manager Settings Maintenance Troubleshooting Appendix Index Table of Contents 5 Remove the toner cartridge 6 Remove the new toner cartridge from the protective bag Save the protective bag You may need it later when you remove the toner cartridge from the machine Do not open the drum protective shutter A ...

Страница 166: ...ck the toner cartridge several times to evenly distribute toner inside 8 Place the toner cartridge on a flat surface and pull the seal completely out Do not pull the seal out at an angle If toner is adhered on the removed seal be careful that your hands or clothes do not get dirty from touching the toner If your hands or clothes get dirty from touching the toner wash them immediately in cold water...

Страница 167: ...y its handle A Do not open the drum protective shutter on the toner cartridge Print quality may deteriorate if the drum surface is exposed to light or is damaged Always hold the toner cartridge by its handle 10 Insert the toner cartridge so that the protrusion on the right side of the toner cartridge A fits into the guide B located on the right side of the machine and slide it down parallel to the...

Страница 168: ...nager Settings Maintenance Troubleshooting Appendix Index Table of Contents 12 Hold the grip A on the right front side of the toner cover 13 Close the toner cover 14 Lower the scanning platform Be careful not to get your fingers caught If you cannot close the toner cover do not force it to close Open the cover and make sure the toner cartridge is properly set in the machine ...

Страница 169: ... which supports four critical environmental areas Recycling in the Workplace Conserving Environmental Resources Scientific Research and Education Encouraging Outdoors Appreciation The remaining Clean Earth initiatives are supported in the U S through sponsorships of the National Park Foundation the National Wildlife Federation and The Nature Conservancy and in Canada through donations to the World...

Страница 170: ...e not refilled You are not entitled to a tax deduction or rebate for the return of empty cartridges This program may be modified or discontinued without notice U S A PROGRAM Packaging Option A 1 Single Box Return Repackage the empty cartridge utilizing the wrapper and pulp mould end blocks from the new cartridge s box Place the empty cartridge in the box of your new cartridge Seal the box Option B...

Страница 171: ... Please be sure that the shipment does not exceed UPS specifications Maximum weight 70 lb 31 8 kg Maximum length 108 in 2 743 mm Maximum girth length 2 x width 2 x height 130 in 3 302 mm If your shipment exceeds the above limits please call 1 800 OK Canon for special shipping information Please Note Do not send defective cartridges for replacement Defective cartridges under warranty should be exch...

Страница 172: ...artridge shipment if they do not already have a delivery scheduled or Take the shipment to your local UPS receiving point CANADA PROGRAM CANADA PROGRAMME Option A Single Box Return Repackage the empty cartridge utilizing the wrapper and pulp mould end blocks from the new cartridge s box Place the empty cartridge in the box of your new cartridge Seal the box Apply the Canon Canada Inc Canada Post l...

Страница 173: ...ndividual cartridge boxes Place your eight individually packaged boxes of empty cartridges into the Canon collection box Seal the box Apply the Canon Canada Inc Canada Post label provided in this brochure Canon s labels are specially marked so that Canon pays the postage Deliver to any local Canada Post outlet or franchise Customers who hold a Commercial pick up agreement with Canada Post may have...

Страница 174: ...ing Printing and Scanning Network Remote UI System Manager Settings Maintenance Troubleshooting Appendix Index Table of Contents For further information about The Clean Earth Campaign in Canada please call or write to Canon 1 800 667 2666 Canon Canada Inc Corporate Customer Relations 6390 Dixie Road Mississauga ON L5T 1P7 ...

Страница 175: ...ollow this procedure to avoid vibration damage to the machine when transporting it over a long distance 1 Turn off the main power switch 2 Disconnect the power cord and all the cables from the back of the machine 3 If you are using the output tray extension fold the paper stopper and then push the output tray extension into the machine 4 Hold the front side of the operation panel with your hands 5...

Страница 176: ...ex Table of Contents 6 Hold the grip A on the right front side of the toner cover 7 Open the toner cover 8 Remove the toner cartridge To avoid exposing the toner cartridge to light place it in its protective bag or wrap it in a thick cloth Do not open the drum protective shutter on the toner cartridge Print quality may deteriorate if the drum surface is exposed to light or is damaged Always hold t...

Страница 177: ...inting and Scanning Network Remote UI System Manager Settings Maintenance Troubleshooting Appendix Index Table of Contents 9 Hold the grip A on the right front side of the toner cover 10 Close the toner cover 11 Lower the scanning platform Be careful not to get your fingers caught 12 Remove the dust cover from the paper cassette ...

Страница 178: ... Scanning Network Remote UI System Manager Settings Maintenance Troubleshooting Appendix Index Table of Contents 13 Open the front panel of the paper cassette 14 Remove the paper from the paper cassette 15 Remove the paper cassette by lifting up the front end of the paper cassette and pulling it forward 16 Detach the Document feeder tray ...

Страница 179: ...g Appendix Index Table of Contents 17 Make sure all the covers are closed 18 Grip the handles on both sides of the machine and lift it carefully as shown in the illustration below Do not lift the machine by any of its attachments Dropping the machine can cause personal injury If you have a back problem make sure to check the weight of this machine before carrying See Chapter 13 Appendix in the Bas...

Страница 180: ...mote UI System Manager Settings Maintenance Troubleshooting Appendix Table of Contents Index 10Troubleshooting Clearing Jams 10 3 Document Jams 10 4 Paper Jams 10 6 LCD Messages 10 14 Error Codes 10 20 If LOAD CORRECT PAPER is displayed 10 22 Re loading the Paper 10 22 Changing the Paper Size Setting 10 22 General Problems 10 24 Paper Feeding Problems 10 26 ...

Страница 181: ...tem Manager Settings Maintenance Troubleshooting Appendix Table of Contents Index Fax Problems 10 27 Sending Problems 10 27 Receiving Problems 10 31 Copying Problems 10 37 Printing Problems 10 40 Telephone Problems 10 43 Network Problems 10 44 If a Power Failure Occurs 10 46 If You Cannot Solve a Problem 10 47 Customer Support U S A 10 47 Customer Support Canada 10 47 ...

Страница 182: ... machine Check that the paper you are using meets the requirements for use See Paper Requirements on p 2 7 Make sure you have removed any scraps of paper from the inside of the machine When removing jammed documents or paper take care not to cut your hands on the edges of the document or paper When removing jammed paper or when inspecting the inside of the machine do not allow necklaces bracelets ...

Страница 183: ... Appendix Index Table of Contents Document Jams When CHECK DOCUMENT appears on the LCD display remove a jammed document from the ADF 1 Open the ADF cover 2 Hold both sides of any jammed documents and gently pull them out straight upward Do not pull the document forcefully as it may tear 3 Hold both sides of any jammed documents and gently pull them out 4 Close the ADF cover Be careful not to get y...

Страница 184: ...pying Sending and Receiving Printing and Scanning Network Remote UI System Manager Settings Maintenance Troubleshooting Appendix Index Table of Contents 5 Open the ADF and then hold both sides of any jammed documents and gently pull them out 6 Close the ADF Be careful not to get your fingers caught ...

Страница 185: ...of Contents Paper Jams When PAPER JAM or PAPER JAM OPEN REAR COVER appears on the LCD display remove jammed paper from the inside of the machine first then from the paper cassette or multi purpose tray if necessary 1 Hold the front side of the operation panel with your hands 2 Lift the scanning platform A until it is locked You will hear an audible click 3 Hold the grip A on the right front side o...

Страница 186: ...racelets or rings when touching the inside of the machine These items might be damaged if they come into contact with the parts inside of the machine To avoid exposing the toner cartridge to light place it in its protective bag or wrap it in a thick cloth Do not open the drum protective shutter on the toner cartridge Print quality may deteriorate if the drum surface is exposed to light or is damag...

Страница 187: ...ly A and transfer roller B until the leading edge emerges from the machine Do not touch the fixing assembly A as it becomes very hot during use Do not touch the transfer roller B as this can damage the machine 8 Hold both sides of the jammed paper and carefully pull it out 9 Hold the toner cartridge by its handle A Do not open the drum protective shutter on the toner cartridge Print quality may de...

Страница 188: ...leshooting Appendix Index Table of Contents 10 Insert the toner cartridge so that the protrusion on the right side of the toner cartridge A fits into the guide B located on the right side of the machine and slide it down parallel to the guide 11 Push down the toner cartridge to make sure it is properly set in the machine 12 Hold the grip A on the right front side of the toner cover 13 Close the to...

Страница 189: ...er Settings Maintenance Troubleshooting Appendix Index Table of Contents 14 Lower the scanning platform Be careful not to get your fingers caught If you cannot close the toner cover do not force it to close Open the cover and make sure the toner cartridge is properly set in the machine 15 Remove the dust cover from the paper cassette 16 Open the front panel of the paper cassette ...

Страница 190: ...emote UI System Manager Settings Maintenance Troubleshooting Appendix Index Table of Contents 17 Remove the paper in the paper cassette 18 Hold both sides of the jammed paper and slowly pull it out in the direction of the arrow When feeding paper from the paper cassette When feeding paper from the multi purpose tray 19 Load the paper into the paper cassette ...

Страница 191: ...ving Printing and Scanning Network Remote UI System Manager Settings Maintenance Troubleshooting Appendix Index Table of Contents 20 Close the front panel of the paper cassette 21 Set the dust cover on the paper cassette 22 Open the rear cover This operation is required only when OPEN REAR COVER appears on the LCD display ...

Страница 192: ...f the jammed paper and gently pull it out upward This operation is required only when OPEN REAR COVER appears on the LCD display If the jammed paper is badly folded similar to the folds of an accordion ease the jammed paper loose and then pull it out from the machine 24 Close the rear cover This operation is required only when OPEN REAR COVER appears on the LCD display Be careful not to get your f...

Страница 193: ...to send any documents in memory Also print send or delete any documents stored in memory CANNOT PRINT RX DATA Description The machine temporarily received the fax in memory because an error of some kind has occurred in the machine This error message appears with one of the messages below CLOSE COVER TONER COVER LOAD CORRECT PAPER REMOVE MP PAPER CHANGE REG D SIZE PAPER SETTINGS OUT OF TONER CHANGE...

Страница 194: ...a on both sides of paper set the CASSETTE paper size to LTR or A4 For details see Setting Paper Size and Type on p 2 13 For two sided copying set the paper size to LTR or A4 For details see Setting Paper Size and Type on p 2 13 CHECK DOCUMENT Description A document jam may have occurred in the ADF Action Remove the jammed document CLOSE COVER TONER COVER Description The toner cover is not closed c...

Страница 195: ... paper is loaded in the paper cassette or multi purpose tray when printing a received document Or when printing a report or list this message appears if the paper size is not appropriate for printing a report or list even if paper is loaded This error message appears with one of the messages below CHANGE REG D SIZE PAPER SETTINGS CANNOT PRINT RX DATA Action Load paper correctly Then press OK when ...

Страница 196: ...jobs Based on the condition that the other party sends the fax by the imageCLASS MF4270 with ITU T Standard Chart No 1 standard mode Wait for the machine to send any faxes in memory Also print or delete any documents in memory NOT AVAILABLE Description You pressed the one touch speed dialing key that has already been registered when you are registering group dialing Description You selected the gr...

Страница 197: ...n turning on the main power switch or when the machine is not ready for printing Action Wait until the message disappears REMOVE MP PAPER Description Paper is loaded in the multi purpose tray Action Remove the paper from the multi purpose tray The machine will not print faxes reports or lists when paper is loaded in the multi purpose tray They will be stored in memory SET PAPER AGAIN SET TONER AGA...

Страница 198: ...ning Network Remote UI System Manager Settings Maintenance Troubleshooting Appendix Index Table of Contents WRONG PASSWORD Description The memory lock reception password or system password you entered is incorrect Action Enter the correct password For details see Memory Lock Reception on p 4 26 or Specifying the System Manager Settings on p 8 2 ...

Страница 199: ...canning Network Remote UI System Manager Settings Maintenance Troubleshooting Appendix Index Table of Contents Error Codes An error code is a four digit code shown on an ERROR TX REPORT or an ERROR RX REPORT when an error occurs For details on reports see Printing Reports Automatically on p 11 26 See the following for individual error codes ...

Страница 200: ...ne cable is properly connected and try again 0001 Description The sender may not be using a G3 fax machine Action Make sure the sender s machine is compatible with your machine 0070 Description Reception was manually canceled on the machine Action Ask the sender to resend the document if necessary 0071 Description The machine s memory is full Action Print send or delete any documents stored in mem...

Страница 201: ...ETTINGS menu For print jobs you need to specify the paper size from your computer Re loading the Paper 1 Load the correct size paper as shown on the LCD display then press OK to resume the job The machine re starts printing Changing the Paper Size Setting 1 Press Additional Functions If LOAD CORRECT PAPER appears during a copy job you cannot access the paper size setting through Additional Functio...

Страница 202: ...ceiving Printing and Scanning Network Remote UI System Manager Settings Maintenance Troubleshooting Appendix Index Table of Contents 6 Press Stop Reset to return to the standby mode Now ready to copy your document For a fax job or report printing go to step 7 7 Press OK to resume the job No further operation is required ...

Страница 203: ...ower switch turned on Turn on the main power switch Q A Q A Q A The Error indicator flashes Does the machine feed paper correctly or is there paper in the paper cassette or multi purpose tray Clear the paper jam or load paper in the paper cassette or multi purpose tray For instructions on clearing paper jam see Clearing Jams on p 10 3 For instructions on loading paper see Set Up the Machine in the...

Страница 204: ... of Contents Nothing appears in the LCD Is the power cord plugged in securely Check that the power cord is securely plugged into the machine and into the wall outlet If the machine is plugged into a power strip make sure the power strip is plugged in and turned on Is the main power switch turned on Turn on the main power switch Is the machine in the Sleep mode Press Energy Saver on the operation p...

Страница 205: ...ple sheets feed together into the machine Is the paper loaded correctly Make sure the paper is correctly loaded See Set Up the Machine in the Starter Guide Does the machine contain too many sheets Make sure you load the correct quantity See Paper Requirements on p 2 7 Q A Q A Q A Q A Are different types of paper loaded in the machine Load only one type of paper Make sure you load paper that meets ...

Страница 206: ...ne line type Make sure the machine is set for the correct telephone line type See Before FAX Setting in the Starter Guide Is your machine in the fax mode Press FAX to show the fax standby display Q A Q A Q A Is the document loaded correctly Make sure the document is correctly loaded See Loading Documents on p 2 4 Make sure the scanning platform and rear cover are fully closed See Paper Jams on p 1...

Страница 207: ...nts being sent from memory Allow time for the documents to finish sending Has an error occurred during transmission Check the LCD for an error message See LCD Messages on p 10 14 Print an Activity Report and check for an error See ACTIVITY REPORT on p 11 28 Q A Q A Q A Q A A Is the telephone cable connected properly Make sure the cable is connected properly See Before FAX Setting in the Starter Gu...

Страница 208: ...rnal phone is busy Please wait until the external phone becomes free Is the machine overheated Unplug the machine and let it cool for about 5 minutes Then plug in the machine and try sending again Q A Q A Q A Memory fills up immediately when you try to send Are you sending with the resolution set to SUPER FINE If you want to keep your document quality divide the document into some parts and send t...

Страница 209: ...2 4 The documents you sent are too light Is the density setting changed to be lighter Adjust the density for light documents to be darker See Density on p 4 5 Are the scanning components of the machine clean If the received document is spotted or dirty clean the scanning components See Scanning area on p 9 8 Q A Q A Q A Q A Sending of documents is too slow Is the resolution set to FINE PHOTO or SU...

Страница 210: ... must be set to FaxOnly FAX TEL AnsMode or DRPD If you have set AnsMode confirm that an external telephone with built in answering machine is connected to the machine and that it is turned on with an outgoing message properly recorded See Basic Receiving Method on p 4 23 Q A Q A Are documents stored in memory leaving little or no memory available Print send or delete any documents stored in memory...

Страница 211: ...e properly recorded See Basic Receiving Method on p 4 23 Are documents stored in memory leaving little or no memory available Print send or delete any documents stored in memory Q A Q A Has an error occurred during reception Check the LCD for an error message See LCD Messages on p 10 14 Print an Activity Report and check for an error See ACTIVITY REPORT on p 11 28 Is paper loaded in the machine Ma...

Страница 212: ...F it automatically switches to manual sending Print quality is poor Is the toner low or unevenly distributed Redistribute the toner inside the toner cartridge If the problem persists replace the toner cartridge See Replacing the Toner Cartridge on p 9 11 Q A Q A Q A Is the correct type of paper loaded in the machine Make sure you load paper that meets the requirements for use See Paper Requirement...

Страница 213: ...rements for use See Paper Requirements on p 2 7 Change PAPER SETTINGS See Setting Paper Size and Type on p 2 13 Received faxes print blotched or unevenly Is the sender s machine functioning properly Ask the sender to check that the scanning components of the machine are clean Q A Q A Q A A Q A Is the toner low or unevenly distributed Redistribute the toner inside the toner cartridge If the problem...

Страница 214: ...the printing method to ON or OFF See Received Image Reduction on p 4 31 Cannot receive using Error Correction Mode ECM Does the sender s machine support ECM If the sender s machine does not support ECM the document is received in normal mode without error checking Q A Q A Q A Receiving of documents is too slow Is the resolution of the sender s machine set higher Contact to the sender and make sure...

Страница 215: ...uently while receiving Are the telephone lines in poor condition or do you have a bad connection Check if there is a device nearby that interferes with signal reception e g microwave oven Is the sender s machine functioning properly Ask the sender to check that the machine is functioning properly Cannot print received documents on both sides of the paper Is 2 SIDED PRINT set to ON Make sure that 2...

Страница 216: ...e the toner cartridge See Replacing the Toner Cartridge on p 9 11 Does the document meet the requirements for the machine Make sure you load documents that meet the requirements for use See Document Requirements on p 2 2 Q A Q A Q A Q A Copy is too light or has uneven density Is the toner low or unevenly distributed Redistribute the toner inside the toner cartridge If the problem persists replace ...

Страница 217: ... machine See Set Up the Machine in the Starter Guide Make sure the paper delivery slot is free of obstructions A Q A Q A Q A A Copy is not clear Is the correct type of paper loaded in the machine Make sure you load paper that meets the requirements for use See Paper Requirements on p 2 7 Are you copying on the wrong side of the paper Some papers have a right side for copying If the copy quality is...

Страница 218: ...ding and Receiving Printing and Scanning Network Remote UI System Manager Settings Maintenance Troubleshooting Appendix Index Table of Contents The alarm sounds or MEMORY FULL appears in the LCD when making copies Is the machine s memory full Check remaining memory See Checking Remaining Memory on p 11 30 Q A ...

Страница 219: ...t Up the Machine in the Starter Guide Is the cartridge out of toner Replace the toner cartridge See Replacing the Toner Cartridge on p 9 11 Q A Q A Q A Printout is too light or has uneven density Is the toner low or unevenly distributed Redistribute the toner inside the toner cartridge If the problem persists replace the toner cartridge See Replacing the Toner Cartridge on p 9 11 Printout has vert...

Страница 220: ...e the paper is correctly loaded in the machine See Set Up the Machine in the Starter Guide Make sure the Output tray is free of obstructions See Machine Components on p 1 3 A Q A Q A Q A A Printout is not clear Is the correct type of paper loaded in the machine Make sure you load paper that meets the requirements for use See Paper Requirements on p 2 7 Are you printing on the wrong side of the pap...

Страница 221: ...o others Are there any jobs remaining in the print queue A print job may be stuck in the print queue when it could not be finished due to an expected interruption When this happens follow this procedure to delete any remaining print jobs and then print the documents again Q A Q A Q A Q A For Windows 2000 XP Server 2003 Vista 1 Double click the icon of the printer you installed For Windows Vista Cl...

Страница 222: ...s plugged in and turned on Is the main power switch turned on Turn on the main power switch Is the machine set for the correct telephone line type Make sure the machine is set for the correct telephone line type See Before FAX Setting in the Starter Guide Q A Q A Q A Q A Telephone disconnects while you are talking Is the telephone cable connected properly Make sure the cable is connected properly ...

Страница 223: ...nting properly set up Make sure the proper printer driver is installed See Software Settings with Computer in the Starter Guide Make sure the correct machine is set as the output destination for the computer that is printing in Printers and Faxes or Print Manager Q A Q A Q A A Is the name of the file being printed too long Rename the file with a shorter name Normally LPR or the Microsoft TCP IP Pr...

Страница 224: ... See Software Settings with Computer in the Starter Guide Make sure the correct machine is set as the output destination for the computer that is printing in Printers and Faxes or Printers Detailed information concerning the machine cannot be set or browsed using the Remote UI or utility Does the SNMP community name match If you use an SNMP community name different from the one stored in the machi...

Страница 225: ...able to make telephone calls You can receive telephone calls from the telephone connected to the machine You cannot send receive or copy documents If power is suddenly lost due to a power failure or accidental unplugging the machine may lose any data stored in the memory including received fax documents If this happens the LCD displays LOST IMAGE when power is restored and automatically prints a L...

Страница 226: ...www canon ca Free live technical support 9 A M to 8 P M EST Monday through Friday excluding holidays for products still under warranty 1 800 652 2666 For the location of the authorized service facility nearest you visit http www canon ca or 1 800 652 2666 If the problem cannot be corrected by using one of the above technical support options repair options are available at the time of your call to ...

Страница 227: ...em Manager Settings Maintenance Troubleshooting Appendix Table of Contents Index 11Appendix Machine Settings 11 3 Printing USER DATA LIST 11 3 Accessing the Setting Menu 11 3 Setting Menu 11 5 PAPER SETTINGS 11 5 VOLUME CONTROL 11 6 BROADCAST 11 7 COMMON SETTINGS 11 7 COPY SETTINGS 11 8 FAX SETTINGS 11 9 ADDRESS BOOK SET 11 14 PRINTER SETTINGS 11 15 TIMER SETTINGS 11 16 ...

Страница 228: ...m Manager Settings Maintenance Troubleshooting Appendix Table of Contents Index ADJUST CLEANING 11 17 REPORT SETTINGS 11 18 SYSTEM SETTINGS 11 20 Summary of Reports and Lists 11 25 Printing Reports Automatically 11 26 TX REPORT 11 26 RX REPORT 11 27 ACTIVITY REPORT 11 28 Printing Reports and Lists Manually 11 29 Checking Remaining Memory 11 30 Glossary 11 31 Index 11 41 ...

Страница 229: ...ings print out USER DATA LIST Printing USER DATA LIST 1 Press Additional Functions 2 Press or to select REPORT SETTINGS then press OK 3 Press or to select LIST PRINT then press OK 4 Press or to select USER DATA LIST then press OK Printing starts and the screen automatically returns to the standby mode Accessing the Setting Menu 1 Press Additional Functions 2 Press or to select the menu you want to...

Страница 230: ...ubleshooting Appendix Index Table of Contents 3 Press or to select a submenu then press OK For details on the submenu see Setting Menu on p 11 5 4 To register the settings or go to a submenu item press OK 5 When finished press Stop Reset to return to the standby mode If you press Stop Reset before pressing OK the setting will not be registered Press Additional Functions to return to the previous d...

Страница 231: ...ets the paper size from the following options LTR LGL A4 B5 A5 EXECUTIVE COM10 MONARCH DL ISO C5 OFICIO BRAZIL OFICIO MEXICO OFICIO FOLIO GOVERNMENT LETTER GOVERNMENT LEGAL and FOOLSCAP 2 PAPER TYPE Sets the paper type from the following options PLAIN PAPER PLAIN PAPER L HEAVY PAPER HEAVY PAPER H and TRANSPARENCY 2 MP TRAY Sets the paper size and type on the purpose tray See Setting Paper Size and...

Страница 232: ...nance Troubleshooting Appendix Table of Contents Index VOLUME CONTROL Setting Item Description 1 MONITOR VOLUME Sets the volume for monitor tone during the fax transmission 0 3 2 2 CALLING TONE Sets the volume of the ring produced when the machine detects a call 0 3 2 3 ENTRY TONE Beeps when pressing the keys on the operation panel 0 3 2 4 ERROR TONE Beeps when an error e g TX error occurs 0 3 2 ...

Страница 233: ...recipients for broadcasting A maximum of 124 recipients can be specified at the same time See Broadcasting on p 4 17 COMMON SETTINGS Setting Item Description 1 INITIAL FUNCTION Selects which standby display appears when turning on the power COPY FAX SCAN 2 TONER SAVER MODE Sets whether to reduce toner consumption OFF ON This function is not effective for print jobs 3 DISPLAY LANGUAGE Selects the l...

Страница 234: ...ets the document type for copying TEXT PHOTO TEXT PHOTO TEXT PHOTO 2 DENSITY Sets the density for copying MANUAL 1 9 5 AUTO 3 ZOOM RATIO Sets the zoom ratio for copying PRESET RATIO Selects the zoom from the preset ratios 100 129 STMT LTR 200 MAX 50 MIN 64 78 LGL LTR MANUAL Enters the zoom ratio by 1 increments 50 200 100 4 AUTO COLLATE Sets whether to collate the copies automatically OFF ON 5 2 S...

Страница 235: ...ecifies the basic operation settings in the fax mode 1 UNIT TELEPHONE Registers your fax number max 20 characters including spaces See Set the Machine for Sending Faxes in the Starter Guide 2 UNIT NAME Registers your name company name max 32 characters including spaces See Set the Machine for Sending Faxes in the Starter Guide 3 TEL LINE TYPE Selects the telephone line type See Before FAX Setting ...

Страница 236: ...e transmission features 1 AUTO REDIAL Sets whether to redial automatically when the other line is busy or a transmission error occurs See Redialing Automatically on p 4 20 ON Customizes the redial operation REDIAL TIMES Sets the number of retries 1TIMES 10TIMES 2TIMES REDIAL INTERVAL Sets period of time before redialing 2MIN 99MIN 2MIN OFF After the first attempt at dialing fails redialing is not ...

Страница 237: ...EC 22SEC F T SWITCH ACTION Selects whether the machine switches to the receive mode after the ring time has elapsed or whether if disconnects the call RECEIVE DISCONNECT 2 DRPD SELECT FAX Selects the ring pattern for fax calls NORMAL RING DOUBLE RING SHORT SHORT LONG SHORT LONG SHORT OTHER RING TYPE 3 INCOMING RING Sets whether or not to activate the ring alert of the external telephone if RX MODE...

Страница 238: ...default 25 OFF The machine disables remote receiving 5 RX PRINT Sets whether to store all received pages in memory before printing them out or print each page as it is received See Selecting the Receive Mode for Printing on p 4 29 MEMORY RX Prints after all the pages of the document are received PRINT RX Prints each page as it is received 6 RX TERMINAL ID Sets whether to insert the machine s fax n...

Страница 239: ...image when a faxed page is larger than the size of paper loaded See Received Image Reduction on p 4 31 ON Reduces the image to fit on the size of paper loaded OFF Retains the original size of the image CUT The image that is larger than 1 page record area is cut and not recorded 2 2 SIDED PRINT Sets the type of two sided printing for faxing See Two Sided Printing on p 4 30 OFF ON 3 CONT PRINTING Se...

Страница 240: ...ient s fax telephone number max 50 digits including spaces 2 CODED DIAL Registers recipients for coded speed dialing codes Up to 100 recipients can be registered See Storing Editing One Touch Speed Dialing Keys Coded Speed Dialing Codes on p 4 7 1 NAME Registers the recipient s name max 20 characters including spaces 2 TEL NUMBER ENTRY Registers the recipient s fax telephone number max 50 digits i...

Страница 241: ...g Network Remote UI System Manager Settings Maintenance Troubleshooting Appendix Table of Contents Index PRINTER SETTINGS Setting Item Description 1 ERROR TIME OUT Sets the length of time before the machine returns an error when no data is received from the computer ON Sets the error time out period 5SEC 300SEC 15SEC OFF The error time out is off ...

Страница 242: ...e 2 DATE TYPE SELECT Sets the date format MM DD YYYY DD MM YYYY YYYY MM DD 3 AUTO SLEEP Sets the auto Sleep mode when the machine remains idle for a certain period of time 3MIN 30MIN 5MIN See Setting the Sleep Mode on p 1 15 ON OFF 4 DAYLIGHT SV TIME Sets the daylight saving time mode See Setting the Daylight Saving Time on p 1 16 OFF Deactivates the daylight saving time mode ON Activates the dayl...

Страница 243: ...me light OFF ON 3 SPECIAL MODE U Select to improve print quality in high temperature and high humidity conditions or in low temperature and low humidity conditions OFF Select in normal condition MODE1 Select to improve print quality in low temperature and low humidity conditions or when using thick paper or an envelope MODE2 Select to improve print quality in high temperature and high humidity con...

Страница 244: ... Sets the report functions See Printing Reports Automatically on p 11 26 1 TX REPORT Sets whether the transmission report prints out PRINT ERROR ONLY Prints a report only when a transmission error occurs OUTPUT NO No report is printed OUTPUT YES Prints a report every time you send a document 2 RX REPORT Sets whether the reception report prints out OUTPUT NO OUTPUT YES PRINT ERROR ONLY 3 ACTIVITY R...

Страница 245: ...ually 3 ACTIVITY REPORT Prints the fax transaction report manually 4 MEMORY DATA LIST Prints the list of the reserved jobs in memory 5 MEMORY IMAGE PRNT Prints the information and image of the first page of the reserved job 6 1 TOUCH LIST Prints the list of fax telephone numbers and names registered for one touch speed dialing 7 CODED DIAL LIST Prints the list of fax telephone numbers and names re...

Страница 246: ...he SYSTEM SETTINGS menu 1 SYSTEM PASSWORD Sets the system manager password seven digits 2 NETWORK SETTINGS Sets the network setting See Chapter 6 Network 1 TCP IP SETTINGS Sets TCP IP network 1 IP ADDRESS AUTO Sets whether to automatically set an IP address ON Enables an IP address to the machine automatically 1 DHCP ON OFF 2 BOOTP OFF ON 3 RARP OFF ON OFF Allocates an IP address to the machine ma...

Страница 247: ...nts Index SYSTEM SETTINGS 5 LPD PRINT Sets whether to use LPD as the print application ON OFF 6 RAW PRINT Sets whether to use RAW as the print application ON Enables to use RAW OFF Disables to use RAW 7 USE HTTP Sets whether to activate HTTP HyperText Transfer Protocol for the Remote UI ON OFF 8 PORT NO SET Sets the port number settings 1 LPD 0 65535 default 515 2 RAW 0 65535 default 9100 3 HTTP 0...

Страница 248: ...ents Index SYSTEM SETTINGS 2 SNMP SETTINGS Sets detailed information about SNMP 1 USE SNMP Sets whether to activate SNMP ON OFF 2 COMMUNITY NAME 1 Sets SNMP community name 1 default public 3 COMMUNITY NAME 2 Sets SNMP community name 2 4 SNMP WRITABLE 1 Enables computers on the network to access the machine and modify its settings ON OFF 5 SNMP WRITABLE 2 Enables computers on the network to access ...

Страница 249: ...de Half duplex Full duplex and Ethernet type 10Base T 100Base TX automatically MANUAL Sets the communication mode and Ethernet type manually 1 COMMUNICATN MODE Selects the communication mode FULL DUPLEX HALF DUPLEX 2 ETHERNET TYPE Selects the Ethernet type 100 BASE TX 10 BASE T 2 MAC ADDRESS Displays the twelve digit MAC address of the machine 4 VIEW IP ADDRESS Checks the current network settings ...

Страница 250: ...tion ON Enables memory lock reception 1 PASSWORD Registers the password that protects the authority for accessing to memory 2 MEMORY RX TIME Sets whether to set a period for memory lock reception OFF Disables setting a period of memory lock reception ON Enables setting a period of memory lock reception MEM RX START TIME MEM RX END TIME 4 ACCESS TO DEST Sets restriction of the access to destination...

Страница 251: ...ax numbers of recipients registered in coded speed dialing codes GROUP DIAL LIST Lists the names and fax numbers of recipients registered in each group dialing group USER DATA LIST Lists all the current settings and registered sender information TX REPORT Shows the transmission result Can be set to print automatically RX REPORT Shows the reception result Can be set to print automatically ACTIVITY ...

Страница 252: ...to select the setting you want then press OK PRINT ERROR ONLY Prints a report only when a transmission error occurs OUTPUT NO Does not print a report OUTPUT YES Prints a report every time you send a document 6 Press Stop Reset to return to the standby mode Report Items The following items are displayed in the Transmission Report JOB NO Job number MODE Mode of transaction G3 or ECM NO Sequence numb...

Страница 253: ... print a report OUTPUT YES Prints a report every time you receive a document PRINT ERROR ONLY Prints a report only when a reception error occurs 6 Press Stop Reset to return to the standby mode Report Items The following items are displayed in the Reception Report JOB NO Job number MODE Mode of transaction G3 or ECM NO Sequence number DESTINATION TEL ID Number of the sending machine displayed only...

Страница 254: ...PORT then press OK 5 Press or to select the setting you want then press OK OUTPUT YES Prints a report after every 60 transactions OUTPUT NO Does not print a report 6 Press Stop Reset to return to the standby mode Report Items The following items are displayed in the Activity Report NO Transaction number 01 to 60 JOB NO Job number START TIME Date and time of transaction MODE Mode of transaction G3 ...

Страница 255: ...TA LIST MEMORY IMAGE PRNT 1 TOUCH LIST CODED DIAL LIST GROUP DIAL LIST USER DATA LIST If no relevant data is stored in memory NO DATA is displayed For information on each report or list see Summary of Reports and Lists on p 11 25 For information on the supported paper size for printing reports or lists see LCD Messages on p 10 14 1 Press Additional Functions 2 Press or to select REPORT SETTINGS th...

Страница 256: ...em Manager Settings Maintenance Troubleshooting Appendix Index Table of Contents Checking Remaining Memory You can check the remaining memory according to the status of the machine 1 Press System Monitor 2 Press or to select AVAILABLE MEMORY then press OK to confirm the remaining memory 7 5 A V A I L A B L E M E M O R Y Ex 3 Press Stop Reset to return to the standby mode ...

Страница 257: ...tiple recipients in a group and assign a one touch speed dialing key to this group Registering a recipient in the Address Book saves you the effort of entering that fax number each time you send a fax ASCII code ASCII American Standard Code for Information Interchange is a set of standardized codes used to represent letters numbers punctuation marks a few symbols and control characters A seven dig...

Страница 258: ...ssion The majority of fax machines in use today can send and detect CNG signals Coded Speed Dialing Codes A method to specify a recipient registered in Address Book Press Coded Dial and a two digit code using the numeric keys Community Name An identification keyword for SNMP Simple Network Management Protocol Cookie A file left on a user s computer when the user visits a web site A cookie allows t...

Страница 259: ...ing on the distinctive ring patterns assigned to different numbers Subscription to a DRPD service offered by some telephone companies is required E ECM Error Correction Mode The ability of your machine to reduce system and line errors when sending or receiving from another fax with ECM capability ECM is most effective in areas where the telephone lines are in poor condition or there is frequent in...

Страница 260: ...ying recipients that enables you to specify multiple recipients registered in Address Book as a group This means that you can press just a single one touch speed dialing key or coded speed dialing code to specify recipients when sending the same document to many recipients H HP GL 2 A graphics language that allows computer applications to draw graphic images using printers Images in HP GL 2 are re...

Страница 261: ...server workstations and computers which are all located in the same building or some other relatively limited area Log in Entering a password as a means of user authentication to start a computer session or access to a service LPD Line Printer Daemon A daemon is a program that runs without human intervention to accomplish a given task The Line Printer Daemon controls the flow of print jobs to a pr...

Страница 262: ...keys The numbered keys on the operation panel that may be registered as single or a group of recipients Once a number or group is registered you press one key to dial the entire number or group P Paper feed Refers to guiding a sheet of paper into the machine s paper path Paper feeder The device in the machine that feeds recording media into the machine for printing copied or sent documents Pause A...

Страница 263: ...eometrical formula Each row of color dots in the mosaic of color dots constitutes one raster graphic In a printer a raster graphic is used as the master image from which a page is printed because the image can be transferred to paper by printing one raster at a time Raw This is a print application used with Windows 2000 XP Server 2003 Vista It can print at higher speeds than LPD Receiving Receivin...

Страница 264: ...ns of a printer that convert vector graphic descriptions from a computer into raster graphic images that can be printed Rotary pulse A telephone dialing system where a dial is rotated to send pulses to the telephone switching system In pulse dialing you hear clicks In touch tone dialing the most common dialing system you hear tones Rotary pulse dialing requires certain setting adjustments RX See R...

Страница 265: ... can be connected The switching hub forwards a data packet from the network to the appropriate computer according to the packet s address Conventional hubs simply send every packet to every connected computer Since a switching hub forwards packets only to their intended recipients it provides greater efficiency T TCP IP Acronym for Transmission Control Protocol Internet Protocol The protocol used ...

Страница 266: ...on of an object usually a web page on the Internet The URL for a web page would look something like this http www w3 org default html Here http indicates that a web page is being accessed http www w3 org is the address of the server containing the web page and default html is the file name under which the web page is stored on the server V Vector Graphics See Raster W WAN Wide Area Network A geogr...

Страница 267: ...res 4 17 AnsMode 4 23 Automatic document feeder 1 3 B Basic network settings 6 4 Basic receiving method 4 23 Basic sending method 4 4 Before using the machine 1 1 BROADCAST 11 7 Broadcasting 4 17 C Canceling Copy job 3 11 Scan job 5 7 TX RX job 4 32 CHECK DOCUMENT message 10 3 Checking Documents stored in memory 4 33 Print job 5 8 Reception result 4 33 Transmission result 4 33 Checking dialing lin...

Страница 268: ...r codes 10 20 Error indicator 1 7 Ethernet port 1 5 External device jack 1 5 F FAX TEL 4 24 Fax dialing features 4 19 FAX key 1 6 FAX MODE 1 10 Fax numbers Registering in Address Book 4 7 FaxOnly 4 23 Fax operation panel 1 9 G Glossary 11 31 Group dialing Adding recipients 4 10 Changing name 4 11 Deleting group 4 11 Deleting recipients 4 10 Registering group 4 9 Using 4 14 GROUP DIAL LIST 11 25 H ...

Страница 269: ...peration panel 1 3 1 6 Main operation panel 1 6 Output tray 1 3 Output tray extension 1 4 Overseas number 4 22 P Page top button 7 5 Paper Jams 10 6 Loading 2 10 Printable area 2 9 Requirements 2 7 Size and type 2 13 Paper cassette 1 3 Paper guide rail 1 4 PAPER JAM message 10 6 Paper requirements 2 7 PAPER SETTINGS 11 5 Paper stopper 1 4 PC faxing 4 18 Platen glass 1 4 2 4 Power failure 10 46 Pow...

Страница 270: ...nts 4 12 Setting menu ADDRESS BOOK SET 11 14 ADJUST CLEANING 11 17 BROADCAST 11 7 COMMON SETTINGS 11 7 COPY SETTINGS 11 8 FAX SETTINGS 11 9 PAPER SETTINGS 11 5 PRINTER SETTINGS 11 15 REPORT SETTINGS 11 18 SYSTEM SETTINGS 11 20 TIMER SETTINGS 11 16 VOLUME CONTROL 11 6 Setting paper size and type 2 13 Setting up a computer for printing sending a fax 6 10 Sleep mode 1 15 Slide guides 1 3 2 5 Slide gu...

Страница 271: ...10 20 General 10 24 If a power failure occurs 10 46 If you cannot solve a problem 10 47 LCD messages 10 14 Network 10 44 Paper feeding 10 26 Printing 10 40 Sending Receiving 10 27 Telephone 10 43 Two sided copying 3 8 Two sided printing 4 30 5 5 TX REPORT 11 25 Printing automatically 11 26 U USB port 1 5 USER DATA LIST 11 3 11 25 Using Coded speed dialing codes 4 13 Group dialing 4 14 One touch sp...

Страница 272: ...MUNICATION IMAGE FRANCE S A S 12 rue de I Industrie 92414 Courbevoie Cedex France CANON U K LTD Woodhatch Reigate Surrey RH2 8BF United Kingdom CANON DEUTSCHLAND GmbH Europark Fichtenhain A10 47807 Krefeld Germany CANON ITALIA S p A Via Milano 8 20097 San Donato Milanese MI Italy CANON ESPAÑA S A c Joaquín Costa 41 28002 Madrid Spain CANON LATIN AMERICA INC 703 Waterford Way Suite 400 Miami Florid...

Отзывы: