


Registering Destinations (Address Book)
8W0J-038
Register destinations for sending and saving scanned data and faxes to the Address Book
*
of the machine.
*
This setting is available only for MF269dw II / MF269dw VP II / MF267dw II.
Address Book Function
By registering destinations to the Address Book, you can save the trouble of entering the information of
destinations each time you send or save data. The Address Book has a function for easily specifying
destinations. Use this function when displaying the Address Book screen or specifying destinations.
Destinations that Can Be Registered
●
E-mail address
●
File save locations (shared folder)
●
Fax number
How to Register Destinations
You can register a destination by entering a name, e-mail address, fax number, and other information.
You can register a destination to the Address Book from the TX Job Log of a scan job or a fax job.
You can register destinations either with the control panel or Remote UI, but the types of destinations that can
be registered and the registration method vary.
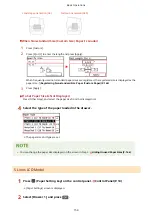
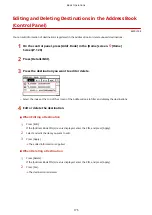
Registering Using the Control Panel
Use the control panel to register destinations from the TX Job Log.
You cannot use the control panel to register file save locations (shared folder).
Registering Destinations to the Address Book (Control Panel)(P. 171)
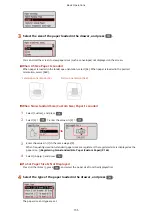
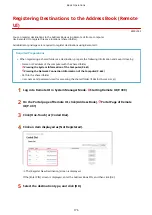
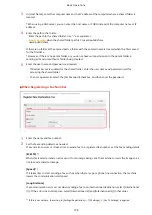
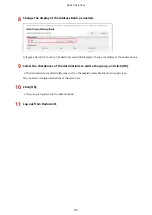
Registering Using Remote UI
Use Remote UI to register file save locations (shared folder).
You cannot use Remote UI to register destinations from the TX Job Log.
Registering Destinations to the Address Book (Remote UI)(P. 176)
◼
See Also
Importing and Exporting the Address Book
You can share and back up data in the Address Book.
Importing and Exporting the Address Book(P. 414)
Preventing Unauthorized Use of the Address Book
To prevent unauthorized adding of new entries to the Address Book and editing of existing entries, you can
set a PIN and restrict the method for adding new entries.
Restricting Address Book Registration and Editing(P. 386)
Basic Operations
168
Содержание imageCLASS MF264dw
Страница 72: ... Shared Key Encryption for WPA WPA2 TKIP AES CCMP IEEE 802 1X Authentication Setting Up 63 ...
Страница 96: ...7 Click OK 8 Restart the machine Restarting the Machine P 113 The settings are applied Setting Up 87 ...
Страница 139: ...Basic Operations 130 ...
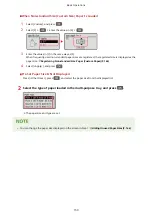
Страница 160: ...Paper with logo in portrait orientation Paper with logo in landscape orientation Basic Operations 151 ...
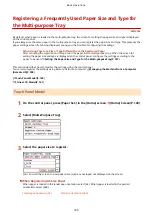
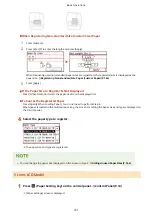
Страница 165: ... You can change the paper size displayed on the screen in Step 3 Hiding Unused Paper Sizes P 166 Basic Operations 156 ...
Страница 201: ...Press on the control panel Function Settings Copy Initialize Default Settings Yes Basic Operations 192 ...
Страница 204: ... The volume is adjusted Basic Operations 195 ...
Страница 319: ... To reduce moire vertical pattern noise in photos Press on the control panel 3 Press Copying 310 ...
Страница 333: ...Copying 324 ...
Страница 368: ...8 Log out from Remote UI Security 359 ...
Страница 501: ... Confirm Destination Scan PC Settings Menu Items 492 ...
Страница 538: ...10 Plug the power cord into the outlet and turn ON the machine Turning ON the Machine P 111 Maintenance 529 ...