background image

4-1

Send

ing F

a

xe

s

Sending Faxes

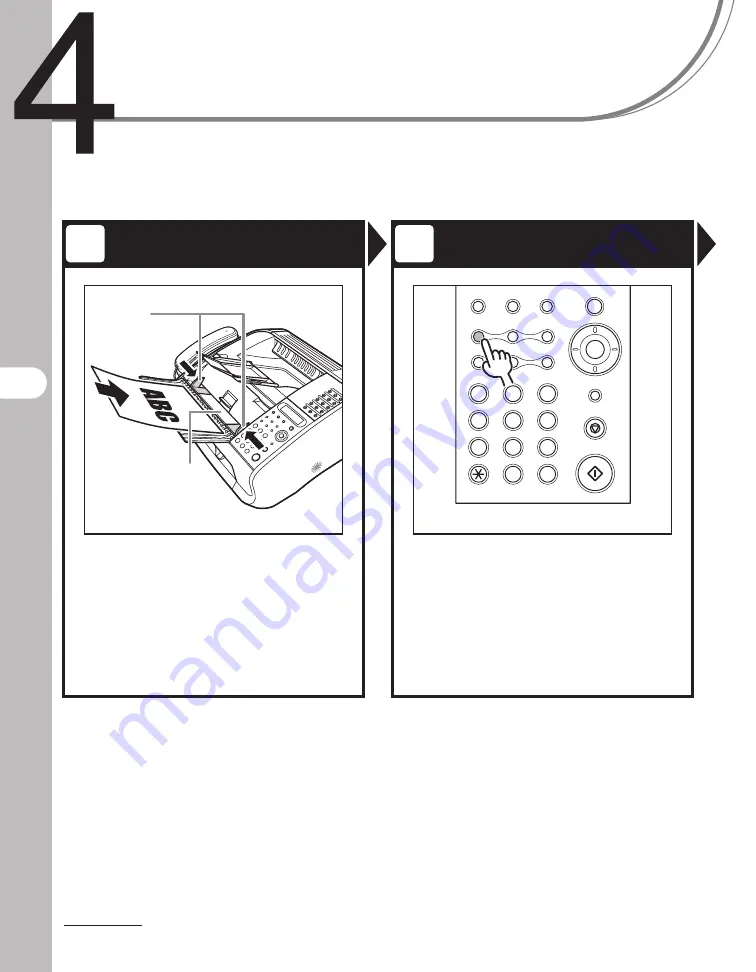
Follow this procedure to send a fax.

Load a Document

Adjust Image Quality

Adjust the document guides (A) to 
the width of the document, and 
insert the document top edge first 
in the ADF (B) with the printed side 
facing up.

For documents you can fax, see “Document 
Requirements,” on p. 2-1.

Press [Image Quality]. Use [Left/
Right] to select resolution and 
image type, and press [Set].

Select from the following:
<STD>: Standard
<FINE>: Fine
<S/F>: Superfine
<H/T>: Halftone (and select resolution)
For details, see “Scan Settings,” on p. 4-3.

1

2

A

B

Stop/Reset

Start

Clear

ABC

DEF

JKL

MNO

TUV

WXYZ

GHI

PQRS

SYMBOLS

Directory Coded Dial

Hook

Set

Tone

OPER

Add.Mode

Menu

Image Quality

Redial

Pause

Status

Copy

#

2

1

3

5

4

6

8

7

9

0

Содержание FaxPhone L120

Страница 1: ... Handling Print Media Sending Faxes Receiving Faxes Copying Printing Maintenance Troubleshooting Machine Settings Appendix Basic Guide Please read this guide before operating this equipment After you finish reading this guide store it in a safe place for future reference ...

Страница 2: ......

Страница 3: ...manuals in PDF format Adobe Reader Acrobat Reader Acrobat is required If Adobe Reader Acrobat Reader Acrobat is not installed on your system please download it from the Adobe Systems Incorporated website http www adobe com Considerable effort has been made to make sure that the manuals for the machine are free of inaccuracies and omissions However as we are constantly improving our products if you...

Страница 4: ...e button One Touch Speed Dialing p 4 7 Specify a recipient with a three digit code Coded Speed Dialing p 4 15 Specify multiple recipients with a single button Group Dialing p 4 22 Look up registered recipients Directory Dialing Advanced Guide Redial when the line is busy Redialing Advanced Guide AAAAA BBBBB CCCCC ...

Страница 5: ...ced Guide Send a fax at a specified time Timer Sending Advanced Guide Send a fax in response to the recipient s request Polling Sending Advanced Guide Receive faxes in memory without printing out Memory Reception Advanced Guide Reject faxes from unregistered telephone numbers Reception Restriction Advanced Guide ...

Страница 6: ...iv What Can I Do with This Machine Fax Features continued Send a fax to be relayed to other fax machines Relay Initiation Advanced Guide ...

Страница 7: ...hine Copy Features Select a scan mode depending on the quality of image to be scanned Image Quality p 6 3 Adjust the density level of scanned images Density p 6 4 Enlarge or reduce copied images Zoom Ratio p 6 5 ABC ABC ABC ABC A A ...

Страница 8: ... S A xiii Customer Support Canada xiv How to Use This Guide xv Legal Notices xvi Copyright xvi Disclaimer xvi Trademarks xvii Users in the U S A xviii Pre Installation Requirements for Canon Facsimile Equipment xviii Connection of the Equipment xix In Case of Equipment Malfunction xix Rights of the Telephone Company xix FCC Notice xx Users in Canada xxii Pre Installation Requirements for Canon Fac...

Страница 9: ...y Mode 1 5 Handset 1 6 Maintaining the Handset 1 6 Toner Cartridge 1 7 Maintaining the Toner Cartridge 1 7 2 Document Handling 2 1 Document Requirements 2 1 Scanned Area 2 2 Loading Documents 2 3 3 Print Media 3 1 Paper Requirements 3 1 Printable Area 3 2 Paper Guidelines 3 3 Loading Paper 3 4 Loading Envelopes 3 4 Setting Paper Type and Size 3 7 ...

Страница 10: ...ng 4 14 Registering Coded Speed Dialing 4 15 Editing Coded Speed Dialing 4 18 Deleting Coded Speed Dialing 4 21 Registering Group Dialing 4 22 Editing Group Dialing 4 24 Deleting Group Dialing 4 26 Using Speed Dialing 4 27 Using One Touch Speed Group Dialing 4 27 Using Coded Speed Dialing 4 28 Manual Sending 4 29 Sending Faxes Manually 4 29 Entering Pauses 4 30 5 Receiving Faxes 5 1 6 Copying 6 1 ...

Страница 11: ...h Campaign 8 9 U S A PROGRAM 8 10 CANADA PROGRAM CANADA PROGRAMME 8 13 Transporting the Machine 8 15 9 Troubleshooting 9 1 Clearing Jams 9 1 Document Jams 9 1 Paper Jams 9 3 Inside the Machine 9 3 Paper Feeder 9 5 LCD Messages 9 6 Error Codes 9 11 If a Power Failure Occurs 9 12 If You Cannot Solve a Problem 9 13 10 Machine Settings 10 1 Machine Settings 10 1 Printing the Machine Status List 10 1 A...

Страница 12: ...x What Can I Do with This Machine 11 Appendix 11 1 Specifications 11 1 General 11 1 Facsimile 11 2 Copier 11 3 Telephone 11 3 Printer 11 4 Index 11 5 ...

Страница 13: ...er in the machine while printing When transporting the machine be sure to remove the toner cartridge from the machine Place the toner cartridge in its original protective bag or wrap it in a thick cloth to prevent exposure to light Always hold the bottom when you lift the machine Never lift it by any of its trays or attachments Do not insert any objects into the slots or openings on the machine si...

Страница 14: ...for servicing Location Place the machine on a flat stable vibration free surface that is strong enough to support its weight Place the machine in a cool dry clean well ventilated place Make sure the area is free from dust Make sure the location is not exposed to high temperature or humidity Keep the machine away from direct sunlight as this can damage the machine or affect print quality If you hav...

Страница 15: ...re the cord is not knotted or kinked Power Supply During electrical storms disconnect the power cord from the power outlet Please note that any documents stored in the machine s memory will be deleted when you unplug the machine Whenever you unplug the machine wait at least five seconds before you plug it in again Do not plug the machine into an uninterruptible power supply UPS WARNING This produc...

Страница 16: ...s 24 hours 7 days a week 1 800 652 2666 Free live technical support 9 A M to 8 P M EST Monday through Friday excluding holidays for products still under warranty 1 800 652 2666 The location of the authorized service facility nearest you visit http www canon ca or 1 800 652 2666 If the problem cannot be corrected by using one of the above technical support options repair options are available at th...

Страница 17: ...ed CAUTION Explains how to avoid actions that could injure you or damage your machine NOTE Explains operating restrictions and how to avoid minor difficulties In addition this guide uses distinctive notations to identify buttons and information in the LCD The buttons you press appear in square brackets Stop Reset Information in the LCD appears in angle brackets SET DOCUMENT The numbers that point ...

Страница 18: ...t the prior written permission of Canon Inc Disclaimer The information in this document is subject to change without notice CANON INC MAKES NO WARRANTY OF ANY KIND WITH REGARD TO THIS MATERIAL EITHER EXPRESS OR IMPLIED EXCEPT AS PROVIDED HEREIN INCLUDING WITHOUT LIMITATION THEREOF WARRANTIES AS TO MARKETABILITY MERCHANTABILITY FITNESS FOR A PARTICULAR PURPOSE OF USE OR AGAINST INFRINGEMENT OF ANY ...

Страница 19: ... trademarks and UHQ is a trademark of Canon Inc All other product and brand names are registered trademarks trademarks or service marks of their respective owners As an ENERGY STAR Partner Canon has determined that this product meets the ENERGY STAR guidelines for energy efficiency ...

Страница 20: ...D INTERNATIONAL DIRECT DISTANCE DIAL LINE IF YOU COMMUNICATE OVERSEAS NOTE Canon recommends an individual line following industry standards e g the 2500 Touch Tone or 500 Rotary Pulse Dial telephones A dedicated extension off a PBX machine without Call Waiting can be used with the machine Key telephone systems are not recommended because they send non standard signals to individual telephones for ...

Страница 21: ... company The REN for this product is part of the product identifier that has the format US AAAEQ TXXXX The digits represented by are the REN without a decimal point e g 10 is a REN of 1 0 This equipment may not be used on coin service provided by the telephone company Connection to party lines is subjected to state tariffs In Case of Equipment Malfunction Should any malfunction occur which cannot ...

Страница 22: ...cations However there is no guarantee that interference will not occur in a particular installation If this equipment does cause harmful interference to radio or television reception which can be determined by turning the equipment off and on the user is encouraged to try to correct the interference by one or more of the following measures Reorient or relocate the receiving antenna Increase the se...

Страница 23: ...clearly contains in a margin at the top or bottom of each transmitted page or on the first page of the transmission the date and time it is sent and an identification of the business or other entity or other individual sending the message and the telephone number of the sending machine or such business other entity or individual In order to program this information into the machine follow the inst...

Страница 24: ...alent Use one line per machine DDD DIRECT DISTANCE DIAL LINE or IDDD INTERNATIONAL DIRECT DISTANCE DIAL LINE IF YOU COMMUNICATE OVERSEAS NOTE Canon recommends an individual line following industry standards e g the 2500 touch tone or 500 rotary pulse dial telephones A dedicated extension off a PBX machine without Camp On signals is also permissible with the machine Key telephone systems are not re...

Страница 25: ...e facilities of the local telecommunications company The equipment must also be installed using an acceptable method of connection The customer should be aware that compliance with the above conditions may not prevent degradation of service in some situations Repairs to certified equipment should be coordinated by a representative designated by the supplier Any repairs or alterations made by the u...

Страница 26: ... of the Ringer Equivalence Numbers of all the devices does not exceed five Le Nombre d équivalence Ringer REN de cet appareil terminal est 1 0 Le REN attribué à chaque équipement terminal fournit une indication sur le nombre maximum de terminaux pouvant être connectés sur une interface téléphonique La terminaison sur une interface peut consister en n importe quelle combinaison d appareils à la con...

Страница 27: ...ternal covers the laser beam cannot escape from the machine during any phase of user operation CDRH Regulations The Center for Devices and Radiological Health CDRH of the U S Food and Drug Administration implemented regulations for laser products on August 2 1976 These regulations apply to laser products manufactured from August 1 1976 Compliance is mandatory for products marketed in the United St...

Страница 28: ...cument release lever Releases jammed document G Document guides Set to the width of documents H Automatic document feeder ADF Feeds documents automatically into the machine for scanning I Document feeder tray Holds documents J Document feeder tray extension Extension for the document feeder tray K Document delivery tray Outputs scanned documents Part of paper stack cover L Document delivery tray e...

Страница 29: ...ely P Handset cradle Cradle for the handset Q USB port Connect the USB cable R Handset jack Connect the handset S External device jack Connect an external device if necessary T Line jack Connect the telephone cable U Handset cable retainer Hook the handset cable to retain the slack V Power socket Connect the power cord Q O P V U S R T ...

Страница 30: ...ts G Directory button Displays and searches the list of recipients registered in the machine H Coded Dial button Enters recipients registered for coded speed dialing I Redial button Redials the number last dialed J Pause button Inserts paus when entering a fax number K Hook button Opens and closes the line monitor L Numeric buttons Enter letters and numbers M Tone button Switches to tone dialing w...

Страница 31: ...lls through the setting menu and registered recipients Q Set button Confirms an operation or registers information you enter R Clear button Clears an entry in the LCD S Stop Reset button Cancels machine operations and returns to the standby mode T Start button Starts scanning documents for sending or copying ...

Страница 32: ...A Time B Image quality C Memory available D Message E Receive mode Copy Mode A Image quality B Zoom ratio C Quantity D Density E Paper size and type for non plain paper 1 6 0 0 S T D 1 0 0 S E T D O C F A X O N L Y A B C E D T E X T x 1 0 0 3 L T A B C E D ...

Страница 33: ...see Connect Telephone Cables and Install Handset in the Starter Guide Maintaining the Handset Do not leave the handset exposed to direct sunlight Do not install the handset in hot or humid conditions Do not spray aerosol polish on the handset as it may cause damage Use a damp cloth to wipe clean the handset Use a sharp object i e pen to select the ring volume of the handset ...

Страница 34: ...light or bright light for more than five minutes Store the cartridge in its protective bag Do not open the bag until you are ready to install the cartridge in the machine Save the cartridge s protective bag in case you need to repack and transport the cartridge at a later date Do not store the cartridge in a salty atmosphere or where there are corrosive gases such as from aerosol sprays Do not rem...

Страница 35: ...1 8 Before Using the Machine ...

Страница 36: ...r carbon backed paper Curled or rolled paper Coated paper Torn paper Onion skin or thin paper Documents with staples or paper clips attached Paper with fresh glue ink or correction fluid that is not completely dry Size W x L Quantity for 75 g m2 paper Weight Max 8 5 x 15 75 in 216 x 400 mm Min 5 8 x 4 1 in 148 x 105 mm Max 30 A4 or letter size sheets Max 10 legal size sheets or the stack height of...

Страница 37: ...Make sure your document s text and graphics fall within the shaded area in the following diagram Note that the margin widths listed are approximate and there may be slight variations in actual use 0 08 2 mm 0 08 2 mm 0 04 1 mm 0 04 1 mm ...

Страница 38: ...ng Documents 1 Adjust the document guides to the width of the document 2 Fan the document stack and even the edges 3 Insert the document top edge first in the ADF with the printed side facing up The document is ready for scanning ...

Страница 39: ...2 4 Document Handling ...

Страница 40: ...aper size See Setting Paper Type and Size on p 3 7 For transparencies you can load only up to 100 sheets Paper Size Setting Size W L Weight Quantity LT Letter 8 5 11 in 216 279 mm 16 to 43 lb 60 to 163 g m2 Max stack height 0 6 in 15 mm Approx 150 sheets of 20 lb 75 g m2 paper LG Legal 8 5 14 in 216 356 mm A4 8 3 11 7 in 210 297 mm Paper Type Setting Paper Type Weight PLAIN Plain paper 16 to 24 lb...

Страница 41: ...3 2 Print Media Printable Area The shaded area indicates the approximate printable area of Letter size paper 0 08 2 mm 0 20 5 mm 0 08 2 mm 0 08 2 mm ...

Страница 42: ...rse side The following types of paper do not print well Highly textured paper Very smooth paper Shiny paper Make sure the paper is free from dust lint and oil stains Be sure to test paper before purchasing large quantities Store all paper wrapped and on a flat surface until ready for use Keep opened packs in their original packaging in a cool dry location Store paper at 64 4 F 75 2 F 18 C 24 C 40 ...

Страница 43: ...mbossed paper Envelopes with peel off sealing strips Envelopes with letters enclosed Make sure to set the correct envelope size in the printer driver See Chapter 2 Printing in the Software Guide 1 Place the stack of envelopes on a firm flat surface and press down firmly on the edges to make the folds crisp Press all the way around the envelopes to remove any curls and expel air from inside the env...

Страница 44: ...re the back end of the cover does not catch the front paper guide 3 Pull out the paper guide rail 4 Insert the envelope stack up to 10 envelopes with the print side facing up 5 Adjust the side paper guides to the size of the stack ...

Страница 45: ...paper guide rail to the front edge of the stack 7 Pinch and slide the front paper guide to match the envelope size 8 Insert the paper stack cover NOTE Make sure the back end of the cover does not catch and lower the scanning platform ...

Страница 46: ...g 1 Press Menu 2 Use Up Down to select PAPER SOURCE SETUP then press Set 3 Use Left Right to select the paper type then press Set PLAIN Plain paper PLAIN L Light paper HEAVY Heavy paper HEAVY H Heavier paper TRANSPARENCY Transparencies 2 1 3 5 4 6 8 7 9 0 Stop Reset Start Clear ABC DEF JKL MNO TUV WXYZ GHI PQRS S Y M B O L S Directory CodedDial Hook Set FAXPHONE L120 Tone OPER Add Mode Menu ImageQ...

Страница 47: ...egal not available for transparencies A4 A4 5 Press Stop Reset to return to standby mode 2 1 3 5 4 6 8 7 9 0 Stop Reset Start Clear ABC DEF JKL MNO TUV WXYZ GHI PQRS S Y M B O L S Directory CodedDial Hook Set FAXPHONE L120 Tone OPER Add Mode Menu ImageQuality Redial Pause Status Copy Set ...

Страница 48: ...s you can fax see Document Requirements on p 2 1 Press Image Quality Use Left Right to select resolution and image type and press Set Select from the following STD Standard FINE Fine S F Superfine H T Halftone and select resolution For details see Scan Settings on p 4 3 1 2 A B Stop Reset Start Clear ABC DEF JKL MNO TUV WXYZ GHI PQRS S Y M B O L S Directory CodedDial Hook Set Tone OPER Add Mode Me...

Страница 49: ...s in the Advanced Guide The message MEM FULL TX CANCEL is displayed Press any key Wait until the machine sends the document in memory and try again 3 4 Stop Reset Start Clear ABC DEF JKL MNO TUV WXYZ GHI PQRS S Y M B O L S Directory CodedDial Hook Set Tone OPER 1 4 7 2 3 5 6 8 9 0 Add Mode Menu ImageQuality Redial Pause Status Copy 0 1 2 3 X X X X X X X S U B T X S T A R T Ex Stop Reset Start Clea...

Страница 50: ...et or after the document is scanned Contrast 1 Press Menu 2 Use Up Down to select TX SETTING then press Set 3 Use Up Down to select 1 SCAN CONTRAST then press Set 4 Use Left Right to adjust scan contrast then press Set Right To send a darker image Left To send a lighter image 5 Press Stop Reset to return to standby mode 2 1 3 5 4 6 8 7 9 0 Stop Reset Start Clear ABC DEF JKL MNO TUV WXYZ GHI PQRS S...

Страница 51: ...ine for fine print documents S F Superfine for very fine documents Will be displayed as S FINE on LCD H T For documents that contain half tone images such as photographs Clear Tone OPER Set Add Mode Menu ImageQuality Redial Pause Status Copy 2 1 3 5 4 6 8 7 9 0 Stop Reset Start Clear ABC DEF JKL MNO TUV WXYZ GHI PQRS S Y M B O L S Directory CodedDial Hook FAXPHONE L120 Set ...

Страница 52: ...s STD HT in standby mode FINE Displayed as F HT in standby mode S F Displayed as SF HT in standby mode 2 1 3 5 4 6 8 7 9 0 Stop Reset Start Clear ABC DEF JKL MNO TUV WXYZ GHI PQRS S Y M B O L S Directory CodedDial Hook FAXPHONE L120 Clear Tone OPER Set Add Mode Menu ImageQuality Redial Pause Status Copy Set ...

Страница 53: ...digit code You can register up to 100 coded speed dialing codes Group Dialing p 4 22 Specify multiple recipients must be registered for one touch speed dialing and or coded speed dialing with a one touch speed dialing button You can register up to 50 recipients in a group dial Registering Recipients for Speed Dialing For each recipient you can register Name optional Fax number required Subaddress ...

Страница 54: ...o 15 for this recipient 5 Use the numeric buttons to enter the recipient s name up to 20 characters then press Set Copy Function Utility Copy 01 02 03 04 05 06 07 08 09 10 11 12 13 14 15 FAXPHONE L120 Clear Tone OPER Set Add Mode Menu ImageQuality Redial Pause Status Copy 2 1 3 5 4 6 8 7 9 0 Stop Reset Start Clear ABC DEF JKL MNO TUV WXYZ GHI PQRS S Y M B O L S Directory CodedDial Hook FAXPHONE L1...

Страница 55: ...Entering Pauses on p 4 30 If no subaddress or password is required skip to step 9 2 1 3 5 4 6 8 7 9 0 Stop Reset Start Clear ABC DEF JKL MNO TUV WXYZ GHI PQRS S Y M B O L S Directory CodedDial Hook FAXPHONE L120 Clear Tone OPER Set Add Mode Menu ImageQuality Redial Pause Status Copy 0 1 2 3 X X X X X X X Y E S S E T S U B Ex ...

Страница 56: ...eric buttons to enter the password up to 20 digits for the subaddress If no password is required skip to step 9 9 Press Set 2 1 3 5 4 6 8 7 9 0 Stop Reset Start Clear ABC DEF JKL MNO TUV WXYZ GHI PQRS Tone OPER S Y M B O L S Directory CodedDial Hook Set FAXPHONE L120 Add Mode Menu ImageQuality Redial Pause Status Copy Set S U B 1 2 3 4 _ Y E S S E T P W D Ex P W D 1 2 3 4 _ Y E S S E T Ex ...

Страница 57: ...andby mode 12 Use the supplied destination labels to label the registered one touch speed dialing buttons 2 1 3 5 4 6 8 7 9 0 Stop Reset Start Clear ABC DEF JKL MNO TUV WXYZ GHI PQRS Tone OPER S Y M B O L S Directory CodedDial Hook Set FAXPHONE L120 Add Mode Menu ImageQuality Redial Pause Status Copy Set ...

Страница 58: ...ss the one touch speed dialing button 01 to 15 for the recipient you want to edit then press Clear Copy Function Utility Copy 01 02 03 04 05 06 07 08 09 10 11 12 13 14 15 FAXPHONE L120 2 1 3 5 4 6 8 7 9 0 Stop Reset Start Clear ABC DEF JKL MNO TUV WXYZ GHI PQRS S Y M B O L S Directory CodedDial Hook FAXPHONE L120 Tone OPER Add Mode Menu ImageQuality Redial Pause Status Copy Set Set ...

Страница 59: ...press Set If no change is necessary press Set without making any change 7 Use Left Right Clear and the numeric buttons to change the recipient s number Tone OPER Set Add Mode Menu ImageQuality Redial Pause Status Copy 2 1 3 5 4 6 8 7 9 0 Stop Reset Start Clear ABC DEF JKL MNO TUV WXYZ GHI PQRS S Y M B O L S Directory CodedDial Hook FAXPHONE L120 Set ...

Страница 60: ... Right Clear and the numeric buttons to change or enter the password if required If no password is required skip to step 11 11 Press Set 12 Repeat the procedure as necessary from step 4 13 Press Stop Reset to return to standby mode 2 1 3 5 4 6 8 7 9 0 Stop Reset Start Clear ABC DEF JKL MNO TUV WXYZ GHI PQRS S Y M B O L S Directory CodedDial Hook Tone OPER Set Add Mode Menu ImageQuality Redial Paus...

Страница 61: ...nt to delete then press Clear 5 Use Left Right to select DELETE then press Set 6 Repeat the procedure as necessary from step 4 7 Press Stop Reset to return to standby mode Copy Function Utility Copy 01 02 03 04 05 06 07 08 09 10 11 12 13 14 15 FAXPHONE L120 2 1 3 5 4 6 8 7 9 0 Stop Reset Start Clear ABC DEF JKL MNO TUV WXYZ GHI PQRS S Y M B O L S Directory CodedDial Tone OPER Set Add Mode Menu Ima...

Страница 62: ...t 2 CODED DIAL then press Set 4 Use the numeric buttons to enter the three digit code 001 to 100 for this recipient 2 1 3 5 4 6 8 7 9 0 Stop Reset Start Clear ABC DEF JKL MNO TUV WXYZ GHI P QR S Tone OPER S Y M B O L S Directory CodedDial Hook Set FAXPHONE L120 Add Mode Menu ImageQuality Redial Pause Status Copy Set C O D E D D I A L 0 0 1 Ex ...

Страница 63: ... to 50 digits Press Pause to enter a pause See Entering Pauses on p 4 30 If no subaddress or password is required skip to step 9 Tone OPER Set Add Mode Menu ImageQuality Redial Pause Status Copy 2 1 3 5 4 6 8 7 9 0 Stop Reset Start Clear ABC DEF JKL MNO TUV WXYZ GHI PQRS S Y M B O L S Directory CodedDial Hook FAXPHONE L120 Set 0 1 2 3 X X X X X X X Y E S S E T S U B Ex ...

Страница 64: ...its for the subaddress If no password is required skip to step 9 9 Press Set 10 Repeat the procedure as necessary from step 4 11 Press Stop Reset to return to standby mode Tone OPER Set Add Mode Menu ImageQuality Redial Pause Status Copy 2 1 3 5 4 6 8 7 9 0 Stop Reset Start Clear ABC DEF JKL MNO TUV WXYZ GHI PQRS S Y M B O L S Directory CodedDial Hook FAXPHONE L120 Set S U B 1 2 3 4 _ Y E S S E T ...

Страница 65: ...n press Set 4 Use the numeric buttons to enter the three digit code 001 to 100 for the recipient you want to edit then press Clear 2 1 3 5 4 6 8 7 9 0 Stop Reset Start Clear ABC DEF JKL MNO TUV WXYZ GHI PQRS S Y M B O L S Tone OPER Set Add Mode Menu ImageQuality Redial Pause Status Copy Directory CodedDial Hook FAXPHONE L120 Set C O D E D D I A L 0 0 1 Ex ...

Страница 66: ...press Set If no change is necessary press Set without making any change 7 Use Left Right Clear and the numeric buttons to change the recipient s number Tone OPER Set Add Mode Menu ImageQuality Redial Pause Status Copy 2 1 3 5 4 6 8 7 9 0 Stop Reset Start Clear ABC DEF JKL MNO TUV WXYZ GHI PQRS S Y M B O L S Directory CodedDial Hook FAXPHONE L120 Set ...

Страница 67: ... Right Clear and the numeric buttons to change or enter the password if required If no password is required skip to step 11 11 Press Set 12 Repeat the procedure as necessary from step 4 13 Press Stop Reset to return to standby mode 2 1 3 5 4 6 8 7 9 0 Stop Reset Start Clear ABC DEF JKL MNO TUV WXYZ GHI PQRS S Y M B O L S Directory CodedDial Hook Tone OPER Set Add Mode Menu ImageQuality Redial Paus...

Страница 68: ...igit code 001 to 100 for the recipient you want to delete then press Clear 5 Use Left Right to select DELETE then press Set 6 Repeat the procedure as necessary from step 4 7 Press Stop Reset to return to standby mode 2 1 3 5 4 6 8 7 9 0 Stop Reset Start Clear ABC DEF JKL MNO TUV WXYZ GHI PQRS S Y M B O L S Tone OPER Set Add Mode Menu ImageQuality Redial Pause Status Copy Directory CodedDial Hook F...

Страница 69: ...s group 5 Use the numeric buttons to enter the name for the group up to 20 characters then press Set Copy Function Utility Status 01 02 03 04 05 06 07 08 09 10 11 12 13 14 15 FAXPHONE L120 2 1 3 5 4 6 8 7 9 0 Stop Reset Start Clear ABC DEF JKL MNO TUV WXYZ GHI PQRS S Y M B O L S Directory CodedDial Hook FAXPHONE L120 Tone OPER Set Add Mode Menu ImageQuality Redial Pause Status Copy Set G R O U P N...

Страница 70: ...ous step as necessary to register all required recipients up to 50 for the group 8 Press Start to finish registering the group 9 Repeat the procedure as necessary from step 4 10 Press Stop Reset to return to standby mode Copy Function Utility 01 02 03 04 05 06 07 08 09 10 11 12 13 14 15 FAXPHONE L120 2 1 3 5 4 6 8 7 9 0 Stop Reset Start Clear ABC DEF JKL MNO TUV WXYZ GHI PQRS S Y M B O L S Directo...

Страница 71: ...ing button 01 to 15 for the group you want to edit then press Clear 5 Use Left Right to select EDIT then press Set Copy Function Utility 01 02 03 04 05 06 07 08 09 10 11 12 13 14 15 FAXPHONE L120 2 1 3 5 4 6 8 7 9 0 Stop Reset Start Clear ABC DEF JKL MNO TUV WXYZ GHI PQRS S Y M B O L S Tone OPER Set Add Mode Menu ImageQuality Redial Pause Status Copy Directory CodedDial Hook FAXPHONE L120 Set ...

Страница 72: ...ssary to remove all required recipients from the group 9 If required register additional one touch speed dialing buttons and or coded speed dialing codes up to 50 total in the group If no addition is necessary skip to step 10 10 Press Start to finish changing the group 11 Repeat the procedure as necessary from step 4 12 Press Stop Reset to return to standby mode 2 1 3 5 4 6 8 7 9 0 Stop Reset Star...

Страница 73: ...te then press Clear 5 Use Left Right to select DELETE then press Set 6 Repeat the procedure as necessary from step 4 7 Press Stop Reset to return to standby mode Copy Copy Function Utility 01 02 03 04 05 06 07 08 09 10 11 12 13 14 15 FAXPHONE L120 2 1 3 5 4 6 8 7 9 0 Stop Reset Start Clear ABC DEF JKL MNO TUV WXYZ GHI PQRS S Y M B O L S Directory Tone OPER Set Add Mode Menu ImageQuality Redial Pau...

Страница 74: ... Advanced Guide Using One Touch Speed Group Dialing 1 Load a document 2 Press the one touch speed dialing button 01 to 15 for the required recipient or group The machine scans the document automatically If you loaded the document after pressing a one touch speed dialing button press Start to start scanning Press Stop Reset then Set to cancel sending the fax Copy Function Utility Copy 01 02 03 04 0...

Страница 75: ... for the required recipient If you entered a wrong code press Clear and try again 4 Press Start Press Stop Reset then Set to cancel sending the fax 2 1 3 5 4 6 8 7 9 0 Stop Reset Start Clear ABC DEF JKL MNO TUV WXYZ GHI PQRS S Y M B O L S Directory CodedDial Hook FAXPHONE L120 Set Add Mode Menu ImageQuality Redial Pause Status Copy Tone OPER C O D E D D I A L 0 0 1 Ex ...

Страница 76: ...r press Hook and dial the recipient s number You can dial from the operation panel or an external telephone If you made a mistake hang up the handset or press Hook again and start over 3 When you hear a fax tone press Start to start sending the document If you pressed Hook instead of using the handset you will not be able to talk to the recipient Hang up the handset after pressing Start 2 1 3 5 4 ...

Страница 77: ...r a pause in a fax number Each pause entered is 2 5 seconds 2 Continue entering the rest of the fax number with the numeric buttons 2 1 3 5 4 6 8 7 9 0 Stop Reset Start Clear ABC DEF JKL MNO TUV WXYZ GHI PQRS S Y M B O L S Directory CodedDial Hook FAXPHONE L120 Tone OPER Set Add Mode Menu ImageQuality Redial Pause Status Copy ...

Страница 78: ... Setting Press Menu Use Up Down to select RX SETTING then press 5 1 2 Stop Reset Start Clear ABC DEF JKL MNO TUV WXYZ GHI PQRS Tone OPER S Y M B O L S Directory CodedDial Hook Set Add Mode Menu ImageQuality Redial Pause Status Copy 2 1 3 5 4 6 8 7 9 0 Stop Reset Start Clear ABC DEF JKL MNO TUV WXYZ GHI PQRS Tone OPER S Y M B O L S Directory CodedDial Hook Set Add Mode Menu ImageQuality Redial Paus...

Страница 79: ...ce calls NOTE For AnsMode make sure an answering machine is connected to the machine For DRPD subscription to a DRPD service is required Press Stop Reset What if You want to cancel receiving See Chapter 1 Advanced Fax Features in the Advanced Guide 3 4 Stop Reset Start Clear ABC DEF JKL MNO TUV WXYZ GHI PQRS Tone OPER S Y M B O L S Directory CodedDial Hook Set Add Mode Menu ImageQuality Redial Pau...

Страница 80: ... in the ADF B For documents you can copy see Chapter 2 Document Handling Press Copy The copy mode automatically resets to the fax mode after one minute of inactivity or when you press Stop Reset 1 2 A B Stop Reset Start Clear ABC DEF JKL MNO TUV WXYZ GHI PQRS Tone OPER S Y M B O L S Directory CodedDial Hook Set Add Mode Menu ImageQuality Redial Pause Status Copy 2 1 3 5 4 6 8 7 9 0 ...

Страница 81: ...n p 6 3 What if You want to cancel copying See Chapter 1 Advanced Fax Features in the Advanced Guide 3 4 Stop Reset Start Clear ABC DEF JKL MNO TUV WXYZ GHI PQRS Tone OPER S Y M B O L S Directory CodedDial Hook Set Add Mode Menu ImageQuality Redial Pause Status Copy 1 4 7 2 3 5 6 8 9 0 T E X T x 1 0 0 3 L T Ex Stop Reset Start Clear ABC DEF JKL MNO TUV WXYZ GHI PQRS Tone OPER S Y M B O L S Directo...

Страница 82: ...s if you press Stop Reset Image Quality 1 Press Image Quality to select either TEXT or PHOTO TEXT For scanning text documents PHOTO For documents that contain fine text and photographs 2 1 3 5 4 6 8 7 9 0 Stop Reset Start Clear ABC DEF JKL MNO TUV WXYZ GHI PQRS S Y M B O L S Directory CodedDial Hook FAXPHONE L120 Tone OPER Set Add Mode Menu ImageQuality Redial Pause Status Copy ...

Страница 83: ...n density Right For a darker copy Left For a lighter copy 2 1 3 5 4 6 8 7 9 0 Stop Reset Start Clear ABC DEF JKL MNO TUV WXYZ GHI PQRS S Y M B O L S Directory CodedDial Hook FAXPHONE L120 Tone OPER Set Add Mode Menu ImageQuality Redial Pause Status Copy ...

Страница 84: ...p Enlarge up to 200 2 00 of the original size 1 00 Down Reduce down to 50 0 50 of the original size 1 00 2 1 3 5 4 6 8 7 9 0 Stop Reset Start Clear ABC DEF JKL MNO TUV WXYZ GHI PQRS S Y M B O L S Directory CodedDial Hook FAXPHONE L120 Tone OPER Set Add Mode Menu ImageQuality Redial Pause Status Copy ...

Страница 85: ...6 6 Copying ...

Страница 86: ...ake sure that the printer driver is installed For details on printer driver settings see the Software Guide in the User Software CD Start the Print Command Select the Printer From an open document on an application click File Print Select the printer icon for the machine Canon L120 1 2 ...

Страница 87: ...rinting Adjust Preferences Print the Document Click Preferences to open the dialog box After finished click OK Click Print What if You want to cancel printing See Chapter 2 Printing in the Software Guide 3 4 ...

Страница 88: ...owels or similar materials for cleaning they can stick to the components or generate static charges CAUTION Never use volatile liquids such as thinners benzene acetone or any other chemical cleaner to clean the machine These can damage the machine components Exterior 1 Disconnect the power cord from the machine 2 Wipe the machine s exterior with a clean soft lint free cloth moistened with water or...

Страница 89: ... Close the paper delivery tray extension A and then the paper delivery tray B itself CAUTION Do not close the paper delivery tray without folding the extension first 3 Open the cartridge cover by the notch A 4 Remove the cartridge NOTE Always hold the cartridge by its handle To avoid exposing the cartridge to light place it in its protective bag or wrap it in a thick cloth A B A ...

Страница 90: ...ntact with your skin or clothing wash with cold water Warm water will set the toner 6 Hold the cartridge by its handle The arrow A on the cartridge should be facing away from you and pointing down 7 Insert the cartridge into the machine as far as it will go Align the guide A on the left side of the cartridge with the groove inside the machine 8 Close the cartridge cover NOTE Be careful not to get ...

Страница 91: ...er does not catch the front paper guide 3 Lower the scanning platform A in the document delivery slot 4 Gently wipe the scanning glass A and white sheet B with a clean soft lint free cloth moistened with water 5 After the scanning area becomes dry lift the scanning platform back into place 6 Insert the paper stack cover NOTE Make sure the back end of the cover does not catch and lower the scanning...

Страница 92: ...distributing Toner 1 Close the paper delivery tray extension A and then the paper delivery tray B itself CAUTION Do not close the paper delivery tray without folding the extension first 2 Open the cartridge cover by the notch A 3 Remove the cartridge NOTE Always hold the cartridge by its handle 4 Gently rock it several times to redistribute toner inside A B A ...

Страница 93: ... from you and pointing down 6 Insert the cartridge into the machine as far as it will go Align the guide A on the left side of the cartridge with the groove inside the machine 7 Close the cartridge cover NOTE Be careful not to get your fingers caught 8 Open the paper delivery tray and the extension A A ...

Страница 94: ...itself CAUTION Do not close the paper delivery tray without folding the extension first 2 Open the cartridge cover by the notch A 3 Remove the old cartridge NOTE Always hold the cartridge by its handle 4 Remove the new cartridge from the protective material 5 Gently rock it several times to distribute toner inside A B A ...

Страница 95: ...dle The arrow A on the cartridge should be facing away from you and pointing down 8 Insert the cartridge into the machine as far as it will go Align the guide A on the left side of the cartridge with the groove inside the machine 9 Close the cartridge cover NOTE Be careful not to get your fingers caught 10 Open the paper delivery tray and the extension A A ...

Страница 96: ...he World Wildlife Fund Canada and The Nature Conservancy of Canada Since its inception The Canon Cartridge Recycling Program has collected millions of cartridges that otherwise would have been discarded into landfills or similar facilities Instead this rapidly growing program returns used cartridges to the manufacturing process thus conserving an array of resources Canon has instituted a worldwide...

Страница 97: ...significant contribution to a cleaner planet Cartridges collected through this program are not refilled You are not entitled to a tax deduction or rebate for the return of empty cartridges This program may be modified or discontinued without notice U S A PROGRAM Packaging Option A 1 Single Box Return Repackage the empty cartridge utilizing the wrapper and pulp mould end blocks from the new cartrid...

Страница 98: ...o ship cartridges Complete Option A 1 Bundle multiple cartridge boxes together securely with tape Please be sure that the shipment does not exceed UPS specifications Maximum weight 70 lb 31 8 kg Maximum length 108 in 2 743 mm Maximum girth length 2 x width 2 x height 130 in 3 302 mm If your shipment exceeds the above limits please call 1 800 OK Canon for special shipping information Please Note Do...

Страница 99: ...bel Option A UPS Pick up Give the shipment to your UPS driver when you receive your next regular delivery or Take the shipment to your local UPS receiving point Option B MBE Drop off Take the shipment to a participating MBE Mail Boxes Etc Center For location please call 1 800 949 6660 By using either of the above methods of shipment your used cartridge s will be forwarded to the Canon Cartridge Co...

Страница 100: ... outlet or franchise Option B Volume Box Return eight or more cartridges We encourage you to use this option as a more efficient way to ship cartridges Call 1 800 667 2666 to receive your free Canon collection box kit The collection box can accommodate eight individual cartridge boxes Place your eight individually packaged boxes of empty cartridges into the Canon collection box Seal the box Apply ...

Страница 101: ...on Canada donates 1 shared equally between World Wildlife Fund Canada and the Nature Conservancy of Canada This donation is utilized in Canada For further information about The Clean Earth Campaign in Canada please call or write to Canon 1 800 667 2666 Canon Canada Inc Corporate Customer Relations 6390 Dixie Road Mississauga ON L5T 1P7 ...

Страница 102: ...r delivery tray extension A and then the paper delivery tray B itself CAUTION Do not close the paper delivery tray without folding the extension first 3 Open the cartridge cover by the notch A 4 Remove the cartridge NOTE Always hold the cartridge by its handle To avoid exposing the cartridge to light place it in its protective bag or wrap it in a thick cloth 5 Close the cartridge cover NOTE Be car...

Страница 103: ...close the document feeder tray B 7 Fold the document delivery tray extension A and then push the document delivery tray B into the machine CAUTION Do not open or close the document delivery tray extension after the document delivery tray is pushed into the machine B A A B ...

Страница 104: ...ys ORIGINAL DOC JAM and REMOVE ORIG IN ADF A jammed document can be pulled out from the ADF or the document delivery slot 1 Lift the document release lever If a multi page document is loaded remove the entire document from the ADF 2 Lift the paper stack cover and pull it out completely NOTE Make sure the back end of the cover does not catch the front paper guide 3 Lower the scanning platform A in ...

Страница 105: ...t 5 Lift the scanning platform back into place 6 Insert the paper stack cover NOTE Make sure the back end of the cover does not catch and lower the scanning platform 7 Lower the document release lever back into place 8 Press Stop Reset to return to standby mode ...

Страница 106: ...dia on p 3 1 Make sure you have removed any scraps of paper from inside the machine Inside the Machine 1 Close the paper delivery tray extension A and then the paper delivery tray B itself CAUTION Do not close the paper delivery tray without folding the extension first 2 Open the cartridge cover by the notch A CAUTION Always open the cartridge cover first before removing jammed paper inside the ma...

Страница 107: ...act with your skin or clothing wash with cold water Warm water will set the toner 5 Hold the cartridge by its handle The arrow A on the cartridge should be facing away from you and pointing down 6 Insert the cartridge into the machine as far as it will go Align the guide A on the left side of the cartridge with the groove inside the machine 7 Close the cartridge cover NOTE Be careful not to get yo...

Страница 108: ...k cover and pull it out completely NOTE Make sure the back end of the cover does not catch the front paper guide 2 Carefully pull jammed paper from inside the slot NOTE If you tear the paper remove any torn pieces to avoid further jams 3 Insert the paper stack cover NOTE Make sure the back end of the cover does not catch and lower the scanning platform ...

Страница 109: ... if their machine is set correctly for the required function COMM ERROR xxxx Communication is disconnected Resend the fax or ask the other party to send their fax again DESTINATION SET BY MANUAL UP TO 16 Maximum number of recipients 16 were manually entered for broadcasting or polling Resend the document to other recipients if necessary DRAM LOST The data in memory was lost when the machine was tu...

Страница 110: ...mber is correct or the telephone cable is properly connected MEM FULL RX CANCEL Reception cannot be completed due to insufficient memory Print out or delete documents in memory and ask the other party to send the fax again MEM FULL TX CANCEL Transmission is canceled due to insufficient memory No operation is performed for one minute after the memory becomes near full Wait for the machine to send d...

Страница 111: ...ton or code Register recipients for speed dialing Press Redial Pause only after dialing had been made previously ORIGINAL DOC JAM REMOVE ORIG IN ADF There is a document jam Clear the document jam PAPER EMPTY LOAD PAPER paper size Paper has run out or there was a jam in the paper feeder Load paper or clear the paper jam and press Stop Reset PAPER JAM OPEN CARTRIDGE COVER There is a paper jam Clear ...

Страница 112: ... ERROR The remote machine does not have a subaddress and or password set up Ask the other party to set a subaddress and or password in their machine SYSTEM ERROR Exxx A system error has occurred xxx will be a three digit code that indicates a particular type of error Unplug the machine Wait for at least five seconds and reconnect the power cord If the message persists contact Canon Customer Care C...

Страница 113: ...eshooting WRONG NUMBER SET An invalid number was entered in the date and time setting Enter a correct date or time WRONG PASSWORD A wrong password was entered Enter the correct password Message Description Action ...

Страница 114: ... Print send or delete any documents stored in memory 0080 The recipient s machine did not respond within 35 seconds Resend the document Ask the other party to check their machine If you are making an overseas call add a pause to the number 008D The recipient s machine has run out of paper Ask the recipient to make sure that paper is loaded in their machine 00A0 Transmission was manually canceled o...

Страница 115: ... machine You cannot send receive or copy documents If power is suddenly lost due to a power failure or accidental unplugging the machine may lose received documents stored in memory If this happens the LCD displays DRAM LOST when power is restored and automatically prints a Lost Report unless the cartridge is empty or there is no paper in the machine that lists the documents received in the last 6...

Страница 116: ...ave the following information ready when you contact Canon Product name FAXPHONE L120 Serial number On the label located at the back of the machine Place of purchase Nature of problem Steps you have taken to solve the problem and the results CAUTION If the machine makes strange noises emits smoke or odd odor unplug it immediately and contact Canon Customer Care Center Do not attempt to disassemble...

Страница 117: ...9 14 Troubleshooting ...

Страница 118: ...the list of current settings print out the Machine Status List Printing the Machine Status List 1 Press Status 2 Use Up Down to select PRINT REPORT then press Set 2 1 3 5 4 6 8 7 9 0 Stop Reset Start Clear ABC DEF JKL MNO TUV WXYZ GHI PQRS S Y M B O L S Directory CodedDial Hook FAXPHONE L120 Tone OPER Set Add Mode Menu ImageQuality Redial Pause Status Copy Set ...

Страница 119: ...o select MACHINE STATUS then press Set 2 1 3 5 4 6 8 7 9 0 Stop Reset Start Clear ABC DEF JKL MNO TUV WXYZ GHI PQRS S Y M B O L S Tone OPER Set Add Mode Menu ImageQuality Redial Pause Status Copy Directory CodedDial Hook FAXPHONE L120 Set ...

Страница 120: ...t MACHINE SETTING PAPER SOURCE SETUP TEL REGISTRATION TX SETTING RX SETTING COMM SETTING REPORTING SETTING USER SETTING 2 1 3 5 4 6 8 7 9 0 Stop Reset Start Clear ABC DEF JKL MNO TUV WXYZ GHI PQRS S Y M B O L S Directory CodedDial Hook FAXPHONE L120 Tone OPER Set Add Mode Menu ImageQuality Redial Pause Status Copy Set ...

Страница 121: ...e settings or go to subsetting items press Set 5 When finished press Stop Reset to return to standby mode 2 1 3 5 4 6 8 7 9 0 Stop Reset Start Clear ABC DEF JKL MNO TUV WXYZ GHI PQRS S Y M B O L S Directory CodedDial Hook FAXPHONE L120 Tone OPER Set Add Mode Menu ImageQuality Redial Pause Status Copy Set ...

Страница 122: ...AYLIGHT SAVING Sets whether to follow the daylight saving time PAPER SOURCE SETUP Setting Item Description 1 CASSETTE PAPER Sets the paper type and size See Setting Paper Type and Size on p 3 7 TEL REGISTRATION Setting Item Description 1 1 TOUCH SPD DIAL Registers recipient s name number subaddress and password for one touch speed dialing See Registering One Touch Speed Dialing on p 4 7 2 CODED DI...

Страница 123: ...ry at what time with password protection if required See Chapter 1 Advanced Fax Features in the Advanced Guide 2 INCOMING RINGS Sets whether the machine is to ring for how many times before it answers a call 3 REDUCTION RX Sets whether to reduce or truncate the image when a faxed page is larger than the size of paper loaded ON Reduces the image to fit on the size of paper loaded OFF Retains the or...

Страница 124: ...one See Chapter 1 Advanced Fax Features in the Advanced Guide COMM SETTING Setting Item Description 1 TEL LINE TYPE Sets the telephone line type See Set the Telephone Line Type in the Starter Guide REPORTING SETTING Setting Item Description 1 ACTIVITY REPORT Sets whether to print an activity report automatically See Chapter 3 Reports and Lists in the Advanced Guide 2 TX RESULT REPORT Sets whether ...

Страница 125: ...TTING Setting Item Description 1 DATE TIME Sets the machine time and date See Register Sender Information in the Starter Guide 2 USER FAX NO Sets the machine s fax number See Register Sender Information in the Starter Guide 3 USER NAME Sets the user name See Register Sender Information in the Starter Guide ...

Страница 126: ...nsions Trays open 19 1 in W x 22 8 in D x 12 8 in H 484 mm W x 580 mm D x 326 mm H Trays folded 19 1 in W x 15 2 in D x 8 7 in H 484 mm W x 386 mm D x 221 mm H Installation Space 19 1 in W x 22 8 in D x 12 8 in H 484 mm W x 580 mm D x 326 mm H Environmental Conditions Temperature 59 F 86 F 15 C 30 C Humidity 10 80 RH Display Languages English French Spanish Portuguese ADF Capacity p 2 1 Printable ...

Страница 127: ...om memory Transmission Reception Memory Approx 340 346 pages 2 Fax Resolution STD 203 pels in x 98 lines in 8 pels mm x 3 85 lines mm FINE 203 pels in x 196 lines in 8 pels mm x 7 7 lines mm S FINE 203 pels in x 392 lines in 8 pels mm x 15 4 lines mm Dialing Speed dialing One touch speed dialing 15 destinations Coded speed dialing 100 destinations Group dialing max 50 destinations Regular dialing ...

Страница 128: ... x 600 dpi Enlargement Reduction 0 50 50 to 2 00 200 in 0 01 1 increments First Copy Time Approx 23 seconds Copy Speed Approx 12 5 pages minute Letter size No of Copies Max 99 copies Telephone Connection Handset External telephone answering machine CNG detecting signal data modem ...

Страница 129: ... No 1 standard mode NOTE Specifications are subject to change without notice Printer Printing Method Electrophoto Method on demand fixing Paper Handling Automatic feed Paper Size and Weight p 3 1 Print Speed See Copy Speed on p 11 3 Print Width 8 3 in 212 mm Resolution 600 x 600 dpi Number of Tones 256 Printing Cartridge p 1 7 Toner Saver Approx 50 reduction in toner consumption ...

Страница 130: ...g 4 15 Using 4 28 COMM SETTING 10 7 Components 1 1 Contrast 4 3 Copy button 1 3 Copying 6 1 Customer Support Canada xiv U S A xiii D Density 6 4 Directory button 1 3 Document Guides 2 3 Jams 9 1 Loading 2 3 Requirements 2 1 Scanned area 2 2 Document delivery tray 1 1 Document delivery tray extension 1 1 Document feeder tray 1 1 Document feeder tray extension 1 1 Document guides 1 1 Document releas...

Страница 131: ...der 9 5 L LCD 1 3 1 5 Messages 9 6 Left Right button 1 4 Legal 3 1 Letter 3 1 Line jack 1 2 Loading Document 2 3 Envelope 3 4 Paper 3 4 M MACHINE SETTING 10 5 Machine settings 10 1 Machine Status List 10 1 Maintenance 8 1 Manual Sending 4 29 Menu Accessing 10 3 Button 10 3 Menu button 1 3 N Notch 1 1 Numeric buttons 1 3 O One touch speed dialing 4 6 Deleting 4 14 Editing 4 11 Registering 4 7 Using...

Страница 132: ...eed dialing 4 6 REMOVE ORIG IN ADF message 9 1 Replacing the cartridge 8 7 REPORTING SETTING 10 7 RX SETTING 10 6 S Safety Instructions xi Scan settings Copy 6 3 Fax 4 3 Scanned area 2 2 Sending faxes 4 1 Set button 1 4 Setting menu 10 5 Setting paper type and size 3 7 Specifications 11 1 Copier 11 3 Facsimile 11 2 General 11 1 Printer 11 4 Telephone 11 3 Speed dialing 4 6 Standby mode 1 5 Copy 1 ...

Страница 133: ...11 8 Appendix U Up Down button 1 4 USB port 1 2 USER SETTING 10 8 Using Speed Dialing 4 27 Z Zoom ratio 6 5 ...

Страница 134: ... GmbH Europark Fichtenhain A10 47807 Krefeld Germany CANON ITALIA S p A Via Milano 8 20097 San Donato Milanese MI Italy CANON LATIN AMERICA INC 703 Waterford Way Suite 400 Miami Florida 33126 U S A CANON AUSTRALIA PTY LTD 1 Thomas Holt Drive North Ryde Sydney N S W 2113 Australia CANON CHINA CO LTD 15F North Tower Beijing Kerry Centre 1 Guang Hua Road Chao Yang District 100020 Beijing China CANON ...

Отзывы: