background image

69

Advanced Guide

Basic Guide

Camera Basics

Auto Mode /  

Hybrid Auto Mode

Other Shooting Modes

Playback Mode

Wireless Features

Setting Menu

Accessories

Appendix

Index

P Mode

Tv, Av, M, C1, and C2 Mode

Before Use

Image Brightness (Exposure)

Adjusting Image Brightness (Exposure 

Compensation)

 Still Images 

 Movies

The standard exposure set by the camera can be adjusted in 1/3-stop 

increments, in a range of -3 to +3.


As you watch the screen, turn the 

exposure compensation dial to adjust 

brightness.

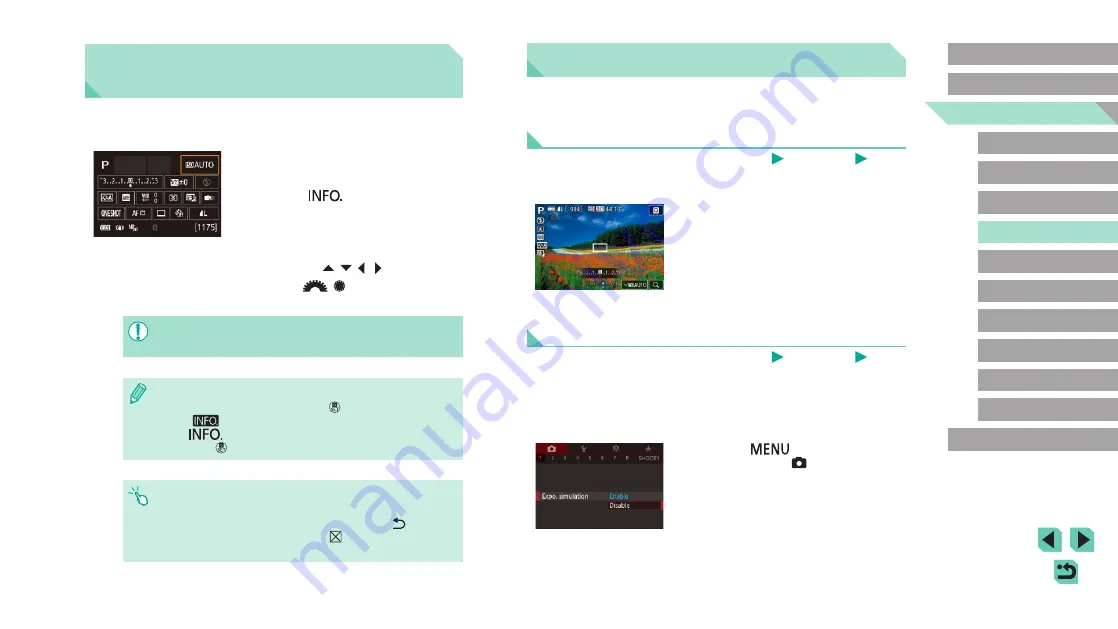
Deactivating Exposure Simulation

 Still Images 

 Movies

Images are displayed at a brightness simulating the actual brightness as 

captured. For this reason, screen brightness is also adjusted in response 

to changes in exposure compensation. This feature can be disabled to 

keep the screen at a brightness convenient for shooting, unaffected by 

exposure compensation.


Press the [

] button, choose [Expo. 

simulation] on the [ 1] tab, and then 

choose [Disable] (

=

 35).

Setting Up Shooting from a 

Single Screen

The INFO. Quick Control screen provides convenient, single-screen 

access to a variety of shooting settings.

Access the INFO. Quick Control 

screen.


Press the [

] button a few times to 

display the INFO. Quick Control screen.

Choose a setting to configure.


To view a description, choose an item by 

pressing the [ ][ ][ ][ ] buttons.


Turn the [

][ ] dials to adjust a 

setting.


The items that are displayed and configurable vary by shooting 

mode.


Some settings are configured on another screen that opens when 

you select the setting and press the [ ] button. Items labeled 
with [

] on the second screen can be configured by pressing 

the [

] button. To return to the INFO. Quick Control screen, 

press the [ ] button.


You can also access setting screens by touching a setting on the 
INFO. Quick Control screen and then touching the setting again. 
To return to the INFO. Quick Control screen, touch [ ].


To close a setting description, touch [ ] in the upper right of the 
description.

Содержание EOS M5

Страница 1: ...109 C Make sure you read this guide including the Safety Precautions 15 section before using the camera Reading this guide will help you learn to use the camera properly Store this guide safely so that you can use it in the future Click the buttons in the lower right to access other pages Next page Previous page Page before you clicked a link To jump to the beginning of a chapter click the chapter...

Страница 2: ... to SD standards However not all memory cards have been verified to work with the camera 2 UHS I memory cards are also supported Initial Information Package Contents Before use make sure the following items are included in the package If anything is missing contact your camera retailer Camera with body cap Battery Pack LP E17 with terminal cover Battery Charger LC E17 LC E17E Neck Strap EM 300DB I...

Страница 3: ... produced under extremely high precision manufacturing conditions and more than 99 99 of the pixels meet design specifications in rare cases some pixels may be defective or may appear as red or black dots This does not indicate camera damage or affect recorded images When the camera is used over an extended period it may become warm This does not indicate damage Conventions in This Guide In this g...

Страница 4: ...te switch terminal 26 External microphone IN terminal 27 N Mark 1 28 Tripod socket 29 DC coupler terminal cover 30 Memory card battery cover 2 3 1 5 4 7 20 19 18 23 22 10 13 16 17 9 8 21 15 14 11 12 6 1 Power switch 2 Viewfinder 3 Screen monitor 2 Touch screen panel 4 Hot shoe 5 Flash sync contacts 6 Quick Control Dial Playback magnify index 7 Speaker 8 AE lock button 9 AF frame selector button 10...

Страница 5: ...layback Mode Wireless Features Setting Menu Accessories Appendix Index P Mode Tv Av M C1 and C2 Mode Before Use Lens EF M Lens 1 Focusing ring 2 Hood mount 3 Filter mounting thread 4 Lens retraction switch 5 Lens mount index 6 Zoom ring 7 Lens retraction index 8 Zoom position index 9 Contacts ...

Страница 6: ...ng Touch Screen Operations to Configure Settings 35 Using the Menu Screen 35 Touch Screen Operations 36 On Screen Keyboard 37 Indicator Display 38 Auto Mode Hybrid Auto Mode 39 Shooting with Camera Determined Settings 39 Shooting Scene Intelligent Auto 39 Table of Contents Before Use Initial Information 2 Package Contents 2 Compatible Memory Cards 2 Preliminary Notes and Legal Information 3 Conven...

Страница 7: ...cording Movies in Movie Mode 64 Locking or Changing Image Brightness before Recording 64 Disabling Auto Slow Shutter 65 Recording Time Lapse Movies Time Lapse Movie 65 Sound Settings 66 Adjusting the Recording Volume 66 Deactivating the Wind Filter 67 Using the Attenuator 67 P Mode 68 Shooting in Program AE P Mode 68 Shooting in Hybrid Auto Mode 41 Digest Movie Playback 41 Still Images Movies 42 S...

Страница 8: ...osures Bulb 93 Adjusting the Flash Output 93 Recording Movies at Specific Shutter Speeds and Aperture Values 94 Customizing Controls and Display 95 Setting Up Shooting from a Single Screen 69 Image Brightness Exposure 69 Adjusting Image Brightness Exposure Compensation 69 Deactivating Exposure Simulation 69 Locking Image Brightness Exposure AE Lock 70 Changing the Metering Method 70 Changing the I...

Страница 9: ...ing Images Rating 117 Using the Menu 117 Editing Still Images 118 Resizing Images 118 Using the Menu 119 Cropping 119 Customizing Display Information 95 Customizing the Information Displayed 95 Configuring Touch Drag AF 95 Changing the Settings of Touch and Drag Operations 96 Restricting the Area of the Screen Available for Touch and Drag Operations 96 Configuring Custom Functions 96 Assigning Fun...

Страница 10: ...ble from Smartphones 152 Changing the Camera Nickname 153 Returning the Wireless Settings to Default 153 Clearing Information of Devices Paired via Bluetooth 154 Applying Filter Effects 120 Correcting Red Eye 121 Processing RAW Images with the Camera 122 Using the Menu 123 Choosing Images Individually 123 Selecting a Range 124 Editing Movies 124 Reducing File Sizes 125 Editing Digest Movies 126 Wi...

Страница 11: ...onment 176 Installing the Software 176 Saving Images to a Computer 177 Printing Images 178 Easy Print 178 Setting Menu 155 Adjusting Basic Camera Functions 155 Date Based Image Storage 155 File Numbering 155 Formatting Memory Cards 156 Low Level Formatting 156 Changing the Video System 157 Electronic Level Calibration 157 Resetting the Electronic Level 157 Using Eco Mode 157 Power Saving Adjustmen...

Страница 12: ... Weight CIPA compliant 216 Battery Pack LP E17 216 Battery Charger LC E17 LC E17E 217 Configuring Print Settings 179 Cropping Images before Printing 179 Choosing Paper Size and Layout before Printing 180 Available Layout Options 180 Printing ID Photos 180 Printing Movie Scenes 181 Movie Printing Options 181 Adding Images to the Print List DPOF 181 Configuring Print Settings 182 Setting Up Printing...

Страница 13: ...g Menu Accessories Appendix Index P Mode Tv Av M C1 and C2 Mode Before Use Index 218 Precautions for Wireless Features Wi Fi Bluetooth or Others 220 Radio Wave Interference Precautions 220 Security Precautions 220 Third Party Software 221 Personal Information and Security Precautions 221 Trademarks and Licensing 221 Disclaimer 222 ...

Страница 14: ...ion Blur the action Tv Mode 90 Shoot yourself under optimal settings Self Portrait 57 Apply special effects Creative Filters 59 Shoot several shots at once Continuous 46 Without using the flash Flash Off 39 Include yourself in the shot Self Timer 44 View View images Playback Mode 103 Automatic playback Slideshow 111 On a TV 169 On a computer 176 Browse through images quickly 107 Erase images 114 R...

Страница 15: ... inside This could result in electrical shock or fire If the product gets wet or if liquid or foreign objects get inside remove the battery pack batteries or unplug immediately If your model has a viewfinder or interchangeable lens do not look through the viewfinder or lens at bright light sources such as the sun on a clear day or a bright artificial light source This may damage your eyesight If y...

Страница 16: ...es resulting in electrical shock fire burns or other injuries Overheating and damage may result in electrical shock fire burns or other injuries The slideshow transition effects may cause discomfort when viewed for prolonged periods When using optional lenses lens filters or filter adapters if applicable be sure to attach these accessories firmly If the lens accessory becomes loose and falls off i...

Страница 17: ...ies do not use batteries that have different levels of charge together and do not use old and new batteries together Do not insert the batteries with the and terminals reversed This may cause the product to malfunction Do not sit down with the camera in your pant pocket Doing so may cause malfunctions or damage the screen When putting the camera in your bag ensure that hard objects do not come int...

Страница 18: ...itial preparations to shooting and playback Basic Guide Initial Preparations Prepare for shooting as follows Attaching the Strap 1 Prepare the strap Pull the cap in the direction of 1 while holding the ring Rotate the ring in the direction of 2 2 Attach the ring Pass the end of the ring through the holder as shown 3 Turn the ring around Rotate the ring in the direction of 1 When rotating the ring ...

Страница 19: ... the battery pack and charger and insert the battery pack by pushing it in 1 and down 2 2 Charge the battery pack LC E17 Flip out the plug 1 and plug the charger into a power outlet 2 LC E17E Plug the power cord into the charger then plug the other end into a power outlet The charging lamp turns orange and charging begins When charging is finished the lamp turns green LC E17 LC E17E 4 Secure the r...

Страница 20: ...der of the charge status attach the battery cover with visible on a charged battery pack and concealed on an uncharged one The charger can be used in areas with 100 240 V AC power 50 60 Hz For power outlets in a different format use a commercially available adapter for the plug Never use an electrical transformer designed for traveling which may damage the battery pack Inserting the Battery Pack a...

Страница 21: ...battery pack will pop up Remove the memory card Push the memory card in until it clicks and then slowly release it The memory card will pop up 1 2 Setting the Date and Time Set the current date and time correctly as follows if the Date Time screen is displayed when you turn the camera on Information you specify this way is recorded in image properties when you shoot and it is used when you manage ...

Страница 22: ...4 hours even if the camera is off once you insert a charged battery pack or when you insert a DC coupler and connect an AC adapter both sold separately 167 Once the date time battery is depleted the Date Time screen will be displayed when you turn the camera on Set the correct date and time as described in Setting the Date and Time 21 4 Finish the setup process Press the button when finished After...

Страница 23: ...n also set the display language by touching a language on the screen in step 3 and then touching it again Attaching a Lens The camera is compatible with EF M lenses Additionally the optional Mount Adapter EF EOS M can be attached to use EF and EF S lenses 24 1 Make sure the camera is off 2 Remove the caps Remove the lens cap and body cap by turning them in the directions shown 3 Attach the lens Al...

Страница 24: ...lease button 1 as you turn the lens in the direction shown 2 Turn the lens until it stops and then remove it in the direction shown 3 Attach the lens cap to the lens after removal 3 1 2 Minimizing Dust When changing lenses do it quickly in a place with minimal dust When storing the camera without a lens attached be sure to attach the body cap to the camera Remove dust on the body cap before attach...

Страница 25: ...n or shooting range of the lens If the front part focusing ring of the lens rotates during autofocusing do not touch the rotating part The focus preset and power zoom features of some super telephoto lenses are not supported Detaching a Lens 1 Detach the adapter Make sure the camera is off Hold down the lens release button and turn the adapter with the lens attached in the direction shown Turn the...

Страница 26: ...t still images or movies and then view them Shooting Scene Intelligent Auto For fully automatic selection of the optimal settings for specific scenes simply let the camera determine the subject and shooting conditions 1 Turn the camera on Move the power switch to 2 Enter mode Hold down the mode dial release button and turn the mode dial to A scene icon 1 is displayed in the upper left of the scree...

Страница 27: ...ally when you have raised it Your shot remains displayed on the screen for about two seconds Even while the shot is displayed you can take another shot by pressing the shutter button again Recording Movies 1 Start recording Press the movie button Recording begins and Rec is displayed with the elapsed time Black bars displayed on the top and bottom edges of the screen indicate image areas not recor...

Страница 28: ...ttons to browse through images quickly To access this screen Scroll Display mode turn the dial rapidly In this mode turn the dial to browse through images To return to single image display press the button Movies are identified by a icon To play movies go to step 3 3 Play movies Press the button press the buttons to choose and then press the button again Playback now begins and after the movie is ...

Страница 29: ...cause they cannot be recovered 1 Choose an image to erase Press the buttons or turn the dial to choose an image 2 Erase the image Press the button After Erase is displayed press the buttons or turn the dial to choose Erase and then press the button The current image is now erased To cancel erasure press the buttons or turn the dial to choose Cancel and then press the button You can choose multiple...

Страница 30: ...e To switch to Shooting mode press the button again To turn off the camera move the power switch to When an EF M lens is attached to the camera and the power is off the aperture narrows to reduce the amount of light entering the camera and protect the internal components of the camera Accordingly the camera makes a small noise when turned on or off as the aperture is adjusted The sensor is cleaned...

Страница 31: ...ccess the shooting screen by pressing the shutter button halfway You can deactivate Auto Power Down and adjust the timing of Display Off if you prefer 158 Power saving is not active while the camera is connected to other devices via Wi Fi 127 or when connected to a computer 177 Shutter Button To ensure that the subject is in focus begin by holding the shutter button halfway down and once the subje...

Страница 32: ...ses some pixels may be defective or may appear as red or black dots This does not indicate camera damage or affect recorded images Some aspect ratio settings 49 will cause black bars to be displayed on the top and bottom or left and right edges of the screen These areas will not be recorded The screen will not be activated when you move your eye away from the viewfinder if you have selected MENU 3...

Страница 33: ...0 91 92 100 5 Scene Intelligent Auto Mode Hybrid Auto Mode Fully automatic shooting with camera determined settings 39 41 6 Creative Assist Mode Preview easy to understand image adjustments when shooting Settings can also be saved and applied again later 53 You can turn the mode dial to switch to Shooting mode from Playback mode Adjusting the Screen Angle You can adjust the screen angle and orient...

Страница 34: ... match the brightness of your shots Note that any on screen image distortion or jerky subject motion will not affect recorded images For playback display options see Switching Display Modes 105 Using the Quick Set Menu Configure commonly used functions in the Quick Set menu Note that menu items and options vary depending on the shooting mode 196 or playback mode 210 1 Access the menu Press the but...

Страница 35: ... previous screen touch the menu item or touch the selected option again You can access the screen for options labeled with a icon by touching Using the Menu Screen Configure a variety of camera functions through the menu screen as follows 1 Access the menu screen Press the button 2 Choose a tab Press the buttons or turn the dial to choose a tab Tabs represent functions 1 such as shooting playback ...

Страница 36: ...item or option in steps 3 and 4 by turning the dial To undo any accidental setting changes you can restore the camera s default settings 163 Available menu items vary depending on the selected shooting or playback mode 198 210 Touch Screen Operations To choose tabs press the button to access the menu screen and then touch the desired function tab and page tab Touch an item to choose it and then to...

Страница 37: ...return to the previous screen press the button On Screen Keyboard Use the on screen keyboard to enter wireless settings 127 and other information Note that the length and type of information you can enter varies depending on the function you are using Entering Characters Touch the characters to enter them The amount of information you can enter 1 varies depending on the function you are using Movi...

Страница 38: ...ndicator on the back of the camera 4 blinks in green at these times Connected to a computer 177 Display off 31 157 158 Starting up recording or reading Communicating with other devices Shooting long exposures 90 92 Connecting transmitting via Wi Fi When the indicator blinks green never turn the camera off open the memory card battery cover or shake or jolt the camera which may corrupt images or da...

Страница 39: ...lection of the optimal settings for specific scenes simply let the camera determine the subject and shooting conditions Shooting Scene Intelligent Auto Still Images Movies 1 Turn the camera on Move the power switch to 2 Enter mode Hold down the mode dial release button and turn the mode dial to A scene icon is displayed in the upper left of the screen 43 Frames are displayed around faces and subje...

Страница 40: ...emains displayed on the screen for about two seconds Even while the shot is displayed you can take another shot by pressing the shutter button again Recording Movies 1 Start recording Press the movie button Recording begins and Rec is displayed with the elapsed time Black bars displayed on the top and bottom edges of the screen indicate image areas not recorded Frames displayed around any detected...

Страница 41: ... shot A digest movie may not be recorded if you shoot a still image immediately after turning the camera on choosing mode or operating the camera in other ways Any sounds and vibrations from your camera or lens operations will be recorded in digest movies Digest movie image quality is for NTSC or for PAL This varies depending on the video output format 157 Sounds are not played when you press the ...

Страница 42: ...tion setting 86 1 Still Images Movies If the camera makes no operating sounds it may have been turned on while holding down the button To activate sounds press the button choose Beep on the 3 tab and then press the buttons or turn the dial to choose On Still Images If the camera cannot focus on subjects when you press the shutter button halfway an orange AF frame is displayed with and no picture i...

Страница 43: ...ses from auto focusing may also be recorded Lens noises may be less noticeable if you use an optional external microphone If you prefer not to record sound choose MENU 35 7 tab Sound recording Disable To keep the focus fixed during movie recording choose MENU 35 7 tab Movie Servo AF Disable Individual movies that exceed 4 GB are divided into multiple files To notify you about 30 sec before the mov...

Страница 44: ...s displayed around the subject or person s face detected as the main subject Frames follow moving subjects within a certain range as they are tracked to keep them in focus Frames turn green after you press the shutter button halfway and the camera focuses Frames turn blue and focus and brightness are readjusted using Servo AF if you press the shutter button halfway when subject motion is detected ...

Страница 45: ...nger than two seconds is specified two seconds before the shot the lamp blinking and self timer sound will speed up The lamp will remain lit in case the flash fires Once you start the self timer the lamp will blink and the camera will play a self timer sound Two seconds before the shot the blinking and sound will speed up The lamp will remain lit in case the flash fires To cancel shooting after yo...

Страница 46: ...ll the way down to shoot continuously Shooting by Touching the Screen Touch Shutter Still Images Movies With this option instead of pressing the shutter button you can simply touch the screen and release your finger to shoot The camera will focus on subjects and adjust image brightness automatically 1 Enable the touch shutter function Press the button choose Touch Shutter on the 2 tab and then pre...

Страница 47: ...b Image quality During continuous shooting focus is locked at the position determined when you pressed the shutter button halfway Cannot be used with the self timer 44 Shooting may stop momentarily or continuous shooting may slow down depending on shooting conditions camera settings and the zoom position As more shots are taken shooting may slow down There may be a delay before you can shoot again...

Страница 48: ...mages are captured when is selected When finished press the button to return to the menu screen RAW and JPEG cannot both be set to When deciding the number of pixels based on print size use the following table as a guide for images with a 3 2 aspect ratio A2 16 5 x 23 4 in A3 11 7 x 16 5 in A4 8 3 x 11 7 in 3 5 x 5 in 5 x 7 in Postcard Capturing in RAW Format The camera can capture images in JPEG ...

Страница 49: ...of Recording Pixels Frame Rate Details 1920 x 1080 59 94 fps For shooting in Full HD enables a cinematic frame rate 1920 x 1080 29 97 fps 1920 x 1080 23 98 fps 1280 x 720 59 94 fps For shooting in HD 640 x 480 29 97 fps For shooting in standard definition Changing the Aspect Ratio Still Images Movies Change the image aspect ratio ratio of width to height as follows Press the button choose in the m...

Страница 50: ...een If the electronic level is not displayed in step 1 check the setting in MENU 35 1 tab Shooting information display 95 The electronic level is not displayed in mode or during movie recording If you hold the camera vertically the orientation of the electronic level will be updated automatically to match the camera orientation Calibrate the electronic level if it seems ineffective in helping you ...

Страница 51: ...assist beam LED firing on the 3 tab and then choose Disable To restore the original setting repeat this process but choose Enable Deactivating the Red Eye Reduction Lamp Still Images Movies You can deactivate the red eye reduction lamp that lights up to reduce red eye when the flash is used in low light shots 1 Access the Flash Control screen Press the button choose Flash Control on the 5 tab and ...

Страница 52: ...splay Period after Shots Still Images Movies Press the button choose Image review on the 2 tab and then choose the desired option To restore the original setting repeat this process but choose 2 sec 2 sec 4 sec 8 sec Displays images for the specified time Even while the shot is displayed you can take another shot by pressing the shutter button halfway again Hold Displays images until you press the...

Страница 53: ...m past images captured in mode This mode makes it easier to learn about Creative Zone shooting modes and because you can check the corresponding settings in these modes when viewing images shot in mode Customize shots in these ways Background Adjust the appearance of the background Choose higher values to make backgrounds sharper or lower values to make them blurrier Brightness Adjust image bright...

Страница 54: ...to your new settings Press the button press the buttons or turn the dial to choose OK after the confirmation message and then press the button 1 Enter mode Hold down the mode dial release button and turn the mode dial to 2 Configure the settings Press the button press the buttons to choose an item and then adjust the setting either by pressing the buttons or turning the dials 34 Once you are finis...

Страница 55: ...ings Follow step 1 in Shooting with Your Favorite Settings Creative Assist 53 and choose Press the button press the buttons to choose and then choose a profile to load either by pressing the buttons or turning the dials Press the button to apply the saved settings To return without applying settings choose and press the button Using Settings from Images Load settings from images captured in mode t...

Страница 56: ...pod Handheld Night Scene Still Images Movies Beautiful shots of evening scenes or portraits with evening scenery in the background without the need to hold the camera very still as with a tripod A single image is created by combining consecutive shots reducing camera shake and image noise Specific Scenes Choose a mode matching the shooting scene and the camera will automatically configure the sett...

Страница 57: ...to and cannot be changed In mode the time left before shooting is shown on the top of the screen when you activate the self timer by selecting or by selecting and setting the time to 3 seconds or more Subjects appear larger in mode compared to other modes In and mode shots may look grainy because the ISO speed 71 is increased to suit the shooting conditions Because the camera will shoot continuous...

Страница 58: ...ove the frame by dragging it or touching the screen For best results hold the camera securely in both hands with your elbows close to your body and rotate your whole body to follow the subject This feature is more effective for subjects moving horizontally such as cars or trains Enhancing Colors in Shots of Food Food Still Images Movies Adjust color tones to make food look fresh and vibrant 1 Choo...

Страница 59: ... each time you shoot and the camera combines image areas with optimal brightness to create a single image This mode can reduce the loss of detail in shadows that tends to occur in shots with mixed bright and dark image areas 1 Choose Follow steps 1 2 in Specific Scenes 56 and choose 2 Shoot Hold the camera steady as you shoot When you press the shutter button all the way down the camera will take ...

Страница 60: ...3 Shoot Try taking some test shots first to make sure you obtain the desired results Shooting in Monochrome Grainy B W Still Images Movies Take monochrome pictures with a gritty rough feeling 1 Choose Follow steps 1 2 in Image Effects Creative Filters 59 and choose 2 Choose an effect level Turn the dial to choose an effect level A preview is shown of how your shot will look with the effect applied...

Страница 61: ... Images have a warmer tone than with Standard Cool Images have a cooler tone than with Standard Try taking some test shots first to make sure you obtain the desired results Shots Resembling Oil Paintings Art Bold Effect Still Images Movies Make subjects look more substantial like subjects in oil paintings 1 Choose Follow steps 1 2 in Image Effects Creative Filters 59 and choose 2 Choose an effect ...

Страница 62: ...o of With PAL movie quality is for an aspect ratio of You can also move the frame by touching or dragging across the screen Shots Resembling Miniature Models Miniature Effect Still Images Movies Creates the effect of a miniature model by blurring image areas above and below your selected area You can also make movies that look like scenes in miniature models by choosing the playback speed before t...

Страница 63: ...ies Three consecutive images are captured at different brightness levels each time you shoot and the camera combines image areas with optimal brightness to create a single image This mode can reduce the washed out highlights and loss of detail in shadows that tend to occur in high contrast shots 1 Choose Follow steps 1 2 in Image Effects Creative Filters 59 and choose 2 Shoot Hold the camera stead...

Страница 64: ... again Turn the exposure compensation dial to adjust the exposure as you watch the screen You can also lock or unlock the exposure by touching During recording you can also adjust exposure by touching the exposure compensation bar on the bottom of the screen and then touching The amount that exposure is adjusted by touching the screen differs from the amount set by using the exposure compensation ...

Страница 65: ... the top and bottom edges of the screen indicate image areas not recorded 2 Configure movie settings Press the button Press the buttons or turn the dial to choose an item Choose the desired option and then press the button 3 Secure the camera Mount the camera on a tripod or take other measures to keep it still 4 Shoot To start recording press the movie button Do not disturb the camera while shooti...

Страница 66: ...at this process but choose Auto Item Details Shooting scene Choose from four types of scenes Interval Shots Choose the shooting interval in seconds and total number of shots Exposure Choose whether exposure is determined by the first shot or adjusted for each shot Review image Display the previous shot for up to 2 seconds Item Details Time required Length of the recording session Varies depending ...

Страница 67: ...the wind filter Access the Sound recording screen as described in step 1 of Adjusting the Recording Volume 66 Choose Wind filter Attenuator and then press the button Choose Wind Filter and then choose Off Using the Attenuator Set to Auto to reduce audio distortion by automatically activating and deactivating the attenuator to suit shooting conditions The attenuator can also be set to On or Off man...

Страница 68: ...E AE Auto Exposure Before using a function introduced in this chapter in modes other than make sure the function is available in that mode 194 Shooting in Program AE P Mode Still Images Movies You can customize many function settings to suit your preferred shooting style 1 Enter mode Hold down the mode dial release button and turn the mode dial to 2 Customize the settings as desired 69 89 and then...

Страница 69: ...ation Press the button choose Expo simulation on the 1 tab and then choose Disable 35 Setting Up Shooting from a Single Screen The INFO Quick Control screen provides convenient single screen access to a variety of shooting settings 1 Access the INFO Quick Control screen Press the button a few times to display the INFO Quick Control screen 2 Choose a setting to configure To view a description choos...

Страница 70: ...ic spot of the subject or scene Metering is restricted to within the circular spot metering frame in the center of the screen Center weighted average Determines the average brightness of light across the entire image area calculated by treating brightness in the central area as more important With the exposure is locked at the level determined when you press the shutter button halfway With or the ...

Страница 71: ...y in use 69 the value specified for that function is treated as the standard exposure level for this function You can also adjust exposure compensation by turning the exposure compensation dial in step 2 Changing the ISO Speed Still Images Movies Set the ISO speed to AUTO for automatic adjustment to suit the shooting mode and conditions Otherwise set a higher ISO speed for higher sensitivity or a ...

Страница 72: ...Brightness and Contrast Auto Lighting Optimizer Still Images Movies Correct brightness and contrast automatically to avoid images that are too dark or lack contrast Press the button choose in the menu and choose the desired option 34 This feature may increase noise under some shooting conditions When the effect of Auto Lighting Optimizer is too strong and images become too bright set it to Low or ...

Страница 73: ...n press On the confirmation screen press the buttons or turn the dial to choose OK and then press the button Press the button to close the menu 4 Choose Follow the steps in Adjusting White Balance 73 to choose Image Colors Adjusting White Balance Still Images Movies By adjusting white balance WB you can make image colors look more natural for the scene you are shooting Press the button choose in t...

Страница 74: ... touching in step 1 Shots in step 1 that are too bright or dark may prevent you from setting the white balance correctly A message is displayed if you specify an image in step 3 that is not suitable for loading white data Choose Cancel to choose a different image Choose OK to use that image for loading white data but note that it may not produce a suitable white balance If Unselectable image is di...

Страница 75: ...le based on presets such as Portrait or Landscape or a Picture Style file and then adjust it as needed Default Auto settings are used for and until you add a Picture Style You can also configure this setting by accessing MENU 35 6 tab Picture Style Manually Setting White Balance Color Temperature Still Images Movies A value can be set representing the white balance color temperature Follow the ste...

Страница 76: ...omizing Colors Picture Style 75 Press the button 2 Configure the setting Press the buttons to choose an item and then choose an option by pressing the buttons or turning the dials To undo any changes press the button When finished press the button Customizing Picture Styles Customize these Picture Style settings as needed Sharpness Strength Adjust the level of edge enhancement Choose lower values ...

Страница 77: ...e more noticeable with higher Contrast values Saving Customized Picture Styles Save presets such as or that you have customized as new styles You can create several Picture Styles with different settings for parameters such as sharpness or contrast 1 Select a user defined style number Choose or as described in Customizing Colors Picture Style 75 2 Select a style to modify Press the button Press th...

Страница 78: ...The frame size varies depending on IS Mode and Auto Level settings Blue frames are displayed around positions in focus when you select MENU 35 3 tab AF operation Servo AF 1 point AF The camera focuses using a single AF frame Effective for reliable focusing Frames turn green after you press the shutter button halfway and the camera focuses Move the frame as needed 79 To compose shots with subjects ...

Страница 79: ... can be locked After you lock the focus the focal position will not change even when you release your finger from the shutter button 1 Lock the focus With the shutter button pressed halfway press the button The focus is now locked and is displayed To unlock the focus release the shutter button and press the button again In this case is no longer displayed 2 Compose the shot and shoot Choosing Subj...

Страница 80: ...utton halfway Press the button choose Continuous AF on the 3 tab and then choose Off 35 On Helps avoid missing sudden photo opportunities because the camera constantly focuses on subjects until you press the shutter button halfway Off Conserves battery power because the camera does not focus constantly However this may delay focusing Choosing MENU 35 3 tab AF Frame Size Small will restrict the mod...

Страница 81: ... magnify Press the buttons to move the frame to an area to magnify To center the frame again press the button 4 Activate magnification Turn the dial to switch the magnification between 1x no magnification 5x and 10x Fine Tuning the Focus Still Images Movies Fine tune autofocusing with an EF M lens attached by turning the focusing ring 1 Configure the setting Press the button choose Focus mode on t...

Страница 82: ...lly adjusts the shutter speed or ISO speed for flash shots to reduce washed out highlights and shoot at optimal exposure Thus shutter speeds and ISO speeds displayed when you press the shutter button halfway may not match the settings in flash shots You can also configure this setting by choosing MENU 35 5 tab Flash Control Flash firing 5 Focus While looking at the magnified image turn the lens fo...

Страница 83: ...perture value by accessing MENU 35 and choosing 5 tab Flash Control Safety FE Disable You can also configure the flash exposure compensation by accessing MENU 35 and choosing 5 tab Flash Control Built in flash settings exp comp You can also access the Flash Control screen 35 as follows Press and hold the button for at least one second When the flash is up press the button and immediately press the...

Страница 84: ...standard flash exposure can be changed to average flash metering across the metering area as when using an externally metered flash Press the button and choose Flash Control on the 5 tab Choose E TTL II meter and then Average When using Average adjust flash exposure compensation to suit the shooting conditions Shooting with the FE Lock Still Images Movies Just as with the AE lock 70 you can lock t...

Страница 85: ...ble with the dial is displayed 2 Set the desired item Turn the dial to set the desired item while the function icon is displayed After you set the desired item the camera will revert to the default function adjusted with the Quick Control Dial The camera will revert to the default function adjusted with the button after some time even if no items are set Resetting Flash Settings Still Images Movie...

Страница 86: ... Disable Try taking some test shots first to check the effect with the lens you are using Enhanced is only available in and modes When you set Digital IS to Enable or Enhanced Auto level is set to Disable and cannot be changed Functions you can switch to by pressing the button can be modified as described in Assigning Functions to the Quick Control Dial 98 This function is not available in or mode...

Страница 87: ...orate their own correction data Existing JPEG images cannot be corrected Effects of peripheral illumination correction and chromatic aberration correction are not displayed when shooting with a magnified view Similarly the effect of diffraction correction is not displayed at the time of shooting The amount of correction except diffraction correction is less for lenses that do not provide distance ...

Страница 88: ...Reduction Flash shooting is not possible Recording the image to the card will take longer than with normal shooting You cannot take another shot until processing is finished Effects of lens aberration correction vary by lens and shooting conditions With some lenses and under some shooting conditions effects may be less noticeable If effects of correction are hard to see magnify the image and check...

Страница 89: ...ress the button choose Long exp noise reduction on the 6 tab and then choose an option 35 OFF Disables noise reduction for long exposures AUTO Applies noise reduction if the noise that tends to occur in long exposures at shutter speeds of one second or slower is detected ON Always applies noise reduction at shutter speeds of one second or slower There may be a delay before you can shoot again as t...

Страница 90: ...r 213 1 Enter mode Hold down the mode dial release button and turn the mode dial to 2 Set the shutter speed Turn the dial to set the shutter speed There may be a delay before you can shoot again when Long exp noise reduction is set to ON or AUTO and the shutter speed is 1 second or slower because images are processed to remove noise We recommend deactivating image stabilization when shooting at sl...

Страница 91: ...ed aperture value before shooting as follows The camera automatically adjusts the shutter speed to suit your aperture value Available aperture values vary by lens 1 Enter mode Hold down the mode dial release button and turn the mode dial to 2 Set the aperture value Turn the dial to set the aperture value Orange display of the shutter speed when you press the shutter button halfway indicates that t...

Страница 92: ...e following operations are available when ISO speed is set to AUTO Adjust exposure by turning the exposure compensation dial Press the button to lock the ISO speed Screen brightness changes accordingly You can also adjust the setting items on the bottom of the screen by touching an item to select it and then either touching dragging the bar or touching Specific Shutter Speeds and Aperture Values M...

Страница 93: ...t least one second When the flash is up press the button and immediately press the button You can also access the Flash Control screen 35 by pressing the button and touching Shooting Long Exposures Bulb With bulb exposures shots are exposed for as long as you hold down the shutter button 1 Specify bulb exposure Set the shutter speed to BULB following steps 1 2 in Specific Shutter Speeds and Apertu...

Страница 94: ...e from standard exposure exceeds 3 stops You can also adjust the setting items on the bottom of the screen by touching an item to select it and then either touching dragging the bar or touching Focus can be locked during recording by touching is then displayed Recording Movies at Specific Shutter Speeds and Aperture Values Still Images Movies Set your preferred shutter speed aperture value and ISO...

Страница 95: ...g Touch Drag AF Still Images Movies With Touch Drag AF you can move the AF frame by touching or dragging the screen while looking through the viewfinder 1 Access the setting screen Choose Touch drag AF settings on the 2 tab and then press the button 35 Customizing Controls and Display Customizing Display Information Customize what screen is displayed when you press the button on the shooting scree...

Страница 96: ...on Press the buttons or turn the dials to choose a function and then press the button 3 Choose an option Press the buttons or turn the dial to choose an option When finished press the button to return to the previous screen 2 Configure the setting Choose Touch drag AF select Enable and then press the button This function is not available in the following cases When the screen is open 180 When MENU...

Страница 97: ...n Exposure ISO expansion Set to 1 Enable for the option of setting the ISO speed to H in mode H corresponds to ISO 12800 Safety shift Set to 1 Enable for automatic adjustment of the shutter speed and aperture value to bring the exposure level closer to standard exposure if standard exposure would not be available otherwise under your specified shutter speed or aperture value in or mode Others Dial...

Страница 98: ...unctions Follow steps 1 2 in Assigning Functions to Buttons and Dials 97 and choose Set Func 2 Assign the function Choose Register and then press the button Press the buttons to choose a shooting mode Press the buttons or turn the dial to choose a function to add and then press the button is displayed To cancel saving press the button is no longer displayed Press the button Shutter button or butto...

Страница 99: ...olding down the button when the Quick Set menu is displayed You can also choose icons on the screen in step 2 by touching them 3 Rearrange functions as needed Choose Sort and press the button Press the buttons to choose a shooting mode Choose a function to move either press the buttons or turn the dial and then press the button Press the buttons or turn the dial to change the order and then press ...

Страница 100: ...ay Settings That Can Be Saved Shooting modes and Items set in and modes 69 92 Shooting menu settings My Menu settings 101 1 Enter a shooting mode with settings you want to save and change the settings as desired 2 Access the screen for assigning functions Press the button choose Custom shooting mode C1 C2 on the 4 tab and then press the button 3 Save the settings Press the buttons or turn the dial...

Страница 101: ...he button Press the buttons or turn the dial to choose a menu item to save max six items and then press the button to save it is displayed To cancel saving press the button is no longer displayed Press the button 3 Rearrange menu items as needed Press the buttons or turn the dial to choose Sort registered items and then press the button Choose a menu item to move either press the buttons or turn t...

Страница 102: ... the screen in step 1 of Saving Commonly Used Shooting Menu Items My Menu 101 choose Menu display and then choose an item as desired Normal display Display the most recent menu as shown for your previous operation Display from My Menu tab Start display from tab screens Display only My Menu tab Restrict display to tab screens Renaming My Menu Tabs 1 Choose Rename tab Following step 2 in Saving Comm...

Страница 103: ...ovies After shooting images or movies you can view them on the screen as follows 1 Enter Playback mode Move the power switch to Press the button Your last shot is displayed 2 Choose images To view the previous image press the button or turn the dial counterclockwise To view the next image press the button or turn the dial clockwise Press and hold the buttons to browse through images quickly To acc...

Страница 104: ...n touch to adjust the volume To switch frames touch the scrollbar or drag left or right To resume playback touch Touch to return to the screen in step 2 of Viewing 103 3 Play movies To start playback press the button press the buttons to choose and then press the button again 4 Adjust the volume Press the buttons to adjust the volume To adjust the volume when the volume indicator 1 is no longer di...

Страница 105: ...odes Press the button in Playback mode to switch from no info display to info display 1 basic info to info display 2 details Switching display modes is not possible while the camera is connected via Wi Fi to devices other than printers Customizing the Shooting Information Displayed Customize the information shown on each screen For details on the information available see During Playback 192 1 Acc...

Страница 106: ...tness Histogram Still Images Movies Information displays 2 8 include a graph on the top called a brightness histogram which shows the distribution of brightness in images The horizontal axis represents the degree of brightness and the vertical axis how much of the image is at each level of brightness Viewing the histogram is a way to check exposure RGB Histogram Still Images Movies Information dis...

Страница 107: ...ce turn the dial counterclockwise Fewer images are shown each time you turn the dial 2 Choose an image Turn the dial to scroll through the images Press the buttons to choose an image An orange frame is displayed around the selected image Press the button to view the selected image in single image display To use the and buttons just as you would use the dial in step 1 choose MENU 35 5 tab resize En...

Страница 108: ...ndition When is selected you can view only images matching this condition by pressing the buttons or turning the dial To perform an action for all of these images together press the button and go to step 3 2 Choose the second condition and view the filtered images When you have selected or as the first condition choose the second by pressing the buttons and then turn the dial to view only matching...

Страница 109: ...next image according to the jump method chosen in single image display You can also set the condition or jump method by choosing MENU 35 5 tab Image jump w 3 View the filtered images Images matching your conditions are displayed in yellow frames To view only these images press the buttons or turn the dial To cancel filtered display press the button choose in the menu and then press the button When...

Страница 110: ...he approximate position of the displayed area 1 is shown for reference To reduce image display turn the dial clockwise 2 Move the display position and switch images as needed To move the display position press the buttons Press the button to move to the AF frame that was in focus at the time of shooting To switch to other images while zoomed turn the dial Touch Screen Operations You can also jump ...

Страница 111: ...ns down You can configure slideshow repetition display time per image and the transition between images on the screen accessed by choosing Set up and pressing the button 35 You can also stop slideshows by touching the screen You can return to single image display from magnified display by pressing the button In Magnify approx on tab 5 you can set the magnification in single image display when the ...

Страница 112: ...switch to Shooting mode or turn the camera off before finishing the setup process in step 3 You can also select or clear images by touching the screen in step 2 and you can access the confirmation screen by touching You can also protect images by touching OK on the screen in step 3 Protecting Images Still Images Movies Protect important images to prevent accidental erasure 114 Press the button cho...

Страница 113: ...3 You can also protect images by touching Protect on the screen in step 4 Protecting All Images at Once 1 Choose Protect All Images Following step 2 in Using the Menu 112 choose Protect All Images and press the button 2 Protect the images Press the buttons or turn the dial to choose OK and then press the button Selecting a Range 1 Choose Select Range Following step 2 in Using the Menu 112 choose S...

Страница 114: ...e image Press the button After Erase is displayed press the buttons or turn the dial to choose Erase and then press the button The current image is now erased To cancel erasure press the buttons or turn the dial to choose Cancel and then press the button For images captured in both RAW and JPEG format pressing the button while the image is displayed gives you the option of choosing Erase Erase JPE...

Страница 115: ...ill erase both versions Selecting a Range 1 Choose Select Range Following step 2 in Choosing a Selection Method 115 choose Select Range and press the button 2 Choose images Follow steps 2 3 in Selecting a Range 113 to specify images Erasing Multiple Images at Once You can choose multiple images to erase at once Be careful when erasing images because they cannot be recovered However protected image...

Страница 116: ...s or turn the dial to choose or which rotates the image 90 in the specified direction Press the button to complete the setting Rotation is not possible when Auto Rotate is set to Off 117 Using the Menu 1 Choose Rotate Press the button and choose Rotate on the 1 tab 35 3 Erase the images Press the button to choose Erase and then press the button Specifying All Images at Once 1 Choose Select All Ima...

Страница 117: ...e Rating Press the button and choose Rating on the 1 tab 35 2 Choose an image and rate it Choose an image either press the buttons or turn the dial and then press the buttons to choose a rating 2 Rotate the image Press the buttons or turn the dial to choose an image Press the button to rotate the image 90 clockwise Press it again to rotate it 90 counterclockwise and press it a third time to restor...

Страница 118: ...refer Resizing Images Still Images Movies Save a copy of images at a lower number of recording pixels 1 Choose an image size Press the button choose in the menu and choose an image size 34 Press the button 2 Save the new image After Save new image is displayed press the buttons or turn the dial to choose OK and then press the button 3 Configure the setting Press the button A confirmation message i...

Страница 119: ...he button To change the frame aspect ratio turn the dial to choose To switch between aspect ratios and press the button repeatedly 3 Preview the cropped image Turn the dial to choose To switch display between the cropped image and the cropping frame press the button repeatedly 3 Review the new image Press the buttons or turn the dial to choose Processed img and then press the button The saved imag...

Страница 120: ... button to resize the frame and press the buttons to move it 3 Save as a new image and review Press the button Follow steps 2 3 in Resizing Images 118 4 Save as a new image and review Turn the dial to choose and then press the button Follow steps 2 3 in Resizing Images 118 RAW images cannot be edited Cropped images cannot be cropped again Cropped images cannot be resized or have Creative filters a...

Страница 121: ...ges cannot be edited this way Red eye correction can be applied to JPEG images also captured in RAW format but the original image cannot be overwritten You can also save images by touching New File or Overwrite on the screen in step 4 To switch the orientation of the frame to vertical press the buttons on the screen in step 2 To move the frame press the buttons again To return the frame to horizon...

Страница 122: ...the resulting JPEG image Peripheral illum corr Correct vignetting from lens characteristics Chromatic aberr corr Correct chromatic aberration from lens characteristics Diffraction correction Correct loss of sharpness from diffraction Processing RAW Images with the Camera Still Images Movies Process images captured in RAW format on the camera The original RAW image is retained and a copy is saved a...

Страница 123: ... Camera 122 to process the image You can also choose an effect for a selected processing condition on the screen in step 3 by turning the dial For magnified display on the screen in step 3 turn the dial counterclockwise You can compare the current image to the original image by pressing the button and turning the dial on the screen in step 3 To return to the setting screen press the button To rest...

Страница 124: ...n the dial to move the orange or icon Cut the beginning of the movie from by choosing and cut the end of the movie by choosing If you move or to a position other than a mark in the portion before the nearest mark on the left will be cut while in the portion after the nearest mark on the right will be cut Selecting a Range 1 Choose Select Range Following the procedure in Using the Menu 119 choose S...

Страница 125: ... choose and then press the button The edited movie is now played To edit the movie again repeat step 2 To cancel editing press the button choose OK either press the buttons or turn the dial and then press the button 4 Save the edited movie Press the buttons to choose and then press the button Press the buttons or turn the dial to choose New File and then press the button Choose Save w o Comp and t...

Страница 126: ...y a movie recorded in mode as described in steps 1 2 in Viewing Short Movies Created When Shooting Still Images Digest Movies 106 and then press the button to access the movie control panel Press the buttons or turn the dial to choose or and then press the button 2 Choose Press the buttons or turn the dial to choose and then press the button The selected clip is played back repeatedly 3 Confirm er...

Страница 127: ...w a shooting screen on your smartphone or tablet For convenience in this guide smartphones tablets and other compatible devices are collectively referred to as smartphones Web Services Add your account information to the camera for CANON iMAGE GATEWAY online photography service or other Web services to send camera images to the services Unsent images on the camera can also be sent to a computer or...

Страница 128: ...ame To return to Wireless settings after pressing the button press the button again Transferring Images to a Smartphone Transfer images to a smartphone as follows Connect via Bluetooth 128 You can easily connect the camera to a Bluetooth enabled smartphone by pairing them This simplifies transferring images to a smartphone Connect via NFC 130 Simply touch an NFC compatible Android smartphone again...

Страница 129: ...ected Disconnected You can also use the camera to disable Wi Fi connection described in step 7 To disable Bluetooth communication choose MENU 35 4 tab Wireless settings Bluetooth settings and set Bluetooth to Off To check the information of the smartphone connected via Bluetooth in Check clear connection info choose MENU 35 4 tab Wireless settings Bluetooth settings Choose Address check to check t...

Страница 130: ...rtphone s NFC to simplify the process of installing Camera Connect and connecting to the camera Operation when devices are initially connected via NFC varies depending on the camera mode when the devices are touched together If the camera is in Shooting mode when the devices are touched together you can choose and send images on the image selection screen Once the devices are connected you can als...

Страница 131: ... OK 4 Send an image Turn the dial to choose an image to send press the buttons to choose Send this image and then press the button Transfer completed is displayed after the image is sent and the image transfer screen is displayed again To end the connection press the button choose OK on the confirmation screen either press the buttons or turn the dial and then press the button You can also use the...

Страница 132: ...one choose the camera to begin pairing If during connection a message on the camera or smartphone requests you to enter the nickname follow step 2 in Connecting via NFC When Camera Is in Shooting Mode 130 to enter it The camera does not keep a record of smartphones you connect to via NFC in Playback mode Connecting to a Smartphone via the Wi Fi Menu These steps show how to use the camera as an acc...

Страница 133: ...recent target devices choose MENU 35 4 tab Wireless settings Wi Fi Settings Target History Off 8 Adjust the privacy setting When this screen is displayed press the buttons or turn the dial to choose All images and then press the button You can now use the smartphone for remote live view shooting or to browse import or geotag images on the camera 9 Send an image Turn the dial to choose an image to ...

Страница 134: ...l to choose Switch Network and then press the button A list of detected access points will be displayed Using Another Access Point When connecting the camera to a smartphone through the Wi Fi menu you can also use an existing access point Also refer to the access point user manual Confirming Access Point Compatibility Confirm that the Wi Fi router or base station conforms to the Wi Fi standards in...

Страница 135: ...en press the button 5 Send the images Follow steps 6 9 in Connecting to a Smartphone via the Wi Fi Menu 132 to choose the smartphone adjust the privacy setting and send the images 4 Choose WPS Connection Press the buttons or turn the dial to choose WPS Connection and then press the button 5 Choose PBC Method Press the buttons or turn the dial to choose PBC Method and then press the button 6 Establ...

Страница 136: ...you want to register Separate ISP connection and access point fees may be applicable CANON iMAGE GATEWAY also provides user guides for downloading To determine the access point password check on the access point itself or refer to the user manual If no access points are detected even after you choose Refresh in step 2 to update the list choose Manual Settings in step 2 to complete access point set...

Страница 137: ...er of your choice press the buttons or turn the dial to choose Next and then press the button You will need this four digit number later when setting up linkage with CANON iMAGE GATEWAY in step 8 Registering CANON iMAGE GATEWAY Link the camera and CANON iMAGE GATEWAY by adding CANON iMAGE GATEWAY as a destination Web service on the camera Note that you will need to enter an email address used on y...

Страница 138: ...From a computer or smartphone access http www canon com cig to visit CANON iMAGE GATEWAY 2 Configure the Web service you want to use Follow the instructions displayed on the smartphone or computer to set up the Web service 7 Check for the notification message Once information has been sent to CANON iMAGE GATEWAY you will receive a notification message at the email address entered in step 5 Press t...

Страница 139: ...ages uploaded to CANON iMAGE GATEWAY on a smartphone try the dedicated Canon Online Photo Album app Download and install the Canon Online Photo Album app for iPhones or iPads from the App Store or for Android devices from Google Play 3 Choose Press the button Press the buttons or turn the dial to choose and then press the button The Web service settings are now updated If any configured settings c...

Страница 140: ...ils refer to the media player s user manual When finished press the button on the camera to end the connection If the screen is dimmed press any button Once the second screen in step 3 is displayed press the button Viewing Images Using a Media Player View images on the camera s memory card on a TV or other device This feature requires a DLNA compatible TV set or other media player such as a game s...

Страница 141: ...ord are displayed Connections require that a memory card with saved images be in the camera Once you have connected to devices via the Wi Fi menu recent destinations will be listed first when you access the Wi Fi menu You can easily connect again by pressing the buttons to choose the device and then pressing the button To add a new device display the device selection screen by pressing the buttons...

Страница 142: ...splay recent target devices choose MENU 35 4 tab Wireless settings Wi Fi Settings Target History Off When using another access point see Using Another Access Point 134 4 Connect the printer to the network In the printer s Wi Fi setting menu choose the SSID network name displayed on the camera to establish a connection 5 Choose the printer Choose the printer name either press the buttons or turn th...

Страница 143: ... and then pressing the button To add a new device display the device selection screen by pressing the buttons and then configure the setting If you prefer not to display recent target devices choose MENU 35 4 tab Wireless settings Wi Fi Settings Target History Off You can also send multiple images at once and change the image size before sending 144 Sending Images to Another Camera Connect two cam...

Страница 144: ...es press the button Press the buttons or turn the dial to choose OK and then press the button 3 Send the images Press the buttons or turn the dial to choose Send and then press the button You can also choose images in step 2 by turning the dial counterclockwise to access single image display and then pressing the buttons or turning the dial Image Sending Options You can choose multiple images to s...

Страница 145: ... from the group to send by choosing an image and pressing the button to clear the mark After you finish choosing images press the button Press the buttons or turn the dial to choose OK and then press the button 2 Send the images Press the buttons or turn the dial to choose Send and then press the button Selecting a Range 1 Choose Select Range Following step 2 in Sending Multiple Images 144 choose ...

Страница 146: ...ndition of the network you are using it may take a long time to send movies Be sure to keep an eye on the camera battery level Web services may limit the number of images or length of movies you can send When sending movies to smartphones note that the supported image quality varies depending on the smartphone For details refer to the smartphone user manual On the screen wireless signal strength i...

Страница 147: ... Mac OS In the menu bar click and then click Add new camera A list of cameras linked to CANON iMAGE GATEWAY is displayed Choose the camera from which images are to be sent Once the camera is registered and the computer is ready to receive images the icon changes to Sending Images Automatically Image Sync Images on the memory card that have not been transferred already can be sent to a computer or ...

Страница 148: ...ing in Image Sync settings cannot be accessed this way For Canon Online Photo Album instructions refer to Canon Online Photo Album Help Sending Images Images sent from the camera are automatically saved to the computer If the computer that you intend to send images to is turned off the images will be stored temporarily on the CANON iMAGE GATEWAY server Stored images are regularly erased so make su...

Страница 149: ...ons except using the power switch are disabled 4 Shoot Use the smartphone to shoot Using a Smartphone to View Camera Images and Control the Camera You can do the following with the dedicated smartphone app Camera Connect Browse images on the camera and save them to the smartphone Geotag images on the camera 149 Control the camera remotely from a smartphone 149 In camera settings the smartphone mus...

Страница 150: ...ection environment will not affect recorded images Captured images are not transferred to the smartphone Use the smartphone to browse and transfer images from the camera Controlling the Camera via Bluetooth You can use a Bluetooth enabled smartphone for remote shooting and switching of image display This is convenient if you want to connect quickly while shooting or if you will control playback wh...

Страница 151: ...t is displayed on the camera Following step 4 in Editing Connection Information 151 choose Change Device Nickname and press the button Select the input field and press the button Use the keyboard displayed to enter a new nickname 37 Editing or Erasing Wireless Settings Edit or erase wireless settings as follows Editing Connection Information 1 Access the Wi Fi menu and choose a device to edit Move...

Страница 152: ...oose All images Erasing Connection Information Erase connection information information about devices that you have connected to as follows Following step 4 in Editing Connection Information 151 choose Erase Connection Info and press the button After Erase is displayed press the buttons to choose OK and then press the button The connection information will be erased Specifying Images Viewable from...

Страница 153: ...efault settings Press the buttons or turn the dial to choose OK and then press the button The wireless settings are now reset To reset settings other than wireless settings to defaults choose Reset camera on the 4 tab 163 Changing the Camera Nickname Change the camera nickname displayed on connected devices as desired 1 Choose Wireless settings Press the button and choose Wireless settings on the ...

Страница 154: ...tings Press the button and choose 4 tab Wireless settings Bluetooth settings 2 Choose Check clear connection info Press the buttons or turn the dial to choose Check clear connection info and then press the button 3 Clear the information On the Check clear connection info screen press the button After Clear information about devices you have connected to is displayed press the buttons or turn the d...

Страница 155: ...olders created each month you can have the camera create folders each day you shoot to store shots taken that day Choose Create Folder on the 1 tab and then choose Daily Images will now be saved in folders created on the shooting date File Numbering Your shots are automatically numbered in sequential order 0001 9999 and saved in folders that store up to 2 000 images each You can change how the cam...

Страница 156: ... A icon is displayed Follow step 2 in Formatting Memory Cards 156 to continue with the formatting process Low level formatting takes longer than Formatting Memory Cards 156 because data is erased from all storage regions of the memory card You can cancel low level formatting in progress by choosing Cancel In this case all data will be erased but the memory card can be used normally Regardless of t...

Страница 157: ...ten seconds after darkening the screen turns off The camera turns off after approximately three minutes of inactivity 2 Shoot To activate the screen and prepare for shooting when the screen is off and the indicator is blinking press the shutter button halfway Changing the Video System Set the video system of any television used for display This setting determines the image quality frame rate avail...

Страница 158: ...f Screen Information Information displayed on the screen and menus can be changed to a color suitable for shooting under low light conditions Choose Night Display on the 2 tab and then choose On To restore the original display choose Off You can also return the setting to Off by holding down the button for at least one second Power Saving Adjustment Adjust the timing of automatic camera and screen...

Страница 159: ... or activate the self timer Choose Beep on the 3 tab and then choose Off World Clock To ensure that your shots will have the correct local date and time when you travel abroad simply register the destination in advance and switch to that time zone This convenient feature eliminates the need to change the Date Time setting manually Before using the world clock be sure to set the date and time and y...

Страница 160: ...perations when the screen or your fingers are wet the camera may not respond or it may malfunction In this case turn the camera off and wipe the screen with a cloth Do not apply screen protectors or adhesive film purchased separately This may reduce the responsiveness of touch operations The camera may be less responsive if you perform touch operations quickly when the setting is set to Sensitive ...

Страница 161: ...blower tip past the lens mount which may damage the shutter curtains For best results clean with the camera placed upright on a desk or other surface Repeated cleaning will not produce notably better results Note that Clean now may not be available immediately after cleaning Contact a Canon Customer Support Help Desk regarding dust or other material that cannot be removed by sensor cleaning Cleani...

Страница 162: ...once you save the images to a computer Download the EOS Utility instruction manual from the Canon website as needed For downloading instructions see Software Instruction Manual 176 Cleaning the Sensor Manually Any dust that remains after automatic cleaning can also be removed by using an optional blower or other specialized tool The surface of the image sensor is extremely delicate If the sensor m...

Страница 163: ...tes During firmware updates the touch screen panel will be disabled to prevent accidental operations Restoring Default Camera Settings If you accidentally change a setting you can restore default camera settings Restoring All Camera Defaults 1 Access the Basic settings screen Choose Reset camera on the 4 tab and then press the button Press the buttons or turn the dial to choose Basic settings and ...

Страница 164: ...ternal flash func setting and External flash C Fn setting in Flash Control 1 Tab Wireless settings Calibrated value for the electronic level Copyright information 1 Access the Other settings screen Choose Reset camera on the 4 tab and then press the button Press the buttons or turn the dial to choose Other settings and then press the button 2 Choose the function to reset Press the buttons or turn ...

Страница 165: ...ries sold separately Use of genuine Canon accessories is recommended This product is designed to achieve excellent performance when used with genuine Canon accessories Canon shall not be liable for any damage to this product and or accidents such as fire etc caused by the malfunction of non genuine Canon accessories e g a leakage and or explosion of a battery pack Please note that any repairs your...

Страница 166: ...U 2 AC Adapter CA PS700 Included Accessories Battery Charger LC E17 LC E17E 2 Battery Pack LP E17 2 Body Jacket EH29 CJ Neck Strap EM E2 Neck Strap EM 300DB 2 USB Port Card Slot Remote Controller RC 6 TV Video System Computer PictBridge Compatible Printers Card Reader SD SDHC SDXC Memory Card Directional Stereo Microphone DM E1 Connect Station CS100 EF Lenses EF S Lenses EF M Lenses Mount Adapter ...

Страница 167: ...nded when using the camera over extended periods or when connecting the camera to a printer or computer Cannot be used to charge the battery pack in the camera DC Coupler DR E17 Used with an AC adapter The battery charger and AC adapter can be used in areas with 100 240 V AC power 50 60 Hz For power outlets in a different format use a commercially available adapter for the plug Never use an electr...

Страница 168: ... Body Jacket EH29 CJ Protects the camera from dust and scratches Flash Units Speedlite 600EX II RT 600EX RT 600EX 430EX III RT 430EX III 430EX II 270EX II Shoe mounted flash unit that enables many styles of flash photography Speedlite 580EX II 580EX 550EX 430EX 420EX 380EX 320EX 270EX 220EX and 90EX are also supported Speedlite Transmitter ST E3 RT ST E2 Enables wireless control of slave Speedlite...

Страница 169: ... TV are off 2 Connect the camera to the TV On the TV insert the cable plug fully into the HDMI input as shown On the camera open the terminal cover and insert the cable plug fully into the camera terminal Neck Strap EM E2 Strap made of the same material as Body Jacket EH29 CJ Interface Cable IFC 600PCU For connecting the camera to a computer or printer Rings and caps included with Neck Strap EM 30...

Страница 170: ...o the coupler Open the cover and insert the adapter plug fully into the coupler 4 Connect the power cord Insert one end of the power cord into the compact power adapter and then plug the other end into a power outlet Turn the camera on and use it as desired When finished turn the camera off and unplug the power cord from the outlet 1 1 2 3 Turn the TV on and switch to external input Switch the TV ...

Страница 171: ...se for your external flash or microphone 2 Attach the hot shoe cap After removing the external flash or microphone reattach the cap to protect the hot shoe Insert the cap as shown 1 2 Do not disconnect the adapter or unplug the power cord while the camera is still on This may erase your shots or damage the camera Do not attach the adapter or adapter cord to other objects Doing so could result in m...

Страница 172: ...gs 174 Choose External flash func setting and press the button to access the screen at left Press the buttons or turn the dial to choose an item and then press the button On the screen displayed choose an option either press the buttons or turn the dial and then press the button Using an External Flash Sold Separately Still Images Movies More sophisticated flash photography is possible with an opt...

Страница 173: ... functions available with your flash unit refer to the instruction manual of the flash unit With an EX series Speedlite not compatible with flash function settings only Flash Exp Comp can be adjusted Shutter synchronization can also be set for some EX series Speedlites Setting Option Description Flash Mode Choose a flash mode to suit your desired flash shooting E TTL II flash metering is the stand...

Страница 174: ...4 as shown 1 2 Setting External Flash Custom Functions For details on Custom Functions for flash units refer to the instruction manual of the flash sold separately Press the button choose Flash Control on the 5 tab choose External flash C Fn setting and then press the button Press the buttons or turn the dial to choose an item and then press the button On the screen displayed choose an option eith...

Страница 175: ...r Down feature 5 Adjust microphone directivity to match the subject Use the microphone directivity switch to set the directivity 6 Remove when finished After turning off the microphone unplug the output plug and remove it by following the attachment instructions in reverse The external microphone requires a battery for power Replace the battery when the power check lamp is no longer lit When testi...

Страница 176: ... region Download the software 2 Follow the instructions displayed Double click the downloaded file to install it Using the Software The software available for download from the Canon website is introduced below with instructions for installation and saving images to a computer Software After installing the software you can do the following things on your computer EOS Utility Import images and chan...

Страница 177: ...ng limitations apply It may take a few minutes after you connect the camera to the computer until camera images are accessible Images shot in vertical orientation may be saved in horizontal orientation RAW images or JPEG images recorded with RAW images may not be saved Image protection settings may be cleared from images saved to a computer Some problems may occur when saving images or image infor...

Страница 178: ... Printers 169 Printing Images Still Images Movies Your shots can easily be printed by connecting the camera to a printer On the camera you can specify images to set up batch printing prepare orders for photo development services and prepare orders or print images for photobooks A Canon SELPHY CP series compact photo printer is used here for the sake of illustration Screens displayed and available ...

Страница 179: ...asy Print 178 to print Cropping may not be possible at small image sizes or at some aspect ratios Configuring Print Settings Still Images Movies 1 Access the printing screen Follow steps 1 6 in Easy Print 178 to access this screen 2 Configure the settings Press the buttons or turn the dial to choose an item and then press the button On the next screen choose an option either press the buttons or t...

Страница 180: ...0 choose ID Photo and press the button 2 Choose the long and short side length Press the buttons or turn the dial to choose an item and then press the button On the next screen choose the length either press the buttons or turn the dial and then press the button Choosing Paper Size and Layout before Printing Still Images Movies 1 Choose Paper Settings After following step 1 in Configuring Print Se...

Страница 181: ...Images to the Print List DPOF Still Images Movies Batch printing 184 and ordering prints from a photo development service can be set up on the camera Choose up to 998 images on a memory card and configure relevant settings such as the number of copies as follows The printing information you prepare this way will conform to DPOF Digital Print Order Format standards RAW images cannot be included in ...

Страница 182: ... the button again is no longer displayed Configuring Print Settings Still Images Movies Specify the printing format whether to add the date or file number and other settings as follows These settings apply to all images in the print list Press the button choose Print settings on the 3 tab and then press the button Press the buttons or turn the dial to choose Print Settings and then press the butto...

Страница 183: ...y be displayed on the camera to warn you that the memory card has print settings that were configured on another camera Changing the print settings using this camera may overwrite all previous settings 3 Specify the number of prints Press the buttons or turn the dial to specify the number of prints up to 99 To set up printing for other images and specify the number of prints repeat steps 2 3 Print...

Страница 184: ...ually Still Images Movies 1 Choose Select Following the procedure in Choosing a Selection Method 183 choose Select and press the button 2 Choose an image Press the buttons or turn the dial to choose an image and then press the button is displayed To remove the image from the photobook press the button again is no longer displayed Repeat this process to specify other images When finished press the ...

Страница 185: ... the battery pack a few times The battery pack runs out of power quickly Battery performance decreases at low temperatures Try warming the battery pack a little by putting it in your pocket for example ensuring that the terminals do not touch any metal objects Dirty battery terminals reduce battery performance Try cleaning the terminals with a cotton swab and reinserting the battery pack a few tim...

Страница 186: ...level 83 93 White spots appear in flash shots This is caused by light from the flash reflecting off dust or airborne particles Shots look grainy Lower the ISO speed 71 High ISO speeds in some shooting modes may cause grainy images 56 Shooting Cannot shoot The camera cannot shoot unless subjects are in focus Wait until the frame turns green as you press the shutter button halfway and allow the came...

Страница 187: ...d in the movie is faint No sound is played for movies shot in 62 or 65 mode because audio is not recorded in these modes Shots are affected by linear noise or moiré Some subjects make shots more susceptible to linear noise or moiré This is more likely to happen under the following conditions Subjects have fine horizontal stripes or checkered patterns The sun lights or other sources of bright light...

Страница 188: ...are no objects between the devices No notification message is received on a computer or smartphone after adding CANON iMAGE GATEWAY to the camera Make sure the email address you entered is correct and try adding the destination again Check the email settings on the computer or smartphone If they are configured to block email from certain domains you may not be able to receive the notification mess...

Страница 189: ...ed folder number 999 for storing images on the card has been reached and the highest supported image number 9999 for images in folders has been reached On the 1 tab of the menu 35 change File Numbering to Auto Reset 155 or format the memory card 156 Lens Error There is a communication problem between the camera and lens Clean the lens contacts and mount the lens correctly on the camera Frequent di...

Страница 190: ...ATEWAY to create space Save the images sent via Image Sync 147 to your computer Check network settings Check to make sure your computer can connect to the Internet with the current network settings A camera error was detected error number If this error message is displayed immediately after a shot the image may not have been saved Switch to Playback mode to check for the image Frequent display of ...

Страница 191: ...rity 72 35 ISO speed 71 36 Camera shake warning 42 37 Audio recording mode 66 38 Attenuator 67 39 Wind filter 67 40 Time zone 159 41 Eco mode 157 42 Image stabilization 86 43 Digital IS 86 44 Auto level 51 45 Auto slow shutter 65 46 Exposure simulation 69 47 AF MF indicator 64 48 Movie Servo AF 64 Battery Level An on screen icon or message indicates the battery charge level Display Details Suffici...

Страница 192: ...labeled with Info Display 3 Shows the lens name focal length and an RGB histogram Note that long lens names may not be fully displayed Information on the top of the screen is the same as for Info Display 2 Info Display 4 Shows white balance information Information on the top of the screen is the same as for Info Display 2 During Playback Info Display 1 1 Current image Total images 2 Battery level ...

Страница 193: ... 126 To continue skipping forward keep holding down the button Erase Clip displayed when a digest movie is selected 126 Edit 124 Displays the frame approx 4 sec before or after the current frame During movie playback you can skip back or forward or to the previous or next clip by pressing the buttons To switch frames touch the scrollbar or drag left or right Info Display 5 Shows Picture Style info...

Страница 194: ...O O O O O O O O O O O O O O O O 100 6400 1 O O O O O 8000 25600 1 O O O O Flash 82 Auto 1 O O O O O O O O O O O O O O On 1 O O O O O O O O O O O O O O O O O Slow Synchro 1 O O 3 3 O 3 Off 1 O O O O O O O O O O O O O O O O O O O O O O O O O O O External Flash Firing 172 O O O O O O O O O O O O O O O O O O O O Flash Exposure Compensation 83 1 O O O O 4 4 Flash Output Level 93 1 O O O Aperture Value ...

Страница 195: ...O O O O O O O O O O O O O O O O O O O O O O O O Face Select 79 O O O O O O O O O O O O O O O O O O O O O O O O Magnified Display 81 1 O O O O O O O O O O Touch Shutter 46 O O O O O O O O O O O O O O O O O O 6 O O 6 6 O Change Display 34 69 Info Display 1 Info Display 2 No Information Display O O O O O O O O O O O O O O O O O O O O O O O O O O O O INFO Quick Control 1 O O O O O O O 1 Options vary d...

Страница 196: ... O O O O O O O O O O O O O O 1 O O O O O O O O O O O O O O O O O O O O 3 O O O O O O 1 O O O O O O O O O O O O O O O O O O O O O O O O O 1 O O O O O O O O O O O O O O O O O O O O 3 O O O O O When Set to PAL 1 O O O O O O O O O O O O O O O O O O O O O O O O O 1 O O O O O O O O O O O O O O O O O O O O 3 O O O O O O 1 O O O O O O O O O O O O O O O O O O O O 3 O O O O O Drive mode 46 1 O O O O O O O O...

Страница 197: ... O O O O O O O O O O O O O O O 1 O O O O Auto Lighting Optimizer 72 1 O O O O O O O O O O O O O O O O O 1 O O O O O O 1 O O O O O O O O O O O O O O O O Still Image Aspect Ratio 49 1 O O O O O 4 O O O O O O O O O O O O O O O O 5 5 O 1 O O O O O O 4 O O O O O O O O O O O O O O O O 1 O O O O O 4 O O O O O O O O O O O O O O O O 5 5 1 O O O O O 4 O O O O O O O O O O O O O O O O 1 Options vary depending...

Страница 198: ...splay INFO Quick Control O O O O O O O O O O O O O O O O O O O O O O O O O O O O VF info toggle settings No info display Custom display 1 Custom display 2 O O O O O O O O O O O O O O O O O O O O O O O O O O O VF vertical display On 1 O O O O O O O O O O O O O O O O O O O O O O O Off 1 O O O O O O O O O O O O O O O O O O O O O O O O O O Grid display 3x3 6x4 3x3 diag 1 O O O O O O O O O O O O O O O ...

Страница 199: ...ec Hold 1 O O O O O O O O O O O O O O O O O O O O O O O O O O O Touch Shutter 46 Touch Shutter Enable 1 O O O O O O O O O O O O O O O O O O O O O O O Disable 1 O O O O O O O O O O O O O O O O O O O O O O O O O O O AF frame pos n Center Touch point 1 O O O O O O O O O O O O O O O O O Touch drag AF settings 95 Touch drag AF Enable Disable 1 O O O O O O O O O O O O O O O O O O O O O O O Pos n method ...

Страница 200: ...e Size 3 78 Normal 1 O O O O O O O O O O O O O O O O O O O O O Small 1 O O O O O O O O O O O O O O O O Continuous AF 80 On 1 O O O O O O O O O O O O O O O O O O O O O O O O O O O Off 1 O O O O O O O O O O O O O O O O O O O O O O O Focus mode 81 AF 1 O O O O O O O O O O O O O O O O O O O O O O O O O O O MF AF MF 1 O O O O O O O O O O O O O O O O O O O O O O O AF assist beam LED firing 51 Enable 1 O...

Страница 201: ... O O O O O O O O O O O O O O O O O O O Continuous 1 O O O O O O O O O O O O O O O O O O O O O O O O O O Digital IS Disable 1 O O O O O O O O O O O O O O O O O O O O O O O O O O O Enable 1 O O O O O O O O O O O O O O O O O O O O O O O O O Enhanced O O Auto level 51 Enable 1 O O O O O O O O O O O O O O O O O O O O O O O O O Disable 1 O O O O O O O O O O O O O O O O O O O O O O O O O O O Lens aberrat...

Страница 202: ...e in Each Shooting Mode 194 E TTL II meter 84 Evaluative 1 O O O O O O O O O O O O O O O O O O O Average 1 O O O O Red eye reduc 51 On Off 1 O O O O O O O O O O O O O O O O O O O Safety FE 83 Enable 1 O O O O O O O O O O O O O O O O O O O Disable 1 O O O O O Built in flash settings Flash Mode 93 E TTL II 1 O O O O O O O O O O O O O O O O O O O Manual flash 1 O O O Shutter Sync 84 1st curtain 1 O O...

Страница 203: ...de Function 6 6 White balance 73 See Quick Set Menu 196 Custom WB 73 O O O O O O O O WB correction 74 See Quick Set Menu 196 Picture Style 75 See Quick Set Menu 196 Long exp noise reduction 89 Disable 1 O O O O O O O O O O O O O O O O O O O O O O O O O O O Auto Enable 1 O O O O High ISO speed NR 88 Standard 1 O O O O O O O O O O O O O O O O O O O O O O O O O O O Disable Low High Multi Shot Noise R...

Страница 204: ...196 Self timer Remote ctrl 44 See Quick Set Menu 196 Digest Type 41 Include Stills No Stills O AF auto switch 44 Enable O Disable O O O O O O O O O O O O O O O O O O O O O O O O O O O O Keep setting 53 Disable Enable O Time lapse movie settings 65 Shooting scene Scene 1 Scene 2 Scene 3 Custom O Interval Shots 2 4 sec 30 900 Scene 1 5 10 sec 30 720 Scene 2 11 30 sec 30 240 Scene 3 2 30 sec 30 900 C...

Страница 205: ...O O Disable 1 O O O O O O O O O O O O O O O O O O O O O O O O O O AF w shutter button during 64 ONE SHOT 1 O O O O O O O O O O O O O O O O O O O O O O O O O O Disable 1 O O O O O O O O O O O O O O O O O O O O O O O O O O O Auto slow shutter Enable 1 O O O O O O O O O O O O O O O O O O O O O O O O Disable 1 O O O O O O O O O O O O O O O O O O O O O O O O O O O 1 Options vary depending on the assign...

Страница 206: ...nsion Disable O O O O O O O O O O O O O O O O O O O O O O O O O O O Enable O Safety shift Disable O O O O O O O O O O O O O O O O O O O O O O O O O O O Enable O O C Fn II Others 96 Dial direction during Tv Av Normal O O O O O O O Reverse direction O O O O O O Custom Controls Shutter AE lock AF AE lock O O O O O O AE lock AF O O O O O O AF AF lock no AE lock O O O O O O AE AF no AE lock O O O O O O...

Страница 207: ...O O O button O O O O O button O O O O O O O O button O O O O O O O button O O O O O O O O button O O O O O O O O button O O O O O O O O Release shutter w o lens Disable O O O O O O O O O O O O O O O O O O O O O O O O O O O Enable O O O O O O O Retract lens on power off Enable O O O O O O O O O O O O O O O O O O O O O O O O O O O Disable O O O O O O O Clear all Custom Func C Fn 96 O O O O O O O Opt...

Страница 208: ... O O O O AEB O O O O O Flash Exp Comp O O O O O Picture Style O O O O O O O O White balance O O O O O O O O WB correction O O O O O O O O Auto Lighting Optimizer O O O O O O O Custom Controls O O O O O O O Metering mode O O O O O Drive mode O O O O O Self Timer O O O O O O O O Image quality O O O O O O O O Flash firing O O O O O AF method O O O O O O O AF operation O O O O O Movie rec size O O Rec...

Страница 209: ...irmware ver 3 163 1 Only available in these modes and 2 Only Other settings is available in or mode 3 Only available in these modes and My Menu Tab Tab Item Reference Page 1 My Menu settings 101 Set Up Tab Tab Item Reference Page 1 Create Folder 155 File Numbering 155 Format 156 Video system 157 Display settings 32 Electronic level 50 2 Eco Mode 157 Power Saving 31 Disp Brightness 158 Night Displa...

Страница 210: ...opping 119 Creative filters 120 RAW img processing 122 Apply settings 55 Playback Tab Tab Item Reference Page 1 Protect 112 Rotate 116 Erase 114 Rating 117 Slideshow 111 2 List Play Digest Movies 106 Image Search 108 Creative filters 120 3 Resize 118 Cropping 119 Red Eye Correction 121 RAW img processing 122 Print settings 181 Photobook Set up 183 4 Transition Effect 103 Index Effect 107 Scroll Di...

Страница 211: ...a dry soft cloth such as an eyeglass cloth Do not rub hard or apply force Never use cleaners containing organic solvents to clean the camera or screen Use a blower brush to remove dust from the lens If cleaning is difficult contact a Canon Customer Support Help Desk To prevent condensation from forming on the camera after sudden temperature changes when the camera is transferred from cold to warm ...

Страница 212: ... index ISO Auto range AUTO mode Min speed ISO 100 Max speed ISO 6400 Max ISO speed P mode ISO 25600 AE lock Manual Auto Provided White Balance WB settings Auto Day Light Shade Cloudy Tungsten light White fluorescent light Flash Color temperature Custom White balance correction Provided Specifications Type Category DSLR non reflex AF AE cameras Image Sensor Sensor size Image sensor size Approx 22 3...

Страница 213: ...O speed Image correction Auto Lighting Optimizer Provided Highlight tone priority Provided Lens correction EF M lens has in lens correction data Peripheral illumination correction Chromatic aberration correction Diffraction correction Picture Style Auto Standard Portrait Landscape Fine Detail Neutral Faithful Monochrome User Def 1 User Def 2 User Def 3 Shutter Method Focal plane Shutter speed Rang...

Страница 214: ...ontinuous shooting Drive mode Single shooting Continuous shooting Max approx 9 0 shots sec Maximum number of shots at burst Approx 26 shots Approx 25 shots Approx 24 shots Approx 23 shots Approx 24 shots Approx 17 shots RAW JPEG Approx 16 shots Recording File format DCF compliant DPOF compatible Version1 1 Data type Still images Recording format Exif 2 3 DCF 2 0 Images RAW images shot continuously...

Страница 215: ...B W Soft focus Fish eye effect Art bold effect Water painting effect Toy camera effect Miniature effect Resize Red Eye Correction Customizing Registration of Custom Functions Shutter button Main dial Quick control dial Cross button up down left right Control dial M Fn button Movie button Touch Drag AF switching button Copyright Info Provided Movie Using a 16 GB UHS I memory card Image Quality Reco...

Страница 216: ...0 x 49 4 mm 1 30 x 0 55 x 1 94 in Weight Approx 45 g 1 59 oz excluding protective cover Power Battery pack LP E17 Number of still image shots CIPA compliant Monitor On Approx 295 shots Electronic color viewfinder On Approx 295 shots Number of still image shots Eco Mode On Monitor On Approx 420 shots Movie recording time CIPA compliant Monitor On Approx 85 min Electronic color viewfinder On Approx ...

Страница 217: ... 104 F Working humidity 85 or less Dimensions W x H x D Approx 67 3 x 27 7 x 92 2 mm 2 65 x 1 09 x 3 63 in Weight LC E17 Approx 85 g 3 00 oz LC E17E Approx 80 g 2 82 oz excluding power cord All the data above is based on Canon s testing standards and CIPA Camera Imaging Products Association testing standards and guidelines Dimensions maximum diameter length and weight listed above are based on CIP...

Страница 218: ...s 191 192 Image dust prevention 161 Image quality Compression Images Display period 52 Erasing 114 Playback Viewing Protecting 112 Image stabilization 86 Image Sync 147 Index display 107 Indicator 38 51 Index Numbers 1 point AF frame mode 78 A AC adapter 167 170 Accessories 167 AEB shooting 71 AE lock 70 AF frames 77 AF lock 79 AF point zoom 81 Art bold effect shooting mode 61 Aspect ratio 49 Auto...

Страница 219: ...e search 108 Index display 107 Jump display 109 Magnified display 110 Single image display 28 Slideshow 111 TV display 169 W Water painting effect shooting mode 61 White balance color 73 Wireless features 127 Wireless flash shooting 173 World clock 159 Z Zoom 26 Installation 176 ISO speed 71 J Jump display 109 L Landscape 75 Landscape shooting mode 56 Lens 23 Lock release 24 Level 191 Long exposur...

Страница 220: ...Wi Fi transmissions and attempt to acquire the data you are sending Precautions for Wireless Features Wi Fi Bluetooth or Others Countries and Regions Permitting Wireless Function Use Use of wireless functions is restricted in some countries and regions and illegal use may be punishable under national or local regulations To avoid violating wireless regulations visit the Canon website to check wher...

Страница 221: ...rs This device incorporates exFAT technology licensed from Microsoft Unauthorized network access Third parties with malicious intent may gain unauthorized access to the network you are using to steal modify or destroy information Additionally you could fall victim to other types of unauthorized access such as impersonation where someone assumes an identity to gain access to unauthorized informatio...

Страница 222: ...sonal and non commercial purpose or 2 by a video provider licensed under the AT T patents to provide MPEG 4 compliant video No license is granted or implied for any other use for MPEG 4 standard Disclaimer Unauthorized reproduction of this guide is prohibited All measurements based on Canon testing standards Information subject to change without notice as are product specifications and appearance ...

Отзывы: