background image

72

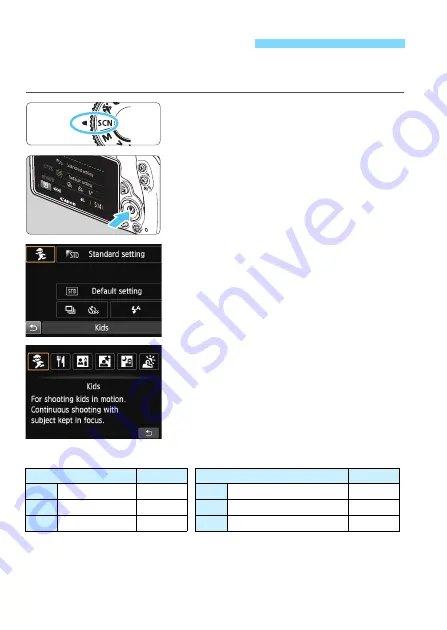
The camera will automatically choose the appropriate settings when 
you select a shooting mode for your subject or scene.

1

Set the Mode Dial to <

8

>.

2

Press the <

Q

> button. 

(

7

)

X

The Quick Control screen will appear.

3

Select a shooting mode.


Press the <

S

> cross keys to select 

the desired shooting mode’s icon.


Turn the <

6

> dial to select a 

shooting mode.


You can also select the shooting 
mode icon and press <

0

> to 

display a selection of shooting modes 
from which you can select one.

Available Shooting Modes in the <

8

> Mode

8

: Special Scene Mode

Shooting Mode

Page

Shooting Mode

Page

C

Kids

p.73

6

Night Portrait

p.76

P

Food

p.74

F

Handheld Night Scene

p.77

x

Candlelight

p.75

G

HDR Backlight Control

p.78

Содержание EOS 100D

Страница 1: ...The Quick Reference Guide is included at the end of this manual INSTRUCTION MANUAL ENGLISH...

Страница 2: ...Camera While reading this manual take a few test shots and see how they come out You can then better understand the camera Testing the Camera Before Use and Liability After shooting play images back a...

Страница 3: ...rly Also if you play back a movie on a card with a slow reading speed the movie may not play back properly If you want to shoot still photos while shooting a movie you will need an even faster card To...

Страница 4: ...d The Instruction Manuals and DVD CD ROMs provided are listed on the next page If you purchased a Lens Kit check that the lenses are included Depending on the Lens Kit type lens instruction manuals ma...

Страница 5: ...uctions for viewing the Instruction Manuals on the DVD ROM are on pages 361 362 EOS Solution Disk Contains various software For outlines and installation procedure of the software see pages 365 367 In...

Страница 6: ...rd the back of the camera insert it into the card slot 3 Attach the lens p 40 Align the lens white or red index with the camera s index in the matching color 4 Set the lens focus mode switch to AF p 4...

Страница 7: ...will focus the subject If necessary the built in flash will be raised automatically 8 Take the picture p 43 Press the shutter button completely to take the picture 9 Review the picture p 217 The captu...

Страница 8: ...ressing the M button and changing the setting M When shown on the upper right of a page it indicates that the function is available only in the Creative Zone modes p 26 p Reference page numbers for mo...

Страница 9: ...eative Shooting 91 Advanced Shooting 113 Shooting with the LCD Monitor Live View Shooting 149 Shooting Movies 181 Handy Features 215 Image Playback 241 Post Processing Images 273 Printing Images 281 C...

Страница 10: ...erture priority AE Adjust the image brightness exposure p 123 Exposure compensation Shoot in low light p 58 111 D Flash photography p 98 ISO speed setting Shoot without flash p 63 7 Flash Off p 80 b F...

Страница 11: ...display p 243 I Image browsing Rate images p 248 Ratings Prevent important images p 266 K Image protect from accidental deletion Delete unnecessary images p 268 L Delete Auto play images and movies p...

Страница 12: ...21 Image Quality Image recording quality p 94 Picture Style p 101 White balance p 142 Color space p 146 Image enhancement features Auto Lighting Optimizer p 130 Lens peripheral illumination correction...

Страница 13: ...oting p 190 Quick Control p 192 Miniature Effect Movies p 195 Video snapshot p 197 Playback Image review time p 217 Single image display p 89 Shooting information display p 270 Index display p 242 Ima...

Страница 14: ...omenclature 22 Getting Started 29 Charging the Battery 30 Installing and Removing the Battery and Card 32 Turning on the Power 35 Setting the Date Time and Zone 37 Selecting the Interface Language 39...

Страница 15: ...g Food 74 x Shooting Candlelight Portraits 75 6 Shooting Night Portraits With a Tripod 76 F Shooting Night Scenes Handheld 77 G Shooting Backlit Scenes 78 Q Quick Control 80 Shoot by Ambience Selectio...

Страница 16: ...etting Noise Reduction 131 Lens Peripheral Illumination Chromatic Aberration Correction 134 A Customizing Image Characteristics Picture Style 137 A Registering Preferred Image Characteristics Picture...

Страница 17: ...Card Reminder 216 Setting the Image Review Time 217 Setting the Auto Power off Time 217 Adjusting the LCD Monitor Brightness 218 Creating and Selecting a Folder 219 File Numbering Methods 221 Setting...

Страница 18: ...rst and Last Scenes 256 Slide Show Auto Playback 258 Viewing Images on a TV Set 262 K Protecting Images 266 L Erasing Images 268 B Shooting Information Display 270 Post Processing Images 273 U Applyin...

Страница 19: ...Speedlites 311 H Using Eye Fi Cards 313 Function Availability Table According to Shooting Mode 316 System Map 322 Menu Settings 324 Troubleshooting Guide 331 Error Codes 343 Specifications 344 Safety...

Страница 20: ...nearest Canon Service Center Do not touch the camera s electrical contacts with your fingers This is to prevent the contacts from corroding Corroded contacts can cause camera misoperation If the camer...

Страница 21: ...ronic contacts with your fingers or anything metallic Do not affix any stickers etc on the card Do not store or use the card near anything having a strong magnetic field such as a TV set speakers or m...

Страница 22: ...inal p 265 282 364 Body cap p 40 Lens release button p 41 Grip Contacts p 21 Red eye reduction Self timer lamp p 112 110 Mirror p 147 239 Remote control sensor p 147 309 Hot shoe p 311 Flash sync cont...

Страница 23: ...2 A Hy AE lock FE lock button Index Reduce button p 127 128 242 244 279 289 S u AF point selection Magnify button p 105 244 279 289 DC cord hole p 308 B Info button p 50 89 152 187 226 M Menu button p...

Страница 24: ...b Small 2 Fine c Small 3 Fine 1 73 RAW Large Fine 1 RAW AF operation p 103 X One Shot AF 9 AI Focus AF Z AI Servo AF MF Manual Focus Picture Style p 101 Auto Lighting Optimizer p 130 Main Dial pointe...

Страница 25: ...FEB in progress y Flash exposure compensation Card full warning FuLL Card error warning Card No card warning Card Exposure level indicator Exposure compensation amount AEB range Red eye reduction lamp...

Страница 26: ...p 58 7 Flash Off p 63 C Creative Auto p 64 2 Portrait p 68 3 Landscape p 69 4 Close up p 70 5 Sports p 71 8 Special scene p 72 C Kids p 73 P Food p 74 x Candlelight p 75 6 Night Portrait p 76 F Handhe...

Страница 27: ...lamp Full charge lamp IMPORTANT SAFETY INSTRUCTIONS SAVE THESE INSTRUCTIONS DANGER TO REDUCE THE RISK OF FIRE OR ELECTRIC SHOCK CAREFULLY FOLLOW THESE INSTRUCTIONS For connection to a supply not in th...

Страница 28: ......

Страница 29: ...the Strap Pass the end of the strap through the camera s strap mount eyelet from the bottom Then pass it through the strap s buckle as shown in the illustration Pull the strap to take up any slack an...

Страница 30: ...d insert the plug into a power outlet X Recharging starts automatically and the charge lamp lights up in orange X When the battery is fully recharged the full charge lamp will light up in green It tak...

Страница 31: ...formance The battery charger can also be used in foreign countries The battery charger is compatible with a 100 V AC to 240 V AC 50 60 Hz power source If necessary attach a commercially available plug...

Страница 32: ...lever as shown by the arrows and open the cover 2 Insert the battery Insert the end with the battery contacts Insert the battery until it locks in place 3 Insert the card As shown by the illustration...

Страница 33: ...the provided protective cover p 30 to the battery 4 Remove the card Gently push in the card then let go to eject it Pull the card straight out 5 Close the cover Press the cover until it snaps shut Rem...

Страница 34: ...data card or camera Removing the card Removing the battery Shaking or banging the camera around If the card already contains recorded images the image number may not start from 0001 p 221 If a card re...

Страница 35: ...sensor cleaning by pressing the shutter button halfway p 43 to stop the sensor cleaning and take a picture If you repeatedly turn the power switch 1 2 at a short interval the f icon may not be display...

Страница 36: ...Room Temperature 23 C 73 F Low Temperatures 0 C 32 F No Flash Approx 480 shots Approx 420 shots 50 Flash Use Approx 380 shots Approx 350 shots The number of possible shots will decrease with any of t...

Страница 37: ...he correct date time 1 Display the menu screen Press the M button to display the menu screen 2 Under the 52 tab select Date Time Zone Press the Y Z keys to select the 52 tab Press the W X keys to sele...

Страница 38: ...t in step 4 will advance by 1 hour If Y is set the daylight saving time will be canceled and the time will go back by 1 hour 6 Exit the setting Press the Y Z keys to select OK then press 0 X The date...

Страница 39: ...er the 52 tab select LanguageK Press the Y Z keys to select the 52 tab Press the W X keys to select LanguageK then press 0 3 Set the desired language Press the S cross keys to select the language then...

Страница 40: ...Turn the lens as shown by the arrow until it clicks in place 3 Set the lens focus mode switch to AF AF stands for autofocus If it is set to MF manual focus autofocus will not operate 4 Remove the fro...

Страница 41: ...ectly through any lens Doing so may cause loss of vision When attaching or detaching a lens set the camera s power switch to 2 If the front part focusing ring of the lens rotates during autofocusing d...

Страница 42: ...the shutter button 4 Press your arms and elbows lightly against the front of your body 5 To maintain a stable stance place one foot slightly ahead of the other 6 Press the camera against your face and...

Страница 43: ...ovement during the moment of exposure is called camera shake It can cause blurred pictures To prevent camera shake note the following Hold and steady the camera as shown on the preceding page Press th...

Страница 44: ...function X The selected function and Feature guide p 52 will appear Turn the 6 dial to change the setting 3 Take the picture Press the shutter button completely to take the picture X The captured imag...

Страница 45: ...mple Quick Control Screen Function Setting Screen Shutter speed p 114 AF operation p 103 White balance p 142 Shooting mode p 26 Highlight tone priority p 301 Auto Lighting Optimizer p 130 Metering mod...

Страница 46: ...eys and 0 button on the back of the camera to operate the menus 3 Menu Operations S cross keys Tab Menu items Menu settings z Shooting LCD monitor 5 Set up 9 My Menu 0 button 3 Playback The menu tabs...

Страница 47: ...lect the desired setting Some settings require you to press either the W X or Y Z keys to select it The current setting is indicated in blue 5 Set the desired setting Press 0 to set it 6 Exit the sett...

Страница 48: ...is nothing you need to keep If necessary transfer the images and data to a computer etc before formatting the card 1 Select Format card Under the 51 tab select Format card then press 0 2 Format the c...

Страница 49: ...rmatting by selecting Cancel Even in this case normal formatting will be completed and you can use the card as usual When the card is formatted or data is erased only the file management information i...

Страница 50: ...eyepiece the LCD monitor will turn on again By pressing the B button you can switch the LCD monitor screen as follows Display the shooting settings screen p 24 turn off the LCD monitor screen or displ...

Страница 51: ...ayed pressing the shutter button will enable you to shoot immediately If you look through the viewfinder eyepiece while wearing sunglasses the LCD monitor may not turn off automatically If this occurs...

Страница 52: ...n It also displays a description when you select a function or option on the Quick Control screen The Feature guide turns off when you tap the description or proceed with the operation Shooting mode S...

Страница 53: ...en operation is possible a frame will appear around the icon except on menu screens For example when you tap Q the Quick Control screen appears By tapping 2 you can return to the preceding screen Oper...

Страница 54: ...gging your finger on the screen Selecting a menu tab or item after pressing the M button Setting a scale control Quick Control Setting functions during Live View shooting Setting functions during movi...

Страница 55: ...Touch Control Cautions for Touch Screen Operations Since the LCD monitor is not pressure sensitive do not use any sharp objects such as your fingernail or a ballpoint pen for touch operations Do not...

Страница 56: ......

Страница 57: ...th Basic Zone modes all you do is point and shoot while the camera sets everything automatically p 81 316 Also to prevent botched pictures due to mistaken operations advanced shooting function setting...

Страница 58: ...sest object will be focused Aiming the center AF point over the subject will make focusing easier 3 Focus the subject Press the shutter button halfway and the lens focusing ring will rotate to focus X...

Страница 59: ...t all those AF points When the AF point covering the desired subject flashes take the picture The beeper continues to beep softly The focus confirmation light o does not light up It indicates that the...

Страница 60: ...and shoot When shooting flash photography if the subject is too close to the camera the picture may come out extremely bright overexposure In low light the built in flash fired a series of flashes Pre...

Страница 61: ...k Focus lock is also possible in other Basic Zone modes except 5 C In the A mode if the subject moves distance to camera changes while or after you focus AI Servo AF will take effect to focus the subj...

Страница 62: ...pear on the LCD monitor 2 Focus the subject Press the shutter button halfway to focus X When focus is achieved the AF point will turn green and the beeper will sound 3 Take the picture Press the shutt...

Страница 63: ...mera shake is prone to occur the viewfinder s shutter speed display will blink Hold the camera steady or use a tripod When using a zoom lens use the wide angle end to reduce blur caused by camera shak...

Страница 64: ...for Creative Auto 1 Set the Mode Dial to C 2 Press the Q button 7 X The Quick Control screen will appear 3 Set the desired function Press the S cross keys to select the function X The selected functio...

Страница 65: ...e a picture both images will be displayed together The image without the effect is displayed on the left and the one with the effect will be on the right Registering your favorite shooting effects Dur...

Страница 66: ...slider adjustments may not be selectable indicated by If you use Live View shooting you can see how the image is blurred in front of and behind the point of focus While you turn the 6 dial Simulating...

Страница 67: ...taken 2 seconds after you press the shutter button q Self timer Continuous Press the W X keys to set the number of multiple shots 2 to 10 to be taken with the self timer 10 seconds after you press the...

Страница 68: ...er against an uncluttered dark background Use a telephoto lens If you have a zoom lens use the telephoto end to fill the frame with the subject from the waist up Move in closer if necessary Focus the...

Страница 69: ...When using the wide angle end of a zoom lens objects near and far will be in focus better than at the telephoto end It also adds breadth to landscapes Shooting night scenes The 3 mode is also good fo...

Страница 70: ...um focusing distance Some lenses have indications such as 40 25m 0 8ft on them The lens minimum focusing distance is measured from the V focal plane mark on the top of the camera to the subject If you...

Страница 71: ...ue beeping softly If focus cannot be achieved the focus confirmation light o will blink The default setting is i Continuous shooting When you want to take the picture press the shutter button complete...

Страница 72: ...S cross keys to select the desired shooting mode s icon Turn the 6 dial to select a shooting mode You can also select the shooting mode icon and press 0 to display a selection of shooting modes from...

Страница 73: ...s confirmation light o will blink Shoot continuously The default setting is i Continuous shooting When you want to take the picture press the shutter button completely If you hold down the shutter but...

Страница 74: ...tone Set it toward Cool tone if it looks too red Avoid using flash If you use flash the light may reflect off the dish or food and results in unnatural shadows By default b Flash off is set Try to pr...

Страница 75: ...occur the viewfinder s shutter speed display will blink Hold the camera steady or use a tripod When using a zoom lens use the wide angle end to reduce blur caused by camera shake even while handholdi...

Страница 76: ...ically to obtain a good exposure of the subject It is recommended to play back the image after the shooting to check the image brightness If the subject looks dark move nearer and shoot again Also sho...

Страница 77: ...ly and steadily In this mode four shots are aligned and merged into a single image However if there is significant misalignment in any of the four shots due to camera shake they may not align properly...

Страница 78: ...sed by backlighting Hold the camera firmly While shooting hold the camera firmly and steadily In this mode three shots are aligned and merged into a single image However if there is significant misali...

Страница 79: ...e end regardless of the lens zoom position If you have to set the flash coverage manually set it to the wide angle end Cautions for G HDR Backlight Control Note that the image may not be rendered with...

Страница 80: ...Press the Q button 7 X The Quick Control screen will appear 3 Set the functions Press the S cross keys to select a function This step is not necessary in the 7 mode X The selected function and Featur...

Страница 81: ...iring a Automatic firing o o o o D Flash on Fires at all times k k k k b Flash off k o k k o k o Ambience based shots p 82 k k k k k Light scene based shots p 86 k k k k Background blur p 66 k Color t...

Страница 82: ...Quick Control screen select the desired ambience Press the Q button 7 Press the W X keys to select Standard setting Ambience based shots will appear on the screen Shoot by Ambience Selection Ambience...

Страница 83: ...e shutter button completely to take the picture If you change the shooting mode or set the power switch to 2 the setting will revert back to Standard setting The Live View image shown with the ambienc...

Страница 84: ...photo look more impressive than with Standard setting Soft The subject will look softer and more dainty Good for portraits pets flowers etc Warm The subject will look softer with warmer colors Good f...

Страница 85: ...The picture will look brighter Darker The picture will look darker Monochrome The picture will be monochrome You can select the monochrome color to be black and white sepia or blue When Monochrome is...

Страница 86: ...and Ambience based shots p 82 you should first set Light scene based shots This will make it easier to see the resulting effect on the LCD monitor 1 Set the Mode Dial to any of the following modes 2 3...

Страница 87: ...ew shooting Then press the shutter button completely to take the picture If you change the shooting mode or set the power switch to 2 the setting will revert back to Default setting If you use flash t...

Страница 88: ...may look too bluish and for light colored flowers Cloudy For subjects under overcast skies Makes skin tones and landscapes which may otherwise look dull on a cloudy day look warmer Also effective for...

Страница 89: ...2 Select an image To view images starting with the last image press the Y key To view images starting with the first oldest image press the Z key Each time you press the B button the display format wi...

Страница 90: ......

Страница 91: ...era sets the shutter speed and aperture automatically to obtain a standard exposure The difference between the Basic Zone modes and d is explained on pages 316 319 The functions explained in this chap...

Страница 92: ...lfway X The dot inside the AF point achieving focus lights up briefly in red and the focus confirmation light o on the viewfinder s bottom right lights up in One Shot AF mode X The shutter speed and a...

Страница 93: ...program Program shift is canceled automatically after the picture is taken Program shift is not possible with flash Shooting Tips If the 30 shutter speed and the lower f number blink it indicates und...

Страница 94: ...mage quality Under the z1 tab select Image quality then press 0 X Image quality will appear 2 Select the image recording quality The respective quality s pixel count and number of possible shots will...

Страница 95: ...ses apply to an UHS I compatible 8 GB card based on Canon s testing standards Guide to Image recording Quality Settings Approx Image Quality Pixels Recorded megapixels File Size MB Possible Shots Maxi...

Страница 96: ...images to be saved to the card Both b and c have 7 Fine quality I was able to take more shots than the number of possible shots indicated Depending on the shooting conditions you may be able to take m...

Страница 97: ...with a single shot The two images are saved to the card simultaneously The two images will be saved in the same folder with the same file numbers file extension JPG for JPEG and CR2 for RAW 73 images...

Страница 98: ...igh ISO speeds will result in grainier images i Changing the ISO SpeedN ISO Speed Shooting Situation No flash Flash Range ISO 100 400 Sunny outdoors The higher the ISO speed the farther the flash rang...

Страница 99: ...ing and irregular colors will be more noticeable and the resolution will be lower than usual As the maximum ISO speed that can be set differs between still photo shooting and movie shooting manual exp...

Страница 100: ...he z2 tab select ISO Auto then press 0 Select the ISO speed then press 0 Shooting Mode ISO Speed Setting A 7 C 2 4 5 Automatically set within ISO 100 6400 3 Automatically set within ISO 100 1600 8 C P...

Страница 101: ...he menu will reappear D Auto The color tone will be adjusted automatically to suit the scene The colors will look vivid especially for blue skies greenery and sunsets in nature outdoor and sunset scen...

Страница 102: ...of 5200K the color is adjusted colorimetrically to match the subject s color Images will appear dull and subdued V Monochrome Creates black and white images W User Def 1 3 You can register a basic sty...

Страница 103: ...point over the subject and press the shutter button halfway The camera will then autofocus in the selected AF operation Suited for still subjects When you press the shutter button halfway the camera...

Страница 104: ...a will detect the movement change the AF operation automatically to AI Servo AF and keep tracking the moving subject AI Servo AF for Moving Subjects AI Focus AF for Switching the AF Operation Automati...

Страница 105: ...e desired AF point lights up in red When all the AF points light up automatic AF point selection will be set The AF point will be selected automatically to focus the subject Pressing 0 toggles the AF...

Страница 106: ...fire a brief burst of flashes This illuminates the subject to enable easier autofocusing Shooting Tips AF Assist Beam with the Built in Flash The AF assist beam will not be fired from the built in fl...

Страница 107: ...Shot AF focus an object at the same distance as the subject and lock the focus before recomposing the shot p 61 2 Set the lens focus mode switch to MF and focus manually 1 Set the lens focus mode swit...

Страница 108: ...hen you press the shutter button completely only one shot will be taken i Continuous shooting Max approx 4 shots sec While you hold down the shutter button completely shots will be taken continuously...

Страница 109: ...ower In AI Servo AF operation the continuous shooting speed may become slightly slower depending on the subject and the lens used i The maximum continuous shooting speed of approx 4 shots sec is attai...

Страница 110: ...play in seconds on the LCD monitor X Two seconds before the picture is taken the self timer lamp will light up and the beeper will sound faster j Using the Self timer With q the interval between the m...

Страница 111: ...on halfway In the bottom left of the viewfinder check that the D icon is lit 3 Take the picture When focus is achieved and you press the shutter button completely the flash will fire for the picture E...

Страница 112: ...flash picture can reduce red eye Red eye reduction will function in any shooting mode except 7 3 5 x or G Under the z1 tab select Red eye reduc then press 0 Select Enable then press 0 For flash photo...

Страница 113: ...an also be used in the s f and a modes To see which functions can be used in each shooting mode see page 316 The M icon at the upper right of the page title indicates that the function is available on...

Страница 114: ...faster shutter speed and turning it to the left sets a slower one 3 Take the picture When you focus and press the shutter button completely the picture will be taken at the selected shutter speed s C...

Страница 115: ...hutter speed while the aperture is displayed the aperture display will also change to maintain the same exposure amount of light reaching the image sensor If you exceed the adjustable aperture range t...

Страница 116: ...the 6 dial to the right will set a higher f number smaller aperture opening and turning it to the left will set a lower f number larger aperture opening 3 Take the picture Focus and press the shutter...

Страница 117: ...ield And the closer the subject the narrower the depth of field A farther subject will have a wider depth of field Set the aperture so that the shutter speed display does not blink If you press the sh...

Страница 118: ...a tripod is recommended To prevent a slow shutter speed under z2 Flash control set Flash sync speed in Av mode to 1 200 1 60 sec auto or 1 200 sec fixed p 232 The aperture opening diaphragm changes o...

Страница 119: ...e viewfinder The exposure level mark h indicates how far the current exposure level is from the standard exposure level 5 Set the exposure and take the picture Check the exposure level indicator and s...

Страница 120: ...ress the A button to lock the ISO speed If you press the A button and recompose the shot you can see the exposure level difference on the exposure level indicator p 24 25 compared to when the A button...

Страница 121: ...purpose metering mode suited even for backlit subjects The camera sets the exposure automatically to suit the scene w Partial metering Effective when the background is much brighter than the subject d...

Страница 122: ...etering the exposure setting will be locked when you press the shutter button halfway and focus is achieved In the w Partial metering r Spot metering and e Center weighted average metering modes the e...

Страница 123: ...n the LCD monitor and in the viewfinder After taking the picture cancel the exposure compensation by setting it back to 0 Setting Exposure CompensationN O Setting Exposure Compensation Increased expos...

Страница 124: ...sh exposure brighter turn the 6 dial to the right increased exposure To make it darker turn the 6 dial to the left decreased exposure X When you press the shutter button halfway the y icon will appear...

Страница 125: ...he Y Z keys to set the exposure compensation amount If AEB is combined with exposure compensation AEB will be applied centering on the exposure compensation amount Press 0 to set it When you press the...

Страница 126: ...e shooting u B Press the shutter button three times to take the three bracketed shots The three bracketed shots will be exposed in the following sequence standard exposure decreased exposure and incre...

Страница 127: ...AE lock Each time you press the A button the current autoexposure setting is locked 3 Recompose and take the picture If you want to maintain the AE lock while taking more shots hold down the A button...

Страница 128: ...tter button halfway and look in the viewfinder to check that the D icon is lit 2 Focus the subject 3 Press the A button 8 Aim the spot metering circle over the subject then press the A button X The fl...

Страница 129: ...nd beyond the effective range of the flash the D icon will blink Move closer to the subject and repeat steps 2 to 4 FE lock is not possible during Live View shooting If you set 53 Switch S A button to...

Страница 130: ...corded with the brightness and contrast corrected if necessary 3 Auto Correction of Brightness and ContrastN Under 54 Custom Functions C Fn if 3 Highlight tone priority is set to 1 Enable the Auto Lig...

Страница 131: ...r M Multi Shot Noise Reduction This applies noise reduction with higher image quality than High For a single photo four shots are taken continuously and aligned and merged automatically into a single...

Страница 132: ...tripes etc or flat single tone images Recording the image to the card will take longer than with normal shooting During the processing of the images BUSY will be displayed and you cannot take another...

Страница 133: ...Auto setting 3 Take the picture The image will be recorded with noise reduction applied With Auto and Enable the noise reduction process after the picture is taken may take the same amount of time as...

Страница 134: ...ble is displayed for the attached lens Select Peripheral illumin then press 0 Select Enable then press 0 If Correction data not available is displayed see Lens Correction Data on page 136 3 Take the p...

Страница 135: ...ction Data on the next page 2 Take the picture The image will be recorded with the chromatic aberration corrected Chromatic Aberration Correction With Enable the maximum burst for continuous shooting...

Страница 136: ...tic Aberration Correction Lens Correction Data Peripheral illumination correction and chromatic aberration correction cannot be applied to JPEG images already taken When using a non Canon lens setting...

Страница 137: ...rameter Select a parameter such as Sharpness then press 0 4 Set the parameter Press the Y Z keys to adjust the parameter as desired then press 0 Press the M button to save the adjusted parameters The...

Страница 138: ...trast set it toward the plus end The closer it is to H the crisper the image will look Saturation Adjusts the color saturation in the image To decrease the color saturation set it toward the minus end...

Страница 139: ...ok more impressive The following can be selected N None S Sepia B Blue P Purple or G Green V Monochrome Adjustment Filter Sample Effects N None Normal black and white image with no filter effects Ye Y...

Страница 140: ...d software p 365 1 Select Picture Style Under the z3 tab select Picture Style then press 0 X The Picture Style selection screen will appear 2 Select User Def Select User Def then press B X The Detail...

Страница 141: ...modified from the base Picture Style settings the Picture Style s name will be displayed in blue If a Picture Style has already been registered under User Def changing the base Picture Style in step 4...

Страница 142: ...te balance setting Press the Y Z keys to select the desired setting then press 0 The Approx K K Kelvin displayed for the white balance settings W E R Y or U is the respective color temperature Custom...

Страница 143: ...then press 0 Select O Custom then press 0 If the exposure obtained in step 1 differs greatly from the standard exposure a correct white balance may not be obtained In step 3 the following images canno...

Страница 144: ...keys to move the mark to the desired position B is for blue A for amber M for magenta and G for green The image s color balance will be corrected towards the selected color On the upper right Shift in...

Страница 145: ...the bracketing direction and correction amount Pressing the L button will cancel all the WB Shift Bkt settings Press 0 to exit the setting and return to the menu Bracketing Sequence The images will be...

Страница 146: ...mmended if you are not familiar with image processing Adobe RGB and Design rule for Camera File System 2 0 Exif 2 21 or higher The image will look very subdued in a sRGB computer environment and with...

Страница 147: ...n and the mirror goes back down After taking the picture set 5 Mirror lockup to 0 Disable Using the self timer Q l with mirror lockup When you press the shutter button completely the mirror locks up T...

Страница 148: ...eep pressing the shutter button completely self timer delay time bulb exposure time If you let go of the shutter button during the self timer countdown there will be a shutter release sound but no pic...

Страница 149: ...the camera and shoot while viewing the LCD monitor camera shake can cause blurred images Using a tripod is recommended Remote Live View Shooting With EOS Utility provided software p 365 installed in...

Страница 150: ...tely X The picture will be taken and the captured image is displayed on the LCD monitor X After the image review ends the camera will return to Live View shooting automatically Press the A button to e...

Страница 151: ...th other shooting modes Do not point the camera toward an intense light source such as the sun on a sunny day or an intense artificial light source Doing so may damage the image sensor or the camera s...

Страница 152: ...e filters Battery check Picture Style Metering mode Highlight tone priority Exposure simulation Flash exposure compensation When g is displayed in white it indicates that the Live View image brightnes...

Страница 153: ...if a person is detected 2 Displayed when the attached lens has distance information With an Extension Tube or Close up Lens the icon displayed may not match the actual scene 3 The icon suiting the sc...

Страница 154: ...captured image will look like During shooting the Live View image will automatically reflect the function settings listed below Final Image Simulation During Live View Shooting Picture Style All setti...

Страница 155: ...e table on page 81 except Background blur as well as the functions in bold above 1 Press the Q button X The settable functions will be displayed 2 Select a function and set it Press the W X keys to se...

Страница 156: ...reative Zone modes you can set the ISO speed by pressing the i button With Live View shooting you cannot set Drive self timer s B and M settings When you set w Partial metering or r Spot metering a me...

Страница 157: ...ou also want to save the image without a Creative filter applied take the picture without a Creative filter Then apply a Creative filter effect and save it as a new image p 274 1 Set any shooting mode...

Страница 158: ...n single shooting mode You cannot shoot with Creative filters if the recording quality is 1 73 or 1 or if AEB white balance bracketing or Multi Shot Noise Reduction is set The histogram is not display...

Страница 159: ...on the number of recorded pixels Check the image on the screen while setting this filter The AF method will be either FlexiZone Single fixed at center or Quick mode fixed at center AF point Art bold...

Страница 160: ...e the color cast by adjusting the color tone Miniature effect Creates a diorama effect You can change where the image looks sharp In step 5 on page 158 if you press the u button or tap on on the lower...

Страница 161: ...to achieve focus when you press the shutter button halfway If Enable is set the lens will operate constantly and consume more battery power This will reduce the number of possible shots battery life A...

Страница 162: ...l Count approx 3 2 4 3 16 9 1 1 3 5184x3456 17 9 megapixels 4608x3456 16 0 megapixels 5184x2912 15 1 megapixels 3456x3456 11 9 megapixels 1 4 3456x2304 8 0 megapixels 3072x2304 7 0 megapixels 3456x194...

Страница 163: ...ing is displayed AE lock time In Basic Zone modes metering timer is fixed at 16 sec Selecting any of the following operations will stop Live View shooting To start Live View shooting again press the A...

Страница 164: ...While the Live View image is displayed you can also press the Q button to select the AF method on the Quick Control screen p 155 The camera detects and focuses human faces If a face moves the AF point...

Страница 165: ...hieved the AF point will turn green and the beeper will sound X If focus is not achieved the AF point will turn orange 4 Take the picture Check the focus and exposure then press the shutter button com...

Страница 166: ...election is set automatically Use the S cross keys to select a zone To return to the center zone press the L button again You can also tap the LCD monitor screen to select a zone When a zone is select...

Страница 167: ...pletely to take the picture p 150 When the camera does not focus the desired target subject with automatic AF point selection switch the AF method to zone selection or FlexiZone Single and refocus Dep...

Страница 168: ...the S cross keys to move the AF point to where you want to focus It cannot go to the edges of the picture To return the AF point to the center press the L button You can also tap the LCD monitor scre...

Страница 169: ...omatic selection will be magnified If you press the shutter button halfway the display will return to normal and the camera will focus When FlexiZone Single is set and you press the u button or tap on...

Страница 170: ...or pattern keeps changing Night scenes or points of light Under fluorescent or LED light sources and when the image flickers Extremely small subjects Subjects at the edge of the picture Subjects stron...

Страница 171: ...300mm f 4 5 6 III USM For information on discontinued lenses refer to your local Canon website If you shoot a peripheral subject and it is slightly out of focus aim the center AF point or zone over th...

Страница 172: ...ed by that AF point manual selection 1 Display the Live View image Press the A button X The Live View image will appear on the LCD monitor The small boxes are the AF points 2 Select the AF point N Pre...

Страница 173: ...point that achieved focus will turn green and the Live View image will reappear X If focus is not achieved the AF point will turn orange and blink 4 Take the picture Check the focus and exposure then...

Страница 174: ...ng the screen y Touch shutter Disable You can tap to select where you want to focus Press the shutter button completely to take the picture 3 Tap the screen to shoot Tap the face or subject on the scr...

Страница 175: ...Shutter AE lock button is set to 1 AE lock AF or 3 AE AF no AE lock under 54 Custom Functions C Fn autofocusing does not take effect You can also set the touch shutter with A Touch shutter To take a...

Страница 176: ...an also tap on the screen to magnify the image 3 Move the magnifying frame Press the S cross keys to move the magnifying frame to the position where you want to focus To return to the screen s center...

Страница 177: ...le looking at the magnified image turn the lens focusing ring to focus After achieving focus press the u button to return to the normal view 6 Take the picture Check the focus and exposure then press...

Страница 178: ...ill soon stop automatically If this happens you will not be able to shoot again until the camera s internal temperature decreases Exit Live View shooting or turn off the power and let the camera rest...

Страница 179: ...the bright area In low light if you set the 52 LCD brightness to a bright setting noise or irregular colors may appear in the Live View image However the noise or irregular colors will not be recorded...

Страница 180: ......

Страница 181: ...enabled by setting the power switch to k The movie recording format will be MOV For cards that can record movies see page 3 Full HD 1080 Full HD 1080 indicates compatibility with High Definition featu...

Страница 182: ...the LCD monitor 2 Set any shooting mode except a 3 Focus the subject Before shooting a movie focus with AF or manual focus p 164 173 176 By default Movie Servo AF Enable is set so that the camera will...

Страница 183: ...s p 320 The ISO speed 100 6400 shutter speed and aperture are set automatically In Creative Zone modes you can press the A button p 127 to lock the exposure AE lock The exposure setting will be displa...

Страница 184: ...o u Tracking If another AF method is set the Non portrait icon will be displayed even if a person is detected 2 Displayed when the attached lens has distance information With an Extension Tube or Clos...

Страница 185: ...the LCD monitor 2 Set the Mode Dial to a 3 Set the shutter speed and aperture To set the shutter speed turn the 6 dial The settable shutter speeds depend on the frame rate 9 8 7 1 4000 sec 1 60 sec 6...

Страница 186: ...nd you switch from still photo shooting to movie shooting the manual setting range s maximum will be H equivalent to ISO 12800 Even if you switch back to still photo shooting the ISO speed will not re...

Страница 187: ...perture Movie Servo AF Drive self timer Video snapshots Movie recording size Shutter speed Image recording quality AF method c u Tracking o FlexiZone Multi d FlexiZone Single Battery check Possible sh...

Страница 188: ...ie related settings are under the Z1 and Z2 tabs p 207 A movie file is recorded each time you shoot a movie If the file size exceeds 4 GB a new file will be created for every subsequent 4 GB The movie...

Страница 189: ...tomatically reflect the effects of the settings listed below Final Image Simulation for Movie Shooting Picture Style All settings such as sharpness contrast color saturation and color tone will be ref...

Страница 190: ...priority is set the ISO speed range will start from ISO 200 Shooting Still Photos Function Settings Image Recording Quality As set in z1 Image quality When the movie recording size is 1920x1080 or 128...

Страница 191: ...mena may occur Focus may become far off momentarily The brightness of the recorded movie may be different from that of the actual scene The recorded movie may be momentarily still The movie may record...

Страница 192: ...Basic Zone modes only the functions in bold can be set 1 Press the Q button 7 X The settable functions will be displayed 2 Select a function and set it Press the W X keys to select a function X The se...

Страница 193: ...HD recording quality The aspect ratio will be 16 9 B 1280x720 High Definition HD recording quality The aspect ratio will be 16 9 C 640x480 Standard definition recording quality The aspect ratio will...

Страница 194: ...dividually Movie files cannot play back consecutively automatically After the movie playback ends select the next movie to be played Movie Shooting Time Limit The maximum recording time of one movie c...

Страница 195: ...on the right of the screen 3 Select the playback speed Press the Y Z keys or turn the 6 dial to select 5x 10x or 20x then press 0 4 Position the white frame over the part you want to look sharp Press...

Страница 196: ...ed and Length for 1 minute movie Speed Playback Length 5x Approx 12 sec 10x Approx 6 sec 20x Approx 3 sec Sound will not be recorded With Miniature effect movies Movie Servo AF will not work Miniature...

Страница 197: ...show quick highlights of a trip or event A video snapshot album can also be played together with background music p 204 255 1 Select Video snapshot Under the Z2 tab select Video snapshot then press 0...

Страница 198: ...Album p 202 4 Select Create a new album Select Create a new album then press 0 5 Select the snapshot length Press 0 press the W X keys to select the snapshot s length then press 0 6 Select OK Select...

Страница 199: ...press 0 X The movie clip will be saved as the video snapshot album s first video snapshot 9 Continue to shoot more video snapshots Repeat step 7 to shoot the next video snapshot Select J Add to album...

Страница 200: ...a different file from the previously recorded album 1 Playback video snapshot Steps 8 and 9 The video snapshot just recorded will be played For playback operations see the next page r Do not save to a...

Страница 201: ...0 the video snapshot skips back by a few seconds 3 Previous frame Each time you press 0 the previous frame is displayed If you hold down 0 it will rewind the movie 6 Next frame Each time you press 0 t...

Страница 202: ...then press 0 After confirming the dialog displayed select OK on the screen then press 0 X Certain video snapshot settings will change to match the existing album s settings Press the M button to exit...

Страница 203: ...hots a new album will be created for subsequent video snapshots Changing the Movie rec size p 193 Changing the Sound rec setting from Auto or Manual to Disable or from Disable to Auto or Manual p 210...

Страница 204: ...back the album Press W On the movie playback panel displayed select 7 Play then press 0 Playing an Album Background Music You can play background music when you play back albums normal movies and sli...

Страница 205: ...en press 0 Editing an Album Function Description Move snapshot Press the Y Z keys to select the video snapshot you want to move then press 0 Press the Y Z keys to move the video snapshot then press 0...

Страница 206: ...movie select New file To save it and overwrite the original movie file select Overwrite then press 0 Provided Software Usable with Albums EOS Video Snapshot Task Enables the editing of albums This is...

Страница 207: ...ult setting is Enable When Enable is set Even if you do not press the shutter button halfway the camera will continue focusing the subject Since the lens is always operating it will consume battery po...

Страница 208: ...ll resume While Movie Servo AF is stopped if you press a button such as M or x and then return to movie shooting Movie Servo AF will resume When Disable is set Press the shutter button halfway to focu...

Страница 209: ...oting in precise focus When Disable is set You can immediately start shooting a still photo by pressing the shutter button even though focus is not achieved This is effective when you want to give pri...

Страница 210: ...keys to adjust the sound recording level While looking at the peak hold indicator approx 3 sec adjust so that the level meter sometimes lights up the 12 12 dB mark on the right for the loudest sounds...

Страница 211: ...ttings available for Sound recording will be On or Off If On is set the sound recording level will be adjusted automatically same as with Auto However the wind filter function will not take effect The...

Страница 212: ...the Image Stabilizer IS switch to 1 the Image Stabilizer will operate at all times even if you do not press the shutter button halfway The Image Stabilizer consumes battery power and may shorten the...

Страница 213: ...hoot a few test movies to see if the card can write fast enough Still Photo Shooting During Movie Shooting Regarding the image quality of still photos see Image Quality on page 178 Playback and TV con...

Страница 214: ......

Страница 215: ...19 File Numbering Methods p 221 Setting Copyright Information p 223 Auto Rotation of Vertical Images p 225 Checking Camera Settings p 226 Reverting the Camera to the Default Settings p 227 Preventing...

Страница 216: ...er only during touch screen operations select Touch to This setting prevents shooting if there is no card in the camera Under the z1 tab select Release shutter without card then press 0 Select Disable...

Страница 217: ...era turns off automatically after the set time of idle operation elapses You can set this auto power off time When the camera has turned off due to auto power off you can turn it on again by pressing...

Страница 218: ...52 tab select LCD brightness then press 0 Press the Y Z keys to adjust the brightness on the adjustment screen then press 0 When checking the exposure of an image set the LCD monitor brightness to 4...

Страница 219: ...ll be created automatically for saving captured images Creating a Folder 1 Select Select folder Under the 51 tab select Select folder then press 0 2 Select Create folder Select Create folder then pres...

Страница 220: ...sed by one is created automatically Also if manual reset p 222 is executed a new folder will be created automatically Folders numbered from 100 to 999 can be created Creating Folders with a Computer W...

Страница 221: ...older the file numbering continues in sequence up to 9999 This is convenient when you want to save images numbered anywhere between 0001 to 9999 in multiple cards or folders into one folder in your co...

Страница 222: ...the file numbering manually a new folder is created automatically and the file numbering of images saved to that folder starts from 0001 This is convenient if you want to use different folders for the...

Страница 223: ...The text entry screen will appear Select Display copyright info to check the copyright information currently set Select Delete copyright information to delete the copyright information currently set...

Страница 224: ...h time you press 0 the entry mode will change as follows Lower case 9 Numerals Symbols 1 9 Numerals Symbols 2 9 Upper case When Touch control Disable is set you can display all the available character...

Страница 225: ...tated during the image review immediately after it is captured Press the x button and the image playback will display the rotated image OnzD is set but the image does not rotate during playback Auto r...

Страница 226: ...Checking Camera Settings Date Time p 37 WB correction p 144 WB bracketing p 145 Color space p 146 Auto rotate display p 225 Auto power off p 217 Card remaining capacity Settings display Red eye reduc...

Страница 227: ...lect Clear all camera settings Select Clear all camera settings then press 0 3 Select OK Select OK then press 0 X Setting Clear all camera settings will reset the camera to the default settings as sho...

Страница 228: ...ring Chromatic aberration correction Disable Correction data retained ISO speed AUTO Auto Color space sRGB ISO Auto Maximum 6400 White balance Q Auto Exposure compensation AEB Canceled Custom White Ba...

Страница 229: ...nzD LCD brightness Movie Shooting LCD auto off Enable AF method u Tracking Date Time Zone Unchanged Movie Servo AF Enable Language Unchanged AF with shutter button during movie recording ONE SHOT Vide...

Страница 230: ...f then press 0 Select Disable then press 0 You can change the background color of the shooting settings screen Under the 53 tab select Screen color then press 0 Select the desired color then press 0 W...

Страница 231: ...ontrol screen will appear Normally set this to Enable If Disable is set neither the built in flash nor the external Speedlite will fire This is useful when you only want to use the flash s AF assist b...

Страница 232: ...conditions It is effective for preventing subject blur and camera shake However while the subject will be properly exposed with the flash the background may come out dark 1 200 sec fixed The flash sy...

Страница 233: ...Functions For FEB Flash exposure bracketing Wireless functions and Zoom refer to the Speedlite s instruction manual Built in flash settings and External flash func setting Function Built in flash set...

Страница 234: ...lash fires immediately after the exposure starts If 2nd curtain is set the flash will fire right before the shutter closes When this is combined with a slow shutter speed you can create a trail of lig...

Страница 235: ...s the Y Z keys to select the function number then set the function The procedure is the same as setting the camera s Custom Functions p 298 1 Select Clear settings Under the z2 Flash control tab selec...

Страница 236: ...the sensor is being cleaned A small sound may be heard Although there will be a shutter sound during the cleaning no picture is taken In step 2 select Auto cleaningf and set it to Disable X The senso...

Страница 237: ...as a sheet of paper Set the lens focal length to 50 mm or longer Set the lens focus mode switch to MF and set the focus to infinity If the lens has no distance scale look at the front of the lens and...

Страница 238: ...age will appear Follow the Preparation procedure on the preceding page then select OK Take the picture again After the Dust Delete Data is obtained it is appended to all the JPEG and RAW images captur...

Страница 239: ...by a Canon Service Center is recommended 1 Select Sensor cleaning Under the 53 tab select Sensor cleaning then press 0 2 Select Clean manually Select Clean manually then press 0 3 Select OK Select OK...

Страница 240: ...rush can scratch the sensor Do not insert the blower tip inside the camera beyond the lens mount If the power is turned off the shutter will close and the shutter curtains or reflex mirror may get dam...

Страница 241: ...ng and Image Playback Here you will find explanations of how to play back and erase photos and movies with the camera and view them on a TV set Images shot and saved with another device The camera may...

Страница 242: ...ressing the Hy button will switch the display from 9 images to 36 images and then to 100 images Pressing the u button will switch the display from 100 images to 36 images to 9 images to 4 images and t...

Страница 243: ...Display movies only j Display stills only k Display by image rating p 248 Turn the 6 dial to select 3 Browse by jumping Press the x button to play back images In the single image display turn the 6 d...

Страница 244: ...fication If you hold down the button the magnification will be reduced to the single image display 2 Scroll around the image Use the S cross keys to scroll around the magnified image To exit magnified...

Страница 245: ...age With index display also touch the LCD monitor with one finger You can browse to the next or previous screen by swiping your finger up or down Swipe up to see the next newer images or swipe down to...

Страница 246: ...fingers apart Touch the screen with two fingers together then spread your fingers apart on the screen As you spread your fingers the image will be magnified The image can be magnified up to 10x You ca...

Страница 247: ...ate the image Each time you press 0 the image will rotate clockwise as follows 90 9 270 9 0 To rotate another image repeat steps 2 and 3 To exit and return to the menu press the M button b Rotating th...

Страница 248: ...Press the Y Z keys to select an image or movie to be rated You can display three images by pressing the Hy button To return to the single image display press the u button 3 Rate the image Press the W...

Страница 249: ...Image jump w 6 you can display only images with a specific rating With x2 Slide show you can play back only images with a specific rating With Digital Photo Professional provided software p 365 you c...

Страница 250: ...ol options will appear 2 Select a function and set it Press the W X keys to select a function X The name and current setting of the selected function are displayed at the bottom of the screen Set it b...

Страница 251: ...et 51 Auto rotate to OnzD If 51 Auto rotate is set to OnD or Off the b Rotate image setting will be recorded to the image but the camera will not rotate the image for display For images taken with ano...

Страница 252: ...s first and last scenes and play back the still photos and movies on the card in an automatic slide show k Enjoying Movies Playback on a TV Set p 262 265 Playback on the Camera s LCD Monitor p 254 261...

Страница 253: ...computer use a high performance computer Regarding the computer hardware requirements for ImageBrowser EX refer to the PDF file ImageBrowser EX User Guide If you want to use commercially available so...

Страница 254: ...a thumbnail indicate a movie As movies cannot be played from the index display press 0 to switch to the single image display 3 In the single image display press W X The movie playback panel will appea...

Страница 255: ...Next frame Each time you press 0 the movie will play frame by frame If you hold down 0 it will fast forward the movie 4 Last frame Displays the movie s last frame Background music Plays back a movie w...

Страница 256: ...s 0 Press the Y Z keys to see another frame Holding it down will fast forward the frames After deciding which part to edit out press 0 The portion highlighted in gray on the top of the screen is what...

Страница 257: ...ation screen select OK then press 0 to save the edited movie and return to the movie playback screen Since the editing is performed in approx 1 sec increments position indicated by on the top of the s...

Страница 258: ...desired option then press 0 All images Movies Stills Press the W X keys to select one of the following jAll images kMovies zStills Then press 0 Date Folder Rating Press the W X keys to select one of t...

Страница 259: ...the settings press the M button Item Playback Description jAll images All the still photos and movies on the card will be played back iDate Still photos and movies taken on the selected shooting date...

Страница 260: ...will be displayed on the upper left of the image Press 0 again to resume the slide show You can also pause the slide show by tapping the screen During auto playback you can press the B button to chan...

Страница 261: ...of the background music press the B button Press the W X keys to play another background music track To stop listening to the background music press the B button again Adjust the sound volume by turni...

Страница 262: ...to the TV s HDMI IN port 3 Turn on the TV and switch the TV s video input to select the connected port 4 Set the camera s power switch to 1 Viewing Images on a TV Set Viewing on High Definition HD TV...

Страница 263: ...mote control for playback operations An HDMI standard function enabling HDMI devices to control each other so that you can control them with one remote control unit 1 Set Ctrl over HDMI to Enable Unde...

Страница 264: ...on the left Press the button to select the desired option then press the Enter button For a slide show press the remote control s button to select an option then press the Enter button If you select R...

Страница 265: ...nected port 4 Set the camera s power switch to 1 5 Press the x button X The image will appear on the TV screen Nothing will be displayed on the camera s LCD monitor To play back movies see page 254 Vi...

Страница 266: ...s then press 0 X An image will be displayed 3 Protect the image Press the Y Z keys to select the image to be protected then press 0 X When an image is protected the K icon will appear on the top of th...

Страница 267: ...l images in folder or Unprotect all images on card 3 Protecting All Images in a Folder or on a Card If you format the card p 48 the protected images will also be erased Movies can also be protected On...

Страница 268: ...m Erasing a 1 73 image will erase both the RAW and JPEG images 1 Play back the image to be erased 2 Press the L button X The Erase menu will appear at the bottom of the screen 3 Erase the image Select...

Страница 269: ...then press 0 X A checkmark X will be displayed on the upper left of the screen To select other images to be erased repeat step 3 4 Erase the image Press the L button Select OK then press 0 X The sele...

Страница 270: ...ked with the icon Images taken with flash exposure compensation are marked with the y icon B Shooting Information Display Sample Still Photo Taken in a Creative Zone Mode Flash exposure compensation a...

Страница 271: ...was used the shutter speed aperture and ISO speed when set manually will be displayed The icon will be displayed for video snapshots Sample Still Photo Taken in a Basic Zone Mode Sample Movie Ambience...

Страница 272: ...dow detail will be lost If there are too many pixels on the right the highlight detail will be lost The gradation in between will be reproduced By checking the image and its brightness histogram you c...

Страница 273: ...ve filter resize the image reduce the number of pixels or crop the image The camera may not be able to process images taken with another camera Post processing images as described in this chapter is n...

Страница 274: ...ilter to By pressing the Hy button you can switch to the index display and select an image 3 Select a filter When you press 0 the types of Creative filters will be displayed p 275 Press the Y Z keys t...

Страница 275: ...ct of a fish eye lens The image will have a barrel type distortion Depending on the level of this filter effect the area trimmed along the periphery of the image changes Also since this filter effect...

Страница 276: ...olors You can adjust the color density Note that night scenes or dark scenes may not be rendered with a smooth gradation and may look irregular or have significant noise Toy camera effect Darkens the...

Страница 277: ...Select the image you want to resize By pressing the Hy button you can switch to the index display and select an image 3 Select the desired image size Press 0 to display the image sizes Press the Y Z...

Страница 278: ...ginal Image Size Available Resize Settings 4 a b c 3 k k k k 4 k k k a k k b k c Image Sizes Image Quality Aspect Ratio and Pixel Count Approx 3 2 4 3 16 9 1 1 4 3456x2304 8 0 megapixels 3072x2304 7 0...

Страница 279: ...switch to the index display and select an image 3 Set the cropping frame s size aspect ratio position and orientation Press 0 to display the cropping frame X Everything outside the cropping frame will...

Страница 280: ...les you to create a vertical image from a horizontal one and vice versa 4 Display the cropped image in the full view Press the O button X You can see the cropped image To return to the original displa...

Страница 281: ...ting Digital Print Order Format DPOF p 291 DPOF Digital Print Order Format enables you to print images recorded on the card according to your printing instructions such as the image selection quantity...

Страница 282: ...on manual 3 Connect the Camera to the Printer Use the interface cable provided with the camera Connect the cable to the camera s C terminal with the cable plug s D icon facing the front of the camera...

Страница 283: ...long beeping sound in step 5 it indicates a problem with the printer Resolve the problem displayed in the error message p 290 Printing is not possible when shooting mode is set to F or G in the 8 mod...

Страница 284: ...ppear 3 Select Paper settings Select Paper settings then press 0 X The paper settings screen will appear w Printing Printer connected icon Print setting screen Depending on the printer certain setting...

Страница 285: ...Paper Type U Setting the Page Layout Bordered The print will have white borders along the edges Borderless The print will have no borders If your printer cannot print borderless prints the print will...

Страница 286: ...ng Effect Description EOn The image will be printed using the printer s standard colors The image s Exif data is used to make automatic corrections EOff No automatic correction will be applied EVivid...

Страница 287: ...er options are the printer s own default settings as set by the printer s manufacturer Refer to the printer s instruction manual to find out what the Default settings are Depending on the image s file...

Страница 288: ...vel 0 127 or highlight level 128 255 kBrightener Effective in backlit conditions that can make the subject s face look dark When On is set the face will be brightened for printing Red eye corr Effecti...

Страница 289: ...ler the cropping frame the larger the image magnification will be for printing Moving the Cropping Frame Press the S cross keys to move the frame over the image vertically or horizontally Move the cro...

Страница 290: ...printing For details on resuming the printing refer to the printer s instruction manual Error Messages If a problem occurs during printing an error message will appear on the camera s LCD monitor Pre...

Страница 291: ...ally for each image 1 Select Print order Under the x1 tab select Print order then press 0 2 Select Set up Select Set up then press 0 3 Set the option as desired Set the Print type Date and File No Sel...

Страница 292: ...With Index prints the Date and File No cannot both be set to On at the same time When printing with DPOF use the card whose print order specifications have been set It will not work if you just extra...

Страница 293: ...int order for one copy of all the images in the folder will be placed If you select Clear all in folder and select the folder the print order for that folder will all be canceled All image If you sele...

Страница 294: ...ers cannot imprint the file number If Bordered is set certain printers may imprint the date on the border Depending on the printer the date may appear faint if it is imprinted on a bright background o...

Страница 295: ...ect images Select Select images then press 0 X An image will be displayed To display the three image display press the Hy button To return to the single image display press the u button 3 Select the i...

Страница 296: ...ll the images in the folder or on the card will be specified To cancel the image specification select Clear all in folder or Clear all on card Specifying All Images in a Folder or on a Card RAW images...

Страница 297: ...tomizing the Camera You can customize various camera functions to suit your picture taking preferences with Custom Functions Custom Functions can be set and used only in Creative Zone modes C r e a t...

Страница 298: ...setting number then press 0 Repeat steps 2 and 3 if you want to set other Custom Functions At the bottom of the screen the current Custom Function settings are indicated below the respective function...

Страница 299: ...II Autofocus Drive 4 AF assist beam firing p 302 k With f 5 Mirror lockup If you use an EX series Speedlite sold separately equipped with an LED light the LED light will turn on for AF assist even in...

Страница 300: ...posure compensation AEB flash exposure compensation etc This is effective when you prefer to control the exposure in less fine increments than 1 3 stop increments C Fn 2 ISO expansion 0 Off 1 On When...

Страница 301: ...hlights becomes smoother With setting 1 the Auto Lighting Optimizer p 130 is automatically set to Disable and the setting cannot be changed With setting 1 noise grainy image banding etc may become sli...

Страница 302: ...3 IR AF assist beam only When an external Speedlite is attached only with infrared AF assist beam will be emitted This prevents the AF assist beam from firing as a burst of small flashes With an EX s...

Страница 303: ...etween the camera and subject The exposure is set at the moment the picture is taken 3 AE AF no AE lock This is useful for subjects that keep moving and stopping repeatedly During AI Servo AF you can...

Страница 304: ...itor 4 Menu display The menu screen will appear 5 ISO speed The ISO speed setting screen will appear Set the ISO speed with the Y Z keys or 6 dial You can also set the ISO speed looking through the vi...

Страница 305: ...gister up to six items To return to the screen in step 2 press the M button Sort You can change the order of the registered items in My Menu Select Sort and select the item whose order you want to cha...

Страница 306: ......

Страница 307: ...stem accessories etc Certification Logo Under the 54 tab if you select Certification Logo Display and press 0 some of the logos of the camera s certifications will appear Other certification logos can...

Страница 308: ...using the camera unplug the power plug from the power outlet 2 Connect the DC Coupler Connect the DC cord s plug to the DC Coupler 3 Insert the DC Coupler Open the cover and insert the DC Coupler unti...

Страница 309: ...Sold Separately Remote control sensor Fluorescent or LED lighting may cause camera misoperation by triggering the shutter inadvertently Try to keep the camera away from such light sources If you point...

Страница 310: ...viewfinder can cause the image to look dark To prevent this use the eyepiece cover p 29 attached to the camera strap During Live View shooting and movie shooting attaching the eyepiece cover is unnece...

Страница 311: ...series Speedlites External Speedlites EOS dedicated EX series Speedlites Shoe mount Speedlites Macro Lites With an EX series Speedlite not compatible with flash function settings p 233 only Flash expo...

Страница 312: ...act non Canon flash units at 1 200 sec or slower shutter speeds Use a sync speed slower than 1 200 sec Be sure to test the flash unit beforehand to make sure it synchronizes properly with the camera C...

Страница 313: ...th the card manufacturer Also note that approval is required to use Eye Fi cards in many countries or regions Without approval use of the card is not permitted If it is unclear whether the card has be...

Страница 314: ...the picture X The picture is transferred and the H icon switches from gray not connected to one of the icons below For transferred images O is displayed in the shooting information display p 270 H Gr...

Страница 315: ...transfer does not function check the Eye Fi card and computer settings For details refer to the card s instruction manual Depending on the wireless LAN s connection conditions the image transfer may...

Страница 316: ...uto D D D D D D D D D D D D D Manual selection Extra Effect Shot k Ambience based shots k k k k k k k k k k Lighting scene based shots k k k k k Background blur k Color tone k k Creative filters 2 k k...

Страница 317: ...ogram shift Exposure compensation AEB AE lock Depth of field preview Drive self timer Single shooting k k k k k k k k k k k k k Continuous shooting k k k k k k k k k k k k k Silent single shooting Sil...

Страница 318: ...Extra Effect Shot Ambience based shots Lighting scene based shots Background blur Color tone Creative filters 1 k k k k White balance Auto k k k k Preset k k k k Custom k k k k Correction Bracketing...

Страница 319: ...ld preview k k k k Drive self timer Single shooting k k k k Continuous shooting k k k k Silent single shooting 3 k k k k Silent continuous shooting 3 k k k k Q 10 sec k k k k l 2 sec k k k k q Continu...

Страница 320: ...ISO speed Automatically set ISO Auto o o o o o o o o o o o k o o k Manual k k Picture Style Automatically set Auto o o o o o o o o k k k k o k k Manual selection k k k k k k White balance Auto o o o o...

Страница 321: ...k k k k k k k FlexiZone Single k k k k k k k k k k k k k k k Manual focus MF k k k k k k k k k k k k k k k Metering mode Exposure Program shift AE lock k k k 2 k 2 Exposure compensation k k k k AEB D...

Страница 322: ...E series Dioptric Adjustment Lenses Wide Strap 270EX II ST E2 ST E3 RT 90EX 430EX II 320EX 600EX RT 600EX Macro Twin Lite MT 24EX Semi Hard Case EH25 L Hand Strap E2 Battery Pack LP E12 Battery Charge...

Страница 323: ...1 3 m 4 3 ft Interface Cable 1 3 m 4 3 ft Interface Cable IFC 200U 500U 1 9 m 6 2 ft 4 7 m 15 4 ft Card reader SD SDHC SDXC memory card Card slot USB port Computer GPS Receiver GP E2 All cable length...

Страница 324: ...isable 134 Red eye reduction Disable Enable 112 Exposure compensation AEB 1 3 stop or 1 2 stop increments 5 stops AEB 2 stops 125 Flash control Flash firing E TTL II metering Flash sync speed in Av mo...

Страница 325: ...etering e Center weighted average metering 121 Dust Delete Data Obtains data to be used to erase dust spots 237 Long exposure noise reduction Disable Auto Enable 132 High ISO speed noise reduction Dis...

Страница 326: ...images All images in folder Clear all in folder All images on card Clear all on card 295 Creative filters Grainy B W Soft focus Fish eye effect Art bold effect Water painting effect Toy camera effect...

Страница 327: ...at card Initialize and erase data on the card 48 Eye Fi settings Eye Fi transmission Disable Enable Connection information 313 Auto power off 30 sec 1 min 2 min 4 min 8 min 15 min Disable 217 LCD brig...

Страница 328: ...eceiver GP E2 sold separately is attached Certification Logo Display Displays some of the logos of the camera s certifications 307 Custom Functions C Fn Customize camera functions as desired 298 Copyr...

Страница 329: ...0 Disable during manual exposure White balance Q W E R Y U I O 142 Custom white balance Manual setting of white balance 142 White balance shift bracketing WB correction White balance correction BKT se...

Страница 330: ...lexiZone Multi FlexiZone Single 207 Movie Servo AF Enable Disable 207 AF with shutter button during movie shooting k ONE SHOT Disable 209 Grid display Off Grid 1l Grid 2m 209 Metering timer 4 sec 16 s...

Страница 331: ...charger again and wait a while before connecting the charger to a power outlet again Make sure the battery is properly installed in the camera p 32 Make sure the card slot battery compartment cover is...

Страница 332: ...g the LCD monitor often Continuing Live View shooting or movie shooting for a prolonged period Auto power off is in effect If you do not want auto power off to take effect set 52 Auto power off to Dis...

Страница 333: ...y p 43 107 If a card error message is displayed see page 34 or 343 Set the lens focus mode switch to AF p 40 To prevent camera shake press the shutter button gently p 42 43 If the lens has an Image St...

Страница 334: ...r H equivalent to ISO 25600 the maximum burst for continuous shooting will greatly decrease p 99 Set z3 High ISO speed NR to Standard Low or Disable If it is set to High or if Multi Shot Noise Reducti...

Страница 335: ...e Auto Lighting Optimizer can be set p 301 Set z2 Auto Lighting Optimizer to Disable When Standard Low or High is set even if you set a decreased exposure compensation or flash exposure compensation t...

Страница 336: ...utput p 233 If flash exposure compensation has already been set with the external Speedlite flash exposure compensation cannot be set with the camera When the external Speedlite s flash exposure compe...

Страница 337: ...2 If the card s writing speed is slow movie shooting may stop automatically Use an SD Speed Class 6 or faster card To find out the card s reading writing speed refer to the card manufacturer s website...

Страница 338: ...horizontal stripes noise or irregular exposures can be caused by fluorescent light LED bulbs or other light sources during movie shooting Also changes in the exposure brightness or color tone may be...

Страница 339: ...me has been set p 37 Check the time zone and daylight saving time p 37 The shooting date and time does not appear in the picture The date and time is instead recorded in the image data as shooting inf...

Страница 340: ...l not be able to check the card s connection status or disable Eye Fi transmission p 313 It is the highlight alert p 272 Overexposed highlight areas with a loss of highlight detail will blink If the i...

Страница 341: ...he same video system as the TV set p 265 If the movie file size reaches 4 GB another movie file will be created automatically p 194 Depending on the card reader and computer OS used SDXC cards may not...

Страница 342: ...depending on the printer This instruction manual lists all the printing effects available p 286 Install the provided software EOS Solution Disk CD ROM on the computer p 366 Sensor Cleaning Problems T...

Страница 343: ...with camera Remove and insert the card again replace the card or format the card p 32 48 04 Cannot save images because card is full Replace card Replace the card erase unnecessary images or format th...

Страница 344: ...ls 5184 x 3456 M Medium Approx 8 0 megapixels 3456 x 2304 S1 Small 1 Approx 4 5 megapixels 2592 x 1728 S2 Small 2 Approx 2 5 megapixels 1920 x 1280 S3 Small 3 Approx 350 000 pixels 720 x 480 RAW Appro...

Страница 345: ...r at center Spot metering approx 4 of viewfinder at center Center weighted average metering Metering brightness range EV 1 20 at room temperature with EF 50mm f 1 8 II lens ISO 100 Exposure control Pr...

Страница 346: ...hooting Silent continuous shooting Self timer with 10 sec or 2 sec delay and 10 sec delay with continuous shooting Continuous shooting speed Continuous shooting Max approx 4 shots sec Silent continuou...

Страница 347: ...60p 59 94 fps 50p 50 00 fps File size 1920x1080 30p 25p 24p Approx 330 MB min 1280x720 60p 50p Approx 330 MB min 640x480 30p 25p Approx 82 5 MB min Focusing Hybrid CMOS AF II System Face Tracking Flex...

Страница 348: ...index 4 9 36 100 Zoom magnification Approx 1 5x 10x Highlight alert Overexposed highlights blink Image browsing methods Single image jump by 10 or 100 images by shooting date by folder by movies by s...

Страница 349: ...ower Battery Battery Pack LP E12 Quantity 1 AC power can be supplied via AC Adapter Kit ACK E15 Number of possible shots Based on CIPA testing standards With viewfinder shooting Approx 380 shots at ro...

Страница 350: ...dity 85 or less Dimensions W x H x D Approx 65 x 25 5 x 90 mm 2 6 x 1 0 x 3 5 in Weight Approx 81 g 2 9 oz Battery Charger LC E12E Compatible battery Battery Pack LP E12 Recharging time Approx 2 hours...

Страница 351: ...sold separately All the data above is based on Canon s testing standards and CIPA Camera Imaging Products Association testing standards and guidelines Dimensions maximum diameter length and weight li...

Страница 352: ...used for encoding MPEG 4 compliant video and or decoding MPEG 4 compliant video that was encoded only 1 for a personal and non commercial purpose or 2 by a video provider licensed under the AT T paten...

Страница 353: ...prevent contact with other metallic objects or batteries This is to prevent a fire or an explosion If excessive heat smoke or fumes are emitted when recharging the battery immediately unplug the batte...

Страница 354: ...lectrical shock follow the safeguards below Always insert the power plug all the way in Do not handle a power plug with wet hands When unplugging a power plug grasp and pull the plug instead of the co...

Страница 355: ...not carry the camera around when it is attached to a tripod Doing so may cause injury Also make sure the tripod is sturdy enough to support the camera and lens Do not leave the product in a low tempe...

Страница 356: ...on an authorized one for one basis when you buy a new similar product or to an authorized collection site for recycling waste electrical and electronic equipment EEE and batteries and accumulators Im...

Страница 357: ...357...

Страница 358: ...358...

Страница 359: ...computer gives an overview of the software in the EOS Solution Disk CD ROM and explains how to install the software on your computer EOS Solution Disk Software EOS Camera Instruction Manuals Disk EOS...

Страница 360: ...ctions and procedures including basic content this booklet Software Instruction Manuals Software Instruction Manuals PDFs for the software supplied on the EOS Solution Disk see p 365 ViewingtheEOSCame...

Страница 361: ...ating system XThe index of the Instruction Manuals is displayed Viewing the EOS Camera Instruction Manuals Disk DVD ROM EOS Camera Instruction Manuals Disk XXX XXXXX XXXXX XXXXX XXXXX XXXXX CEL XXX XX...

Страница 362: ...the Instruction Manuals is displayed Viewing the EOS Camera Instruction Manuals Disk DVD ROM EOS Camera Instruction Manuals Disk XXX XXXXX XXXXX XXXXX XXXXX XXXXX CEL XXX XXX CANON INC 20XX Made in t...

Страница 363: ...your computer Use the interface cable provided with the camera Connect the cable to the camera s C terminal with the cable plug s D icon facing the front of the camera Connect the cord s plug to the c...

Страница 364: ...rd reader 3 Use Canon software to download the images X Use Digital Photo Professional X Use ImageBrowser EX For details refer to the Software Instruction Manual p 361 Downloading Images with a Card R...

Страница 365: ...is aimed at advanced users who are experienced in processing images You can edit Picture Style to your unique image characteristics and create save an original Picture Style file Image Viewing and Edi...

Страница 366: ...correctly When downloading and installing ImageBrowser EX follow the steps below as with other EOS software included on the EOS Solution Disk Note that Internet connection is necessary Downloading or...

Страница 367: ...install the software The software will not be installed correctly When downloading and installing ImageBrowser EX follow the steps below as with other EOS software included on the EOS Solution Disk No...

Страница 368: ...368...

Страница 369: ...p 372 Nomenclature p 373 Basic Zone modes p 375 DUsing the Built in Flash p 375 Creative Zone modes p 376 d Program AE p 376 s Shutter priority AE p 376 f Aperture priority AE p 376 f AF Operation p...

Страница 370: ...Modes Menu items Menu settings Tabs 1 Press the M button to display the menu 2 Press the Y Z keys to select a tab then press the W X keys to select the desired item 3 Press 0 to display the setting 4...

Страница 371: ...0 o Select z3 Picture Style then press 0 o Press the W X keys to select the Picture Style then press 0 Style Description D Auto Color tones optimized for the particular scene P Standard Vivid colors...

Страница 372: ...he shooting mode o Press the S cross keys to select a function then turn the 6 dial to set it Shutter speed Aperture Highlight tone priority ISO speed Picture Style Exposure compensation AEB setting S...

Страница 373: ...ial Power switch i ISO speed setting button D Flash button 6 Main Dial L Erase button Access lamp O Aperture Exposure compensation button A Live View shooting Movie shooting button S AF point selectio...

Страница 374: ...n indicator Spot metering circle Focus confirmation light Aperture Max burst AE lock Flash ready Exposure level indicator Shutter speed ISO speed Aperture Shooting mode Possible shots Auto Lighting Op...

Страница 375: ...ly in low light or backlit conditions with certain shooting modes Creative Zone Modes All the settings necessary for shooting are set automatically You just press the shutter button and the camera doe...

Страница 376: ...A mode o Set the Mode Dial to d o Set the Mode Dial to s o Turn the 6 dial to set the desired shutter speed then focus the subject The aperture will be set automatically o If the aperture display blin...

Страница 377: ...AF Switches the AF operation automatically Z AI Servo AF For moving subjects o Press the S button o Press the S cross keys to select the AF point o While looking through the viewfinder you can select...

Страница 378: ...utomatically When you press the shutter button halfway the ISO speed setting is displayed Not selectable in Basic Zone modes o Select z1 Drive self tmr then press 0 o Press the Y Z keys to select the...

Страница 379: ...ton to display the Live View image o Press the shutter button halfway to focus o Press the shutter button completely to take the picture o Number of Possible Shots Live View Shooting Temperature No Fl...

Страница 380: ...ovie Shooting Autoexposure o Set the power switch to k o Set the Mode Dial to any shooting mode except a o Press the A button to start shooting a movie o To stop movie shooting press the A button agai...

Страница 381: ...381 Quick Reference Guide Image Playback Index B Shooting information Magnify Playback Erase Select image L x S u u y y...

Страница 382: ...ideo output 252 265 B B W Monochrome 102 139 Background blur 66 Background music 261 Basic Zone modes 26 Battery 30 32 36 Battery check 36 Beep Beeper 216 Black and white image 82 102 139 Bracketing 1...

Страница 383: ...n 123 Exposure level increments 300 External flash 311 Extra Effect Shot 65 Eyecup 310 Eye Fi card 313 Eyepiece cover 29 310 F Faithful 102 FE lock 128 Feature guide 52 FEB flash exposure bracketing 2...

Страница 384: ...s RGB 272 Hot shoe 311 Household power 308 I ICC profile 146 Image area 41 Image dust prevention 236 237 239 Image review time 217 Image recording quality 94 Images Auto playback 258 Auto rotate 225 E...

Страница 385: ...ual selection AF 105 Manual white balance 142 Maximum burst 95 96 Medium image recording quality 24 Memory cards 9 Cards Menu 46 My Menu 305 Setting procedure 47 Settings 324 3 icon 8 Metering mode 12...

Страница 386: ...hots 36 94 151 Recharging 30 Predictive AI Servo 104 Pressing completely 43 Pressing halfway 43 Printing 281 Cropping 289 Page layout 285 Paper settings 284 Photobook set up 295 Print order DPOF 291 P...

Страница 387: ...1 Single image display 89 Single point AF 105 Slide show 258 Small image recording quality 24 278 Soft focus 159 275 Software 365 Speaker 254 Special scene mode 72 Sports 71 Spot metering 121 sRGB 146...

Страница 388: ...e refer to your warranty card or to www canon europe com Support The product and associated warranty are provided in European countries by Canon Europa N V The descriptions in this Instruction Manual...

Отзывы: