[Media setting ]
Description
[Vacuum power] Controls the suction of the media on the platen. Per media category default
values are used for each of the five zones available. Only change the vac-
uum power when you encounter problems:
• Make sure the values for zones A, B, and C are always higher than for
zones D and E.
• Increase the vacuum power with steps of 10% when the vacuum power
appears to be too low, e.g. when media is not flat on the printer platen.
• Decrease the vacuum power with steps of 10% when the vacuum power
appears to be too high, e.g. when the leading edge of the media is
blocked halfway across the printer platen, or when dark tracks are visible
around the swath boundary
1
and graininess is poor within swaths.
• Do not set the values below 30% when [Winding tension] is set to [No
tension bar] or [Locked tension bar].
• Always re-calibrate the media after you changed the vacuum power.
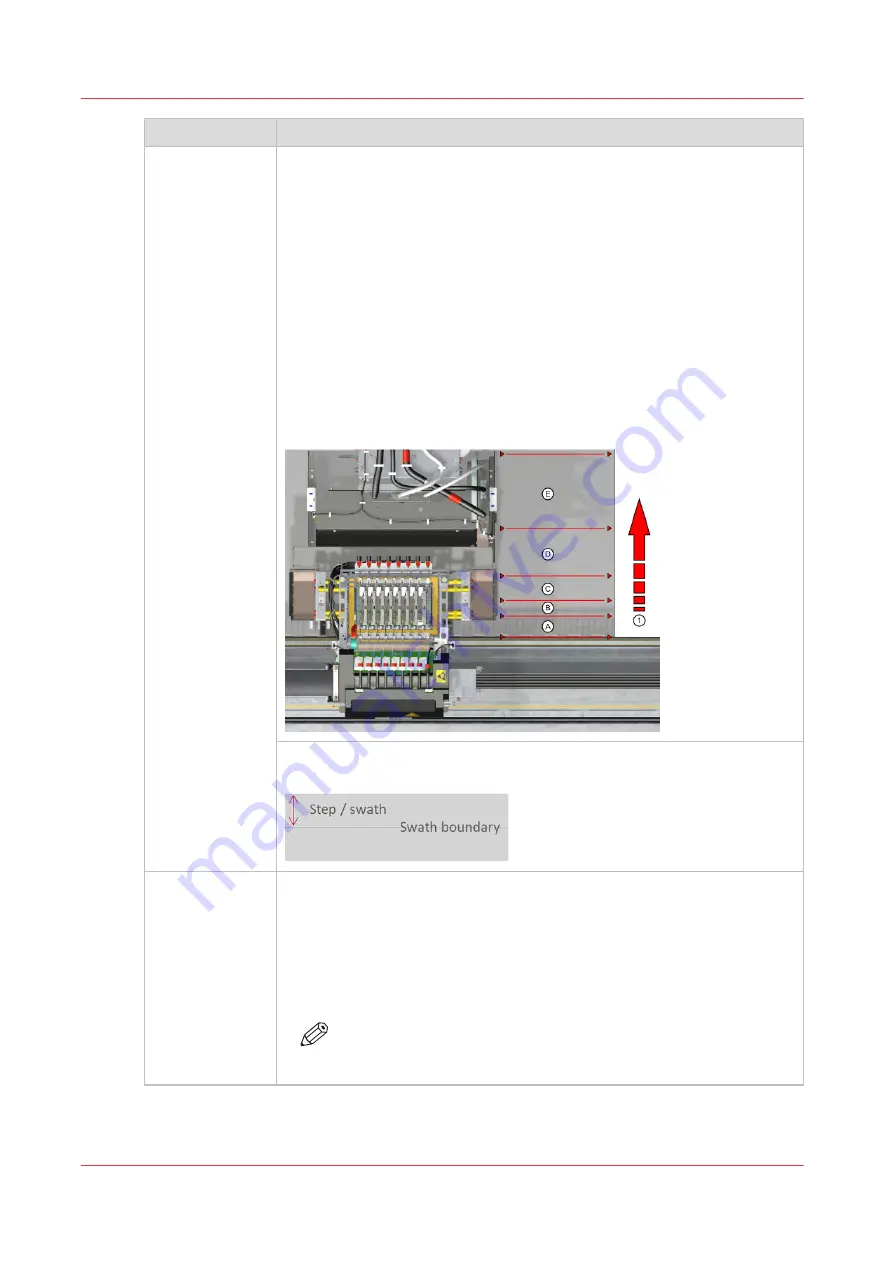
Location of the zones A, B, C, D, E, with (1) media transport direction:
1
Swath boundary. Two adjoining swaths/passes of the printhead must be
positioned without overlap (dark lines), or gap (white lines ).
[Winding ten-
sion]
Controls winding. For printing without winding or for winding without ten-
sion bar select [No tension bar].
For certain media types it is necessary to wind the media with a tension bar
in order to let it run smoothly. Select [Tension bar] for media that is flexible
and buckle-sensitive but not too stiff. Select [Locked tension bar] for media
that is very stiff. Depending on what is selected here, the operator panel will
display a request for taping media, locking, or placing a tension bar.
NOTE
After you have changed the setting, make sure to reload the me-
dia roll in the media drawer. Only then the change will take effect.
4
Change the media settings
78
Chapter 4 - Handle the media
Содержание Colorado M Series
Страница 1: ...Colorado M series Extended operation guide 2023 Canon Production Printing ...
Страница 9: ...Chapter 1 Introduction ...
Страница 17: ...Instruction videos Available documentation Chapter 1 Introduction 17 ...
Страница 20: ...Optional features 20 Chapter 1 Introduction ...
Страница 21: ...Chapter 2 Safety information ...
Страница 32: ...Safety System 32 Chapter 2 Safety information ...
Страница 33: ...Chapter 3 Explore the system ...
Страница 40: ...The components of the printer top cover open 40 Chapter 3 Explore the system ...
Страница 41: ...Chapter 4 Handle the media ...
Страница 70: ...FLXfinish in the RIP 70 Chapter 4 Handle the media ...
Страница 165: ...Chapter 5 Print a job ...
Страница 174: ...Use the PRISMAsync Remote Control app 174 Chapter 5 Print a job ...
Страница 175: ...Chapter 6 Maintain the system ...
Страница 206: ...6 Unscrew the six green screws of the mirror boxes manually Clean the mirrors 206 Chapter 6 Maintain the system ...
Страница 249: ...Chapter 7 Improve quality ...
Страница 259: ...Chapter 8 Configure the network and security settings ...
Страница 290: ...Enable system installation from USB 290 Chapter 8 Configure the network and security settings ...
Страница 291: ...Chapter 9 Troubleshooting and support ...
Страница 309: ...Install a license via ORS Chapter 9 Troubleshooting and support 309 ...
Страница 313: ...Install a license received via e mail Chapter 9 Troubleshooting and support 313 ...
Страница 342: ...No gradual variation vertical banding Vertical banding 342 Chapter 9 Troubleshooting and support ...
Страница 363: ...Chapter 10 Regulation Notices ...
Страница 377: ......


