Canon Color imageCLASS MF9220Cdn Скачать руководство пользователя страница 213

Cop

ying

4-66

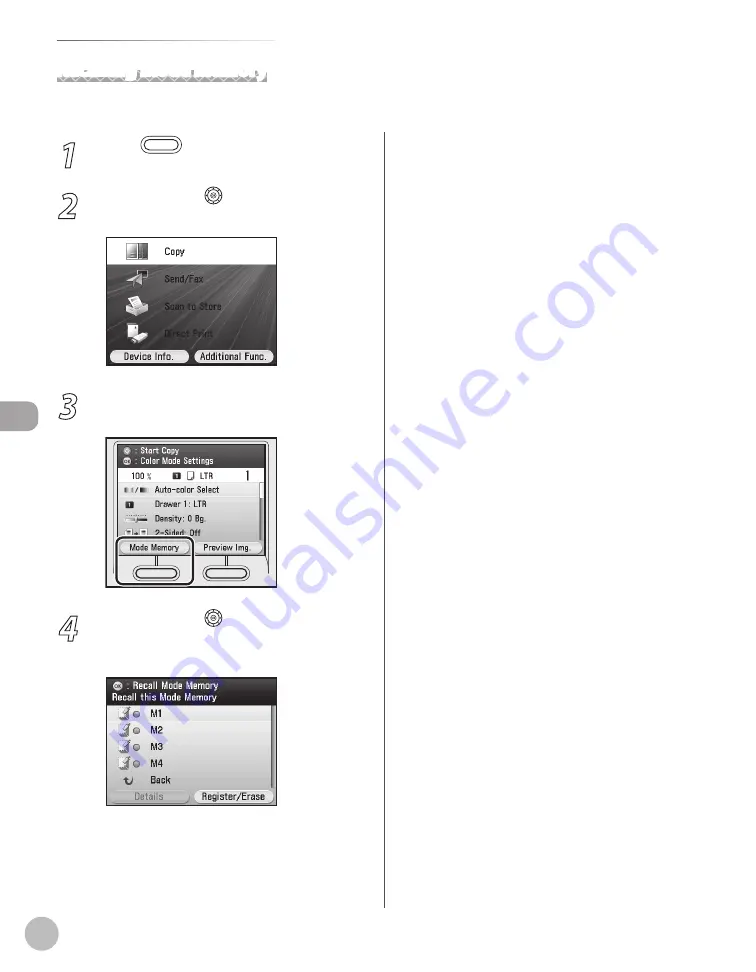
Frequently Used Settings (Mode Memory)

1


Press 

 (Main Menu).

2


Use [

], [

] or   (Scroll Wheel) to select 

<Copy>, then press [OK].

3


Press the left Any key to select <Mode 

Memory>.

4


Use [

], [

] or   (Scroll Wheel) to select 

the desired mode memory, then press 

[OK].

Recalling Mode Memory

This section describes how to recall the registered mode memories.

Содержание Color imageCLASS MF9220Cdn

Страница 1: ... finish reading this guide store it in a safe place for future reference Before Using the Machine Originals and Print Media Registering Destinations in the Address Book Copying Fax E mail Printing Scanning Network Setting from a PC Maintenance Troubleshooting Machine Settings Appendix ...

Страница 2: ...p Connection and settings before using the machine Connecting the machine to a network Software installation Read this manual to learn the required settings and connections before using the machine Read this manual next Basic Operation Guide Safety instructions Registering destinations in the Address Book Copy Fax E mail Specifications Read this manual to learn information about basic operations a...

Страница 3: ...send faxes from a computer and send I faxes Received fax documents can be also forwarded to specified destinations such as a shared folder in a computer Basic Operation Guide Fax see on p 5 1 e Manual Fax Printing In addition to the printing from a computer you can print a document directly from memory media Basic Operation Guide Printing see on p 7 1 e Manual Printing Scanning You can store scann...

Страница 4: ...nterface You can set and manage this machine easily and quickly from a computer Basic Operation Guide Settings from a PC see on p 10 1 e Manual Setting from a PC E mail function Scanned documents can be sent as e mail file attachments Basic Operation Guide E mail see on p 6 1 e Manual E mail Security function You can limit the use of the machine by setting the IDs You can also limit the use of som...

Страница 5: ... Usage of Your Product and the Use of Images xviii FCC Federal Communications Commission xix Users in the U S A xix Contents Users in Canada xxi Utilisation au Canada xxii Laser Safety xxiii CDRH Regulations xxiii 1 Before Using the Machine 1 1 Machine Components 1 2 External View Front 1 2 External View Back 1 4 Internal View 1 5 Control Panel 1 6 Main Control Panel 1 6 Registering the Custom Key...

Страница 6: ...x Numbers in One Touch 3 32 Registering Fax Numbers Obtained via an LDAP Server in One Touch 3 37 Registering E Mail Addresses in One Touch 3 40 Registering E Mail Addresses Obtained via an LDAP Server in One Touch 3 43 Registering I Fax Addresses in One Touch 3 46 Registering File Server Addresses in One Touch 3 49 Registering Group Addresses in One Touch 3 55 Checking Editing Addresses Registere...

Страница 7: ...nts Manual Sending 5 19 Switching Temporarily to Tone Dialing 5 21 Dialing an Overseas Number With Pauses 5 22 Basic Methods for Sending I Faxes 5 25 Basic Methods for Sending PC Faxes 5 27 Canceling Sending Fax Documents 5 29 Specifying Destinations 5 30 Specifying a New Fax Number 5 30 Using the Address Book 5 34 Using the One Touch 5 36 Using the Group Addresses 5 38 Sending Originals to More T...

Страница 8: ...ts 5 141 Resending Documents with Forwarding Errors 5 143 Checking Changing the Status of Documents with Forwarding Errors 5 144 Checking Changing the Status of Fax Documents in Memory 5 147 Checking Deleting Fax Transmission Documents 5 147 Checking Deleting Fax Reception Documents 5 148 Checking Printing the Fax Log 5 150 6 E mail 6 1 Overview of E Mail Functions 6 2 Introduction to Using E Mail...

Страница 9: ... Jams 12 3 Paper Delivery Tray 12 5 Duplex Unit 12 6 Stack Bypass Tray 12 8 Paper Drawer 1 12 10 Optional Paper Drawer Paper Drawer 2 12 11 Inside of the Machine 12 13 Fixing Unit 12 16 Back Cover 12 18 When the Message Does Not Disappear 12 19 If the Delivery Feeder Unit Is Not Installed Correctly 12 22 Error Messages 12 24 Error Codes 12 34 If a Message Such as Paper diff from set size type is d...

Страница 10: ...mes are a few examples of how keys to be pressed are expressed in this manual Operation Panel Keys Key icon Key name Example Stop Buttons on the computer operation screen Button name Example OK Information in the display appears in angle brackets LOAD PAPER Abbreviations Used in This Manual In this Manual operating systems are abbreviated as follows MicrosoftWindows 2000 operating system Windows 2...

Страница 11: ...tions such as on unsteady platforms or inclined floors or in locations subject to excessive vibrations as this may cause the machine to fall or tip over resulting in personal injury The ventilation slots are provided for proper ventilation of working parts inside the machine Never place the machine on a soft surface such as a bed sofa or rug Blocking the slots can cause the machine to overheat res...

Страница 12: ...r the power cord The power cord is bent near the connection part and continuous stress is being applied to the power outlet or the connection part Applying a shock to the power connector Do not use power cords other than the one provided as this can result in a fire or electrical shock As a general rule do not use extension cords Using an extension cord may result in a fire or electrical shock Rem...

Страница 13: ...nd immediately after printing Do not touch the area surrounding the output slot as this may result in burns Printed paper may be hot immediately after being output Be careful when removing the paper and aligning the removed paper especially after continuous printing Failure to do so may result in burns When performing copy with a thick book placed on the platen glass do not press the feeder forcef...

Страница 14: ...s hot Check regularly that the power cord and plug are not handled in the following manner Failure to do so can result in a fire or electrical shock The power connector is loosened Stress is being applied to the power cord by a heavy object or by fixing it with staples The power plug is loosened The power cord is tied in a bundle A part of the power cord is put in an aisle The power cord is put in...

Страница 15: ...bag to prevent the toner from scattering and then dispose of the toner cartridge according to local regulations Keep the toner cartridges and other consumables out of the reach of small children If the toner or other parts are ingested consult a physician immediately Do not attempt to disassemble the toner cartridge The toner may scatter and get into your eyes or mouth If toner gets into your eyes...

Страница 16: ...chine to an uninterruptible power source Use an AC power outlet exclusively for the machine Do not use the other sockets of the AC power outlet Do not plug the power plug into the auxiliary outlet on a computer Do not use the same AC power outlet for both the machine and any of the following equipment Copy machine Air conditioner Shredder Equipment that consumes a large amount of electricity Equip...

Страница 17: ... may operate improperly Use a modular cable of 118 1 8 3 m or shorter in length The communication may become unavailable depending on the condition of local environment In this case contact your local authorized Canon dealer or the Canon help line The repairing parts and toner cartridges for the machine will be available for at least seven 7 years after production of this machine model has been di...

Страница 18: ...itted transcribed stored in a retrieval system or translated into any language or computer language in any form or by any means electronic mechanical magnetic optical chemical manual or otherwise without the prior written permission of Canon Inc UFST Copyright 1989 2003 Monotype Imaging Inc Third Party Software A This Canon product the PRODUCT includes third party software modules Use and distribu...

Страница 19: ...RECT INCIDENTAL OR CONSEQUENTIAL DAMAGES OF ANY NATURE OR LOSSES OR EXPENSES RESULTING FROM THE USE OF THIS MATERIAL About the Part Containing Mercury Applicable Only to the USA LAMP S INSIDE THIS PRODUCT CONTAIN MERCURY AND MUST BE RECYCLED OR DISPOSED OF ACCORDING TO LOCAL STATE OR FEDERAL LAWS For CA USA only Included battery contains Perchlorate Material special handling may apply See http www...

Страница 20: ...nless otherwise specified in this manual If you make such changes or modifications you could be required to stop operation of the equipment Canon U S A Inc One Canon Plaza Lake Success NY 11042 U S A TEL No 1 800 OK CANON Users in the U S A Pre Installation Requirements for Canon Facsimile Equipment A Location Supply a suitable table cabinet or desk for the machine See Chapter 14 Appendix for spec...

Страница 21: ...hould not be reconnected or the main power switch turned ON until the problem is completely resolved Users should contact Canon Authorized Service Facilities for servicing of equipment Information regarding Authorized Service Facility locations can be obtained by calling Canon Customer Care Center 1 800 OK CANON Rights of the Telephone Company If this equipment Color imageCLASS M9280Cdn MF9220Cdn ...

Страница 22: ...This product meets the applicable Industry Canada technical specifications The Ringer Equivalence Number is an indication of the maximum number of devices allowed to be connected to a telephone interface The termination of an interface may consist of any combination of devices subject only to the requirement that the sum of the RENs of all the devices does not exceed five The REN of this product i...

Страница 23: ... Industrie Canada Avant d installer cet appareil l utilisateur doit s assurer qu il est permis de le connecter à l équipement de la compagnie de télécommunication locale et doit installer cet appareil en utilisant une méthode de connexion autorisée Il se peut qu il faille étendre la circuiterie intérieure de la ligne individuelle d abonné qui a été installée par la compagnie au moyen d un jeu de c...

Страница 24: ... external covers the laser beam cannot escape from the machine during any phase of user operation CDRH Regulations The Center for Devices and Radiological Health CDRH of the U S Food and Drug Administration implemented regulations for laser products on August 2 1976 These regulations apply to laser products manufactured from August 1 1976 Compliance is mandatory for products marketed in the United...

Страница 25: ...Legal Notices xxiv Legal Notices ...

Страница 26: ...n 1 14 Select Memory Media Screen Color imageCLASS MF9280Cdn Only 1 14 Log In Mode 1 14 Toner Cartridges 1 15 Maintaining the Toner Cartridges 1 16 Checking the Toner Level 1 17 Checking the Device Information 1 18 Entering Characters 1 19 Telephone Line Setting 1 20 Timer Settings 1 22 Setting the Sleep Mode 1 22 Setting Auto Clear Time 1 23 Setting the Daylight Saving Time 1 24 This chapter desc...

Страница 27: ...Before Using the Machine 1 2 Machine Components Machine Components This section describes the names and functions of all the parts on the outside and inside of the machine External View Front ...

Страница 28: ...LGL size paper pull out the extension first and then open the stopper Control Panel Machine controls Stack Bypass Tray Feeds non standard size or thick thin type paper stacks Stack Bypass Tray Extension Pull out to load paper stack Slide Guides for Stack Bypass Tray Adjusts to the width of the paper Paper Stopper Prevents the paper from falling off the paper delivery tray Open the stopper from its...

Страница 29: ...Before Using the Machine 1 4 Machine Components External View Back Back Cover Open this cover to clear paper jams Power Socket Connect the power cord ...

Страница 30: ...s Delivery Feeder Unit Electrostatic Transfer Belt Transfers toner to paper Do not place any objects on or touch the transfer belt Doing so deteriorates print quality Front Cover Open this cover to replace the toner cartridges or to clear paper jams Duplex Unit The duplex unit enables you to use the 2 Sided mode for copying or printing Fixing Unit The fixing unit fixes the toner to the paper The p...

Страница 31: ... job in progress such as a scan or copy job Main Power Indicator Lights when the main power is turned ON Error Indicator Blinks or lights up if there is an error with the machine When the Error indicator flashes follow the instructions that appear on the display When the Error indicator maintains a steady red light contact your local authorized Canon dealer or Canon Customer Care Center Start key ...

Страница 32: ...t jobs and cancel the ongoing jobs The status of device or consumable can also be checked Display The settings screen for each function is shown on this display Some settings screens may have several pages See Display Parts and Functions on p 1 11 Custom Key 2 You can assign the desired function for this key For details see Registering the Custom Keys on p 1 8 Custom Key 1 You can assign the desir...

Страница 33: ...s You can assign frequently used functions to two custom keys located on the left of the display The default settings are as follows Key 1 Copy Key 2 Send Fax After registering the custom keys attach the supplied customize labels onto the control panel If there is no label applicable to the function you register for the custom key fill in the blank label and attach it Size and form of the customiz...

Страница 34: ...select the function you want to assign then press OK You can select from Copy Send Fax Fax E mail I Fax File Server Send Log Address Book Search LDAP Server Favorites One touch Scan to Store Store on Memory Remote Scan and Direct Print 1 1 Only for the Color imageCLASS MF9280Cdn 7 Press Main Menu to return to the Main Menu screen ...

Страница 35: ...ard when using the Direct Print function When two different types of cards are inserted the machine only recognizes the one that was inserted first Right Side of Control Panel Power switch Sub Power Supply USB Slot Insert a USB memory media device when scanning documents to it or printing image files stored in it Direct Print The Direct Print function is available only for the Color imageCLASS MF9...

Страница 36: ...nagement Set For instructions see Introduction of the Machine in the e Manual A scroll bar displayed on the right side on the screen indicates that there are more items Use or Scroll Wheel to display the next screen Depending on the system configuration and product purchased some functions may not be available Main Menu Screen Color imageCLASS MF9280Cdn Color imageCLASS MF9220Cdn Copy Displays the...

Страница 37: ...r Source Settings Selects the paper source Density Background Removal Settings Sets the density 2 Sided Settings Sets 2 sided copying Preview Img You can confirm the current standard settings See Checking Current Settings on p 4 63 Mode Memory Select with the left Any key You can store and recall frequently used copy settings and recall them See Frequently Used Settings Mode Memory on p 4 64 Copy ...

Страница 38: ...ter 3 Registering Destinations in the Address Book Search LDAP Server Specify a fax number and an e mail address via an LDAP server See Specifying Fax Numbers via an LDAP Server on p 5 43 and E mail in the e Manual New Fax Entry Enter a fax number using the numeric keys See Basic Methods for Sending Faxes on p 5 17 New E mail Entry Displays the E mail address entry screen See Sending E Mail Docume...

Страница 39: ...rn to the previous screen Select Memory Media Screen Color imageCLASS MF9280Cdn Only For details about the Select Memory Media Screen see Printing from Memory Media Direct Print on p 7 12 Insert a memory media select a media then press OK Log In Mode If the Department ID Management or User ID Management is set the Log In screen is displayed For information on the Department ID Management or User I...

Страница 40: ... original contains a lot of graphics tables or charts the life of the toner cartridge will be shorter as they consume more toner When you are replacing a toner cartridge be sure to use a toner cartridge designed for this product To purchase the Canon genuine replacement toner cartridge contact your local Canon dealer or Canon Customer Care Center 1 800 OK CANON The term 5 coverage denotes a docume...

Страница 41: ...ht or bright light for more than five minutes Store the toner cartridges in their protective bags Do not open the bags until you are ready to install the toner cartridges in the machine Save the protective toner cartridge bags in case you need to repack and transport the toner cartridges at a later date If the toner cartridge has to be removed from the machine for maintenance place it in the prote...

Страница 42: ...ct Device Info The screen below indicates there is sufficient toner in the toner cartridge The screen below indicates that only a small amount of toner remaining inside the machine You can continue printing Proceed to step 4 It is recommended that you purchase a new toner cartridge to have it available when needed The screen below indicates the toner cartridge is running out of toner 3 Press the r...

Страница 43: ...er The status of toner is displayed Available Memory The remaining amount of available system memory is displayed in percentage Paper Information The paper supply and the paper type paper size loaded in the paper drawer s are displayed The paper drawer 2 is displayed only when the optional Paper Drawer Paper Drawer 2 is attached 3 Press Main Menu return to the Main Menu screen You can also return ...

Страница 44: ...ition up and down Press OK to enter the highlighted character or space and to determine the entry mode Press or Scroll Wheel to change the entry mode then press OK A 1 Alphanumeric character entry mode Sym Symbol entry mode Select Backspace by pressing the left Any key to clear the entered characters one by one Select Set by pressing the right Any key to complete the entry and return to the previo...

Страница 45: ...line that you are using and make the correct setting The default setting is Tone Connect the telephone line cable before turning ON the machine if you use the automatic detection mode 1 Press Main Menu 2 Press the right Any key to select Additional Func 3 Use or Scroll Wheel to select Communications Settings then press OK 4 Use or Scroll Wheel to select Fax Settings then press OK 5 Use or Scroll W...

Страница 46: ...s OK 8 Use or Scroll Wheel to select the type of telephone line that is connected to the machine then press OK Pulse Pulse dialing Tone Tone dialing Be sure to check the type of telephone line you are using and make the correct setting If this setting is incorrect you will not be able to communicate with other machines 9 Press Main Menu to return to the Main Menu screen ...

Страница 47: ...Minutes We recommend that you use this option in the default setting 1 Press Main Menu 2 Press the right Any key to select Additional Func 3 Use or Scroll Wheel to select Timer Settings then press OK 4 Use or Scroll Wheel to select Auto Sleep Time then press OK 5 Use or Scroll Wheel to select On then press OK 6 Use or Scroll Wheel to set the desired interval then press OK You can set the interval ...

Страница 48: ...ually press Power on the operation panel The machine will not enter the Sleep mode when the machine is in operation the Processing Data indicator is lit or flashing a message is on the display and the Error indicator is flashing there is a paper jam in the machine the handset of the external telephone is off the hook The machine will leave the Sleep mode when you press Power on the operation panel...

Страница 49: ...utes in one minute increments You can also set the interval using numeric keys 6 Press Main Menu to return to the Main Menu screen Setting the Daylight Saving Time In some countries or areas time is advanced throughout the summer season This is called Daylight Saving Time The default setting is Off 1 Press Main Menu 2 Press the right Any key to select Additional Func 3 Use or Scroll Wheel to selec...

Страница 50: ... press OK 6 Use or Scroll Wheel to select On then press OK 7 Use or Scroll Wheel to select Month then press OK 8 Use or Scroll Wheel to select the month when the daylight saving time starts then press OK 9 Use or Scroll Wheel to select Week then press OK 10 Use or Scroll Wheel to select the week then press OK 11 Use or Scroll Wheel to select Day of the Week then press OK ...

Страница 51: ... appears 14 Use or Scroll Wheel to select Month then press OK 15 Use or Scroll Wheel to select the month when the daylight saving time ends then press OK 16 Use or Scroll Wheel to select Week then press OK 17 Use or Scroll Wheel to select the week then press OK 18 Use or Scroll Wheel to select Day of the Week then press OK 19 Use or Scroll Wheel to select the day of the Week then press OK ...

Страница 52: ...Before Using the Machine 1 27 Timer Settings 20 Press the right Any key to select Set 21 Press Main Menu to return to the Main Menu screen ...

Страница 53: ...Before Using the Machine 1 28 Timer Settings ...

Страница 54: ... 2 2 Scanning Area 2 3 Placing Originals 2 4 On the Platen Glass 2 4 In the Feeder 2 5 Paper Requirements 2 7 Printable Area 2 9 Loading Paper 2 10 In the Paper Drawer 2 10 In the Stack Bypass Tray 2 16 Setting Paper Size and Type 2 22 For the Stack Bypass Tray 2 22 Registering Irregular Paper Sizes for the Stack Bypass Tray 2 26 For the Paper Drawer 2 28 Originals and Print Media Chapter 2 ...

Страница 55: ...nsparencies use a piece of plain white paper to cover the original after placing it face down on the platen glass 2 When copying two sided originals only LTR LGL FLSC A4 can be used 3 17 to 34 lb 64 to 128 g m2 when copying originals smaller than LTR A4 4 17 to 28 lb 64 to 105 g m2 when copying originals smaller than LTR A4 5 20 lb 75 g m2 paper Do not place the originals on the platen glass or in...

Страница 56: ...Scanning Area Make sure your originals text and graphics fall within the shaded area in the following diagram Note that the margin widths listed are approximate and there may be slight variations in actual use Copy Scanning Area Fax Scanning Area ...

Страница 57: ...ant to use On the Platen Glass Place the originals on the platen glass when copying bound originals such as books and magazines heavy or lightweight originals and transparencies 1 Lift up the feeder 2 Place your original face down 3 Align the original with the appropriate paper size marks If your original does not match any of the paper size marks align the center of your original with the arrow m...

Страница 58: ...aten glass when scanning is complete In the Feeder Place the originals into the feeder when you want to copy several originals at the same time and press Start The machine automatically feeds the originals to the scanning area and scans them 1 Fan the originals stack and even the edges 2 Adjust the slide guides to the width of the originals ...

Страница 59: ...y are being scanned When scanning is complete remove the originals from the originals delivery tray to avoid paper jams Avoid using feeder to scan the same originals more than 30 times When scanned repeatedly originals can become folded or torn which may cause paper jams If the feeder rollers are soiled from scanning originals written in pencil clean them See Cleaning the Machine on p 11 2 ...

Страница 60: ... From 28 to 32 lb 106 to 120 g m2 5 From 32 to 47 lb 121 to 176 g m2 6 From 20 to 28 lb 75 to 105 g m2 7 Use only LTR or A4 size transparencies 8 Max 500 sheets of paper can be set in the optional Paper Drawer Paper Drawer 2 9 Can be used for two sided copying 10 Select Heavy 1 for the paper type when using the coated paper with the weight of 27 to 29 lb 100 to 110 g m2 Load the paper into the sta...

Страница 61: ...verse side The following types of paper do not print well Highly textured paper Very smooth paper Shiny paper Make sure the paper is free from dust lint and oil stains Be sure to test paper before purchasing large quantities Store all paper wrapped and on a flat surface until ready for use Keep opened packs in their original packaging in a cool dry location Store paper at 64 4 F 75 2 F 18 C 24 C 4...

Страница 62: ...Area Originals and Print Media Printable Area The shaded area indicates the approximate printable area of LTR paper Note that the margin widths listed are approximate and there may be slight variations in actual use ...

Страница 63: ... describes how to load paper in the paper drawer or in the optional paper drawer 1 Pull out the paper drawer until it stops 2 Hold the paper drawer with both hands and remove it from the machine 3 Hold the lock release lever of the side paper guides A and slide the guides to the mark for the size of the paper to be loaded The side paper guides move together Make sure to set the guides to the mark ...

Страница 64: ...the paper to be loaded correctly If the guides are positioned incorrectly it may cause paper jams dirty prints etc 5 Fan the paper stack and even the edges 6 Load the paper stack of the appropriate size with the print side facing up Align the rear edge of the paper stack with the rear paper guide Make sure the paper stack does not exceed the load limit mark A The paper drawer holds approximately 2...

Страница 65: ...installed in the machine follow the procedure described below 1 Pull out the optional paper drawer until it stops 2 Hold the optional paper drawer with both hands and remove it from the machine 3 Hold the lock release lever of the side paper guides A and slide the guides to the mark for the size of the paper to be loaded The side paper guides move together Make sure to set the guides to the mark f...

Страница 66: ...es are positioned incorrectly it may cause paper jams dirty prints etc 5 Fan the paper stack and even the edges 6 Load the paper stack of the appropriate size with the print side facing up Align the rear edge of paper stack with the rear paper guide Make sure the paper stack does not exceed the load limit mark A The optional paper drawer holds approximately 500 sheets of paper 20 lb 75 g m2 7 Hold...

Страница 67: ...2 14 Loading Paper Originals and Print Media 8 Push the paper drawer as far as it will go For details on loading paper in the stack bypass tray see In the Stack Bypass Tray on p 2 16 ...

Страница 68: ...ettings is set to Speed Priority the default setting For details see Introduction of the Machine in the e Manual with the printing side facing up with the printing side facing up 1 sided printing When Paper Feed Method Switch in Common Settings is set to Print Side Priority For details see Introduction of the Machine in the e Manual with the printing side facing down with the printing side facing ...

Страница 69: ... If this happens load only one sheet of heavyweight paper at a time When printing on special types of paper such as heavyweight paper or transparencies make sure to correctly set the paper type especially if you are using heavyweight paper If the type of paper is not set correctly it could adversely affect the quality of the image Moreover the fixing unit may become dirty and require a service rep...

Страница 70: ...r Size and Type on p 2 22 2 Adjust the slide guides to match the size of the paper If you are feeding large size paper pull out the auxiliary tray and extend the tray extension 3 Load the paper into the stack bypass tray Insert the paper stack as far as it will go Before inserting paper When you use the stack bypass tray to make copies straighten out curled paper prior to use as shown below Curled...

Страница 71: ...y and find that the paper or envelopes are not being fed smoothly or evenly through the stack bypass tray remove the paper or envelopes curl the feeding edges upward approximately 1 8 3 mm and then reload the paper or envelopes Curling the feeding edges enables the rollers to grip the paper or envelopes as they are fed into the machine from the stack bypass tray If there are instructions on the pa...

Страница 72: ... the envelopes by hand in the direction of the arrows to remove any curls Repeat this step five times for each set of five envelopes Take particular care to spread the envelopes out in the direction that they will be fed Hold down the four corners of the envelopes firmly so that they and the sealed or glued portion stay flat Do not print on the back side of the envelopes the side with the flap If ...

Страница 73: ... sealing side flap side is located on the left when viewed from the front For side opening envelopes load them so their sealing side flap side is located in the back of the stack bypass tray when viewed from the front The screen for selecting the paper size appears The stack bypass tray can hold 10 envelopes at a time Envelopes may be creased in the printing process ...

Страница 74: ...mon Settings is set to Speed Priority the default setting For details see Introduction of the Machine in the e Manual with the printing side facing down with the printing side facing down 1 sided printing When Paper Feed Method Switch in Common Settings is set to Print Side Priority For details see Introduction of the Machine in the e Manual with the printing side facing up with the printing side ...

Страница 75: ...ize and type loaded into the paper drawer s and stack bypass tray For the Stack Bypass Tray You can register a frequently used paper size and type for the stack bypass tray The default setting is Off 1 Press Main Menu 2 Press the right Any key to select Additional Func 3 Use or Scroll Wheel to select Paper Settings then press OK ...

Страница 76: ...om the following paper sizes LTR LGL STMT EXEC FLSC OFI B OFI M OFI G LTR G LGL Custom Size COM10 Monarch DL ISO C5 ISO B5 If you use A B size paper press the left Any key to select A B Sizes and select the paper size you want to use If you register an irregular paper size Use or Scroll Wheel to select Custom Size then press OK Use or Scroll Wheel to select X length for the short edge then press O...

Страница 77: ...you register an irregular paper size by recalling the previously set size You can recall the previously set paper size For instructions on how to register the irregular paper size see Registering Irregular Paper Sizes for the Stack Bypass Tray on p 2 26 Use or Scroll Wheel to select Custom Size then press OK Press the right Any key to select Recall Register Use or Scroll Wheel to select Size 1 or ...

Страница 78: ... Y select Set Size press the right Any key to select Done select Back press OK Use or Scroll Wheel to select Set Size then press OK 6 Use or Scroll Wheel to select paper type then press OK The selectable paper types vary depending on the paper size you have specified The unavailable paper types are grayed out on the display 7 Use or Scroll Wheel to select On then press OK 8 Press right Any key to ...

Страница 79: ...details see Recalling Irregular Paper Size Registered for the Stack Bypass Tray on p 4 17 1 Press Main Menu 2 Press the right Any key to select Additional Func 3 Use or Scroll Wheel to select Paper Settings then press OK 4 Use or Scroll Wheel to select Custom Size then press OK 5 Use or Scroll Wheel to select Size 1 or Size 2 then press OK 6 Use or Scroll Wheel to select X length for the short edg...

Страница 80: ...e then press OK 11 Press the right Any key to select Done If you want to register the other custom paper size select Size 1 or Size 2 then repeat steps 6 to 10 12 Press Main Menu to return to the Main Menu screen You can use the irregular paper size registered with the procedure above for the Stack Bypass Paper Std setting which is useful if you frequently use the same irregular size paper For det...

Страница 81: ...his procedure to change the settings The default settings are LTR and Plain 2 1 Press Main Menu 2 Press the right Any key to select Additional Func 3 Use or Scroll Wheel to select Paper Settings then press OK 4 Use or Scroll Wheel to select Drawer 1 or Drawer 2 then press OK Only when the optional Paper Drawer Paper Drawer 2 is attached ...

Страница 82: ...aper press the left Any key to select A B Sizes and perform the step above 6 Use or Scroll Wheel to select paper type then press OK You can select from the following paper types Plain 1 Plain 2 Recycled Paper Color Bond Heavy 1 If you use the paper drawer 2 repeat the steps 4 to 6 for the paper drawer 2 Only when the optional Paper Drawer Paper Drawer 2 is attached 7 Press Main Menu to return to t...

Страница 83: ...2 30 Setting Paper Size and Type Originals and Print Media ...

Страница 84: ... Address Book 3 16 Registering File Server Addresses in the Address Book 3 18 Registering Group Addresses in the Address Book 3 24 Checking Editing Addresses Registered in the Address Book 3 27 Erasing Addresses from the Address Book 3 30 Storing Editing One Touch 3 32 Registering Fax Numbers in One Touch 3 32 Registering Fax Numbers Obtained via an LDAP Server in One Touch 3 37 Registering E Mail...

Страница 85: ...o the machine For information on how to export and import the Address Book see Setting from a PC in the e Manual For easy reference it is recommended to print the list of recipients registered in the Address Book and one touch For information on how to print the lists see Introduction of the Machine in the e Manual New destinations cannot be registered in the Address Book if Restrict New Addresses...

Страница 86: ...Security in the e Manual 4 Use or Scroll Wheel to select Register Address then press OK 5 Press the right Any key to select Register New 6 Use or Scroll Wheel to select Fax then press OK 7 Use or Scroll Wheel to select Register Name then press OK 8 Use the software keyboard to enter the recipient s name You can enter up to 16 characters for the recipient s name For information on how to use the so...

Страница 87: ...en the numbers If you insert a pause at the end of the fax number the letter P appears When dialing an overseas number insert a pause after the country code and at the end of the fax number If you want to directly call an extension line that is connected to a PBX Private Branch Exchange which accepts only tone signals use or Scroll Wheel to select Tone then press OK If you want to insert a space b...

Страница 88: ...e or Scroll Wheel to select ECM TX then press OK 14 Use or Scroll Wheel to select On or Off then press OK 15 Use or Scroll Wheel to select Sending Speed then press OK 16 Use or Scroll Wheel to select the sending speed then press OK If your document transmissions are slow to start it may mean that the telephone lines in your area are in poor condition Select a slower speed You can select 33600 bps ...

Страница 89: ...ur when you make overseas calls when the overseas telephone number is registered in the Address Book If errors persist try selecting Long Distance 2 or Long Distance 3 19 Press the right Any key to select Done 20 Use or Scroll Wheel to select Set Destination then press OK 21 Press the right Any key to select Register If you want to register another fax number repeat from step 6 22 Press the right ...

Страница 90: ...elect Address Book then press OK Press the left Any key to select Reg Edit Erase Use or Scroll Wheel to select Register New Dest to Add Book then press OK Follow the procedure described in this section from step 6 1 Press Main Menu 2 Press the right Any key to select Additional Func 3 Use or Scroll Wheel to select Address Book Settings then press OK If a password has been set for the Address Book ...

Страница 91: ...nges to Clear Selection To cancel a selected destination select the destination again then press OK to clear the check mark You can use or to restrict the displayed range of destinations 9 Press the right Any key to select Register If only one destination is selected Use or Scroll Wheel to select Display Name then press OK Confirm the recipient s name then press the right Any key to select Set If ...

Страница 92: ...d specify the optional settings see Registering Fax Numbers in the Address Book on p 3 2 Use or Scroll Wheel to select Set Destination then press OK Press the right Any key to select Register If multiple destinations are selected Confirm the message shown on the display then press the right Any key to select Done 10 Press Main Menu to return to the Main Menu screen ...

Страница 93: ...ll Wheel to select Address Book then press OK Press the left Any key to select Reg Edit Erase Use or Scroll Wheel to select Register New Dest to Add Book then press OK Follow the procedure described in this section from step 6 1 Press Main Menu 2 Press the right Any key to select Additional Func 3 Use or Scroll Wheel to select Address Book Settings then press OK If a password has been set for the ...

Страница 94: ...ation on how to use the software keyboard see Entering Characters on p 1 19 Registered destinations are sorted in the Address Book by its recipient s name in alphabetical order 9 If you are finished press the right Any key to select Set 10 Use or Scroll Wheel to select Destination Registration then press OK 11 Use the software keyboard to enter the recipient s e mail address You can enter up to 12...

Страница 95: ...s Book 12 If you are finished press the right Any key to select Set 13 Press the right Any key to select Register If you want to register another e mail address repeat from step 6 14 Press the right Any key to select Done 15 Press Main Menu to return to the Main Menu screen ...

Страница 96: ...e screen as follows In the Select Send Type screen use or Scroll Wheel to select Address Book then press OK Press the left Any key to select Reg Edit Erase Use or Scroll Wheel to select Register New Dest to Add Book then press OK Follow the procedure described in this section from step 6 1 Press Main Menu 2 Press the right Any key to select Additional Func 3 Use or Scroll Wheel to select Address B...

Страница 97: ...Scroll Wheel to select Register E mail for I Fax the selected e mail address can be specified as an I fax destination To register e mail addresses as I fax addresses register one e mail address at a time To cancel a selected destination select the destination again then press OK to clear the check mark You can use or to restrict the displayed range of destinations 9 Press the right Any key to sele...

Страница 98: ...ss the right Any key to select Set If you edit the destination obtained from the search results see Registering E Mail Addresses in the Address Book on p 3 10 Press the right Any key to select Register If multiple destinations are selected Confirm the message shown on the display then press the right Any key to select Done 10 Press Main Menu to return to the Main Menu screen ...

Страница 99: ... key to select Reg Edit Erase Use or Scroll Wheel to select Register New Dest to Add Book then press OK Follow the procedure described in this section from step 6 1 Press Main Menu 2 Press the right Any key to select Additional Func 3 Use or Scroll Wheel to select Address Book Settings then press OK If a password has been set for the Address Book enter the password to enter Address Book Settings m...

Страница 100: ...haracters on p 1 19 Registered destinations are sorted in the Address Book by its recipient s name in alphabetical order 9 If you are finished press the right Any key to select Set 10 Use or Scroll Wheel to select Destination Registration then press OK 11 Use the software keyboard to enter the recipient s I fax address You can enter up to 120 characters for the I fax address For information on how...

Страница 101: ...o them This section describes how to register destinations from the Additional Functions screen You can also register destinations from the Select Send Type screen as follows In the Select Send Type screen use or Scroll Wheel to select Address Book then press OK Press the left Any key to select Reg Edit Erase Use or Scroll Wheel to select Register New Dest to Add Book then press OK Follow the proc...

Страница 102: ...elect Register Name then press OK 8 Use the software keyboard to enter the file server name You can enter up to 16 characters for the file server name For information on how to use the software keyboard see Entering Characters on p 1 19 Registered destinations are sorted in the Address Book by its recipient s name in alphabetical order 9 If you are finished press the right Any key to select Set 10...

Страница 103: ...r 2008 Windows SMB Browse Select this protocol if you want to specify a file server connected to a specific network After turning the main power on you must wait for the time set in the Startup Time Settings to elapse before selecting Windows SMB Browse Network transmission is not possible until this startup time has elapsed See Network Settings in the e Manual If you select FTP or Windows SMB Use...

Страница 104: ...r in the file server as the destination of the send job If you are sending to an imageWARE Document Manager folder enter the folder name set in imageWARE Gateway Color imageCLASS MF9280Cdn only If you are finished press the right Any key to select Set Use or Scroll Wheel to select User Name then press OK Use the software keyboard to enter the user name You can enter up to 24 characters for the use...

Страница 105: ... 24 characters when FTP is selected as the server protocol or up to 14 when Windows SMB is selected For information on how to use the software keyboard see Entering Characters on p 1 19 If you are sending to an imageWARE Document Manager folder enter the password set in imageWARE Gateway Color imageCLASS MF9280Cdn only If you are finished press the right Any key to select Set Press the right Any k...

Страница 106: ...le server is not displayed use or Scroll Wheel to scroll to the desired file server Use or Scroll Wheel to select the desired file server then press the right Any key to select Set To enter the user name and the network password select a file server from the list and press OK Enter the user name up to 24 character and network password up to 14 characters then press the right Any key to select Set ...

Страница 107: ...ddresses I fax addresses and file server addresses You cannot register a group address in a group address This section describes how to register destinations from the Additional Functions screen You can also register destinations from the Select Send Type screen as follows In the Select Send Type screen use or Scroll Wheel to select Address Book then press OK Press the left Any key to select Reg E...

Страница 108: ...ll Wheel to select Register Name then press OK 8 Use the software keyboard to enter the group name You can enter up to 16 characters for the group name For information on how to use the software keyboard see Entering Characters on p 1 19 Registered destinations are sorted in the Address Book by its name in alphabetical order 9 If you are finished press the right Any key to select Set 10 Use or Scr...

Страница 109: ...s not displayed use or Scroll Wheel to scroll to the desired destination You can select a destination and press the left Any key to select Details to confirm the detailed information related to the selected destination Press the right Any key to select Done to return to the previous screen 12 Repeat step 11 to select all destinations you want to register in the group address then press the right A...

Страница 110: ...select Address Book then press OK Use or Scroll Wheel to select the destination you want to check or edit Press the left Any key to select Reg Edit Erase Use or Scroll Wheel to select Confirm Edit Address Book Dest then press OK Follow the procedure described in this section from step 7 1 Press Main Menu 2 Press the right Any key to select Additional Func 3 Use or Scroll Wheel to select Address Bo...

Страница 111: ...o scroll to the desired destination If you select All destinations registered in one touch are also displayed However you cannot edit those destinations For information on how to edit the destinations registered in one touch see Checking Editing Addresses Registered in One Touch on p 3 59 6 Use or Scroll Wheel to select Confirm Edit Address Book Dest then press OK 7 Check or edit the address detai...

Страница 112: ...il addresses see Registering E Mail Addresses in the Address Book on p 3 10 For information on how to register I fax addresses see Registering I Fax Addresses in the Address Book on p 3 16 For information on how to register file server addresses see Registering File Server Addresses in the Address Book on p 3 18 For information on how to register group addresses see Registering Group Addresses in ...

Страница 113: ... to erase Press the left Any key to select Reg Edit Erase Use or Scroll Wheel to select Erase from Add Book then press OK Follow the procedure described in this section from step 7 1 Press Main Menu 2 Press the right Any key to select Additional Func 3 Use or Scroll Wheel to select Address Book Settings then press OK If a password has been set for the Address Book enter the password to enter Addre...

Страница 114: ...ll Wheel to scroll to the desired destination If you select All destinations registered in one touch are also displayed However you cannot delete those destinations For information on how to delete the destinations registered in one touch see Erasing Addresses Registered in One Touch on p 3 62 6 Use or Scroll Wheel to select Erase from Add Book then press OK 7 Use or Scroll Wheel to select Yes the...

Страница 115: ...if Restrict New Addresses in Restrict the Send Function in System Management Set is set to On Registering Fax Numbers in One Touch This section describes the procedure for registering fax numbers in one touch This section describes how to register destinations from the Additional Functions screen You can also register destinations from the Select Send Type screen as follows In the Select Send Type...

Страница 116: ...select Fax then press OK 7 Use or Scroll Wheel to select Register Name then press OK 8 Use the software keyboard to enter the recipient s name You can enter up to 16 characters for the recipient s name For information on how to use the software keyboard see Entering Characters on p 1 19 Registered destinations are sorted in the Address Book by its recipient s name in alphabetical order 9 If you ar...

Страница 117: ...f the cursor use or Scroll Wheel If you want to delete the number or character immediately to the left of the cursor use or Scroll Wheel to select Backspace then press OK If you want to insert a pause of several seconds use or Scroll Wheel to select Pause then press OK If you insert a pause within the fax number the letter p is displayed between the numbers If you insert a pause at the end of the ...

Страница 118: ... is always 10 seconds long 15 If you want to set the ECM TX sending speed and long distance settings press the right Any key to select Option These settings are optional If you do not want to set the optional settings skip to step 23 16 Use or Scroll Wheel to select ECM TX then press OK 17 Use or Scroll Wheel to select On or Off then press OK 18 Use or Scroll Wheel to select Sending Speed then pre...

Страница 119: ...ication errors frequently occur when you make overseas calls when the overseas telephone number is registered in the Address Book If errors persist try selecting Long Distance 2 or Long Distance 3 22 Press the right Any key to select Done 23 Use or Scroll Wheel to select Set Destination then press OK 24 Press the right Any key to select Register If you want to register another fax number repeat fr...

Страница 120: ...he right Any key to select One touch Press the left Any key to select Reg Edit Erase Use or Scroll Wheel to select Register New Dest to One touch then press OK Follow the procedure described in this section from step 5 1 Press Main Menu 2 Press the right Any key to select Additional Func 3 Use or Scroll Wheel to select Address Book Settings then press OK If a password has been set for the Address ...

Страница 121: ...tions at a time To cancel a selected destination select the destination again then press OK to clear the check mark You can use or to restrict the displayed range of destinations 9 Press the right Any key to select Set 10 Use or Scroll Wheel to select Display Name then press OK 11 Confirm the recipient s name then press the right Any key to select Set If you edit the recipient s name obtained from...

Страница 122: ...touch name For information on using the software keyboard see Entering Characters on p 1 19 14 Use or Scroll Wheel to select Display Destination then press OK 15 Confirm the destination If you edit the destination obtained from the search results and specify the optional settings see Registering Fax Numbers in One Touch on p 3 32 16 Use or Scroll Wheel to select Set Destination then press OK 17 Pr...

Страница 123: ...t Any key to select Reg Edit Erase Use or Scroll Wheel to select Register New Dest to One touch then press OK Follow the procedure described in this section from step 5 1 Press Main Menu 2 Press the right Any key to select Additional Func 3 Use or Scroll Wheel to select Address Book Settings then press OK If a password has been set for the Address Book enter the password to enter Address Book Sett...

Страница 124: ...ng Characters on p 1 19 Registered destinations are sorted in the Address Book by its recipient s name in alphabetical order 9 If you are finished press the right Any key to select Set 10 Use or Scroll Wheel to select Register One touch Name then press OK 11 Use the software keyboard to enter the one touch name You can enter up to 12 characters for the one touch name For information on how to use ...

Страница 125: ...ess You can enter up to 120 characters for the e mail address For information on how to use the software keyboard see Entering Characters on p 1 19 15 If you are finished press the right Any key to select Set 16 Press the right Any key to select Register If you want to register another e mail address repeat from step 5 17 Press the right Any key to select Done 18 Press Main Menu to return to the M...

Страница 126: ...ows In the Select Send Type screen press the right Any key to select One touch Press the left Any key to select Reg Edit Erase Use or Scroll Wheel to select Register New Dest to One touch then press OK Follow the procedure described in this section from step 5 1 Press Main Menu 2 Press the right Any key to select Additional Func 3 Use or Scroll Wheel to select Address Book Settings then press OK I...

Страница 127: ...E mail for I Fax the selected e mail address can be specified as an I fax destination To cancel a selected destination select the destination again then press OK to clear the check mark You can use or to restrict the displayed range of destinations 9 Press the right Any key to select Set 10 Use or Scroll Wheel to select Display Name then press OK 11 Confirm the recipient s name then press the righ...

Страница 128: ...2 characters for the one touch name For information on using the software keyboard see Entering Characters on p 1 19 14 Use or Scroll Wheel to select Display Destination then press OK 15 Confirm the destination then press the right Any key to select Set If you edit the destination obtained from the search results see Registering E Mail Addresses in One Touch on p 3 40 16 Press the right Any key to...

Страница 129: ...select Register One touch then press OK 5 Use or Scroll Wheel to select the one touch you want to register then press OK Registering I Fax Addresses in One Touch This section describes the procedure for registering I fax addresses in one touch This section describes how to register destinations from the Additional Functions screen You can also register destinations from the Select Send Type screen...

Страница 130: ...nformation on how to use the software keyboard see Entering Characters on p 1 19 Registered destinations are sorted in the Address Book by its recipient s name in alphabetical order 9 If you are finished press the right Any key to select Set 10 Use or Scroll Wheel to select Register One touch Name then press OK 11 Use the software keyboard to enter the one touch name You can enter up to 12 charact...

Страница 131: ...nter the recipient s I fax address You can enter up to 120 characters for the I fax address For information on how to use the software keyboard see Entering Characters on p 1 19 15 If you are finished press the right Any key to select Set 16 Press the right Any key to select Register If you want to register another I fax address repeat from step 5 17 Press the right Any key to select Done 18 Press...

Страница 132: ...the Select Send Type screen press the right Any key to select One touch Press the left Any key to select Reg Edit Erase Use or Scroll Wheel to select Register New Dest to One touch then press OK Follow the procedure described in this section from step 5 1 Press Main Menu 2 Press the right Any key to select Additional Func 3 Use or Scroll Wheel to select Address Book Settings then press OK If a pas...

Страница 133: ...formation on how to use the software keyboard see Entering Characters on p 1 19 Registered destinations are sorted in the Address Book by its recipient s name in alphabetical order 9 If you are finished press the right Any key to select Set 10 Use or Scroll Wheel to select Register One touch Name then press OK 11 Use the software keyboard to enter the one touch name You can enter up to 12 characte...

Страница 134: ...er 2008 R2 or Red Hat Linux 7 2 Windows SMB Select this protocol if you are sending documents to a computer running UNIX Linux Samba 2 2 8a or later or Windows 98 Me 2000 XP Vista 7 Server 2003 Server 2008 Windows SMB Browse Select this protocol if you want to specify a file server connected to a specific network After turning the main power on you must wait for the time set in the Startup Time Se...

Страница 135: ...s for the folder path For information on how to use the software keyboard see Entering Characters on p 1 19 A file path is a series of characters that signify the location of the folder Specify a folder in the file server as the destination of the send job If you are sending to an imageWARE Document Manager folder enter the folder name set in imageWARE Gateway Color imageCLASS MF9280Cdn only If yo...

Страница 136: ...se the software keyboard to enter the password You can enter up to 24 characters when FTP is selected as the server protocol or up to 14 when Windows SMB is selected For information on how to use the software keyboard see Entering Characters on p 1 19 If you are sending to an imageWARE Document Manager folder enter the password set in imageWARE Gateway Color imageCLASS MF9280Cdn only If you are fi...

Страница 137: ... the desired file server Use or Scroll Wheel to select the desired file server then press the right Any key to select Set To enter the user name and the network password select a file server from the list and press OK Enter the user name up to 24 character and network password up to 14 characters then press the right Any key to select Set Specify the folder path user name and password as described...

Страница 138: ...ver addresses You cannot register a group address in a group address This section describes how to register destinations from the Additional Functions screen You can also register destinations from the Select Send Type screen as follows In the Select Send Type screen press the right Any key to select One touch Press the left Any key to select Reg Edit Erase Use or Scroll Wheel to select Register N...

Страница 139: ...OK 7 Use or Scroll Wheel to select Register Name then press OK 8 Use the software keyboard to enter the group name You can enter up to 16 characters for the group name For information on how to use the software keyboard see Entering Characters on p 1 19 Registered destinations are sorted in the Address Book by its name in alphabetical order 9 If you are finished press the right Any key to select S...

Страница 140: ... then press OK To cancel a selected destination select the destination again and press OK to clear the check mark Use or to select the index key e g ABC to restrict the display range of entries Select All to return to the full address list If the desired destination is not displayed use or Scroll Wheel to scroll to the desired destination You can select a destination and press the left Any key to ...

Страница 141: ...ng Destinations in the Address Book 16 Press the right Any key to select Register If you want to register another group address repeat from step 5 17 Press the right Any key to select Done 18 Press Main Menu to return to the Main Menu screen ...

Страница 142: ...e screen press the right Any key to select One touch Use or Scroll Wheel to select the one touch you want to check or edit Press the left Any key to select Reg Edit Erase Use or Scroll Wheel to select Confirm Edit One touch Dest then press OK Follow the procedure described in this section from step 7 1 Press Main Menu 2 Press the right Any key to select Additional Func 3 Use or Scroll Wheel to sel...

Страница 143: ...tinations at the same time If the desired one touch is not displayed use or Scroll Wheel to scroll to the desired one touch 6 Use or Scroll Wheel to select Details Edit then press OK 7 Check or edit the address details If you want to check the address details Check the details then press the right Any key to select Done If you want to edit the address details Use or Scroll Wheel to select the item...

Страница 144: ...ster e mail addresses see Registering E Mail Addresses in One Touch on p 3 40 For information on how to register I fax addresses see Registering I Fax Addresses in One Touch on p 3 46 For information on how to register file server addresses see Registering File Server Addresses in One Touch on p 3 49 For information on how to register group addresses see Registering Group Addresses in One Touch on...

Страница 145: ... select Erase from One touch then press OK Follow the procedure described in this section from step 7 1 Press Main Menu 2 Press the right Any key to select Additional Func 3 Use or Scroll Wheel to select Address Book Settings then press OK If a password has been set for the Address Book enter the password to enter Address Book Settings menu Enter the password using numeric keys then press OK For d...

Страница 146: ... Destinations in the Address Book 6 Use or Scroll Wheel to select Erase then press OK 7 Use or Scroll Wheel to select Yes then press OK If you want to cancel erasing the destination select No 8 Press Main Menu to return to the Main Menu screen ...

Страница 147: ...3 64 Storing Editing One Touch Registering Destinations in the Address Book ...

Страница 148: ...educe Images 4 31 Preset Zoom 4 31 Custom Copy Ratio 4 33 Selecting Image Quality 4 35 Multiple Originals onto One Sheet N on 1 4 37 Making ID Card Copies 4 40 Adjusting Sharpness 4 42 Erasing Shadows Lines 4 44 Original Frame Erase 4 45 Book Frame Erase 4 48 Binding Erase 4 51 Adjusting Color Balance 4 54 Registering Color Balance 4 56 Recalling Registered Color Balance 4 58 Deleting Color Balanc...

Страница 149: ...f Copy Functions Overview of Copy Functions In addition to the enlarging reducing the copy you can make 2 sided copies or use the N on 1 mode which reduces multiple originals to fit on one sheet of paper p 4 11 p 4 35 p 4 19 ...

Страница 150: ...Copying 4 3 Overview of Copy Functions p 4 23 p 4 31 p 4 37 ...

Страница 151: ...sword in the e Manual To make black and white copies press the right Any key to select Black Copy When the display shows the message Enter User ID and password enter the user ID and password Then press Log In Out on the control panel For details see Security in the e Manual 2 Press Main Menu 3 Use or Scroll Wheel to select Copy then press OK 4 Make the copy settings you require You can specify the...

Страница 152: ...ic keys to enter the desired copy quantity 1 to 99 If you make a mistake when entering values press Clear and enter the correct values The copy quantity appears on the right side of the Copy top screen You cannot change the copy quantity while the machine is copying 6 Press Start to start copying When scanning is complete remove your originals You cannot change copy mode settings such as the copy ...

Страница 153: ...el a copy job during scanning make sure to remove the original 1 Press the left Any key to select Cancel The display will return to the Copy top screen While the machine is scanning printing or waiting to print you can cancel a copy job by pressing Stop 2 Press Main Menu to return to the Main Menu screen ...

Страница 154: ...croll Wheel to select the color mode then press OK Auto color Select For the automatic selection of color or B W Color For copies in full color Black For black and white copies Depending on the condition of the originals the machine may not be able to properly distinguish between color and black and white originals Selecting Color Mode This section describes how to select the color mode color B W ...

Страница 155: ...se numeric keys to enter the desired copy quantity 1 to 99 7 Press Start If you want to copy multiple originals using the platen glass set an original and press Start once for each page 8 Press Main Menu to return to the Main Menu screen ...

Страница 156: ... R such as in STMTR used in paper size designations indicates that the paper is loaded in a paper drawer or the stack bypass tray horizontally Copying on Paper in Drawers You can select paper drawer 1 or 2 optional for a copy You need to set up the paper size and type for each drawer in advance For details about configuring the paper size and type see Setting Paper Size and Type on p 2 22 1 Set or...

Страница 157: ...esired paper source then press OK 6 Use numeric keys to enter the desired copy quantity 1 to 99 7 Press Start If you want to copy multiple originals using the platen glass set an original and press Start once for each page 8 Press Main Menu to return to the Main Menu screen ...

Страница 158: ...er Requirements on p 2 7 The available paper sizes will vary depending on the country where the unit was purchased Using Stack Bypass Tray with Standard Paper Sizes This section describes how to copy onto standard sized paper using the stack bypass tray If Stack Bypass Paper Std setting in Paper Settings from the Additional Functions screen is set to Off the paper size type setting screen appears ...

Страница 159: ...uirements on p 2 7 If you want to print the back side of the printed paper press the right Any key to select 2nd of 2 Sided 7 Press OK to select Stack Bypass The selected paper size is displayed next to Stack Bypass 8 Use numeric keys to enter the desired copy quantity 1 to 99 9 Press Start If you want to copy multiple originals using the platen glass set an original and press Start once for each ...

Страница 160: ...tal length X Using Stack Bypass Tray with Irregular Sizes of Paper This section describes how to copy onto non standard sized paper using the stack bypass tray If Stack Bypass Paper Std setting in Paper Settings from the Additional Functions screen is set to Off the paper size type setting screen appears when you load paper in the stack bypass tray If Stack Bypass Paper Std is set to On copying ca...

Страница 161: ...alues for Y between 5 127 mm and 14 356 mm 10 Use or Scroll Wheel to select Set Size then press OK 11 Use or Scroll Wheel to select the desired paper type then press OK You can select from the following paper types Plain 1 Plain 2 Recycled Paper Color Bond Heavy 1 Heavy 2 Labels Envelope For details see Paper Requirements on p 2 7 If you want to print the back side of the printed paper press the r...

Страница 162: ...bypass tray If Stack Bypass Paper Std is set to On copying can be performed only for the registered paper size and type See Setting Paper Size and Type on p 2 22 1 Set originals For details see Placing Originals on p 2 4 2 Press Main Menu 3 Use or Scroll Wheel to select Copy then press OK 13 Use numeric keys to enter the desired copy quantity 1 to 99 14 Press Start If you want to copy multiple ori...

Страница 163: ...heel to select the desired size of envelopes then press OK You can select from the following sizes of envelopes COM10 Monarch DL ISO C5 ISO B5 For details see Paper Requirements on p 2 7 6 Press OK to select Stack Bypass The selected paper size is displayed next to Stack Bypass 7 Press Start 8 Press Main Menu to return to the Main Menu screen ...

Страница 164: ... by recalling the pre registered paper size For details see Registering Irregular Paper Sizes for the Stack Bypass Tray on p 2 26 1 Set originals For details see Placing Originals on p 2 4 2 Press Main Menu 3 Use or Scroll Wheel to select Copy then press OK 4 Load the paper into the stack bypass tray 5 Use or Scroll Wheel to select Custom Size then press OK 6 Press the right Any key to select Reca...

Страница 165: ... the paper type then press OK You can select the paper type from the following Plain 1 Plain 2 Recycled Paper Color Bond Heavy 1 Heavy 2 Labels Envelope For details see Paper Requirements on p 2 7 If you want to print the back side of the printed paper press the right Any key to select 2nd of 2 Sided 10 Use or Scroll Wheel to select Stack Bypass Custom Size then press OK 11 Use numeric keys to ent...

Страница 166: ...ginal The copy tone becomes lighter as the indicator moves to the left and darker as it moves to the right The default setting is 0 1 Set originals For details see Placing Originals on p 2 4 2 Press Main Menu 3 Use or Scroll Wheel to select Copy then press OK 4 Use or Scroll Wheel to display Density Background Rem Set then press OK ...

Страница 167: ... density scale to the left To make light originals darker move the density scale to the right 6 Use numeric keys to enter the desired copy quantity 1 to 99 7 Press Start If you want to copy multiple originals using the platen glass set an original and press Start once for each page 8 Press Main Menu to return to the Main Menu screen ...

Страница 168: ...ty Background Rem Set then press OK 5 Press the right Any key to select Background 6 Use or Scroll Wheel to select the background setting then press OK If you select Background Removal Use or Scroll Wheel to select Background Removal then press OK Press OK then skip to step 7 Adjusting Base Color This mode enables you to adjust or remove the base color of the originals The default setting is Off ...

Страница 169: ...lor then press OK Use or Scroll Wheel to adjust the strength of the color then press OK Press the right Any key to select Set then press OK 7 Use numeric keys to enter the desired copy quantity 1 to 99 8 Press Start If you want to copy multiple originals using the platen glass set an original and press Start once for each page 9 Press Main Menu to return to the Main Menu screen ...

Страница 170: ...ault setting is Off When you use the feeder to make two sided copies from two sided originals or one sided copies from two sided originals the original size must be LTR LGL FLSC or A4 For the paper size that can be used for the 2 sided copying see the following e Manual Print Printer Settings from the Machine Settings Menu 2 Sided The same paper size can be used for the 2 sided copying and 2 sided...

Страница 171: ...Use or Scroll Wheel to display Various 2 Sided Settings then press OK 5 Use or Scroll Wheel to select 1 Sided to 2 Sided If there are odd number of originals when the 1 Sided to 2 Sided mode is used the back side of the last copy is left blank 6 Press the right Any key to select Layout Settings 7 Use or Scroll Wheel to select Vertical Original or Horizontal Original then press OK ...

Страница 172: ... Type Copy The front and back sides of the copy will have the opposite top bottom orientation 9 Press OK 10 Use numeric keys to enter the desired copy quantity 1 to 99 11 Press Start If you want to copy multiple originals using the platen glass set an original and press Start once for each page After scanning all originals press the right Any key to select Done 12 Press Main Menu to return to the ...

Страница 173: ... then press OK 4 Use or Scroll Wheel to display Various 2 Sided Settings then press OK 5 Use or Scroll Wheel to select 2 Sided to 2 Sided then press OK 6 Press the right Any key to select Layout Settings 2 to 2 Sided Copying When you use the feeder to make two sided copies from two sided originals the original size must be LTR LGL FLSC or A4 ...

Страница 174: ...ave the same top bottom orientation Calendar Type Original The front and back sides of the original will have the opposite top bottom orientation 9 Use or Scroll Wheel to select Book Type Copy or Calendar Type Copy then press OK Book Type Copy The front and back sides of the copy will have the same top bottom orientation Calendar Type Copy The front and back sides of the copy will have the opposit...

Страница 175: ...y to select Done 13 Press Main Menu to return to the Main Menu screen 2 to 1 Sided Copying When you use the feeder to make one sided copies from two sided originals the original size must be LTR LGL FLSC or A4 1 Set originals For details see Placing Originals on p 2 4 2 Press Main Menu 3 Use or Scroll Wheel to select Copy then press OK 4 Use or Scroll Wheel to display Various 2 Sided Settings then...

Страница 176: ... press OK 8 Use or Scroll Wheel to select Book Type Original or Calendar Type Original for the original layout then press OK Book Type Original The front and back sides of the original will have the same top bottom orientation Calendar Type Original The front and back sides of the original will have the opposite top bottom orientation 9 Press OK 10 Use numeric keys to enter the desired copy quanti...

Страница 177: ...Start If you want to copy multiple originals using the platen glass set an original and press Start once for each page After scanning all originals press the right Any key to select Done 12 Press Main Menu to return to the Main Menu screen ...

Страница 178: ... preset zoom or you can also enlarge or reduce images in 1 increments custom copy ratio The default setting is 100 1 1 Preset Zoom You can enlarge or reduce originals from one standard paper size to another 1 Set originals For details see Placing Originals on p 2 4 2 Press Main Menu 3 Use or Scroll Wheel to select Copy then press OK ...

Страница 179: ...the following 100 Direct 200 Maximum 129 STMT LTR 78 LGL LTR 64 LTR STMT 50 Minimum If you want to specify the other copy ratio see Custom Copy Ratio on p 4 33 6 Use numeric keys to enter the desired copy quantity 1 to 99 7 Press Start If you want to copy multiple originals using the platen glass set an original and press Start once for each page 8 Press Main Menu to return to the Main Menu screen...

Страница 180: ...3 Use or Scroll Wheel to select Copy then press OK 4 Use or Scroll Wheel to display Copy Ratio Settings then press OK 5 Use or Scroll Wheel to select Custom Copy Ratio then press OK 6 Use or Scroll Wheel to adjust the zoom ratio in 1 increments then press OK If you enter a value outside the setting range a message prompting you to enter an appropriate value appears on the screen 7 Use numeric keys...

Страница 181: ...g 4 34 Enlarge Reduce Images 8 Press Start If you want to copy multiple originals using the platen glass set an original and press Start once for each page 9 Press Main Menu to return to the Main Menu screen ...

Страница 182: ... of originals A correct selection is necessary for the optimal reproduction of the colors of the original The default setting is Text Photo Map Combinations of these four modes Text Photo Map Printed Image Photo and Text cannot be selected at the same time If you select one of these modes the previously set mode is canceled If the original is a transparency select the original type then adjust the...

Страница 183: ...hoto Press the right Any key to select Priority Level then use or Scroll Wheel to adjust the priority revel Printed Image For originals that contain dot photos such as magazines Photo For photo paper originals such as photos Text For originals that contain only text 6 Use numeric keys to enter the desired copy quantity 1 to 99 7 Press Start If you want to copy multiple originals using the platen g...

Страница 184: ...ultiple originals onto one sheet This mode enables you to cut print costs by saving copy paper and it is also useful for saving space The default setting is Off The N on 1 mode cannot be used with the ID Card Copy Original Frame Erase mode Book Frame Erase or Binding Erase mode For details about the erase mode see Erasing Shadows Lines on p 4 44 The reduction ratio is automatically set so that the...

Страница 185: ...oll Wheel to display Copy Multiple Pages onto 1 Page then press OK 5 Use or Scroll Wheel to select the combination type then press OK 2 On 1 This setting reduces two 1 sided originals or one 2 sided original to fit onto one side or both sides of the copy sheet 4 On 1 This setting reduces four 1 sided or two 2 sided originals to fit onto one side or both sides of the copy sheet If you select 4 On 1...

Страница 186: ... to make two sided copies of N on 1 see 2 Sided Copying on p 4 23 If you want to make N on 1 copies from two sided originals select 2 Sided to 1 Sided in the two sided settings For details see 2 Sided Copying on p 4 23 8 Use numeric keys to enter the desired copy quantity 1 to 99 9 Press Start If you want to copy multiple originals using the platen glass set an original and press Start once for ea...

Страница 187: ...ailable Place the ID card on the platen glass when using this function Make sure that no originals are placed in the feeder The zoom ratio is automatically set to 100 with this mode You cannot change the copy ratio The ID Card Copy mode can be used with LTR or A4 paper 1 Place the ID card on the platen glass as illustrated Place the ID card on the middle of the left side of the platen glass 2 Pres...

Страница 188: ...y After the settings are complete press OK to return to the previous display For details on density and base color settings see Adjusting Density on p 4 19 Proceed to step 9 if density and base color adjustment is not necessary 9 To scan one side of the ID card press Start 10 To scan the other side turn the ID card and place it on the platen glass then press Start You can adjust the copy density a...

Страница 189: ...s then press OK To make copies of printed images or other halftones move the sharpness scale to the left To make copies of blueprints or faint pencil drawn images move the sharpness scale to the right Adjusting Sharpness You can set the sharpness of the copied image If you want to copy text and lines more clearly move the sharpness scale to the right If you want to copy a halftone original such as...

Страница 190: ...se numeric keys to enter the desired copy quantity 1 to 99 7 Press Start If you want to copy multiple originals using the platen glass set an original and press Start once for each page 8 Press Main Menu to return to the Main Menu screen ...

Страница 191: ...ypes of originals The following three Frame Erase modes are available Original Frame Erase Book Frame Erase and Binding Erase The default setting is Off Combinations of the three Frame Erase modes cannot be set If you select one of these modes the previously set mode is canceled Frame Erase modes cannot be used with the ID Card Copy mode ...

Страница 192: ... Frame Erase Settings then press OK 5 Use or Scroll Wheel to select Original Frame Erase then press OK Original Frame Erase This mode erases the dark borders and frame lines that appear around the copy if the original is smaller than the selected paper size You can also use this mode to create a blank border around the edge of the copy The Original Frame Erase mode cannot be used with the N on 1 m...

Страница 193: ... to select Enter mm When entering the value in millimeters you can also use Scroll Wheel and numeric keys If you want to change the value press Clear before entering the new value If you enter a value outside the setting range a message prompting you to enter an appropriate value appears on the screen If you want to set the top left right and bottom widths independently Press the right Any key to ...

Страница 194: ...w value If you enter a value outside the setting range a message prompting you to enter an appropriate value appears on the screen Use or Scroll Wheel to select Apply Settings then press OK The display will return to the Copy top screen 7 Use numeric keys to enter the desired copy quantity 1 to 99 8 Press Start If you want to copy multiple originals using the platen glass set an original and press...

Страница 195: ...The Book Frame Erase mode cannot be used with the N on 1 You must place an original on the platen glass when using this function 1 Set an original on the platen glass For details see Placing Originals on p 2 4 2 Press Main Menu 3 Use or Scroll Wheel to select Copy then press OK 4 Use or Scroll Wheel to display Shadow Frame Erase Settings then press OK 5 Use or Scroll Wheel to select Book Frame Era...

Страница 196: ...nter mm Use or Scroll Wheel to enter a frame erase width value then press OK The default setting is 3 8 10 mm The maximum original frame erase width that you can set is 1 15 16 50 mm When entering the value in millimeters you can also use Scroll Wheel or numeric keys If you want to change the value press Clear before entering the new value If you enter a value outside the setting range a message p...

Страница 197: ...l frame erase width that you can set is 1 15 16 50 mm 8 Use or Scroll Wheel to select Apply Settings then press OK 9 Use numeric keys to enter the desired copy quantity 1 to 99 10 Press Start If you want to copy multiple originals using the platen glass set an original and press Start once for each page 11 Press Main Menu to return to the Main Menu screen ...

Страница 198: ... Frame Erase Settings then press OK 5 Use or Scroll Wheel to select Binding Erase then press OK Binding Erase This mode erases the shadows that appear on copies from binding holes on originals Do not place originals with binding holes into the feeder as this may damage the originals The borders you do not select are attenuated when using this function You must place an original on the platen glass...

Страница 199: ...8 Use or Scroll Wheel to select the frame erase width then press OK The default setting is 3 4 18 mm The maximum original frame erase width that you can set is 13 16 20 mm If you want to change the value press Clear before entering the new value If you enter a value outside the setting range a message prompting you to enter an appropriate value appears on the screen When entering the value in mill...

Страница 200: ... 4 53 Erasing Shadows Lines 10 Press Start If you want to copy multiple originals using the platen glass set an original and press Start once for each page 11 Press Main Menu to return to the Main Menu screen ...

Страница 201: ...Copy then press OK 4 Use or Scroll Wheel to display Color Adjustment then press OK 5 Use or Scroll Wheel to select the desired color then press OK Adjusting Color Balance This mode enables you to adjust the color balance depending on the color of the originals The adjusted color balance can be stored and named so that you can use them repeatedly ...

Страница 202: ...e to the left To heighten the selected color move the adjust scale to the right 7 Press the left Any key to select Set 8 Use numeric keys to enter the desired copy quantity 1 to 99 9 Press Start If you want to copy multiple originals using the platen glass set an original and press Start once for each page 10 Press Main Menu to return to the Main Menu screen ...

Страница 203: ...red color then press OK 5 Use or Scroll Wheel to adjust the strength of each color then press OK To weaken the selected color move the adjust scale to the left To heighten the selected color move the adjust scale to the right 6 Press the right Any key to select Recall Register Registering Color Balance This section describes how to register the color balance setting Up to four different settings c...

Страница 204: ...ter Settings If you want to name the color balance setting Use or Scroll Wheel to select Register Name then press OK Use the software keyboard to enter a name then press the right Any key to select Set You can enter up to 10 characters for the name For information on using the software keyboard see Entering Characters on p 1 19 9 Use or Scroll Wheel to select Yes then press OK 10 Press Main Menu t...

Страница 205: ... Color Adjustment then press OK 4 Press the right Any key to select Recall Register 5 Use or Scroll Wheel to select the desired memory key then press OK 6 Press the left Any key to select Set 7 Press Main Menu to return to the Main Menu screen Recalling Registered Color Balance This section describes how to recall registered Color Balance ...

Страница 206: ...3 Use or Scroll Wheel to display Color Adjustment then press OK 4 Press the right Any key to select Recall Register 5 Use or Scroll Wheel to select the memory key that you want to delete then press the right Any key to select Register Erase 6 Use or Scroll Wheel to select Erase then press OK 7 Use or Scroll Wheel to select Yes then press OK 8 Press Main Menu to return to the Main Menu screen ...

Страница 207: ...Copying 4 60 Collating Copies Collating Copies You can sort copies into sets arranged in page order This function is useful when making handouts for meetings The default setting is Off ...

Страница 208: ... Use or Scroll Wheel to select display Finishing Settings then press OK 5 Use or Scroll Wheel to select On then press OK 6 Use numeric keys to enter the desired copy quantity 1 to 99 7 Press Start If you want to copy multiple originals using the platen glass set an original and press Start once for each page 8 Press Main Menu to return to the Main Menu screen ...

Страница 209: ...isplay Number of Copies Settings then press OK 5 Use numeric keys or Scroll Wheel to enter the desired copy quantity 1 to 99 then press OK 6 Press Start If you want to copy multiple originals using the platen glass set an original and press Start once for each page 7 Press Main Menu to return to the Main Menu screen Making Multiple Copies This section describes how to make multiple copies ...

Страница 210: ...s selected for the copy 1 Press Main Menu 2 Use or Scroll Wheel to select Copy then press OK 3 Press the right Any key to select Preview Img 4 Check the current settings then press the right Any key to select Done Actual scanned image of the original will not be displayed 5 Press Main Menu to return to the Main Menu screen ...

Страница 211: ...ossible combination of copy modes and store them as a mode memory There are four mode memories and they can be assigned names for increased convenience This feature is useful for storing frequently used copy settings Even if the power is turned OFF the copy settings stored in memory keys are not deleted Registering Mode Memory This section describes how to register the copy settings to a mode memo...

Страница 212: ...mory setting Use or Scroll Wheel to select Register Name then press OK Use the software keyboard to enter a name then press the right Any key to select Set You can enter up to 10 characters for the name For information on using the software keyboard see Entering Characters on p 1 19 6 Use or Scroll Wheel to select Yes then press OK If you want to check the details of the setting use or Scroll Whee...

Страница 213: ...n Menu 2 Use or Scroll Wheel to select Copy then press OK 3 Press the left Any key to select Mode Memory 4 Use or Scroll Wheel to select the desired mode memory then press OK Recalling Mode Memory This section describes how to recall the registered mode memories ...

Страница 214: ...s Main Menu 2 Use or Scroll Wheel to select Copy then press OK 3 Press the left Any key to select Mode Memory 4 Use or Scroll Wheel to select the desired mode memory then press the left Any key to select Details 5 Check the details of the mode memory then press the right Any key to select Done 6 Press Main Menu to return to the Main Menu screen ...

Страница 215: ...Scroll Wheel to select the mode memory key that you want to delete then press the right Any key to select Register Erase 5 Use or Scroll Wheel to select Erase then press OK 6 Use or Scroll Wheel to select Yes then press OK 7 Press Main Menu to return to the Main Menu screen Deleting Mode Memory This section describes how to delete the copy settings from the mode memory list ...

Страница 216: ...tically applies when the power is turned ON or when Reset is pressed You can change the Standard mode to suit your needs The default settings are as follows Color Mode Settings Auto color Select Paper Source Settings Drawer 1 LTR Density Background Rem Set 0 Various 2 Sided Settings Off Copy Ratio Settings 100 Original Image Quality Settings Text Photo Map Copy Multiple Pages onto 1 Page Off Sharp...

Страница 217: ...Copying 4 70 Changing Standard Mode 4 Press OK to select Register 5 Use or Scroll Wheel to select Yes then press OK 6 Press Main Menu to return to the Main Menu screen ...

Страница 218: ...t standard mode 1 Press Main Menu 2 Use or Scroll Wheel to select Copy then press OK 3 Use or Scroll Wheel to display Standard Mode Reg Initialize then press OK 4 Use or Scroll Wheel to select Initialize then press OK 5 Use or Scroll Wheel to select Yes then press OK 6 Press Main Menu to return to the Main Menu screen ...

Страница 219: ...the status of a copy job while it is printing or waiting to be processed 1 Press Status Monitor Cancel 2 Use or Scroll Wheel to select Copy then press OK 3 Use or Scroll Wheel to select Job Status then press OK 4 Use or Scroll Wheel to select the desired job then press the left Any key to select Details 5 Check the copy status then press the right Any key to select Done 6 Press Main Menu to return...

Страница 220: ...l 2 Use or Scroll Wheel to select Copy then press OK 3 Use or Scroll Wheel to select Job Status then press OK 4 Use or Scroll Wheel to select the desired job then press the right Any key to select Cancel If you want to check the copy information press the left Any key to select Details 5 Use or Scroll Wheel to select Yes then press OK 6 Press Main Menu to return to the Main Menu screen ...

Страница 221: ...d copy jobs 1 Press Status Monitor Cancel 2 Use or Scroll Wheel to select Copy then press OK 3 Use or Scroll Wheel to select Log then press OK 4 Use or Scroll Wheel to select the desired job then press the left Any key to select Details 5 Check the copy log then press the right Any key to select Done 6 Press Main Menu to return to the Main Menu screen ...

Страница 222: ...ndard Send Settings 5 85 Storing the Standard Send Settings 5 85 Restoring the Standard Send Settings toTheir Default 5 87 Printing theTXTerminal ID 5 89 Adjusting Sharpness 5 92 SpecifyingWhat to Display on the Screen for a Send Operation 5 94 Restoring the Send Function Settings toTheir Default 5 96 Send Start Speed 5 98 Receiving Faxes Printing Received Documents on Both Sides of Paper 5 100 Re...

Страница 223: ...ition to supporting the Super G3 fax functions this machine enables you to send receive I faxes and send faxes from your computer Received fax I fax documents can be also forwarded to specified destinations such as other fax machines and computers p 5 17 p 5 25 p 5 27 ...

Страница 224: ...Fax 5 3 Overview of Fax Functions p 5 30 p 5 56 p 5 63 p 5 58 p 5 121 p 5 113 ...

Страница 225: ... current time and date See Setting the Current Date and Time on p 5 12 Your telephone line type Set the type of telephone line that is connected to the machine See Setting the Type of Telephone Line on p 5 13 Fax receiving mode Set how the machine receives fax documents to suit your needs See Methods for Receiving Faxes on p 5 4 Methods for Receiving Faxes Your machine provides several methods for...

Страница 226: ...hone Before using this mode Simply set the receive mode to Auto RX See Selecting the Receive Mode on p 5 9 When an incoming call is received With no external telephone connected to the machine For fax calls the machine receives fax documents automatically For telephone calls you cannot talk to the caller With external telephone connected to the machine If you want to change Incoming Ring see Setti...

Страница 227: ...to Off Before using this mode Make sure to do the following Connect your external telephone to the machine See Introduction of the Machine in the e Manual Set the receive mode to Fax Tel Auto Switch See Selecting the Receive Mode on p 5 9 When an incoming call is received Incoming calls or outgoing calls may not work properly depending on the type of the external telephone connected to the machine...

Страница 228: ...chine in the e Manual Set your answering machine to answer after 1 to 2 rings Record a message on your answering machine When you record a message we recommend you insert about 4 seconds of silence at the beginning of the message or limit the message to 20 seconds Set the receive mode to Answer Mode See Selecting the Receive Mode on p 5 9 When an incoming call is received This mode does not suppor...

Страница 229: ...e Machine in the e Manual Set the receive mode to Manual RX See Selecting the Receive Mode on p 5 9 When an incoming call is received If Remote RX is set to On you can also start to receive fax documents by dialing from your telephone See Receiving Documents Manually with an External Telephone Remote Reception on p 5 113 If you do not pick up the handset you receive neither telephone nor fax calls...

Страница 230: ...assigned by your telephone company Contact your telephone company for availability Before using this mode Make sure to do the following Subscribe to a DRPD service Contact your telephone company for availability Connect your external telephone to the machine See Introduction of the Machine in the e Manual Set the receive mode to DRPD See Selecting the Receive Mode on p 5 9 Selecting the Receive Mo...

Страница 231: ... again If you specify the optional settings for Fax Tel Auto Switch Use or Scroll Wheel to select Fax Tel Auto Switch then press the right Any key to select Option Use or Scroll Wheel to select Ring Start Time then press OK Use or Scroll Wheel to specify the duration 4 to 30 seconds for which the machine attempts to detect the fax tone before it starts ringing then press OK You can also use numeri...

Страница 232: ...ing is 15 Seconds Use or Scroll Wheel to select After Ring Action then press OK Use or Scroll Wheel to select the action the machine will take after the ringing ends then press OK Done Disconnects the call Receive Receives a fax If you specify the optional settings for DRPD Use or Scroll Wheel to select DRPD then press the right Any key to select Option Use or Scroll Wheel to select a ring pattern...

Страница 233: ... select Date Time Settings then press OK 5 Use or Scroll Wheel to select Current Time Settings then press OK 6 Enter the current date and time using numeric keys then press OK 7 Press Main Menu to return to the Main Menu screen Setting the Current Date and Time You can set the current date and time The current date and time settings are used as standard timer settings for functions that require th...

Страница 234: ...ngs then press OK 5 Use or Scroll Wheel to select User Settings then press OK 6 Use or Scroll Wheel to select Tel Line Type Selection then press OK Setting the Type of Telephone Line Set the type of telephone line that is connected to the machine If this setting is incorrect you will be unable to send faxes Be sure to check the type of telephone line that you are using and make the correct setting...

Страница 235: ...ll Wheel to select the type of telephone line then press OK Pulse Pulse dialing Tone Tone dialing If you do not know the telephone line type call your telephone service provider for details 9 Press Main Menu to return to the Main Menu screen Registering the Machine s Name Your name or company s name must be registered as the machine s name When you send a document the name that you registered is p...

Страница 236: ...o select TX Settings then press OK 6 Use or Scroll Wheel to select Register Unit Name then press OK 7 Use the software keyboard to enter the machine s name then press the right Any key to select Set For information on using the software keyboard see Entering Characters on p 1 19 8 Press Main Menu to return to the Main Menu screen ...

Страница 237: ... or Scroll Wheel to select User Settings then press OK 6 Use or Scroll Wheel to select Register Unit Telephone then press OK 7 Enter the machine s fax number using numeric keys then press the right Any key to select Register 8 Press Main Menu to return to the Main Menu screen Registering Your Machine s Fax Number Your machine s fax number must be registered When you send a document the number that...

Страница 238: ... describes the flow of sending faxes 1 Place your originals 2 Press Main Menu 3 Use or Scroll Wheel to select Send Fax then press OK 4 Use or Scroll Wheel to select Enter Fax New then press OK 5 Enter the fax number using and numeric keys You can enter up to 40 characters for the fax number For details about how to specify destinations see Specifying Destinations on p 5 30 ...

Страница 239: ...Sided Original on p 5 56 Delayed TX Settings Sends scanned documents at a specified time See Sending Originals at a Preset Time Delayed Sending on p 5 58 Direct Send Settings Sends each page of the document to the destination as it is scanned See Direct Sending on p 5 61 Register Favorites Stores frequently used send settings for future use See Favorites on p 5 63 8 Press Start Scanning starts if ...

Страница 240: ...ternal telephone to the machine if you want to talk to the recipient before sending a document For information on how to connect an external telephone to the machine see Introduction of the Machine in the e Manual 2 Place your originals You can only send one page at a time when you place your original on the platen glass 11 Follow the instructions on the display then press Start once for each orig...

Страница 241: ...r before the dial tone can be heard the call may not connect or the wrong number may be dialed 8 Talk through the handset to the recipient If you select Hook in step 6 you can pick up the handset when you hear the recipient s voice If you hear a high pitched signal instead of the recipient s voice go to step 10 9 Ask the recipient to set their fax machine to receive faxes 10 When you hear a high p...

Страница 242: ...If you are using one touch Use or Scroll Wheel to select One touch then press OK Use or Scroll Wheel to select the desired one touch then press the right Any key to select Set Switching Temporarily to Tone Dialing If your machine is set for pulse dialing use the procedure below to switch to tone dialing to use information services e g banks airline reservations and hotel reservations To talk to th...

Страница 243: ...7 Enter the numbers requested by the information service using numeric keys 8 Use or Scroll Wheel to select RX Start then press OK if you require a faxed copy of the information If you do not require a faxed copy of the information press the right Any key to select Done Dialing an Overseas Number With Pauses When you dial or register an overseas number you may need to insert a pause within the num...

Страница 244: ...erted within the fax number in Set Pause Time The default setting is two second See Adjusting the Pause Time on p 5 78 7 Enter the country code the area code and the fax number of the recipient 8 If necessary use or Scroll Wheel to select Pause then press OK Pauses entered at the end of fax numbers are always 10 seconds long 9 Press Start Scanning starts if the original is placed in the feeder and...

Страница 245: ...ess Start Scanning starts To cancel scanning press the left Any key to select Cancel or press Stop 12 Follow the instructions on the display then press Start once for each original 13 When scanning is complete press the right Any key to select Done The scanned data is sent to the specified destination ...

Страница 246: ...or the I fax address For information on using the software keyboard see Entering Characters on p 1 19 Basic Methods for Sending I Faxes This section describes the flow of sending I faxes The following conditions are always selected Paper Size LTR This is because the sender does not know whether the recipient s machine can receive sizes other than LTR Originals larger than LTR are reduced to LTR si...

Страница 247: ...sage Settings Sets the subject line and message body text See Fax in the e Manual Reply to Settings Sets the reply to address See Fax in the e Manual Register Favorites Stores frequently used send settings for future use See Fax in the e Manual If you want to divide multiple images into single pages and send each page as a separate file use or Scroll Wheel to select B W TIFF Divide into Pages then...

Страница 248: ...ication software For details on the PC fax functions see Fax in the e Manual 1 Open the document you want to fax from the application 2 Select Print from the File menu The procedure for displaying the Print dialog box may differ depending on the application you are using 3 Select your fax from Name then click Properties The fax name displayed in the fax driver screen is changed by settings in the ...

Страница 249: ...ved by default Power Users and higher have access to the folder If you are not permitted access to the folder log on as a user who has access to the folder or click Specify a Folder in the Edit Address Book sheet and save the address book file in a folder such as the My Documents folder where you have write permission See Fax in the e Manual When you click Add to Destination List a dialog box to p...

Страница 250: ...or Cancel during transmission 2 Use or Scroll Wheel to select Fax then press OK 3 Use or Scroll Wheel to select Send Job Status then press OK 4 Use or Scroll Wheel to select the job you want to cancel then press the right Any key to select Cancel 5 Use or Scroll Wheel to select No or Yes then press OK 6 Press Main Menu to return to the Main Menu screen ...

Страница 251: ...ct only settings stored See Security in the e Manual The destination that you just specified is not stored in the Address Book It is deleted once the document is sent If you frequently send documents to the same destinations store these destinations in the Address Book beforehand See Registering Fax Numbers in the Address Book on p 3 2 Specifying a New Fax Number You can specify a new fax number u...

Страница 252: ... select Tone and press OK the letter T appears Direct Send Send documents directly to the recipient Select On then press OK If you do not select direct sending mode memory sending mode is used See Direct Sending on p 5 61 Hook Send a fax document manually or use tone dialing See Calling the Recipient before Sending Fax Documents Manual Sending on p 5 19 or Switching Temporarily to Tone Dialing on ...

Страница 253: ... confirm or edit is selected then press OK Confirm the specified destination To complete this procedure press the right Any key to select Done To edit the specified destination press OK then edit the destination If you want to register the specified destination in the Address Book For the Color imageCLASS MF9220Cdn you cannot register the destination in the following procedures Press the left Any ...

Страница 254: ...g Destinations Press the left Any key to select Reg Add Book Register the specified destination For details on how to register the destination in the Address Book see Registering Fax Numbers in the Address Book on p 3 2 ...

Страница 255: ... the e Manual For details on how to send the documents see Basic Methods for Sending Faxes on p 5 17 1 Press Main Menu 2 Use or Scroll Wheel to select Send Fax then press OK 3 Use or Scroll Wheel to select Address Book then press OK 4 Use or Scroll Wheel to select the desired destination then press OK The icons displayed on the Address Book are Fax E mail I Fax File Server Group You can select mul...

Страница 256: ...o clear the specified destination Press the left Any key to select Confirm Erase Check if the destination you want to clear is selected then press the left Any key to select Erase If multiple destinations are specified clear the other destinations as necessary Specify a destination again ...

Страница 257: ... imageCLASS MF9220Cdn you can register only one touch destinations in the Address Book For details on how to send the documents see Basic Methods for Sending Faxes on p 5 17 1 Press Main Menu 2 Use or Scroll Wheel to select Send Fax then press OK 3 Press the right Any key to select One touch 4 Use or Scroll Wheel to select the desired destination then press OK You can select multiple destinations ...

Страница 258: ...d destination Press the left Any key to select Confirm Erase Check if the destination you want to clear is selected then press the left Any key to select Erase If multiple destinations are specified clear the other destinations as necessary Specify a destination again ...

Страница 259: ...stination select the destination again to clear the check mark 5 Press the right Any key to select Set Using the Group Addresses Group address enables you to specify a group of registered destinations in the Address Book or one touch This is useful if you want to send the same document to several destinations You can register up to 299 199 for the Color imageCLASS MF9220Cdn destinations in one gro...

Страница 260: ...nation you want to clear is selected then press the left Any key to select Erase If multiple destinations are specified clear the other destinations as necessary Specify a destination again Specifying a Group from the One Touch 1 Press Main Menu 2 Use or Scroll Wheel to select Send Fax then press OK 3 Press the right Any key to select One touch ...

Страница 261: ... destination select the destination again to clear the check mark 5 Press the right Any key to select Set If you want to clear the specified destination Press the left Any key to select Confirm Erase Check if the destination you want to clear is selected then press the left Any key to select Erase If multiple destinations are specified clear the other destinations as necessary Specify a destinatio...

Страница 262: ...d at the same time Out of the 332 or 232 destinations 32 new destinations can be specified If you specify a group of several destinations each destination is counted as a separate address If you frequently send documents to multiple destinations it is recommended that you store those destinations as a group When Restrict Seq Broadcast is set to Prohibit Broadcast you cannot send the documents to m...

Страница 263: ...the scanned data is sent to the specified destination when scanning is complete To cancel scanning press the left Any key to select Cancel or press Stop 8 Use or Scroll Wheel to select the original size then press OK 9 Press Start Scanning starts To cancel scanning press the left Any key to select Cancel or press Stop 10 Follow the instructions on the display then press Start once for each origina...

Страница 264: ...set Language Switch to Off See Introduction of the Machine in the e Manual You may have to set up the LDAP servers beforehand depending on the network environment If you want to specify or register destinations via an LDAP server the LDAP server settings must be specified in the machine beforehand See Network Settings in the e Manual For information on how to specify e mail addresses via an LDAP s...

Страница 265: ...arch Use or Scroll Wheel to select Name E mail or Fax then press OK Use the software keyboard to enter the name e mail address or fax number then press the right Any key to select Set The search criteria boxes that are not filled out are not searched For information on using the software keyboard see Entering Characters on p 1 19 To make a more detailed search with multiple search conditions press...

Страница 266: ...on Unit can be used as search categories only if the information has been registered on the LDAP Server Detailed Search by Organization Organization Unit may not be performed depending on whether the attribute types have been registered on the LDAP server and depending on the type of application on the server You can also add additional user defined search attributes For instructions on how to reg...

Страница 267: ...h the same last few letters that you entered for the name e mail address fax number organization or organizational unit Use or Scroll Wheel to select the third item then press OK Use the software keyboard to enter the search criterion then press the right Any key to select Set For information on using the software keyboard see Entering Characters on p 1 19 Press the right Any key to select Set 6 A...

Страница 268: ... Menu Use or Scroll Wheel to select Add Search Condition then press OK Follow step 5 to add the search criteria You can specify up to four different search criteria at a time If you specify three or more search criteria you cannot use both or and and together To edit the search criteria Use or Scroll Wheel to select the search criterion that you want to edit then press the left Any key to select M...

Страница 269: ...ime settings on the server and the machine The number of search results displayed will not exceed the maximum limit set in Register LDAP Server in System Management Set See Network Settings in the e Manual If the desired destination is not displayed either increase the maximum number of addresses to search or change the search criteria If you select Start Search without specifying any search crite...

Страница 270: ...nation from the search results then press OK You can select up to 32 destinations To cancel a selected destination select the destination again then press OK to clear the check mark You can use or to restrict the displayed range of destinations 9 Press the right Any key to select Set ...

Страница 271: ... x 400 dpi is LGL For details on how to send the documents see Basic Methods for Sending Faxes on p 5 17 1 Press Main Menu 2 Use or Scroll Wheel to select Send Fax then press OK 3 Specify a destination For details about how to specify destinations see Specifying Destinations on p 5 30 4 Use or Scroll Wheel to display Resolution Settings then press OK 5 Use or Scroll Wheel to select the desired res...

Страница 272: ...cuments see Basic Methods for Sending Faxes on p 5 17 1 Press Main Menu 2 Use or Scroll Wheel to select Send Fax then press OK 3 Specify a destination For details about how to specify destinations see Specifying Destinations on p 5 30 4 Use or Scroll Wheel to display Density Background Rem Set then press OK 5 Use or Scroll Wheel to adjust the density then press OK Move the indicator to the left to...

Страница 273: ... have turned yellow from age For details on how to send the documents see Basic Methods for Sending Faxes on p 5 17 1 Press Main Menu 2 Use or Scroll Wheel to select Send Fax then press OK 3 Specify a destination For details about how to specify destinations see Specifying Destinations on p 5 30 4 Use or Scroll Wheel to display Density Background Rem Set then press OK 5 Press the right Any key to ...

Страница 274: ...ust If you want to make fine adjustments to the density of the background color go to the next step 7 Use or Scroll Wheel to select the desired color then press OK 8 Use or Scroll Wheel to adjust the strength of the color then press OK If you adjust the strength of Yellow the levels of Red and Green adjust automatically to the same level as Yellow If you adjust the strength of Red or Green the Yel...

Страница 275: ...de the moiré effect a shimmering wavy pattern may occur In this case you can lessen this moiré effect by using the sharpness mode See Adjusting Sharpness on p 5 92 If the original is a transparency select the original type and adjust the exposure to the most appropriate level for the original For details on how to send the documents see Basic Methods for Sending Faxes on p 5 17 1 Press Main Menu 2...

Страница 276: ...anning originals containing both text and photos such as magazines or catalogs Text This mode is best suited for scanning text originals Blueprints or pencil drawn originals can also be scanned clearly Photo This mode is best suited for scanning photos printed on photographic paper or photo originals containing halftones e g printed photos ...

Страница 277: ...ake sure to place them horizontally into the feeder If these originals are placed vertically the back sides of these originals are scanned upside down For details on how to send the documents see Basic Methods for Sending Faxes on p 5 17 1 Press Main Menu 2 Use or Scroll Wheel to select Send Fax then press OK 3 Specify a destination For details about how to specify destinations see Specifying Dest...

Страница 278: ...type of original then press OK Off 1 sided originals are scanned Book Type Original The front and back sides of the original have the same top bottom orientation Calendar Type Original The front and back sides of the original have opposite top bottom orientations ...

Страница 279: ...itions If multiple documents are being sent at the same time If large documents are being sent If there are jobs other than delayed sending Once the delayed documents are sent the documents are automatically deleted from memory You can check the status or cancel the transmission of jobs for which a preset send time has been specified See Checking Deleting Fax Transmission Documents on p 5 147 1 Pl...

Страница 280: ...than the current time the document will be sent at that time on the next day If you make a mistake when entering the send time press Clear to clear your entry then enter another four digit number 7 Press Start Scanning starts if the original is placed in the feeder The scanned data is stored in memory and sent to the specified destination at the specified send time To cancel scanning press the lef...

Страница 281: ...ding 10 Follow the instructions on the display then press Start once for each original 11 When scanning is complete press the right Any key to select Done The scanned data is stored in memory and sent to the specified destination at the specified send time ...

Страница 282: ... for direct sending mode Memory sending is automatically set when using delayed sending or when multiple destinations are specified If an error occurs or you cancel transmission in the direct sending mode you can check how many pages have been sent to the destination by printing the Activity Report the Fax Activity Report or on the Log for fax on the System Monitor screen 1 Place your originals 2 ...

Страница 283: ...feeder and the scanned data is sent to the specified destination when scanning is complete To cancel scanning press the left Any key to select Cancel or press Stop 8 Use or Scroll Wheel to select the original size then press OK 9 Press Start Scanning starts To cancel scanning press the left Any key to select Cancel or press Stop You can only send one page at a time when you place your original on ...

Страница 284: ...rom the Address Book it is also deleted from the settings registered in the favorites For details on how to send the documents see Basic Methods for Sending Faxes on p 5 17 Registering Favorites You can register names for favorites from the Select Send Type Screen or register settings for favorites from the Send Settings screen The currently specified settings are registered for the favorites Regi...

Страница 285: ...ight Any key to select Done to return to the previous screen 5 Use or Scroll Wheel to select Register Name then press OK 6 Use the software keyboard to enter a name for favorites then press the right Any key to select Set You can enter up to 16 characters for the name If you press Set without entering any characters the key name reverts to its current name default M1 to M9 For information on using...

Страница 286: ...er Favorites then press OK The currently specified settings are registered for the favorites 5 Use or Scroll Wheel to select the favorites you want to register then press the right Any key to select Register Erase You can also check the settings stored in the favorites by pressing the left Any key to select Details Press the right Any key to select Done to return to the previous screen Registering...

Страница 287: ...vious settings You can check detail settings to select Details 8 Press the right Any key to select Register Erase 9 Use or Scroll Wheel to select Register Name then press OK 10 Use the software keyboard to enter a name for favorites then press the right Any key to select Set You can enter up to 16 characters for the name If you press Set without entering any characters the key name reverts to its ...

Страница 288: ...y to select Register Erase You can only erase a key that has settings stored in the favorites You can also check the settings stored in the favorites by pressing the left Any key to select Details Press the right Any key to select Done to return to the previous screen Erasing Favorites You can erase the settings from the Select Send Type screen or from the Send Settings screen Erasing Favorites fr...

Страница 289: ...w to specify destinations see Specifying Destinations on p 5 30 Erasing Favorites from the Send Settings Screen 5 Use or Scroll Wheel to select Erase then press OK Make sure to check the settings first before erasing them 6 Use or Scroll Wheel to select Yes then press OK Key names are not erased You can change the name in Register Name ...

Страница 290: ... settings stored in the favorites You can also check the settings stored in the favorites by pressing the left Any key to select Details Press the right Any key to select Done to return to the previous screen 6 Use or Scroll Wheel to select Erase then press OK Make sure to check the settings first before erasing them 7 Use or Scroll Wheel to select Yes then press OK Key names are not erased You ca...

Страница 291: ...ations the Select Send Type screen appears You can specify destinations To cancel all settings and return to the Select Send Type screen press Reset Using the Favorites If you frequently send documents with the same document settings to the same destination store these settings in a favorites Then when you need to specify the destination all you have to do is select the favorites containing your s...

Страница 292: ...vorites See Registering Favorites on p 5 63 For details on how to send the documents see Basic Methods for Sending Faxes on p 5 17 Checking Favorites from the Select Send Type Screen 1 Press Main Menu 2 Use or Scroll Wheel to select Send Fax then press OK 3 Press the left Any key to select Favorites 4 Use or Scroll Wheel to select the favorites you want to check then press the left Any key to sele...

Страница 293: ...on For details about how to specify destinations see Specifying Destinations on p 5 30 4 Use or Scroll Wheel to display Register Favorites then press OK 5 Use or Scroll Wheel to select the favorites you want to check then press the left Any key to select Details You can check detail settings Press the right Any key to select Done to return to the previous screen ...

Страница 294: ...Send Function in System Management Set under Additional Func is set to On the addresses specified from the Address Book are only recalled The settings that were stored in memory are not erased even when the main power is turned OFF If Restrict Sending From Log in Restrict the Send Function in System Management Set under Additional Func is set to On you cannot specify a destination using the Log Se...

Страница 295: ... how to specify destinations see Specifying Destinations on p 5 30 6 Press Start Scanning starts if the original is placed in the feeder and the scanned data is sent to the specified destination when scanning is complete To cancel scanning press the left Any key to select Cancel or press Stop 7 Use or Scroll Wheel to select the original size then press OK 8 Press Start Scanning starts To cancel sc...

Страница 296: ...ob Recall 9 Follow the instructions on the display then press Start once for each original 10 When scanning is complete press the right Any key to select Done The scanned data is sent to the specified destination ...

Страница 297: ...the sending and receiving machines ECM transmissions are possible only when this mode is activated in both machines Even when ECM is activated errors can sometimes occur due to a poor telephone line connection If there is trouble with the line it will take more time to send the documents 1 Press Main Menu 2 Press the right Any key to select Additional Func 3 Use or Scroll Wheel to select Communica...

Страница 298: ...ECM Transmission 6 Use or Scroll Wheel to select ECM TX then press OK 7 Use or Scroll Wheel to select Off or On then press OK Off Does not use ECM On Uses ECM 8 Press Main Menu to return to the Main Menu screen ...

Страница 299: ... where the pause was inserted in the number This helps to improve the connection The default setting is 2 Seconds You can insert a pause on the screen where you specify the fax number See Dialing an Overseas Number With Pauses on p 5 22 Pauses entered at the end of dialed fax numbers are always 10 seconds long 1 Press Main Menu 2 Press the right Any key to select Additional Func 3 Use or Scroll Wh...

Страница 300: ...e Time 6 Use or Scroll Wheel to select Set Pause Time then press OK 7 Use or Scroll Wheel to set the pause time then press OK You can also use numeric keys to set the pause time 8 Press Main Menu to return to the Main Menu screen ...

Страница 301: ...al can be turned on or off If you set Auto Redial to on you can set how many times the machine redials the redial interval and whether the document should be resent due to an error The default settings are as follows Auto redial On Redial Time 2 Times Redial Interval 2 Minutes TX Error Redial All Pages 1 Press Main Menu 2 Press the right Any key to select Additional Func 3 Use or Scroll Wheel to s...

Страница 302: ...t redial automatically when a transmission fails If you select Off and press OK go to step 15 On Redials automatically when a transmission fails If you select On and press OK press OK again then go to the next step 8 Press the right Any key to select Option 9 Use or Scroll Wheel to select Redial Times then press OK 10 Use or Scroll Wheel to set the number of redial times then press OK You can also...

Страница 303: ...elect TX Error Redial then press OK 14 Use or Scroll Wheel to select Off All Pages or Error and 1st Page then press OK Off Redialing does not take place if a sending error occurs All Pages Auto Redial takes place if a sending error occurs All pages of the document are resent Error and 1st Page Auto Redial takes place if a sending error occurs The first page of the document the error page and all s...

Страница 304: ...nother fax machine made by a company other than Canon is trying to send you a fax your fax document may end up being redirected to that fax machine instead of the original destination you had intended Setting Check Tone Before Sending to On enables you to avoid such sending problems The default setting is On 1 Press Main Menu 2 Press the right Any key to select Additional Func 3 Use or Scroll Whee...

Страница 305: ...cking the Dial Tone before Sending 6 Use or Scroll Wheel to select Check Tone Before Sending then press OK 7 Use or Scroll Wheel to select Off or On then press OK 8 Press Main Menu to return to the Main Menu screen ...

Страница 306: ... The default settings are as follows Resolution Settings 200 200 dpi Density Background Removal 0 Original Type Text 2 Sided Originals Settings Off 1 Press Main Menu 2 Press the right Any key to select Additional Func 3 Use or Scroll Wheel to select Communications Settings then press OK 4 Use or Scroll Wheel to select Common Settings then press OK 5 Use or Scroll Wheel to select TX Settings then p...

Страница 307: ...lecting Resolution on p 5 50 Density Background Removal Adjusts the density and the background color of originals See Adjusting Density on p 5 51 Original Type Adjusts the image quality of originals See Selecting Image Quality on p 5 54 2 Sided Originals Settings Scans two sided originals for sending See 2 Sided Original on p 5 56 You do not need to specify Color File Format Settings This setting ...

Страница 308: ...ored to their default settings 1 Press Main Menu 2 Press the right Any key to select Additional Func 3 Use or Scroll Wheel to select Communications Settings then press OK 4 Use or Scroll Wheel to select Common Settings then press OK 5 Use or Scroll Wheel to select TX Settings then press OK 6 Use or Scroll Wheel to select Change Send Func Mode then press OK 7 Use or Scroll Wheel to select Initializ...

Страница 309: ...Fax 5 88 Standard Send Settings 8 Use or Scroll Wheel to select No or Yes then press OK 9 Press Main Menu to return to the Main Menu screen ...

Страница 310: ...ax number and name is printed enabling the recipient to know who sent the document The default settings are as follows TX Terminal ID On Printing Position Outside Telephone Mark FAX 1 Press Main Menu 2 Press the right Any key to select Additional Func 3 Use or Scroll Wheel to select Communications Settings then press OK 4 Use or Scroll Wheel to select Common Settings then press OK 5 Use or Scroll ...

Страница 311: ...n 8 Use or Scroll Wheel to select Printing Position then press OK 9 Use or Scroll Wheel to select Inside or Outside then press OK Inside The Terminal ID information is printed inside the image area on the recipient s paper Outside The Terminal ID information is printed outside the image area on the recipient s paper 10 Use or Scroll Wheel to select Telephone Mark then press OK ...

Страница 312: ... the TX Terminal ID 12 Use or Scroll Wheel to select FAX or TEL then press OK FAX FAX is printed before the fax number TEL TEL is printed before the telephone number 13 Press Main Menu to return to the Main Menu screen ...

Страница 313: ...efault setting is 0 1 Press Main Menu 2 Press the right Any key to select Additional Func 3 Use or Scroll Wheel to select Communications Settings then press OK 4 Use or Scroll Wheel to select Common Settings then press OK 5 Use or Scroll Wheel to select TX Settings then press OK 6 Use or Scroll Wheel to select Sharpness then press OK ...

Страница 314: ...printed images or other halftones the setting should be towards Low This setting lessens the moiré effect a shimmering wavy pattern High To scan text or lines clearly the setting should be towards High This setting is particularly suited for scanning blueprints and faint pencil drawn images 8 Press Main Menu to return to the Main Menu screen ...

Страница 315: ...n you select Send Fax on the Main Menu screen and press OK the screen specified here is displayed for a send operation The default setting is Default Screen 1 Press Main Menu 2 Press the right Any key to select Additional Func 3 Use or Scroll Wheel to select Communications Settings then press OK 4 Use or Scroll Wheel to select Common Settings then press OK 5 Use or Scroll Wheel to select TX Settin...

Страница 316: ...Scroll Wheel to select the initial screen then press OK Favorites The Set Favorites screen is displayed on the initial Send screen One touch The One touch Selection Clear screen is displayed on the initial Send screen Default Screen The Select Send Type screen is displayed on the initial Send screen 8 Press Main Menu to return to the Main Menu screen ...

Страница 317: ...ialize Register Unit Name and Retry Times Retry Times is disabled for the fax functions 1 Press Main Menu 2 Press the right Any key to select Additional Func 3 Use or Scroll Wheel to select Communications Settings then press OK 4 Use or Scroll Wheel to select Common Settings then press OK 5 Use or Scroll Wheel to select TX Settings then press OK 6 Use or Scroll Wheel to select Initialize TX Settin...

Страница 318: ...Fax 5 97 Restoring the Send Function Settings to Their Default 7 Use or Scroll Wheel to select No or Yes then press OK 8 Press Main Menu to return to the Main Menu screen ...

Страница 319: ... select Additional Func 3 Use or Scroll Wheel to select System Management Set then press OK If the screen appears prompting you to enter the System Manager ID and System Password enter the System Manager ID and System Password using numeric keys then press Log In Out 4 Use or Scroll Wheel to select Communications Settings then press OK 5 Use or Scroll Wheel to select Fax Settings then press OK 6 U...

Страница 320: ...hen press OK If your document transmission is slow in starting this may mean that the telephone lines in your area are in poor condition Select a slower speed You can select 33600 bps 14400 bps 9600 bps 7200 bps 4800 bps or 2400 bps 8 Press Main Menu to return to the Main Menu screen ...

Страница 321: ...ve paper The default setting is Off 1 Press Main Menu 2 Press the right Any key to select Additional Func 3 Use or Scroll Wheel to select Communications Settings then press OK 4 Use or Scroll Wheel to select Common Settings then press OK 5 Use or Scroll Wheel to select RX Settings then press OK 6 Use or Scroll Wheel to select 2 Sided Print then press OK ...

Страница 322: ...Fax 5 101 Printing Received Documents on Both Sides of Paper 7 Use or Scroll Wheel to select Off or On then press OK 8 Press Main Menu to return to the Main Menu screen ...

Страница 323: ... area of the paper The default settings are as follows Receive Reduction On RX Reduction Auto Reduce 90 Reduce Direction Vertical Only 1 Press Main Menu 2 Press the right Any key to select Additional Func 3 Use or Scroll Wheel to select Communications Settings then press OK 4 Use or Scroll Wheel to select Common Settings then press OK 5 Use or Scroll Wheel to select RX Settings then press OK ...

Страница 324: ...to the next step 8 Use or Scroll Wheel to select RX Reduction then press OK 9 Use or Scroll Wheel to select Auto or Fixed Reduction Auto The image is automatically reduced by a suitable reduction ratio If you select Auto press OK then go to step 12 Fixed Reduction The image is reduced by the reduction ratio set for Reduce in the next step If you select Fixed Reduction press OK then go to the next ...

Страница 325: ...OK 13 Use or Scroll Wheel to select Vertical and Horizontal or Vertical Only then press OK Vertical and Horizontal The image is reduced in both the vertical and horizontal directions Vertical Only The image is reduced in the vertical direction only 14 Press Main Menu to return to the Main Menu screen ...

Страница 326: ... page number at the bottom of the received document The default setting is Off 1 Press Main Menu 2 Press the right Any key to select Additional Func 3 Use or Scroll Wheel to select Communications Settings then press OK 4 Use or Scroll Wheel to select Common Settings then press OK 5 Use or Scroll Wheel to select RX Settings then press OK 6 Use or Scroll Wheel to select Received Page Footer then pre...

Страница 327: ...Fax 5 106 Printing Footer Information on a Received Document 7 Use or Scroll Wheel to select Off or On then press OK 8 Press Main Menu to return to the Main Menu screen ...

Страница 328: ... Print is set to On the printed documents may be light or blurred because of lack of toner The data is erased when the documents are printed out so you cannot print the same documents again 1 Press Main Menu 2 Press the right Any key to select Additional Func 3 Use or Scroll Wheel to select Communications Settings then press OK 4 Use or Scroll Wheel to select Common Settings then press OK 5 Use or...

Страница 329: ...g the Way of Printing When Toner Is Low 6 Use or Scroll Wheel to select Toner Out Continuous Print then press OK 7 Use or Scroll Wheel to select Off or On then press OK 8 Press Main Menu to return to the Main Menu screen ...

Страница 330: ... sending and receiving machines ECM transmissions are possible only when this mode is activated in both machines Even when ECM is activated errors can sometimes occur due to a poor telephone line connection If there is trouble with the line it will take more time to receive the documents 1 Press Main Menu 2 Press the right Any key to select Additional Func 3 Use or Scroll Wheel to select Communica...

Страница 331: ...Fax 5 110 ECM Reception 6 Use or Scroll Wheel to select ECM RX then press OK 7 Use or Scroll Wheel to select Off or On then press OK 8 Press Main Menu to return to the Main Menu screen ...

Страница 332: ...efault settings are as follows Incoming Ring On Ring Times 2 Times Incoming calls or outgoing calls may not work properly depending on the type of the external telephone connected to the machine 1 Press Main Menu 2 Press the right Any key to select Additional Func 3 Use or Scroll Wheel to select Communications Settings then press OK 4 Use or Scroll Wheel to select Fax Settings then press OK 5 Use ...

Страница 333: ...or On Off Incoming tone does not ring If you select Off press OK then go to step 9 On Incoming tone rings If you select On press OK then go to the next step 8 Use or Scroll Wheel to set the number of ring times then press OK You can also use numeric keys to set the number of ring times 9 Press Main Menu to return to the Main Menu screen ...

Страница 334: ...xternal telephone to start receiving the document without walking over to the machine Activating the Remote Reception Follow this procedure to turn on the remote reception The default settings are as follows Remote RX On Remote RX ID 25 1 Press Main Menu 2 Press the right Any key to select Additional Func 3 Use or Scroll Wheel to select Communications Settings then press OK 4 Use or Scroll Wheel t...

Страница 335: ... a beep use the numeric keys to enter the two digit remote reception ID to start reception If you hear someone on the line you can start talking to the other party 3 When the reception is complete hang up the telephone 6 Use or Scroll Wheel to select Remote RX then press OK 7 Use or Scroll Wheel to select On then press OK 8 Use or Scroll Wheel to enter a remote reception ID a combination of two ch...

Страница 336: ...nging for a specified length of time in the Manual RX mode The default setting is Off 1 Press Main Menu 2 Press the right Any key to select Additional Func 3 Use or Scroll Wheel to select Communications Settings then press OK 4 Use or Scroll Wheel to select Fax Settings then press OK 5 Use or Scroll Wheel to select RX Settings then press OK 6 Use or Scroll Wheel to select Manual Auto Switch then p...

Страница 337: ...croll Wheel to select On then press OK 8 Use or Scroll Wheel to set the amount of time the machine waits before automatically switching to the document receive mode then press OK You can also use numeric keys to set the time 9 Press Main Menu to return to the Main Menu screen ...

Страница 338: ...numbers to your machine This can be useful when you do not want to receive direct mail DM The default setting is Off 1 Press Main Menu 2 Press the right Any key to select Additional Func 3 Use or Scroll Wheel to select Communications Settings then press OK 4 Use or Scroll Wheel to select Fax Settings then press OK 5 Use or Scroll Wheel to select RX Settings then press OK 6 Use or Scroll Wheel to s...

Страница 339: ... the Unidentified Senders 7 Use or Scroll Wheel to select Off or On then press OK Off Does not reject to receive faxes from unknown senders On Rejects to receive faxes from unknown senders 8 Press Main Menu to return to the Main Menu screen ...

Страница 340: ...ey to select Additional Func 3 Use or Scroll Wheel to select System Management Set then press OK If the screen appears prompting you to enter the System Manager ID and System Password enter the System Manager ID and System Password using numeric keys then press Log In Out 4 Use or Scroll Wheel to select Communications Settings then press OK 5 Use or Scroll Wheel to select Fax Settings then press O...

Страница 341: ...ed then press OK If your document reception is slow in starting this may mean that the telephone lines in your area are in poor condition Select a slower speed You can select 33600 bps 14400 bps 9600 bps 7200 bps 4800 bps or 2400 bps 8 Press Main Menu to return to the Main Menu screen ...

Страница 342: ...ed memory lock reception The default setting is Off 1 Press Main Menu 2 Press the right Any key to select Additional Func 3 Use or Scroll Wheel to select System Management Set then press OK If the screen appears prompting you to enter the System Manager ID and System Password enter the System Manager ID and System Password using numeric keys then press Log In Out 4 Use or Scroll Wheel to select Co...

Страница 343: ...ck mode settings or cancel the Memory Lock mode If you do not want to set the Memory Lock with a password press OK without entering any numbers You cannot store a password that only consists of zeros such as 0000000 If you enter fewer than seven digits the machine stores the password with leading zeros Example If 02 or 002 is entered 0000002 is stored If you make a mistake when entering the passwo...

Страница 344: ...anually set the Memory Lock mode to On in step 6 10 Specify the time in 24 hour military time format for the machine to enter the Memory Lock mode using numeric keys then press OK If you make a mistake when entering the time press Clear to clear your entry then enter another four digit number 11 Specify the time in 24 hour military time format for the machine to leave the Memory Lock mode using nu...

Страница 345: ...ditional Func 3 Use or Scroll Wheel to select System Management Set then press OK If the screen appears prompting you to enter the System Manager ID and System Password enter the System Manager ID and System Password using numeric keys then press Log In Out 4 Use or Scroll Wheel to select Communications Settings then press OK 5 Use or Scroll Wheel to select Memory Lock Settings then press OK If th...

Страница 346: ...5 125 Printing All Documents Stored in the Memory Lock Reception Mode 6 Use or Scroll Wheel to select Off then press OK The received documents are printed 7 Press Main Menu to return to the Main Menu screen ...

Страница 347: ...as Only the fax documents sent from a specific fax number are to be forwarded to sort the received documents automatically The maximum number of forwarding settings that you can store is 52 12 for the Color imageCLASS MF9220Cdn 50 10 for the Color imageCLASS MF9220Cdn with forwarding conditions and 2 without conditions You can set whether to print fax documents with forwarding errors and whether t...

Страница 348: ...Fax 5 127 Forwarding Received Fax Documents to a Computer or Fax Machine Before Specifying the Forwarding Settings The necessary settings before forwarding received fax documents are as follows ...

Страница 349: ...nd the forwarding destinations If the machine receives fax documents matching the registered conditions the documents are automatically sent to the specified destination You can also specify forwarding destinations for received documents that do not match the forwarding conditions To be able to forward received documents you need to specify the forwarding settings in this section then activate the...

Страница 350: ...ger ID and System Password enter the System Manager ID and System Password using numeric keys then press Log In Out 4 Use or Scroll Wheel to select Forwarding Settings then press OK 5 Press the left Any key to select Menu 6 Use or Scroll Wheel to select Register then press OK 7 Use the software keyboard to enter a name for the forwarding condition then press the right Any key to select Set For inf...

Страница 351: ...t if the Fax Number information begins with the characters entered ends with Forwards the document if the Fax Number information ends with the characters entered contains Forwards the document if the Fax Number information contains the characters entered does not contain Forwards the document if the Fax Number information does not contain the characters entered If you select disregard or Does Not ...

Страница 352: ... See Storing Editing Address Book on p 3 2 To cancel a selected destination select the destination again 13 Press the right Any key to select Set 14 Use or Scroll Wheel to select the file format of the document you want to forward TIFF Forwards the file in the TIFF format PDF Forwards the file in the PDF format This procedure is not necessary if a fax number is specified as the destination in step...

Страница 353: ...ess Main Menu 2 Press the right Any key to select Additional Func When Forwarding Destinations Do Not Match the Forwarding Conditions You can store the forwarding destinations of a received document if the forwarding settings of the received document are not registered or if the received document does not match all of the forwarding conditions that you have specified Forwarding destinations can be...

Страница 354: ...D and System Password enter the System Manager ID and System Password using numeric keys then press Log In Out 4 Use or Scroll Wheel to select Forwarding Settings then press OK 5 Press the left Any key to select Menu 6 Use or Scroll Wheel to select Forward w o Condition then press OK 7 Use or Scroll Wheel to select Fax then press OK 8 Use or Scroll Wheel to select the forwarding destination then p...

Страница 355: ...ou want to forward TIFF Forwards the file in the TIFF format PDF Forwards the file in the PDF format This procedure is not necessary if a fax number is specified as the destination in step 8 Go to step 13 To view a TIFF file a software application that supports the TIFF format such as Imaging for Windows is required To view a PDF file Adobe Reader Adobe Acrobat Reader is required 11 Press the righ...

Страница 356: ...nter the System Manager ID and System Password using numeric keys then press Log In Out 4 Use or Scroll Wheel to select Forwarding Settings then press OK 5 Use or Scroll Wheel to select the desired forwarding setting then press OK Each time you press OK the icon status displayed on the left side of the condition name is switched The received document is forwarded to the specified destination if it...

Страница 357: ...o select System Management Set then press OK If the screen appears prompting you to enter the System Manager ID and System Password enter the System Manager ID and System Password using numeric keys then press Log In Out 4 Use or Scroll Wheel to select Forwarding Settings then press OK 5 Use or Scroll Wheel to select the forwarding setting you want to erase 6 Press the left Any key to select Menu ...

Страница 358: ...nt a list of the stored forwarding settings 1 Press Main Menu 2 Press the right Any key to select Additional Func 3 Use or Scroll Wheel to select System Management Set then press OK If the screen appears prompting you to enter the System Manager ID and System Password enter the System Manager ID and System Password using numeric keys then press Log In Out 4 Use or Scroll Wheel to select Forwarding...

Страница 359: ...return to the Main Menu screen Checking Changing Forwarding Settings You can check or change forwarding settings that have been stored 1 Press Main Menu 2 Press the right Any key to select Additional Func 3 Use or Scroll Wheel to select System Management Set then press OK If the screen appears prompting you to enter the System Manager ID and System Password enter the System Manager ID and System P...

Страница 360: ...ll Wheel to select the forwarding setting you want to check or change 6 Press the left Any key to select Menu 7 Use or Scroll Wheel to select Details Edit then press OK 8 Check or change the forwarding settings For instructions on changing forwarding settings see Storing Forwarding Settings on p 5 128 9 Press Main Menu to return to the Main Menu screen ...

Страница 361: ...d destination 1 Press Status Monitor Cancel 2 Use or Scroll Wheel to select Fax then press OK 3 Use or Scroll Wheel to select Received Job Status then press OK 4 Use or Scroll Wheel to select the job you want to transfer 5 Press the left Any key to select Details 6 Press the left Any key to select Forward 7 Use or Scroll Wheel to select the destination then press the right Any key to select Start ...

Страница 362: ...be lost if a forwarding error occurs If Memory Lock Settings is set to On forwarded documents or those with forwarding errors are not printed even if Print Image is set to On or Only When Error Occurs They are printed when Memory Lock Settings is set to Off When Print Image is set to On or Only When Error Occurs the first page of a document with forwarding errors will be printed on the Error TX Re...

Страница 363: ...curs Prints the image only when forwarding has failed 7 Use or Scroll Wheel to select Store Image to Memory then press OK 8 Use or Scroll Wheel to select Do Not Store or Only When Error Occurs then press OK Do Not Store Does not store the image Only When Error Occurs Stores the image in memory if forwarding fails If you set Store Image to Memory to Only When Error Occurs you can resend the jobs wi...

Страница 364: ...ect the job you want to transfer 5 Press the right Any key to select Menu 6 Use or Scroll Wheel to select Forward then press OK Resending Documents with Forwarding Errors You can resend the fax documents that the machine failed to forward Documents with forwarding errors are stored in memory only if Store Image to Memory is set to Only When Error Occurs in Store Print When Fwding in System Managem...

Страница 365: ...nnot select a group address for transferring the document 8 Press Main Menu to return to the Main Menu screen Checking Changing the Status of Documents with Forwarding Errors You can check the details of fax documents that the machine failed to forward You can also erase and print those documents Documents with forwarding errors are stored in memory only if Store Image to Memory is set to Only Whe...

Страница 366: ...ant to check Press the right Any key to select Menu Use or Scroll Wheel to select Details then press OK Check the details of the selected job then press the right Any key to select Done If you want to erase a document with a forwarding error Use or Scroll Wheel to select the job you want to erase Press the right Any key to select Menu Use or Scroll Wheel to select Erase then press OK ...

Страница 367: ...ocument at a time If you want to print a document with a forwarding error Use or Scroll Wheel to select the job you want to print Press the right Any key to select Menu Use or Scroll Wheel to select Print then press OK Use or Scroll Wheel to select No or Yes then press OK To print multiple document select and print one document at a time 4 Press Main Menu to return to the Main Menu screen ...

Страница 368: ...nts You can check the detailed information of fax documents currently being sent or waiting to be sent then delete unwanted documents as necessary 1 Press Status Monitor Cancel 2 Use or Scroll Wheel to select Fax then press OK 3 Use or Scroll Wheel to select Send Job Status then press OK 4 Use or Scroll Wheel to select the job whose detailed information you want to check then press the left Any ke...

Страница 369: ...r Scroll Wheel to select No or Yes then press OK 8 Press Main Menu to return to the Main Menu screen Checking Deleting Fax Reception Documents You can check the detailed information of the fax documents currently being received or fax documents that have been received in memory If the documents are unwanted you can delete them as necessary In addition documents that have been received in memory ca...

Страница 370: ...you complete this procedure Go to step 8 You can forward the selected job to another destination by pressing the left Any key to select Forward For information on forwarding received documents see Sending Documents in Memory to a Different Destination on p 5 140 6 Make sure that the job you want to erase is selected then press the right Any key to select Erase To erase multiple documents from memo...

Страница 371: ...o the Main Menu screen Checking Printing the Fax Log You can view or print the results of fax transactions that list all faxes sent or received 1 Press Status Monitor Cancel 2 Use or Scroll Wheel to select Fax then press OK 3 Use or Scroll Wheel to select Log then press OK If Job Log Display in System Management Set is set to Off Log is not displayed ...

Страница 372: ...eft Any key to select Details 5 Check the details of the selected job then press the right Any key to select Done 6 If you want to print a list of transaction results press the right Any key to select Print List If you do not want to print the list go to step 8 7 Use or Scroll Wheel to select No or Yes then press OK 8 Press Main Menu to return to the Main Menu screen ...

Страница 373: ...Fax 5 152 Checking Changing the Status of Fax Documents in Memory ...

Страница 374: ...scribes how to use e mail functions E mail Chapter 6 Overview of E Mail Functions 6 2 Introduction to Using E Mail Functions 6 4 Basic E Mail Operations 6 5 Sending E Mail Documents 6 5 Canceling Sending E Mail Documents 6 7 ...

Страница 375: ...E mail 6 2 Overview of E Mail Functions Overview of E Mail Functions You can send scanned documents as e mail attachments You can also print out received e mail messages ...

Страница 376: ...E mail 6 3 Overview of E Mail Functions ...

Страница 377: ...ted as an e mail attachment to the recipient s e mail application The necessary settings before using the scan to E mail and I fax function is as follows Network settings Connect the network cable and set the IP address to enable your machine to communicate over the network For details see Network Settings in the e Manual E mail settings Check the required information and set up the machine For de...

Страница 378: ...y scan multiple page originals using a file format for color use the feeder instead Sending E Mail Documents This section describes the flow of sending e mails 1 Place your originals 2 Press Main Menu 3 Use or Scroll Wheel to select Send Fax then press OK 4 Use or Scroll Wheel to select Enter E mail New then press OK 5 Use the software keyboard to enter the e mail address then press the right Any ...

Страница 379: ...time See E mail in the e Manual Send Document Name Settings Sets the name of the document for sending See E mail in the e Manual Subject Message Settings Sets your e mail subject and message See E mail in the e Manual Reply to Settings Sets the reply address to your e mail See E mail in the e Manual E mail Priority Settings Sets your e mail priority See E mail in the e Manual Register Favorites St...

Страница 380: ...tions on the display then press Start once for each original 11 When scanning is complete press the right Any key to select Done The scanned data is sent to the specified destination 1 Press Status Monitor Cancel during transmission 2 Use or Scroll Wheel to select Send Store then press OK 3 Use or Scroll Wheel to select Send Job Status then press OK ...

Страница 381: ... Operations 4 Use or Scroll Wheel to select the job you want to cancel then press the right Any key to select Cancel 5 Use or Scroll Wheel to select No or Yes then press OK 6 Press Main Menu to return to the Main Menu screen ...

Страница 382: ... Pages on One Sheet 7 10 2 Sided Printing 7 11 Printing from Memory Media Direct Print 7 12 Memory Media Supported by This Machine 7 12 Data Supported by This Machine 7 13 Inserting Memory Media 7 14 Removing Memory Media 7 15 Printing from Memory Media 7 15 Checking and Canceling Print Jobs Checking Print Logs 7 27 Checking Print Jobs 7 27 Canceling Print Jobs 7 28 Checking Print Logs 7 29 Printi...

Страница 383: ...ions You can print on both sides of paper or use the mode that reduces multiple pages to fit onto one sheet of paper You can also print out data from a memory medium inserted into the slot of the machine p 7 12 20XX 12 01 20XX 12 02 20XX 12 03 p 7 20 p 7 22 and 7 24 ...

Страница 384: ...Printing 7 3 Overview of Print Functions p 7 10 p 7 11 p 7 8 ...

Страница 385: ...pported by this machine must be installed For installing the driver to send a print job to the machine over a network see Network Connection in the Starter Guide For installing the driver to send a print job directly from your Computer to the machine see USB Connection in the Starter Guide UFRII LT Mode UFR Ultra Fast Rendering is printing technology developed by Canon High speed printing is made ...

Страница 386: ...rint environment it is necessary to install the Canon Driver Information Assist Service in the server computer in order to set up the printer configuration automatically or to use Department ID Management For instructions on how to install the Canon Driver Information Assist Service see Set Up Computers and Software in the Starter Guide Most settings of printing are made from the printer driver Al...

Страница 387: ...shared printer in the Print Server Point and Print environment it is necessary to install the Canon Driver Information Assist Service in the server computer in order to set up the printer configuration automatically or to use Department ID Management For instructions on how to install the Canon Driver Information Assist Service see Set Up Computers and Software in the Starter Guide The machine may...

Страница 388: ...Documents from Computer 4 Configure the required settings in the printer driver screen then click OK 5 Click Print The name of the button to start printing may vary depending on the application you are using Printing begins ...

Страница 389: ...magnify the document Depending on the printer model you are using you may not be able to magnify the document to the optimum ratio for the selected page size If you are using an application that enables you to enlarge or reduce the document configure the settings in the application The display may differ according to the operating system as well as the type and version of the printer driver Most s...

Страница 390: ...y according to the settings made in Page Size and Output Size 4 If you want to increase or decrease the magnification manually select Manual Scaling specify the scaling ratio for Scaling If the ratio is less than 25 or more than 200 the document is printed without scaling on the paper specified in Output Size 5 Click OK ...

Страница 391: ...nding on the application you are using do not used it together with this function If you do printing may not be executed correctly You cannot enlarge and reduce manually when using this function The display may differ according to the operating system as well as the type and version of the printer driver Most settings of printing are made from the printer driver Although there are some settings wh...

Страница 392: ...hand corner of the printer driver window to view the Online Help The display may differ according to the operating system as well as the type and version of the printer driver Most settings of printing are made from the printer driver Although there are some settings which can be made from the machine the settings from the printer driver has priority 1 Display the Finishing sheet 2 Select 2 sided ...

Страница 393: ...the display You do not need to connect the machine to your computer The Direct Print function is available only for the Color imageCLASS MF9280Cdn Memory Media Supported by This Machine The memory media listed below are compatible with this machine USB Memory Memory cards that can be directly inserted into the slot USB Memory SD Secure Digital memory card SDHC memory card Compact Flash CF Card sup...

Страница 394: ...Supported by This Machine Note the followings so you can use an appropriate memory medium Supported file systems of a memory are FAT16 and FAT32 You can not select the data contained in other folder at once You can not select a data in a lower level folder The following file formats are supported JPEG TIFF JPEG files that conform to the following are supported DCF Exif2 21 or earlier JFIF Number o...

Страница 395: ...oing so may damage the machine and the memory medium When inserted some memory media protrude from the slot Do not force them into the slot any further Doing so may damage the machine and the memory media Make sure that the memory medium is correctly oriented before inserting it into the slot Forcing an improperly positioned memory medium into the slot may damage the memory medium and or the machi...

Страница 396: ...ve the memory medium when the access lamp is blinking The blinking lamp indicates that the machine is accessing the data in the memory medium The data may be damaged if you remove the memory medium at this point 1 Insert a memory medium into the slot 2 Confirm that the access lamp has lit up 3 Press Main Menu 4 Use or Scroll Wheel to select Direct Print then press OK Printing from Memory Media 1 M...

Страница 397: ...e display method from Folder File Name Display to Image Display then press OK You can select the desired data by sorting all data according to date or extension If you want to sort data by date see Selecting Files by Date on p 7 22 If you want to sort data by extension see Selecting Files by Extension on p 7 24 7 Use or Scroll Wheel to select the data that you want to print then press OK In the Im...

Страница 398: ...the detailed procedures in the next page Print File Name Prints the file name on data To make this setting see the detailed procedures in the next page Vivid Photo Makes green and blue more lively Brightness Adjusts brightness Halftones Optimizes data for printing The Halftones default setting is Auto Gradation is suitable for photos taken with a digital camera and Error Diffusion is suitable for ...

Страница 399: ...t Date or Print File Name is set to Off Use or Scroll Wheel to select the layout type then press OK Use or Scroll Wheel to select Yes then press OK If you select Print Date or Print File Name Only JPEG data can be printed Even if the selected files contain TIFF data only JPEG data is printed The file name can consist of up to 20 characters Use or Scroll Wheel to select On then press OK 10 Press to...

Страница 400: ...el to select Direct Print then press OK 5 Press the right Any key to select Index Print 6 Use or Scroll Wheel to select the desired memory medium then press OK You can not select multiple memory media or folders at once If you press the right Any key to select Set only the data saved outside folders will be printed 7 Use or Scroll Wheel to select the desired folder then press the right Any key to ...

Страница 401: ... blinking lamp indicates that the machine is accessing the data in the memory medium The data may be damaged if you remove the memory medium at this point Selecting All Files in Folder You can print all files in the selected folder 1 Insert a memory medium into the slot 2 Confirm that the access lamp has lit up 3 Press Main Menu 4 Use or Scroll Wheel to select Direct Print then press OK 5 Use or S...

Страница 402: ...ct All 11 Use or Scroll Wheel to select the desired setting then press OK For details about Print Settings see step 9 in Printing from Memory Media on p 7 15 12 Press Start to start printing When printing is complete remove the memory medium Do not remove the memory medium when the access lamp is blinking The blinking lamp indicates that the machine is accessing the data in the memory medium The d...

Страница 403: ... a memory medium into the slot 2 Confirm that the access lamp has lit up 3 Press Main Menu 4 Use or Scroll Wheel to select Direct Print then press OK 5 Use or Scroll Wheel to select the desired memory medium then press OK 6 Press the left Any key to select Display Select 7 Use or Scroll Wheel to select Change File Selection then press OK 8 Use or Scroll Wheel to select Specify Conditions then pres...

Страница 404: ... to select the start date then press OK Use or Scroll Wheel to select the end date then press OK Use or Scroll Wheel to select the file that you want to print then press OK Press the right Any key to select Print Settings If you want to print all files on the specified dates Use or Scroll Wheel to select Specify Date Select All then press OK Use or Scroll Wheel to select the start date then press ...

Страница 405: ...nking The blinking lamp indicates that the machine is accessing the data in the memory medium The data may be damaged if you remove the memory medium at this point 1 Insert a memory medium into the slot 2 Confirm that the access lamp has lit up 3 Press Main Menu 4 Use or Scroll Wheel to select Direct Print then press OK 5 Use or Scroll Wheel to select the desired memory medium then press OK 6 Pres...

Страница 406: ...les of the specified extension Use or Scroll Wheel to select Specify Extension then press OK Use or Scroll Wheel to select the desired extension then press OK Use or Scroll Wheel to select the file that you want to print then press OK Press the right Any key to select Print Settings If you want to print all files of the specified extension Use or Scroll Wheel to select Specify Ext Select All then ...

Страница 407: ...ee step 9 in Printing from Memory Media on p 7 15 11 Press Start to start printing When printing is complete remove the memory medium Do not remove the memory medium when the access lamp is blinking The blinking lamp indicates that the machine is accessing the data in the memory medium The data may be damaged if you remove the memory medium at this point ...

Страница 408: ...elect Details 5 Check the print job status then press the right Any key to select Done 6 Press Main Menu to return to the Main Menu screen Checking and Canceling Print Jobs Checking Print Logs You can check the numbers of prints and the print results or you can cancel a print job before the printing starts Checking Print Jobs Make sure that the Processing Data indicator is on or blinking When the ...

Страница 409: ...a indicator is off there are no print jobs in the memory 1 Press Status Monitor Cancel 2 Use or Scroll Wheel to select Print then press OK 3 Use or Scroll Wheel to select Job Status then press OK 4 Use or Scroll Wheel to select the desired job then press the right Any key to select Cancel 5 Use or Scroll Wheel to select Yes 6 Press Main Menu to return to the Main Menu screen ...

Страница 410: ... to select Print then press OK 3 Use or Scroll Wheel to select Log Printer then press OK 4 Use or Scroll Wheel to select the desired log then press the left Any key to select Details 5 Check the print log then press the right Any key to select Done 6 Press Main Menu to return to the Main Menu screen Checking Print Logs ...

Страница 411: ...Printing 7 30 Checking and Canceling Print Jobs Checking Print Logs ...

Страница 412: ...ing Scanner Functions 8 4 For Scanning Documents to a Shared Folder File Server 8 4 For Scanning Documents from a Networked Computer 8 4 Basic Scanning Operations 8 6 Scanning Documents to a File Server 8 6 Scanning Documents to a USB Memory 8 8 Scanning Documents from a Networked Computer 8 10 Scanning Chapter 8 ...

Страница 413: ...ning 8 2 Overview of Scanner Functions Overview of Scanner Functions You can transmit scanned documents over the network to your computer You also can store scanned documents in a file server or USB memory ...

Страница 414: ...Scanning 8 3 Overview of Scanner Functions ...

Страница 415: ... the menu of a TWAIN compliant application applications capable of modifying images or inserting them into a document such as Adobe Photoshop Microsoft Office etc A TWAIN compliant application must be installed in your computer since Color Network ScanGear cannot be used as an independent application software Network Settings Connect the network cable and set the IP address to enable your machine ...

Страница 416: ... computer you need to select the machine for scanning using the ScanGear Tool For details see Set Up Computers and Software in the Starter Guide ScanGear Tool is an application software included with the Color Network ScanGear ScanGear Tool is installed together with the Color Network ScanGear driver ...

Страница 417: ...aten glass If you want to consecutively scan multiple page originals using a file format for color use the feeder instead 1 Place your originals 2 Press Main Menu 3 Use or Scroll Wheel to select Send Fax or Scan to Store then press OK If you select Scan to Store use or Scroll Wheel to select Store on File Server then press OK 4 Use or Scroll Wheel to select Enter File Server New then press OK 5 Sp...

Страница 418: ...Specifies the transmission time See Scan in the e Manual Send Document Name Settings Sets the name of the document for sending See Scan in the e Manual Subject Message Settings Sets the message body text See Scan in the e Manual Register Favorites Stores frequently used send settings for future use See Scan in the e Manual 7 Press Start Scanning starts if the original is placed in the feeder and t...

Страница 419: ...s to a USB memory If you use the platen glass to scan your originals you will not be able to scan multiple page originals consecutively Also in the Color File Format Settings screen you will be able to select Off or On in the Divide Pages menu but the function will be ineffective To scan multiple page originals consecutively use the feeder 1 Insert your USB memory to an appropriate slot on the rig...

Страница 420: ... originals and the file format for sending See Scan in the e Manual Resolution Settings Adjusts the resolution of originals See Scan in the e Manual Density Background Rem Set Adjusts the density and the background color of originals See Scan in the e Manual Original Image Quality Settings Adjusts the image quality of originals See Scan in the e Manual 2 Sided Orig Orientation Set Scans two sided ...

Страница 421: ...ow for more information on TWAIN compliant applications Before proceeding to the procedure below see Introduction to Using Scanner Functions on p 8 4 and make sure that all the setups are complete for scanning originals from a computer Color Network ScanGear cannot be used as an independent application software To use the Color Network ScanGear driver a TWAIN compliant application such as Adobe Ph...

Страница 422: ...n step 4 displayed If you change the screen the machine will automatically go offline when scanning is complete or as soon as the preview image is displayed If you press Main Menu while the machine is online the machine will automatically go offline 5 Place your original on the platen glass or in the feeder The Color Network ScanGear driver cannot store scanned images or convert them to PDF or oth...

Страница 423: ...can Import from TWAIN source etc depending on the application you are using For details see the documentation that comes with the application software used When you select the command to start the Color Network ScanGear driver and if it does not start and an error message such as Scanner is not connected appears check if all the setups are complete for scanning originals from a computer See Introd...

Страница 424: ...ng is complete 11 After scanning is complete switch the scanner offline Use or Scroll Wheel to select Offline then press OK To use other functions of the machine such as copying you must switch the machine offline For details see Scan in the e Manual 12 Press Main Menu to return to the Main Menu screen Scanning 8 13 Basic Scanning Operations ...

Страница 425: ...Scanning 8 14 Basic Scanning Operations ...

Страница 426: ...ting Up Network 9 2 What is the Network 9 3 Overview of Network Functions 9 4 This chapter describes what the network is what you can do with the network and what you have to do to use the machine with the network Network Chapter 9 ...

Страница 427: ...Network 9 2 Flowchart for Setting Up Network Flowchart for Setting Up Network Follow the procedures in the flowchart below to set up each network function ...

Страница 428: ...N are the two most common words used to refer to networks The Internet is the vast network to which computers all over the world are connected Computers connected to the Internet anywhere in the world can exchange information with one another On the other hand LAN is the abbreviation for Local Area Network and means a network within a limited area in an office for example ...

Страница 429: ...Network 9 4 Overview of Network Functions Overview of Network Functions This section describes actions you can perform using the network function ...

Страница 430: ...Settings from a PC 10 1 Settings from a PC This chapter describes how to use the Remote UI functions Overview of Remote UI 10 2 Starting the Remote UI 10 4 Settings from a PC Chapter 10 ...

Страница 431: ...Remote UI Remote UI enables you to check the machine s status and manage the machine s functions from a computer on the network using a web browser Using the computer keyboard the management process such as entering addresses to the address book will be easier ...

Страница 432: ...t place provides you with easy job management For details see Job Management in the e Manual Editing the Address Book from a computer The Remote UI enables you to make additions and changes to each item of the address book You can use the PC keyboard so entering a lot of addresses to the address book will be easier For details see Managing the Address Book in the e Manual Setting registering from ...

Страница 433: ...Computers and Software in the Starter Guide 2 Start the web browser 3 Enter the IP address of the machine in Address or Location then press Enter on the keyboard For details on how to check the IP address see Setting and Checking the IP Address in the e Manual The Remote UI screen appears 4 Enter the required data The required data differ depending on the authentication mode you are using If both ...

Страница 434: ... and the Password and click OK For End User Mode enter the User Name and click OK For Department ID Management mode Enter the Department ID and Password and click OK For User Management mode Enter the User ID and Password and click OK If no password is set you can log on without entering a password ...

Страница 435: ...om a PC 10 6 Starting the Remote UI 5 Operate the Machine Now you can manage the machine on the web browser For details see Settings from a PC in the e Manual For details on the Remote UI settings see Online Help ...

Страница 436: ... 2 Exterior 11 2 Interior 11 3 Scanning Area 11 4 Replacing the Toner Cartridges 11 7 When a Message Appears 11 7 Replacing the Toner Cartridge with a New One 11 8 Recycling Used Cartridges 11 13 The Clean Earth Campaign The Canon Cartridge Return Program 11 13 U S A PROGRAM 11 14 Canadian Program Programme au Canada 11 17 Transporting the Machine 11 19 ...

Страница 437: ...ed Documents received into memory and documents stored for delayed send will be retained for approximately 60 minutes after the power cord has been disconnected When you turn OFF the main power switch the documents stored in memory will be erased To check the jobs stored in memory see the following Checking and Canceling Copy Jobs Checking Copy Logs on p 4 72 Checking and Canceling Print Jobs Chec...

Страница 438: ...it Cleaning procedure every time the toner cartridge is replaced Print the cleaning pattern on LTR paper for cleaning the fixing unit As cleaning paper LTR or A4 paper must be loaded in the paper drawer or the stack bypass tray Cleaning the fixing unit takes approximately 60 seconds 1 Press Main Menu 2 Press the right Any key to select Additional Func 3 Use or Scroll Wheel to select Adjustment Cle...

Страница 439: ... the Main Menu screen Scanning Area Keep the scanning area clean to avoid dirty copies or faxes to be sent Cleaning the Platen Glass Clean the platen glass and the underside of the feeder by following the procedure below 1 Open the feeder 2 Clean the platen glass and the underside of the feeder with a cloth dampened with water Then wipe the area with a soft dry cloth Do not dampen the cloth too mu...

Страница 440: ...canning them through the feeder clean the rollers of the feeder Use LTR or A4 paper as cleaning paper It takes approximately 30 seconds to clean the feeder 1 Press Main Menu 2 Press the right Any key to select Additional Func 3 Use or Scroll Wheel to select Adjustment Cleaning then press OK 4 Use or Scroll Wheel to select Feeder Cleaning then press OK ...

Страница 441: ... the feeder 6 Confirm that Start is displayed then press OK The display returns to the Adjustment Cleaning screen Discard the cleaning paper after use The cleaning process cannot be canceled Please wait until it is completed 7 Press Main Menu to return to the Main Menu screen ...

Страница 442: ...artridge Replacing the toner cartridge is recommended before performing a bulk printing Check the XXX toner A toner cartridge that cannot guarantee print quality because it has reached the end of its life etc or a toner cartridge that has already been spent may be set Continued use of this toner cartridge may cause the machine to malfunction Replacing of the toner cartridge is recommended Replace ...

Страница 443: ...This may cause the toner remaining inside the cartridges to ignite resulting in burns or fire Do not pull out the sealing tape forcefully or stop at midpoint as this may cause toner to spill out If toner gets into your eyes or mouth wash them immediately with cold water and consult a physician When closing the front cover be careful not to get your fingers caught 1 Open the front cover by using th...

Страница 444: ...If the delivery feeder unit is broken or transfer belt A is damaged this may result in misfeeds or deterioration in print quality 3 Hold the blue tabs on the both sides of toner cartridge and pull it horizontally Do not touch the high voltage contact A or the electrical contacts B as this may result in damage to the printer 4 Take the new toner cartridge out of the protective bag after taking it o...

Страница 445: ... inch long gently by hooking your fingers into the tab and pulling it out straight in the direction of the arrow Do not pull the seal out at an angle Do not open the drum protective shutter A If toner is adhered on the removed seal be careful that your hands or clothes do not get dirty from touching the toner If your hands or clothes get dirty from touching the toner wash them immediately in cold ...

Страница 446: ...dge in a manner that is not directed in this procedure 10 Align A of the toner cartridge that you want to replace with the slots B to which the label of the same color is attached then insert the cartridge until it stops 11 After removing all the packing materials on the each toner cartridges and installing the cartridges remove the paper on the transfer belt of the delivery feeder unit When remov...

Страница 447: ...Replacing the Toner Cartridges Maintenance 12 Close the front cover If you cannot close the front cover do not force it to close Open the cover and make sure the toner cartridge is properly set in the machine ...

Страница 448: ...aging Appreciation of the Outdoors Clean Earth initiatives supported by Canon in the U S include Eyes on Yellowstone Canon Envirothon NATURE Series on PBS and The Canon Clean Earth Crew Initiatives supported in Canada include Canon Envirothon and World Wildlife Fund Canada Since its inception The Canon Cartridge Return Program has collected millions of cartridges that otherwise would have been dis...

Страница 449: ...o receive your free eight cartridge collection box Call 1 800 OK CANON or Visit www usa canon com cleanearth return OR Place as many cartridges as possible into one box Carefully seal the box with tape OR Place an empty toner cartridge in the box that contained your new toner cartridge ...

Страница 450: ...hipment does not exceed UPS specifications See Below Maximum weight 70 pounds Maximum length 108 inches Maximum girth length 2 x width 2 x height 130 inches Please Note Do not send defective cartridges for replacement Defective cartridges under warranty should be exchanged by an authorized dealer or service facility as provided in the warranty ...

Страница 451: ... methods of shipment your used cartridge s will be forwarded to the Canon Cartridge Collection Center at no charge to you Residents of Alaska and Hawaii Do not use UPS authorized return label Alternative return service with the U S Postal Service is available by calling 1 800 OK CANON or visit www usa canon com cleanearth return For further information about the Clean Earth Campaign in the United ...

Страница 452: ...cks from the new cartridge s box Place the empty toner cartridge in the box from your new toner cartridge Seal the box Apply the Canon Canada Inc Canada Post label provided in this brochure Canon s labels are specially marked so that Canon pays the postage Deposit your empty toner cartridge in any full size street mailbox or take it to your local Canada Post outlet or franchise ...

Страница 453: ...anon pays the postage Deliver to any local Canada Post outlet or franchise Customers who hold a Commercial pick up agreement with Canada Post may have their collection box picked up Working to protect the environment is a long standing Canon interest To this end for every cartridge collected Canon Canada donates funds to World Wildlife Fund Canada and the Canon Envirothon For further information a...

Страница 454: ...sconnect the power cord and all the cables from the machine Disconnect the power cord from the machine Disconnect the LAN and USB cables if any are connected to the machine Disconnect the telephone cable and other cables from the machine if you connect your own telephone to the machine 3 If you are using the output tray extension fold the paper stopper and then push the output tray extension into ...

Страница 455: ...ve the Cassette Feeding Unit AC1 perform the installation procedure in reverse See the sheet Cassette Feeding Unit AC1 Setup Instruction 7 Pick up the machine using the hand grips on the left right and back of the machine Check the weight of the machine to carry it safely See Specifications on p 14 2 If you need to install the Cassette Feeding Unit AC1 in the machine place the feeder at the instal...

Страница 456: ...lex Unit 12 6 Stack Bypass Tray 12 8 Paper Drawer 1 12 10 Optional Paper Drawer Paper Drawer 2 12 11 Inside of the Machine 12 13 Fixing Unit 12 16 Back Cover 12 18 When the Message Does Not Disappear 12 19 If the Delivery Feeder Unit Is Not Installed Correctly 12 22 Error Messages 12 24 Error Codes 12 34 If a Message Such as Paper diff from set size type is displayed 12 41 Reloading the Paper 12 4...

Страница 457: ...g inside of the machine be careful not to allow necklaces bracelets or other metal objects to touch the inside of the machine as this can result in burns or electrical shock When removing jammed paper be careful not to get any toner on your hands or clothing as this will dirty your hands or clothing If toner gets on your hands or clothing wash them immediately with cold water Washing with warm wat...

Страница 458: ...achine If the jammed original cannot be removed easily proceed to the next step 3 Open the inner cover holding it by its front tab A 4 Lift the release lever A until it clicks into place Original Jams If a screen similar to the one shown below appears on the display remove the jammed original from the feeder Then press the right Any key to display the next procedure ...

Страница 459: ...g 5 Remove the jammed original Do not force a jammed paper out of the machine as it may tear 6 Return the release lever A to its original position 7 Close the inner cover 8 Close the feeder cover 9 Load the original in the feeder again ...

Страница 460: ... the removed paper it may adhere to the paper to be printed next 2 Open and close the front cover to reset the machine If you are using the stack bypass tray close it before opening the front cover Use the handle A to gently close the front cover Paper Delivery Tray If a screen similar to the one shown below appears on the display remove the jammed paper from the output tray Then press the right A...

Страница 461: ...any jammed paper and gently pull it out Do not force a jammed paper out of the machine If the jammed paper cannot be removed easily proceed to the next step 4 Close the inner cover Duplex Unit If a screen similar to the one shown below appears on the display remove the jammed paper from the duplex unit Then press the right Any key to display the next procedure ...

Страница 462: ...bleshooting 5 Lower the scanning platform 6 Open and close the front cover to reset the machine If you are using the stack bypass tray close it before opening the front cover Close the front cover gently holding the handle A ...

Страница 463: ... paper out of the machine If the jammed paper cannot be removed easily proceed to the next step 2 Close the stack bypass tray Stack Bypass Tray If a screen similar to the one shown below appears on the display remove the jammed paper from the stack bypass tray Then press the right Any key to display the next procedure ...

Страница 464: ...12 9 Clearing Jams Troubleshooting 3 Open and close the front cover to reset the machine Close the front cover gently holding the handle A ...

Страница 465: ...d on the jammed paper as you remove it Do not force a jammed paper out of the machine Doing so may result in the feed roller coming off If the jammed paper cannot be removed easily proceed to the next step 3 Gently push the paper drawer back into the machine until it clicks into place in the closed position 4 Open and close the front cover to reset the machine If you are using the stack bypass tra...

Страница 466: ...ed paper out of the machine Doing so may result in the feed roller coming off If the jammed paper cannot be removed easily proceed to the next step Optional Paper Drawer Paper Drawer 2 If a screen similar to the one shown below appears on the display remove the jammed paper from the optional paper drawer Then press the right Any key to display the next procedure ...

Страница 467: ...aper drawer back into the machine until it clicks into place in the closed position 4 Open and close the front cover to reset the machine If you are using the stack bypass tray close it before opening the front cover Close the front cover gently holding the handle A ...

Страница 468: ... delivery feeder unit is broken or transfer belt A is damaged this may result in misfeeds or deterioration in print quality If the size of the paper loaded in the paper drawer differs from the paper size set in the Paper Settings or the paper size set on the printer driver a paper jam may occur If this is the case load the correct size paper before removing the jammed paper If you remove the jamme...

Страница 469: ...aper and gently pull it out in the direction of the arrow Do not force a jammed paper out of the machine If the jammed paper cannot be removed easily proceed to the next step 4 Hold both sides of any jammed paper and gently pull it out in the direction of the arrow Do not force a jammed paper out of the machine If the jammed paper cannot be removed easily proceed to the next step 5 Press the lock ...

Страница 470: ... duplex print transport guide is closed completely If the duplex print transport guide is not closed completely this may result in misfeeds or paper jams 8 Hold the tab A of the delivery feeder unit and lift the delivery feeder unit until it clicks If the delivery feeder unit comes off see If the Delivery Feeder Unit Is Not Installed Correctly on p 12 22 9 Remove the jammed paper in the direction ...

Страница 471: ... it is locked 2 Open the fixing cover holding it by its left tab A Fixing Unit If a screen similar to the one shown below appears on the display remove the jammed paper from the fixing unit Then press the right Any key to display the next procedure 10 Close the front cover ...

Страница 472: ...ng 3 Hold both sides of any jammed paper and gently pull it out Do not force a jammed paper out of the machine If the jammed paper cannot be removed easily proceed to the next step 4 Close the fixing cover 5 Lower the scanning platform ...

Страница 473: ...he front cover to reset the machine If you are using the stack bypass tray close it before opening the front cover Close the front cover gently holding the handle A Back Cover If a screen similar to the one shown below appears on the LCD display remove the jammed paper from the back side of the machine Then press the right Any key to display the next procedure ...

Страница 474: ...e jammed paper Touching the fixing unit when it is still hot may result in burns When you remove the fixing unit you have to turn the main power switch OFF Sending or receiving documents cannot be done when the main power switch is OFF or the power cord is disconnected If the main power switch is turned OFF all jobs waiting in the print queue will be erased Documents received into memory and docum...

Страница 475: ... upright position 5 Press the blue tabs A and hold the fixing unit by the parts indicated with arrows 6 Remove the fixing unit with both hands 7 Place the fixing unit on a flat surface 8 Open the fixing unit cover 9 Remove the jammed paper 10 Install the fixing unit 11 Close the fixing cover ...

Страница 476: ...12 21 When the Message Does Not Disappear Troubleshooting 12 Lower the scanning platform 13 Reconnect the power cord and turn on the main power switch ...

Страница 477: ... receiving documents cannot be done when the main power switch is OFF or the power cord is disconnected If the main power switch is turned OFF all jobs waiting in the print queue will be erased Documents received into memory and documents stored for delayed send will be retained for approximately 60 minutes after the power cord has been disconnected 1 Turn OFF the main power switch and disconnect ...

Страница 478: ... it If the delivery feeder unit is broken or transfer belt A is damaged this may result in misfeeds or deterioration in print quality 4 Install the delivery feeder unit so that the protrusions A of the delivery feeder unit fit into the guides B and click into place 5 Confirm that the triangle marks A on the delivery feeder unit are aligned with the triangle marks B on the machine 6 Close the front...

Страница 479: ...e settings The machine cannot connect to the specified IP address port Check the gateway address setting See Network Settings in the e Manual Check the server address and port number for the LDAP server See Network Settings in the e Manual Check that the LDAP server is operating properly If Login Information is set to Use Sec Auth Ver 3 UTF 8 for the LDAP server check whether UDP User Datagram Pro...

Страница 480: ...llow Cyan or Magenta There may be a problem with the toner cartridge connection of the indicated color Take out the toner cartridge of the indicated color then properly set it again For detailed instructions see Replacing the Toner Cartridge with a New One on p 11 8 Turn OFF the main power switch wait for more than 10 seconds then turn it ON again When this message does not disappear even if you t...

Страница 481: ...he correct certificate information The correct client authentication information the key pair and certificate user name and password and the CA certificate is not set Check for incorrect settings in the authentication method and authentication information the key pair and certificate user name and password and the CA certificate IEEE802 1X Error The Certificate has expired The server certificate s...

Страница 482: ...e size specified on the machine s paper settings and on the printer driver Load the paper of the size specified on the machine and on the printer driver and close the paper drawer Printing will resume To print on the paper of the size that is loaded in the paper drawer 1 Delete the current job 2 Change the paper size settings both on the printer driver and on the machine 3 Retry printing Load pape...

Страница 483: ...ize type The following did not match when copying receiving faxes I faxes or E mails The paper size specified on the machine The size of the paper loaded in the paper drawer Change the following so that they match Paper size setting on the machine The size of the paper loaded in the paper drawer See Loading Paper on p 2 10 or Setting Paper Size and Type on p 2 22 The following did not match when p...

Страница 484: ...location of the paper jam and remove the jammed paper Press the right Any key to display the next procedure For detailed instructions see Fixing Unit on p 12 16 Perform the operation again A transmission error has occurred because the line condition was poor Check the line condition then try again Preparing The machine is not ready for scanning Wait until the machine is ready Prepare a new toner c...

Страница 485: ...porarily received the data in memory because an error of some kind has occurred in the machine This error message appears with one of the messages below Load paper A cover is open Check that all of the covers are closed The paper has jammed Remove the jammed paper from Replace the toner This error message appears with another message When the error is resolved the received data will be printed out...

Страница 486: ...ze of paper into the paper drawer or stack bypass tray See Reloading the Paper on p 12 42 2 Remove the jammed paper and close the front cover See Inside of the Machine on p 12 13 3 Wait a while until the job resumes Remove the jammed paper from XXX XXX indicates the location of the jam A paper jam occurred at the location shown on the display Check the location of the paper jam and remove the jamm...

Страница 487: ...ings in System Management Set from the Additional Functions screen then turn the machine s main power OFF and back ON again See Network Settings or Setting Up the Machine in the e Manual Set the toner cartridge XXX XXX indicates either Black Yellow Cyan or Magenta The toner cartridge of the indicated color is not set Set the toner cartridge of the indicated color For detailed instructions see Repl...

Страница 488: ...r of addresses to search See Network Settings in the e Manual The scan area is dirty The feeder s scanning area is dirty Clean the feeder s scanning area This size cannot be used with 2 Sided unit modes The paper size is not appropriate for a two sided copy Set the paper size to LTR or LGL then load paper of the same size Transmission has been suspended Contact system manager You tried to send e m...

Страница 489: ...rocedures according to the error code For details on reports see Introduction of the Machine in the e Manual See the table below for individual error codes Error Code Description Action 0001 Paper or originals are jammed Remove any jammed paper or originals See Clearing Jams on p 12 2 0003 Communications that take longer than the preset time 64 minutes caused the error Reduce the resolution or div...

Страница 490: ...as included in the telephone number when sending a fax overseas Insert a pause after the country code or after the fax number of the recipient and then dial the number again See Dialing an Overseas Number With Pauses on p 5 22 Change the Long Distance setting if you are sending documents to a destination stored in the Address Book or One touch See Registering Fax Numbers in the Address Book on p 3...

Страница 491: ...led because the medium was pulled out during the transfer Confirm that the medium is correctly inserted and then try the transfer again An error has occurred while data such as image data were being transferred to the medium Check the status of the medium or make sure that the medium is formatted with a file system supported by the machine 0703 The memory for image data is full when sending color ...

Страница 492: ...753 A TCP IP error occurred while sending documents to a file server or sending an e mail message Socket Select error etc Check that the network cable is properly connected between the machine and your computer Check that the SMB Settings is set to On Check that the Host Name of the file server destination is set correctly Check that the Workgroup Name is set correctly Set Use LM Announce to On Ch...

Страница 493: ... Start the Remote UI and make sure that Primary DNS Server Address and Secondary DNS Server Address in TCP IP Settings under Network Settings are set correctly Connection to the DNS server failed Ask the network administrator to check that the DNS server is operating properly 0804 You have no permission to access the folder Check that the user name and password you specified match the user account...

Страница 494: ... 0819 You have received data that cannot be processed MIME information is incorrect Check the settings and then ask the sender to resend the data The machine can receive only e mails in plain text format HTML e mails cannot be received 0820 You have received data that cannot be processed BASE 64 or uuencode is incorrect Check the settings and then ask the sender to resend the data The machine can ...

Страница 495: ... Settings under Network Settings If you do not know what your password is check in the notification form issued by your ISP Internet Service Provider or consult the network administrator 0853 The job was not able to be processed due to the reason why it was canceled from an application or operating system while the print data was being sent to this machine from a computer etc You have sent the pri...

Страница 496: ...med paper from inside the front cover The following did not match The paper size specified on the machine The size of the paper loaded in the paper drawer Print Load LTR to Drawer 1 Depending on the paper supply and settings the message displayed may vary The following did not match The paper size specified on the machine The size of the paper loaded in the paper drawer Paper diff from set size ty...

Страница 497: ...If you set the standard settings for stack bypass tray follow the procedures below to change paper size 1 Press Main Menu 2 Press the right Any key to select Additional Func 3 Use or Scroll Wheel to select Paper Settings then press OK 4 Use or Scroll Wheel to select Stack Bypass Paper Std then press OK 5 Use or Scroll Wheel to select On then press the right Any key to select Option If you do not w...

Страница 498: ... use 7 Use or Scroll Wheel to select paper type then press OK You can select from the following paper types Plain 1 Plain 2 Recycled Paper Color Bond Heavy 1 Heavy 2 Transparencies Labels Envelope The selectable paper types vary depending on the paper size you have specified The unavailable paper types are grayed out on the display 8 Press Main Menu to return to the Main Menu screen For the Paper ...

Страница 499: ...croll Wheel to select paper size then press OK You can select from the following paper sizes LTR LGL EXEC FLSC OFI B OFI M OFI If you use A B size paper press the right Any key to select A B Sizes and perform the step above 6 Use or Scroll Wheel to select paper type then press OK You can select from the following paper types Plain 1 Plain 2 Recycled Paper Color Bond Heavy 1 7 Press Main Menu to re...

Страница 500: ...uring a power cut functions are limited as follows You cannot send receive copy scan or print documents You may not be able to make telephone calls using an external telephone depending on the type of telephone you use You can receive telephone calls using an external telephone depending on the type of telephone you use To fully charge the built in battery it takes approximately 2 hours after when...

Страница 501: ...options For step by step troubleshooting e mail technical support the latest driver or document downloads and answers to frequently asked questions visit http www canon ca Free live technical support 9 A M to 8 P M EST Monday through Friday excluding holidays for products still under warranty 1 800 652 2666 For the location of the authorized service facility nearest you visit http www canon ca or ...

Страница 502: ...top inside part of the front cover Place of purchase Nature of problem Steps you have taken to solve the problem and the results If the machine makes strange noises emits smoke or odd odor turn off the main power switch immediately disconnect the power cord and contact Canon Customer Care Center Do not attempt to disassemble or repair the machine yourself Attempting to repair the machine yourself ...

Страница 503: ...12 48 If You Cannot Solve a Problem Troubleshooting ...

Страница 504: ... 13 2 Printing USER S DATA LIST 13 2 Accessing the Setting Menu 13 3 Setting Menu 13 5 Paper Settings 13 5 Volume Settings 13 6 Common Settings 13 6 Communications Settings 13 8 Address Book Settings 13 10 Printer Settings 13 13 Timer Settings 13 18 Adjustment Cleaning 13 19 Report Settings 13 20 System Management Settings 13 21 ...

Страница 505: ... works To see the list of current settings print out USER S DATA LIST Printing USER S DATA LIST 1 Press Main Menu 2 Press the right Any key to select Additional Func 3 Use or Scroll Wheel to select Report Settings then press OK 4 Use or Scroll Wheel to select Print List then press OK 5 Use or Scroll Wheel to select User s Data List then press OK ...

Страница 506: ...nu to return to the Main Menu screen 1 Press Main Menu 2 Press the right Any key to select Additional Func 3 Use or Scroll Wheel to select the menu you want to access then press OK Paper Settings Volume Settings Common Settings Communications Settings Address Book Settings Printer Settings Timer Settings Adjustment Cleaning Report Settings System Management Set Accessing the Setting Menu ...

Страница 507: ... Settings 4 Use or Scroll Wheel to select a submenu then press OK For details on the submenu see Setting Menu on p 13 5 5 To register the settings or go to a submenu item press OK 6 Press Main Menu to return to the Main Menu screen ...

Страница 508: ...r Size Inch Size LTR LGL STMT EXEC FLSC OFI B OFI M OFI G LTR G LGL Custom Size COM10 Monarch DL ISO C5 ISO B5 A B Size A4 A5 B5 Paper Type Plain 1 Plain 2 Recycled Paper Color Bond Heavy 1 Heavy 2 Transparencies Labels Envelope Drawer 1 p 2 28 Paper Size Inch Size LTR LGL EXEC FLSC OFI B OFI M OFI A B Size A4 A5 B5 Paper Type Plain 1 Plain 2 Recycled Paper Color Bond Heavy 1 Drawer 2 Paper Size I...

Страница 509: ... 1 to 3 1 Common Settings Item Settings Applicable Page Initial Function Settings e Manual Introduction of the Machine Select Initial Function Main Menu Copy Send Fax Scan to Store Direct Print Set System Monitor to Def Off On Status Monitor Device Off On Register Custom Key p 1 8 Key 1 Copy Send Fax Fax E mail I Fax File Server Send Log Address Book Search LDAP Server Favorites One touch Scan to ...

Страница 510: ...ff On Auto Clear Settings Selected Function Initial Function Inch Entry Off On Auto Drawer Selection Copy Stack Bypass Off On Drawer 1 Off On Drawer 2 Off On Printer Stack Bypass Off On Drawer 1 Off On Drawer 2 Off On Receive Stack Bypass Off On Drawer 1 Off On Drawer 2 Off On Other Stack Bypass Off On Drawer 1 Off On Drawer 2 Off On Sleep Mode Energy Use Low High ...

Страница 511: ...es Only for the Color imageCLASS MF9280Cdn Communications Settings Item Settings Applicable Page Common Settings TX Settings Register Unit Name Max 24 characters p 5 14 Data Compression Ratio High Ratio Normal Low Ratio e Manual Scan E mail Retry Times 0 to 5 Times 3 e Manual Fax Scan E mail Change Send Func Mode Register Initialize e Manual Fax Scan E mail TX Terminal ID On p 5 89 Printing Positi...

Страница 512: ...Settings 2 Sided Print Off On p 5 100 Receive Reduction Off On p 5 102 RX Reduction Auto Fixed Reduction Reduce 97 95 90 75 Reduce Direction Vertical and Horizontal Vertical Only Received Page Footer Off On p 5 105 Toner Out Continuous Print Off On p 5 107 YCbCr Receive Gamma Val Gamma 1 0 Gamma 1 4 Gamma 1 8 Gamma 2 2 e Manual E mail Fax Settings User Settings Register Unit Telephone Max 20 chara...

Страница 513: ...ode Selection Auto RX Fax Tel Auto Switch Manual RX Answer Mode DRPD Select Fax p 5 9 Incoming Ring Off On 1 to 99 Times 2 p 5 111 Remote RX Off On 00 to 99 25 p 5 113 Manual Auto Switch Off On 1 to 99 Seconds 15 p 5 115 RX Restriction Off On p 5 117 Address Book Settings Item Settings Applicable Page Register Address Fax p 3 2 Register Name Max 16 characters Destination Registration Max 40 charac...

Страница 514: ...Max 120 characters Folder Path Max 120 characters User Name Max 24 characters Password FTP Max 24 characters Windows SMB Max 14 characters Group p 3 24 Register Name Max 16 characters Destination Registration Max 299 destinations Search LDAP Server p 3 7 p 3 13 Display Name Max 16 characters Display Destination When a fax number is selected from the search results Max 40 characters When an e mail ...

Страница 515: ... 120 characters I Fax p 3 46 Register Name Max 16 characters Register One touch Name Max 12 characters Destination Registration Max 120 characters File p 3 49 Register Name Max 16 characters Register One touch Name Max 12 characters Destination Registration FTP Windows SMB Windows SMB Browse Host Name FTP Max 47 characters Windows SMB Max 120 characters Folder Path Max 120 characters User Name Max...

Страница 516: ...tance 3 Only for the Color imageCLASS MF9280Cdn Printer Settings Item Settings Applicable Page Number of Copies 1 to 999 Copies 1 e Manual Print 2 Sided 2 Sided 1 Sided p 7 11 Paper Feed e Manual Print Default Paper Size LTR LGL STMT EXEC FLSC OFI B OFI M OFI G LTR G LGL COM10 Monarch DL ISO C5 ISO B5 A4 A5 B5 Default Paper Type Plain 1 Plain 2 Recycled Paper Color Bond Heavy 1 Heavy 2 Transparenc...

Страница 517: ...f Measure Millimeter Inch Margin 1 97 to 1 97 inch 0 00 50 0 to 50 0 mm 0 0 Auto Continue Off On Collate Off On Timeout Off Timeout 5 to 300 seconds 15 Personality Auto PS PCL Mode Priority Off PS PCL Auto Select PS Off On PCL Off On Color Mode Auto Detect Color Black and White Gradation Settings Gradation Off Smooth 1 Smooth 2 Graphics Off On Image Off On Compressed Image Output Output Display Er...

Страница 518: ...SO69 ISOCYR ISOGRK ISOHEB ISOL1 ISOL2 ISOL5 ISOL6 LEGAL MATH8 MCTEXT MSPUBL PC775 PC8 PC850 PC851 PC852 PC862 PC864 PC866 PC8DN PC8GRK PC8TK PC1004 PIFONT PSMATH PSTEXT ROMAN8 VNINTL VNMATH VNUS WIN30 WINARB WINBALT WINCYR WINGRK WINL1 WINL2 WINL5 Custom Paper Size Setting Off On Unit of Measure Millimeter Inch X dimension 3 00 to 8 50 inch 8 50 76 2 to 216 0 mm 216 0 Y dimension 5 00 to 14 00 inc...

Страница 519: ...mma 1 8 Gamma 2 4 Image sRGB Gamma 1 5 Gamma 1 8 Gamma 2 4 Output Profile Text Normal Photo Graphics Normal Photo Image Normal Photo Matching Method Text Perceptual Saturation Colorimetric Graphics Perceptual Saturation Colorimetric Image Perceptual Saturation Colorimetric Gray Compensation Text Off On Graphics Off On Image Off On CMS Matching Selection Printer Host ...

Страница 520: ...8 2 2 Advanced Smoothing Advanced Smoothing Off Smooth 1 Smooth 2 Graphics Off On Text Off On PS Settings Job Timeout 0 to 3600 seconds 0 Wait Timeout 0 to 3600 seconds 300 Print PS Errors Off On RGB Source Profile sRGB Gamma 1 5 Gamma 1 8 Gamma 2 4 CMYK Simulation Profile US Web Ctd Canon Euro Standard Use Grayscale Profile Off On Output Profile Normal Photo TR Normal TR Photo Matching Method Per...

Страница 521: ...g Off Smooth 1 Smooth 2 Graphics Off On Text Off On Toner Vol Adjustment Normal Gradation Only for the Color imageCLASS MF9280Cdn Timer Settings Item Settings Applicable Page Date Time Settings Current Time Settings MM DD YYYY p 5 12 Time Zone Settings GMT 12 00 to GMT 12 00 GMT 5 00 e Manual Introduction of the Machine Daylight Saving Time Set Off On p 1 24 Auto Sleep Time Off On 3 to 240 minutes...

Страница 522: ...irty Auto Correct Off On First Calibration Off On ACS Function Adjustment Feeder Color Priority B W Priority 0 Platen Glass Color Priority B W Priority 0 Color Black Char Process Feeder Color Priority B W Priority 0 Platen Glass Color Priority B W Priority 0 Image Special Processing Off Level 1 Level 2 Paper Length Confirmation Off On Special Mode P Off On Fixing Unit Cleaning Start Cleaning p 11 ...

Страница 523: ...riginal Off On Activity Report Auto Print Off On Send Receive Separate Off On Daily Activity Rep Time Off On RX Report Off On Only When Error Occurs Fax Activity Report Auto Print Off On Send Receive Separate Off On Daily Activity Rep Time Off On Print List Address Book List Address Book No Yes One touch No Yes User s Data List No Yes p 13 2 Only for the Color imageCLASS MF9280Cdn ...

Страница 524: ...rmation Max 32 characters Dept ID Management Off On e Manual Security Register Dept ID Pass Register Dept ID Max 7 characters Password Max 7 characters Limit On Off Page Limit Total Print Limit Off On 0 to 999999 0 Total Color Print Limit Off On 0 to 999999 0 Total Black Print Limit Off On 0 to 999999 0 Color Copy Limit Off On 0 to 999999 0 Color Scan Limit Off On 0 to 999999 0 Color Print Limit O...

Страница 525: ...obs Off On User ID Management Off On Network Settings e Manual Network Settings TCP IP Settings IPv4 Settings IP Address Settings Manual Settings Off On IP Address IP Address 0 0 0 0 Subnet Mask IP Address 0 0 0 0 Gateway Address IP Address 0 0 0 0 Obtain Automatically DHCP BOOTP RARP PING Command IP Address 0 0 0 0 IP Address Range Settings Off On Register Single Address IP Address 0 0 0 0 Multip...

Страница 526: ...l Address IP Address Prefix Length 0 to 128 64 Default Router Address IP Address Use DHCPv6 Off On PING Command IPv6 address IP Address Host Name Max 47 characters IP Address Range Settings Off On Register Single Address IP Address Multiple Destinations Max 10 IPv6 Addresses Prefix Address IP Address DNS Settings DNS Server Settings Primary DNS Server IP Address Secondary DNS Server IP Address DNS...

Страница 527: ...rint Settings Off On Use Bidirectional Off On WSD Print Settings Use WSD Print Off On Use WSD Browsing Off On Use Multicast Discovery Off On SNTP Settings Off On Polling Interval 1 to 48 hours 24 NTP Server Address Max 47 characters NTP Server Check Start Use PASV Mode for FTP Off On FTP Extension Off On Certificate Settings Key and Certificate List Certificate Details Displays Version Serial No S...

Страница 528: ... Validity Start Validity End Issuer Public Key Cert Thumbprint Erase No Yes Register Key and Cert Register Key Name Max 24 characters Password Max 24 characters Erase No Yes CA Cert Registration Register No Yes Erase No Yes Use HTTP Off On Port Number Settings LPD 1 to 65535 515 RAW 1 to 65535 9100 HTTP 1 to 65535 80 SMTP Receive 1 to 65535 25 POP3 Receive 1 to 65535 110 FTP Sending 1 to 65535 21 ...

Страница 529: ...Workgroup Name Max 15 characters Comment Max 48 characters Use LM Announce Off On SNMP Settings Off On Community Name 1 Max 15 characters public Community Name 2 Max 15 characters Writable SNMP1 Off On Writable SNMP2 Off On Printer Mgt Info from Host Off On Dedicated Port Settings On Off Startup Time Settings 0 to 300 seconds 0 Ethernet Driver Settings Auto Detect On Off Communication Mode Half Du...

Страница 530: ... Interval 0 to 99 minutes 0 Authentication Encryption POP Auth Before Send Off On SMTP Authentication Off On User Name Max 64 characters Password Max 32 characters IEEE802 1X Settings Off On Login Name Max 24 characters Use TLS Off On Key and Certificate Set as Default Key No Yes Certificate Details Displays Version Serial No Signature Algorithm Issue Destination Validity Start Validity End Issuer...

Страница 531: ...mit 0 to 99 MB 3 e Manual Fax E mail Divide TX Data Oversize Off On Default Subject Max 40 characters Attached Image Fax Settings Send Start Speed 33600bps 14400bps 9600bps 7200bps 4800bps 2400bps p 5 98 Receive Start Speed 33600bps 14400bps 9600bps 7200bps 4800bps 2400bps p 5 119 Memory Lock Settings Off On p 5 121 Memory Lock Password Max 7 digits Report Print Off On Memory Lock Time Settings Do...

Страница 532: ...f registered addresses File Format When Fax is selected in Forwarding Conditions Settings TIFF PDF When I Fax is selected in Forwarding Conditions Settings TIFF Black PDF Color TIFF Black JPEG Color PDF PDF Black JPEG Color Divide Pages Off On Forward w o Condition p 5 132 Forwarding Without Conditions Fax I Fax Forwarding Destination Select from the list of registered addresses File Format When F...

Страница 533: ...ction Address Book Password Max 7 digits Restrict New Addresses Off On Allow Fax Driver TX Off On Restrict Sending From Log Off On Confirm Entered Fax No Off On Restrict Seq Broadcast Off Broadcast Confirmation Prohibit Broadcast Auto Online Offline Auto Online Off On Auto Offline Off On Register LDAP Server e Manual Network Settings Register Server Name Max 24 characters Server Address Max 47 cha...

Страница 534: ... Off On Server LDAP Version and Char Code Ver 3 UTF 8 Ver 2 UTF 8 Ver 2 SJIS Ver 2 EUC Ver 2 JIS Ver 2 ISO8859 Use Sec Auth Ver 3 UTF 8 User Name Max 120 characters Password Max 24 characters Domain Name Max 120 characters Display Auth Screen Off On Details Edit Same as Register Erase No Yes Print List No Yes Reg Edit LDAP Search Attributes Not Registered 1 Display Name Max 11 characters Attribute...

Страница 535: ...r Name Display Off On PDL Selection PnP UFRII LT PCL5c PCL6 FAX PS3 e Manual Introduction of the Machine Memory Media Settings e Manual Security Store on Memory Media Off On Direct Print Off On Update Firmware This function is used only when it is necessary to update the firmware Start Setup Guide No Yes e Manual Introduction of the Machine Only for the Color imageCLASS MF9280Cdn ...

Страница 536: ...14 1 Appendix Specifications 14 2 General 14 2 Copier 14 3 Printer 14 3 Facsimile 14 4 Telephone 14 4 Send 14 5 Cassette Feeding Unit AC1 Optional 14 6 Index 14 7 Appendix Chapter 14 ...

Страница 537: ...tional Cassette Feeding Unit AC1 Installation Space 21 1 2 W 44 7 8 D 31 1 4 H 546 mm W 1140 mm D 792 mm H with drawer pulled out and with back cover and feeder open 21 1 2 W 44 7 8 D 43 1 8 H 546 mm W 1140 mm D 1095 mm H with optional Cassette Feeding Unit AC1 attached drawer pulled out and back cover and feeder open Environmental Conditions Temperature 50 F 86 F 10 C 30 C Humidity 20 80 RH no co...

Страница 538: ...s 68 F 20 C and humidity is 65 Warm up time may differ depending on the condition and environment of the machine First Print Time Platen glass Less than 12 5 sec LTR Feeder Less than 18 5 sec LTR Printer Printing Method Indirect electrostatic method On demand fixing Paper Handling Paper drawer 250 sheets 20 lb 75 g m2 x 1 Stack Bypass tray 100 sheets 20 lb 75 g m2 Paper Delivery 250 sheets 20 lb 7...

Страница 539: ...tions One touch speed dialing 200 destinations Group dialing 299 destinations Color imageCLASS MF9220Cdn Speed dialing One touch speed dialing 200 destinations Group dialing 199 destinations Regular dialing with numeric keys Automatic redialing Manual redialing Recalling from the log Sequential broadcast Color imageCLASS MF9280Cdn 332 destinations Color imageCLASS MF9220Cdn 232 destinations TTI Tr...

Страница 540: ...OP3 I FAX Simple mode Data Format TIFF B W PDF B W JPEG Color PDF Compact Color Resolution I FAX 200 100 dpi 200 200 dpi TIFF PDF B W 100 100 dpi 150 150 dpi 200 100 dpi 200 200 dpi 200 400 dpi 300 300 dpi 400 400 dpi 600 600 dpi JPEG PDF color 100 100 dpi 150 150 dpi 200 200 dpi 300 300 dpi 600 600 dpi PDF color compact 300 300 dpi System Environment Windows XP Professional Home Edition Windows 2...

Страница 541: ...ver 2000 Microsoft Exchange Server 2003 Microsoft Exchange Server 2007 is not supported Lotus Domino R4 6 or later Windows Cassette Feeding Unit AC1 Optional Paper Feeding System 500 sheets 1 drawer 20 lb 75 g m2 Acceptable Paper Stock See Paper Requirements on p 2 7 Power Source From the main unit Dimensions 17 3 8 W 21 3 8 D 12 H 440 mm W 543 mm D 304 mm H Weight Approx 28 7 lb 13 kg Specificati...

Страница 542: ...py 4 21 Fax 5 52 Basic sending method Scanning documents to a file server 8 6 Scanning documents to a USB memory 8 8 Sending E Mail Documents 6 5 Sending faxes 5 17 Sending I faxes 5 25 Sending PC faxes 5 27 C Canceling Sending e mail documents 6 7 Sending fax documents 5 29 Canceling Copy Jobs 4 6 Canceling Print Jobs 7 28 CF card slot 1 10 Change Paper Size If displayed 12 41 Checking Fax recept...

Страница 543: ...tio 4 33 Customize labels 1 8 Custom key 1 1 7 Custom key 2 1 7 Custom Keys Registering 1 8 D Delayed Sending 5 58 Delivery feeder unit Electrostatic transfer belt 1 5 Density Copy 4 19 Fax 5 51 Device Information Checking 1 18 Direct Sending 5 61 Display 1 7 Display parts and functions 1 11 Copy top screen 1 12 Main menu screen 1 11 Select memory media screen 1 14 Send type selection screen 1 13 ...

Страница 544: ...e Such as Paper diff from set size type is displayed 12 41 Changing the Paper Size Setting 12 42 Reloading the paper 12 42 If a Power failure occurs 12 45 If the delivery feeder unit is not installed correctly 12 22 Image Quality Copy 4 35 Fax 5 54 Inserting Memory Media 7 14 Inside of the machine Clearing jams 12 13 Installation requirements xv Installation space xvi Introduction to Using Print F...

Страница 545: ...y tray 1 3 Overview Machine functions ii Overview of Print Functions 7 2 P Paper delivery tray 1 3 Clearing jams 12 5 Paper drawer 1 3 Paper Drawer 1 Clearing jams 12 10 Paper Drawer 2 Clearing jams 12 11 Paper Requirements 2 7 Paper Settings 13 5 Paper Source 4 9 Paper stopper 1 3 PCL 7 4 Placing originals 2 4 In the Feeder 2 5 On the platen glass 2 4 Platen glass 1 5 Power failure 12 45 Power re...

Страница 546: ... Printer Settings 13 13 Report Settings 13 20 System Management Set 13 21 Timer Settings 13 18 Volume Settings 13 6 Setting paper size and type 2 22 For the paper drawer 2 28 For the stack bypass tray 2 22 Sharpness Copy 4 42 Fax 5 92 Slide guides 1 3 Slide guides for stack bypass tray 1 3 Specifications 14 2 Copier 14 3 Facsimile 14 4 General 14 2 Optional cassette 14 6 Printer 14 3 Send 14 5 Tel...

Страница 547: ...addresses in One Touch 3 40 Registering fax numbers in One Touch 3 32 Registering file server addresses in One Touch 3 49 Registering group addresses in One Touch 3 55 Registering I fax addresses in One Touch 3 46 System Management Set 13 21 T Telephone Specifications 14 4 Telephone line jack 1 3 Telephone Line Setting 1 20 Timer Settings 1 22 13 18 Setting Auto Clear Time 1 23 Setting the dayligh...

Страница 548: ...venkerkerweg 59 61 1185 XB Amstelveen The Netherlands CANON CHINA CO LTD 15F Jinbao Building No 89 Jinbao Street Dongcheng District Beijing 100005 PRC CANON SINGAPORE PTE LTD 1 HarbourFront Avenue 04 01 Keppel Bay Tower Singapore 098632 CANON AUSTRALIA PTY LTD 1 Thomas Holt Drive North Ryde Sydney NSW 2113 Australia CANON GLOBAL WORLDWIDE SITES http www canon com FT5 3332 000 xxxxxxxxxx CANON INC ...

Отзывы: