background image

Changing the Copy (Zoom) Ratio

3-18

3

Basic

 C

o

p

y

ing 

and

 M

a

il Bo

F

e

atu

res

Making Copies (Scanning) with the Same XY Copy/Zoom Ratio (Zoom)

You can set the same copy (zoom) ratio for both the horizontal (X) and vertical (Y) axes.

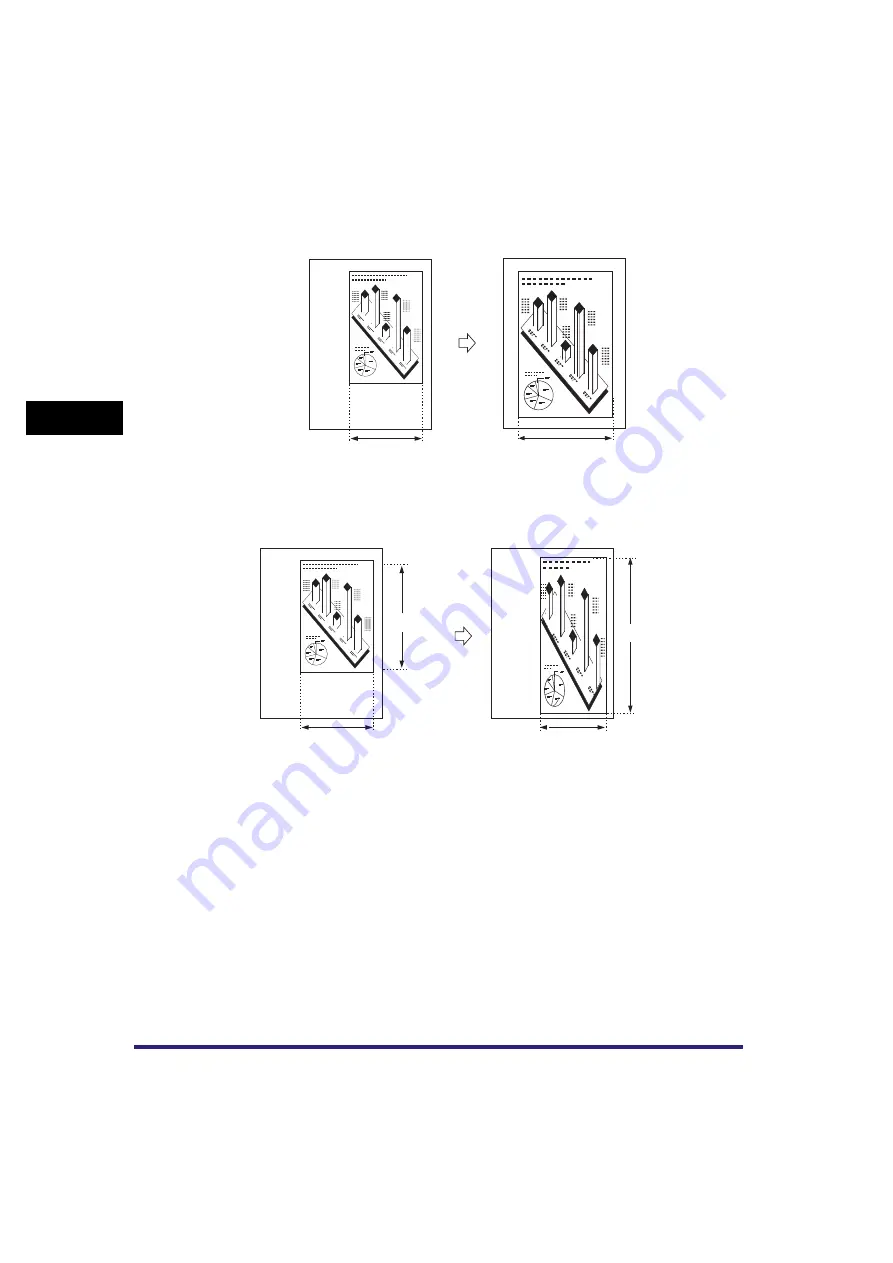
Making Copies (Scanning) with Different XY Copy/Zoom Ratios (XY Zoom)

You can set different copy (zoom) ratios for the horizontal (X) and vertical (Y) axes.

A4

A4

X = 100 mm

X = 150 mm

Original

Copy

A4

A4

X = 100 mm

Y = 120 mm

Y = 180 mm

X = 80 mm

Original

Copy

Содержание CLC5151

Страница 1: ...Please read this guide before operating this equipment After you finish reading this guide store it in a safe place for future reference ENGLISH Copying and Mail Box Guide...

Страница 2: ......

Страница 3: ...CLC5151 CLC4040 iR C4580i iR C4080i Copying and Mail Box Guide 0 Frontmatter...

Страница 4: ...designed to help you learn the various functions of the machine Tutorial CD CD ROM Basic Information User s Guide CD ROM Basic Operations Troubleshooting Reference Guide CD ROM Copying and Mail Box In...

Страница 5: ...iver Installation and Instructions Mac UFR II Driver Guide CD ROM Fax Driver Installation and Instructions Fax Driver Guide CD ROM Installing MEAP Applications and Using the Login Service MEAP SMS Adm...

Страница 6: ...Documents Using the Inboxes Chapter 7 Using the Express Copy Basic Features Screen Chapter 8 Customizing Settings Chapter 9 Appendix Includes the colour copy samples combination of functions chart an...

Страница 7: ...play 1 17 Using the Stop Key 1 17 Using the System Monitor Screen 1 18 Reserved Copying 1 20 Reserving Copy Jobs 1 20 Using the Stack Bypass 1 22 Interrupt Mode 1 28 Sample Set 1 30 Confirming Changin...

Страница 8: ...il Box Scan 3 7 Exposure Adjustment during Copying Printing 3 8 Copying 3 8 Mail Box Print 3 9 Changing the Copy Zoom Ratio 3 10 Preset Zoom 3 10 Copying 3 11 Mail Box Scan 3 12 Zoom by Percentage 3 1...

Страница 9: ...5 Specifying the Special Mail Box Features for Printing 4 7 2 Page Separation 4 9 Copying 4 10 Mail Box Scan 4 10 Cover Sheet Insertion 4 11 Copying 4 14 Mail Box Print 4 17 Cover Job Separator 4 18...

Страница 10: ...lour 4 81 Adjusting the Colour Balance 4 81 Storing Colour Balance Settings 4 84 Naming a Colour Balance Key 4 86 Recalling Colour Balance Settings 4 88 Erasing Colour Balance Settings 4 89 One Touch...

Страница 11: ...6 6 Confirming Documents in the Divided Data RX Inbox 6 7 Erasing Divided Data 6 8 Confidential Fax Inboxes 6 9 Receiving Confidential Documents 6 10 Printing a Document in the Confidential Fax Inbox...

Страница 12: ...le Verifying Scanned Images Scan Image Check 7 45 Book Page Edit Shift Settings 7 46 Adding Covers Sheet Insertions and Chapter Pages Front Cover Back Cover Paper Insertion 7 48 Making a Copy with Fro...

Страница 13: ...Settings 8 4 Copy Settings Table 8 4 Setting the Paper Select Key Size for the Express Copy Basic Features Screen 8 5 Setting the Standard Keys for the Regular Copy Basic Features Screen 8 6 Setting t...

Страница 14: ...xii Mail Box 9 17 Index 9 25...

Страница 15: ...warning concerning operations that may lead to death or injury to persons if not performed correctly To use the machine safely always pay attention to these warnings CAUTION Indicates a caution conce...

Страница 16: ...3 FAX Board Color Image Reader F1 Saddle Finisher W2 Puncher Unit AG1 and Cassette Feeding Unit Z1 Note that functions that cannot be used depending on the model or options are not displayed on the to...

Страница 17: ...This Manual Illustrations used in this manual are those displayed when the CLC5151 has the following optional equipment attached to it the Color Image Reader F1 Saddle Finisher W2 Puncher Unit AG1 and...

Страница 18: ...form or by any means electronic or mechanical including photocopying and recording or by any information storage or retrieval system without the prior written permission of Canon Inc Disclaimers The i...

Страница 19: ...e sure to check the ingredients of the adhesive before you use it Test some adhesives with an unwanted colour copy before you use it with a valuable copy Inserting Copies Between Printed Pages When co...

Страница 20: ...xviii...

Страница 21: ...eatures Screen 1 2 Various Copying Features 1 3 Flow of Copy Operations 1 6 Paper Selection 1 12 Cancelling a Copy Job 1 17 Using the Touch Panel Display 1 17 Using the Stop Key 1 17 Using the System...

Страница 22: ...y Basic Features screen appears on the touch panel display This machine also includes an Express Copy function The Express Copy function is useful for advanced users as it allows you to set the variou...

Страница 23: ...Features Regular Copy Basic Features Screen The screen below which appears when Copy is selected is called the Regular Copy Basic Features screen a Colour Selection Drop Down List Press to select the...

Страница 24: ...copies of several originals to form a booklet d Transparency Interleaving Press to insert a sheet between each transparency when copying transparencies You can make the same prints on the interleaf s...

Страница 25: ...t will become visible if the resulting output is copied e Mode Memory Press to store or recall copy modes f Recall Press to recall previously set copy modes g Sharpness Press to sharpen or soften the...

Страница 26: ...tenance See Chapter 7 Routine Maintenance in the Reference Guide If you are using a login service log in and log out using the procedure for the login service you are using before and after operating...

Страница 27: ...from the Additional Functions screen is set to On the Collate or the Offset Collate mode is automatically set when you place your originals in the feeder See Auto Collate on p 8 9 3 Gently close the f...

Страница 28: ...Colour Modes on p 3 55 If the originals contain a few colour sections If the colour sections are located only on the left side within 10 mm from the left edge or the right side within 17 mm from the...

Страница 29: ...unctions on the Special Features screen see Chapters 4 through 5 6 Press numeric keys to enter the desired copy quantity 1 to 999 If you make a mistake when entering values press enter the correct val...

Страница 30: ...as the copy quantity and paper size while the machine is copying NOTE If there is a current job the machine scans the original and waits to print it Printing starts when the current job is complete 8...

Страница 31: ...ity copies press Interrupt NOTE For instructions on interrupting a copy job see Interrupt Mode on p 1 28 If you want to start copying the next original while a previous original is printing Press Done...

Страница 32: ...at a copy ratio of 100 the periphery of the original image may be cut off slightly on the copy For more information on how much may be cut off look under the margin areas in the Specifications table i...

Страница 33: ...Auto IMPORTANT You cannot use the Automatic Paper Selection mode when copying the following types of originals Copy these originals using the Manual Paper Selection mode Nonstandard size originals Hi...

Страница 34: ...e of paper loaded in each paper drawer can be displayed on paper selection screens if you store that information into the machine beforehand See Chapter 4 Customizing Settings in the Reference Guide i...

Страница 35: ...r size To copy on nonstandard size paper loaded in the stack bypass Press Stack Bypass If you want to select the stack bypass when a paper size type is already selected for the current or reserved job...

Страница 36: ...select the paper size after setting the 1 2 Sided or 2 2 Sided mode The following nonstandard paper sizes can be used with the 1 2 Sided and 2 2 Sided modes Width X axis 182 mm to 457 mm Length Y axis...

Страница 37: ...p up screen that appears while the machine is scanning printing or waiting to print The copy job is cancelled NOTE If you cancel a copy job during scanning be sure to remove the original for that job...

Страница 38: ...bs and cancel them all at once Select and cancel one job at a time The copy job is cancelled 3 Press Resume Copying Copying resumes NOTE If you press while copying in the Store In User Inbox mode and...

Страница 39: ...hat you want to cancel press Cancel You cannot select multiple jobs and cancel them all at once Select and cancel one job at a time 4 Press Yes The copy job is cancelled NOTE The cancelled job is disp...

Страница 40: ...is in the waiting state such as when the power is just turned ON or after a paper jam is cleared Copying automatically begins when the machine is ready The message Reservation copies can be made appe...

Страница 41: ...an the Copy function press Done Copy to display the Regular Copy Basic Features screen 2 Place your originals set the desired copy modes and paper source 3 Press If you specify a reserved copy job whi...

Страница 42: ...the type of paper is not set correctly it could adversely affect the quality of the image Moreover the fixing unit may become dirty or the paper could jam and a service repair may be needed NOTE If S...

Страница 43: ...any Finishing modes Collate Group or Staple If Stack Bypass Standard Settings in Common Settings from the Additional Functions screen is set to On and the paper size type have been stored the selected...

Страница 44: ...in the Reference Guide Press Next Select the desired paper type press OK If you are copying onto the back side of a previously printed sheet press 2nd Side of 2 Sided Page If you want to select an en...

Страница 45: ...tack bypass and complete the scanning and printing process of the reserved job 5 Press 6 When it is time for the reserved copy job to be printed load the specified paper into the stack bypass NOTE The...

Страница 46: ...ze to the same size as the paper loaded in the stack bypass If you want to select a standard paper size Select the desired paper size press Next NOTE To select an inch paper size press Inch size Selec...

Страница 47: ...ence Guide Press Next Select the desired paper type press OK If you are copying onto the back side of a previously printed sheet press 2nd Side of 2 Sided Page If you want to select an envelope size P...

Страница 48: ...press Interrupt To cancel previously set copy modes press The Interrupt mode itself is not cancelled 1 Press Interrupt If you want to make copies after changing the Department ID while Department ID M...

Страница 49: ...your originals set the desired copy modes 3 Press 4 Once the originals are scanned remove them from the machine IMPORTANT If you want to continue making interrupt copies wait until the current interru...

Страница 50: ...r original in the Collate Rotate Collate Offset Collate Staple Cover Sheet Insertion Booklet or Transparency Interleaving mode Sample Set does not appear if the Group or Offset Group mode is set NOTE...

Страница 51: ...If you select Specified Pages specify the page numbers of the output Note that the page numbers of the output may be different from those of the original If you select Specified Pages the Staple Hole...

Страница 52: ...Paper Selection on p 2 25 To collate the copies press Finishing See Collating Copies Prints on p 3 33 To set a margin for binding press Margin See Margin Mode on p 4 40 To make colour balance adjustme...

Страница 53: ...Setting Confirmation screen to confirm change or cancel selected copy modes 1 Press Setting Confirmation 2 Check the settings If the desired modes are set skip to step 4 Otherwise press the key of the...

Страница 54: ...s 1 34 1 Introduction to the Copy Functions 3 Change or cancel the selected copy mode To change a copy mode Perform the same steps used for setting the mode Change the setting as you desire press OK T...

Страница 55: ...election 2 25 Cancelling a Job 2 30 While Scanning 2 30 While Printing 2 31 Reserving Jobs 2 34 Storing Originals While Printing 2 34 Reserving Print Jobs 2 35 Sample Print 2 44 Storing Print Settings...

Страница 56: ...a which is scanned by this machine and the data sent from a personal computer as if storing documents in binders The documents data stored in an inbox can be kept confidential by setting a password an...

Страница 57: ...nals and documents sent from computers are stored and displayed here Press to select the Memory RX Inbox or the Confidential Fax Inboxes You can store a name and or password for an inbox in Mail Box S...

Страница 58: ...000 pages of documents have been stored in all of the inboxes NOTE It is recommended that you delete unwanted documents or image data from your inbox to make space for storing new documents Inbox Sele...

Страница 59: ...are stored in the Memory RX Inbox or Divided Data RX Inbox The stored documents can be printed or sent to computers at anytime using the desired settings c Confidential Fax Inbox If a document receiv...

Страница 60: ...ting the conditions with which each document was scanned or saved is displayed For more information on the icons displayed in User Inboxes see Checking a Document s Detailed Information on p 2 50 Foll...

Страница 61: ...send a document stored in the User Inbox or the Memory RX Inbox j I Fax Memory Lock Press to turn the I Fax Memory Lock mode On or Off for the Memory RX Inbox in order to receive I faxes in memory k...

Страница 62: ...box selected a Colour Selection Drop Down List Press to select the colour mode for printing b Change Pr Settings Press to change the print settings c Erase Doc After Print Press to have a document aut...

Страница 63: ...aper source d Finishing Press to select or cancel the Collate Group or Staple mode e 2 Sided Printing Press to make two sided prints f Original Settings Press to cancel the settings that you have chan...

Страница 64: ...e scanning size of the original d 2 Sided Original Press if you are scanning a two sided original e Document Name Press to assign the document a name f Document Size Select Press to set the size of th...

Страница 65: ...e destination list d Erase Press to delete the destination selected in the destination list e Cc Bcc Press to specify addresses destinations for the Cc and Bcc addresses when sending an e mail f Delet...

Страница 66: ...Optional Equipment in the Reference Guide If you are using Department ID Management see Chapter 2 Basic Operations in the Reference Guide If you are performing user authentication using the SDL or SS...

Страница 67: ...Inbox number using numeric keys make sure to enter a two digit number press OK If you make a mistake when entering the User Inbox number press enter the correct number NOTE If a document is stored in...

Страница 68: ...enter the password using numeric keys press OK Enter the password set for the selected User Inbox See Setting Storing a User Inbox on p 8 14 If a password is not set for the selected User Inbox this s...

Страница 69: ...our originals in the Black mode under the following conditions To avoid this set the colour mode to Full Color See Changing Colour Modes on p 3 55 If the originals contain a few colour sections If the...

Страница 70: ...ar to the Copy function To specify a document name Press Document Name enter a name for the document press OK NOTE If you scan a document without giving it a name the machine automatically assigns the...

Страница 71: ...e size of the document manually Nonstandard size originals Highly transparent originals such as transparencies Originals with an extremely dark background A6R or smaller originals A5R originals that a...

Страница 72: ...achine is scanning The stored data is deleted after three days default setting This setting can be changed to any time period between 1 hour and 30 days Also data can be stored indefinitely if the tim...

Страница 73: ...nts are stored in the same User Inbox To print multiple documents stored in different User Inboxes you need to move the documents to one User Inbox beforehand See Moving Duplicating a Document on p 2...

Страница 74: ...NOTE If a document is stored in an inbox that inbox is displayed with the documents icon If an inbox is set with a password a locked icon is displayed next to the icon of that inbox If you make a mis...

Страница 75: ...in the User Inbox To select all of the documents up to 100 documents from the top in the User Inbox press Select All Max 100 doc If a document is already selected this key appears as Clear Selection i...

Страница 76: ...hange Pr Settings To change the number of prints enter the desired number using numeric keys If multiple documents are selected you can change the number of prints by pressing Change The Copies If you...

Страница 77: ...rned to the settings specified at the computer and the settings for documents scanned and recorded at the machine are returned to Standard Local Print Settings See Chapter 4 Customizing Settings in th...

Страница 78: ...the following screen appears When printing is complete the display returns to the Inbox Selection screen NOTE If you notice a difference between the document size specified when scanning originals an...

Страница 79: ...sure to correctly set the paper type especially if you are using heavy paper If the type of paper is not set correctly it could adversely affect the quality of the image Moreover the fixing unit may...

Страница 80: ...MPORTANT If you want to print a scanned document whose size has been specified as A3 in Document Size Select load the stack bypass with 305 mm x 457 mm or 320 mm x 450 mm paper or load a paper drawer...

Страница 81: ...in the Reference Guide indicates that the paper is set vertically and indicates that the paper is set horizontally The suffix R such as in A4R used in paper size designations indicates that the paper...

Страница 82: ...the paper size If you want to select a nonstandard paper size Press Stack Bypass If you want to select the stack bypass when a paper size type is already selected for the current or reserved job pres...

Страница 83: ...ertion Cover Job Separator or Tab Paper Creation mode cannot be specified To print on envelope loaded in the stack bypass Press Stack Bypass If you want to select the stack bypass when a paper size ty...

Страница 84: ...nbox from the touch panel display or by pressing on the control panel However the printing of a document stored in an inbox can only be cancelled from the touch panel display While Scanning Using the...

Страница 85: ...the Mail Box Functions Using the Stop Key 1 Press The job is cancelled 2 Remove the original While Printing Using the Touch Panel Display 1 Press Cancel on the pop up screen that appears while the ma...

Страница 86: ...Cancelling a Job 2 32 2 Introduction to the Mail Box Functions Using the System Monitor Screen 1 Press System Monitor 2 Press Print...

Страница 87: ...at you want to cancel press Cancel You cannot select multiple jobs and cancel them all at once Select and cancel one job at a time 4 Press Yes The print job is cancelled NOTE The cancelled job is disp...

Страница 88: ...each reserved job A User Inbox is used as an example in this section Storing Originals While Printing You can scan and store an original while the machine is printing 1 Press Done on the pop up screen...

Страница 89: ...s ready NOTE You can specify reserved printing while the machine is in the waiting state in the following cases Between the time that the machine is turned ON and when it is ready to print Between the...

Страница 90: ...36 2 Introduction to the Mail Box Functions 2 Select the desired User Inbox number and document to print press Print 3 Print the selected document If you want to print without changing any settings P...

Страница 91: ...s Press No if you want to cancel printing altogether If the machine can no longer accept any more reserved jobs the screen below is displayed Press OK try reserving the job again after the current job...

Страница 92: ...ly it could adversely affect the quality of the image Moreover the fixing unit may become dirty or the paper could jam and a service repair may be needed NOTE If Stack Bypass Standard Settings in Comm...

Страница 93: ...ss Standard Settings in Common Settings from the Additional Functions screen is set to On and the paper size type have been stored the selected paper size type are displayed on the screen See Chapter...

Страница 94: ...he Reference Guide Press Next Select the desired paper type press OK If you are printing onto the back side of a previously printed sheet press 2nd Side of 2 Sided Page If you want to select an envelo...

Страница 95: ...ad paper into the stack bypass 5 Press Start Print 6 When it is time for the reserved print job to be printed load the specified paper into the stack bypass NOTE The specified paper size type is displ...

Страница 96: ...mmon Settings from the Additional Functions screen See Chapter 4 Customizing Settings in the Reference Guide IMPORTANT Set the paper size to the same size as the paper loaded in the stack bypass If yo...

Страница 97: ...a paper size in that key beforehand For instructions on registering a paper size see Chapter 4 Customizing Settings in the Reference Guide Press Next Select the paper type press OK If you are printin...

Страница 98: ...RX Inbox or Confidential Fax Inboxes Sample Print appears only if you set to make multiple prints of the document in the Collate Offset Collate Rotate Collate Staple Cover Job Separator Cover Sheet In...

Страница 99: ...hat the page numbers of the output may be different from those of the stored document If you select Specified Pages the Staple Hole Punch or Booklet mode cannot be set You cannot change All Pages to S...

Страница 100: ...aper Selection on p 2 25 To collate the prints press Finishing See Collating Copies Prints on p 3 33 To make 2 Sided prints press 2 Sided Printing See Two Sided Copying Printing on p 3 45 To change th...

Страница 101: ...g settings in memory are not erased even if the power is turned OFF You can store the following print settings and modes the number of printouts paper select 2 Sided Printing Finishing Cover Sheet Ins...

Страница 102: ...t mode is selected 3 A screen appears asking for your confirmation to overwrite the previous settings Press Yes NOTE The document for which the print settings are stored is overwritten its name is cha...

Страница 103: ...a document and view the contents of the User Inboxes Changing the Name of a Document IMPORTANT You cannot change the name of documents stored in the Memory RX Inbox or Confidential Fax Inboxes 1 Sele...

Страница 104: ...the document whose detailed information you want to check press Details To select a document from the Memory RX Inbox refer to step 1 of Printing a Document in the Memory RX inbox on p 6 5 To select...

Страница 105: ...re icons without print settings 1 If the document is stored in inboxes from the PS driver the color format will be CMYK The CMYK documents cannot be sent from the inbox To print full color CMYK docume...

Страница 106: ...step 1 of Printing a Document in the Confidential Fax Inbox on p 6 11 To select all of the documents up to 100 documents from the top in the User Inbox press Select All Max 100 doc If a document is al...

Страница 107: ...if A3 A4 or A4R paper plain recycled or colour paper is loaded in a paper source that is set to On when you press Other to select a paper source in Drawer Eligibility For APS ADS in Common Settings fr...

Страница 108: ...the Memory RX Inbox or any Confidential Fax Inbox 1 Select the desired User Inbox number select the document that you want to move or duplicate press Move Duplicate To select all of the documents up...

Страница 109: ...or duplication cannot be performed If the document cannot be moved or duplicated to the selected inbox it remains in the original User Inbox If an error occurs while multiple documents are being moved...

Страница 110: ...t which has been stored in the Memory RX Inbox or a Confidential Fax Inbox Checking an Image in a Document 1 Select the desired User Inbox number select the document whose contents you want to view pr...

Страница 111: ...e multiple documents in the same inbox as one document to create a new document IMPORTANT You cannot use the Merge and Save mode if the resolution of either document is less than 600 x 600 dpi Documen...

Страница 112: ...y 15 2006 its name will be 20060115133541 If print settings have been stored for the selected documents the settings are not carried over to the new document 3 Press Done Inserting a Document into Ano...

Страница 113: ...to insert another document press Edit Menu Document Insertion NOTE If you select multiple documents and press Document Insertion the selected highlighted document becomes the document that is inserte...

Страница 114: ...ter Insert enter the name of the document press OK Start If memory is insufficient while you are using the Document Insertion mode a message appears to inform you that you cannot insert the document N...

Страница 115: ...he pages of a document the entire document is erased 1 Select the desired User Inbox number select the document containing the pages you want to erase press Edit Menu Page Erase NOTE If you select mul...

Страница 116: ...document you have selected by pressing View Page See Checking an Image in a Document on p 2 56 If Erase Pages Consecutively is selected Press First Page and Last Page select the first and last pages...

Страница 117: ...set Zoom 3 10 Zoom by Percentage 3 12 Auto Zoom 3 14 Entire Image 3 16 Reducing Enlarging Using the Original and Copy Record Sizes 3 17 Setting the X and Y Axes Independently 3 22 Poster 3 26 Collatin...

Страница 118: ...see Unavailable Combination of Functions on p 9 6 NOTE You can change the exposure while the machine is printing Manual Exposure Adjustment You can manually adjust the exposure to the most appropriat...

Страница 119: ...Box Scan 1 Select the desired User Inbox number place your originals press Scan or 2 Press Original Type Selection You can manually select the original type according to the type of image The followi...

Страница 120: ...most appropriate level for the original Text Photo Map Mode This mode is best suited for originals containing text images photos as well as fine graphics such as those on a map Printed Image Mode Thi...

Страница 121: ...text or photo images press OK Details of each item are shown below 2 Press Mail Box Scan 1 Select the desired User Inbox number place your originals press Scan 2 Press the original type drop down lis...

Страница 122: ...ou to scan by erasing the background colour of the original and the Prevent Bleeding mode which enables you to prevent the original image on the reverse side of the original from appearing on the pape...

Страница 123: ...Exposure and Original Type Settings 3 7 3 Basic Copying and Mail Box Features Mail Box Scan 1 Select the desired User Inbox number place your originals press Scan A 2 Press...

Страница 124: ...or Confidential Fax Inboxes You cannot change the print exposure while printing in the Secure Watermark mode Copying 1 Press or on the screen that is displayed while the machine is Copying Press to m...

Страница 125: ...not adjust the exposure when CMYK format documents are selected If you change the exposure when scanning an original into an inbox the selected exposure may be modified by the machine if you select to...

Страница 126: ...ratios to reduce or enlarge standard size originals to another standard paper record size IMPORTANT Place the originals horizontally in the following cases If you are enlarging A4 originals to A3 If...

Страница 127: ...ement The available preset copy zoom ratios for enlarging originals are Maximum 400 A5 A3 200 A4 A3 14 Copying 1 Place your originals press Copy Ratio IMPORTANT The Paper Select setting must be set to...

Страница 128: ...press Scan Copy Ratio 2 Specify the zoom ratio and scan originals in accordance with steps 2 and 3 of Copying on p 3 11 Zoom by Percentage You can reduce or enlarge originals by any copy zoom ratio i...

Страница 129: ...pying in Preset Zoom on p 3 10 2 Press or to set a copy ratio press Done 3 Press Mail Box Scan 1 Select the desired User Inbox number place your originals press Scan Copy Ratio If necessary see the sc...

Страница 130: ...r sizes A3 A4 A4R A5 A5R or A6R You can place A6R originals only on the platen glass NOTE If you notice a difference between the automatic copy zoom ratio and the actual copy record size you can try t...

Страница 131: ...laten cover is closed provided that the original size can be detected If the original is placed in the feeder the copy ratio appears when is pressed Mail Box Scan 1 Select the desired User Inbox numbe...

Страница 132: ...age is slightly reduced so that the entire image is copied without being cut off The Entire Image mode should also be set when you want to copy A3 originals onto paper larger than A3 to ensure that th...

Страница 133: ...l and copy paper record size Any copy zoom ratio from 25 to 400 may be used The following two Zoom Program modes are available NOTE The specified sizes are converted into a copy zoom ratio by the mach...

Страница 134: ...Zoom You can set the same copy zoom ratio for both the horizontal X and vertical Y axes Making Copies Scanning with Different XY Copy Zoom Ratios XY Zoom You can set different copy zoom ratios for th...

Страница 135: ...Zoom Copying 1 Place your originals press Copy Ratio If necessary see the screen shot in step 1 of Copying in Preset Zoom on p 3 10 2 Press Zoom Program 3 Use the numeric keys on the touch panel displ...

Страница 136: ...0 will be set to 400 NOTE To specify the horizontal X and vertical Y axis independently press XY Zoom 4 Press Mail Box Scan 1 Select the desired User Inbox number place your originals press Scan Copy...

Страница 137: ...Press Y vertical axis for Original Size enter a value Press X horizontal axis for Copy Size enter a value Press Y vertical axis for Copy Size enter a value Press OK If the computation results in a zo...

Страница 138: ...ze and Record Size Setting the X and Y Axes Independently The XY Zoom mode enables you to make reduced or enlarged copies with different XY copy zoom ratios expressed in percentages Any copy zoom rati...

Страница 139: ...ly specify the copy zoom ratio for these types of originals If you set the Auto XY Zoom mode select the paper size using the Manual Paper Selection mode If you do not select a paper size paper drawer...

Страница 140: ...your originals press Copy Ratio If necessary see the screen shot in step 1 of Copying in Preset Zoom on p 3 10 2 Press XY Zoom 3 Specify the desired copy ratios To manually specify the copy ratios XY...

Страница 141: ...to If you do not specify a paper size paper drawer 1 is automatically selected and the copy ratios are set to match the size of the paper loaded in that drawer 4 Press Mail Box Scan 1 Select the desir...

Страница 142: ...the original is placed in the feeder If you set the Poster mode while the colour mode is set to Auto Color Select the colour mode is automatically set to Full Color The Poster mode cannot be used to...

Страница 143: ...of the actual copy will be slightly smaller than the size indicated in the table You can create a poster with copy ratios that are not listed in the table However the size of the original must not be...

Страница 144: ...oster 3 Press Copy Ratio s Next 4 Use the numeric keys or press or on the touch panel display to enter a copy ratio press OK 5 Press NOTE If you press while copying is in progress to cancel the copy j...

Страница 145: ...ginals on the platen glass press Copy Ratio If necessary see the screen shot in step 1 of Copying in Preset Zoom on p 3 10 2 Press Poster If necessary see the screen shot in step 2 of Specifying the C...

Страница 146: ...of output pages that you have selected is used as a guideline The actual number of output pages may be less than what you have selected depending on a combination of factors that determine the most ap...

Страница 147: ...ed indicates that when using A3 paper six pages 2 x 3 are output Size of Original Orientation of Original Copy Size Orientation of Copy A3 Vertical A1 Vertical Original Copies 1st page 2nd page 4th pa...

Страница 148: ...hboring sheets created by the Poster mode overlap slightly When pasting the sheets together trim the overlapping portions leaving an adequate amount of overlap to apply the glue The width of the overl...

Страница 149: ...tab paper or washi Japanese paper is selected If Tray B Copy Tray M1 is set as the output tray and a finisher is not attached to the machine copies are output in the opposite order to the originals b...

Страница 150: ...Tray N1 A4 A4R Finisher X1 A3 A4 A4R A3 15 sheets A4 A4R 30 sheets Finisher W1 A3 A4 A4R A3 A4R 30 sheets A4 50 sheets A3 A4R 30 sheets A4 50 sheets Finisher W1 and Puncher Unit AG1 A3 A4 A4R A3 A4R...

Страница 151: ...the Staple Mode Is Set The copies are automatically collated into sets arranged in page order and stapled The output is as follows If you select Corner Top Left If you select Double Left Originals Set...

Страница 152: ...er of sheets NOTE To use the Saddle Stitch mode the original stored document must already be in booklet form as shown in the illustration above See Booklet Mode on p 4 21 and Booklet Scanning on p 4 2...

Страница 153: ...e order and are output in alternating directions as follows If the Offset Mode Is Set The copies are slightly offset vertically in the output tray as follows You can also specify the number of copy se...

Страница 154: ...e available paper size is selected manually If the available paper size is loaded in both the horizontal and vertical directions The selected paper source must have Drawer Eligibility For APS ADS in C...

Страница 155: ...ance with steps 2 and 3 of Copying on p 3 37 3 Press Start Print Same Page Group Copying 1 Place your originals press Finishing If necessary see the screen shot in step 1 of Copying in Page Order Coll...

Страница 156: ...vertical directions The selected paper source must have Drawer Eligibility For APS ADS in Common Settings from the Additional Functions screen set to On See Chapter 4 Customizing Settings in the Refe...

Страница 157: ...ting on special types of paper such as heavy paper or transparencies be sure to correctly set the paper type especially if you are using heavy paper If the type of paper is not set correctly it could...

Страница 158: ...x Features 2 Press Staple If you want to make hole punches press Hole Punch If the optional Finisher X1 is attached Press OK If the optional Finisher W1 is attached Press Next Select the stapling type...

Страница 159: ...ass Select the paper size press OK IMPORTANT Make sure to use the same paper size for the cover and the main document You can select Heavy 2 paper only if you are not printing on the cover Only 64 to...

Страница 160: ...t the desired User Inbox number and the document to print press Print Change Pr Settings Finishing If necessary see the screen shot in step 1 of Mail Box Print in Page Order Collate on p 3 37 2 Specif...

Страница 161: ...eft corner or with the back edge of the feeder The 2 Sided mode you have selected is displayed above 2 Sided on the Regular Copy Basic Features screen or above 2 Sided Printing on the Change Pr Settin...

Страница 162: ...y If these originals are placed vertically the back side of the copy is printed upside down NOTE If there are an odd number of originals the back side of the last copy is left blank The machine s coun...

Страница 163: ...2 Sided Printing mode is used together with the Automatic Paper Selection mode and the pages that you want to print are of different size the different sized documents will be printed as one sided pr...

Страница 164: ...Sided This feature enables you to make two sided copies from two sided originals If a two sided original is placed in the feeder it is automatically turned over so that both sides of the original are...

Страница 165: ...e Auto Collate on p 8 9 2 Press 2 2 Sided To set the orientation of the originals and the copies press Option select the type of two sided orientation for the originals and the copies press Done Origi...

Страница 166: ...n Special Features to execute 2 1 Sided copying See Job Build on p 4 53 1 Place your originals in the feeder press 2 Sided If necessary see the screen shot in step 1 of Copying in 1 to 2 Sided on p 3...

Страница 167: ...sided copies from facing pages or from the front and back sides of a page in bound originals such as books and magazines Left Right Two sided This setting makes two sided copies from facing pages Fro...

Страница 168: ...To make copies in the correct page order begin copying from the first open page of the book or bound original Place your original face down making sure that its top edge is aligned with the back edge...

Страница 169: ...anning originals with a horizontal landscape orientation such as A4R and A5R make sure to place them horizontally in the feeder If these originals are placed vertically the back sides of the originals...

Страница 170: ...ures 2 Select the type of original press OK Details of each item are shown below 3 Press Book Type The front and back sides of the original have the same topbottom orientation Calendar Type The front...

Страница 171: ...from the Additional Functions screen See Changing the Current Standard Settings on p 8 11 You can set to display a shortcut key for the Black mode next to the colour selection drop down list on the C...

Страница 172: ...prints in black and white regardless of whether the original is in colour or black and white Single Color The Single Color mode enables you to make one colour copies prints IMPORTANT You can select R...

Страница 173: ...e the colour mode is set to Auto Color Select the colour mode is automatically set to Full Color 1 Place your originals press the colour selection drop down list press Auto Color Select Full Color Bla...

Страница 174: ...sic Copying and Mail Box Features Mail Box Scan 1 Select the desired User Inbox number place your originals press Scan 2 Press the colour selection drop down list press Auto Color Select Full Color or...

Страница 175: ...e document to print press Print 2 Press the colour selection drop down list press Auto Color Select Black Single Color or Two Colors You can also press Change Pr Settings and then select the desired c...

Страница 176: ...le document Documents combining cutout artwork transparencies and data sent from one or more computers using the Two sided Printing mode IMPORTANT You can set the Merge Documents mode only if you sele...

Страница 177: ...100 documents from the top in the User Inbox press Select All Max 100 doc If a document is already selected this key appears as Clear Selection instead To cancel all documents press Clear Selection C...

Страница 178: ...Merging Documents 3 62 3 Basic Copying and Mail Box Features...

Страница 179: ...e 4 21 Copying 4 23 Mail Box Print 4 26 Booklet Scanning 4 27 Transparency Interleaving 4 29 Image Combination 4 32 Copying 4 33 Mail Box Scan 4 35 Shifting the Original Image 4 36 Using the Arrow Key...

Страница 180: ...94 Mail Box Scan 4 94 Composing Images 4 95 Copying 4 96 Mail Box Print 4 97 Embedding Hidden Text in the Background 4 98 Copying 4 99 Mail Box Print 4 102 Page and Copy Set Numbering 4 103 Page Numb...

Страница 181: ...es are modes for performing various kinds of editing according to your needs when copying printing or storing documents in an inbox IMPORTANT Depending on the mode some combinations of modes will not...

Страница 182: ...ending on the mode you may have to place your original on the platen glass or in the feeder See the corresponding section on each mode for detailed information NOTE If the desired setting is not displ...

Страница 183: ...e bottom right of their key Example Frame Erase Press Special Features Frame Erase Cancel For modes which do not have a right triangle on the bottom right of their key Example Job Build Press Special...

Страница 184: ...feeder See the corresponding section on each mode for detailed information 4 Set the desired mode For more information on setting each mode see the corresponding section To set other modes at the sam...

Страница 185: ...their key Example Job Build Press Special Features Job Build To cancel all settings and return the machine to the Standard Scan mode press Initial Settings To return to the Inbox Selection screen pre...

Страница 186: ...me repeat steps 3 and 4 5 Press Start Print If there is a current or reserved print job the document is placed in the queue and is printed after the current or reserved job is complete Printing starts...

Страница 187: ...PORTANT For information on the modes which cannot be set in combination with this mode see Unavailable Combination of Functions on p 9 6 Place your original on the platen glass The 2 Page Separation m...

Страница 188: ...ace down making sure that their top edge is aligned with the back edge of the platen glass by the arrow in the top left corner 2 Press To scan the next two facing pages turn the page of the original p...

Страница 189: ...e Unavailable Combination of Functions on p 9 6 For the Mail Box function you cannot set the Cover Sheet Insertion mode when you select multiple documents In this case set the Cover Job Separator mode...

Страница 190: ...Cover Back Cover This setting adds a front cover and back cover sheet to each set of copies prints You may also copy print on the front back cover sheet Sheet Insertion Chapter Page This setting inse...

Страница 191: ...rts sheets of tab paper into the prints Since tab paper is always copied printed on one side this feature is useful when you want to divide the main body of text To print on the tab paper set the shif...

Страница 192: ...want to print on the tab paper insert blank sheets of paper in each place where you want the tab paper to go Images in the area which is to be shifted but not within the tab area may cause the prints...

Страница 193: ...Done IMPORTANT Select the same size paper for Front Cover Back Cover Sheet Insertion or Chapter Page and Tab Paper If you try to set a different paper size for one feature the paper sizes for the othe...

Страница 194: ...ill copy print your original s first or last page on the preprinted paper If you select Print on Front Side Print on Back Side or Copy on Both Sides for the front and or back cover and or sheet insert...

Страница 195: ...Leave Blank for the sheet insertion you can set the same page for tab paper In this case the paper for the sheet insertion is output first and then the tab paper is output NOTE The settings are displa...

Страница 196: ...ocuments mode See Merging Documents on p 3 60 You cannot print on the job separator sheets If you select the Staple mode when the optional Finisher X1 is attached you cannot staple more than 20 sheets...

Страница 197: ...atures Cover Job Separator Merge Documents is displayed only when the multiple documents are selected 2 Select the desired Cover Job Separator feature s press Paper Select for each selected feature IM...

Страница 198: ...pear on your machine may differ depending on the setting in step 2 If you select Leave Blank for the front and or back cover the machine inserts a sheet of paper from the paper source that you selecte...

Страница 199: ...in such a way that the copies prints are made into a booklet For the Booklet Scanning mode of the Mail Box function see Booklet Scanning on p 4 27 Booklet This mode enables you to copy print one sided...

Страница 200: ...and centre page of the booklet 8 7 6 5 4 3 2 1 16 15 14 13 12 11 10 9 3 7 1 Originals Copies Prints Number of Sheets to Divide 1 In the above example illustration the number of sheets is two 1 After...

Страница 201: ...tity of paper When printing on special types of paper such as heavy paper or transparencies be sure to correctly set the paper type especially if you are using heavy paper If the type of paper is not...

Страница 202: ...for the cover page as that used for copying the main document If you are using Heavy 2 paper for the cover sheets you can only print on the inside of the front cover or inside of the back cover Only...

Страница 203: ...uding cover sheets that can be saddle stitched is 15 sheets 64 to 80 g m2 10 sheets 81 to 105 g m2 NOTE If the number of sheets is 16 or more the booklet is not saddle stitched The number of saddle st...

Страница 204: ...annot be set if multiple documents are selected and their record sizes are different The Booklet mode cannot be used with documents with resolution of less than 600 x 600 dpi NOTE If you want to print...

Страница 205: ...formation on the modes which cannot be set in combination with this mode see Unavailable Combination of Functions on p 9 6 Make sure to place originals with a vertical portrait orientation vertically...

Страница 206: ...NOTE To select an inch paper size press Inch size 2 Sided Original cannot be selected if A5R or A6R is the selected original size 3 Select the booklet layout size press OK NOTE To select an inch paper...

Страница 207: ...navailable Combination of Functions on p 9 6 Even if an optional finisher is attached you cannot use any of the Finishing modes with the Transparency Interleaving mode Only A4 is available for the Tra...

Страница 208: ...he Interleaf Sheets The Print setting outputs a printed transparency and a printed interleaf sheet alternately 1 Place your originals press Special Features Transparency Interleaving 2 Select the pape...

Страница 209: ...Transparency if Stack Bypass Standard Settings is set to On IMPORTANT Make sure that transparencies are loaded into the selected paper source Loading paper types other than transparencies may result...

Страница 210: ...ions on p 9 6 Originals copied scanned in the Image Combination mode must all be the same size You cannot use the Image Combination mode with the Different Size Originals mode For the Copy function yo...

Страница 211: ...ide or both sides of one sheet of paper Copying 1 Place your originals press Special Features Image Combination 2 Select the original size press Next If the original is two sided press 2 Sided Origina...

Страница 212: ...u do not change the image order by pressing Option the images are printed as follows 4 Select the desired paper size press OK NOTE The machine automatically selects the copy ratio depending on the sel...

Страница 213: ...place your originals press Scan Special Features Image Combination 2 Specify the Image Combination settings in accordance with steps 2 to 4 of Copying on p 4 33 NOTE To select an inch paper size press...

Страница 214: ...the original is not shifted If you use the numeric keys to enter the shift position the original image may be partially cut off on the copy depending on the size of the original the size of the copy p...

Страница 215: ...moved to if you first visualize the original image as being face up and appearing in the centre of the copy page Using the Numeric Keys The No Key Entry setting enables you to shift the entire image...

Страница 216: ...o Key Entry press Settings under Front Side or Back Side NOTE Back side settings are only valid when making two sided copies prints 3 Use numeric keys to enter the shift position Select the shift dire...

Страница 217: ...gonal direction Press the top Enter the shift value Press the right Enter the shift value 4 Press OK Mail Box Print 1 Select the desired User Inbox number and the document to print press Print Change...

Страница 218: ...ode see Unavailable Combination of Functions on p 9 6 The Margin mode shifts the entire original image by the designated width Therefore an original whose image extends all the way to the edges of the...

Страница 219: ...low the instructions below 1 2 Sided Set the Margin mode for the back only 2 2 Sided You do not need to set the Margin mode Proceed to make copies or prints in the usual way 2 1 Sided Set the Margin m...

Страница 220: ...n switch between positive and negative margin width by pressing Mail Box Print 1 Select the desired User Inbox number and the document to print press Print Change Pr Settings Special Features Margin 2...

Страница 221: ...in combination with this mode see Unavailable Combination of Functions on p 9 6 NOTE For instructions on entering values in inches see Chapter 2 Basic Operations in the Reference Guide Original Frame...

Страница 222: ...If you want to set the top left right and bottom widths independently Press Adjust Each Dim Select the desired frame erase borders press or to set their respective frame erase widths press Next To ret...

Страница 223: ...Specify the Frame Erase settings in accordance with steps 2 to 4 of Copying on p 4 44 Book Frame Erase This mode erases the dark border as well as centre and contour lines that appear if you are copy...

Страница 224: ...ctive frame erase widths press Next If you want to set the top left centre right and bottom widths independently Press Adjust Each Dim Select the desired frame erase borders press or to set their resp...

Страница 225: ...in accordance with steps 2 to 4 of Copying on p 4 46 Binding Erase This mode erases the shadows that appear on copies scanned image from binding holes on originals IMPORTANT Make sure you place your...

Страница 226: ...holes are located The border is where the binding holes are located on the original if you visualize the original as being face up 3 Press or to set the frame erase width press OK Mail Box Scan 1 Sele...

Страница 227: ...ng and Facsimile Guide NOTE The Job Done Notice is available for the Copying function only The Job Done Notice can be set only if the Color Universal Send Kit standard equipped for the iR C4580i iR C4...

Страница 228: ...nnot select multiple destinations at one time Once copying is complete a job done notice is sent to the selected destination To display the Access Number key set Access Number Management to On To acce...

Страница 229: ...n fed to the platen glass As a result the images may be scanned and copied as slanted If the Different Size Originals mode is set the scanning speed may be slower than normal Stapling cannot be perfor...

Страница 230: ...l Copying and Mail Box Features Copying 1 Place your originals press Special Features Different Size Originals Mail Box Scan 1 Select the desired User Inbox number place your originals press Scan Spec...

Страница 231: ...nce by dividing them into multiple batches You can use both the feeder and the platen glass for scanning When copying the originals are printed as one document after all of the batches have been scann...

Страница 232: ...our mode while the machine is scanning originals in the Image Combination mode If you use the Job Block Combination mode the Job Build mode is automatically set for each batch of originals You cannot...

Страница 233: ...es Copying 1 Place your originals press Special Features Job Build 2 Press NOTE To cancel scanning press Cancel or 3 When scanning is complete place your next batch of originals press If you want to c...

Страница 234: ...ancel the 2 Sided Original mode according to the type of originals you place next To cancel the 2 Sided Original mode press 2 Sided Original Cancel Repeat this step as necessary 4 After the last batch...

Страница 235: ...opying and Mail Box Features Mail Box Scan 1 Select the desired User Inbox number place your originals press Scan Special Features Job Build 2 Specify the Job Build settings in accordance with steps 2...

Страница 236: ...t be set in combination with this mode see Unavailable Combination of Functions on p 9 6 When 1 2 Sided is set two sided copying is not performed and the machine copies each original at a time The ori...

Страница 237: ...you want to change the copy settings make the changes before pressing You can adjust the exposure and the image quality See Exposure and Original Type Settings on p 3 2 You can change the number of c...

Страница 238: ...ion modes Nega Posi Image Repeat Mirror Image and Area Designation modes IMPORTANT For information on the modes which cannot be set in combination with this mode see Unavailable Combination of Functio...

Страница 239: ...the Image Repeat mode IMPORTANT To use Area Designation Framing with the Image Repeat mode first specify the Image Repeat mode and then designate the desired area Only one area can be designated Even...

Страница 240: ...s 1 Place your originals press Special Features Image Creation If you are designating the area to repeat using the edit pen place the original on the platen glass To copy multiple originals using the...

Страница 241: ...Press or to set the number of times that you want the image to repeat IMPORTANT The repeated images may overlap or have gaps between them depending on the number of repeats that you set 4 If you want...

Страница 242: ...ect select the point that you want to modify press or to move the point press Done Preview to check the modified area Press OK Using the numeric keys Press Numeric Key Entry IMPORTANT Before performin...

Страница 243: ...of space between repeated images using and If you want to set the same amount of space for all four sides Press or to set the amount of space press OK If you want to set the top left right and bottom...

Страница 244: ...les you to frame areas to scan copy or areas to blank out in the scanned image You can designate up to four areas using the edit pen on the preview screen or the numeric keys on the control panel You...

Страница 245: ...dit pen If you designate an area using the edit pen the output image may not reflect the designated area precisely To designate an area precisely enter the values using the numeric keys Using the Edit...

Страница 246: ...ecial Features Image Creation 2 Press Area Designation press Pen Entry 3 Press Start Scan IMPORTANT Confirm that the original is placed on the platen glass 4 Designate the area using the edit pen IMPO...

Страница 247: ...ate up to four different areas To designate an area with multiple points Press Multi point specify the area with the edit pen After designating the last point press Fix Multipoints You can designate u...

Страница 248: ...creen displays the desired point that you want to modify press or or to move the point press Done Preview to check the modified area 7 Press Next select Shift center or Do not shift center If only Bla...

Страница 249: ...il Box Features Mail Box Scan 1 Select the desired User Inbox number place your original on the platen glass press Scan Special Features Area Designation Pen Entry 2 Specify the Area Designation setti...

Страница 250: ...Features Using the Numeric Keys NOTE For instructions on entering values in inches see Chapter 2 Basic Operations in the Reference Guide Original Copy Framing Blanking Designate an Area Area X2 X1 Y2...

Страница 251: ...to the top of the original These measurements tell the machine the desired framed area s size and position 3 Press X1 X2 Y1 and Y2 use numeric keys to specify the respective measurements X1 The distan...

Страница 252: ...ift center or Do not shift center If only Blanking is selected this step is unnecessary Skip to step 6 NOTE If the Center Shift mode is already specified beforehand the Center Shift Settings screen do...

Страница 253: ...on mode You must set how much the image on the originals must be shifted so that the image is copied printed onto the tabs IMPORTANT For information on the modes which cannot be set in combination wit...

Страница 254: ...have black streaks or appear as dirty To cancel this setting press Special Features Tab Paper Creation Cancel Copying 1 Load the tab paper into the stack bypass Make sure that the height of the paper...

Страница 255: ...ANT Make sure that the tab paper is loaded in the stack bypass in the following way The side to be printed on is placed face up The first sheet of tab paper to be printed on is placed on the top The t...

Страница 256: ...re on the Scan screen or the Copy Basic Features screen pressing Image Qual Adjustment and making fine adjustments cancels the automatic copy scan exposure setting Similarly if you select A Auto for t...

Страница 257: ...al remains press next to Yellow to adjust the density Adjusting Yellow automatically adjusts the levels of Red and Green to the same level as Yellow However Adjusting the levels of Red or Green sets Y...

Страница 258: ...bleeding that you want to prevent press OK Details of each item are shown below NOTE If you make fine adjustments to the density the automatic copy exposure setting is cancelled and the original is s...

Страница 259: ...80 Adjusting the Colour You can make fine adjustments to the colour by varying the relative strength and density of yellow magenta cyan and black The colour adjustments that you make can be stored an...

Страница 260: ...r You can also press Recall Store to recall and change the previously stored colour balance settings See Recalling Colour Balance Settings on p 4 88 4 Specify Saturation Hue and Density If Saturation...

Страница 261: ...of all the colours press Counter Clockwise or Clockwise To adjust the hue level of each colour press More Red More Green More Yellow More Cyan More Blue or More Magenta for each colour If Density Fine...

Страница 262: ...nge Pr Settings Special Features Color Balance 2 Specify the Colour Balance settings in accordance with steps 3 to 5 of Copying on p 4 81 Storing Colour Balance Settings You can store colour balance s...

Страница 263: ...nce settings press Register NOTE Keys that already have settings stored in them are displayed with a coloured triangle in the lower right corner of the key If you select a key that already has setting...

Страница 264: ...red User Inbox number and the document to print press Print Change Pr Settings Special Features Color Balance 2 Store the Colour Balance Settings in accordance with steps 3 to 5 of Copying on p 4 84 N...

Страница 265: ...tings stored in it the settings are displayed You can also name keys with no settings stored in them 5 Enter a name press OK NOTE If you press OK without entering any characters the key name reverts t...

Страница 266: ...the settings press OK If you select a key that does not have colour balance settings stored in it OK is grayed out and cannot be pressed You can select another key that has colour balance settings st...

Страница 267: ...Change Pr Settings Special Features Color Balance 2 Recall the Colour Balance Settings in accordance with steps 3 to 5 of Copying on p 4 88 Erasing Colour Balance Settings Copying 1 Press Special Fea...

Страница 268: ...If you select a key that already has settings stored in it the settings are displayed 5 Press Yes NOTE Key names are not erased For instructions on changing a key name see Naming a Colour Balance Key...

Страница 269: ...ables you to make copies with more vivid colour tones and increased colour saturation NOTE The One Touch Color mode Vivid Colors is available for the Copying function only Tranquil Colors This setting...

Страница 270: ...t the following cannot be selected together Vivid Colors and Tranquil Colors Lighten Image and Darken Image and Highlight Reproduction NOTE If you select Retro Photo Image Single Color is displayed on...

Страница 271: ...use Low as the setting Low If you make copies or scan an original containing halftones such as a printed photograph using the Printed Image mode the moir effect a shimmering wavy pattern may occur How...

Страница 272: ...harpness press OK To copy text or lines clearly the setting should be towards High To copy originals containing printed photographs or other halftones the setting should be towards Low Mail Box Scan 1...

Страница 273: ...ion can be used with other copy modes which are not listed above to process images However copy modes other than the Shift mode can only be used for copying images and not for stored image forms Up to...

Страница 274: ...mage form to be superimposed over the original press Next To check images stored as forms press Check Print to print a sample of the image Image forms stored in the RGB colour format are indicated wit...

Страница 275: ...selected Select a colour press OK IMPORTANT If the colour format of the selected image form is CMYK only Auto Color Select can be selected Mail Box Print 1 Select the desired User Inbox number and the...

Страница 276: ...le Combination of Functions on p 9 6 You cannot change the copy print exposure while copying printing in the Secure Watermark mode The embedded hidden text may not appear as specified even if the copy...

Страница 277: ...lace your originals press Special Features press Secure Watermark 2 Select the type of secure watermark Watermark Date Copy Set Numbering Serial Number ID User Name If you select Watermark Select a pr...

Страница 278: ...ecessary press Register enter the text to be registered If you select Date Enter the date using numeric keys select the date format from the Date Type drop down list press Next NOTE There are six diff...

Страница 279: ...TE The Serial Number is the number which is displayed at the bottom left of the screen when you press on the control panel If you select ID User Name Press Next NOTE The current ID or user name is dis...

Страница 280: ...e of the text You can select Magenta Cyan or Black for the color of the text To use white letters on a coloured background press White Letters on Colored Backgnd To change the orientation of character...

Страница 281: ...ertion Sheet Insertion Chapter Page Tab Paper mode or the Cover Job Separator mode for the Mail Box function the chapter numbers are counted as follows If the copy number has fewer than five digits th...

Страница 282: ...cuments can be copied with page numbers numbers only numbers enclosed with hyphens with chapter numbers or with the total page number Copy Set Numbering This mode enables you to copy or print a docume...

Страница 283: ...Numbers with Hyphens Numbered Chapters or Total Page Numbering 4 Select the orientation and the position of the page numbers press Next Orientation Vertical Prints the page number vertically Horizont...

Страница 284: ...ecify to have the page numbers start on the left side 1 to 9 999 and the total page number starts on the right side 1 to 20 000 To set the total page number automatically press Auto NOTE If Total Page...

Страница 285: ...atermark in Common Settings from the Additional Functions screen Set the position of the text press Next 6 Set the size and colour of the page numbers press OK Select the size of the page numbers from...

Страница 286: ...peatedly over the surface of the output Press Numbers in 5 Locations to select all five print positions NOTE If Copy Set Numbering Option Settings in System Settings from the Additional Functions scre...

Страница 287: ...Adjust the character density by pressing Light or Dark You can select Yellow Magenta Cyan Black Red Green or Blue for the specified text NOTE If Copy Set Numbering Option Settings in System Settings f...

Страница 288: ...r than 600 x 600 dpi Printing performance may not be optimal in the Watermark Print Date mode depending on the selected document and combination of printing modes NOTE You can also adjust the position...

Страница 289: ...ng and Mail Box Features Print Date Prints the date onto the output Watermark Printing Copying 1 Place your originals press Special Features Watermark Print Date 2 Press Watermark 3 Set the watermark...

Страница 290: ...n press OK 4 Select the desired preset watermark press Next If Create is selected Press Enter enter the text press OK You can also select the text which has been registered in Register Characters for...

Страница 291: ...e document to print press Print Change Pr Settings Special Features Watermark Print Date 2 Specify the Watermark settings in accordance with steps 2 to 5 of Copying on p 4 111 Date Printing Copying 1...

Страница 292: ...Settings in the System Settings from the Additional Functions screen is printed Confirm that the date and time settings are correct 5 Set the number size print type and colour press OK Select the size...

Страница 293: ...nt them as one document You can set copy settings for example the Job Separator and Page Numbering modes for the combined document You can also store the combined document in a User Inbox 4 3 2 1 1 1...

Страница 294: ...opying with the Job Block Combination mode You cannot store the Job Block Combination mode in Standard Settings You cannot store the Job Block Combination mode in Mode Memory You cannot recall the Job...

Страница 295: ...tch of originals 4 Check the settings on the Scan screen You can change or specify the Color 2 Sided Original Copy Ratio Original Type or Copy Exposure mode before scanning the next batch of originals...

Страница 296: ...from step 3 Select the batches of originals in the order in which you want to combine them To view the detailed information of a batch of originals select the batch of originals press Details To eras...

Страница 297: ...x mode for the combined document in step 2 Press Print Store The combined document will be stored in the selected User Inbox at the same time as printing To store the combined document without printin...

Страница 298: ...NT For information on the modes which cannot be set in combination with this mode see Unavailable Combination of Functions on p 9 6 When you press while copying in the Store In User Inbox Copy upon St...

Страница 299: ...nt without giving it a name the machine automatically assigns the document a name using the year month day and time the document was scanned For example if a document is stored at 1 35 PM 41 seconds o...

Страница 300: ...Storing Scanned Originals with Copy Settings in a User Inbox 4 122 4 Special Copying and Mail Box Features...

Страница 301: ...This chapter describes the memory features Recalling Previous Copy Jobs 5 2 Memory Keys 5 4 Storing Scan Print Copy Settings 5 4 Naming a Memory Key 5 6 Recalling Scan Print Copy Settings 5 7 Erasing...

Страница 302: ...ied If you recall copy settings stored in Mode Memory Therefore if you make settings but do not press the control panel power switch or and the Auto Clear mode does not activate the settings you have...

Страница 303: ...Recalling Previous Copy Jobs 5 3 5 Memory Features 3 Verify the settings press OK NOTE You can change the recalled copy settings before making copies...

Страница 304: ...ful for storing frequently used scan print and copy settings NOTE The scan print and copy settings stored in memory are not erased even if the power is turned OFF Storing Scan Print Copy Settings IMPO...

Страница 305: ...Yes If you select a key that already has settings stored in it A screen appears asking for your confirmation to overwrite the previous settings Press Yes 4 Press Cancel NOTE You can assign a name to t...

Страница 306: ...Press Special Features Mode Memory 2 Select a key M1 to M9 to name press Register Name NOTE Keys that already have settings stored in them are displayed with a coloured triangle in the lower right co...

Страница 307: ...ox number press Scan Special Features Mode Memory 2 Name a memory key in accordance with steps 2 to 4 of Copying on p 5 6 Mail Box Print 1 Select the desired User Inbox number and a document press Pri...

Страница 308: ...select another key that has copy settings stored in it or press Cancel NOTE Recalling settings from memory cancels the current settings You can make changes to the recalled settings If you press anoth...

Страница 309: ...Erasing Scan Print Copy Settings Copying 1 Press Special Features Mode Memory 2 Select the key containing the copy settings that you want to erase press Erase IMPORTANT Make sure to check the setting...

Страница 310: ...ox Scan 1 Select the desired User Inbox number press Scan Special Features Mode Memory 2 Erase the scan settings in accordance with steps 2 to 4 of Copying on p 5 9 Mail Box Print 1 Select the desired...

Страница 311: ...cuments received by fax and or I fax in the Memory RX Inbox and Confidential Fax Inboxes Memory RX Inbox 6 2 Memory RX Inbox 6 2 Divided Data RX Inbox 6 6 Confidential Fax Inboxes 6 9 Receiving Confid...

Страница 312: ...ry RX Receive Inbox is an inbox for receiving and storing documents received by Fax and I Fax Documents received in the Memory RX Inbox are stored without being printed You can print or send the store...

Страница 313: ...Settings screen press System Settings Communications Settings See Chapter 11 System Manager Settings in the Sending and Facsimile Guide Receiving Documents through Fax or I Fax 1 Set Memory Lock to On...

Страница 314: ...Fax Memory Lock to On in Memory RX Inbox Settings To access the Memory RX Inbox Settings screen press System Settings Communications Settings See Chapter 11 System Manager Settings in the Sending and...

Страница 315: ...Printing a Document in the Memory RX inbox IMPORTANT The Memory RX Inbox is available only if the Color Universal Send Kit standard equipped for the iR C4580i iR C4080i is activated or the optional S...

Страница 316: ...ngle I fax document After the document has been combined it is printed forwarded or stored in memory in the same way as when a regular I fax document is received IMPORTANT You can save I fax in divide...

Страница 317: ...RX Inbox You can check the status of divided data and the remaining capacity of the Divided Data RX Inbox 1 Press Memory RX Inbox on the Inbox Selection screen press Divided Data RX Inbox 2 Select the...

Страница 318: ...ment which is being erased only the data which has already been received is combined to form the document Data which can be combined to form complete pages is printed and any remaining data is erased...

Страница 319: ...ches the specified forwarding conditions it is stored in a Confidential Fax Inbox without being printed This feature is useful for receiving confidential documents You can print the documents stored i...

Страница 320: ...tial Fax Inbox it is necessary to first register the Confidential Fax Inbox as a forwarding destination in Forwarding Settings in System Settings from the Additional Functions screen See Chapter 11 Sy...

Страница 321: ...print documents stored in Confidential Fax Inboxes only with the settings used when the documents were received NOTE You can print only one document at a time You cannot print multiple documents stor...

Страница 322: ...n other than 600 x 600dpi cannot be sent if there is a fax address included in the destination NOTE You cannot send documents stored in a Confidential Fax Inbox 1 Select the desired User Inbox number...

Страница 323: ...Send settings NOTE If Restrict New Address is set to On in the System Manager Settings from the Additional Functions screen you cannot enter a destination in New Address You have to select a stored d...

Страница 324: ...Sending a Document 6 14 6 Sending and Receiving Documents Using the Inboxes...

Страница 325: ...25 Collating Copies into Groups of the Same Page Group 7 27 Collating Pages and Stapling Staple 7 29 Setting Standard Keys 7 31 Interrupting the Current Job to Make Priority Copies Interrupt Mode 7 33...

Страница 326: ...ting the Image Quality Image Quality Adjustment 7 82 Adjusting the Colour Colour Balance 7 83 Specifying the Look of the Image One Touch Color 7 84 Making Copies with Job Done Notice Others 7 86 Combi...

Страница 327: ...function key from the Additional Functions screen After changing the copy settings even if you switch to the Express Copy Basic Features screen from the Regular Copy Basic Features screen or vice vers...

Страница 328: ...en are displayed on the Regular Copy Basic Features screen by pressing Special Features This screen enables you to set basic copying modes You can adjust the exposure set basic copying modes such as t...

Страница 329: ...riginals 2 to 2 Sided on p 7 22 Making One Sided Copies from Two Sided Originals 2 to 1 Sided on p 7 23 Making Two Sided Copies from Facing Pages in a Book Book to 2 Sided on p 7 24 g Finishing The Fi...

Страница 330: ...various settings for the scanning of bound originals and different sized originals See Scan Originals Settings on p 7 41 p Recall This function enables you to recall the three most recently performed...

Страница 331: ...op up displays appear on the Express Copy Basic Features screen Press or any point outside the pop up display to close the pop up displays Example The pop up display which appears when Enlarge is pres...

Страница 332: ...can be used in combination with other copy modes Depending on the copy modes you have selected some copy modes which are not selected may be displayed with an You cannot select these copy modes in com...

Страница 333: ...set and your originals contain colour sections the machine scans them in the Full Color mode However the machine may scan the colour originals in the Black mode under the following conditions To avoi...

Страница 334: ...usting Copy Exposure For instructions on this procedure using the Regular Copy Basic Features screen see Exposure Adjustment during Copying Printing on p 3 8 1 Press or Auto Density to adjust the copy...

Страница 335: ...s moir effect by using the Sharpness mode See Making Sharp Contrast Copies Sharpness on p 7 81 1 Select the image quality Text Text Photo or Photo If you want to adjust the text photo map processing p...

Страница 336: ...ifying the Copy Ratio by Percentage Zoom by Percentage For instructions on this procedure using the Regular Copy Basic Features screen see Zoom by Percentage on p 3 12 1 Set the copy ratio by pressing...

Страница 337: ...et Zoom on p 3 10 IMPORTANT Place your originals horizontally in the following cases If you are enlarging A4 originals to A3 If you are enlarging A5 originals to A3 If you are reducing A3 originals to...

Страница 338: ...Zoom on p 3 14 IMPORTANT You cannot copy highly transparent originals such as transparencies in the Auto Zoom mode Use the Preset Zoom or Zoom by Percentage modes To use the Auto Zoom mode your origi...

Страница 339: ...using the Regular Copy Basic Features screen see Entire Image on p 3 16 1 Press Entire Image Calculating the Copy Ratio Based on the Original and Copy Paper Sizes Zoom Program For instructions on this...

Страница 340: ...sage appears telling you that the ratio will be adjusted to 25 If it is more than 400 a message appears telling you that the ratio will be adjusted to 400 Making Copies with Different XY Copy Ratios X...

Страница 341: ...as transparencies in the Auto XY Zoom mode To make such copies specify the copy ratio If you set the Auto XY Zoom mode select the paper size using Manual Paper Selection If you do not select the paper...

Страница 342: ...matically set to Full Color The poster mode cannot be used to make copies on nonstandard size paper envelopes transparencies and tab paper 1 Press Other Ratio Settings Poster 2 Press Copy Ratio s or N...

Страница 343: ...ORTANT When printing on special types of paper such as heavy paper or transparencies be sure to correctly set the paper type especially if you are using heavy paper If the type of paper is not set cor...

Страница 344: ...ypass Settings Select the paper size press Next IMPORTANT If you select a nonstandard size paper the Poster Rotate Collate Rotate Group Offset Collate Offset Group Staple Book 2 Sided 2 Page Separatio...

Страница 345: ...ey to Register Paper Type in Common Settings from the Additional Functions screen Paper Select Key Size for Express Copy Screen in Copy Settings from the Additional Functions screen and Stack Bypass S...

Страница 346: ...he type of two sided orientation Making Two Sided Copies from Two Sided Originals 2 to 2 Sided For instructions on this procedure using the Regular Copy Basic Features screen see 2 to 2 Sided on p 3 4...

Страница 347: ...on this procedure using the Regular Copy Basic Features screen see 2 to 1 Sided on p 3 50 IMPORTANT You may not be able to make 2 sided copies on some types of paper depending on the paper Make sure...

Страница 348: ...e to make 2 sided copies on some types of paper depending on the paper When using this feature select A4 size paper When copying with the Front Back 2 Sided mode the front side of the first two sided...

Страница 349: ...ype If Tray B Copy Tray M1 is set as the output tray and a finisher is not attached to the machine copies are output in the opposite order to the originals because they are output face up Therefore ch...

Страница 350: ...manually When the available paper size is loaded in both the horizontal and vertical directions The selected paper source must have Drawer Eligibility For APS ADS in Common Settings from the Addition...

Страница 351: ...type If Tray B Copy Tray M1 is set as the output tray and a finisher is not attached to the machine copies are output in the opposite order to the originals because they are output face up Therefore...

Страница 352: ...manually When the available paper size is loaded in both the horizontal and vertical directions The selected paper source must have Drawer Eligibility For APS ADS in Common Settings from the Addition...

Страница 353: ...Stitch mode may vary depending on the paper type and the number of sheets The Staple mode can be set only if an optional finisher is attached When printing on special types of paper such as heavy pap...

Страница 354: ...ou can select Heavy 2 paper only if you are not printing on the cover Only 64 to 105 g m2 can be used for the main document Paper of the following weight can be used as a cover sheet If printing on th...

Страница 355: ...Basic Features Screen on p 8 6 1 Press Register frequently used keys 2 Select the number of Standard Keys that are displayed on the Express Copy Basic Features screen Up to 5 Set Keys Displaying maxim...

Страница 356: ...ures Screen 7 32 7 Using the Express Copy Basic Features Screen 5 Select the desired mode to be stored as a Standard Key press OK The five stored Standard Keys are displayed as shown below The ten sto...

Страница 357: ...8 1 Press Interrupt 2 Place your originals select the desired copy modes Sample Set For instructions on this procedure using the Regular Copy Basic Features screen see Sample Set on p 1 30 IMPORTANT S...

Страница 358: ...n 1 Place your originals select the desired copy modes press Sample Set IMPORTANT Sample Print is not displayed if only one print is set 2 Select All Pages or Specified Pages press OK If you select Sp...

Страница 359: ...nto Sets in Page Order Collate on p 7 25 Collating Copies into Groups of the Same Page Group on p 7 27 or Collating Pages and Stapling Staple on p 7 29 To make two sided copies press 2 Sided Copy See...

Страница 360: ...umber of copies exposure zoom etc and by pressing the control panel power switch or when the Auto Clear function is On or by calling up a copy job stored in memory If one of these keys was not pressed...

Страница 361: ...n Memory Mode Memory For instructions on this procedure using the Regular Copy Basic Features screen see Storing Scan Print Copy Settings on p 5 4 Storing Copy Settings IMPORTANT You cannot store the...

Страница 362: ...egistered settings are displayed If you select an occupied memory key settings have been stored Press Yes when the confirmation message appears asking you to overwrite the mode The memory key register...

Страница 363: ...dure using the Regular Copy Basic Features screen see Recalling Scan Print Copy Settings on p 5 7 1 Press Mode Memory select a memory key that registers the copy settings you want to use Erasing a Cop...

Страница 364: ...press Copy Basic Features Screen 7 40 7 Using the Express Copy Basic Features Screen 2 Select a memory key to be erased press Erase IMPORTANT Make sure to check the settings first before erasing them...

Страница 365: ...E To cancel the settings for each function press Do Not Set a 2 Page Separation This mode enables you to copy facing pages in a book or a magazine onto separate sheets of paper See Copying Facing Page...

Страница 366: ...reen see 2 Page Separation on p 4 9 IMPORTANT Place the original on the platen glass The 2 Page Separation mode cannot be used when the original is placed in the feeder NOTE To make two sided copies o...

Страница 367: ...er remove each original from the original output area when scanning is complete When copying you can change or specify the following settings before scanning the next batch of originals i e between ba...

Страница 368: ...ls placed together in the feeder must be the same weight paper type If you place originals with different widths in the feeder the originals may move slightly when fed to the platen glass As a result...

Страница 369: ...he Regular Copy Basic Features screen see Scan Image Check on p 4 58 IMPORTANT When 1 2 Sided is set two sided copying is not performed and the machine copies each original at a time The originals mus...

Страница 370: ...modes see Unavailable Combination of Functions on p 9 6 NOTE The Book Page Edit Shift screen consists of a list of individual settings Press or to scroll to the desired setting To cancel the settings...

Страница 371: ...his mode enables you to copy a watermark and user defined text onto the output See Watermark on p 7 55 g Print Date This mode enable you to copy the date onto the output See Print Date on p 7 56 h Shi...

Страница 372: ...you cannot staple more than 20 sheets of A3 paper or 30 sheets of A4 or A4R paper including sheet insertions If you select the Staple mode when the optional Finisher W1 or Saddle Finisher W2 is attac...

Страница 373: ...same sized paper as the front and back covers When you select Front Cover Back Cover Paper Insertion if the paper size for one feature is changed to another size the other two features are changed Ho...

Страница 374: ...en you select Front Cover Back Cover Sheet Insertion or Chapter Page if the paper size for one feature is changed to another size the other two features are changed However you may change the paper dr...

Страница 375: ...the even numbered pages will be printed upside down When printing on special types of paper such as heavy paper or transparencies be sure to correctly set the paper type especially if you are using h...

Страница 376: ...paper to use for the cover page in the stack bypass depends on the type of the paper as shown below Plain Recycled Color Bond Heavy 1 face up Heavy 2 face down If you select Add Cover you cannot speci...

Страница 377: ...r jam 4 Press Done Page and Copy Set Numbering Page Numbering Copy Set Numbering For instructions on this procedure using the Regular Copy Basic Features screen see Page and Copy Set Numbering on p 4...

Страница 378: ...gistered in Register Characters for Page No Watermark in Common Settings from Additional Functions screen If you want to adjust the print position press Adjust Position press X and Y press or to set t...

Страница 379: ...nd colour of the page numbers 3 Press Done Printing a Watermark and Date Watermark Print Date For instructions on this procedure using the Regular Copy Basic Features screen see Printing a Watermark a...

Страница 380: ...een registered in Register Characters for Page No Watermark in Common Settings from the Additional Functions screen Press Print Type select the desired print type You can select Transparent or Overlay...

Страница 381: ...set their respective position press Done 3 Press Done Making Copies with the Original Image Shifted Shift For instructions on this procedure using the Regular Copy Basic Features screen see Shifting t...

Страница 382: ...e the original image as being face up and appearing in the centre of the copy image 3 Press Done Making Copies with the Original Image Shifted Using the Numeric Keys NOTE For instructions on entering...

Страница 383: ...ginal image is shifted to the left right top or bottom by a selected width then copied When copying an original image that extends to the edge of the sheet part of that image will be cut off NOTE For...

Страница 384: ...or the back only If you are using the Margin and 2 Sided modes together and copying an original that does not have a margin follow the instructions below 1 2 Sided Set the margin for both the front an...

Страница 385: ...61 7 Using the Express Copy Basic Features Screen 2 Press Set specify each setting Press Paper Select select Paper Drawer 3 or 4 Press or to set the shift width 0 mm to 25 mm NOTE To enter values in...

Страница 386: ...e and so on Press Process Layout to set these modes IMPORTANT For information on the modes which cannot be set in combination with these modes see Unavailable Combination of Functions on p 9 6 NOTE Th...

Страница 387: ...ly copy the image of an original in either the vertical or horizontal direction See Making Copies by the Original Image Repeated Image Repeat on p 7 72 f Frame Erase This mode erases shadows and lines...

Страница 388: ...iginals mode Before scanning the next original between jobs you can set or change settings for the number of copy sets and 2 Sided Original mode 1 Press Process Layout Image Combination 2 Specify each...

Страница 389: ...omposition mode can be used with other copy modes other than those listed above to process images However copy modes other than the Shift mode are effective on the copied images and not on the stored...

Страница 390: ...rms stored in the RGB colour format are indicated with a icon Image forms stored in the CMYK colour format are indicated with a icon Colour image forms are indicated with a colour icon If you press De...

Страница 391: ...ecure Watermark is activated Printing performance may not be optimal in the Secure Watermark mode depending on the selected document and combination of printing modes The Secure Watermark mode is only...

Страница 392: ...rocedure using the Regular Copy Basic Features screen see Area Designation on p 4 66 IMPORTANT To use Area Designation Framing with the Image Repeat mode first specify the Image Repeat mode and then d...

Страница 393: ...rea using the edit pen IMPORTANT You cannot designate a rectangular area and a polygonal area at the same time To designate a rectangular area with two points Designate two opposing points with the ed...

Страница 394: ...rest of the original Blanking Copy the original by blanking out the contents of the designated area If you want to use different settings for different areas select the area by pressing the appropria...

Страница 395: ...the image out to the right side edge of the original and up to the top of the original These measurements tell the machine the desired framed area s size and position 3 Press X1 X2 Y1 and Y2 use numer...

Страница 396: ...ecessary Skip to step 6 6 Press OK Done Making Copies by the Original Image Repeated Image Repeat For instructions on this procedure using the Regular Copy Basic Features screen see Image Repeat on p...

Страница 397: ...the image will repeat manually If you want to specify the amount of space between repeated images press Margin Settings If you want only a designated area on the original to be repeated press Framing...

Страница 398: ...erase values by pressing or IMPORTANT You can set the Original Frame Erase mode only for the original paper sizes shown on the touch panel display 3 Press Done Making Copies by Erasing the Book Frame...

Страница 399: ...Do not place originals with binding holes in the feeder as this may damage the originals When using the Binding Erase mode the borders you do not select are also erased by 4 mm 1 Press Process Layout...

Страница 400: ...ee Transparency Interleaving on p 4 29 IMPORTANT Only A4 is available for the Transparency Interleaving mode 1 Press Process Layout Transparency Interleaving 2 Press Set To switch the paper source for...

Страница 401: ...Standard Settings is set to On IMPORTANT Make sure that transparencies are loaded into the selected paper source Loading paper types other than transparencies may result in a paper jam 3 Specify the s...

Страница 402: ...ess Copy Basic Features Screen Inverting Original Images Nega Posi For instructions on this procedure using the Regular Copy Basic Features screen see Inverting Images Nega Posi on p 4 60 1 Press Proc...

Страница 403: ...g the Express Copy Basic Features Screen Making Copies with the Original Image Reversed Mirror Image For instructions in Copy Basic Features Screen see Mirror Image on p 4 66 1 Press Process Layout Mi...

Страница 404: ...T For information on the modes which cannot be set in combination with these modes see Unavailable Combination of Functions on p 9 6 NOTE To cancel the settings for each function press Do Not Set a Sh...

Страница 405: ...arpness 2 Adjust the sharpness by pressing Low or High 3 Press Done c Color Balance This mode enables you to adjust the colour by changing the relative strength and density of yellow magenta cyan and...

Страница 406: ...ine adjustments cancels the automatic copy scan exposure setting Similarly if you select A Auto for the scan copy exposure setting when image quality adjustments have been made the Image Quality Adjus...

Страница 407: ...mage Quality Adjustment 2 Press Prevent Bleed thru If you want to make fine adjustments to the density press Fine Adj 3 Press Done Adjusting the Colour Colour Balance For instructions on this procedur...

Страница 408: ...re select a key that already has settings stored on it To name the specified colour balance settings press Recall Store select a key that already has settings stored in it press Register Name To erase...

Страница 409: ...Image Adjustment Settings 7 85 7 Using the Express Copy Basic Features Screen 1 Press Image Adjustment One Touch Color 2 Select the desired One Touch Color type 3 Press Done...

Страница 410: ...cel the settings for each function press Do Not Set a Job Block Combination This mode enables you to scan multiple batches of originals with different copy settings and print them as one document See...

Страница 411: ...Insertion mode for the combined document You cannot use the Cover Sheet Insertion mode for each batch of originals If you use the Job Block Combination mode the Job Build mode is automatically set for...

Страница 412: ...opying and Mail Box Features and Unavailable Combination of Functions on p 9 6 If you are scanning two or more batches of originals press Recall Last Setting to return to the copy settings for the pre...

Страница 413: ...riginals select the batch of originals press Erase To make a sample print of a selected batch of originals or the combined document press Sample Print To make a sample print of a selected batch of ori...

Страница 414: ...ancelled You cannot store documents in the Memory RX Inbox or a Confidential Fax Inbox For instructions on storing documents in the Memory RX Inbox and Confidential Fax Inboxes see Chapter 6 Sending a...

Страница 415: ...ee Chapter 10 Storing Editing Address Book Settings in the Sending and Facsimile Guide 1 Press Others Job Done Notice 2 Select the destination to send the Job Done Notice If you want to select a desti...

Страница 416: ...Making Copies with Job Done Notice Others 7 92 7 Using the Express Copy Basic Features Screen...

Страница 417: ...d Keys for the Regular Copy Basic Features Screen 8 6 Setting the Standard Keys for the Express Copy Basic Features Screen 8 7 Auto Collate 8 9 Image Orientation Priority 8 9 Auto Orientation 8 10 Cha...

Страница 418: ...Functions enable you to customize the machine s various settings NOTE Settings specified from the Additional Functions screen are never changed when you press 1 Press The Additional Functions screen...

Страница 419: ...Functions screen see Copy Settings Table on p 8 4 and Mail Box Settings Table on p 8 13 NOTE The Copy Settings screen consist of a list of individual settings Press or to scroll to the desired settin...

Страница 420: ...Settings Delivered Applicable Page Paper Select Key Size for Express Copy Screen Large 1 Four paper sources maximum Stack Bypass Stack Bypass Settings 1 Paper Drawer 1 2 Paper Drawer 2 3 Paper Drawer...

Страница 421: ...lumn For instructions on setting the Device Information Delivery Settings mode see Chapter 6 System Manager Settings in the Reference Guide Setting the Paper Select Key Size for the Express Copy Basic...

Страница 422: ...rd Keys in addition to the Copy Ratio Finishing and 2 Sided Mode keys on the Regular Copy Basic Features screen the Special Features screen and the memory keys containing stored copy settings in Mode...

Страница 423: ...as shown below Setting the Standard Keys for the Express Copy Basic Features Screen This feature is useful when you want to store frequently used copy functions on the Express Copy Basic Features scr...

Страница 424: ...ister press Settings 4 Display the group of functions to be stored as Standard Keys by pressing or select the desired function To cancel the Standard Key setting already stored and press No Settings 5...

Страница 425: ...tached the Offset Collate mode is set However if no finisher is attached the Collate mode is set instead 1 Press Copy Settings Auto Collate 2 Select On or Off press OK Image Orientation Priority If Im...

Страница 426: ...ress Copy Settings Auto Orientation 2 Select On or Off press OK NOTE If A4 or A5 originals are enlarged onto A3 copy paper Auto Orientation is not performed even if you select On Only the images of st...

Страница 427: ...opy Quantity 1 Paper Selection Auto Exposure and Original Type Auto Original Type Text Photo Map Copy Ratio 1 1 Copy Function 1 1 Sided Copy Colour Mode Auto Color Select for the CLC5151 CLC4040 or Bl...

Страница 428: ...Press Copy Settings Standard Settings 2 Press Initialize 3 Verify the settings press Yes Done Restoring the Default Copy Settings Modes that have been changed in Copy Settings from the Additional Func...

Страница 429: ...attached 5 Indicates items that appear only when the appropriate optional equipment standard equipped for the iR C4580i iR C4080i is attached Item Settings Delivered Applicable Page User Inbox Setting...

Страница 430: ...on setting the Device Information Delivery Settings mode see Chapter 6 System Manager Settings in the Reference Guide Setting Storing a User Inbox You can set and store a name and password for a User...

Страница 431: ...can check or perform operations on the document in the User Inbox using the Remote UI User Interface of the machine To send a link to a User Inbox via e mail press URL Send Settings specify the desti...

Страница 432: ...se time to their default settings IMPORTANT You cannot initialize a User Inbox if there are documents still remaining in it 1 Press Mail Box Settings User Inboxes Settings 2 Select the User Inbox that...

Страница 433: ...efault settings are Document Size Auto Record Size Auto Original Type Text Photo Map Copy Ratio 1 1 Colour Mode Auto Color Select for the CLC5151 CLC4040 or Black for the iR C4580i iR C4080i Storing t...

Страница 434: ...Fax Inboxes Setting appears only if the Color Universal Send Kit standard equipped for the iR C4580i iR C4080i is activated or if the optional Super G3 FAX Board is installed You can create up to 50 C...

Страница 435: ...Inbox in which the document is stored you can check or perform operations on the document in the Confidential Fax Inbox using the Remote UI User Interface of the machine If you want to send a link to...

Страница 436: ...tandard equipped for the iR C4580i iR C4080i is activated or if the optional Super G3 FAX Board is installed You cannot initialize a Confidential Fax Inbox if there are documents still remaining in it...

Страница 437: ...ides the colour copy samples and index Colour Copy Samples 9 2 Color Balance 9 2 One Touch Color 9 3 Image Quality Adjustments 9 4 Single Color 9 5 Two Colors 9 5 Unavailable Combination of Functions...

Страница 438: ...e produced using different colour adjustment modes Color Balance This mode enables you to make fine adjustments to the colour by varying the relative strength and density of yellow magenta cyan and bl...

Страница 439: ...One Touch Color This mode enables you to make copies prints by selecting the look of the image with just one touch of a key Original Vivide Colours Tranquil Colours Darken Image Lighten Image Highlig...

Страница 440: ...nts by erasing the background colour of the original This mode is especially useful for copying scanning originals such as catalogues and paper that have turned yellow from age Prevent Bleeding This m...

Страница 441: ...py Samples 9 5 9 Appendix Single Color This mode enables you to make copies prints in one specific colour only Two Colors This mode enables you to make copies prints in two colours Original Copy Origi...

Страница 442: ...ge Combination Booklet Auto XY Zoom Preset Zoom Zoom by Percentage XY Zoom Auto Zoom Zoom Program Poster Automatic Paper Selection Auto Orientation Image Combination Tab Paper Booklet Image Repeat Aut...

Страница 443: ...to Image Single Color Automatic Color Selection Full Color Black Two Colors One Touch Color Retro Photo Image Two Colors Automatic Color Selection Full Color Black Single Color One Touch Color Retro P...

Страница 444: ...election Stack Bypass 7 Collate Group Rotate Collate Offset Collate Offset Group Staple Saddle Stitch Hole Punch Front Cover Back Cover Sheet Insertion Chapter Page Tab Paper Transparency Interleaving...

Страница 445: ...d 2 Page Separation Image Combination Transparency Interleaving Booklet Scan Image Check Book 2 Sided Poster Stack Bypass 2 Saddle Stitch 1 2 Sided 2 2 sided 2 1 Sided 2 Page Separation Image Combinat...

Страница 446: ...ion Shift Using the Arrow Keys Poster Automatic Paper Selection 4 Shift Using the Numeric Keys Tab Paper Different Size Originals 12 Image Repeat Mirror Image Tab Paper Creation Shift Using the Numeri...

Страница 447: ...lanking Framing Form Composition Job Block Combination Transparency Interleaving Poster Auto Orientation Stack Bypass 6 Collate Group Rotate Collate Rotate Group Offset Collate Offset Group Staple Sad...

Страница 448: ...Form Composition Watermark Print Date Scan Image Check Tab Paper Creation Job Block Combination Secure Watermark Divided Booklet Preset Zoom Zoom by Percentage XY Zoom Auto XY Zoom Zoom Program Entire...

Страница 449: ...ermark Print Date Scan Image Check Tab Paper Creation Job Block Combination Secure Watermark Mirror Image Entire Image Poster Staple Saddle Stitch Image Combination Original Frame Erase Book Frame Era...

Страница 450: ...me Erase Book Frame Erase Binding Erase Shift Using the Numeric Keys Transparency Interleaving Booklet Image Repeat Mirror Image One Touch Color 14 Form Composition Job Block Combination 17 Secure Wat...

Страница 451: ...Rotate Group Offset Group Saddle Stitch Original Frame Erase Book Frame Erase Binding Erase Shift Using the Numeric Keys Transparency Interleaving Booklet Sharpness Nega Posi Image Repeat Mirror Imag...

Страница 452: ...e paper source 10 You cannot set the Sample Set mode as the Interrupt mode 11 You can set the Sample Set mode as the Reserve Copy mode 12 You cannot combine these modes if the Automatic Paper Selectio...

Страница 453: ...Zoom Zoom Program Image Combination Booklet Scanning Zoom Designation Preset Zoom XY Zoom Auto Zoom Zoom Program Image Combination Booklet Scanning XY Zoom Preset Zoom Zoom Designation Auto Zoom Zoom...

Страница 454: ...Originals Framing Book Frame Erase Document Size Auto Select Document Size Manual Select 3 Image Combination Original Frame Erase Binding Erase Booklet Scanning Different Size Originals Framing Bindin...

Страница 455: ...the document size 4 Combination unavailable if A3 is selected as the document size 5 Any combination of up to four areas can be designated Nega Posi None Framing Feeder Scanning 2 2 Page Separation I...

Страница 456: ...arate Continuous Printing Front Cover Back Cover Sheet Insertion Chapter Page Tab Paper Cover Job Separator Booklet Sample Print Merge Documents Copy Set Numbering Tab Paper Creation Secure Watermark...

Страница 457: ...us Printing Booklet Merge Documents Tab Paper Creation Document Separate Duplex Printing Stack Bypass 7 One Sided Printing Document Separate Continuous Printing Creep Correction Booklet Single Documen...

Страница 458: ...e Sided Printing 2 Sided Printing Document Separate Continuous Printing Front Cover Back Cover Sheet Insertion Chapter Page Tab Paper Cover Job Separator Different Size Originals Multiple Documents 9...

Страница 459: ...Separator Multiple Documents Merge Documents Multiple Documents Document Separate Duplex Printing Document Separate Continuous Printing Front Cover Back Cover Sheet Insertion Chapter Page Tab Paper Co...

Страница 460: ...aple 8 Saddle Stitch 2 Sided Printing Document Separate Duplex Printing Document Separate Continuous Printing Front Cover Back Cover Sheet Insertion Chapter Page Tab Paper Cover Job Separator Booklet...

Страница 461: ...the edit pen 4 67 Using the numeric keys 4 72 Blueprints 4 93 Book Page Edit Shift 7 46 Book Frame Erase 4 45 Adjust At All Once 4 46 Adjust Each Dim 4 46 Book to 2 Sided 3 51 7 24 Front back two side...

Страница 462: ...not shift center 4 70 4 74 Document Editing Screen 2 7 Document list printing 2 53 Document Name changing 2 49 Document Selection Screen 2 6 Double 3 35 3 42 Duplicating a document 2 54 E Edit Menu 2...

Страница 463: ...ng images 4 60 J Job Block Combination 4 115 7 87 Job Build 4 53 7 43 Job Done Notice 4 49 7 91 Job separator 4 18 4 19 L Left Margin 4 40 Lightening Image 4 91 M Mail Box function 2 2 Mail Box settin...

Страница 464: ...Using the stack bypass 2 38 Resume Copying 1 18 Retro Photo Image 4 91 Right Margin 4 40 Rotate 3 37 3 38 S Saddle Stitch 3 36 Sample Print 2 44 Cancel 2 45 Start Print 2 45 Change Settings 2 46 Sampl...

Страница 465: ...r Inbox 8 14 Storing Originals into an Inbox 2 12 Storing originals while printing 2 34 Storing standard settings 8 11 System Monitor 1 18 T Tab Paper Creation 4 75 7 60 Top Margin 4 40 Transparency I...

Страница 466: ...Index 9 30 9 Appendix...

Страница 467: ......

Страница 468: ...N V 2006 Canon Canon Inc 30 2 Shimomaruko 3 chome Ohta ku Tokyo 146 8501 Japan Europe Africa and Middle East Canon Europa N V P O Box 2262 1180 EG Amstelveen Netherlands Canon Middle East FZ LLC P O...

Отзывы: