background image

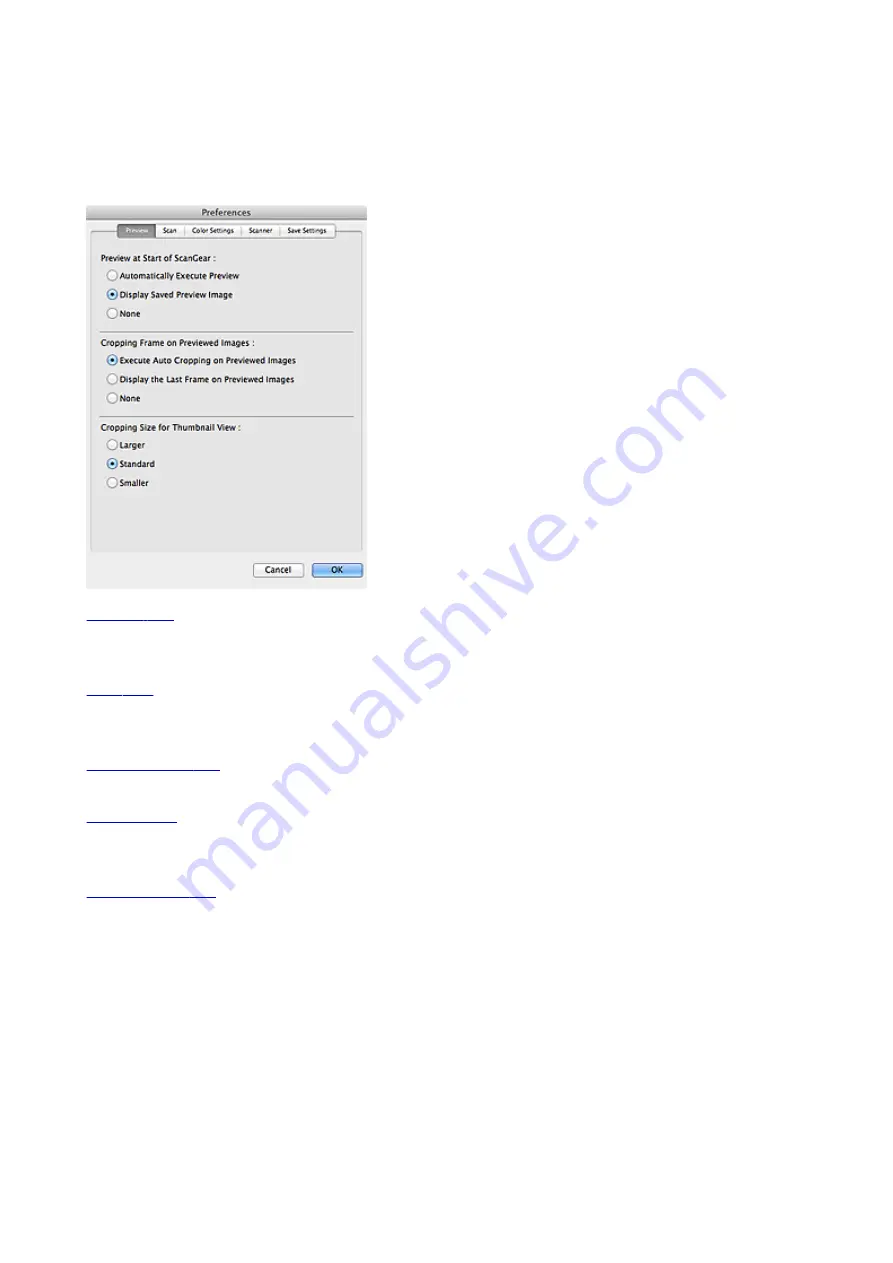
Preferences Dialog

In the 

Preferences

 dialog, you can make advanced settings to ScanGear functions via the 

Preview

Scan

,

Color Settings

Scanner

, and 

Save Settings

 tabs.

Click 

Preferences...

 in the ScanGear screen to open the 

Preferences

 dialog.

Preview Tab

Allows you to select what to do with Preview when ScanGear is started, how to display cropping frames
after previewing images, and the cropping size for thumbnails of scanned documents.

Scan Tab

Allows you to select what to do with ScanGear after scanning and set the 

Color Mode

 (48 bit output)

option for 

Advanced Mode

 tab.

Color Settings Tab

Allows you to select how to adjust color, and specify the monitor gamma value.

Scanner Tab

Allows you to set the quiet mode, specify the folder in which to save images temporarily, and set the
music file to play at the end of a scan.

Save Settings Tab

Allows you to set the file names and save location for saving the scanned images to a computer.

177

Содержание CanoScan LiDE 120

Страница 1: ...LiDE 120 Online Manual Read Me First Useful Functions Available on the Machine Overview of the Machine Scanning Troubleshooting English ...

Страница 2: ... 27 Place the Item on the Platen 28 Items You Can Place How to Place Items 29 Maintenance 31 Precautions for Safe Transport of the Machine 32 Legal Limitations on Use of Your Product and Use of Images 33 Specifications 34 Scanning 36 Scanning from a Computer 37 Scanning with IJ Scan Utility 38 What Is IJ Scan Utility Scanner Software 39 Starting IJ Scan Utility 41 Easy Scanning with Auto Scan 42 S...

Страница 3: ...olors with ScanGear 131 Correcting Images Unsharp Mask Reduce Dust and Scratches Fading Correction etc 132 Adjusting Colors Using a Color Pattern 136 Adjusting Saturation and Color Balance 138 Adjusting Brightness and Contrast 140 Adjusting Histogram 142 Adjusting Tone Curve 146 Setting Threshold 149 ScanGear Screens 150 Basic Mode Tab 151 Advanced Mode Tab 158 Input Settings 164 Output Settings 1...

Страница 4: ...Y Button 213 Scanning Items and Sending the Scanned Images SEND Button 214 Scanner Button Settings via IJ Scan Utility 215 Troubleshooting 218 Problems with Scanning 219 Problems with Scanning 220 Error Message Release the lock switch Is Displayed 221 Scanner Does Not Work 222 Scanner Driver Does Not Start 223 Error Message Appears and the Scanner Driver Screen Does Not Appear 224 Scanner Buttons ...

Страница 5: ...ectly but the Scanned Image Is Slanted 238 Scanned Image Is Enlarged Reduced on the Computer Monitor 239 Problems with Installation Downloading 240 Cannot Install the Scanner Driver 241 Installation Is Unsuccessful Insufficient Free Hard Disk Space 242 Installation Is Unsuccessful Insufficient Memory 243 About Inkjet Printer Scanner Fax Extended Survey Program 244 ...

Страница 6: ...n stoppage of disclosure of this guide Although the contents of this guide have been prepared with utmost care please contact the service center if you find any incorrect or missing information In principle the descriptions in this guide are based on the product at the time of its initial sale This guide does not disclose the manuals of all the products sold by Canon See the manual supplied with t...

Страница 7: ... personal injury or material damage caused by incorrect operation of the equipment These must be observed for safe operation Important Instructions including important information To avoid damage and injury or improper use of the product be sure to read these indications Note Instructions including notes for operation and additional explanations Basic Instructions explaining basic operations of yo...

Страница 8: ...eserved Redistribution and use in source and binary forms with or without modification are permitted provided that the following conditions are met 1 Redistributions of source code must retain the above copyright notice this list of conditions and the following disclaimer 2 Redistributions in binary form must reproduce the above copyright notice this list of conditions and the following disclaimer...

Страница 9: ...or bind by name to the interfaces of the Work and Derivative Works thereof Contribution shall mean any work of authorship including the original version of the Work and any modifications or additions to that Work or Derivative Works thereof that is intentionally submitted to Licensor for inclusion in the Work by the copyright owner or by an individual or Legal Entity authorized to submit on behalf...

Страница 10: ...n notices cannot be construed as modifying the License You may add Your own copyright statement to Your modifications and may provide additional or different license terms and conditions for use reproduction or distribution of Your modifications or for any such Derivative Works as a whole provided Your use reproduction and distribution of the Work otherwise complies with the conditions stated in t...

Страница 11: ...a fee for acceptance of support warranty indemnity or other liability obligations and or rights consistent with this License However in accepting such obligations You may act only on Your own behalf and on Your sole responsibility not on behalf of any other Contributor and only if You agree to indemnify defend and hold each Contributor harmless for any liability incurred by or claims asserted agai...

Страница 12: ...dered for the search If you want to narrow down the search results add your product s model name or your application s name to the keywords Searching for Functions Enter your product s model name and a keyword for the function you want to learn about Example When you want to learn how to load paper Enter your product s model name load paper in the search window and perform a search Troubleshooting...

Страница 13: ...he search window and perform a search Searching for Reference Pages Enter your model name and a reference page title You can find reference pages more easily by entering the function name as well Example When you want to browse the page referred to by the following sentence on a scanning procedure page Refer to Color Settings Tab for your model from Home of the Online Manual for details Enter your...

Страница 14: ...Notes on Operation Explanations In this guide most of the operations are described based on the windows displayed when OS X Mavericks v10 9 is used 14 ...

Страница 15: ...Useful Functions Available on the Machine View Photos Easily Using My Image Garden Connection Methods Available on the Machine 15 ...

Страница 16: ... to find the target photos easily when you search for them later on Calendar View People View Display Recommended Items in Slide Shows Based on the information registered to photos Quick Menu automatically selects the photos on your computer and creates recommended items such as collages and cards The created items appear in slide shows Place Photos Automatically Delightful items are created easil...

Страница 17: ...Other Various Functions My Image Garden has many other useful functions Refer to What You Can Do with My Image Garden for details 17 ...

Страница 18: ...ection Methods Available on the Machine The following connection methods are available on the machine USB Connection USB Connection Connect the scanner and a computer with a USB cable Prepare a USB cable 18 ...

Страница 19: ...latory and Safety Information Main Components Placing Items Place the Item on the Platen Items You Can Place How to Place Items Maintenance Precautions for Safe Transport of the Machine Legal Limitations on Use of Your Product and Use of Images Specifications 19 ...

Страница 20: ...Safety Guide Safety Precautions Regulatory and Safety Information 20 ...

Страница 21: ...mage the wires and lead to fire or electrical shock Do not apply excessive force to plug or unplug USB cable Do not damage or modify the USB cable Do not place heavy objects on pull or excessively bend twist or tie the USB cable Do not twist or tie the USB cable Plug the USB cable completely into the connector Working around the machine Keep the document cover closed except when necessary Never pu...

Страница 22: ... be determined by turning the equipment off and on the user is encouraged to try to correct the interference by one or more of the following measures Reorient or relocate the receiving antenna Increase the separation between the equipment and receiver Connect the equipment into an outlet on a circuit different from that to which the receiver is connected Consult the dealer or an experienced radio ...

Страница 23: ...e vlasti komunalne službe odobreni plan reciklaže ili Gradsku čistoću Za više informacija o vraćanju i recikliranju WEEE proizvoda posetite stranicu www canon europe com weee India only This product is not to be disposed of with your household waste according to the e waste Management and Handling Rules 2011 This product should be handed over to a designated collection point e g to an authorized c...

Страница 24: ...chase of energy efficient models which help to minimise environmental impact Products which meet the stringent requirements of the Energy Star programme for both environmental benefits and the amount of energy consumption will carry the Energy Star logo accordingly Paper types This product can be used to print on both recycled and virgin paper certified to an environmental stewardship scheme which...

Страница 25: ...light and scans items 3 platen Place the item to be scanned 4 alignment mark Align a corner of the item with this mark 5 scanner buttons You can scan easily according to your purpose by simply pressing a button PDF button AUTO SCAN button COPY button SEND button 6 scanner lock switch Lock or unlock the scanning unit 25 ...

Страница 26: ...ied USB cable Important There is no power switch or power lamp on this scanner No AC adapter or power cord is required When you connect a computer and the scanner with the USB cable and turn on the computer the scanner also turns on 26 ...

Страница 27: ...Placing Items Place the Item on the Platen Items You Can Place How to Place Items 27 ...

Страница 28: ...ace Items Important Be sure to observe the following when placing the item on the platen The scanner may not work correctly or the glass may break Do not place any objects weighing 4 4 lb 2 kg or more on the platen Do not put any pressure of 4 4 lb 2 kg or more on the platen 2 Close the document cover gently Important After placing the item on the platen be sure to close the document cover properl...

Страница 29: ...cm x 29 7 cm Placing the Item to Be Aligned with the Alignment Mark When scanning documents magazines or newspapers When scanning by specifying a standard size A4 Letter etc Place the item with the side to scan facing down and align it with the alignment mark Portions placed on the diagonally striped area cannot be scanned Important Portions placed over A 0 094 inch 2 4 mm from the left edge of th...

Страница 30: ... well You can place up to four E sized or L sized items or two 2L sized or postcard sized items Portions placed on the diagonally striped area cannot be scanned A 0 4 inch 1 cm Note Positions of slanted items up to approximately 10 degrees are corrected automatically by the Skew Correction function Slanted photos with a long edge of approximately 7 1 inches 18 cm or more cannot be corrected Non re...

Страница 31: ...re with a soft dry cloth Wipe thoroughly especially the glass surface so as not to leave any residue Important Do not press the document cover or platen heavily The glass may break and cause injury Wipe off moisture thoroughly Scanning with moisture left on the glass surface and document cover may affect the image Do not wet the connectors or metal parts on the rear side of the machine If they get...

Страница 32: ...ipping agent is handling transport of the machine have its box marked FRAGILE or HANDLE WITH CARE with the bottom of the machine facing down 1 Disconnect the USB cable 2 Secure the document cover with adhesive tape to keep it closed 3 Move the scanner lock switch on the bottom of the machine to the direction of the lock mark then pack the machine in the bag 4 Cover the four sides of the machine wi...

Страница 33: ...ey orders Certificates of deposit Postage stamps canceled or uncanceled Identifying badges or insignias Selective service or draft papers Checks or drafts issued by governmental agencies Motor vehicle licenses and certificates of title Traveler s checks Food stamps Passports Immigration papers Internal revenue stamps canceled or uncanceled Bonds or other certificates of indebtedness Stock certific...

Страница 34: ...item types scan settings or specifications of the computer Maximum document size A4 Letter 8 5 x 11 7 216 x 297 mm Scanner buttons 4 buttons PDF AUTO SCAN COPY SEND Operating environment Temperature 41 to 95 F 5 to 35 C Humidity 10 90 RH no condensation Power supply Supplied via USB port No external adapter required Power consumption In operation 2 5 W Stand by 1 5 W 1 Off 11 mW 1 1 USB connection...

Страница 35: ...Windows software Windows A CD ROM Drive or internet connection is required during software installation Windows XPS Essentials Pack is required to print on Windows XP Windows Operation can only be guaranteed on a computer with Windows 8 1 Windows 8 Windows 7 Windows Vista or Windows XP pre installed Windows Some functions may not be available with Windows Media Center Mac OS Hard Disk must be form...

Страница 36: ...Scanning Scanning from a Computer Scanning Using the Scanner Buttons 36 ...

Страница 37: ...Scanning from a Computer Scanning with IJ Scan Utility Scanning with ScanGear Scanning with Scanner Driver Useful Information on Scanning Placing Items When Scanning from a Computer 37 ...

Страница 38: ... with Auto Scan Basic Scanning Documents Scanning Photos Scanning with Favorite Settings Scanning Items Larger than the Platen Image Stitch Scanning Multiple Items at One Time Saving after Checking Scan Results Sending Scanned Images via E mail Extracting Text from Scanned Images OCR IJ Scan Utility Screens 38 ...

Страница 39: ... better readability or Photo to scan with settings suitable for photos according to the item type or your purpose Note Refer to IJ Scan Utility Main Screen for details on the IJ Scan Utility main screen Save Scanned Images Automatically Scanned images are automatically saved in a preset folder You can change the folder as required Note The default save folder is the Pictures folder Refer to Settin...

Страница 40: ...Important Some functions are available only when My Image Garden is installed Note Refer to Settings Dialog for how to set the applications to integrate with 40 ...

Страница 41: ...tarting IJ Scan Utility From the Go menu of Finder select Applications then double click the Canon Utilities folder IJ Scan Utility folder and then Canon IJ Scan Utility2 icon to start IJ Scan Utility 41 ...

Страница 42: ... items on the platen of your scanner Placing Items When Scanning from a Computer 2 Start IJ Scan Utility 3 Click Auto Scanning starts Note Click Cancel to cancel the scan To apply suitable corrections based on the item type click Settings then select the Apply recommended image correction checkbox in the Settings Auto Scan dialog Scanned images are saved in the folder set for Save in in the Settin...

Страница 43: ...Settings then set the paper size resolution etc in the Settings Document Scan dialog as required When setting is completed click OK 4 Click Document Scanning starts Note Click Cancel to cancel the scan Scanned images are saved in the folder set for Save in in the Settings Document Scan dialog displayed by clicking Settings In the Settings Document Scan dialog you can also make advanced scan settin...

Страница 44: ...ick Settings then set the paper size resolution etc in the Settings Photo Scan dialog as required When setting is completed click OK 4 Click Photo Scanning starts Note Click Cancel to cancel the scan Scanned images are saved in the folder set for Save in in the Settings Photo Scan dialog displayed by clicking Settings In the Settings Photo Scan dialog you can also make advanced scan settings 44 ...

Страница 45: ...ettings Custom Scan dialog as required When setting is completed click OK Note Once the settings are made you can scan with the same settings from the next time 3 Place the item on the platen Placing Items When Scanning from a Computer 4 Click Custom Scanning starts Note Click Cancel to cancel the scan Scanned images are saved in the folder set for Save in in the Settings Custom Scan dialog displa...

Страница 46: ...ote The following explains how to scan from the item to be placed on the left side 1 Start IJ Scan Utility 2 Click Settings then set the item type resolution etc in the Settings Scan and Stitch dialog as required When setting is completed click OK 3 Click Stitch The Image Stitch window appears 4 In Select Output Size select an output size according to the paper size 5 Make sure that Scan from Left...

Страница 47: ... side of the screen face down on the platen 7 Click Start Scanning Image 1 The first item is scanned and appears in 1 Note Click Cancel to cancel the scan 8 Place the item that is to be displayed on the right side of the screen face down on the platen 47 ...

Страница 48: ...d appears in 2 Note Click Cancel to cancel the scan 10 Adjust the scanned images as required Use the Toolbar to rotate or zoom in out or drag the images to adjust their positions Note Select the Adjust cropping frames checkbox to specify the area to be saved 48 ...

Страница 49: ...t the top of the screen then click Delete The selected image is deleted allowing you to scan the item again 11 Click Save The combined image is saved Note Refer to Image Stitch Window for details on the Image Stitch window You can make advanced scan settings in the Settings Scan and Stitch dialog displayed by clicking Settings 49 ...

Страница 50: ...whitish background Items printed on white paper hand written documents business cards etc Thin items Thick items Using Auto Scan Whether there are multiple items or not is detected automatically Click Auto and scan Easy Scanning with Auto Scan Not Using Auto Scan In the Settings dialog set Paper Size to Auto scan and scan Note The screens for scanning with favorite settings are used as examples in...

Страница 51: ...5 Select Select Source according to the items to be scanned 6 Select Auto scan for Paper Size then click OK 51 ...

Страница 52: ... Scan Dialog Settings Photo Scan Dialog Settings Custom Scan Dialog 7 Click Custom Multiple items are scanned at one time Note Click Cancel to cancel the scan Scanned images are saved in the folder set for Save in in the corresponding Settings dialog displayed by clicking Settings In each Settings dialog you can also make advanced scan settings 52 ...

Страница 53: ... check the scan results before saving when scanned using Auto scan or the scanner buttons Note The screens for scanning photos are used as examples in the following descriptions 1 Start IJ Scan Utility 2 Click Settings The Settings dialog appears 3 Click Photo Scan 4 Select the Check scan results checkbox then click OK 53 ...

Страница 54: ... Photo Scan Dialog Settings Custom Scan Dialog Settings Scan and Stitch Dialog Settings Driver Dialog 5 Click Photo Scanning starts When scanning is completed the Save Settings dialog appears Note Click Cancel to cancel the scan 6 Change the image order or file save options as required You can change the image order or file save options in the Save Settings dialog 54 ...

Страница 55: ...Note The default save folder is the Pictures folder 7 Click OK Scanned images are saved according to the settings 55 ...

Страница 56: ...a e mail Note The screens for scanning photos are used as examples in the following descriptions 1 Start IJ Scan Utility 2 Click Settings The Settings dialog appears 3 Click Photo Scan 4 Select Attach to e mail in Application Settings then select an e mail client 56 ...

Страница 57: ...ts from the pop up menu If None Attach Manually is selected manually attach scanned and saved images to e mail 5 Click OK The IJ Scan Utility main screen appears Note Refer to the following pages for details on the setting items in the Settings dialog 57 ...

Страница 58: ...l to cancel the scan The scanned images are saved according to the settings made in the Settings dialog When the Check scan results checkbox is selected in the Settings dialog the Save Settings dialog appears After you set the save options and click OK the scanned images are saved and automatically attached to a new message of the specified e mail client 7 Specify the recipient enter the subject a...

Страница 59: ...e screens for scanning documents are used as examples in the following descriptions 1 Start IJ Scan Utility 2 Click Settings The Settings dialog appears 3 Click Document Scan Note For Resolution only 300 dpi or 400 dpi can be set when Start OCR is selected in Application Settings 4 Select Start OCR for Application Settings then select the application in which you want to display the result 59 ...

Страница 60: ...appears in your text editor Text to be displayed is based on Document Language in the Settings General Settings dialog Select the language you want to extract in Document Language and scan You can add the application from the pop up menu 5 Click OK The IJ Scan Utility main screen appears 60 ...

Страница 61: ...to cancel the scan Text displayed in your text editor is for guidance only Text in the image of the following types of documents may not be detected correctly Documents containing text with font size outside the range of 8 points to 40 points at 300 dpi Slanted documents Documents placed upside down or documents with text in the wrong orientation rotated characters Documents containing special fon...

Страница 62: ...ings Document Scan Dialog Settings Photo Scan Dialog Settings Custom Scan Dialog Settings Scan and Stitch Dialog Settings Driver Dialog Settings AUTO SCAN Dialog Settings PDF Dialog Settings COPY Dialog Settings SEND Dialog Settings General Settings Dialog Save Settings Dialog Image Stitch Window 62 ...

Страница 63: ...n save settings and the response after scanning can be specified in the Settings Document Scan dialog Photo Scans items as photos and saves them to a computer Scan save settings and the response after scanning can be specified in the Settings Photo Scan dialog Custom Scans items with your favorite settings and saves the images to a computer The item type can be automatically detected Scan save set...

Страница 64: ...Settings Displays the Settings dialog in which you can specify the scan save settings and the response after scanning 64 ...

Страница 65: ...om a Computer Tab You can specify how to respond when scanning from IJ Scan Utility or My Image Garden Settings Auto Scan Dialog Settings Document Scan Dialog Settings Photo Scan Dialog Settings Custom Scan Dialog Settings Scan and Stitch Dialog Settings Driver Dialog Scanning Using the Scanner Buttons Tab You can specify how to respond when scanning using the scanner buttons Settings AUTO SCAN Di...

Страница 66: ...the Scanning Using the Scanner Buttons tab does not appear General Settings Tab You can set the product to use file size restriction on e mail attachment language to detect text in images and folder in which to save images temporarily Settings General Settings Dialog 66 ...

Страница 67: ...magazines newspapers documents and BD DVD CD Important To scan the following types of items specify the item type and size in the Settings Document Scan dialog Settings Photo Scan dialog or Settings Custom Scan dialog then click Photo Document or Custom in the IJ Scan Utility main screen You cannot scan correctly with Auto A4 size photos Text documents smaller than 2L 5 inches x 7 inches 127 mm x ...

Страница 68: ...ppended to the set file name in the _20XX0101_0001 format Note When you select the Save to a subfolder with current date checkbox the date and four digits are appended to the set file name Save in Displays the folder in which to save the scanned images To change the folder specify the destination folder in the dialog displayed by selecting Add from the pop up menu The default save folder is the Pi...

Страница 69: ...lected files are saved directly in the folder specified in Save in 3 Application Settings Area Open with an application Select this when you want to enhance or correct the scanned images You can specify the application from the pop up menu Send to an application Select this when you want to use the scanned images as they are in an application that allows you to browse or organize images You can sp...

Страница 70: ...Defaults You can restore the settings in the displayed screen to the default settings 70 ...

Страница 71: ...pplication Settings Area Important When the Settings dialog is displayed from My Image Garden the setting items for Application Settings do not appear 1 Scan Options Area Select Source Photo is selected Color Mode Select the color mode in which to scan the item Paper Size Select the size of the item to be scanned When you select Custom a screen in which you can specify the paper size appears Selec...

Страница 72: ...e appended to the set file name in the _20XX0101_0001 format Note When you select the Save to a subfolder with current date checkbox the date and four digits are appended to the set file name Save in Displays the folder in which to save the scanned images To change the folder specify the destination folder in the dialog displayed by selecting Add from the pop up menu The default save folder is the...

Страница 73: ... can specify the application from the pop up menu Send to an application Select this when you want to use the scanned images as they are in an application that allows you to browse or organize images You can specify the application from the pop up menu Send to a folder Select this when you also want to save the scanned images to a folder other than the one specified in Save in You can specify the ...

Страница 74: ...s as documents 1 Scan Options Area 2 Save Settings Area 3 Application Settings Area Important When the Settings dialog is displayed from the Scan screen of My Image Garden the setting items for Application Settings do not appear 1 Scan Options Area Select Source Select the type of item to be scanned Scanning documents Document Scanning magazines Magazine Color Mode Select the color mode in which t...

Страница 75: ...ce gutter shadow Correct slanted text document and Detect the orientation of text document and rotate image appear Apply Auto Document Fix Select this checkbox to sharpen text in a document or magazine for better readability Important The color tone may differ from the source image due to corrections In that case deselect the checkbox and scan Note Scanning takes longer than usual when you enable ...

Страница 76: ...ents with small amount of text Documents containing figures images Hand written text Documents containing both vertical and horizontal lines tables Note Scanning takes longer than usual when you enable Correct slanted text document Detect the orientation of text document and rotate image Automatically rotates the image to the correct orientation by detecting the orientation of text in the scanned ...

Страница 77: ... Multiple Pages Important You cannot select JPEG Exif when Color Mode is Black and White When Start OCR is selected in Application Settings you cannot select PDF or PDF Multiple Pages PDF Compression Select the compression type for saving PDF files Standard It is recommended that you normally select this setting High Compresses the file size when saving allowing you to reduce the load on your netw...

Страница 78: ... the pop up menu Send to an application Select this when you want to use the scanned images as they are in an application that allows you to browse or organize images You can specify the application from the pop up menu Send to a folder Select this when you also want to save the scanned images to a folder other than the one specified in Save in You can specify the folder from the pop up menu Attac...

Страница 79: ...ication Settings Area Important When the Settings dialog is displayed from the Scan screen of My Image Garden the setting items for Application Settings do not appear 1 Scan Options Area Select Source Select the type of item to be scanned Select Auto to detect the item type automatically and to set Color Mode Paper Size and Resolution automatically as well Important Item types supported by Auto ar...

Страница 80: ...nstead of selecting Auto To reduce moire set Select Source to Magazine Color Mode Select the color mode in which to scan the item Note Only Color is available when Select Source is Auto Paper Size Select the size of the item to be scanned When you select Custom a screen in which you can specify the paper size appears Select a Unit then enter the Width and Height and then click OK Note Only Auto is...

Страница 81: ...d White only Reduce gutter shadow Correct slanted text document and Detect the orientation of text document and rotate image appear Apply Auto Document Fix Select this checkbox to sharpen text in a document or magazine for better readability Important The color tone may differ from the source image due to corrections In that case deselect the checkbox and scan Note Scanning takes longer than usual...

Страница 82: ...rizontal lines tables Note Scanning takes longer than usual when you enable Correct slanted text document Detect the orientation of text document and rotate image Automatically rotates the image to the correct orientation by detecting the orientation of text in the scanned document Important Only text documents written in languages that can be selected from Document Language in the Settings Genera...

Страница 83: ... is Black and White When Start OCR is selected in Application Settings you cannot select PDF PDF Multiple Pages or Auto Note Auto appears only when Auto is selected for Select Source JPEG Image Quality You can specify the image quality of JPEG files Important This appears only when JPEG Exif or Auto is selected in Data Format PDF Compression Select the compression type for saving PDF files Standar...

Страница 84: ... or correct the scanned images You can specify the application from the pop up menu Send to an application Select this when you want to use the scanned images as they are in an application that allows you to browse or organize images You can specify the application from the pop up menu Send to a folder Select this when you also want to save the scanned images to a folder other than the one specifi...

Страница 85: ...Defaults You can restore the settings in the displayed screen to the default settings 85 ...

Страница 86: ...er than the platen 1 Scan Options Area 2 Save Settings Area 3 Application Settings Area Important When the Settings dialog is displayed from the Scan screen of My Image Garden the setting items for Application Settings do not appear 1 Scan Options Area Select Source Select the type of item to be scanned Scanning photos Photo Scanning documents Document Scanning magazines Magazine Note To reduce mo...

Страница 87: ... moire patterns Printed materials are displayed as a collection of fine dots Moire is a phenomenon where uneven gradation or a stripe pattern appears when such photos or pictures printed with fine dots are scanned Note Scanning takes longer than usual when you enable Reduce moire 2 Save Settings Area File Name Enter the file name of the image to be saved When you save a file the date and four digi...

Страница 88: ...d create PDF files that support keyword search Important This appears only when PDF or PDF Multiple Pages is selected in Data Format Note PDF files that are searchable in the language selected in Document Language on the General Settings tab of the Settings dialog are created JPEG Image Quality You can specify the image quality of JPEG files Important This appears only when JPEG Exif is selected i...

Страница 89: ...ges You can specify the application from the pop up menu Send to a folder Select this when you also want to save the scanned images to a folder other than the one specified in Save in You can specify the folder from the pop up menu Do not start any application Saves to the folder specified in Save in Note Specify the application or folder in the dialog displayed by selecting Add from the pop up me...

Страница 90: ...ot appear 1 Save Settings Area File Name Enter the file name of the image to be saved When you save a file the date and four digits are appended to the set file name in the _20XX0101_0001 format Note When you select the Save to a subfolder with current date checkbox the date and four digits are appended to the set file name Save in Displays the folder in which to save the scanned images To change ...

Страница 91: ...ormat Create a PDF file that supports keyword search Select this checkbox to convert text in images into text data and create PDF files that support keyword search Important This appears only when PDF or PDF Multiple Pages is selected in Data Format Note PDF files that are searchable in the language selected in Document Language on the General Settings tab of the Settings dialog are created Save t...

Страница 92: ... application from the pop up menu Send to a folder Select this when you also want to save the scanned images to a folder other than the one specified in Save in You can specify the folder from the pop up menu Attach to e mail Select this when you want to send e mails with the scanned images attached You can specify the e mail client you want to start from the pop up menu Start OCR Select this when...

Страница 93: ... scanning them using the scanner button 1 Scan Options Area 2 Save Settings Area 3 Application Settings Area 1 Scan Options Area Select Source Document is selected Color Mode Select the color mode in which to scan the item Paper Size Select the size of the item to be scanned When you select Custom a screen in which you can specify the paper size appears Select a Unit then enter the Width and Heigh...

Страница 94: ... you enable this function Sharpen outline Emphasizes the outline of the subjects to sharpen the image Reduce show through Sharpens text in an item or reduces show through in newspapers etc Reduce moire Reduces moire patterns Printed materials are displayed as a collection of fine dots Moire is a phenomenon where uneven gradation or a stripe pattern appears when such photos or pictures printed with...

Страница 95: ...ttings dialog are supported Settings General Settings Dialog The orientation may not be detected for the following types of settings or documents since the text cannot be detected correctly Resolution is outside the range of 300 dpi to 600 dpi Font size is outside the range of 8 points to 48 points Documents containing special fonts effects italics or hand written text Documents with patterned bac...

Страница 96: ...er specified in Save in and save scanned images in it The folder will be created with a name such as 20XX_01_01 Year_Month_Date If this checkbox is not selected files are saved directly in the folder specified in Save in 3 Application Settings Area Open with an application Select this when you want to enhance or correct the scanned images You can specify the application from the pop up menu Send t...

Страница 97: ...Instructions Opens this guide Defaults You can restore the settings in the displayed screen to the default settings 97 ...

Страница 98: ... scan the following types of items specify the item type and size in the Settings Document Scan dialog or Settings Photo Scan dialog then click Document or Photo in the IJ Scan Utility main screen You cannot scan correctly with Auto A4 size photos Text documents smaller than 2L 5 inches x 7 inches 127 mm x 178 mm such as paperback pages with the spine cut off Items printed on thin white paper Long...

Страница 99: ...our digits are appended to the set file name Save in Displays the folder in which to save the scanned images To change the folder specify the destination folder in the dialog displayed by selecting Add from the pop up menu The default save folder is the Pictures folder Data Format Auto is selected The following data formats are automatically applied according to the item type when saving Photos po...

Страница 100: ...or correct the scanned images You can specify the application from the pop up menu Send to an application Select this when you want to use the scanned images as they are in an application that allows you to browse or organize images You can specify the application from the pop up menu Send to a folder Select this when you also want to save the scanned images to a folder other than the one specifie...

Страница 101: ... sheet of paper select an option other than Auto and select a standard size A4 Letter etc for Paper Size 1 Scan Options Area 2 Printer Settings Area 1 Scan Options Area Select Source Select the type of item to be scanned Select Auto to detect the item type automatically and to set Color Mode Paper Size and Resolution automatically as well Important Item types supported by Auto are photos postcards...

Страница 102: ...ource is Auto Click Defaults in the screen in which you can specify the paper size to restore the specified settings to the default settings Resolution Select the resolution of the item to be scanned The higher the resolution value the more detail in your image Resolution Note Only Auto is available when Select Source is Auto Scale Select a scale according to the paper to print on and purpose of u...

Страница 103: ... shadow appears Apply Auto Document Fix Select this checkbox to sharpen text in a document or magazine for better readability Important The color tone may differ from the source image due to corrections In that case deselect the checkbox and scan Note Scanning takes longer than usual when you enable this function Sharpen outline Emphasizes the outline of the subjects to sharpen the image Reduce sh...

Страница 104: ... tone may differ from the source image due to corrections In that case deselect the checkbox and scan Note Scanning takes longer than usual when you enable this function 2 Printer Settings Area Paper Settings You can specify the printer to use paper size etc Note Selectable paper sizes depend on the selected printer Print Settings You can specify the printer to use printing method number of copies...

Страница 105: ... them using the scanner button 1 Scan Options Area 2 Save Settings Area 3 Application Settings Area 1 Scan Options Area Select Source Select the type of item to be scanned Note To reduce moire set Select Source to Magazine Color Mode Select the color mode in which to scan the item Paper Size Select the size of the item to be scanned When you select Custom a screen in which you can specify the pape...

Страница 106: ...k and White only Reduce gutter shadow Correct slanted text document and Detect the orientation of text document and rotate image appear Apply Auto Document Fix Select this checkbox to sharpen text in a document or magazine for better readability Important The color tone may differ from the source image due to corrections In that case deselect the checkbox and scan Note Scanning takes longer than u...

Страница 107: ...remely large or small fonts Documents with small amount of text Documents containing figures images Hand written text Documents containing both vertical and horizontal lines tables Note Scanning takes longer than usual when you enable Correct slanted text document Detect the orientation of text document and rotate image Automatically rotates the image to the correct orientation by detecting the or...

Страница 108: ...n which to save the scanned images You can select JPEG Exif TIFF PNG or PDF Important You cannot select JPEG Exif when Color Mode is Black and White JPEG Image Quality You can specify the image quality of JPEG files Important This appears only when JPEG Exif is selected in Data Format PDF Compression Select the compression type for saving PDF files Standard It is recommended that you normally sele...

Страница 109: ...name such as 20XX_01_01 Year_Month_Date If this checkbox is not selected files are saved directly in the folder specified in Save in 3 Application Settings Area Send Method Specify the e mail client to use for attaching scanned images application to which to send them or folder in which to save them Note Specify the e mail client application or folder in the dialog displayed by selecting Add from ...

Страница 110: ...rrently set to use If the displayed product is not the one you want to use select the desired product from the list File Size for Attach to E mail and Send Image You can restrict the size of scanned images to be attached to an e mail or to be sent You can select Small Suitable for 640 x 480 Windows Medium Suitable for 800 x 600 Windows Large Suitable for 1024 x 768 Windows or No Change Document La...

Страница 111: ...eration Buttons 2 Scan Results Area 3 Save Settings Area 1 Preview Operation Buttons Rotate Left 90 Rotate Right 90 Rotates scanned images 90 degrees counter clockwise or clockwise Select the image you want to rotate then click Rotate Left 90 or Rotate Right 90 Important The preview operation buttons do not appear when the Enable large image scans checkbox is selected in the Settings Driver dialog...

Страница 112: ...age scans checkbox is selected in Save Settings of the Settings Driver dialog Start OCR is selected in Application Settings of the Settings Document Scan Settings Custom Scan or Settings Driver dialog You cannot select JPEG Exif when Color Mode is Black and White JPEG Image Quality You can specify the image quality of JPEG files Important This appears only when JPEG Exif is selected in Data Format...

Страница 113: ...e created Save to a subfolder with current date Select this checkbox to create a current date folder in the folder specified in Save in and save scanned images in it The folder will be created with a name such as 20XX_01_01 Year_Month_Date If this checkbox is not selected files are saved directly in the folder specified in Save in 113 ...

Страница 114: ...ry depending on the select source and view 1 Settings and Operation Buttons Select Output Size B4 B5 x 2 Scans the left and right halves of a B4 size item separately A3 A4 x 2 Scans the left and right halves of an A3 size item separately 11 x 17 Letter x 2 Scans the left and right halves of an item twice as large as Letter size separately Full Platen x 2 Scans the left and right halves of an item ...

Страница 115: ...frames You can adjust the scan area in preview If no area is specified the image of the size selected in Select Output Size will be saved If an area is specified only the image in the cropping frame will be scanned and saved Adjusting Cropping Frames in the Image Stitch Window Save Save Saves the two scanned images as one image 115 ...

Страница 116: ...tate Left Rotates the preview image 90 degrees counter clockwise Invert Vertically Rotates the preview image 180 degrees Rotate Right Rotates the preview image 90 degrees clockwise Open Guide Opens this page 3 Thumbnail View Area Displays the thumbnails of the scanned images Appears blank if none has been scanned 4 Preview Area Displays the scanned images You can adjust the layout by dragging the ...

Страница 117: ...age 1 The image is scanned in the direction specified in Scan Direction and 2 appears next to it After scanning the second item by clicking Start Scanning Image 2 The two scanned images appear Related Topic Scanning Items Larger than the Platen Image Stitch 117 ...

Страница 118: ...ting ScanGear Scanning in Basic Mode Scanning in Advanced Mode Scanning Multiple Documents at One Time with ScanGear Correcting Images and Adjusting Colors with ScanGear ScanGear Screens Placing Items When Scanning from a Computer Adjusting Cropping Frames ScanGear General Notes ScanGear 118 ...

Страница 119: ...ightness contrast etc Screens There are two modes Basic Mode and Advanced Mode Switch modes by clicking a tab on the upper right of the screen Note ScanGear starts in the last used mode Settings are not retained when you switch modes Basic Mode Use the Basic Mode tab to scan easily by following three simple on screen steps and Advanced Mode Use the Advanced Mode tab to specify the color mode outpu...

Страница 120: ...120 ...

Страница 121: ...Scanning with Advanced Settings Using ScanGear Starting ScanGear Scanning in Basic Mode Scanning in Advanced Mode Scanning Multiple Documents at One Time with ScanGear 121 ...

Страница 122: ...lect Applications then double click the Canon Utilities folder IJ ScanGear Starter EX folder and then Canon IJ ScanGear Starter EX icon to start ScanGear Note When the Scanner Selection screen appears select the scanner to use then click Select 122 ...

Страница 123: ...ckground Documents printed on white paper hand written text business cards etc Thin documents Thick documents The following types of documents may not be scanned correctly Documents smaller than 1 2 inches 3 cm square Photos that have been cut to various shapes 1 Place the document on the Platen then start ScanGear Placing Items When Scanning from a Computer Starting ScanGear 2 Set Select Source a...

Страница 124: ...ing Frames ScanGear 7 Set Image corrections as required 8 Click Scan Scanning starts Note Click Information to open a dialog in which you can check the current scan settings document type etc Scanned images are saved in the folder set for Save in on the Save Settings tab of the Preferences dialog On the Save Settings tab you can also make advanced save settings A response of ScanGear after scannin...

Страница 125: ...d scan Photos that have a whitish background Documents printed on white paper hand written text business cards etc Thin documents Thick documents The following types of documents may not be scanned correctly Documents smaller than 1 2 inches 3 cm square Photos that have been cut to various shapes 1 Place the document on the Platen then start ScanGear Placing Items When Scanning from a Computer Sta...

Страница 126: ...tarts Note Click Information to open a dialog in which you can check the current scan settings document type etc Scanned images are saved in the folder set for Save in on the Save Settings tab of the Preferences dialog On the Save Settings tab you can also make advanced save settings A response of ScanGear after scanning can be specified in Status of ScanGear dialog after scanning on the Scan tab ...

Страница 127: ...cards etc Thin documents Thick documents Scanning Multiple Documents in Whole Image View The following types of documents may not be scanned correctly Documents smaller than 1 2 inches 3 cm square Photos that have been cut to various shapes Note You can also scan multiple documents at one time from the Advanced Mode tab Use the Advanced Mode tab to make advanced scan settings such as the color mod...

Страница 128: ...ze 4 Set Destination 5 Set Output Size according to purpose 6 Adjust the cropping frames and set Image corrections as required Note You can correct each image separately Select the frame you want to correct In thumbnail view you can only create one cropping frame per image To create multiple cropping frames in an image scan in whole image view 128 ...

Страница 129: ... steps if thumbnails are not displayed correctly when previewed or if you want to scan multiple documents as a single image Note Positions of slanted documents are not corrected in whole image view 1 After previewing images click Thumbnail on the Toolbar Switch to whole image view Note When the whole image is displayed the icon changes to Whole Image 2 Set Destination 3 Set Output Size according t...

Страница 130: ...nt will be scanned at the document size Auto Crop If an area is specified only the portion in the specified area will be scanned Adjusting Cropping Frames ScanGear 5 Set Image corrections as required 6 Click Scan Areas framed by broken lines are scanned Note Scanned images are saved in the folder set for Save in on the Save Settings tab of the Preferences dialog On the Save Settings tab you can al...

Страница 131: ... Correcting Images Unsharp Mask Reduce Dust and Scratches Fading Correction etc Adjusting Colors Using a Color Pattern Adjusting Saturation and Color Balance Adjusting Brightness and Contrast Adjusting Histogram Adjusting Tone Curve Setting Threshold 131 ...

Страница 132: ...a function and select an item from the pop up menu Important Do not apply these functions to images without moire dust scratches or faded colors The color tone may be adversely affected Refer to Image Settings for details and precautions on each function Note Refer to Scanning in Advanced Mode to start the Advanced Mode tab of ScanGear and scan Adjusting the image brightness and color tone Set Ima...

Страница 133: ...ing the base color in recycled paper newspapers etc when scanning documents Set Reduce Show through to ON OFF ON Sharpening slightly out of focus images Set Unsharp Mask to ON OFF ON Reducing gradations and stripe patterns Set Descreen to ON OFF ON 133 ...

Страница 134: ...Low Medium or High according to the degree of dust and scratches None Medium Correcting photos that have faded with time or due to colorcast Set Fading Correction to Low Medium or High according to the degree of fading or colorcast None Medium Reducing graininess Set Grain Correction to Low Medium or High according to the degree of graininess None Medium Correcting shadows that appear between page...

Страница 135: ...135 ...

Страница 136: ...lorcast Colorcast is a phenomenon where a specific color affects the entire picture due to the weather or ambient strong colors Click an arrow in Color Adjustment to emphasize the corresponding color Cyan red magenta green and yellow blue are complementary color pairs each pair produces a shade of gray when mixed You can reproduce the natural colors of the scene by reducing the cast color and incr...

Страница 137: ...llow and Magenta arrows to correct Before After Note Color adjustments are applied only to the cropping frames scan areas or the frame selected in thumbnail view You can select multiple frames or cropping frames by clicking them while pressing the command key You can also select a color tone from the color pattern displayed on the left of the Color Pattern screen You can also use this function to ...

Страница 138: ...the left to decrease the saturation darken the image and to the right to increase the saturation brighten the image You can also enter a value 127 to 127 Saturation decreased Original image Saturation increased Note The natural color tone of the original image may be lost if you increase saturation too much Color Balance Adjust images that have a colorcast Colorcast is a phenomenon where a specifi...

Страница 139: ...omplementary color It is usually difficult to correct the image completely by adjusting only one color pair It is recommended that you find a portion in the image where it should be white and adjust all three color pairs so that the portion turns white You can also enter a value 127 to 127 Below is an example of an image in which the Cyan Red pair has been adjusted Cyan is increased Red is increas...

Страница 140: ...urn to the previous view Click Defaults to reset all adjustments in the current window Channel Each dot of an image is a mixture of Red Green and Blue in various proportions gradation These colors can be adjusted individually as a channel Master Adjust the Red Green and Blue combined Red Adjust the Red channel Green Adjust the Green channel Blue Adjust the Blue channel Note Only Grayscale will be ...

Страница 141: ...etween the brighter and darker parts of an image Increasing contrast will increase the difference thus sharpening the image Decreasing contrast will decrease the difference thus softening the image Move Slider under Contrast to the left to decrease and right to increase the contrast of the image You can also enter a value 127 to 127 Decreased contrast Original image Increased contrast Note Increas...

Страница 142: ... various proportions gradation These colors can be adjusted individually as a channel Master Adjust the Red Green and Blue combined Red Adjust the Red channel Green Adjust the Green channel Blue Adjust the Blue channel Note Only Grayscale will be displayed in Channel when Color Mode is Grayscale Reading Histograms You can see the histogram of a specified area for each Channel The higher the histog...

Страница 143: ...t and white point All parts to the right of White point Slider will turn white level 255 When Image Adjustment is set to anything but None the adjustments shown below are performed automatically Moving the Black point and White point Sliders Move the Black point Slider or White point Slider to adjust brightness Images with more data distributed to the highlight side Move the Black point Slider tow...

Страница 144: ...he Black point Mid point or White point Dropper the mouse pointer on the preview image changes to a dropper Click a Dropper displayed below the histogram to change the setting The point clicked with Black point Dropper will be the darkest point You can also enter a value 0 to 245 The point clicked with Mid point Dropper will be the middle of the tonal range You can also enter a value 5 to 250 The ...

Страница 145: ...ll be set as the achromatic color reference and the rest of the image is adjusted accordingly For instance if snow in a photo appears bluish click the bluish part to adjust the whole image and reproduce natural colors 145 ...

Страница 146: ... of Red Green and Blue in various proportions gradation These colors can be adjusted individually as a channel Master Adjust the Red Green and Blue combined Red Adjust the Red channel Green Adjust the Green channel Blue Adjust the Blue channel Note Only Grayscale will be displayed in Channel when Color Mode is Grayscale Reading Tone Curves With ScanGear scanning images via a scanner is the input a...

Страница 147: ...the output side resulting in a bright toned image when viewed on a monitor Underexposure Concave curve The midtone data of the input side is stretched toward the shadow of the output side resulting in a dark toned image when viewed on a monitor High contrast S curve The highlight and shadow of the input side are enhanced resulting in a high contrast image Reverse the negative positive image Downwa...

Страница 148: ...Edit custom curve You can drag specific points on the Tone Curve to freely adjust the brightness of the corresponding areas 148 ...

Страница 149: ...ow Adjusting Threshold The brightness of color and grayscale images is expressed in a value between 0 and 255 However in creating black and white images all colors are mapped to either black 0 or white 255 Threshold is the borderline value that determines a color as black or white Move Slider to the right to increase the threshold value and thus increase the black areas Move the slider to the left...

Страница 150: ...ar Screens Basic Mode Tab Advanced Mode Tab Input Settings Output Settings Image Settings Color Adjustment Buttons Preferences Dialog Preview Tab Scan Tab Color Settings Tab Scanner Tab Save Settings Tab 150 ...

Страница 151: ... and Operation Buttons Select Source Photo Color Scan color photos Magazine Color Scan color magazines Document Color Scan documents in color Document Grayscale Scan documents in black and white Note When you select a document type the unsharp mask function will be active The image adjustment function which adjusts images based on the document type will also be active If you select Magazine Color ...

Страница 152: ... data that can be edited in word processors and other programs Output Size Select an output size Output size options vary by the item selected in Destination Flexible Allows you to freely adjust the cropping frames scan areas In thumbnail view Drag the mouse over a thumbnail to display a cropping frame When a cropping frame is displayed the portion within the cropping frame will be scanned When no...

Страница 153: ...tered to the Output Size list and can be selected along with the predefined items Adding Enter Output Size Name Width and Height then click Add For Unit you can select inches or mm when Destination is Print but you can only select pixels when Destination is Image display The name of the added size appears in Output Size List Click Save to save the items listed in Output Size List Deleting Select t...

Страница 154: ...ected The color tone may change from the source image due to corrections In that case deselect the checkbox and scan Correction may not be applied properly if the scan area is too small Correct fading Corrects and scans photos that have faded with time or have a colorcast Reduce gutter shadow Corrects shadows that appear between pages when scanning open booklets Important For precautions on using ...

Страница 155: ...ght Rotates the preview image 90 degrees clockwise The result will be reflected in the scanned image The image returns to its original state when you preview again Auto Crop Displays and adjusts the cropping frame automatically to the size of the document displayed in the Preview area The scan area is reduced every time you click this button if there are croppable areas within the cropping frame C...

Страница 156: ...f the settings image corrections color adjustments etc made in 1 Settings and Operation Buttons When Thumbnail is displayed on the Toolbar Cropping frames are specified according to the document size and thumbnails of scanned images are displayed Only the images with the checkbox selected will be scanned Note When multiple images are previewed different outlines indicate different selection status...

Страница 157: ...ole Image is displayed on the Toolbar Items on the Platen are scanned and displayed as a single image All portions in the cropping frames will be scanned Note You can specify the cropping frame on the displayed image In thumbnail view you can only create one cropping frame per image In whole image view you can create multiple cropping frames Adjusting Cropping Frames ScanGear Related Topic Scannin...

Страница 158: ... The displayed items vary by document type and view 1 Settings and Operation Buttons Favorite Settings You can name and save a group of settings Input Settings Output Settings Image Settings and Color Adjustment Buttons on the Advanced Mode tab and load it as required It is convenient to save a group of settings if you will be using it repeatedly You can also use this to reload the default setting...

Страница 159: ... or contrast and adjustments to its highlight and shadow values histogram or balance tone curve Zoom Zooms in on a frame or zooms in on the image in the area specified with a cropping frame scan area When zoomed in Zoom changes to Undo Click Undo to return the display to its non magnified state In thumbnail view When multiple images are displayed in thumbnail view clicking this button zooms in on ...

Страница 160: ...the images if the total size of the scanned images exceeds a certain size In that case a warning message appears it is recommended that you reduce the total size To continue scan in whole image view Preferences Opens the Preferences dialog in which you can make scan preview settings Close Closes ScanGear 2 Toolbar You can adjust or rotate preview images The buttons displayed on the Toolbar vary by...

Страница 161: ...in the scanned image The image returns to its original state when you preview again Rotate Right Rotates the preview image 90 degrees clockwise The result will be reflected in the scanned image The image returns to its original state when you preview again Auto Crop Displays and adjusts the cropping frame automatically to the size of the document displayed in the Preview area The scan area is redu...

Страница 162: ...s color adjustments etc made in 1 Settings and Operation Buttons When Thumbnail is displayed on the Toolbar Cropping frames are specified according to the document size and thumbnails of scanned images are displayed Only the images with the checkbox selected will be scanned Note When multiple images are previewed different outlines indicate different selection status Focus Frame thick blue outline...

Страница 163: ...ortions in the cropping frames will be scanned Note You can specify the cropping frame on the displayed image In thumbnail view you can only create one cropping frame per image In whole image view you can create multiple cropping frames Adjusting Cropping Frames ScanGear Related Topic Scanning in Advanced Mode 163 ...

Страница 164: ...els x 30000 pixels or less and 1 8 GB or less in data size If you change Paper Size after previewing the preview image will be deleted Note If you are not sure which size you should select for Paper Size set Paper Size to Full Platen then measure the size of the document and enter the values into Width and Height Color Mode Select how to scan the document Color Select this mode to scan color docum...

Страница 165: ... view the Paper Size is displayed before preview and the cropping frame scan area size is displayed after preview You can adjust the cropping frame size by entering the values into Width and Height Click Change Aspect Ratio and change it to Keep Aspect Ratio to maintain the aspect ratio when you specify the cropping frame size Important Input size settings are available only when Output Size in Ou...

Страница 166: ...set custom sizes or select a size for printing or displaying Select Add Delete to set custom size and save it as a new output size option Flexible You can specify the output resolution and scale and adjust the cropping frames scan areas In thumbnail view Drag the mouse over a thumbnail to display a cropping frame When a cropping frame is displayed the portion within the cropping frame will be scan...

Страница 167: ...an specify multiple output sizes and save them at one time Saved items will be registered to the Output Size list and can be selected along with the predefined items Adding Select Print or Image display for Destination then enter Output Size Name Width and Height then click Add For Unit you can select inches or mm when Destination is Print but you can only select pixels when Destination is Image d...

Страница 168: ...hing but Flexible Click this button to rotate the cropping frame Click again to return it to the original orientation Data Size The data size when scanned with the current settings is displayed Note When the data size exceeds a certain size the value appears in red In that case a warning message appears when you click Scan It is recommended that you adjust the settings to reduce Data Size To conti...

Страница 169: ... Image Adjustment is set the brightness of the specified portion of the image is optimized Images can be adjusted according to the automatically detected document type or the specified document type The result of the adjustment will be reflected in the entire image None Image Adjustment will not be applied Auto Applies Image Adjustment by automatically detecting the document type It is recommended...

Страница 170: ...references dialog and Document or Magazine is selected for Image Adjustment Unsharp Mask Emphasizes the outline of the subjects to sharpen the image when scanning photos OFF Unsharp Mask will not be applied ON Emphasizes the outline of the subjects to sharpen the image It is recommended that you normally select this setting Descreen Printed photos and pictures are displayed as a collection of fine...

Страница 171: ... Low Select this to correct a small amount of fading and colorcast Medium It is recommended that you normally select this setting High Select this to correct a large amount of fading and colorcast This can affect the tone of the image Important You can set Fading Correction after preview You can set this setting when Recommended is selected on the Color Settings tab of the Preferences dialog Corre...

Страница 172: ...ot place objects that weigh 4 4 lbs 2 0 kg or more on the platen Also do not press on the document with a force exceeding 4 4 lbs 2 0 kg If you press heavily the scanner may not work correctly or you might break the glass Align the document with the edge of the Platen If not the shadow will not be corrected properly Shadows may not be corrected properly depending on the document If the page backgr...

Страница 173: ... If the shadow is not corrected properly adjust the cropping frame scan area on the preview image Adjusting Cropping Frames ScanGear 173 ...

Страница 174: ...lor Adjustment Buttons the results will be reflected in the preview image Click a Color Adjustment Button to set the following items Saturation Color Balance Adjust the saturation vividness and color tone of the image Use this function to brighten colors that have faded with time or due to colorcast Colorcast is a phenomenon where a specific color affects the entire picture due to the weather or a...

Страница 175: ...ere are no settings to make in this screen For a color image select a color in Channel to check either Red Green or Blue or select Master to check three colors together If you place the cursor on the preview image the portion will be enlarged and its RGB values only L when Color Mode is Grayscale before and after the adjustments will be displayed Threshold Set the boundary threshold at which black...

Страница 176: ...ings List and click Delete Click Save to save the settings displayed in Tone Curve Settings List or Threshold Settings List You can load and apply the saved tone curve threshold settings to a preview image To load the settings select the saved item from the pop up menu Note Save up to 20 items Defaults Reset all adjustments saturation color balance brightness contrast histogram and tone curve 176 ...

Страница 177: ...g images and the cropping size for thumbnails of scanned documents Scan Tab Allows you to select what to do with ScanGear after scanning and set the Color Mode 48 bit output option for Advanced Mode tab Color Settings Tab Allows you to select how to adjust color and specify the monitor gamma value Scanner Tab Allows you to set the quiet mode specify the folder in which to save images temporarily a...

Страница 178: ...scanned images Perform calibration when the color tones in the preview image are significantly different from the original item or when colors appear in white areas Execute at Every Scan When you set to ON the scanner will be calibrated every time before previewing and scanning to reproduce correct color tones in scanned images Note Even when Execute at Every Scan is set to OFF the scanner may be ...

Страница 179: ...view image will be displayed at startup Note Select None if you do not want to save the preview image Cropping Frame on Previewed Images Select how to display cropping frames after previewing images Execute Auto Cropping on Previewed Images The cropping frame scan area will automatically be displayed in the document size after previewing Display the Last Frame on Previewed Images A cropping frame ...

Страница 180: ...ler Displays 95 in width and height of the area displayed for the standard size Note When you change the Cropping Size for Thumbnail View setting the preview images will be refreshed and cropped to the new size As the preview images are refreshed the color adjustments and other settings applied to them are reset 180 ...

Страница 181: ...canning is completed Advanced Mode Settings Enable 48 16 bit Output Select this checkbox to display Color 48bit in Color Mode on the Advanced Mode tab Important Some applications cannot receive images scanned in Color 48bit or may close when such images are received Note When Color 48bit is selected for Color Mode deselecting this checkbox changes Color 48bit to Color When using a model supporting...

Страница 182: ...inter colors thus reducing time and trouble to manually match the monitor and printer colors Source Scanner Select scanner profile Target Select target profile Monitor Select this checkbox to display preview image with optimum correction for monitor Defaults Returns to the default Color Matching settings Note The Color Adjustment Buttons on the Advanced Mode tab are not available when you select C...

Страница 183: ...Monitor Gamma By setting the gamma value of a monitor you can adjust the input data to the brightness characteristics of the monitor Adjust the value if your monitor s gamma value does not match the default value set in ScanGear and the colors of the original image are not accurately reflected in the monitor Click Defaults to return to the default Monitor Gamma value 2 20 Note Refer to the manual ...

Страница 184: ...ave in Displays the folder in which to save the scanned images To change the folder specify the destination folder in the dialog displayed by clicking Browse The default save folder is the Pictures folder Data Format Select the data format in which to save the scanned images You can select JPEG Exif or TIFF JPEG Image Quality You can specify the image quality of JPEG files Important This appears o...

Страница 185: ...tem type or size automatically Important When scanning by specifying the paper size align an upper corner of the item with the corner at the arrow alignment mark of the platen Photos that have been cut to various shapes and items smaller than 1 2 inches 3 cm square cannot be cropped accurately when scanning Reflective disc labels may not be scanned as expected For Photos Postcards Business Cards o...

Страница 186: ...aced on the diagonally striped area cannot be scanned more than 0 4 inch 1 cm Note You can place up to 12 items Positions of slanted items 10 degrees or less are corrected automatically Important Refer to Items You Can Place How to Place Items for your model from Home of the Online Manual for details on the portions in which items cannot be scanned 186 ...

Страница 187: ... specified You can drag the mouse over a thumbnail to specify a cropping frame In whole image view An active cropping frame is automatically specified around the preview image You can drag the cropping frame in the Preview area to specify the area Note You can change the auto crop setting in the Preferences dialog Refer to Cropping Frame on Previewed Images in Preview Tab for details Cropping Fram...

Страница 188: ...accordingly The cursor will change into Crosshair Arrow when it is positioned within a cropping frame Click and drag the mouse to move the entire cropping frame Note On the Advanced Mode tab you can specify the cropping frame size by entering the values into Width and Height in Input Settings You can rotate a cropping frame 90 degrees by clicking Switch Aspect Ratio However Switch Aspect Ratio is ...

Страница 189: ...so select multiple cropping frames by clicking them while pressing the command key If you select multiple cropping frames and change the settings on a tab at the right of ScanGear the settings will be applied to all the selected cropping frames When you create a new cropping frame it retains the settings of the latest cropping frame Note Create up to 12 cropping frames Scanning takes longer than u...

Страница 190: ... select it and click Remove Cropping Frame on the Toolbar Alternatively press the delete key When there are multiple cropping frames all the selected cropping frames active cropping frame and selected cropping frames are deleted simultaneously 190 ...

Страница 191: ... the computer then reconnect it Do not connect two or more scanner or multifunction printers with scanner function to the same computer simultaneously If multiple scanning devices are connected you may experience errors while accessing the devices Make sure that you have adequate disk space available when scanning large images at high resolutions For example at least 300 MB of free space is requir...

Страница 192: ... in the format set in Data Format in the Settings Driver dialog of IJ Scan Utility Note Refer to Image Corrections and Color Adjustments for details on the setting procedures for image correction and color adjustment Refer to General Notes Scanner Driver for the scanner driver Refer to Updating the Scanner Driver for the scanner driver In the Settings Driver dialog of IJ Scan Utility you can also ...

Страница 193: ...image correction or color adjustment is applied Image Adjustment When Image Adjustment is set the brightness of the specified portion of the image is optimized Images can be adjusted according to the automatically detected item type or the specified item type The result of the adjustment will be reflected in the entire image None Image Adjustment will not be applied Auto Applies Image Adjustment b...

Страница 194: ... effective for some types of photos Note It is recommended that you select None when scanning printed materials Fading Correction Use this function to correct photos that have faded with time or have a colorcast Colorcast is a phenomenon where a specific color affects the entire picture due to the weather or ambient strong colors None Fading Correction will not be applied Low Select this to correc...

Страница 195: ... recommended that you normally select this setting High Select this when the effect level is too weak with the medium setting Important Do not place objects that weigh 4 4 lbs 2 0 kg or more on the platen In addition do not press on the item with a force exceeding 4 4 lbs 2 0 kg If you press heavily the scanner may not work correctly or you might break the glass Align the item with the edge of the...

Страница 196: ...sharp Mask If Unsharp Mask is enabled some moire effects may remain Note Scanning takes longer than usual when you enable Descreen Reduce Show through Use this function to reduce show through in duplex documents or lighten the base color in recycled paper and other colored paper when scanning documents Important Reduce Show through is effective only when Document or Magazine is selected for Image ...

Страница 197: ... scanners or multifunction printers with scanner function to the same computer simultaneously If multiple scanning devices are connected you cannot scan using the scanner buttons of the machine and also may experience errors while accessing the devices Make sure that you have adequate disk space available when scanning large images at high resolutions For example at least 300 MB of free space is r...

Страница 198: ...Updating the Scanner Driver Obtaining the Latest Scanner Driver Before Installing the Scanner Driver Installing the Scanner Driver 198 ...

Страница 199: ...olve some problems you have experienced To obtain the scanner driver access our website and download the scanner driver for your model Important Scanner driver can be downloaded for free however Internet connection fees apply Related Topic Before Installing the Scanner Driver Installing the Scanner Driver 199 ...

Страница 200: ...puter You will be required to enter the name and password of the user with administrator privileges If you have multiple user accounts on Mac OS X log in with the first administrator account created Important If you install an older version of the scanner driver after installing a newer one the scanner driver may not operate properly In that case reinstall the newer scanner driver Note When instal...

Страница 201: ...reen appears read the terms and click Continue If you do not accept the license agreement you cannot install this software If an authentication screen appears enter the administrator s name and password then click Install Software 4 Complete the installation The scanner driver is installed Important Installation may fail if you click Go Back during the process In that case select Quit Installer fr...

Страница 202: ...Useful Information on Scanning Adjusting Cropping Frames in the Image Stitch Window Resolution Data Formats 202 ...

Страница 203: ... you select the Adjust cropping frames checkbox an active cropping frame is automatically specified around the image in the Preview area You can drag the cropping frame to specify the area When you perform a scan the image in the area specified with the cropping frame will be scanned Adjusting a Cropping Frame The cursor will change into Arrow when it is positioned over a cropping frame Click and ...

Страница 204: ...according to the use of the scanned image Item Type Use Color Mode Appropriate Resolution Color photo Copying Printing Color 300 dpi Creating a postcard Color 300 dpi Saving to a computer Color 300 dpi Using on a website or attaching to e mail Color 150 dpi Black and white photo Saving to a computer Grayscale 300 dpi Using on a website or attaching to e mail Grayscale 150 dpi Text document documen...

Страница 205: ...Note When you will be printing the scanned image by enlarging it scan by setting a higher resolution than the recommended one above 205 ...

Страница 206: ...are saved and cannot be returned to their original state JPEG is not available for black and white images TIFF Standard File Extension tif A data format featuring a relatively high compatibility between various computers and applications TIFF is suitable for editing saved images Note Some TIFF files are incompatible IJ Scan Utility supports the following TIFF file formats Uncompressed black and wh...

Страница 207: ... of the item with the corner at the arrow alignment mark of the platen Photos that have been cut to various shapes and items smaller than 1 2 inches 3 cm square cannot be cropped accurately when scanning Reflective disc labels may not be scanned as expected When scanned using the scanner driver the response may differ In that case adjust the cropping frame selection box manually For Photos Postcar...

Страница 208: ... 4 inch 1 cm or more space between the edges diagonally striped area of the platen and items and between items Portions placed on the diagonally striped area cannot be scanned more than 0 4 inch 1 cm Note In IJ Scan Utility you can place up to 12 items Positions of slanted items 10 degrees or less are corrected automatically Important Refer to Items You Can Place How to Place Items for details on ...

Страница 209: ...anning Items and Saving the Scanned Images AUTO SCAN Button Scanning and Saving Items as PDF Files PDF Buttons Scanning and Printing Copying Items COPY Button Scanning Items and Sending the Scanned Images SEND Button Scanner Button Settings via IJ Scan Utility 209 ...

Страница 210: ...creates PDF files then saves them AUTO SCAN Button Detects the item type automatically and saves them to a computer COPY Button Scans items and prints them on a printer SEND Button Scans items and attaches the scanned images to an e mail or sends them to an application Note You can specify how IJ Scan Utility responds when the scanner buttons are pressed Scanner Button Settings via IJ Scan Utility...

Страница 211: ...DF Files PDF Buttons You can save scanned images as PDF files 1 Place the item on the platen Placing Items When Scanning from a Computer 2 Press PDF button Scanning starts The scanned images are automatically saved as PDF files 211 ...

Страница 212: ... to a computer 1 Place the item on the platen Placing Items When Scanning from a Computer 2 Press the AUTO SCAN button Scanning starts Note Scanned images are saved in the folder set for Save in in the Settings AUTO SCAN dialog displayed by clicking Settings In the Settings AUTO SCAN dialog you can also make advanced scan settings 212 ...

Страница 213: ...on a printer Note Prepare the printer when printing with the COPY button Refer to the manual of your printer to prepare it 1 Place the item on the platen Placing Items When Scanning from a Computer 2 Press the COPY button Scanning starts The scanned image is printed on a printer 213 ...

Страница 214: ...scanned images to an e mail or send the images to compatible applications 1 Place the item on the platen Placing Items When Scanning from a Computer 2 Press the SEND button Scanning starts The scanned image is attached to a new message or sent to compatible applications 214 ...

Страница 215: ...tons Note The screens for specifying the AUTO SCAN button responses are used as examples in the following descriptions 1 Start IJ Scan Utility Starting IJ Scan Utility 2 Click Settings The Settings dialog appears 3 Select the Scanning Using the Scanner Buttons tab Note Refer to the following for details Settings AUTO SCAN Dialog 215 ...

Страница 216: ...Settings PDF Dialog Settings COPY Dialog Settings SEND Dialog 4 Set Scan Options 5 Specify the file name and other settings in Save Settings 216 ...

Страница 217: ...ct the application you want to start after scanning in Application Settings 7 Click OK The responses will be executed according to the specified settings when you start scanning using the scanner buttons 217 ...

Страница 218: ...Troubleshooting Search Each Function Problems with Scanning Problems with Installation Downloading 218 ...

Страница 219: ...Problems with Scanning Problems with Scanning Scan Results Not Satisfactory 219 ...

Страница 220: ...r Buttons Do Not Work When a Scanner Button Is Pressed an Unexpected Application Starts Cannot Scan Multiple Items at One Time Cannot Scan Properly with Auto Scan Slow Scanning Speed There is not enough memory Message Is Displayed Computer Stops Operating during Scanning Scanned Image Does Not Open Position or Size of the Image Cannot be Detected Correctly When Scanning Using the Scanner Buttons 2...

Страница 221: ...ase the lock switch Is Displayed Check The scanner may be locked Exit the application then unlock the scanner and then reconnect the USB cable Refer to the printed manual Getting Started for how to unlock the scanner 221 ...

Страница 222: ...heck 1 Connect the USB cable to a different USB port on the computer Check 2 If the USB cable is connected to a USB hub remove it from the USB hub and connect it to a USB port on the computer Check 3 Restart the computer 222 ...

Страница 223: ...your scanner on the application s menu Note The operation may differ depending on the application Check 3 Make sure that the application supports the ICA Image Capture Architecture driver You cannot start the scanner driver from applications not supporting the ICA driver Check 4 Scan and save images with IJ Scan Utility and open the files in your application 223 ...

Страница 224: ... install the scanner driver from the web page Check 4 Your scanner may be locked Close the running software program Slide the scanner lock switch to the release position then reconnect the USB cable Check 5 Select your scanner on the application s menu Note The operation may differ depending on the application Check 6 Make sure that the application supports the ICA driver You cannot start the scan...

Страница 225: ...for your printer Check 3 To use the COPY button check that your printer operates properly Check 4 To use the SEND button install a compatible application or e mail client Check 5 Did you restart the computer after installing applications such as IJ Scan Utility To scan using the scanner buttons restart the computer after installing applications 225 ...

Страница 226: ...uttons are managed by IJ Scan Utility To change the assigned applications click Settings in the IJ Scan Utility main screen and change Application Settings on the Scanning Using the Scanner Buttons tab of the Settings dialog Refer to the following pages for details Settings AUTO SCAN Dialog Settings PDF Dialog Settings COPY Dialog Settings SEND Dialog 226 ...

Страница 227: ...ck 1 Make sure that the items are placed correctly Placing Items When Scanning from a Computer Check 2 Check if you can properly scan one item Some applications do not support multiple image scanning In that case scan each item individually 227 ...

Страница 228: ... Make sure that the items are placed correctly Placing Items When Scanning from a Computer Check 2 Multiple items scanning may not be supported Some applications do not support multiple image scanning In that case scan each item individually 228 ...

Страница 229: ...Fading Correction Grain Correction etc to None Refer to Image Corrections and Color Adjustments for details Check 3 In IJ Scan Utility deselect the Correct slanted text document Detect the orientation of text document and rotate image checkbox and scan again Settings Document Scan Dialog Settings Custom Scan Dialog Settings PDF Dialog Settings SEND Dialog 229 ...

Страница 230: ... There is not enough memory Message Is Displayed Check 1 Exit other applications and try again Check 2 Reduce the resolution or output size and scan again Resolution 230 ...

Страница 231: ...Error message may appear if there is not enough hard disk space to scan and save when the image size is too large such as when scanning a large item at high resolution Check 3 In Folder to Save Temporary Files of IJ Scan Utility specify a folder on a drive with sufficient free space Settings General Settings Dialog Check 4 Multiple devices may be connected to USB ports Disconnect devices other tha...

Страница 232: ...a format is not supported by the application scan the image again and select a popular data format such as JPEG when saving it Refer to the application s manual for details If you have any questions contact the manufacturer of the application 232 ...

Страница 233: ...at the items are placed correctly Placing Items When Scanning from a Computer Check 2 Check that the settings match the item to be scanned If you cannot scan properly using the AUTO SCAN button specify the item type in IJ Scan Utility and scan again Scanning Photos Scanning Documents Scanning with Favorite Settings 233 ...

Страница 234: ...ty Image Displayed on the Monitor Is Poor Scanned Image Is Surrounded by Extra White Areas Cannot Scan at the Correct Size Item Is Placed Correctly but the Scanned Image Is Slanted Scanned Image Is Enlarged Reduced on the Computer Monitor 234 ...

Страница 235: ...reen then set one of the following settings Select Magazine for Image Adjustment Select the Descreen checkbox Refer to Image Corrections and Color Adjustments for details Note If moire appears when you scan a digital print photo take the above measures and scan again Check 4 Clean the platen and document cover Clean the platen and document cover of the scanner while taking care not to press the pl...

Страница 236: ...White Areas Check Specify the scan area Manually specify the scan area when there are white margins or unwanted areas along the edges of the scanned images in the Image Stitch window Adjusting Cropping Frames in the Image Stitch Window 236 ...

Страница 237: ...Cannot Scan at the Correct Size Check Make sure that the items are placed correctly Placing Items When Scanning from a Computer 237 ...

Страница 238: ...s Slanted Check When Document or Magazine is selected for Select Source deselect the Correct slanted text document checkbox and scan the item again Settings Document Scan Dialog Settings Custom Scan Dialog Settings PDF Dialog Settings SEND Dialog 238 ...

Страница 239: ...ation Refer to the application s manual for details If you have any questions contact the manufacturer of the application Check 2 Click Driver in the IJ Scan Utility main screen then change the resolution setting and scan again The higher the resolution the larger the resulting image will be Resolution 239 ...

Страница 240: ...lation Downloading Cannot Install the MP Drivers Installation Is Unsuccessful Insufficient Free Hard Disk Space Installation Is Unsuccessful Insufficient Memory About Inkjet Printer Scanner Fax Extended Survey Program 240 ...

Страница 241: ...Cannot Install the Scanner Driver Reinstall the Scanner Driver If you reinstall the Scanner Driver install the drivers from our website 241 ...

Страница 242: ...s Unsuccessful Insufficient Free Hard Disk Space Check Delete unnecessary files to obtain sufficient free hard disk space then try again Delete unnecessary files then click the Finder menu and select Empty Trash 242 ...

Страница 243: ...Installation Is Unsuccessful Insufficient Memory Check Exit other applications or restart the computer and try again 243 ...

Страница 244: ...you agree Click Agree and follow the on screen instructions Information will be sent via the Internet Once the operation is completed from the next time information will be sent automatically without displaying the confirmation screen Note Deselect the Send automatically from the next time checkbox to display the Inkjet Printer Scanner Fax Extended Survey Program icon in the Dock before sending th...

Страница 245: ...If you want to change the setting so that a confirmation screen appears before sending the usage status or to restart the survey program follow these steps below 1 From the Go menu of Finder select Applications then double click the Canon Utilities folder Inkjet Extended Survey Program folder 2 Double click the Canon Inkjet Printer Scanner Fax Extended Survey Program icon Do not display the confir...

Отзывы: