background image

Changing the Copy (Zoom) Ratio

2-39

2

Basic Cop

ying F

eatures


Reducing/Enlarging Using the Original and Copy Sizes

The Zoom Program mode enables you to reduce or enlarge originals by individually 
entering the dimensions of the original and copy paper. Any copy ratio from 25% to 
400% can be set.

The following two Zoom Program modes are available.

NOTE


The specified sizes are converted into a copy ratio (%) by the machine using the formula 
below. The result is rounded to the nearest integer.
Copy ratio (%) = (copy size / original size) x 100

Making Copies with the Same XY Copy Ratio (Zoom)

The copy ratio you set is used for both the horizontal (X) and vertical (Y) axes.

Making Copies with Different XY Copy Ratios (XY Zoom)

You can set different copy ratios for the horizontal (X) and vertical (Y) axes.

Making Copies with the Same XY Copy Ratio (Zoom)

1

Place your originals 

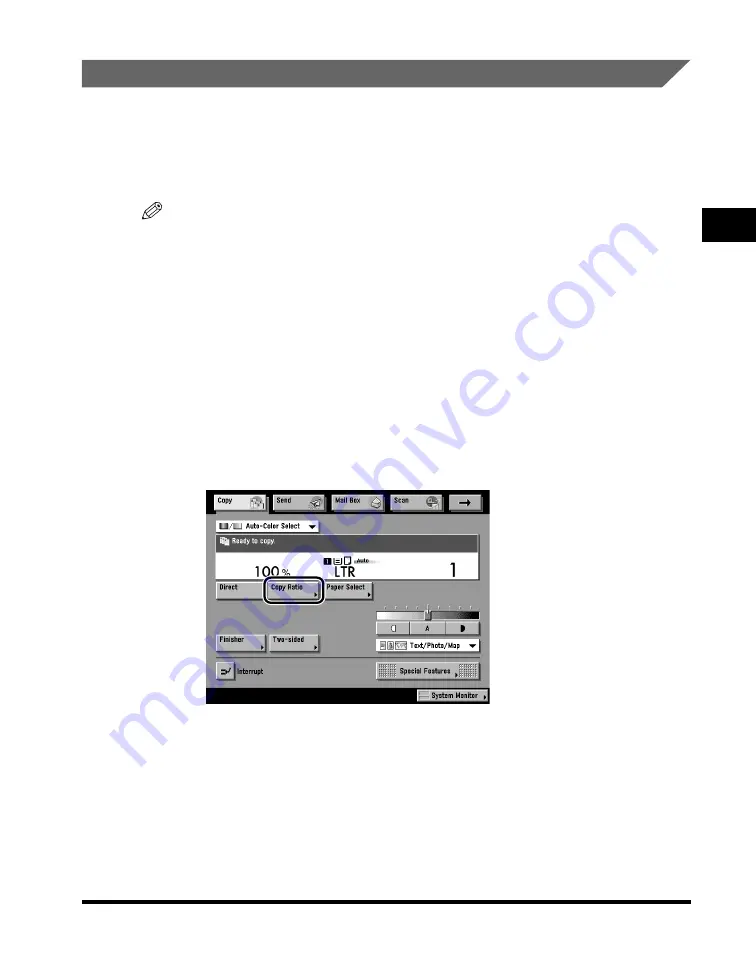
 press [Copy Ratio].

Содержание C3220

Страница 1: ...Please read this guide before operating this equipment After you finish reading this guide store it in a safe place for future reference ENG Copying Guide Copying Guide...

Страница 2: ......

Страница 3: ...Color imageRUNNER C3220 C2620 Copying Guide 0 Ot...

Страница 4: ...uctions Mail Box Guide Sending and Fax Instructions Sending and Facsimile Guide Setting Up the Network Connection and Installing the CD ROM Software Network Quick Start Guide Remote User Interface Ins...

Страница 5: ...ministrator Guide CD ROM To view the manual in PDF format Adobe Reader Acrobat Reader Acrobat is required If Adobe Reader Acrobat Reader Acrobat is not installed on your system please download it from...

Страница 6: ...Image Editing Chapter 7 Special Copying Features Color and Image Quality Adjustments Chapter 8 Memory Functions Chapter 9 Customizing Settings Chapter 10 Appendix Includes the color copy samples combi...

Страница 7: ...olor xvi Hue Density and Saturation xvi Color Balance Adjustment xvi The Complementary Colors xvii Full and Complementary Colors xvii Surprising Effects xvii The Technique of Color Printing xviii Pres...

Страница 8: ...ustment 2 23 Exposure Adjustment during Printing 2 24 Changing the Copy Zoom Ratio 2 25 Preset Zoom 2 29 Zoom by Percentage 2 32 Auto Zoom 2 34 Entire Image 2 37 Reducing Enlarging Using the Original...

Страница 9: ...er 4 Special Copying Features Image Adjustment Shifting the Original Image 4 2 Using the Arrow Keys 4 3 Using the Numeric Keys 4 5 Margin Mode 4 8 Frame Erase 4 12 Original Frame Erase 4 14 Book Frame...

Страница 10: ...Erasing Color Balance Settings 7 11 Adjusting the Contrast Sharpness 7 14 One Touch Color Mode 7 17 Image Quality Adjustment 7 20 Remove Background 7 21 Prevent Bleeding 7 24 Copying in a Single Color...

Страница 11: ...17 Restoring the Default Copy Settings 9 19 Chapter 10 Appendix Color Copy Samples 10 2 Color Balance 10 2 One Touch Color 10 3 Image Quality Adjustments 10 4 Remove Background 10 4 Prevent Bleeding...

Страница 12: ...ning operations that may lead to death or injury to persons if not performed correctly In order to use the machine safely always pay attention to these warnings CAUTION Indicates a caution concerning...

Страница 13: ...rd Resolution Switching Board Color Network Multi PDL Printer Kit Saddle Finisher N2 and Cassette Feeding Unit X1 Note that functions that cannot be used depending on the model or options are not disp...

Страница 14: ...sed in This Manual Illustrations used in this manual are those displayed when the Color imageRUNNER C3220 Copier model has the following optional equipment attached to it the Feeder DADF K1 and Casset...

Страница 15: ...ng or by any information storage or retrieval system without the prior written permission of Canon Inc Disclaimers The information in this document is subject to change without notice CANON INC MAKES...

Страница 16: ...defined as the method of additive color synthesis Color CRT monitors use the three additive primary colors to express various colors using this method The subtractive primary colors consist of cyan C...

Страница 17: ...ors in different proportions However areas of images expressed in black are actually reproduced in brown by using this method The Color imageRUNNER C3220 C2620 reproduces full color images in four col...

Страница 18: ...ated colors are bold and vibrant The colors of the spectrum are of optimal fullness and purity Color adjustments are thus made based on these colors The density and saturation of colors are interrelat...

Страница 19: ...full subtractive color in the visual field followed by a rapid shift to a white area results in the illusion of an entirely different color for a short period of time These colors are called psycholo...

Страница 20: ...print data for each color is then developed onto the respective photoconductive drum and subsequently printed onto the transfer belt with the various colors overlapping The complete image is then pri...

Страница 21: ...Be sure to check the ingredients of the adhesive before you use it Test some adhesives with an unwanted color copy before you use it with a valuable copy Inserting Copies Between Printed Pages When co...

Страница 22: ...xx...

Страница 23: ...1 12 Placing Originals 1 21 Orientation 1 22 Platen Glass 1 23 Feeder DADF K1 Optional 1 27 Canceling a Copy Job 1 30 Using the Touch Panel Display 1 30 Using the Stop Key 1 31 Using the System Monit...

Страница 24: ...20 only if the optional Color Image Reader C1 and Platen Cover Type G are attached or if the optional Color Image Reader C1 and Feeder DADF K1 are attached Various Copying Features Copy Basic Features...

Страница 25: ...rder Is Selected Press to select the Collate Group or Staple mode See Collating Copies on p 2 60 See p 2 76 1 2 Sided Is Selected Press to make 1 2 Sided 2 2 Sided 2 1 Sided or Book 2 Sided copies See...

Страница 26: ...ge Photo or Text See Original Type Selection on p 2 20 See p 1 51 Press to interrupt a copy job to make priority copies See Interrupt Mode on p 1 51 See Chapters 3 through 8 Press to select a Special...

Страница 27: ...a more detailed screen for the selected mode appears To close the Special Features screen and return to the Copy Basic Features screen press Done Pressing Help after selecting a mode displays a help s...

Страница 28: ...he same prints on the interleaf sheets as those on the transparencies See Transparency Interleaving on p 3 20 See p 3 25 2 On 1 Is Selected Press to automatically reduce two four or eight originals to...

Страница 29: ...to eliminate dark border areas and lines that appear around original images or shadows from binding holes See Frame Erase on p 4 12 See p 5 2 Press to make copies feeding different size originals toge...

Страница 30: ...ce all of the originals that you want to copy at the same time See Job Build on p 5 4 See p 5 9 Press to have the machine notify the user through e mail when the copy job is done See Job Done Notice o...

Страница 31: ...Press to designate areas on the original that you want to copy or to blank out on the copy See Area Designation on p 6 17 See p 6 43 Tab Paper Creation Is Selected Press to copy onto the tabs on tab...

Страница 32: ...he color balance or the density of the image See Adjusting the Color on p 7 2 See p 7 14 Press to sharpen or soften the image of the original on the copy See Adjusting the Contrast Sharpness on p 7 14...

Страница 33: ...ction or Retro Photo Image See One Touch Color Mode on p 7 17 See p 7 20 Remove Background Is Selected When A automatic exposure is selected press to erase the background color of the original on the...

Страница 34: ...Reference Guide Routine maintenance See Chapter 7 Routine Maintenance in the Reference Guide 1 Press the appropriate keys in accordance with the messages displayed on the touch panel display If there...

Страница 35: ...ppears Press Dept ID enter the Department ID using numeric keys Press Password enter the password using numeric keys Press ID The Basic Features screen is displayed NOTE For instructions on using Depa...

Страница 36: ...ginals see Placing Originals on p 1 21 If Auto Collate in Copy Settings from the Additional Functions screen is set to On the Collate or the Offset Collate mode is automatically set when you place you...

Страница 37: ...f the originals contain light color densities If the color sections of the originals are close to black When using the platen glass to make copies of a bound original such as a thick book in the Auto...

Страница 38: ...ecial Features screen is divided into two screens Press or to display the desired mode For more information on the other available functions on the Special Features screen see Chapters 3 through 8 6 E...

Страница 39: ...play press Start once for each original When scanning is complete press Done Copying starts IMPORTANT You cannot change copy mode settings such as the copy quantity paper size and copy ratio while the...

Страница 40: ...celing a copy job see Chapter 5 Checking Job and Device Status in the Reference Guide Several copies may be output even after you press Stop You can also cancel a copy job from the System Monitor scre...

Страница 41: ...one place your originals press Start NOTE For instructions on reserving a copy job see Reserved Copying on p 1 35 9 When copying is complete remove your originals 10 If the optional Card Reader D1 is...

Страница 42: ...opy Operations 1 20 1 Introduction to Copying 11 If Department ID Management is set press ID NOTE For instructions on using Department ID Management see Chapter 6 System Manager Settings in the Refere...

Страница 43: ...want to use NOTE If the original has too many pages to be placed in the feeder all at once use the Job Build mode on the Special Features screen See Job Build on p 5 4 Platen Glass Place the original...

Страница 44: ...edge of your original with the back edge of the platen glass by the arrow in the top left corner or the back edge of the feeder Platen Glass Vertical Placement Horizontal Placement Feeder Vertical Pl...

Страница 45: ...TR original onto 11 x 17 paper Horizontally placed LTR and STMT originals are referred to as LTRR and STMTR 11 x 17 and LGL originals must be placed horizontally Platen Glass You should use the platen...

Страница 46: ...t detach from the feeder platen cover the size of the originals may not be detected correctly 2 Place your originals face down The surface of the original that you want to copy must be placed face dow...

Страница 47: ...original on the platen glass the size of the original is detected after the feeder platen cover is closed Be sure to close the feeder platen cover before copying If the original contains fine text or...

Страница 48: ...emove the original from the platen glass when scanning is complete The size of STMT and STMTR originals cannot be detected After pressing Start follow the instructions on the screen to specify the ori...

Страница 49: ...nals with tears or large binding holes Severely curled originals or originals with sharp folds Clipped or stapled originals Carbon backed paper or other originals which may not feed smoothly Transpare...

Страница 50: ...lide guides to fit the size of your originals 2 Neatly place your originals with the side to be copied face up into the original supply tray Place your originals as far into the feeder as they will go...

Страница 51: ...or LGL paper place the original horizontally The scanned originals are output to the original output area in the order they are fed into the feeder You can place different size originals together int...

Страница 52: ...ch panel display the Stop key or the System Monitor screen Using the Touch Panel Display 1 Press Cancel on the pop up screen that appears while the machine is scanning printing or waiting to print The...

Страница 53: ...or Image Reader C1 attached 1 Press Stop When canceling a job that is being printed press Cancel on the pop up screen that appears during printing 2 Select the copy job that you want to cancel press C...

Страница 54: ...Canceling a Copy Job 1 32 1 Introduction to Copying Using the System Monitor Screen You can cancel a copy job while it is waiting to be processed or during printing 1 Press System Monitor 2 Press Copy...

Страница 55: ...that you want to cancel press Cancel If the job that you want to cancel is not displayed press or to scroll through the list You cannot select multiple jobs and cancel them all at once Select and can...

Страница 56: ...want to cancel the job press No The message Canceling appears for approximately two seconds on the touch panel display The copy job is canceled NOTE The canceled job is displayed as NG No Good on the...

Страница 57: ...uch as when the power is just turned ON or after a paper jam is cleared Copying automatically begins when the machine is ready The message Reservation copies can be made appears on the machine when it...

Страница 58: ...nction press Done Copy to display the Copy Basic Features screen This part of the procedure is not necessary if the machine is in the waiting state 2 Place your originals set the desired copy modes an...

Страница 59: ...only if paper is being fed from the stack bypass for the current job The following example assumes that 11 x 17 plain paper is being fed from the stack bypass for the current job and that you are sel...

Страница 60: ...splayed when paper is loaded into the stack bypass 3 Select the desired paper size and type NOTE If Stack Bypass Standard Settings in Common Settings from the Additional Functions screen is set to On...

Страница 61: ...d to be loaded are displayed as shown on the screen below IMPORTANT When printing on special types of paper such as heavy paper or transparencies be sure to correctly set the paper type especially if...

Страница 62: ...e If there is more than one reserved job waiting to print only the last paper size type specified for the reserved copy job is shown on the Paper Select screen and Copy Basic Features screen If you wa...

Страница 63: ...alues in millimeters you can also use numeric keys and Clear to clear your entries If you enter a value outside the setting range a message prompting you to enter an appropriate value appears on the s...

Страница 64: ...lly if you are using heavy paper If the type of paper is not set correctly it could adversely affect the quality of the image Moreover the fixing unit may become dirty and require a service repair or...

Страница 65: ...Copying If you want to select an envelope size Press Envelope Select the desired envelope type press OK The display returns to the paper size selection screen IMPORTANT If the envelope type is not se...

Страница 66: ...ize type specified for the reserved copy job is shown on the Paper Select screen and Copy Basic Features screen 4 Press Done This completes the settings for reserving a copy job using the stack bypass...

Страница 67: ...isplayed on the screen when it is time for the reserved copy job to be printed Make sure to load the same paper size and type selected in step 3 into the stack bypass Printing does not start if paper...

Страница 68: ...or set Stack Bypass Standard Settings to Off in Common Settings from the Additional Functions screen See Chapter 4 Customizing Settings in the Reference Guide IMPORTANT Set the paper size to the same...

Страница 69: ...correctly set the paper type especially if you are using heavy paper If the type of paper is not set correctly it could adversely affect the quality of the image Moreover the fixing unit may become d...

Страница 70: ...ters press mm When entering values in millimeters you can also use numeric keys and Clear to clear your entries If you enter a value outside the setting range a message prompting you to enter an appro...

Страница 71: ...hen printing on special types of paper such as heavy paper or transparencies be sure to correctly set the paper type especially if you are using heavy paper If the type of paper is not set correctly i...

Страница 72: ...troduction to Copying Select the desired envelope type press OK The display returns to the paper size selection screen IMPORTANT If the envelope type is not selected correctly a paper jam will occur 8...

Страница 73: ...if you need to make a rush copy during a long copy job NOTE You can make interrupt copies whenever the machine is ready to scan 1 Press Interrupt If you want to make copies after changing the Departme...

Страница 74: ...terrupt copy starts 2 Place your originals set the desired copy modes NOTE To cancel the Interrupt mode press Interrupt To cancel previously set copy modes press Reset The Interrupt mode itself is not...

Страница 75: ...opies wait until the current interrupt copy job is complete end of printing Then repeat steps 2 to 4 If the original contains fine text or print such as a map the machine may need to read or scan the...

Страница 76: ...Collate Rotate Collate Staple Cover Sheet Insertion or Booklet mode Sample Set does not appear if the Group mode is set NOTE The machine s counter counts the sample print as a print 1 Place your origi...

Страница 77: ...set is output NOTE Although only one sample set is output the number of copies that you specify for the job does not change 3 Check the sample set select Start Print Cancel or Change Settings To prin...

Страница 78: ...Paper Selection on p 2 6 To collate the copies press Finisher See Collating Copies on p 2 60 To make two sided copies press 2 Sided Copy To set a margin for binding press Margin See Margin Mode on p 4...

Страница 79: ...the Special Features screen are all grouped together onto one screen so you can easily check them 1 Press Setting Confirmation The Setting Confirmation screen is displayed showing the selected copy mo...

Страница 80: ...ettings 1 58 1 Introduction to Copying The display returns to the Copy Basic Features screen NOTE A right triangle on a copy mode setting key indicates that more setting screens are available by press...

Страница 81: ...ancel selected copy modes 1 Press Setting Confirmation The Setting Confirmation screen is displayed showing the selected copy mode settings 2 Press the key of the copy mode to be changed or canceled I...

Страница 82: ...setting key without a right triangle and then press Done the selected copy mode is canceled 3 Change or cancel the selected copy mode for example Sharpness To change a copy mode Perform the same steps...

Страница 83: ...Changing Canceling Selected Settings 1 61 1 Introduction to Copying 4 Press Done The display returns to the Copy Basic Features screen...

Страница 84: ...Changing Canceling Selected Settings 1 62 1 Introduction to Copying...

Страница 85: ...20 Automatic Exposure Adjustment 2 23 Exposure Adjustment during Printing 2 24 Changing the Copy Zoom Ratio 2 25 Preset Zoom 2 29 Zoom by Percentage 2 32 Auto Zoom 2 34 Entire Image 2 37 Reducing Enla...

Страница 86: ...2 2 2 Basic Copying Features 2 Basic Copying Features Full Color 2 92 Black 2 93...

Страница 87: ...your local authorized Canon dealer Specifying the Required Number of Copies 1 Press numeric keys to enter the desired copy quantity 1 to 999 The copy quantity appears on the right side of the Copy Bas...

Страница 88: ...opying Features Changing the Copy Quantity 1 Press Clear to clear the entered number 2 Press numeric keys to enter the desired copy quantity 1 to 999 The copy quantity appears on the right side of the...

Страница 89: ...Copy Quantity 2 5 2 Basic Copying Features IMPORTANT You cannot change the copy quantity while the machine is copying...

Страница 90: ...be cut off look under the margin areas in the Specifications table in Chapter 9 Appendix in the Reference Guide If you select the Entire Image mode the copied image is automatically reduced slightly...

Страница 91: ...Paper Selection mode You cannot use the Automatic Paper Selection mode when copying the following types of originals Copy these originals using the Manual Paper Selection mode Nonstandard size origina...

Страница 92: ...Basic Copying Features 2 Press Auto Done The following screen is displayed NOTE When the feeder platen cover is closed the paper source holding that paper size is highlighted along with Auto 3 Press...

Страница 93: ...NOTE You can copy onto envelopes such as your company logo You can load envelopes into the stack bypass For instructions on loading envelopes in the stack bypass see Chapter 2 Basic Operations in the...

Страница 94: ...b press Stack Bypass Settings To set Stack Bypass Settings proceed to step 3 If you do not want to set Stack Bypass Settings proceed to step 5 The optional Feeder DADF K1 Saddle Finisher N2 and Casset...

Страница 95: ...mizing Settings in the Reference Guide indicates that the paper is loaded vertically and indicates that the paper is loaded horizontally The suffix R such as in LTRR used in paper size designations in...

Страница 96: ...e IMPORTANT When printing on special types of paper such as heavy paper or transparencies be sure to correctly set the paper type especially if you are using heavy paper If the type of paper is not se...

Страница 97: ...g Features If you want to select a nonstandard paper size Press Irreg Size Enter the size of the paper using the numeric keys on the touch panel display Press X horizontal axis enter a value Press Y v...

Страница 98: ...press mm When entering values in millimeters you can also use numeric keys and Clear to clear your entries If you enter a value outside the setting range a message prompting you to enter an appropriat...

Страница 99: ...quire a service repair or the paper could jam If you select a nonstandard paper size the Multi Page Enlargement Offset Collate Offset Group Rotate Collate Rotate Group Staple Book 2 Sided Two page Sep...

Страница 100: ...es If you want to select an envelope size Press Envelope Select the desired envelope type press OK The display returns to the paper size selection screen IMPORTANT If the envelope type is not selected...

Страница 101: ...eatures 4 Press Done The display returns to the Copy Basic Features screen and the selected paper size and type are displayed 5 Press Start Copying starts NOTE To cancel all settings and return the ma...

Страница 102: ...following four original type modes are available Text Photo Map Mode This mode is best suited for making copies of originals containing text images photos as well as fine graphics such as those on a...

Страница 103: ...exposure to the most appropriate level for the original 1 Place your originals press or Press to move the indicator to the left to make the exposure lighter or press to move it to the right to make th...

Страница 104: ...s such as a printed image the moir effect a shimmering wavy pattern may occur In this case you can lessen the moir effect by using the Sharpness mode See Adjusting the Contrast Sharpness on p 7 14 NOT...

Страница 105: ...1 Place your originals press the original type drop down list select the original type Text Photo Map Printed Image Photo or Text If you want to adjust the text photo map processing priority level Pre...

Страница 106: ...OK Priority Level The display returns to the Copy Basic Features screen 2 Press Start Copying starts NOTE To cancel all settings and return the machine to the Standard mode press Reset Text Priority...

Страница 107: ...ent the original image on the reverse side of the original from appearing on the paper Select the desired copy exposure adjustment mode depending on the type of original The Remove Background mode is...

Страница 108: ...the machine is printing Press to move the indicator to the left to make the exposure lighter or press to move it to the right to make the exposure darker The copy exposure is changed When printing is...

Страница 109: ...e offers you a variety of preset copy ratios to reduce or enlarge standard size originals to another standard paper size Zoom by Percentage You can reduce or enlarge originals by any copy ratio in 1 i...

Страница 110: ...e is slightly reduced so that the entire image is copied without being cut off Reducing Enlarging Using the Original and Copy Sizes The Zoom Program mode enables you to enter measurements for the orig...

Страница 111: ...les you to make reduced or enlarged originals with different XY copy ratios expressed in percentage Manually Specifying the Copy Ratio XY Zoom You can manually set different copy ratios for the horizo...

Страница 112: ...io Auto XY Zoom The XY copy ratio is automatically set to suit the size of the selected paper Multi Page Enlargement The Multi Page Enlargement mode enables you to enlarge an original over multiple sh...

Страница 113: ...ten glass If you are reducing 11 x 17 originals to LTR with Auto Orientation in Copy Settings from the Additional Functions screen set to Off load LTRR paper in a paper drawer or the stack bypass NOTE...

Страница 114: ...1 Place your originals press Paper Select 2 Press Auto Done The display returns to the Copy Basic Features screen NOTE The default setting is Auto When the feeder platen cover is closed the paper sou...

Страница 115: ...a preset enlargement ratio Following your selection press Done The selected mode is set the display returns to the Copy Basic Features screen and the selected copy ratio is displayed 5 Press Start Co...

Страница 116: ...Features Zoom by Percentage You can reduce or enlarge originals by any copy ratio in 1 increments Any copy ratio from 25 to 400 can be set The same copy ratio is used for the horizontal X and vertica...

Страница 117: ...red the value using numeric keys The selected mode is set the display returns to the Copy Basic Features screen and the specified copy ratio is displayed NOTE If you enter a value outside the setting...

Страница 118: ...hly transparent originals such as transparencies using the Auto setting on the Copy Ratio screen Use the Preset Zoom or Zoom by Percentage mode instead To use the Auto setting on the Copy Ratio screen...

Страница 119: ...er size press Done The display returns to the Copy Basic Features screen IMPORTANT Make sure that you select a paper size other than Auto If you do not select a paper size the copy ratio is automatica...

Страница 120: ...starts NOTE If the original is placed on the platen glass the copy ratio automatically appears when the feeder platen cover is closed provided that the original size can be detected If the original is...

Страница 121: ...to copy 11 x 17 originals onto paper larger than 11 x 17 to ensure that the edges of the originals are not cut off Make sure to place the originals on the platen glass and load the stack bypass with...

Страница 122: ...Entire Image Done The selected mode is set and the display returns to the Copy Basic Features screen 3 Press Start Copying starts NOTE To cancel this setting press Copy Ratio Entire Image To cancel al...

Страница 123: ...available NOTE The specified sizes are converted into a copy ratio by the machine using the formula below The result is rounded to the nearest integer Copy ratio copy size original size x 100 Making C...

Страница 124: ...the original size If you enter the width for the original size make sure to enter the width for the copy size as well and vice versa The machine automatically calculates the correct copy ratio based...

Страница 125: ...in millimeters you can also use numeric keys and Clear to clear your entries For instructions on entering values in inches see Chapter 2 Basic Operations in the Reference Guide To specify the horizon...

Страница 126: ...Changing the Copy Zoom Ratio 2 42 2 Basic Copying Features 2 Press Zoom Program 3 Press XY Zoom...

Страница 127: ...Size enter a value Press OK The machine automatically calculates the correct copy ratio based on the values you entered however the original image may be cut off slightly on the copy depending on the...

Страница 128: ...use numeric keys and Clear to clear your entries For instructions on entering values in inches see Chapter 2 Basic Operations in the Reference Guide To specify the same copy ratio for both the horizo...

Страница 129: ...r size Automatically Specifying the Copy Ratio Auto XY Zoom The XY copy ratio is automatically set to suit the size of the selected paper IMPORTANT The Auto XY Zoom mode cannot be used with the Automa...

Страница 130: ...Changing the Copy Zoom Ratio 2 46 2 Basic Copying Features 1 Place your originals press Copy Ratio 2 Press XY Zoom...

Страница 131: ...numeric keys to enter values and Clear to clear your entries You can change the values by pressing or even if you have entered the values using numeric keys The selected mode is set the display retur...

Страница 132: ...1 is automatically selected and the copy ratios are set to match the size of the paper loaded in that drawer NOTE If you select Auto XY Zoom in the following cases X Auto and Y Auto are displayed as t...

Страница 133: ...Booklet Transparency Interleaving Margin Different Size Originals Job Build Frame Erase Image Repeat Mirror Image Area Designation or Tab Paper mode The Automatic Paper Selection mode cannot be set if...

Страница 134: ...ratio may be different from that indicated in the table After all the sheets have been pasted together the final size of the actual copy will be slightly smaller than the size indicated in the table...

Страница 135: ...nlargement mode by specifying the copy ratio in percentage Any copy ratio from 100 to 400 can be set 1 Place your originals on the platen glass press Copy Ratio 2 Press Multi Page Enlarge NOTE If the...

Страница 136: ...lear your entries You can change the value by pressing or even if you have entered the value using numeric keys The display returns to the Copy Basic Features screen and the specified copy ratio is di...

Страница 137: ...pying is in progress to cancel the copy job and then press Start again copying resumes from the first sheet of the divided image To return the copy ratio to 100 press Direct To cancel this setting pre...

Страница 138: ...largement mode by setting the number of output pages that the original image should be copied over 1 Place your originals on the platen glass press Copy Ratio 2 Press Multi Page Enlarge NOTE If the pa...

Страница 139: ...Changing the Copy Zoom Ratio 2 55 2 Basic Copying Features 3 Press Number Of Output Pages Next 4 Press Paper Select 5 Select the desired paper size press Done...

Страница 140: ...d the copy ratio is displayed as Auto NOTE The number of output pages that you have selected is used as a guideline The actual number of output pages may be less than what you have selected depending...

Страница 141: ...1 x 17 original by 200 to create a 22 x 17 horizontal copy Based on the above criteria the table under Determining the Copy Ratio and Number of Sheets Needed indicates that when using LTRR paper 12 pa...

Страница 142: ...which is then copied onto a separate sheet of paper Copy Ratio 200 Paper Size LTRR The original is placed on the platen glass without changing its original orientation 1 2 3 4 5 6 7 8 9 10 11 12 5 6...

Страница 143: ...Multi Page Enlargement mode overlap slightly When pasting the sheets together trim the overlapping portions leaving an adequate amount of overlap to apply the glue The width of the overlapping portio...

Страница 144: ...B side output tray is set as the output tray for the Copy function copies are output face up Therefore the order of the output page is reversed from the order of the originals To prevent this set Tray...

Страница 145: ...in Common Settings from the Additional Functions screen 3 The maximum when you are using 17 to 20 lb bond 64 to 80 g m2 paper Optional Unit Offset Rotate Staple Corner Double Saddle Stitch None LTR LT...

Страница 146: ...oup mode cannot be used with the Multi Page Enlargement Sample Set Cover Sheet Insertion Booklet Transparency Interleaving or Tab Paper mode If the Staple Mode Is Set The copies are automatically coll...

Страница 147: ...Paper Selection Two page Separation Cover Sheet Insertion or Image Combination mode in addition to the above mentioned modes The accuracy of folds created in the Saddle Stitch mode may vary depending...

Страница 148: ...g directions as follows IMPORTANT The Rotate mode cannot be used with the Multi Page Enlargement Automatic Paper Selection Cover Sheet Insertion Booklet Transparency Interleaving or Tab Paper mode You...

Страница 149: ...machine is equipped with an optional finisher You cannot select STMTR paper Page Order Collate 1 Place your originals press Finisher NOTE If Auto Collate in Copy Settings from the Additional Functions...

Страница 150: ...ANT Rotate can be selected only in the following cases When the available paper size is selected manually When the available paper size is loaded in both the horizontal and vertical directions The sel...

Страница 151: ...t once for each original When scanning is complete press Done Copying starts NOTE To cancel this setting press Finisher Cancel To cancel all settings and return the machine to the Standard mode press...

Страница 152: ...Copying Features 2 Press Group Same pages Offset appears only if an optional finisher is attached Rotate appears only if an optional finisher is not attached An optional finisher is attached An optio...

Страница 153: ...ADS in Common Settings from the Additional Functions screen set to On See Chapter 4 Customizing Settings in the Reference Guide 3 Press OK The selected mode is set and the display returns to the Copy...

Страница 154: ...tional Finisher M1 Finisher N1 or Saddle Finisher N2 is attached 1 Place your originals press Finisher NOTE If Auto Collate in Copy Settings from the Additional Functions screen is set to On the Colla...

Страница 155: ...Features 2 Specify the stapling settings If the optional Finisher M1 is attached Press Staple OK The selected mode is set and the display returns to the Copy Basic Features screen If the optional Fini...

Страница 156: ...ting Copies 2 72 2 Basic Copying Features Select the stapling type Corner or Double select the stapling position press OK The selected mode is set and the display returns to the Copy Basic Features sc...

Страница 157: ...ing Features If the optional Saddle Finisher N2 is attached Press Staple Next Select the stapling type Corner Double or Saddle Stitch If you want to select Corner or Double Press Corner or Double sele...

Страница 158: ...y Basic Features screen NOTE You can adjust the saddle stitch position in Adjustment Cleaning from the Additional Functions screen See Chapter 4 Customizing Settings in the Reference Guide 3 Press Sta...

Страница 159: ...Collating Copies 2 75 2 Basic Copying Features NOTE To cancel this setting press Finisher Cancel To cancel all settings and return the machine to the Standard mode press Reset...

Страница 160: ...displayed above Two sided on the Copy Basic Features screen Paper used to make two sided copies must conform to the following specifications Paper size 12 x 18 11 x 17 LGL LTR LTRR EXEC or STMTR enve...

Страница 161: ...o Sided Originals 2 1 Sided This feature automatically turns over two sided originals placed in the feeder to make one sided copies on different sheets of paper Making Two Sided Copies from Facing Pag...

Страница 162: ...Tab Paper Creation mode Make sure to place originals with a horizontal landscape orientation such as LTRR and STMTR horizontally If these originals are placed vertically the back side of the copy is...

Страница 163: ...Two Sided Copying 2 79 2 Basic Copying Features 1 Place your originals press Two sided 2 Press 1 2 Sided...

Страница 164: ...item are shown below The display returns to the Two sided feature selection screen 3 Press OK The display returns to the Copy Basic Features screen and 1 2 Sided is displayed above Two sided Book Typ...

Страница 165: ...o 2 Sided This feature enables you to make two sided copies from two sided originals If a two sided original is placed in the feeder it is automatically turned over so that both sides of the original...

Страница 166: ...originals into the feeder See Auto Collate on p 9 6 2 Press 2 2 Sided To set the orientation of the originals and the copies press Option select the type of two sided orientation for the originals and...

Страница 167: ...ten glass follow the instructions that appear on the touch panel display press Start once for each original When scanning is complete press Done Copying starts NOTE To cancel this setting press Two si...

Страница 168: ...arency Interleaving mode Make sure to place originals with a horizontal landscape orientation such as LTRR horizontally If these originals are placed vertically the back side of the copy is printed up...

Страница 169: ...the orientation of the originals press Done Details of each item are shown below The display returns to the Two sided feature selection screen Book Type The front and back sides of the original have...

Страница 170: ...K The display returns to the Copy Basic Features screen and 2 1 Sided is displayed above Two sided 4 Press Start Copying starts NOTE To cancel this setting press Two sided Cancel To cancel all setting...

Страница 171: ...nterleaving Tab Paper Image Repeat or Area Designation mode Only LTR paper can be used for Book 2 Sided copying If you select Front Back Two sided the front side of the first two sided page and the ba...

Страница 172: ...of each item are shown below Left Right Two sided The facing pages of a book or bound original are copied on the front and back sides of a single sheet of paper Front Back Two sided The front and bac...

Страница 173: ...al on the platen glass press Start Scanning starts IMPORTANT If the original contains fine text or print such as a map the machine may need to read or scan the document several times Do not remove the...

Страница 174: ...mode is set to Auto Color Select the color mode is automatically set to Full Color Automatic Color Selection If the Auto Color Select mode is selected the machine automatically recognizes whether the...

Страница 175: ...o Color Select 2 Press Start If the original is placed on the platen glass follow the instructions that appear on the touch panel display press Start once for each original When scanning is complete p...

Страница 176: ...In this case select the Full Color mode manually NOTE If a black and white original is copied in the Full Color mode it is counted as a color copy 1 Place your originals press the color selection dro...

Страница 177: ...your originals press the color selection drop down list press Black 2 Press Start If the original is placed on the platen glass follow the instructions that appear on the touch panel display press St...

Страница 178: ...Changing Color Modes 2 94 2 Basic Copying Features...

Страница 179: ...pying Features Document Layout This chapter describes the special copying features for document layout Two Page Separation 3 2 Cover Sheet Insertion 3 5 Booklet Mode 3 13 Transparency Interleaving 3 2...

Страница 180: ...nlargement Two sided Cover Sheet Insertion Image Combination Booklet Transparency Interleaving Different Size Originals Binding Erase Image Repeat Area Designation or Tab Paper mode Place your origina...

Страница 181: ...first open page of the book or bound original Place your original face down making sure that its top edge is aligned with the back edge of the platen glass by the arrow in the top left corner 2 Press...

Страница 182: ...IMPORTANT If the original contains fine text or print such as a map the machine may need to read or scan the document several times Do not remove the original from the platen glass until scanning is...

Страница 183: ...aple mode when the optional Finisher M1 is attached you cannot staple more than 30 sheets of LTR or LTRR paper 20 sheets of LGL paper or 15 sheets of 11 x 17 paper including sheet insertions If you se...

Страница 184: ...ween copies This feature is useful when you want to use a blank sheet to help sort out the copies You may also copy on the sheet insertions Chapter Page This setting adds chapter pages into the copies...

Страница 185: ...Features Cover Sheet Insertion NOTE If the desired setting is not displayed press or to scroll to the desired setting 2 Select the desired Cover Sheet Insertion feature You cannot select the Sheet In...

Страница 186: ...Select the same size paper for Front Cover Back Cover and Sheet Insertion or Chapter Page If you try to set a different paper size for one feature the paper sizes for the other features are automatic...

Страница 187: ...ment Layout 5 Press Next If only Chapter Page is selected press Next proceed to step 7 6 Select whether to copy on the front cover back cover or sheet insertion press Next If either Sheet Insertion or...

Страница 188: ...elected in step 4 to be used as the copy s front and or back cover If you are using paper that already has printing on it e g company logo as your front and or back cover then you must select Leave Bl...

Страница 189: ...position or chapter page on the first page Set the position starting from the second page NOTE You can insert up to 20 sheet insertions or chapter pages If you want to insert 10 or more sheets press t...

Страница 190: ...Press Start If the original is placed on the platen glass follow the instructions that appear on the touch panel display press Start once for each original When scanning is complete press Done Copyin...

Страница 191: ...ency Interleaving Margin Different Size Originals Frame Erase Image Repeat Mirror Image Area Designation or Tab Paper mode Make sure to place originals with a vertical portrait orientation vertically...

Страница 192: ...Special Copying Features Document Layout 1 Place your originals press Special Features Booklet NOTE If the desired setting is not displayed press or to scroll to the desired setting 2 Select the origi...

Страница 193: ...Feeder DADF K1 are attached To select an A or B series paper size press A B size 2 Sided Original cannot be selected if STMTR is the selected original size 3 Select the desired paper size press Next O...

Страница 194: ...Document Layout If you want to add a cover Press Add Cover Next Select whether to copy on the cover page Select the desired paper type for the cover page press Next If the optional Saddle Finisher N2...

Страница 195: ...u select Heavy 2 as the paper type When printing on special types of paper such as heavy paper or transparencies be sure to correctly set the paper type especially if you are using heavy paper If the...

Страница 196: ...s also automatically set 5 Set the Booklet Tray guide to match the paper size IMPORTANT Make sure to set the Booklet Tray guide correctly to match the paper size Setting the Booklet Tray guide incorre...

Страница 197: ...klet Mode 3 19 3 Special Copying Features Document Layout NOTE To cancel this setting press Special Features Booklet Cancel To cancel all settings and return the machine to the Standard mode press Res...

Страница 198: ...ake more than one set of copies at a time in the Transparency Interleaving mode Even if an optional finisher is attached you cannot use any of the Finisher modes with the Transparency Interleaving mod...

Страница 199: ...e Blank setting outputs a printed transparency and a blank interleaf sheet alternately If You Want to Print on the Interleaf Sheets The Print setting outputs a printed transparency and a printed inter...

Страница 200: ...ying Features Document Layout 1 Place your originals press Special Features Transparency Interleaving NOTE If the desired setting is not displayed press or to scroll to the desired setting 2 Select th...

Страница 201: ...apter 4 Customizing Settings in the Reference Guide Set Register Paper Type for the selected paper source to Transparency Set the paper type setting to Transparency if Stack Bypass Standard Settings i...

Страница 202: ...f the total number of copies made 5 Press Start If the original is placed on the platen glass follow the instructions that appear on the touch panel display press Start once for each original When sca...

Страница 203: ...wo page Separation Cover Sheet Insertion Shift No Key Entry Booklet Transparency Interleaving Different Size Originals Original Frame Erase Book Frame Erase Image Repeat Mirror Image Area Designation...

Страница 204: ...ded or two 2 sided originals to fit onto one side or both sides of the copy sheet 8 On 1 This setting reduces eight 1 sided or four 2 sided originals to fit onto one side or both sides of the copy she...

Страница 205: ...ecial Copying Features Document Layout 1 Place your originals press Special Features Image Combination NOTE If the desired setting is not displayed press or to scroll to the desired setting 2 Select t...

Страница 206: ...able only if the optional Color Image Reader C1 and Feeder DADF K1 are attached To select an A or B series paper size press A B size 2 Sided Original cannot be selected if STMTR is the selected origin...

Страница 207: ...ded orientation press OK Next Details of each item are shown below If you want to specify the image order press Option select the image order press Done Next Book Type The front and back sides of the...

Страница 208: ...is set and the display returns to the Copy Basic Features screen IMPORTANT You cannot use Automatic Paper Selection in the Image Combination mode NOTE The machine automatically selects the copy ratio...

Страница 209: ...aten glass follow the instructions that appear on the touch panel display press Start once for each original When scanning is complete press Done Copying starts NOTE To cancel this setting press Speci...

Страница 210: ...Image Combination 3 32 3 Special Copying Features Document Layout...

Страница 211: ...This chapter describes the special copying features for image adjustment Shifting the Original Image 4 2 Using the Arrow Keys 4 3 Using the Numeric Keys 4 5 Margin Mode 4 8 Frame Erase 4 12 Original F...

Страница 212: ...ination with the Automatic Paper Selection mode If the original and the copy paper are the same size and the copy ratio is set at 100 the image of the original is not shifted The default setting is Ce...

Страница 213: ...the Numeric Keys The No Key Entry setting enables you to shift the entire image to a position that you specify using numeric keys Using the Arrow Keys 1 Place your originals press Special Features 4...

Страница 214: ...ed setting 3 Press Center Corner Shift select the shift direction with an arrow key The shift direction is the direction that you want the original image moved to if you first visualize the original i...

Страница 215: ...shift position Press No Key Entry Select the shift direction Enter the shift value using the numeric keys on the inch entry pop up screen Press Done NOTE To change a value you entered select the shift...

Страница 216: ...the left Enter the shift value Example To move the original image in a diagonal direction Press the top Enter the shift value Press the right Enter the shift value A diagonal arrow pointing in the di...

Страница 217: ...age 4 7 4 Special Copying Features Image Adjustment 4 Press Start Copying starts NOTE To cancel this setting press Special Features Shift Cancel To cancel all settings and return the machine to the St...

Страница 218: ...ement Booklet Image Repeat Mirror Image or Tab Paper mode The Margin mode shifts the entire original image by the designated width Therefore an original whose image extends all the way to the edges of...

Страница 219: ...are using the Margin and Two sided modes together and copying an original that does not have a margin follow the instructions below NOTE To enter values in millimeters press mm The default setting is...

Страница 220: ...argin or Bottom Margin Press or to set the margin width 1 16 to 13 16 or 1 mm to 20 mm press OK Done The selected mode is set and the display returns to the Copy Basic Features screen NOTE When enteri...

Страница 221: ...4 Special Copying Features Image Adjustment 3 Press Start Copying starts NOTE To cancel this setting press Special Features Margin Cancel To cancel all settings and return the machine to the Standard...

Страница 222: ...s of the three Frame Erase modes cannot be set If you select one of these modes the previously set mode is canceled Original Frame Erase This mode erases the dark borders and frame lines that appear a...

Страница 223: ...es that appear if you are copying facing pages in a book or bound original onto a single sheet of paper Binding Erase This mode erases the shadows that appear on copies from binding holes on originals...

Страница 224: ...u can also use this mode to create a blank border around the edge of the copy IMPORTANT The Original Frame Erase mode cannot be used with the Entire Image Multi Page Enlargement Image Combination Book...

Страница 225: ...ear to clear your entry You can change the value by pressing or even if you have entered the value using numeric keys If you enter a value outside the setting range a message prompting you to enter an...

Страница 226: ...rame erase widths press Next To return to the screen for setting the same width for all four borders press Adjust All At Once 4 Select the original size press OK Done The selected mode is set and the...

Страница 227: ...Special Copying Features Image Adjustment 5 Press Start Copying starts NOTE To cancel this setting press Special Features Frame Erase Cancel To cancel all settings and return the machine to the Standa...

Страница 228: ...RTANT The Book Frame Erase mode cannot be used with the Entire Image Multi Page Enlargement Image Combination Booklet Image Repeat Mirror Image Tab Paper or Area Designation Framing mode 1 Place your...

Страница 229: ...g or even if you have entered the values using numeric keys If you enter a value outside the setting range a message prompting you to enter an appropriate value appears on the screen The default setti...

Страница 230: ...t their respective frame erase widths press Next To return to the screen for setting the same width for all four borders press Adjust All At Once 4 Select the size of the bound original when it is ope...

Страница 231: ...e Adjustment NOTE To select an A or B series paper size press A B size 5 Press Start Copying starts NOTE To cancel this setting press Special Features Frame Erase Cancel To cancel all settings and ret...

Страница 232: ...inding holes into the feeder as this may damage the originals If you are using the Binding Erase mode the borders you do not select are also erased by 1 8 4 mm 1 Place your original on the platen glas...

Страница 233: ...g numeric keys If you enter a value outside the setting range a message prompting you to enter an appropriate value appears on the screen The default setting is 3 4 18 mm The maximum binding erase wid...

Страница 234: ...Frame Erase 4 24 4 Special Copying Features Image Adjustment...

Страница 235: ...5 1 CHAPTER 5 Special Copying Features Scan Settings and Notifications This chapter describes the scan settings and notification settings Different Size Originals 5 2 Job Build 5 4 Job Done Notice 5 9...

Страница 236: ...the different size originals are of the same weight paper type You cannot copy originals of different lengths together such as LTR and LGL or 11 x 17 and STMT If the Different Size Originals mode is s...

Страница 237: ...etting is not displayed press or to scroll to the desired setting 3 Press Start If the original is placed on the platen glass follow the instructions that appear on the touch panel display press Start...

Страница 238: ...ine is scanning originals in the Job Build mode You need to set the necessary copy settings beforehand according to the type of originals and the desired result You can change or specify the following...

Страница 239: ...e Two sided Original mode Thereafter you have to manually set or cancel the Two sided Original mode for each batch of originals that you scan It is useful to store originals in an inbox first and prin...

Страница 240: ...change the copy exposure and the original type settings See Copy Exposure and Original Type Settings on p 2 18 You can change the number of copy sets See Copy Quantity on p 2 3 You can change the colo...

Страница 241: ...ncel Repeat this step as necessary IMPORTANT If the original contains fine text or print such as a map the machine may need to read or scan the document several times Do not remove the original from t...

Страница 242: ...an Settings and Notifications 5 After the last batch of originals is scanned press Done Copying starts NOTE To cancel this setting press Special Features Job Build To cancel all settings and return th...

Страница 243: ...o complete IMPORTANT To send a job done notice you need to store e mail addresses in the Address Book beforehand See Chapter 10 Storing Editing Address Book Settings in the Sending and Facsimile Guide...

Страница 244: ...s not set to On proceed to step 4 NOTE To display Access Number set Access Number Management to On To access the Access Number Management mode press Additional Functions System Settings Restrict Acces...

Страница 245: ...nation The selected mode is set and the display returns to the Copy Basic Features screen NOTE For instructions on selecting a destination see Chapter 2 Basic Sending Methods in the Sending and Facsim...

Страница 246: ...Job Done Notice 5 12 5 Special Copying Features Scan Settings and Notifications...

Страница 247: ...ge Editing This chapter describes the special copying features for image editing Using Image Creation Modes 6 2 Inverting Images Nega Posi 6 4 Image Repeat 6 6 Mirror Image 6 15 Area Designation 6 17...

Страница 248: ...able Nega Posi This mode enables you to make copies of the original image by inverting the hues and gradations Image Repeat This mode enables you to repeatedly copy the entire original image in either...

Страница 249: ...Manual Setting The original image is copied the specified number of times Mirror Image This mode enables you to copy the original image reversed as if it were a reflection in a mirror Original Copy E...

Страница 250: ...atures Image Editing Inverting Images Nega Posi This mode enables you to make copies of the original image by inverting the hues and gradations 1 Place your originals press Special Features 2 Press or...

Страница 251: ...a Posi Done Done The selected mode is set and the display returns to the Copy Basic Features screen 4 Press Start Copying starts NOTE To cancel this setting press Special Features Image Creation Nega...

Страница 252: ...original image is copied so that the maximum possible number of repeats fit onto the selected paper size IMPORTANT The Image Repeat Auto mode cannot be used with the Automatic Paper Selection Auto Zo...

Страница 253: ...pen place the original on the platen glass To copy multiple originals using the same designated area remove the original from the platen glass after specifying the area after completing step 6 and th...

Страница 254: ...tting is Auto If Auto is already selected this step is not necessary The original image is copied so that the maximum possible number of repeats fit onto the selected paper size If you want to set the...

Страница 255: ...ginal to be repeated press Framing If you are not designating an area to repeat proceed to step 7 6 Designate the area NOTE If you designate an area using the edit pen the output image may not reflect...

Страница 256: ...ing Image Creation Modes 6 10 6 Special Copying Features Image Editing Using the edit pen Press Pen Entry Press Start Scan Scanning starts IMPORTANT Check that the original is placed on the platen gla...

Страница 257: ...ated Erase Point changes to Clear Area To clear a designated area press Clear Area To zoom in on any area on the original press the ratio drop down list select an enlargement ratio press or to specify...

Страница 258: ...t side edge of the original and up to the top of the original These measurements tell the machine the desired framed area s size and position X1 X2 Y1 Y2 The distance of the area s right border to the...

Страница 259: ...Y1 and Y2 enter their respective measurements using the numeric keys on the inch entry pop up screen press Done OK The setting range for X1 and X2 is 0 to 17 0 mm to 432 mm The setting range for Y1 a...

Страница 260: ...in the Reference Guide To change a value you entered press X1 X2 Y1 or Y2 enter the correct value using the numeric keys on the inch entry pop up screen To check the designated area press Check Area T...

Страница 261: ...e Combination Shift Booklet Transparency Interleaving Margin Frame Erase or Image Repeat mode 1 Place your originals press Special Features If necessary see the screen shot in step 1 of Inverting Imag...

Страница 262: ...ation Modes 6 16 6 Special Copying Features Image Editing NOTE To cancel this setting press Special Features Image Creation Mirror Image To cancel all settings and return the machine to the Standard m...

Страница 263: ...Select NOTE You can use the numeric keys to modify areas designated with the edit pen If you designate an area using the edit pen the output image may not reflect the designated area precisely To des...

Страница 264: ...6 Special Copying Features Image Editing Using the numeric keys Use the numeric keys on the inch entry pop up screen to specify the area 1 1 X2 X1 Y1 Y2 Original Area Area Copy Designate an Area Desi...

Страница 265: ...k out the contents of the designated area The following two designation methods are available Using the edit pen Use the edit pen to specify the area 1 1 1 1 Original Copy Area Area Designate an Area...

Страница 266: ...signated area while discarding the rest of the image You can designate the area using the edit pen or the numeric keys on the inch entry pop up screen IMPORTANT The Framing mode cannot be used with th...

Страница 267: ...RTANT You can designate only one polygonal area at a time You cannot designate a rectangular area and a polygonal area at the same time You can only designate areas when the original is placed on the...

Страница 268: ...ntry 4 Press Start Scan Scanning starts IMPORTANT Confirm that the original is placed on the platen glass 5 Designate the area using the edit pen If you designate a point outside the permitted area a...

Страница 269: ...a on the original press the ratio drop down list select an enlargement ratio press or to display the desired area To designate a rectangular area with two points Designate two opposing points with the...

Страница 270: ...s designated by selecting Multi point cannot be modified using the numeric keys on the inch entry pop up screen or numeric keys on the control panel 6 Press Framing If you want to use different settin...

Страница 271: ...reas repeat steps 5 to 7 Areas that have already been designated are displayed with the new area To modify a designated area that was specified using the edit pen press Area Fine Adj Point select unti...

Страница 272: ...screen does not appear The Center Shift settings specified within the Area Designation mode are deleted when the area settings are canceled 10 Press Start If you need to designate the same area for mu...

Страница 273: ...ace your originals press Special Features If necessary see the screen shot in step 1 of Inverting Images Nega Posi on p 6 4 2 Press or until Area Designation appears press Area Designation If necessar...

Страница 274: ...and up to the top of the original These measurements tell the machine the desired framed area s size and position X1 X2 Y1 Y2 The distance of the area s right border to the original s right edge The d...

Страница 275: ...X2 Y1 and Y2 enter their respective measurements using the numeric keys on the inch entry pop up screen press Done You can designate up to four areas The setting range for X1 and X2 is 0 to 17 0 mm t...

Страница 276: ...ers press mm When entering values in millimeters you can also use numeric keys and Clear to clear your entries For instructions on entering values in inches see Chapter 2 Basic Operations in the Refer...

Страница 277: ...ress Done To clear a designated area select the area by pressing the appropriate area key press Clear Area If you want to use different settings for different areas select the area by pressing the app...

Страница 278: ...Center Shift mode is already specified beforehand the Center Shift Settings screen does not appear The Center Shift settings specified within the Area Designation mode are deleted when the area settin...

Страница 279: ...o different types of areas a rectangular area two points and a polygonal area four points or more IMPORTANT You can designate only one polygonal area at a time You cannot designate a rectangular area...

Страница 280: ...ignate a point outside the permitted area a message appears to inform you that the specified position is not acceptable NOTE To clear the last point entered press Erase Point Once an area is designate...

Страница 281: ...an area with multiple points Press Multi point specify the area with the edit pen After designating the last point press Fix Multipoints You can designate up to 10 points IMPORTANT If you select Multi...

Страница 282: ...ying Features Image Editing 6 Press Blanking If you want to use different settings for different areas select the area by pressing the appropriate area key select Framing or Blanking 7 Press Preview c...

Страница 283: ...Preview to check the modified area 8 Press OK Done The selected mode is set and the display returns to the Copy Basic Features screen NOTE If there are multiple designated areas and Framing is specifi...

Страница 284: ...easure the size and position of the area that you want to designate on the original When you measure the XY values always start measuring from the image out to the right side edge of the original and...

Страница 285: ...X2 Y1 and Y2 enter their respective measurements using the numeric keys on the inch entry pop up screen press Done You can designate up to four areas The setting range for X1 and X2 is 0 to 17 0 mm t...

Страница 286: ...ers press mm When entering values in millimeters you can also use numeric keys and Clear to clear your entries For instructions on entering values in inches see Chapter 2 Basic Operations in the Refer...

Страница 287: ...se different settings for different areas select the area by pressing the appropriate area key select Framing or Blanking 6 Press OK Done The selected mode is set and the display returns to the Copy B...

Страница 288: ...Copying Features Image Editing 7 Press Start Copying starts NOTE To cancel this setting press Special Features Area Designation Numeric Key Entry Cancel To cancel all settings and return the machine t...

Страница 289: ...e tabs on tab paper by using the stack bypass The following are two types of Tab Paper modes Tab Paper Insertion You can insert the tab paper into the body of a text Tab Paper Creation You can copy on...

Страница 290: ...k 2 Sided Finisher Two page Separation Cover Sheet Insertion Image Combination Shift Booklet Transparency Interleaving Margin Frame Erase Image Repeat or Area Designation mode If the Tab Paper mode is...

Страница 291: ...is loaded in the stack bypass in the following way The side to be printed on is placed face up The first sheet of tab paper to be printed on is placed on the top The tab protruding part of the paper i...

Страница 292: ...er values in millimeters press mm When entering values in millimeters you can also use numeric keys and Clear to clear your entries You can change the value by pressing or even if you have entered the...

Страница 293: ...Tab Paper 6 47 6 Special Copying Features Image Editing If you want to add a cover Press Add Cover Next Select Front Cover and or Back Cover Press Paper Select for each selected feature...

Страница 294: ...Tab Paper 6 48 6 Special Copying Features Image Editing Select the paper source Press Done Next Select whether to print on the front and or back cover press Next...

Страница 295: ...lect the side to copy on press Done Next 6 Use numeric keys to enter where you want to insert the tab paper press OK The selected mode is set NOTE You can feed the tab paper to the maximum number of 2...

Страница 296: ...ab Paper 6 50 6 Special Copying Features Image Editing NOTE To cancel this setting press Special Features Tab Paper Cancel To cancel all settings and return the machine to the Standard mode press Rese...

Страница 297: ...l copying features for color and image quality adjustments Adjusting the Color 7 2 Adjusting the Color Balance 7 2 Color Balance Keys 7 5 Adjusting the Contrast Sharpness 7 14 One Touch Color Mode 7 1...

Страница 298: ...ying the relative strength and density of yellow magenta cyan and black The color adjustments that you make can be stored and recalled for future use See Color Balance on p 10 2 Adjusting the Color Ba...

Страница 299: ...ality Adjustments 2 Press or until Color Balance appears press Color Balance 3 Press or to adjust the strength of each color You can also press Recall Store to recall and change the previously stored...

Страница 300: ...nsity Fine Adjustment 5 Select the color that you want to adjust press or to adjust the density levels for the darker high medium and lighter low density areas press OK 6 Press OK Done The selected mo...

Страница 301: ...balance settings and recall them for future use Up to four different settings can be stored Storing Color Balance Settings 1 Press Special Features press or until Color Balance appears press Color Ba...

Страница 302: ...e key If you select a key that already has settings stored in it the settings are displayed If you select a key without settings A screen appears asking for your confirmation to store the settings Pre...

Страница 303: ...isplay The stored settings are displayed 4 Press Cancel Cancel Done The display returns to the Copy Basic Features screen NOTE Pressing Cancel Cancel Done only stores the color balance settings in the...

Страница 304: ...ct a key C1 to C4 to name press Register Name NOTE Keys that already have settings stored in them are displayed with a colored triangle in the lower right corner of the key If you select a key that al...

Страница 305: ...ter 2 Basic Operations in the Reference Guide If you press OK without entering any characters the key name reverts to its current name default C1 to C4 5 Press Cancel OK Done The display returns to th...

Страница 306: ...ary see the screen shots in steps 1 and 2 of Adjusting the Color Balance on p 7 2 2 Press Recall Store 3 Select the key containing the color balance settings that you want to recall verify the setting...

Страница 307: ...balance settings If you press another key the color balance settings stored in that key are recalled 4 Press OK Done The selected mode is set and the display returns to the Copy Basic Features screen...

Страница 308: ...se press Erase A screen appears asking for your confirmation to erase the settings IMPORTANT Make sure to check the settings first before erasing them NOTE Keys that already have settings stored in th...

Страница 309: ...panel display The stored color balance settings are erased NOTE Key names are not erased For instructions on changing a key name see Naming a Color Balance Key on p 7 7 5 Press Cancel OK Done The disp...

Страница 310: ...a myriad of other tropical creatures come together The world s coral reefs where brilliantly colored fish and a myriad of other tropical creatures come together Original Copy Low Set Low Not Set The w...

Страница 311: ...Adjusting the Color Balance on p 7 2 2 Press or until Sharpness appears press Sharpness 3 Press Low or High to adjust the sharpness press OK Done To copy text or lines clearly the setting should be t...

Страница 312: ...7 Special Copying Features Color and Image Quality Adjustments 4 Press Start Copying starts NOTE To cancel this setting press Special Features Sharpness Cancel To cancel all settings and return the ma...

Страница 313: ...you to make copies with subdued color tones and decreased color saturation Lighten Image This setting enables you to make copies with lighter color tones by decreasing the density while maintaining a...

Страница 314: ...nce on p 7 2 2 Press or until One Touch Color appears press One Touch Color 3 Select the desired One Touch Color feature press OK Done You can combine different One Touch Color features but the follow...

Страница 315: ...ents NOTE If you select Retro Photo Image Single Color is displayed on the Copy Basic Features screen 4 Press Start Copying starts NOTE To cancel this setting press Special Features One Touch Color Ca...

Страница 316: ...justments cancels the automatic copy exposure setting Similarly if you select A Auto for the copy exposure setting when image quality adjustments have been made the Image Quality Adjustment mode is ca...

Страница 317: ...to make copies by erasing the background color of the original This mode is especially useful for copying originals such as catalogues and paper that have turned yellow from age See Color Copy Samples...

Страница 318: ...sity of the background color If you want to make fine adjustments to the density of the background color press Fine Adjustment press or to specify the amount of each color that you want to remove pres...

Страница 319: ...the density of each color Press to make the color lighter or press to make the color darker If you make fine adjustments to the density the automatic copy exposure setting is canceled and the original...

Страница 320: ...n the reverse side of thin originals from appearing on the copies 1 Place your originals press A Special Features If necessary see the screen shot in step 1 of Remove Background on p 7 21 2 Press or u...

Страница 321: ...ings 4 Press OK Done The selected mode is set and the display returns to the Copy Basic Features screen 5 Press Start Copying starts NOTE To cancel this setting press Special Features Image Qual Adjus...

Страница 322: ...IMPORTANT The Single Color mode cannot be used with the One Touch Color Retro Photo Image mode NOTE To copy in black only press Black in the color selection drop down list See Changing Color Modes on...

Страница 323: ...K Done The selected mode is set and the display returns to the Copy Basic Features screen Single Color is displayed on the Copy Basic Features screen 4 Press Start Copying starts NOTE To cancel this s...

Страница 324: ...Copying in a Single Color 7 28 7 Special Copying Features Color and Image Quality Adjustments...

Страница 325: ...HAPTER 8 Memory Functions This chapter describes the memory functions Job Recall 8 2 Memory Keys 8 4 Storing Copy Settings 8 4 Naming a Memory Key 8 7 Recalling Copy Settings 8 9 Erasing Copy Settings...

Страница 326: ...stored in memory are not erased even when the power is turned OFF 1 Place your originals press Special Features When copy settings such as the copy ratio number of copies and copy exposure are specifi...

Страница 327: ...fy the settings press OK Done The selected mode is set and the display returns to the Copy Basic Features screen NOTE If there are more stored copy settings than are currently displayed you can scroll...

Страница 328: ...useful for storing frequently used copy settings NOTE The copy settings stored in memory are not erased even if the power is turned OFF You can store any function or mode in a memory key except for t...

Страница 329: ...copy settings press Store NOTE Keys that already have settings stored in them are displayed with a colored triangle in the lower right corner of the key If you select a key that already has settings s...

Страница 330: ...l display The key in which you stored the settings is displayed with a colored triangle in the lower right corner and the stored settings are displayed If you select a key that already has settings st...

Страница 331: ...e screen shot in step 2 of Storing Copy Settings on p 8 4 2 Select a key M1 to M9 to name press Register Name NOTE Keys that already have settings stored in them are displayed with a colored triangle...

Страница 332: ...Operations in the Reference Guide If you press OK without entering any characters the key name reverts to its current name default M1 to M9 4 Press Cancel Done The display returns to the Copy Basic F...

Страница 333: ...he settings press OK Done If you select a key that does not have copy settings stored in it OK is grayed out and cannot be pressed You can select another key that has copy settings stored in it or pre...

Страница 334: ...se press Erase A screen appears asking for your confirmation to erase the settings IMPORTANT Make sure to check the settings first before erasing them NOTE Keys that already have settings stored in th...

Страница 335: ...y The stored copy settings are erased NOTE Key names are not erased For instructions on changing a key name see Naming a Memory Key on p 8 7 4 Press Cancel Done The display returns to the Copy Basic F...

Страница 336: ...Memory Keys 8 12 8 Memory Functions...

Страница 337: ...o suit your needs Copy Settings Table 9 2 Specifying Standard Keys 9 3 Auto Collate 9 6 Image Orientation Priority 9 8 Job Duration Display 9 10 Auto Orientation 9 12 Changing the Current Standard Set...

Страница 338: ...refer to the other manuals listed in Manuals for the Machine on p ii The Copy Settings screen consists of a list of individual settings Press or to scroll to the desired setting Item Settings Applica...

Страница 339: ...elected include the Copy Ratio Finisher and Two sided modes on the Copy Basic Features screen the keys on the Special Features screen or the memory keys containing copy settings stored in Mode Memory...

Страница 340: ...ess Standard Key 2 Settings NOTE If the desired setting is not displayed press or to scroll to the desired setting 3 Press or to display the desired setting group select the desired group To cancel a...

Страница 341: ...ting that you want to store press OK To cancel storing the setting press Cancel 5 Press Done repeatedly until the Copy Basic Features screen appears Example The stored standard keys appear on the Copy...

Страница 342: ...ct the Finisher mode IMPORTANT The Auto Collate mode is available only if the optional Color Image Reader C1 and Feeder DADF K1 are attached NOTE If Auto Collate is set to On and an optional finisher...

Страница 343: ...Auto Collate 9 7 9 Customizing Settings 2 Select On or Off press OK The selected mode is set 3 Press Done repeatedly until the Copy Basic Features screen appears...

Страница 344: ...the original image This is because the images on originals may be copied upside down depending on the copy mode set NOTE If Image Orientation Priority is set to On the copy speed is slower than norma...

Страница 345: ...Image Orientation Priority 9 9 9 Customizing Settings 2 Select On or Off press OK The selected mode is set 3 Press Done repeatedly until the Copy Basic Features screen appears...

Страница 346: ...f Job Duration Display is set to On the waiting time is not displayed in the following cases The waiting time is less than one minute When the Different Size Originals mode is set with the 1 2 Sided o...

Страница 347: ...Job Duration Display 9 11 9 Customizing Settings 2 Select On or Off press OK The selected mode is set 3 Press Done repeatedly until the Copy Basic Features screen appears...

Страница 348: ...nd the zoom ratio to determine the most suitable orientation for the specified paper size and automatically rotates the image if necessary NOTE The default setting is On 1 Press Additional Functions C...

Страница 349: ...you select On Only the images of standard size originals up to LTR paper can be rotated when the copy ratio is set to 100 If Automatic Paper Selection is set and the most suitable paper size is not av...

Страница 350: ...s are Storing New Standard Settings You can store your own copy settings as the Standard Settings To store your own standard settings specify the desired settings on the Copy Basic Features screen and...

Страница 351: ...Changing the Current Standard Settings 9 15 9 Customizing Settings 2 Press or until Standard Settings appears press Standard Settings 3 Press Store...

Страница 352: ...The message Stored in memory appears for approximately two seconds on the touch panel display The displayed settings are stored as the Standard Settings NOTE The settings displayed are the currently...

Страница 353: ...ettings to their default settings 1 Press Additional Functions Copy Settings If necessary see the screen shot in step 1 of Specifying Standard Keys on p 9 3 2 Press or until Standard Settings appears...

Страница 354: ...y the settings press Yes To cancel initializing the Standard Settings press No The message Initialized appears for approximately two seconds on the touch panel display The Standard Settings are initia...

Страница 355: ...Copy Settings from the Additional Functions screen can be restored to their default settings See Copy Settings Table on p 9 2 1 Press Additional Functions Copy Settings If necessary see the screen sh...

Страница 356: ...ings 3 Press Yes To cancel initializing the Copy Settings press No The message Initialized appears for approximately two seconds on the touch panel display The Copy Settings are initialized 4 Press Do...

Страница 357: ...r provides the color copy samples combination of functions chart and index Color Copy Samples 10 2 Color Balance 10 2 One Touch Color 10 3 Image Quality Adjustments 10 4 Single Color 10 5 Combination...

Страница 358: ...roduced using different color adjustment modes Color Balance This mode enables you to make fine adjustments to the color by varying the relative strength and density of yellow magenta cyan and black O...

Страница 359: ...pendix One Touch Color This mode enables you to make copies by selecting the look of the image with just one touch of a key Original Vivid Colors Tranquil Colors Lighten Image Darken Image Highlight R...

Страница 360: ...you to make copies by erasing the background color of the original This mode is especially useful for copying originals such as catalogues and paper that have turned yellow from age Prevent Bleeding T...

Страница 361: ...Color Copy Samples 10 5 10 Appendix Single Color This mode enables you to make copies in one specific color only Original Copy...

Страница 362: ...ack Copy Exposure Automatic Printed Image Photo Text Text Photo Map Automatic Paper Selection Stack Bypass Collate Group Rotate Collating Rotate Group Offset Collate Offset Group Staple Saddle Stitch...

Страница 363: ...al Frame Erase Book Frame Erase Binding Erase Margin Shift Using the Arrow Keys Shift Using the Numeric Keys Front Cover Back Cover Sheet Insertion Printed Leave Blank Chapter Page Transparency Interl...

Страница 364: ...ction Full Color Black Copy Exposure Automatic Printed Image Photo Text Text Photo Map Automatic Paper Selection Stack Bypass Collate Group Rotate Collating Rotate Group Offset Collate Offset Group St...

Страница 365: ...Originals Job Build Sharpness Nega Posi Image Repeat Mirror Image Blanking Framing Single Color Color Balance Tab Paper Insertion Tab Paper Creation One Touch Color Remove Background Prevent Bleeding...

Страница 366: ...7 Booklet key 1 6 Booklet mode 3 13 C Canceling copy job Canceling 1 30 Using Stop key 1 31 Using System Monitor screen 1 32 Using touch panel display 1 30 Canceling selected settings 1 59 Changing Co...

Страница 367: ...Image 2 26 2 37 Multi Page Enlargement 2 28 2 49 Preset zoom 2 25 2 29 XY Zoom 2 27 2 45 Zoom by percentage 2 25 2 32 Zoom Program 2 26 2 39 Copy Basic Features screen 1 2 Copy exposure Adjustment du...

Страница 368: ...1 3 26 Image Combination mode 3 25 Image Combination key 1 6 Image Creation Image Creation modes 6 2 Image Repeat 6 2 6 6 Mirror Image 6 3 6 15 Nega Posi 6 2 6 4 Image Creation key 1 8 Image Orientat...

Страница 369: ...nt 1 22 Orientation of original 1 22 Vertical placement 1 22 Original Frame Erase 4 12 4 14 Original Output Area 1 29 Original type Photo mode 2 18 Printed Image mode 2 18 Text mode 2 18 Text Photo Ma...

Страница 370: ...2 63 Finisher M1 2 61 Finisher N1 2 61 Saddle Finisher N2 2 61 Saddle stitch 2 63 Staple mode 2 62 2 70 Symbols used in this manual x System Monitor key 1 4 T Tab Paper 6 43 Text mode 2 18 Text Photo...

Страница 371: ......

Страница 372: ...eigate Surrey RH2 8BF United Kingdom CANON DEUTSCHLAND GmbH Europark Fichtenhain A10 47807 Krefeld Germany CANON ITALIA S p A Via Milano 8 20097 San Donato Milanese MI Italy CANON LATIN AMERICA INC 70...

Отзывы: