background image

Using the Software on the Windows Platform – Advanced Techniques

24

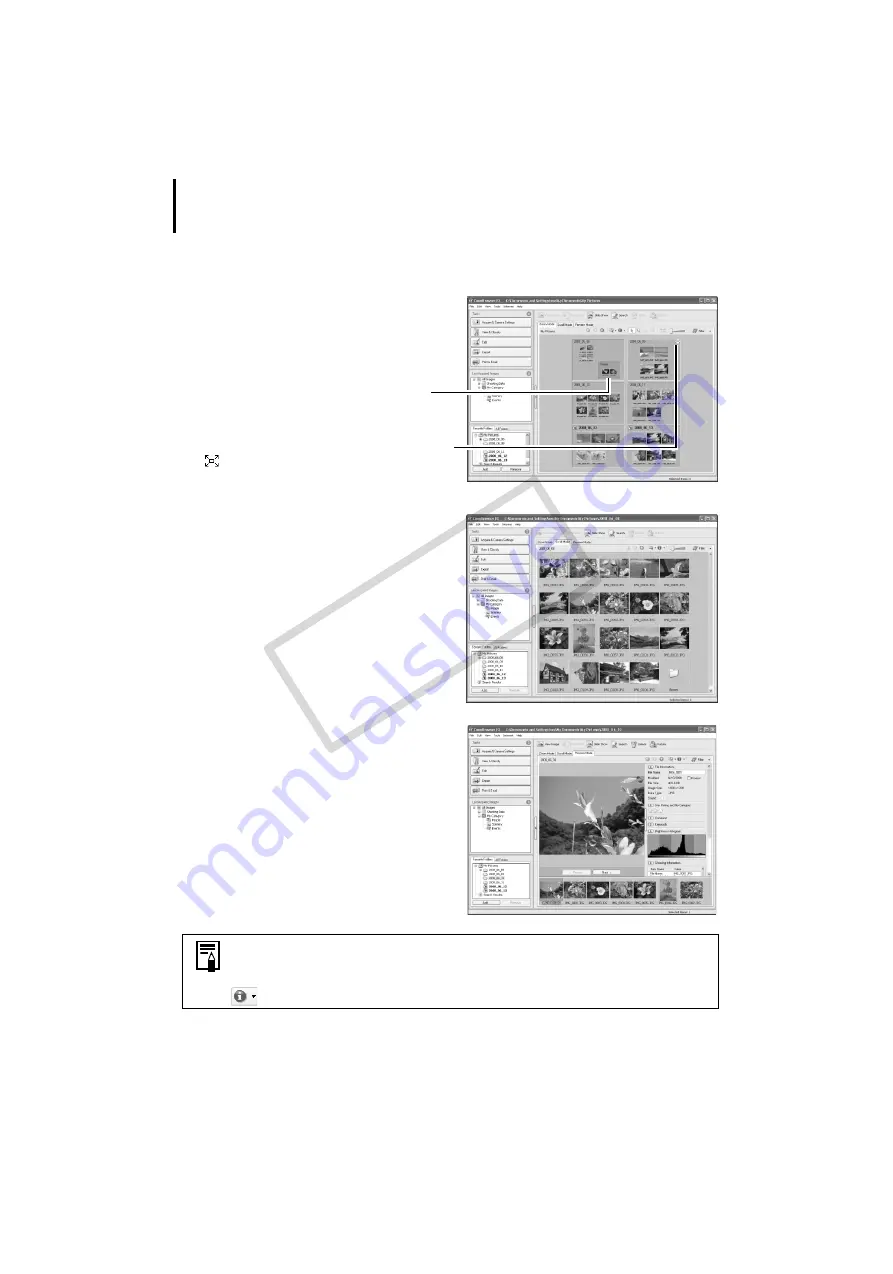
Display Mode

• Selects


the


display


style


for


the


Browser


Area.

Zoom Mode

Displays


all


the


images


in


a


folder


as


thumbnail


images.


This


mode


is


convenient


for


searching


for


images


since


many


can


be


displayed


at


once.


If additional folders are nested within a 
folder, their images are displayed as 
thumbnails as well. 

If you move the mouse cursor over a folder, 

 will display on the upper right. Clicking 

here displays that folder zoomed in. 

Scroll Mode

The


images


within


the


selected


folder


and


subfolders


will


display.


If


you


set


the


display


folder


depth


(level)


to


[1]


or


greater,


the


thumbnails


of


the


images


in


the


folder


will


also


display.


You


can


change


the


folder


depth


in


the


[Tools]


menu


under


the


[Preferences]


option.

Preview Mode

This


mode


displays


the


image


at


a


larger


size


as


well


as


the


image


information.


In zoom mode or scroll mode, positioning the mouse pointer over a 
thumbnail causes the image to appear at a higher magnification in a Mouse 
Over window. You can also set the Mouse Over window to not show in the 

 (Show Information) menu. 

COP

Y

Содержание 3211B001 - PowerShot E1 Digital Camera

Страница 1: ...ons and operating procedures You may download images without installing this software However there are several limitations p 67 CDI E382 010 CANON INC 2008 PRINTED IN MALAYSIA Install the bundled sof...

Страница 2: ...mage the speakers It is also possible to suffer hearing loss from listening with headphones to the loud sounds of a CD ROM played on a music CD player Disclaimer While every effort has been made to en...

Страница 3: ...The Basics 15 Downloading Images to the Computer 15 Printing Images 20 Using the Software on the Windows Platform Advanced Techniques 22 The ZoomBrowser EX Windows 22 ZoomBrowser EX Features 28 Editin...

Страница 4: ...ing 63 Downloading Images without Installing the Software 67 Index 68 Using the PDF Manuals The following PDF manuals are provided to explain the features and procedures for using ZoomBrowser EX and I...

Страница 5: ...s connected via the USB interface cable If it does happen never disconnect the interface cable Try to awaken the computer with the camera in the connected state Some computers will not awaken properly...

Страница 6: ...t the beginning Shoot the images Install the software on the computer Connect the camera to the computer Precautions for Connecting the Camera to the Computer p 3 See your Camera User Guide for connec...

Страница 7: ...Macintosh p 44 Edit a Movie You can edit movies linking movies and stills that have been downloaded to the computer adding text such as titles adding background music or applying various special effe...

Страница 8: ...ate the Camera Shutter from the Computer Remote Shooting Shoot and control the camera s shutter from a computer You can save the recorded images directly to the computer Certain models only Windows p...

Страница 9: ...7 PhotoStitch Windows Macintosh A program for merging multiple images into dramatic panoramas Stitch a Panorama Together Windows p 37 Macintosh p 60 COPY...

Страница 10: ...Read This First 8 COPY...

Страница 11: ...a 512 MB or more Windows XP 256 MB or more Interface USB Free Hard Disk Space Canon Utilities ZoomBrowser EX 200 MB or more PhotoStitch 40 MB or more Display 1 024 x 768 pixels High Color 16 bit or be...

Страница 12: ...Canon Digital Camera Solution Disk to install and overwrite it with the new version If you were using ZoomBrowser EX Ver 2 or 3 perform the following procedures after installing the software 1 Double...

Страница 13: ...ur camera and computer Canon Digital Camera Solution Disk Interface cable supplied with the camera Installation Procedures 1 Confirm that the camera is NOT connected to the computer If it is disconnec...

Страница 14: ...ally select the software to install click Custom Installation 5 If other software is running close each program before clicking OK How to Display the Installer Panel Use the following procedures to di...

Страница 15: ...on screen instructions to proceed with the installation Click Yes if a dialog confirming the installation of Microsoft Net Framework displays 8 When the installation is over select Restart computer i...

Страница 16: ...appears after restarting This concludes the software installation You may now download camera images to the computer p 15 See Uninstalling the Software p 61 to delete the installed programs To ensure...

Страница 17: ...camera to computer connection see below or a memory card reader p 18 Camera to Computer Connection 1 After connecting the supplied interface cable to the computer s USB port and the camera s DIGITAL...

Страница 18: ...ent programs may display depending on your computer setup CameraWindow displays when the camera and computer are set to the mode to communicate Images are not downloaded at this point 3 Download the i...

Страница 19: ...When it is possible to use the Direct Transfer function the Direct Transfer settings menu will appear on the LCD monitor and the Print Share button will light blue See the Camera User Guide for instr...

Страница 20: ...red See the manual for the memory card reader for its connection and handling instructions 2 Select View Download Images using Canon ZoomBrowser EX when the dialog to the right appears and click OK If...

Страница 21: ...s that have had their transfer settings set with the camera click Preferences and select Images whose transfer settings were specified with the camera as the image type to be downloaded Click Lets you...

Страница 22: ...age on each page 1 Click Print Email in ZoomBrowser EX s Main Window followed by Photo Print 2 After confirming that 1 Select Images is selected select images You can select multiple images by holding...

Страница 23: ...u have mastered them try the advanced techniques Using the Software on the Windows Platform Advanced Techniques p 22 Selects the printer and the paper size etc Sets the number of print copies This but...

Страница 24: ...Browser EX Windows This section describes the principal ZoomBrowser EX windows the Main Window Viewer Window and Properties Window Main Window This window is for displaying and organizing images downl...

Страница 25: ...mages You can check images grouped according to the shooting date or My Category Browser Area The folders and the images within the folders selected in the Last Acquired Images section or Folders Area...

Страница 26: ...Clicking here displays that folder zoomed in Scroll Mode The images within the selected folder and subfolders will display If you set the display folder depth level to 1 or greater the thumbnails of...

Страница 27: ...a Filter Tool Menu Displays only images that correspond to the specific conditions Select Button Use this to select images in Zoom mode Fit to Window Changes the thumbnail size to fit them into the wi...

Страница 28: ...olors and brightness cropping and inputting titles You can also use it to start up other programs for editing Image Selector Button Switches between images Full Screen Button Displays the image in the...

Страница 29: ...utter speed and exposure compensation setting The camera model will determine what information is displayed Protect Prevents an image from being overwritten or deleted Comment You can type a comment h...

Страница 30: ...tons are explained in Task Button Functions p 29 2 Perform the procedures according to the instructions Some ZoomBrowser EX functions may not be available with certain camera models Check the Specific...

Страница 31: ...ges from Memory Card Downloads images and sound files from a memory card p 18 You can also select images on the memory card and print them Transfer Images to Memory Card Uploads images from the comput...

Страница 32: ...es during conversion Export Export Still Images Allows you to change the image size or type and export it as a new image Export Movies Allows you to change the movie size or type and export it as a ne...

Страница 33: ...onverts the selected images to the appropriate size for transmission by e mail You can also use it to automatically start an e mail program after conversion Other Features ZoomBrowser EX has the follo...

Страница 34: ...he image movie or still you wish to edit You can select multiple movies or stills 3 Follow the steps at the left of the window to edit the movie and save it Movies are saved as Motion JPEG AVI movies...

Страница 35: ...connecting 2 Click Cancel in Windows Vista to close the Events Dialog or the slide show screen if it appears If CameraWindow appears click Operate Images on Camera followed by in the View Window to c...

Страница 36: ...rams or Programs followed by Canon Utilities CameraWindow RemoteCapture DC 3 and RemoteCapture DC According to the default settings recorded images are saved into the Pictures or My Pictures folder To...

Страница 37: ...Display Click the Start Stop Viewfinder button while a connection to the camera is open to display the image appearing in the camera s viewfinder Slide this to zoom the camera in or out Set the basic...

Страница 38: ...e device performance cannot be guaranteed if the computer enters the standby mode If your camera is equipped with the Auto Rotate function and you set it to On the image will automatically be rotated...

Страница 39: ...ages following the instructions in the guidance panel at the top of the PhotoStitch window Images Shot in Stitch Assist Mode It is easy to merge images if they are shot with the camera s Stitch Assist...

Страница 40: ...the Canon Digital Camera Solution Disk Items to Prepare Your camera and computer Canon Digital Camera Solution Disk Interface cable supplied with the camera Installation Procedures 1 Close any progra...

Страница 41: ...installation settings and click Next Follow the on screen instructions to proceed with the installation 8 When the installation is over click Finish 9 Click Exit in the installer panel and remove the...

Страница 42: ...camera to computer connection see below or a memory card reader p 43 Camera to Computer Connection 1 After connecting the supplied interface cable to the computer s USB port and the camera s DIGITAL...

Страница 43: ...FUNC SET button The Print Share button will blink blue during the transfer and remain lit when it is complete Click the mouse button or press any key on the keyboard to resume the ability to operate...

Страница 44: ...t have had transfer settings set with the camera use the camera or a memory card reader p 43 To check images in the camera or to download only a portion of the images click Operate Images on Camera Yo...

Страница 45: ...quired Images section Next print out the images p 44 By the default settings all images are downloaded to the Pictures folder To download images that have had their transfer settings set with the came...

Страница 46: ...icking on an image selects it and displays a blue frame around it To select multiple images hold down the shift or command key while clicking on images 2 Click Print Email and select Photo Print Movie...

Страница 47: ...basics Once you have mastered them try the advanced techniques Using the Software on the Macintosh Platform Advanced Techniques p 46 Selects a printer Selects options such as the paper size and orient...

Страница 48: ...ftware on the Macintosh Platform The Basics chapter The ImageBrowser Windows This section describes the principal ImageBrowser windows the Browser Window Viewer Window and File Information Window Brow...

Страница 49: ...e or My Category Browser Area The folders and the images within the folders selected in the Last Acquired Images section or Folders Area display here The display style will vary according to your Disp...

Страница 50: ...48 Display Mode Selects the display style for the Browser Area Preview Mode This mode displays the image at a larger size as well as the image information List Mode Displays the images in the folder...

Страница 51: ...Features section p 53 Selection Menu Click this to select deselect all images in the Browser Area Hide Buttons Left Hides the Explorer Panel and the last downloaded image Middle Hides the control pane...

Страница 52: ...ors and brightness cropping and inputting titles You can also use it to start up other programs for editing Image Selector Button Switches between images Zoom Changes the image zoom setting Full Scree...

Страница 53: ...ype a comment here Keyword Sets the keywords used in searches Brightness Histogram A graph of the highlights and shadows distribution in an image Shooting Information Displays detailed information suc...

Страница 54: ...sed in ImageBrowser 1 Select a feature from the Control Panel or the menu 2 Perform the procedures according to the instructions Some ImageBrowser functions may not be available with certain camera mo...

Страница 55: ...ra p 40 Print Selects and prints the images in a camera Write to Camera Uploads images on the computer to the camera Set to Camera Sets the camera owner s name View Image Displays the selected image o...

Страница 56: ...erties allows you to export the shooting properties as a text file Export as a Screensaver Exports the image as a screen saver file Export an Image as Wallpaper Exports the image as a wallpaper file O...

Страница 57: ...der in the Browser Area according to criteria such as the filename file modification date file size or shooting date Other Features ImageBrowser has the following features as well My Camera Settings c...

Страница 58: ...lls You can select multiple movies or stills 2 Click the Edit menu and select Movie Edit 3 Follow the steps displayed in the middle of the window to edit the movie and save it Click this button to pla...

Страница 59: ...ow to close CameraWindow 3 Open the lens cover or remove the lens cap on models equipped with them Proceed to the next step if your model does not have one 4 Double click the Applications folder follo...

Страница 60: ...xt in the boxes below Viewfinder Display Click the Start Stop Viewfinder button while a connection to the camera is open to display the image appearing in the camera s viewfinder Slide this to zoom th...

Страница 61: ...ranteed if the computer enters the sleep mode If your camera is equipped with the Auto Rotate function and you set it to On the image will automatically be rotated and appear in the correct viewing or...

Страница 62: ...mages following the instructions in the guidance panel at the top of the PhotoStitch window Images Shot in Stitch Assist Mode It is easy to merge images if they are shot with the camera s Stitch Assis...

Страница 63: ...uninstall a program You can remove other programs with the same procedures 1 Click the Windows Start menu and select All Programs or Programs followed by Canon Utilities ZoomBrowser EX and ZoomBrowser...

Страница 64: ...JPG STC_0003 JPG All folders except the xxxCANON folders contain image settings files Do not open or delete them Depending on the camera some data types cannot be recorded IMG_xxxx JPG JPEG images _MG...

Страница 65: ...r the correct connection procedures Also check to ensure that you are using the correct cable and that it is securely attached at both ends Are the camera and computer in the correct modes to transfer...

Страница 66: ...t B and press the FUNC SET button Camera not detected Events dialog won t display or images will not download to the computer when camera is connected to the computer via an interface cable Windows Th...

Страница 67: ...lete 4 Click OK in the confirmation dialog Delete all instances of your camera model name or Canon Camera if it appears in one or more places in the Other devices or Imaging devices categories 5 Close...

Страница 68: ...ersonalization followed by Adjust screen Resolution Advanced Settings button and Troubleshoot tab Windows XP Click the Appearance and Theme icon followed by the Display icon Settings tab Advanced butt...

Страница 69: ...d with the Sound Recorder function may not download depending on file size and software used RAW images or JPEG images recorded at the same time as RAW images may not be downloadable with some softwar...

Страница 70: ...22 25 Display Mode Macintosh 46 48 Windows 22 24 Downloading Images Macintosh 40 Windows 15 E Editing Movies 5 Macintosh 56 Windows 32 Events Dialog 16 64 Extracting Stills from Movies 5 Macintosh 50...

Страница 71: ...dows 37 Playing Movies Macintosh 50 Windows 26 Print Share button 17 41 Printing Images 5 Macintosh 44 Windows 20 Properties Window 27 R Remote Shooting 6 Macintosh 57 Windows 33 S Shooting Date Time...

Страница 72: ...Index 70 V View Window Macintosh 41 42 57 Windows 16 17 33 Viewer Window Macintosh 50 Windows 26 Z ZoomBrowser EX 5 10 15 Ver 2 3 10 COPY...

Страница 73: ...71 MEMO COPY...

Страница 74: ...72 MEMO COPY...

Страница 75: ...73 MEMO COPY...

Страница 76: ...74 MEMO COPY...

Страница 77: ...75 MEMO COPY...

Страница 78: ...76 MEMO COPY...

Страница 79: ...77 MEMO COPY...

Страница 80: ...78 MEMO COPY...

Страница 81: ...79 MEMO COPY...

Страница 82: ...80 MEMO COPY...

Страница 83: ...ons and operating procedures You may download images without installing this software However there are several limitations p 67 CDI E382 010 CANON INC 2008 PRINTED IN MALAYSIA Install the bundled sof...

Отзывы: