background image

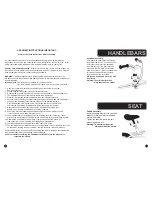
Step 1. Install your handlebars.

J

The stem should be pointing forward. Using the included Allen 

wrench, loosen and remove the bolts and faceplate from the stem. 

The stem connects the handlebar to the fork. Set the bolts and 

faceplate aside together, so you don’t lose anything.

Insert the handlebar into the stem and loosely reattach the faceplate 

to the stem. Take care to not tighten one bolt more than another. 

Your goal is a consistent gap between the stem and faceplate from 

top to bottom.

Center the handlebar in the stem using the markings on the bar and 

roll the handlebar back into a comfortable position. Hand-tighten the 

stem faceplate bolts using the Allen key. You will fully tighten these 

bolts later.

A.

B.

C.

B

C

SET-UP

STEP 2

STEP 1

STEP 3

STEP 4

STEP 5

PRE-RIDE CHECK 

Содержание Kids with Training Wheels

Страница 1: ...Kids with Training Wheels Quick Start Guide Applies to Kids Trail 12 16...

Страница 2: ...NT SAFETY INFORMATION First up thank you for buying a new Cannondale bike we re excited to have you on board and to get you out riding as soon as possible Our new assembly process is easy to follow us...

Страница 3: ...STEP 3 STEP 4 STEP 5 PRE RIDE CHECK The 4 major steps to getting your bike ready to ride 1 Install your handlebars 2 Install your seat post 3 Install your training wheels 4 Install your front wheel 5...

Страница 4: ...ed but before you ride please read the owner s manual First locate the staples on the top of the box and carefully remove them with a screwdriver Use caution the staples are sharp Remove the small par...

Страница 5: ...dlebar into the stem and loosely reattach the faceplate to the stem Take care to not tighten one bolt more than another Your goal is a consistent gap between the stem and faceplate from top to bottom...

Страница 6: ...the seatpost into the frame past this line Hand tighten the seatpost collar so you can t pull the seatpost from the frame You will fully tighten this later Remove any additional packaging from the rea...

Страница 7: ...e training wheel bracket into the top hole of the rear axle dropout Install the training wheel bolt and tighten firmly with your hand Repeat steps 1 and 2 on the opposite side of the bike A B C A B C...

Страница 8: ...el Install the hub guards so the tabs are pointed out Remove the axle spacer from the fork dropouts Lower the fork dropouts onto the hub axle and rotate the hub guards so the hub guard tab aligns with...

Страница 9: ...tab facing the fork Rotate the washers so the tabs fall into the hole in each dropout Hand tighten the axle nuts to retain the tabbed washers Use an open end or adjustable wrench to tighten both axle...

Страница 10: ...arked with R on the body and or spindle into the crank and tighten with your fingers Repeat with the left pedal with an L on it Remember both pedals will always tighten toward the front of the bike Ti...

Страница 11: ...Confirm the handlebar is centered and at the correct angle then torquethestemboltsinan X patterntothespecifiedvalue ensuring the gap between the faceplate and stem body remains even from top to bottom...

Страница 12: ...em If itmoves thestemfaceplateboltsarenottightenough Usethetorque wrench and correct bit to torque the faceplate bolts to specification using the same X pattern as before Grab the front and rear of th...

Страница 13: ...wheel then rotating the pedals backward to engage the brake The wheel should come to a complete stop Tire Pressure Inflate the tires to the manufacturer s recommended tire pressure which is marked on...

Страница 14: ...Welcome to the family ridecannondale...

Страница 15: ......

Страница 16: ......

Отзывы: