background image


TV Mount Wall Safe 

OWNERS MANUAL 


Rev (9/13) 

Содержание Wall Safe

Страница 1: ...TV Mount Wall Safe OWNERS MANUAL Rev 9 13 ...

Страница 2: ... the Keypad Lock Out Wrong Try Penalty Changing the Access Codes Locking Closing the Door Warranty Pg 6 Unit Information Record DO NOT LOCK THIS IN YOUR SAFE Important Taking the time to fill out the information below and stapling a copy of your receipt to this manual will help expedite any service needs 888 220 1116 Purchased From Purchased Date Serial Number Key Number ...

Страница 3: ...rgency key s or manual in the safe Standard Features TV Mount for TV s holds up to 65 inches and 80lbs Maximum VESA of 400 x 400 Hidden storage compartment Quick drop down access door Two user access codes Lock out after ten 10 wrong entries for three 3 minutes Electronic or Mechanical Access LED Lighted Compartment ...

Страница 4: ...3 Included Hardware ...

Страница 5: ...mately 14 37 inches X 14 37 inches Carefully place the safe into the wall Don t forcefully insert the unit should slide into the opening easily Note There should be a 25 inch gap between the safe and wall Open the door and locate the 4 mounting tabs 2 on each side of walls Mark holes for pre drilling Remove the safe and pre drill holes at the marked locations Reinsert safe into the wall and secure...

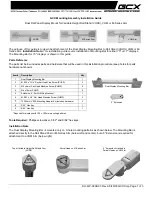
Страница 6: ...rews J in preparation of the installation Insert the end of the TV arm into the mounting bracket on the safe as pictured below While holding the TV arm in the mounting bracket on the safe insert the Shaft K and use the two 2 M8x16 Button Head Socket Screws J to secure the TV arm to the wall safe Use caution not to over tighten and or strip the heads of the screws ...

Страница 7: ...termine the correct screw diameter and lenghth Important The incorrect screws can cause potential damage to person or property See image below to the left Line up the holes on the TV brackets to the mounting holes on the back of the TV and assure the TV brackets are level see image above to the right Important If the TV brackets do not lay flat against the TV or the mounting holes are recessed use...

Страница 8: ...ION ASSISTANCE WITH THESE STEPS Lift TV onto bracket as shown in Diagram 1 making sure it is secure to the top lip of the bracket Center TV onto the bracket as shown in Diagram 2 Tighten set screw to bottom of bracket as show in Diagram 3 Diagram 1 Diagram 2 Diagram 3 ...

Страница 9: ...nto the lock and turn counter clockwise to open Installing Replacing the Batteries With the door in the open position locate the black battery compartment cover inside the safe on the roof top Remove the black battery compartment cover by pressing the tab to the left and pulling down The battery tray will drop down Install four 4 new AA Alkaline Batteries and reinsert the battery tray with INSERT ...

Страница 10: ...nute lock period Changing the Access Codes To program your access codes follow the instructions below Setting Main Code Number o Open the door o Press the RESET button in the upper right corner of the inside of safe System will beep twice and yellow LED lights up o Input the new one 1 to eight 8 digit code followed by the button o Your new code is now recorded Setting secondary code number o Open ...

Страница 11: ...y The Company is not responsible for damage to or theft of the Product or its contents 8 The obligation of Company under this warranty is contingent upon proper use of the Product and shall not apply to Products or parts or components thereof which have been put in unusual or extreme environments or any damage caused by an act of God or force of nature Modifying or tampering with the Product which...

Страница 12: ...11 WWW CANNONSECURITYPRODUCTS COM ...

Отзывы: