background image

Instructions Générales

18

1.1 Indications de sécurité
1.2 Sécurité électrique
1.3 Recommandations
1.4 Installation
1.5 La gestion des déchets et la
protection de l'environnement
1.6 Déclaration de conformité

2.1 Vue d'ensemble
2.2 Accessoires
2.3 Première utilisation

Description du produit

20

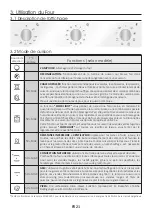
3.1 Description de l'affichage
3.2 Mode de cuisson
3.3 Utilisation du minuteur sonore

Utilisation du Four

21

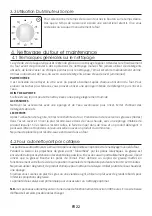
4.1 Remarques générales concernant
le nettoyage
4.2 Four autonettoyant par catalyse
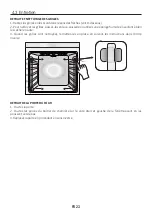
4.3 Entretien

• Retrait et nettoyage des grilles
• Retrait de la porte du four
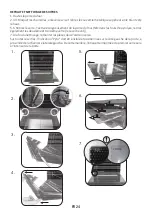
• Retrait et nettoyage des vitres
• Remplacement de l'ampoule

Nettoyage du four et
maintenance

22

5.1 F.A.Q.

Dépannage

25

SOMMAIRE

FR 17

Содержание FCP642X/E

Страница 1: ...USER INSTRUCTIONS OVENS EN FR NOTICE D EMPLOI ET D INSTALLATION DES FOURS ENCASTRABLES 02 14 CANDY HOOVER GROUP S R L Via Comolli 16 20861 Brugherio MB Italy ...

Страница 2: ...ctions Cookthevegetablesinacontainerwithalidinsteadofanopentray Avoid leaving food inside the oven after cooking for more than 15 20 minutes WARNING the appliance and accessible parts become hot during use Be carefulnottotouchanyhotparts WARNING the accessible parts can become hot when the grill is in use Childrenshouldbekeptatasafedistance WARNING ensure that the appliance is switched off before ...

Страница 3: ...nganoccurringcookingphasemaycausea malfunctionofthemonitor lnthiscasecontactcustomerservice Anyexcessofspilledmaterialshouldberemovedbeforecleaning Donotuseasteamcleanerforcleaningoperations Connect a plug to the supply cable that is able to bear the voltage current and load indicated on the tag and having the earth contact The socket must be suitable for the load indicated on the tag and must hav...

Страница 4: ...d in order to operate the applianceattheratedfrequencies WARNING Do not line the oven walls with aluminium foil or single use protection available from stores Aluminium foil or any other protection in direct contact with the hot enamel risk melting and deteriorating the enameloftheinsides WARNING Neverremovetheovendoorseal EN 04 ...

Страница 5: ...ration 2 1 Overview 2 2 Accessories 2 3 First use Product Description 8 3 1 Display description 3 2 Cooking modes 3 3 Using the minute timer Use of the Oven 9 4 1 General notes on cleaning 4 2 Self cleaning oven with catalytic 4 3 Maintenance Removing and cleaning wire racks Removal of the oven window Removal and cleaning of the glass door Changing the bulb 10 5 1 F A Q Troubleshooting 13 ...

Страница 6: ...ctorunreasonableusage donottouchtheappliancewithwetordamphandsorfeet Theuseofanyelectricalapplianceimpliestheobservanceofsomefundamentalrules incaseofmalfunctionand orpooroperation switchofftheapplianceanddonottamperwithit donotpullonthepowercabletodisconnecttheplugfromthesocket 1 2 Electrical Safety Beforeconnectingtheoventothepowersupply askaqualifiedelectriciantocheckthecontinuityofthe power su...

Страница 7: ...the oven is off This is a normal behavior Icanberemovedjustturningtheplugupsidedownorswappingthesupplyterminals 1 5 Waste management and environmental protection In many countries domestic collections may be available for large WEEEs When you buy a new appliance the old one can be returned to the vendor who must accept it free of charge as a one off as longastheapplianceisofanequivalenttypeandhast...

Страница 8: ...trays and plates 2 3 First Use PRELIMINARYCLEANING Clean the oven before using for the first time Wipe over external surfaces with a damp soft cloth Wash all accessories and wipe inside the oven with a solution of hot water and washing up liquid Set the empty oven to the maximum temperature and leave on for about 1 hour this will remove any lingering smellsofnewness EN 08 1 2 3 4 6 5 Lateral wire ...

Страница 9: ...ps the humidity inside the oven and the moisture content of the food preservingthenutritionalvaluesandensuringarapiduniformcookingprocess Try all your recipes and reduce the amount of dressing you usually use and experience thelightnessofthisnewfunction 50 MAX 50 MAX The top heating element is used alone and you can adjust the temperature Five minutes preheating is required to get the elements red...

Страница 10: ...eaning panels covered in a micro porous coating are available as optional extras for all models Iftheyarefitted theovennolongerneedstobecleanedbyhand The fat that is splattered onto the sides of the oven during roasting is eliminated by the microporous coatingwhichbreaksthefatdownbycatalysisandtransformsitintogas Excessive splattering may nevertheless block the pores and therefore hinder self clea...

Страница 11: ...asher or use a wet sponge ensuring that they are driedafterwards 3 Afterthecleaningprocessinstallthewireracksinreverseorder 4 3 Maintenance 2 Open the clamps of the hinge housing on the right and left side of the front window by pushing them downwards 3 Replacethewindowbycarryingouttheprocedureinreverse REMOVALOFTHEOVENWINDOW 1 Openthefrontwindow EN 11 ...

Страница 12: ...ully extracting it from the oven door NB in pyrolytic ovens also remove thesecondandthirdglass ifpresent 7 Attheendofcleaningorsubstitution reassemblethepartsinreverseorder Onallglass theindication Pyro mustbelegibleandpositionedontheleftsideofthedoor closetothe left handlateralhinge Inthisway theprintedlabelofthefirstglasswillbeinsidethedoor 1 Opentheovendoor EN 12 ...

Страница 13: ...ceitwithanewbulbofthesametype 5 5 1 FAQ Troubleshooting EN 13 PROBLEM POSSIBLE CAUSE SOLUTION The oven does not heat up The clock is not set Set the clock The child lock is on A cooking function and temperature has not been set Deactivate the child lock Ensure that the necessary settings are correct The oven does not heat up The oven does not heat up ...

Страница 14: ...s capacités physiques sensorielles ou mentales sont limitées sans expérience ni connaissance du produit uniquement s ils sont surveillés ou s ils ont été informés de la manière d utiliser l appareil en toute sécuritéetqu ilscomprennentlesrisquespossibles AVERTISSEMENT Les parties accessibles peuvent devenir très chaudes quandlegrillestenmarche Lesenfantsdoiventêtretenusàunedistancede sécurité Lese...

Страница 15: ... présence d une mise à la terre La prise d alimentation doit supporter la charge indiquée sur l étiquette et être dotée d une mise à la terre en état de fonctionnement Le conducteur de mise à la terre est jaune et vert Cette opération doit être exécutée par le personnel qualifié En cas d incompatibilité entre la prise d alimentation et la fiche du câble de l appareil demandez à un électricien prof...

Страница 16: ...nsérée dans la cavité Le non respect des consignes ci dessus peut compromettre la sécurité de l appareiletannulerlagarantie Une coupure de courant prolongée durant une phase de cuisson peut engendrer un dysfonctionnement de l écran Dans ce cas veuillez contacter leserviceaprès vente AVERTISSEMENT Ne recouvrez pas les parois du four avec du papier aluminiumouuneprotectionjetabledisponibledanslesmag...

Страница 17: ... Première utilisation Description du produit 20 3 1 Description de l affichage 3 2 Mode de cuisson 3 3 Utilisation du minuteur sonore Utilisation du Four 21 4 1 Remarques générales concernant le nettoyage 4 2 Four autonettoyant par catalyse 4 3 Entretien Retrait et nettoyage des grilles Retrait de la porte du four Retrait et nettoyage des vitres Remplacement de l ampoule Nettoyage du four et maint...

Страница 18: ...esrèglesfondamentales Nepastoucherl appareilaveclesmainsoulespiedsmouillésouhumides Engénérall utilisationd adaptateurs deprisesmultiplesetderallongesestdéconseillé 1 2 Sécurité électrique CONNEXION LE BRANCHEMENT ELECTRIQUE DOIT ÊTRE REALISE PAR UN INSTALLATEUR AGREE OU UN TECHNICIEN DE E QUALIFICATIONSIMILAIR L alimentation électrique à laquelle le four est connecté doit être conforme aux lois e...

Страница 19: ...er la température Nous vous conseillons de n utiliser que des plats desmoulesàpâtisserierésistantsàdetrèshautestempératures Après chaque utilisation du four réaliser un petit entretien qui favorisera le nettoyage parfait du four Ne pas tapisser les parois du four avec des feuilles en aluminium ou des protections jetables du commerce La feuille d aluminium ou toute autre protection en contact direc...

Страница 20: ...épourlescuissonsautresqueGrillet grill pulsé Il va provoquer un écran de température entre le bas et le haut de la cavité Riennedoitêtreposésurlasoledufour risquede déformation de l émail En cas de non respect de ces conseils nous ne pourrons être tenu pour responsable 2 3 Première Utilisation UN PREMIER NETTOYAGE doit être réalisé avant la première utilisation passer un chiffon doux et humide sur...

Страница 21: ...eurs nutritionnelles desalimentsenassurantunprocessusdecuissonrapideetuniforme COOK LIGHT 50 MAX 50 MAX GRIL l utilisation du grilloir se fait porte fermée Un préchauffage de 5 mins est nécessaire pour le rougissement de la résistance Succès assuré pour les grillades les brochettes et les gratins Les viandes blanches doivent être écartées du grilloir le temps de cuisson sera alors plus long mais l...

Страница 22: ...le plat récolte sauce dans de l eau chaude avec une éponge imbibée de produit lessiviel Si les résidus restent collés le faire tremper dans de l eau et un produit détergent Il peutaussiêtrenettoyédansunlave vaisselleouavecunproduitducommerce lêchefrite Nejamaisreplacerleplatrécolte sauceencrassédansunfour LECHEFRITE Sielleestsale lejointpeutêtrenettoyéavecuneépongelégèrementhumide FR 22 4 2 Four a...

Страница 23: ...e RETRAITETNETTOYAGEDESGRILLES 2 Pour nettoyer les grilles passez les en lave vaisselle ou utilisez une éponge humide en veillant à bien lessécherensuite 4 3 Entretien RETRAITDELAPORTEDUFOUR 3 Replacezlaporteenprocédantensensinverse 2 Ouvrez les pinces du boîtier de charnière sur le côté droit et gauche de la fenêtre avant en les poussantverslebas 1 Ouvrezlaporte FR 23 ...

Страница 24: ...AITETNETTOYAGEDESVITRES Sur toutes les vitres l indication Pyro doit être lisible et positionnée sur le côté gauche de la porte à proximité de la charnière latérale gauche De cette manière l étiquette imprimée du premier verre sera àl intérieurdelaporte 5 6 Retirez le verre soigneusement de la porte du four NB dans les fours de pyrolyse retirez égalementlesdeuxièmeettroisièmeverre lecaséchéant l e...

Страница 25: ...erparuneampouledumêmemodèle 5 Dépannage 5 1 FAQ PROBLEMES CAUSE POSSIBLE SOLUTION Le four ne chauffe pas L horloge n est pas réglée Réglez l horloge La sécurité enfant est activée Les réglages nécessaires ne sont pas imposés Désactiver la sécurité enfant Assurez vous que les paramètres nécessaires sont corrects Le four ne chauffe pas Le four ne chauffe pas FR 25 ...

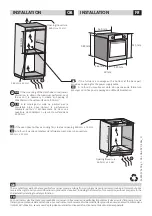
Страница 26: ...Ouverture 460 mm x 15 mm If the oven does not have a cooling fan create an opening 460 mm x 15 mm Si le four n a pas de ventilateur de refroidissement créer une ouverture 460 mm x 15 mm GB FR Opening Ouverture 560 mm x 45 mm If the mounting of the plinth does not allow air circulation to obtain the maximum performance of the oven it is necessary to create an opening of 500x10mmorthesamesurfacein5 ...

Отзывы: