background image

User Instructions
Mode d’emploi
Gebrauchsanweisung
Istruzioni per l’uso

CDC 179X
Reverse Action

EN

FR

DE

IT

40001731English.fm  Page 1  Monday, September 6, 2004  4:21 PM

Содержание CDC 179X

Страница 1: ...User Instructions Mode d emploi Gebrauchsanweisung Istruzioni per l uso CDC 179X Reverse Action EN FR DE IT 40001731English fm Page 1 Monday September 6 2004 4 21 PM ...

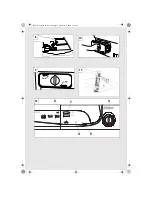
Страница 2: ...2 2 2 1 3 3 4 7 6 5 40001731English fm Page 2 Monday September 6 2004 4 21 PM ...

Страница 3: ...12 3 4 5 9 10 11 8 1 2 40001731English fm Page 3 Monday September 6 2004 4 21 PM ...

Страница 4: ...ly that the air flowing through the dryer is not restricted Check the fluff filter after use and clean if necessary The venting hose or duct should be checked periodically and any accumulation of fluff removed The inlet and outlets should be kept free from obstructions If the dryer is used frequently the period between checks should be reduced accordingly Dryness Clothes should be spin dried or th...

Страница 5: ...Before using the tumble dryer for the first time please read this instruction book thoroughly remove all items packed inside drum wipe the inside of the drum and door with a damp cloth to remove any dust which may have settled in transit IMPORTANT This dryer must only be used for drying household textiles and garments where a water solution has been used for the cleaning process DO NOT tumble dry ...

Страница 6: ...ryer as shown by the care symbols on each item Clothes preparation Check that all fastenings are closed and that pockets are empty Turn the articles inside out Place clothes loosely in the drum to make sure that they don t get tangled Do not overload the drum particularly when drying large items otherwise the laundry may stick to the drum and not dry evenly Maximum drying weight Cottons Max 7 kg S...

Страница 7: ...f laundry this will save time and electricity NEVER exceed the maximum weight this will waste time and electricity ALWAYS check that the filter is clean before every drying cycle as this aids efficiency NEVER put dripping wet items into the tumble dryer this may damage the appliance and waste time and efficiency Opening the door Pull on handle to open the door fig 2 To restart the dryer close the ...

Страница 8: ...lide the water container back into position PUSH FIRMLY INTO PLACE 5 Refit the kickplate by engaging the hinges at the top and snapping the lower clips into place Condenser IMPORTANT Always switch off and remove the plug from the electricity supply before cleaning the condenser To maintain the efficiency of the dryer regularly check that the condenser is clean To remove the condenser 1 Remove the ...

Страница 9: ...N PROGRAM RELAXES CREASES EASIER TO IRON REMEMBER During the last 10 minutes the load is always tumbled in cool air HEAT SETTING HEAVY LOAD MEDIUM LOAD LIGHT LOAD COTTON HIGH 130 160 Min 70 80 Min 30 50 Min SYNTHETICS LOW 70 80 Min 30 40 Min ACRYLICS LOW 50 65 Min 20 30 Min 40001731English fm Page 9 Monday September 6 2004 4 21 PM ...

Страница 10: ...reduce the heat level for delicate items press again to select high temperature HIGH Heat setting LOW Heat setting 3 DRYING TIME dial selects drying time or pre ironing option 4 FILTER CARE indicator lights when filter needs cleaning 5 EMPTY WATER indicator lights when water container is full 40001731English fm Page 10 Monday September 6 2004 4 21 PM ...

Страница 11: ...e or inside on radiators The PRE IRONING process relaxes the creases in the fabric making ironing quicker and easier 4 Gently close the door pushing it slowly until you hear the door click shut 5 Press the ON button The indicator will light and the drying cycle begins 6 The load is dried by tumbling in thermostatically controlled warm air Cool air is used for the last 10 minutes to reduce creasing...

Страница 12: ...to allow circulation of air to dry it Wipe the outside of the machine and the door with a soft cloth DO NOT use abrasive pads or cleaning agents To prevent the door sticking periodically clean the door gasket with a non scratch cream cleaner Technical specifications Drum capacity 115 litres Maximum load 7 kg Height 85 cm Width 60 cm Depth 60 cm Energy Label Band C Note For electrical data refer to...

Страница 13: ...t the machine Go to page 10 Has the drying time or the programme been selected Go to page 10 Has the machine been switched on again after opening the door Go to page 7 Has the dryer stopped operating because the water tray is full and needs emptying Go to page 8 Filter Care Indicator on Does the filter need cleaning Go to page 7 Empty Water Indicator on Does the water container need emptying Go to...

Страница 14: ...ils qui brûlent du gaz ou d autres combustibles Vérifiez régulièrement que l air peut circuler librement dans le sèche linge Vérifiez le filtre à peluches après usage et nettoyez le le cas échéant Il est nécessaire d inspecter régulièrement le tuyau ou la conduite de ventilation et d éliminer les accumulations éventuelles de peluches Les entrées et sorties doivent être libres d obstructions Si le ...

Страница 15: ...nt d utiliser le sèche linge pour la première fois veuillez lire ce manuel d instruction en détail retirez tous les articles qui se trouvent à l intérieur du tambour essuyez l intérieur du tambour et de la porte avec un chiffon humide pour éliminer la poussière éventuelle qui aurait pu s y infiltrer en transit IMPORTANT Ce sèche linge doit être utilisé exclusivement pour sécher le linge de maison ...

Страница 16: ... sont vides Mettez les articles à l envers Placez les vêtements en vrac dans le tambour en veillant à ce qu ils ne s emmêlent pas les uns avec les autres Ne surchargez pas le tambour particulièrement lorsque vous séchez de grands articles sinon le linge risque d adhérer au tambour et de ne pas sécher de manière uniforme Poids de séchage maximum Coton 7 kg maxi Synthétiques 3 5 kg maxi Triez la cha...

Страница 17: ...ps ou de l électricité Vérifiez TOUJOURS que le filtre est propre avant chaque cycle de séchage pour assurer une efficacité de séchage maximale Ne mettez JAMAIS d articles dégoulinant d eau dans le sèche linge pour ne pas endommager la machine et perdre du temps et de l efficacité Ouverture de la porte Tirez sur la poignée pour ouvrir la porte fig 2 Pour remettre le sèche linge en marche fermez la...

Страница 18: ...LACE 5 Remettez la plaque de protection en place en engageant les charnières du haut et en enclenchant les attaches inférieures en place Condenseur IMPORTANT Coupez toujours le courant et débranchez la prise avant de nettoyer le condenseur Pour maintenir l efficacité du sèche linge vérifiez régulièrement la propreté du condenseur Pour retirer le condenseur 1 Retirez la plaque de protection fig 5 2...

Страница 19: ...E ANTI FROISSEMENT PLUS FACILE A REPASSER ATTENTION Pendant les 10 dernières minutes la charge est toujours séchée dans de l air froid PUISSANCE DE SECHAGE PLEINE CHARGE 1 2 CHARGE PETITE CHARGE COTON HAUT 130 160 min 70 80 min 30 50 min SYNTHETIQUES BAS 70 80 min 30 40 min ACRYLIQUE BAS 50 65 min 20 30 min 40001731French fm Page 19 Monday September 6 2004 4 53 PM ...

Страница 20: ...s délicats et appuyez à nouveau pour sélectionner une température élevée Puissance de séchage HAUTE Puissance de séchage BASSE 3 Cadran TEMPS DE SECHAGE sélectionne le temps de séchage ou l option de pré repassage 4 L indicateur ENTRETIEN FILTRE s allume lorsque le filtre a besoin d être nettoyé 5 L indicateur VIDER EAU s allume lorsque le réservoir d eau est plein 40001731French fm Page 20 Monday...

Страница 21: ...érieur sur des radiateurs Le processus de PRE REPASSAGE détend les froissements du tissu pour rendre le repassage plus rapide et plus facile 4 Fermez doucement la porte en la poussant lentement jusqu à ce que vous entendiez un déclic 5 Appuyez sur le bouton MARCHE L indicateur s allume et le cycle de séchage commence 6 La charge est séchée par rotation dans de l air chaud contrôlé par un thermosta...

Страница 22: ...ation d air Essuyez l extérieur de la machine et la porte avec un chiffon doux N utilisez PAS de tampons ou d agents de nettoyage abrasifs Pour empêcher que la porte n adhère nettoyez régulièrement le joint de la porte avec un produit de nettoyage anti rayure en crème Spécification technique Capacité du tambour 115 litres Charge maximale 7 kg Hauteur 85 cm Largeur 60 cm Profondeur 60 cm Bande étiq...

Страница 23: ...sez à la page 21 Le sèche linge est il en position de marche au niveau du courant de secteur et de la machine Passez à la page 20 La période de séchage ou le programme a t il été sélectionné Passez à la page 20 La machine a t elle été remise en marche après l ouverture de la porte Passez à la page 17 Le sèche linge s est il arrêté parce que le réservoir d eau est plein et qu il faut le vider Passe...

Страница 24: ...en verwendet wird Prüfen Sie regelmäßig die reibungslose Luftzirkulation im Trockner Überprüfen Sie nach Gebrauch das Flusensieb und reinigen Sie es wenn es erforderlich ist Der Abluftschlauch oder kanal sollte regelmäßig nachgesehen und angesammelte Flusen entfernt werden Die Ansaug und Abluftanschlüsse dürfen nicht zugestellt werden Bei regelmäßiger Benutzung des Trockners sind die Kontrollabstä...

Страница 25: ...as erste Mal benutzen lesen Sie die Gebrauchsanleitung bitte sorgfältig durch entfernen Sie alle in der Trommel befindlichen Gegenstände wischen Sie die Innenseiten der Trommel und Tür mit einem feuchten Tuch aus um den beim Transport eventuell dort angesammelten Staub zu entfernen WICHTIG Dieser Trockner darf nur für die Trocknung von Haushaltstextilien und Kleidungsstücken benutzt werden die vor...

Страница 26: ...trocknen wollen für eine Trocknung im Trockner geeignet ist Vorbereitung der Textilien Überprüfen Sie ob alle Verschlüsse zu und die Taschen entleert sind Wenden Sie die Innenseiten der Textilien nach außen Füllen Sie die Kleidungsstücke locker in die Trommel so dass diese sich nicht verheddern Überladen Sie die Trommel nicht dies gilt insbesondere wenn Sie große Teile trocknen da die Wäsche sonst...

Страница 27: ...n Überschreiten Sie NIE die maximale Füllmenge denn dies ist zeitaufwendig und Energieverschwendung Achten Sie IMMER darauf dass der Filter vor jedem Trocknungsvorgang sauber ist um eine optimale Leistung zu erzielen Füllen Sie AUF KEINEN FALL tropfnasse Wäschestücke in den Wäschetrockner dies kann zu Schäden am Gerät führen ist zeitaufwendig und kann die Leistung beeinträchtigen Öffnen der Tür Zi...

Страница 28: ... Wartungsklappe wieder indem Sie die Scharniere oben einklinken und die unteren Clips einschnappen lassen Kondensator WICHTIG Schalten Sie immer das Gerät aus und ziehen Sie den Stecker aus der Steckdose bevor der Kondensator gereinigt wird Damit der Trockner immer optimale Leistung erbringen kann überprüfen Sie regelmäßig ob der Kondensator sauber ist Entfernen des Kondensators 1 Entfernen Sie di...

Страница 29: ...HUTZ FÜR LEICHTERES BÜGELN HINWEIS Während der letzten 10 Minuten des Programms wird die Wäsche im kalten Luftstrom abgekühlt TEMPERATUR STUFE VOLLE BELADUNG MITTLERE BELADUNG GERINGE BELADUNG BAUMWOLLE HOCH 130 160 Min 70 80 Min 30 50 Min KUNSTFASER NIEDRIG 70 80 Min 30 40 Min ACRYL NIEDRIG 50 65 Min 20 30 Min 40001731German fm Page 29 Monday September 6 2004 4 54 PM ...

Страница 30: ...n einzustellen Drücken Sie den Knopf erneut um wieder eine höhere Temperatur einzustellen HOHE Temperaturstufe NIEDRIGE Temperaturstufe 3 Drehschalter TROCKNUNGSZEIT für die Wahl der Trocknungszeit oder der Option Knitterschutz 4 FLUSENSIEB Anzeige leuchtet auf wenn das Sieb gereinigt werden muss 5 KONDENSWASSER LEEREN Anzeige leuchtet auf wenn der Kondenswasser Behälter voll ist 40001731German fm...

Страница 31: ...oder in der Wohnung über Heizungen getrocknet werden Das KNITTERSCHUTZ Verfahren lockert die Liegefalten im Stoff wodurch er sich schneller und leichter bügeln lässt 4 Die Tür mit einem sanften Druck schließen bis Sie ein Klick Geräusch hören 5 Drücken Sie die Taste EIN Die Anzeige leuchtet auf und der Trocknungsvorgang beginnt 6 Die Wäsche trocknet während sie sich in der thermostatisch kontrolli...

Страница 32: ...ie durch die Luftzirkulation getrocknet wird Reinigen Sie die Außenseite der Maschine und der Tür mit einem weichen Tuch AUF KEINEN FALL Scheuerschwämme oder Scheuermittel benutzen Um ein Verkleben der Tür zu verhindern die Türdichtung in Abständen mit einem nicht scheuernden flüssigen Reiniger säubern Technische Daten Trommelinhalt 115 Liter Maximales Fassungsvermögen 7 kg Höhe 85 cm Breite 60 cm...

Страница 33: ...ockner sowohl am Netzanschluss als auch an der Maschine angestellt Siehe Seite 30 Ist die Trocknungszeit oder das Programm gewählt worden Siehe Seite 30 Ist die Maschine nach dem Türöffnen wieder angestellt worden Siehe Seite 27 Hat der Trockner den Betrieb eingestellt weil der Kondenswasser Behälter voll ist und entleert werden muss Siehe Seite 28 Die Flusensieb Anzeige leuchtet Muss das Sieb ger...

Страница 34: ...e d aria senza impedimenti di sorta Dopo l uso ispezionare il filtro antifilacce e se necessario pulirlo Controllare periodicamente il tubo o il condotto di sfiato eliminando eventuali filacce accumulatesi al suo interno Verificare costantemente che presa e sfiati non siano ostruiti In caso d impiego frequente dell asciugatrice accorciare opportunamente l intervallo fra un controllo e l altro Asci...

Страница 35: ...ormazioni Prima di utilizzare l asciugatrice per la prima volta leggere attentamente il presente libretto d istruzioni togliere tutti gli articoli presenti all interno del cestello pulire l interno del cestello e il portellone con un panno umido in modo da eliminare l eventuale polvere depositata durante il trasporto IMPORTANTE L asciugatrice è prevista esclusivamente per uso domestico ed è destin...

Страница 36: ...ote Girare i capi con il rovescio all esterno Introdurre i capi nel cestello uno ad uno in modo che non si aggroviglino Non sovraccaricare il cestello particolarmente quando si devono asciugare articoli di grandi dimensioni Diversamente la biancheria potrebbe incollarsi al cestello con conseguente asciugatura non uniforme Peso massimo di asciugatura Capi in cotone 7 kg Capi sintetici 3 5 kg Selezi...

Страница 37: ...si consuma più elettricità Prima di ogni ciclo di asciugatura verificare SEMPRE che il filtro sia pulito in quanto la pulizia del filtro migliora le prestazioni della macchina EVITARE di caricare capi ancora gocciolanti in quanto oltre a rischiare di rovinare la macchina e di peggiorarne le prestazioni si prolunga il tempo di asciugatura Apertura del portellone Tirare la maniglia per aprire lo spo...

Страница 38: ...e lo zoccolo agganciando le cerniere in alto e facendo scattare in sede i dispositivi di bloccaggio inferiori Condensatore IMPORTANTE Prima di procedere alla pulizia del condensatore disattivare sempre l apparecchio e staccare la spina dalla presa elettrica Ai fini delle prestazione dell apparecchio è opportuno verificare regolarmente lo stato di pulizia del condensatore Per togliere il condensato...

Страница 39: ...ANTIPIEGA ATTENUA LE PIEGHE FACILITA LA STIRATURA RICORDA Nel corso degli ultimi 10 minuti il carico viene sempre asciugato con aria fredda SELEZIONE TEMPERATURA CARICO PESANTE CARICO MEDIO CARICO LEGGERO COTONE ELEVATA 130 160 Min 70 80 Min 30 50 min SINTETICI BASSA 70 80 Min 30 40 min ACRILICI BASSA 50 65 min 20 30 min 40001731Italian fm Page 39 Monday September 6 2004 4 50 PM ...

Страница 40: ...ripremere il tasto per selezionare una temperatura elevata Selezione della temperatura ELEVATA Selezione della temperatura BASSA 3 Selettore TEMPO DI ASCIUGATURA consente di selezionare la durata del ciclo di asciugatura o l opzione pre stiratura 4 PULIZIA FILTRO si accende segnalando la necessità di pulire il filtro 5 Spia ELIMINA ACQUA si accende quando la vaschetta dell acqua è piena 40001731It...

Страница 41: ...atti asciugare all aperto sul filo o vengono posti su radiatori Il ciclo di PRE STIRATURA attenua le pieghe sul tessuto rendendo più facile e più rapida la stiratura 4 Chiudere delicatamente il portellone spingendola lentamente fino ad avvertirne lo scatto di chiusura 5 Premere il tasto ON Si accende la spia di accensione ed ha inizio il ciclo di asciugatura 6 Il carico viene asciugato mediante ar...

Страница 42: ... circoli aria e si asciughi Pulire l esterno della macchina e il portellone con un panno morbido NON usare spugnette abrasive né prodotti di pulizia Per evitare che il portellone resti incollato pulire regolarmente le guarnizioni del portellone con un prodotto in crema antigraffio Specifiche tecniche Capacità del cestello 115 litri Carico massimo 7 kg Altezza 85 cm Larghezza 60 cm Profondità 60 cm...

Страница 43: ...hina è stata opportunamente attivata sia collegata all alimentazione sia attivata localmente Leggere pag 40 È stato selezionato il tempo o il programma di asciugatura Leggere pag 40 La macchina è stata riattivata dopo aver aperta il portellone Leggere pag 37 La macchina ha smesso di funzionare perché la vaschetta dell acqua è piena e dev essere svuotata Leggere pag 38 Spia di segnalazione pulizia ...

Страница 44: ...ITALIANO 39 40001731 2001 REGISTERED TRADEMARK Back Page fm Page 39 Monday September 6 2004 4 57 PM ...

Отзывы: