6.2 Mounting
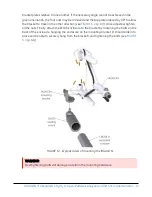
The IRGASON is supplied with mounting hardware to attach it to the end of a horizontal pipe
with a diameter of 1.3 in., such as the Campbell Scientific CM202, CM204, or CM206 crossarm.
The following steps describe the normal mounting procedure. Refer to
1. Secure the chosen crossarm to a tripod or other vertical structure using a CM210 Crossarm-
to-Pole mounting kit.
2. Point the horizontal arm into the direction of the prevailing wind and tighten the nuts and
bolts.
WARNING:
Do not carry the IRGASON by the arms or the strut between the arms. Always hold it by
the block, where the upper and lower arms connect.
3. Bolt the IRGASON mounting bracket to the CM250 leveling mount (see
4. Install the IRGASON to the mounting bracket by inserting the mounting bolt and pin into
the corresponding holes. Tighten the bolt. Make sure the analyzer is vertically oriented so
the label is right-side-up and the upper arm (source) is directly above the lower arm
(detector). The sonic anemometer must be oriented in a way that it faces the prevailing
wind to prevent ‘shadowing’ from the sensor body. See
Data collection and processing with
(p. 43) for additional information about the wind information reported by the
sonic coordinate system.
5. Mount the IRGASON assembly by fitting the boom adapter over the end of the crossarm.
Tighten the set screws on the boom adapter with a 3/16-inch hex socket head wrench.
WARNING:
Handle the IRGASON carefully. The optical source may be damaged by rough handling,
especially while the analyzer is powered.
6. If the assembly is not level, slightly loosen the bolt that holds the mounting bracket on the
boom adapter and adjust the assembly until the leveling bubble on top of the IRGASON
block is within the bullseye. Retighten the bolt.
7. Attach the EC100 enclosure to the mast, tripod leg, or other part of the mounting structure.
To do this, attach the EC100-enclosure mounting bracket to the pipe by loosely tightening
the u-bolts around the pipe. The u-bolts are found in the mesh pocket inside the EC100
enclosure. If the pipe does not run vertically (for example, if the enclosure is being attached
to a leg of a tripod), rotate the bracket to the side of the pipe. The enclosure must hang
upright. Make angle adjustments as needed by loosening the four nuts and rotating the
IRGASON® Integrated CO
2
/H
2
O Open-Path Gas Analyzer and 3D Sonic Anemometer
12
Содержание IRGASON
Страница 1: ...Revision 08 2021 Copyright 2010 2021 Campbell Scientific Inc Product Manual ...
Страница 72: ...D 1 Molecular sieve Type 13X IRGASON Integrated CO2 H2O Open Path Gas Analyzer and 3D Sonic Anemometer 68 ...
Страница 73: ...IRGASON Integrated CO2 H2O Open Path Gas Analyzer and 3D Sonic Anemometer 69 ...
Страница 74: ...IRGASON Integrated CO2 H2O Open Path Gas Analyzer and 3D Sonic Anemometer 70 ...
Страница 75: ...IRGASON Integrated CO2 H2O Open Path Gas Analyzer and 3D Sonic Anemometer 71 ...
Страница 76: ...D 2 Magnesium perchlorate IRGASON Integrated CO2 H2O Open Path Gas Analyzer and 3D Sonic Anemometer 72 ...
Страница 77: ...IRGASON Integrated CO2 H2O Open Path Gas Analyzer and 3D Sonic Anemometer 73 ...
Страница 78: ...IRGASON Integrated CO2 H2O Open Path Gas Analyzer and 3D Sonic Anemometer 74 ...
Страница 79: ...IRGASON Integrated CO2 H2O Open Path Gas Analyzer and 3D Sonic Anemometer 75 ...
Страница 80: ...IRGASON Integrated CO2 H2O Open Path Gas Analyzer and 3D Sonic Anemometer 76 ...
Страница 81: ...IRGASON Integrated CO2 H2O Open Path Gas Analyzer and 3D Sonic Anemometer 77 ...
Страница 82: ...IRGASON Integrated CO2 H2O Open Path Gas Analyzer and 3D Sonic Anemometer 78 ...
Страница 83: ...D 3 Decarbite IRGASON Integrated CO2 H2O Open Path Gas Analyzer and 3D Sonic Anemometer 79 ...
Страница 84: ...IRGASON Integrated CO2 H2O Open Path Gas Analyzer and 3D Sonic Anemometer 80 ...
Страница 85: ...IRGASON Integrated CO2 H2O Open Path Gas Analyzer and 3D Sonic Anemometer 81 ...
Страница 86: ...IRGASON Integrated CO2 H2O Open Path Gas Analyzer and 3D Sonic Anemometer 82 ...

