19
Notes
10.1 Connecting the measuring input leads
Connect the leads to measuring input terminals 1 (-) and
6 (I+) for DC current measurement or 1 (-) and 11 (U+) for
DC voltage measurement to suit the particular measurement
task or application.
10.2 Connecting the measuring output leads
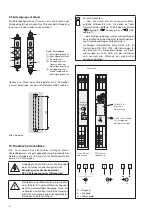
Connect the measuring output leads A to terminals
4 (–) and 9 (+).
Note:
Take care that the amplifier’s maximum permissible
external burden R
ext
is not exceeded (see Section
6 “Technical Data”).
10.3 Connecting the power supply leads
Connect the power supply leads to terminals 5 (
–~
) and
10 (
+
~
).
A two-pole switch must be included in the supply connection
where facility for switching SINEAX TV 808 off is desired.
Note:
An external supply fuse with a rupture capacity
≤
20 A must be provided for DC supply voltages
> 125 V.
11. Configuration
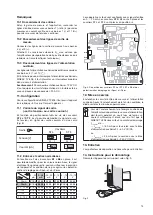
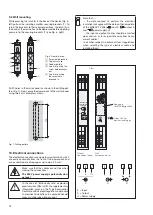
The SINEAX TV 808 unit has to be opened before it can be
configured (see Section “8. Withdrawing and inserting the
device”).
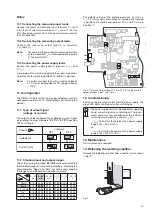
11.1 Type of output signal
(voltage or current)
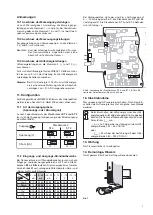
The output can be configured for a voltage or current signal
by inserting the plug-in jumpers
“ST 4”
or
“ST 3”
in position
“U”
or
“I”
(Fig. 8).
Output
Jumpers
ST 4
ST 3
Current [mA]
Voltage [V]
U I
U I
U I
U I
11.2 Standard input and output ranges
Two of the six plug-in jumpers
B1
to
B6
are used for selecting
the standard ranges of the isolating amplifiers. Providing the
potentiometers “Span” and “Zero” are not moved, changing
the range has no influence on amplifier accuracy.
4…20
mA
0…20
mA
–20…20
mA
2…10
V
0…10
V
–10…10
V
4…20 mA
B1,B4 B2,B4
B3,B4
B1,B4 B2,B4
B3,B4
0…20 mA
B1,B5
B2,B5
B3,B5
B1,B5 B2,B5
B3,B5
–20…20 mA B1,B6 B2,B6
B3,B6
B1,B6 B2,B6
B3,B6
2…10 V
B1,B4 B2,B4
B3,B4
B1,B4 B2,B4
B3,B4
0…10 V
B1,B5 B2,B5
B3,B5
B1,B5 B2,B5
B3,B5
–10…10 V
B1,B6 B2,B6
B3,B6
B1,B6 B2,B6
B3,B6
The default setting of the preferred versions ex stock is
0 … 20 mA for input and output, i.e. jumpers are inserted
in positions B2 and B5 and jumpers ST 4 and ST 3 are in
position “I”.
��
��
��
B4
B5
B6
U I
U I
ST3
ST4
����
����
Fig. 8. Position of the jumpers ST 4 and ST 3, B1 to B6 and the
potentiometers “Span” and “Zero”.
12. Commissioning
Switch on the measuring input and the power supply. The
green LED lights continuously after switching on.
The power supply unit must be capable of supplying
a brief current surge when switching on. The instru-
ments presents a low impedance at the instant of
switching which requires a current I
start
of …
… I
start
≥
160 mA for the version with a power supply
range of 24 – 60 V DC/AC
or
… I
start
≥
35 mA for the version with a power supply
range of 85 – 230 V DC/AC
13. Maintenance
No maintenance is required.
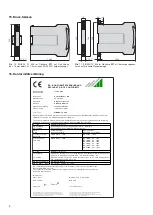
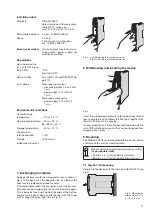
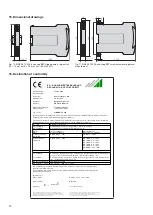
14. Releasing the isolating amplifier
Release the isolating amplifier from a top-hat rail as shown
in Fig. 9.
ON
Fig. 9

