11
11
/
NETWORK CONNECTIONS
Before you can use your Evo 75/Evo 150 for Radio/Streaming you must
have the following:
• A broadband internet connection (such as ADSL) to a suitable internet
service provider (ISP).
• A network connection either wirelessly via 802.11b/g/n or ac Wi-Fi or
wired Ethernet connection (10 or 100 M bits/sec via an RJ45 connection).
Note:
For playback of high sample rate files (24-bits/176.4kHz &
24-bits/192kHz) streamed from your home network, we recommend
using an Ethernet connection to avoid unwanted disruption as the high
data rate of these files is beyond most Wi-Fi networks capability.
In many cases the broadband modem, router and wireless access point will
be a single combined unit supplied by your Internet Service Provider or
bought from a computer store.
If your wireless network is configured to use Wired Equivalent Privacy
(WEP) or Wi-Fi Protected Access (WPA) data encryption then you will
need to know your WEP or WPA key so you can get the Evo 75/Evo 150 to
communicate with the network.
IMPORTANT:
Before you continue, make sure that your wireless access point or
router is powered up and working with your broadband internet
service (use your computer to verify this). To get this part of the
system working you must read the instructions supplied with the
wireless access point or router.
The Evo 75/Evo 150 can be configured to connect to a Wired or Wireless
network or has an (default) Auto setting. In Auto the Evo 75/Evo 150 looks
for a each connection type and selects whichever is present. You can
also force the unit to one or the other connection type, see later Settings
section.
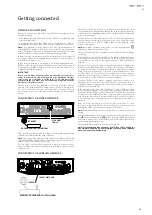
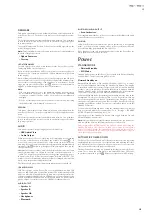
CONNECTING TO A WIRED NETWORK
Left
Loudspeaker
RS-232C
R
L
A
Right
Loudspeaker
B
B
A
1
2
IR In
Trigger In
1 2 3
Ground
Switch
Pre-Out
4–8 Ω
4–8 Ω
Power AC
Max Power Consumption:
700W
Serial no. fitted on underside
Power Rating:
100V-240V~50/60Hz
Ground
USB Media
Ethernet
Optical In
XLR In
Aux In
MM Phono
TV ARC
CD
USB Audio
Coax
In
Sub-Out
Trigger Out
R
L
XLR In
Ethernet
Plug one end of a network cable (Category 5/5E straight through Ethernet
cable) into the LAN port on the back of the unit.
Note:
Only connect the LAN port of the player to an Ethernet port that
supports 10BASE-T or 100BASE-TX. Connecting to any other ports or jacks,
such as a phone jack, can damage the unit
The Evo 75/Evo 150 should automatically connect to your network as
below via DHCP; this means it will be given an IP address by your router
automatically.
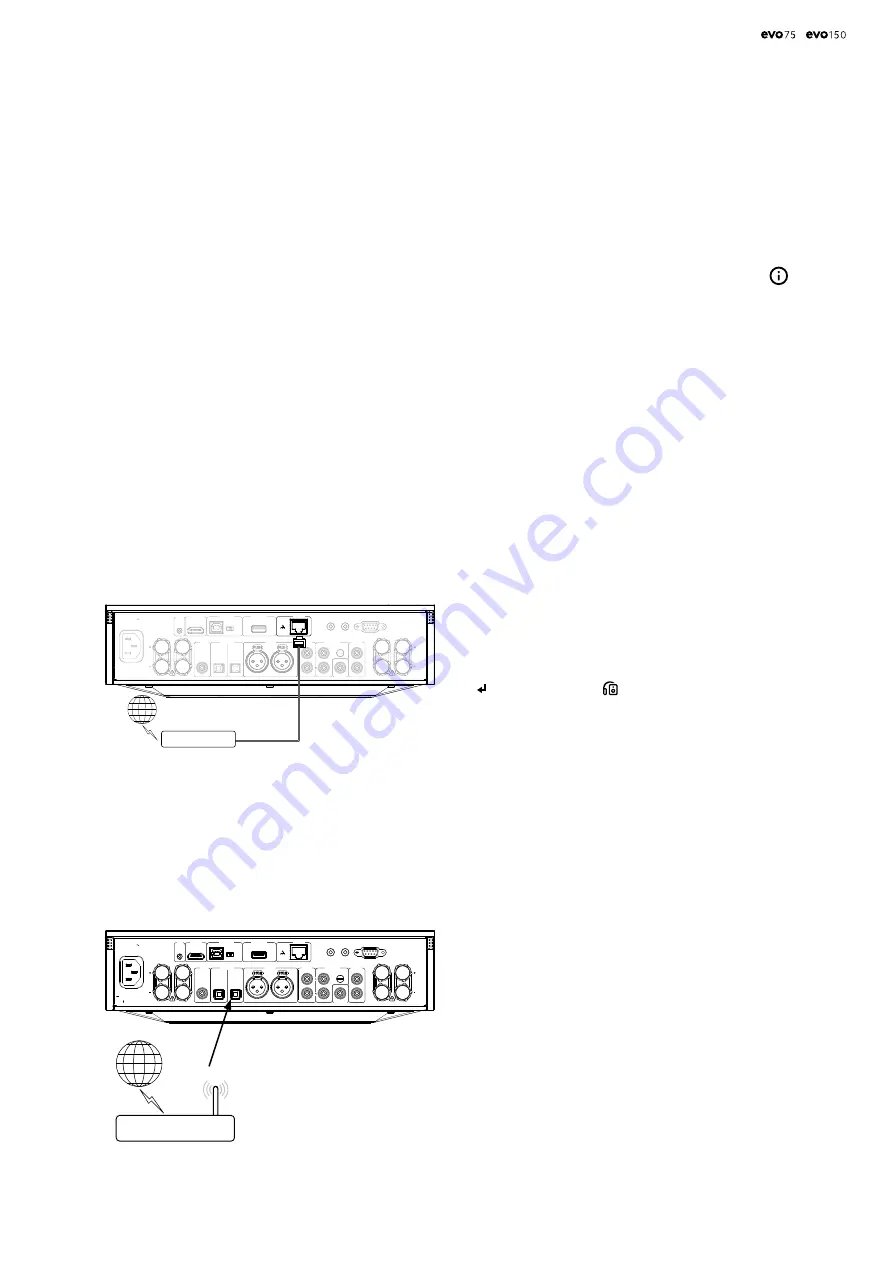
CONNECTING TO A WIRELESS NETWORK
Left
Loudspeaker
RS-232C
R
L
A
Right
Loudspeaker
B
B
A
1
2
IR In
Trigger In
1 2 3
Ground
Switch
Pre-Out
4–8 Ω
4–8 Ω
Power AC
Max Power Consumption:
700W
Serial no. fitted on underside
Power Rating:
100V-240V~50/60Hz
Ground
USB Media
Ethernet
Optical In
XLR In
Aux In
MM Phono
TV ARC
CD
USB Audio
Coax
In
Sub-Out
Trigger Out
Getting connected
ETHERNET
CABLE
INTERNET
BROADBAND ROUTER/MODEM
INTERNET
10-30M DISTANCE
WIRELESS BROADBAND ROUTER/MODEM
Place the Evo 75/Evo 150 in range of your wireless network (usually 10-30m
of a suitable wireless transmitter, although this is affected by walls and the
construction of your building) and turn it on, via the back panel switch and
then on the front panel.
The Evo 75/Evo 150 will automatically connect and obtain an IP address
from your wireless network. For advanced users, if you would like to give
your Evo 75/Evo 150 a static IP address, then see the 'Network config'
section of the manual.
Note:
If you make a mistake at any point, you can always press the
button to go back to the previous screen.
The unit will now scan for all available wireless networks and will display
"Scanning".
If it can’t find one then the display will say: "No Wireless Networks Found".
If this happens then you need to either move the Evo 75/Evo 150 nearer
your wireless access point or investigate any issues with your wireless
network.
When the Evo 75/Evo 150 find your wireless network, it displays the
broadcast name (ESSID) for the access point – this is a name allocated to
the access point by whoever set up the network, it may either be a default
name for your router/wireless or may be a more familiar name such
as "Johns Wi-Fi" etc. If your Evo 75/Evo 150 find more than one wireless
network you can simply choose which one you want to connect to. Turn
the rotary dial to see the ESSID for each wireless network.
When the ESSID for the wireless network you want to connect to is
displayed on the screen, press the SELECT button. If your network is not
configured with an encryption code, the screen should say "Connecting to
network" then "Network OK".
If the screen displays either "Enter WEP key" or "Enter WPA key", then
the network is using one of the supported encryption systems: Wired
Equivalent Privacy (WEP) or Wi-Fi Protected Access (WPA). You now need
to enter your correct WEP or WPA code. The person who set up the wireless
network in the first place will know what this code is (or be able to reset it
to a new known code); if that person is not you, then you need to find out
what it is.
After 3 seconds, the display goes into the code entry mode. To enter
the code, use the rotary dial to select each character of the code in turn,
pressing the SELECT button after entering each character.
Note:
The WEP and WPA codes are case sensitive, so you must enter them
exactly.
After entering the final character, use the front part of rotary dial to select
the
character and press the
button. It’s a little fiddly but you will
only need to do this once. The Evo 75/Evo 150 will remember this code and
use it automatically from now on.
The unit should now be able to connect to the network.
Note: We recommend rebooting your Evo 75/Evo 150 to search for
any firmware updates, as new firmware may have been released
since your unit was manufactured.
Содержание Evo 75
Страница 1: ...ALL IN ONE PLAYER Evo 75 Evo 150...


