background image

Traffic:

This button is only available when you

are using the FM or CD/DVD audio modes. When
on, the Navigation System will search for
stations that broadcast traffic announcements.

The following screen buttons are only available for
video DVDs:

Audio Language:

Select this button to view a list

of language choices. Select the desired language
to change the spoken language. The list of
languages will depend on the languages supported
by the disc.

Subtitle Language:

Select this button to view a

list of languages to choose for subtitles. Select the
language desired. The list of languages will
depend on the languages supported by the disc.

Menu Language:

Select this button to view a

list of languages to choose for the DVD menu text.
The list of languages will depend on the
languages supported by the disc.

Parental Level:

Select this button if you choose

to set up parental protection. Use the keypad
to enter the password. Select from options such
as change level and change password, as
necessary.

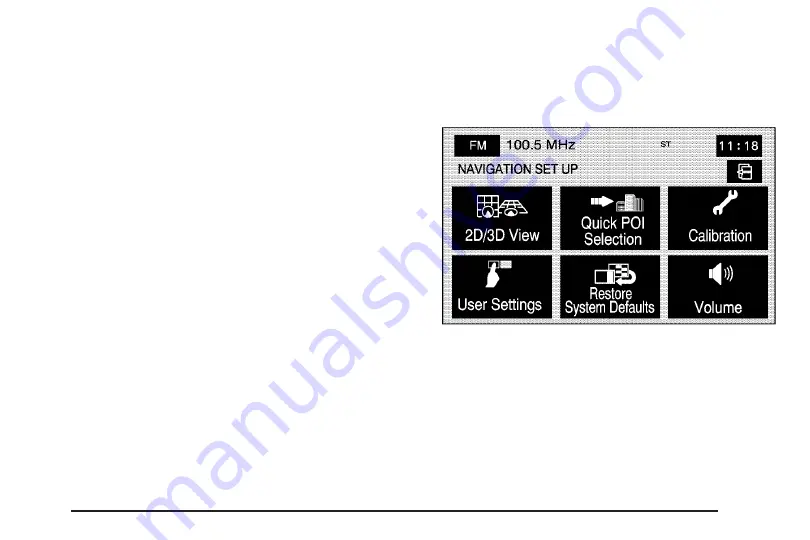
Navigation Set Up

3

(Navigation Set Up):

Touch this screen

button to access the NAVIGATION SET UP screen.

77

Содержание STS 2007

Страница 1: ...eatures and Controls 16 Navigation Audio System 91 Navigation Audio System 92 Voice Recognition 121 Voice Recognition 122 Vehicle Customization 137 Vehicle Customization 138 Phone 149 Phone 150 Index 159 2007 Cadillac STS STS V Navigation System M 1 ...

Страница 2: ...es in the product after that time without notice For vehicles first sold in Canada substitute the name General Motors of Canada Limited for Cadillac Motor Car Division whenever it appears in this manual Keep this manual with the owner manual in the vehicle so it will be there if it is needed If the vehicle is sold leave this manual in the vehicle Canadian Owners For Canadian owners that would like...

Страница 3: ...Overview 4 Navigation System Overview 4 Getting Started 6 Cleaning the Display 14 Section 1 Overview 3 ...

Страница 4: ...Overview Navigation System Overview 4 ...

Страница 5: ... Disc CD DVD Changer on page 103 for more information L CD DVD Changer Loading Slot M On Power Volume Knob See Hard Keys under Using the Navigation System on page 16 for more information N m Navigation Screen Tilt Key in out See Hard Keys under Using the Navigation System on page 16 for more information O Clock See Clock under Configure Menu on page 75 for more information P Memory Point Symbol Se...

Страница 6: ...vigation system so you can use it with less effort and take full advantage of its features Your navigation system includes not only navigation but also audio functions While your vehicle is parked Familiarize yourself with all of its controls hard keys on the faceplate and touch sensitive screen buttons Familiarize yourself with its operation Set up your audio by presetting your favorite stations ...

Страница 7: ... keep your eyes on the road and your mind on the drive avoid engaging in extended searching while driving CAUTION Looking at the moving map on the navigation screen frequently or for too long while driving can cause a crash and you or others can be injured or killed Keep your eyes and mind on the road and avoid looking too long or too often at the moving map on the navigation screen Use the voice ...

Страница 8: ... globe symbol in the lower left corner of the screen to change the language of the system For more information on changing the language see Personalization on page 138 When getting started you may set the navigation system to your preference using various options To do so reference the following topics To adjust screen appearance see Screen Appearance under Configure Menu on page 75 To adjust the ...

Страница 9: ... page 92 for more information Setting the Time To set the time do the following 1 Press the power volume knob to turn the system on 2 Press the CONFIG hard key 3 Press the H clock screen button 4 Select the 12hour or 24hour screen button to display the time in standard or military time 5 Select the AM or PM screen buttons 6 Select the appropriate time zone screen button 7 Select the Daylight Savin...

Страница 10: ...hat contains your final destination The system will return to the DESTINATION ENTRY screen See Region under Destination on page 55 for more information Entering an Address To set a destination by entering a street address do the following 1 Press the power volume knob to turn the system on 2 Insert the DVD map disc See Installing the Map DVD under Maps on page 18 for more information A notice may ...

Страница 11: ...information Entering a Point of Interest POI To set a destination by entering a Point of Interest POI do the following 1 Press the power volume knob to turn the system on 2 Insert the DVD map disc See Installing the Map DVD under Maps on page 18 for more information A notice may appear Touch the I agree screen button to proceed 3 Press the ROUTE hard key Verify that the selected Region is correct ...

Страница 12: ...hard key 4 Press the Menu screen button from the map screen 5 Press the N Memory Points screen button 6 Press the L Home screen button 7 Press the Add screen button 8 Press the Address screen button and enter all address information 9 Press the OK screen button The L Home icon will be highlighted on the DESTINATION ENTRY screen See Using Your Home or Preset Destinations later in this section for m...

Страница 13: ...ailable for selection while driving 1 Press the power volume knob to turn the system on 2 Insert the DVD map disc See Installing the Map DVD under Maps on page 18 for more information A notice may appear Touch the I agree screen button to proceed 3 Press the ROUTE hard key Verify that the selected Region is correct 4 Select the L Home symbol or one of the available preset destination symbols A map...

Страница 14: ...n 3 Press the Volume screen button 4 Select the desired volume or select Off The system will play back the new volume level See Volume under Configure Menu on page 75 for more information Cleaning the Display If the panel or the display is stained wipe it with a dry soft cloth such as a silicon cloth Notice If you use abrasive cleaners when cleaning glass surfaces you could scratch the glass When ...

Страница 15: ...idance 32 Navigation Menu 33 Destination 55 Keyless Access System 73 OnStar System 74 Configure Menu 75 Global Positioning System GPS 87 Vehicle Positioning 88 Problems with Route Guidance 89 If the System Needs Service 89 Ordering Map DVDs 90 Database Coverage Explanations 90 Section 2 Features and Controls 15 ...

Страница 16: ...oading DVDs or CDs See Six Disc CD DVD Changer on page 103 for more information Z CD DVD Eject Press the eject key next to the CD DVD changer loading slot to begin ejecting DVDs or CDs See Six Disc CD DVD Changer on page 103 for more information On Power Volume Press the power volume knob to turn the audio system on and off Turn the knob to increase or decrease the volume to the audio system ymz T...

Страница 17: ...ss the navigation repeat key to repeat the last voice guidance prompt while on a planned route y z Seek Scan Press the seek scan arrows to go to the next or previous radio station or press and hold to scan stations See Navigation Audio System on page 92 w Tune Knob Turn the tune knob to change frequencies See Navigation Audio System on page 92 Alpha Numeric Keypad Letters of the alphabet symbols p...

Страница 18: ...h area has not been selected See Database Coverage Explanations on page 90 for more information Touch Sensitive Screen Buttons Touch sensitive screen buttons are located on the screen When a screen button has been selected a beep will sound These buttons will be highlighted when a feature is available There are also some toggle screen buttons that will be light blue when active and dark blue when ...

Страница 19: ... the navigation system Driver Information Center DIC Head Up Display HUD etc See Language under Personalization on page 138 for more information Once a language has been selected touch I agree to enter the navigation system The map will appear showing your current vehicle position Ejecting the DVD Map Disc When the DVD map disc is not loaded you will not be able to use the navigation portion of th...

Страница 20: ...e your finger from the map screen If scrolling while your vehicle is in PARK P the system will scroll initially at a slower rate It will increase if you continue touching the map screen If scrolling while your vehicle is in motion you have one scroll speed and a limited distance to scroll Keep touching the map screen to scroll for a longer distance If the scroll feature is used to scroll the map a...

Страница 21: ...ear on the map after a route has been planned marking your final destination The waypoint symbol will be displayed on the map after a waypoint has been added to your route The waypoint symbol will be numbered from one through five depending on how many waypoints have been set The distance to destination symbol indicates the distance to your final destination It only appears when time is not availa...

Страница 22: ...h North Up known as North Up mode While in North Up mode the vehicle icon will follow the north direction on the map regardless of which direction the vehicle is traveling Select this screen symbol to switch between North Up and Heading Up modes The heading up symbol indicates the map with the vehicle travel direction up known as Heading Up mode The shaded triangle indicates the North direction Wh...

Страница 23: ...en a name is too long to be displayed an arrow symbol will appear Select the right or left arrow screen button to scroll through the entire name This symbol indicates the position of the next guidance maneuver The following symbols can also be found on a map screen Select the waypoint symbol to enter a waypoint along the current route This allows you to have more than one destination planned at a ...

Страница 24: ...where on the map to display the Point of Interest POI screen button on the bottom right corner of the map screen Select the POI screen button to display the following screen Select one of the categories to display or to delete the POI icons from the map If the POI icons are currently displayed on the map the icons will be deleted from the map and vice versa POI Off Select this button to remove all...

Страница 25: ... category do one of the following To delete the last added POI category select the Delete screen button To delete a specific POI category 1 Select the category 2 Select the subcategory that was added All Local POI s Select this screen button to display the list of available POIs This list is based on the added POI categories The list will contain the POIs within a 20 mile 32 km area from the curre...

Страница 26: ...ap and the name of the POI will appear on the display Select the Info screen button to display more available information about the specific point Select the back screen button to return to the previous page Select the cancel screen button to return to the first menu of the selected option 26 ...

Страница 27: ...from one of the following six options that allow you different views and information of the map screen Availability of these options depends on the current route Single Map Mode Select the map view symbol to display more of the map with a window that gives the direction and distance to the upcoming maneuver 27 ...

Страница 28: ...that will allow different scale levels and heading directions for each Touch anywhere inside the right map to change the scale level 2D and 3D view and to turn the POIs on and off To change the heading direction in the right map touch the north up or heading up symbol 28 ...

Страница 29: ...bol to display the next three upcoming maneuvers Directional arrows street name and distance to the next turn will be displayed As you approach the next turn the system will automatically display a zoomed in view of the upcoming maneuver 29 ...

Страница 30: ... next turn will be displayed As you approach the next turn the system will automatically display a zoomed in view of the upcoming maneuver Guidance Screen Mode Select the next maneuver symbol to display only the next maneuver When approaching the next maneuver the navigation system will automatically display this guidance window 30 ...

Страница 31: ... next maneuver Use the up and down arrows to scroll through the displayed list To view the available POIs for an exit select the exit then select the Map screen button The navigation system will display highway guidance any time you have a route on a highway or freeway or you can select the symbol To turn this feature off see Navigation Set Up under Configure Menu on page 75 31 ...

Страница 32: ...e search area when entering your destination and route settings See Destination on page 55 For example if you were traveling from Michigan to Florida change the region currently selected in the search area to Florida Enter a destination in Florida under the DESTINATION ENTRY menu Head Up Display HUD During Route Guidance When a route is planned the Head Up Display HUD will display information when...

Страница 33: ...s This value will not change as you approach the turn After completing a turn the HUD will display the name and distance of the next street you will be turning on for 10 seconds See Head Up Display HUD in the Index of your vehicle s owner manual for more information Navigation Menu Select the Menu screen button from the map screen to access the NAV Navigation MENU From the NAV MENU select Change R...

Страница 34: ...ITION screen The search condition screen allows you to view your current destination and to change the planning methods between each destination Each distance between waypoints and final destination can have an individual setting y z Scroll Arrows Use the up and down arrows to scroll through your route Quick Normal Short Select one of the route preference options to change the planning method Calc...

Страница 35: ...ile you are driving on a planned route F Route Pref Route Preferences Select this screen button from the ROUTE OPTIONS screen to access the ROUTE PREFERENCES screen Touch any of the following options to turn them on and off The system will use the selected settings to plan the route The selected route preference settings will appear when planning a route c Allow Major Roads This feature allows the...

Страница 36: ...tination and Way Point Select this screen button from the ROUTE OPTIONS screen to access the DEST WAY POINT screen Use this screen to plan a destination with way points Five way points and one destination can be entered See Dest Way Pt under Memory Points later in this section for more information on how to add edit and delete Add Select this button to add a waypoint or to change the destination E...

Страница 37: ...ng maneuvers for the entire route A list of every turn on the route will display With the turn list displayed you can select to avoid streets turns on the route y z Scroll Arrows Select the up and down arrow screen buttons to scroll through the list of maneuvers Avoid To avoid a street select the Avoid screen button next to the turn To cancel the avoided turn select Avoid again to deselect it 37 ...

Страница 38: ...el All screen button A confirmation window will display Select Yes to have all of the avoided streets added back to the route The Turn List screen will display G Route Preview Select this screen button from the ROUTE OPTIONS screen to access the route preview screen From this screen you can preview the entire route in either direction as well as edit the route Use the screen buttons at the bottom ...

Страница 39: ...l appear Press this screen button to provide information regarding the POI name address city and phone number Edit Select this screen button to change the way the skip scroll functions operate You can select to have the skip scroll go to the start point destination or to the next available POI or waypoint To next Dest destination and WP waypoint Selecting tis option will cause the skip scroll func...

Страница 40: ...his screen button to cancel the current set destination A confirmation window will display Select Yes to cancel the destination select No to continue on the current route Memory Points Selecting Memory Points from the NAV MENU will take you to the STORED LOCATIONS screen From the STORED LOCATIONS screen you can access the following options N Memory Points Select this screen button from the STORED ...

Страница 41: ...nt 1 Select the Memory Points screen button from the STORED LOCATIONS screen 2 Select one of the folders categories listed 3 Select Add 4 Select the desired method of entering a destination to enter the memory point See Destination on page 55 for more information A map screen will appear displaying the selected memory point location 5 If available touch the INFO button to view the address informat...

Страница 42: ...Select the Name screen button 6 Use the backspace screen button to delete the current name or use the alpha keypad to make changes 7 Select the OK screen button to store the change You can choose whether or not to have the name show on the map screen next to the POI icon by selecting the Show Name On or Off screen buttons 42 ...

Страница 43: ... edit 5 Select the Add Nametag screen button 6 The system will say Name please State what you would like to call the memory point 7 The system will play back what was recorded and then will ask you to confirm the nametag State Yes to confirm the nametag state No to cancel the nametag and to try again You can choose whether or not to have the name show on the map screen next to the POI icon by sele...

Страница 44: ...ton 4 Select the memory point from the list 5 Select the Icon screen button 6 Select the desired icon There are two pages of icons and a page of icons that have sounds associated with them 7 The new icon will be displayed in the EDIT MEMORY POINT screen next to the Icon screen button on the map To change the phone number of a memory point 1 Select the Memory Points screen button from the STORED LO...

Страница 45: ...Select the folder category the memory points are stored in 3 Select the Del All screen button 4 The system will display a pop up confirmation message Select Yes to delete all the points in the folder category select No to not delete the points and to return to the DELETE POINTS screen To change the name of the folder category 1 Select the Memory Points screen button from the STORED LOCATIONS scree...

Страница 46: ...ear displaying the selected location 4 If desired reduce or enlarge the area around the point you want to avoid by using the reduce or enlarge keys When avoiding locations on freeways reduce the avoid area to the minimum scale This will produce an X on the map rather than a box This will ensure that the system knows to avoid the freeway itself not the area around the freeway 5 Select the OK screen...

Страница 47: ...int to be changed from the list 4 Select the Position screen button 5 Select the map to move the location 6 If desired reduce or enlarge the area around the point you want to avoid by using the reduce or enlarge keys 7 Select the OK screen button to store the area To delete a point to be avoided 1 Select the Avoid Area screen button from the STORED LOCATIONS screen 2 Select the Delete screen butto...

Страница 48: ... the AVOID AREA screen Dest Way Pt Destination and Way Point This feature allows you to store up to five way points to the current route From this screen you can add edit or delete way points to your route To add a way point 1 Select the Dest Way Pt screen button from the STORED LOCATIONS screen 2 Select the Add screen button 3 Using the desired method of entering a destination enter the way point...

Страница 49: ...he ADD WAYPOINT screen 6 Select the Add screen button next to the corresponding waypoint row to add the waypoint To change the order of the route 1 Select the Dest Way Pt screen button from the STORED LOCATIONS screen 2 Select the Edit screen button 3 From the CHANGE ORDER screen select the names in the order you would like them to fall on the route 4 Select the OK screen button to save your chang...

Страница 50: ... return to the STORED LOCATIONS screen To delete a way point from your current route 1 Select the Dest Way Point screen button from the STORED LOCATIONS screen 2 Select the Delete screen button 3 Select the way point destination you want to delete 4 The system will display the map screen with a pop up confirmation message Select Yes to delete the way point select No to not delete the way point To ...

Страница 51: ...me icon will now be highlighted on the DESTINATION ENTRY screen To edit your home destination 1 Select the L Home screen button from the STORED LOCATIONS screen 2 Select the Edit screen button 3 Touch the map to move the location of the point 4 Select the OK screen button to save your changes To delete your home point 1 Select the L Home screen button from the STORED LOCATIONS screen 2 Select the ...

Страница 52: ...play a pop up confirmation message Select Yes to delete all of the destinations select No to not delete all of the destinations A Preset Dests Destinations This feature allows you to add delete or change one of five preset destinations Storing preset destinations makes these destinations easily available to set as a destination See Preset Destination under Destination on page 55 for more informati...

Страница 53: ...s You can choose whether or not to have the name show on the map screen next to the preset destination symbol by selecting the Show Name On or Off screen buttons To change the position of a preset destination 1 Select the Preset Dests screen button from the STORED LOCATIONS screen 2 Select the Edit screen button 3 Select the preset destination you want to change 4 Select the Position screen button...

Страница 54: ...he Delete screen button 3 Select the preset destination you want to delete 4 The system will display the map screen with a pop up confirmation message Select Yes to delete the destination select No to not delete the destination To delete all preset destinations 1 Select the Preset Dests screen button from the STORED LOCATIONS screen 2 Select the Del All screen button 3 The system will display a po...

Страница 55: ...erences route options map appearances or add a way point at this time You may also set the destination without making any further changes See Getting Started on Your Route following in this section for more information on your choices once a destination has been entered Region The DESTINATION ENTRY screen displays a map of the 48 contiguous United States and a part of Canada divided into 11 region...

Страница 56: ...he down arrow to select CAN Canada Once the region has been selected the region will be highlighted on the map Touch the back key to return to the DESTINATION ENTRY screen The new selection will be stored once you select the back screen button Address The address destination entry method allows you to input an address by providing the system with a house number street name and city C Address Touch...

Страница 57: ...guidance See Getting Started on Your Route later in this section for more information To use the street name first destination entry method do the following 1 Touch the Street screen button from the address menu and start entering the street name using the alpha keypad A list of available street names will be displayed if there are less than five items available Select the List screen button at an...

Страница 58: ...ntering the city name and then touch the List screen button to display a list of available cities Choose a city from the list If choosing from one of the prior mentioned lists select the city from the list displayed 4 The House number screen will be displayed Enter the house number using the numeric keypad 5 Select the Street screen button from the address menu and start entering the street name u...

Страница 59: ...e POI name Touch Sym symbol to select symbols and numbers for the POI touch Others to select special characters for the POI or touch A Z to return to the alpha keypad A list of POIs will appear using the information from the alpha keypad input A list of available POIs will display if there are less than five POIs available Touch the List screen button at any time to view the available POIs 2 Selec...

Страница 60: ...tting Started on Your Route later in this section for more information To select a POI by inputting a city name do the following 1 Select the city screen button then select Any City 5 near cities Input City Name or from the Last 5 Cities used Any City The system will take you back to the house number first entry method Select a city from the list 5 near cities The system will display the 5 cities ...

Страница 61: ...mbol screen button to calculate the route 6 Select the Guide screen button to start route guidance See Getting Started on Your Route later in this section for more information Map The map destination entry method allows you to choose a destination by scrolling on the map I Map Touch this screen button from the DESTINATION ENTRY screen to enter the map destination entry method then do the following...

Страница 62: ...ition as a waypoint the point will be stored as a waypoint The system will display the STORED LOCATIONS screen See Memory Points under Navigation Menu on page 33 for more information If select the h destination symbol screen button the system will calculate the route Select the Guide screen button to start route guidance See Getting Started on Your Route later in this section for more information ...

Страница 63: ...reet name to further reduce the number of available items Select the street with the correct prefix Dr Ln St etc After both streets have been chosen a map screen will then appear with the destination marked 5 Select the h destination symbol screen button to calculate the route 6 Select the Guide screen button to start route guidance See Getting Started on Your Route later in this section for more ...

Страница 64: ...he destination marked 3 Select the h destination symbol screen button to calculate the route 4 Select the Guide screen button to start route guidance See Getting Started on Your Route later in this section for more information Freeway Entrance Exit The freeway entrance exit destination entry method allows you to choose a destination by entering a freeway entrance or exit point K Freeway Entrance E...

Страница 65: ...hat will appear You can input the exit entrance by name Touch the Input Name screen button If you choose to input the freeway exit or entrance name the alpha keypad will be displayed Touch the alpha keypad to enter the freeway exit or entrance name You can sort the list by distance or name Touch the Name Sort screen button to sort the list by name Touch the Dist Sort screen button to have the list...

Страница 66: ...en no route has been planned do the following 1 Select a category 2 Select a destination point from the list Touch the Name Sort screen button to sort the list by name or Dist Sort to sort the list by distance from the vehicle s current position After selecting a destination from the list a map screen will appear with the destination marked 3 Select the h destination symbol screen button to calcul...

Страница 67: ...u to choose a destination from a list of points that you have previously stored N Memory Point Select this screen button from the DESTINATION ENTRY screen to access the MEMORY POINTS screen To use this destination entry method do the following 1 Select the category folder in which the memory point has been stored Select from PERSONAL BUSINESS ENTERTAINMENT or MARKED POINT folders Sort the list by ...

Страница 68: ... the destination to view the entire destination name as necessary A map screen will appear with the destination marked 2 Select the h destination symbol screen button to calculate the route 3 Select the Guide screen button to start route guidance See Getting Started on Your Route later in this section for more information Name Touch this screen button to sort the list by name Date Touch this scree...

Страница 69: ...Input the numeric portion of the latitude coordinate using the keypad 3 Touch E or W next to LONG to enter the direction of the longitude coordinate 4 Input the numeric portion of the longitude coordinate using the keypad 5 Once both coordinates are entered touch the OK screen button A map screen will then appear with the destination marked 6 Select the h destination symbol screen button to calcul...

Страница 70: ...he desired preset destination from the DESTINATION ENTRY screen The screen buttons are numbered 1 5 A map screen will appear with the destination marked and the number of the preset destination 2 Select the h destination symbol screen button to calculate the route 3 Select the Guide screen button to start route guidance See Getting Started on Your Route later in this section for more information H...

Страница 71: ... guidance See Getting Started on Your Route later in this section for more information Getting Started on Your Route Once you have entered a destination you can perform one of the following options h Destination Touch the destination symbol to set the entered destination as it is without further adjustment o Waypoint Touch the way point symbol to enter this point as a way point along the route See...

Страница 72: ... destination symbol and the system will automatically calculate your route From this screen you can select Guide to start your route guidance or select 3routes if available to select between Quick Normal or Short route options You can also select the Chg Route screen button to go to the ROUTE OPTIONS menu and select from the available options Three Routes To access this screen touch the 3routes bu...

Страница 73: ...ce to destination W Toll Road This icon shows the route s toll road distance information c Freeway Travel This icon shows the route s freeway distance information b Ferry This icon shows the route s ferry distance information Time Restricted Roads This icon shows the route s time restricted road information Keyless Access System When you start your vehicle you will see Driver 1 or Driver 2 display...

Страница 74: ...ta This button will become available during a phone call This function is used when you need to enter numbers in response to an automated phone request such as when checking voice mail or you are asked to choose menu items Incoming Call When receiving an incoming call a pop up message will display on the screen with two place end call screen buttons one green and the other red Touch the green butt...

Страница 75: ...he appropriate number s using the keypad and then touch the tone send button Once that set of numbers has been sent the tone send button will dim until another set of numbers is entered on the keypad 6 To end the call touch the place end call screen button It will be red while you are on the call Configure Menu Press the CONFIG hard key to access this menu allowing adjustment of several of the sys...

Страница 76: ...nformation This button is only available when in FM or XM Select this button to turn information on The information will change depending on the audio source is selected When on the Info screen button will be available to select from the audio main menu Category This information will change depending on what audio source is selected This button is only available when you are using the FM or XM aud...

Страница 77: ...title Language Select this button to view a list of languages to choose for subtitles Select the language desired The list of languages will depend on the languages supported by the disc Menu Language Select this button to view a list of languages to choose for the DVD menu text The list of languages will depend on the languages supported by the disc Parental Level Select this button if you choose...

Страница 78: ...Quick POI Selection This option allows you to set six Point of Interest POI categories that you can select from while driving To set the Quick POI selection do the following 1 Select the Quick POI Selection screen button 2 Select the sub category you would like to replace 3 Select a Quick POI category from the Quick POI selection menu list 4 Pick the subcategory from the list that appears The syst...

Страница 79: ... and dragging on the map will activate fast scrolling Press touch once on the area to which you would like to move the current position mark 3 Touch the OK screen button once your vehicle is in the current position If a route had already been set the map screen will display select Guide to change your route to your vehicle s new position Once the process of changing your vehicle s current position...

Страница 80: ...to notify you when the current route has traffic restrictions e g winter time Arrival Time G Time of Arrival This option will display the estimated time of arrival to your destination Arrival Time Time to Destination This option will display how much time remains to reach your destination Guidance Screen This option will turn the guidance screen on and off When the guidance screen option is on the...

Страница 81: ...ange all adjustable system settings to factory defaults Average Speed Select this option to set the average speed to default The system monitors the speed on different roads and updates the average speed the vehicle travels at This average speed is used to calculate the time it will take to reach the destination when you set a route Volume This option allows you to adjust the volume of voice guida...

Страница 82: ...onal settings and see Memory Settings later in this section Clock H Clock Adjust Touch this screen button or touch and hold the clock screen button in the upper right corner of the screen to access the Clock Adjust screen and adjust several time features From this screen you can adjust the following 12Hour Touch this screen button to display the time in standard AM PM format 24Hour Touch this scre...

Страница 83: ...to GPS time Daylight Savings Touch this screen button to increase the time by one hour Touch this screen button again to turn this feature off and decrease the time by one hour y z Touch the up arrow to increase the hour or minutes Touch the down arrow to decrease the hour or minutes Screen Appearance z Screen Appearance Touch this screen button to access the appearance screen menu From this menu ...

Страница 84: ...ide of the brightness bar graph to increase or decrease the brightness Screen OFF This feature allows you to turn the navigation screen off Touch any hard key to turn the screen back on Memory Settings If your vehicle has the memory feature memory settings for the following features for up to two drivers can be programmed and recalled The driver s seat position The outside rearview mirrors positio...

Страница 85: ...med and recalled through the navigation system and the voice recognition system Store Memory Settings To store memory settings do the following 1 Be sure the ignition is either on in accessory mode or in RAP The vehicle must be stopped and or the shift lever must be in PARK P 2 Press any button on the appropriate keyless access transmitter to identify yourself as Driver 1 or Driver 2 The numbers o...

Страница 86: ...tion is either on in accessory mode or in RAP The vehicle must be stopped and or the shift lever must be in PARK P 2 Press the CONFIG hard key 3 Push and release either the Driver 1 or Driver 2 screen buttons to recall the driving positions Push and release the Exit screen button to recall the exit position If the vehicle is in PARK P a beep will sound and your previously saved driving position or...

Страница 87: ... your vehicle using signals sent by the GPS Satellites of the United States Department of Defense When your vehicle is not receiving signals from the satellites a symbol will appear on the map screen Refer to Symbols on page 21 This system may not be available or interference may occur if the following happens Signal obstructions caused by tall buildings large trucks tunnels objects located on top...

Страница 88: ...e changes directions more than once or when the vehicle is turning on a turn table in a parking lot The vehicle is entering and or exiting a parking lot garage or a lot with a roof The GPS signal is not received A roof carrier is installed on your vehicle The vehicle is equipped with tire chains The tires are replaced The tire pressure for your tires is incorrect The tires are worn The first time ...

Страница 89: ...erouting may display a route returning to the set waypoint if you are heading for a destination without passing through a set waypoint The route prohibits the entry of a vehicle due to a regulation by time or season or any other regulation which may be given Some routes may not be searched The route to the destination may not be shown if there are new roads if roads have recently changed or if cer...

Страница 90: ...D Map Disc and Ejecting the DVD Map Disc under Maps on page 18 Dispose of the old disc to avoid confusion about which disc is the most current If you have any questions about the operation of the navigation system or the update process call the GM Nav Disc Center or go to the center s website If you need any future updates or a replacement disc because the current disc is lost damaged or needs to ...

Страница 91: ...Navigation Audio System 92 Six Disc CD DVD Changer 103 Auxiliary Devices 118 Radio Personalization 119 Section 3 Navigation Audio System 91 ...

Страница 92: ...the chimes may not work Make sure that replacement or additional equipment is compatible with your vehicle before installing it See Accessories and Modifications in the Index of your vehicle s owner manual Your vehicle has a feature called Retained Accessory Power RAP With RAP the audio system can be played even after the ignition is turned off See Retained Accessory Power RAP in the Index of your...

Страница 93: ...o to a station play for a few seconds then go on to the next station To stop scanning press either arrow again or touch the scan screen button Tuning Knob Turn this knob to change frequencies Finding a Station Press the band source screen button located in the top left corner AM FM CD etc from any screen to access the audio source screen Once this screen is displayed press the BAND hard key to tog...

Страница 94: ...elect this button again to return to the original preset stations This is not available for XM Satellite Radio Stations or when A B C has been selected on Info Information See Radio Data System RDS later in this section Category See Radio Data System RDS later in this section Preset Stations Storing Preset Stations This feature allows you to store up to 24 preset stations You can store six AM six ...

Страница 95: ...may already be stored To exit this feature press the A B C screen button To store the A B C presets do the following 1 Turn the audio system on or select the BAND hard key 2 Select the A B C screen button 3 Scroll to the desired list A G 4 Select the audio band The presets within each list can be mixed AM FM or XM if equipped 5 Seek scan or tune to the desired station 6 Press and hold one of the s...

Страница 96: ...ks best at lower volume settings where background noise may mask the audio At higher volume settings where the audio is much louder than the noise there may be little or no change in the audio level For additional information on AudioPilot please visit www bose com To use this feature touch the Audio Pilot screen button To turn it off touch the screen button again The button will be highlighted wh...

Страница 97: ... the Speakers Left Right Balance To adjust the balance between the right and the left speakers touch and hold the Left or Right screen buttons To center the balance and the fade touch the center where the two lines meet Front Rear Fade To adjust the fade between the front and the rear speakers touch and hold the Front or Rear screen buttons To center the balance and the fade touch the center where...

Страница 98: ...lected type of programming Receive announcements concerning local and national emergencies Display messages from radio stations Seek to stations with traffic announcements This system relies on receiving specific information from these stations and will only work when the information is available In rare cases a radio station may broadcast incorrect information that will cause the radio features t...

Страница 99: ...nother station in the category To scan stations in the category press the Scan screen button The system will start scanning the stations in the category Press the Scan screen button to stop scanning stations To exit out of category select the category screen button and the program types will no longer be displayed Each of the six category names displayed include a grouping of other program types s...

Страница 100: ...ontact XM In the U S at www xmradio com or call 1 800 852 XMXM 9696 or in Canada at www xmradio ca or call 1 877 GET XMSR 438 9677 When XM is active the channel name and number song title and artist will be displayed on the screen Info Information Select this screen button to display broadcasted Information Select Info again to remove the broadcasted information from the display XL Explicit Langua...

Страница 101: ...ton to scroll through the available channels Category Scanning This function allows you to scan through the channels in a specific category To activate the category scan function do the following 1 Select the XM audio source 2 Select the Category screen button The system will display the available categories in place of the preset stations 3 Use the left and right arrows to scroll through the cate...

Страница 102: ...hannel no longer available This previously assigned channel is no longer assigned Tune to another station If this station was one of the presets choose another station for that preset button No Artist Info Artist Name Feature not available No artist information is available at this time on this channel The system is working properly No Title Info Song Program Title not available No song title info...

Страница 103: ...of time the receiver may have a fault Consult with your GM dealer Six Disc CD DVD Changer This system can play different types of media formats DVD Video DVD Video DTS DVD Audio CD Digital Audio CD DA CD DA DTS CD Text CD Extra MP3 CD CDR and CDRW The system may also play DVD R and DVD RW type discs depending on the writing software used The system will play DTS and Dolby tracks in surround sound ...

Страница 104: ...ials liquids and debris Do not add any label to a CD it could get caught in the CD player If a CD is recorded on a personal computer and a description label is needed try labeling the top of the recorded CD with a soft marker instead With the six disc CD DVD changer you can play up to six audio CDs MP3s DTS discs audio DVDs or video DVD discs continuously M Load To load one disc do the following 1...

Страница 105: ...es when loading all until the discs have been read by the system Once all discs have been inserted the system will start playing the last loaded disc If no CD or DVD is loaded in the CD DVD changer and you press the SRCE hard key a No disc loaded error message will be displayed Select the Cancel screen button when available to stop the loading process and to start playing the last loaded disc Z Ej...

Страница 106: ...ess and hold this screen button to reverse through the current track If reverse past the current track the system will go to the previous track on the disc Fast forward Press and hold this screen button to fast forward through the current track If fast forward past the current track the system will go to the next track on the disc j Pause Select this screen button to pause play Select this button ...

Страница 107: ...l discs of the same media type Select the OFF screen button to turn off random play k Repeat Select the repeat screen button to toggle between the following repeat options X RPT Repeat Track If this symbol appears on the display after pressing the repeat screen button the system will repeat the track currently playing Select the OFF screen button to turn off repeat play B RPT Repeat Disc If this s...

Страница 108: ... folder for each album Each folder or album should contain 18 songs or less It is recommended that there is a maximum of 192 files on a disc The files can be recorded on a CD R or CD RW with a maximum capacity of 700MB DVD with MP3 are not playable on this system The radio will play a mixed mode CD R RW a disc recorded with both cda and mp3 files Playing an MP3 If playing a CD R the sound quality ...

Страница 109: ...in the CD player If a CD is recorded on a personal computer and a description label is needed try labeling the top of the recorded CD with a soft marker instead The play reverse fast forward pause previous folder and next folder screen buttons will only appear when the CD MP3 controls button is selected on in the Audio screen Insert an MP3 then see Audio under Configure Menu on page 75 for more in...

Страница 110: ...use play Select this button or the play button to resume play Previous folder Select this screen button to go to the previous folder Next folder Select this screen button to go to the next folder Scan Select the Scan screen button to toggle between the following scan options SCAN Scan Folder If this symbol appears on the display after pressing the Scan screen button the system will play the first ...

Страница 111: ...ther than sequential order Select the OFF screen button to turn off random play M RND Random All Discs If this symbol appears on the display after pressing the random screen button the system will play the tracks on all of the loaded discs in random rather than sequential order This function randoms all discs of the same media type Select the OFF screen button to turn off random play k Repeat Sele...

Страница 112: ...k of the selected disc Press the down arrow to go to the beginning of the current track or to the previous track on a disc If playing the first track pressing the down arrow will seek to the last track on the selected disc Playing an Audio or Video DVD When an audio or video DVD has been loaded the following screen will appear Some features do not function for both audio and video DVDs To get the ...

Страница 113: ... or Dolby tracks in surround sound Menu Select this screen button to access the DVD s menu options Depending on the type of DVD you are using this screen button may or may not be available DVD Menu Select this screen button to access the video DVD menu DVD must be playing to select this feature While watching a video DVD or playing an audio DVD touch anywhere on the screen to remove all screen but...

Страница 114: ...o to the specified title group or chapter track 4 Select the Search screen button to exit the search feature r Reverse Fast Forward Touch the left or right arrows to reverse or fast forward within a track r Play Select the play screen button to begin playing the currently selected disc j Pause Select the pause screen button to pause the currently playing disc Select this button again or the play b...

Страница 115: ... available for DVD audio only k Repeat Select this screen button to repeat the current track Select this screen button again to repeat the current playing group on the disc Select the OFF screen button to turn off repeat play This function is available for DVD audio only OFF Select this screen button to turn off the scan random and repeat functions t u Seek Key Press the up arrow hard key to go to...

Страница 116: ... track names menu options or scene selection Then touch Enter to set your selection Keypad Select this button and a number keypad will appear Input the track number press enter and the system will play the track W Back Return Select either button to return to the previous screen Screen Adjust Menu Screen Adjust Select this screen button to access the audio video DVD screen adjust menu _ Contrast S...

Страница 117: ...t e Normal Screen Select this screen button to view a video DVD in normal screen size Six Disc DVD Changer Errors Although the DVD or CD you are playing meets regulation requirements there are circumstances that may cause the disc to not play correctly Some of those circumstances may include the recording conditions of the disc the disc condition and the pick up circumstances of the player If usin...

Страница 118: ... driver distraction Connect the auxiliary device to the audio and video connectors located in the center console The system requires standard RCA cables not included to connect the auxiliary device to the RCA jacks Refer to the manufacturer s instructions for proper usage The video and left and right audio jacks have graphics and color coding to allow for easy identification Connect the auxiliary ...

Страница 119: ...settings as adjusted the last time your vehicle was operated This feature allows two different drivers to store and recall their own audio system settings The settings recalled by the audio system are determined by which RKE transmitter 1 or 2 was used to enter the vehicle The number on the back of the RKE transmitter corresponds to driver 1 or to driver 2 The audio system settings will automatica...

Страница 120: ... NOTES 120 ...

Страница 121: ...Voice Recognition 122 Section 4 Voice Recognition 121 ...

Страница 122: ...e one of the commands listed on the following pages Helpful Hints for Stating Commands When a multiple command is available choose the command that best works for you Words that are in brackets are optional For example for the command Radio band select FM stating Radio FM or Radio select FM are both valid commands When the system recognizes the command the system will Either perform the function A...

Страница 123: ...n the screen while you are stopped When the vehicle is moving the system will let you know that this command is not available while driving To enter the help screens clearly state one of the help commands While in the help menu you can select from two screens the Command List and the Operating Guide The Command List shows a list of available voice recognition commands to use Touch the Command List...

Страница 124: ...ows and personalization The Operating Guide screen gives step by step directions for using the voice recognition feature Touch the Operating Guide screen button and then touch one of the buttons on the right of the screen to choose the instructions to list Use the up and down arrows to scroll through the instructions Start Touch this screen button to display instructions on how to start using the ...

Страница 125: ...ystem display to day mode See Screen Appearance under Configure Menu on page 75 for more information Display set night mode This command instructs the system to switch the system display to night mode See Screen Appearance under Configure Menu on page 75 for more information Display set auto mode This command instructs the system to switch the system display to auto mode See Screen Appearance unde...

Страница 126: ...ion change to 2 D map mode These commands instruct the system to switch between 2 D and 3 D map modes These commands are available while a map screen is displayed Point of Interest POI Commands The following is a list of POI commands State the commands exactly as they are written to receive information from the system regarding that specific command POIs will only display on the map screen if the ...

Страница 127: ...gation Speedway Navigation Sports Complex Navigation Stadium Navigation Performing Arts Navigation Tourist Attraction Navigation Tourist Information Navigation Video Rental Navigation Winery Financial Locations Navigation ATM Navigation Bank Navigation Other Financial Services Governmental Offices Navigation Town Center Navigation City Center Navigation Convention Center Navigation Exhibition Cent...

Страница 128: ...t Navigation American Food Navigation Chinese Restaurant Navigation Chinese Food Navigation Coffee House Navigation Continental Restaurant Navigation Continental Food Navigation Fast Food Navigation Fast Food Restaurant Navigation French Restaurant Navigation French Food Navigation Ice Cream Parlor Navigation Italian Restaurant Navigation Italian Food Navigation Japanese Restaurant Navigation Japa...

Страница 129: ...m with Enter destination when prompted You may also state Add waypoint or To waypoint after entering a destination to add a waypoint along the route to your final destination You can cancel the command by stating cancel after the system talk back Navigation go home navigation select home These commands instruct the system to set the home preset as the destination Navigation go to previous destinat...

Страница 130: ...State waypoint or destination after the prompt Cancel This command instructs the system to cancel the most recently given command Guidance Commands Navigation louder navigation softer These commands instruct the system to increase and decrease the volume of the voice guidance and voice recognition system prompts Navigation show whole route map navigation show entire route map These commands instru...

Страница 131: ...nds The commands are only available when you are in one of the following audio modes AM FM XM if equipped or WX if equipped Radio These commands instruct the system to turn the audio system on Radio turn off These commands instruct the system to turn the audio system off Radio set balance center These commands instruct the system to set the fade or balance to the center and middle Radio scan up ra...

Страница 132: ...ystem CD DVD changer on CD CD turn off These commands instruct the system to turn the audio system CD DVD changer off CD set balance center These commands instruct the system to set the fade and balance to the center position CD scan up This command instructs the system to scan upward through tracks CD select disc one two etc track one two etc These commands instruct the system to go to a specific...

Страница 133: ...lp This command instructs the system to assist with DVD changer commands Help commands will display on the map screen when the vehicle is stopped The word middle can be substituted in place of the word center The word fade can be substituted in place of the word balance The word chapter can be substituted in place of the word track Climate Control Commands Heater set fan high This command will inc...

Страница 134: ... command selects the memory settings for driver 1 The seat steering wheel and navigation system settings will change to those stored by driver 1 Select driver two This command selects the memory settings for driver 2 The seat steering wheel and navigation system settings will change to those stored by driver 2 Driver help This command instructs the system to assist with driver commands Help comman...

Страница 135: ...al the phone number of a specific previously stored name The system responds with Name Please State the stored name The system will then play back the name and will request a confirmation Respond with a yes or no The system will then dial the number See Phone Book Screen under Dialing and Making Calls Using Your Bluetooth Phone under Bluetooth Phone on page 150 for more information on how to store...

Страница 136: ... NOTES 136 ...

Страница 137: ...Vehicle Customization 138 Personalization 138 Section 5 Vehicle Customization 137 ...

Страница 138: ...s to a preferred setting for up to two people Features such as driver position door lock personalization passenger window personalization chime personalization driver information center remote lock and unlock confirmation suspension system configuration and remote start climate control settings can be personalized Language 138 ...

Страница 139: ...obe screen button or choose the desired language 4 Your choice will be stored automatically If the screens appear in a language that you do not understand do the following 1 Turn off the vehicle 2 Open and close the door Wait about 30 seconds 3 Turn on the vehicle 4 Press the map hard key 5 Touch the globe symbol screen button from the WARNING screen See Getting Started on page 6 for more informat...

Страница 140: ...s transmitter 3 Press the CONFIG hard key 4 Touch the Vehicle screen button 5 Access the Personal Menu Setting by pressing the Personal Settings screen button 6 The appropriate driver information should be highlighted If you wish to change driver numbers touch the appropriate keyless access transmitter to identify yourself as Driver 1 or Driver 2 The system will show the start up screen when the d...

Страница 141: ... closed on Lights Horn Lights flash at UNLOCK on Lights flash at LOCK on Exterior lighting at UNLOCK on Horn chirps at LOCK off External Audible Keyless Entry Transmitter in vehicle reminder on Twilight Delay will be set at five seconds Occupant Information Driver Greeting standard driver greeting Chime Volume Normal Chime Volume Passenger window Lockout off Suspension Ride Control Mode Touring Oc...

Страница 142: ...e vehicle When this feature or any of the following features are selected on the button next to the name will appear highlighted When this feature is selected choose from one of the following options DRIVER unlock at OFF The driver s door will automatically unlock when the ignition is turned off ALL doors unlock at OFF All of the doors will automatically unlock when the ignition is turned off DRIV...

Страница 143: ... PULLING front door handle When you approach the vehicle with your keyless access transmitter and pull the driver s or passengers front door handle the door will automatically unlock See Door Locks in the Index of your vehicle s owner manual for more information You may also choose to activate one or both of the following two options Keyless Access All Doors LOCK after Last door closed The doors w...

Страница 144: ...Select any or all of the following options Lights flash at UNLOCK The exterior lamps will flash when the keyless access transmitter is used to unlock the vehicle All doors must be closed for this feature to work and the lamps will not flash if the parking lamps or headlamps are on If Lights flash at UNLOCK is turned on and either ALL doors unlock when PULLING front door handle or FRONT door unlock...

Страница 145: ...or about 20 seconds unless a door is opened the ignition is turned to ACC ON or START or the keyless access transmitter is used to lock the vehicle Horn chirps at LOCK The horn will chirp once when the keyless access transmitter is used to lock the vehicle All doors must be closed for this feature to work External Audible Keyless Entry Transmitter in vehicle reminder The horn will chirp three time...

Страница 146: ...ypad will display Type in the greeting You may enter up to 16 characters When finished typing the greeting touch the OK screen button Chime Volume Select a normal or high volume level for the vehicle chime setting The chime volume cannot be turned off Magnetic Ride Control If your vehicle has this feature select between performance or touring modes Performance mode is used where road conditions or...

Страница 147: ...ns will be recalled when the START button is pressed See Starting and Operating Your Vehicle in the Index of your vehicle s owner manual for more information REMOTE recall memory When on the previously programmed seat and mirror positions will be recalled when the unlock button on the keyless access transmitter is pressed Auto EXIT Seat Recall When on the previously programmed exit seat position i...

Страница 148: ...l of the following items The Remote Start screen button must be highlighted in order to select the following options Climate Control The climate control system will turn on when the vehicle is started using remote start It will be at the same climate control setting that was last used by the driver using that keyless access transmitter Rear Defog The rear defogger will turn on when the vehicle is ...

Страница 149: ...Phone 150 Bluetooth Phone 150 Section 6 Phone 149 ...

Страница 150: ...stem to connect or pair to the phone 1 Press the CONFIG hard key 2 Select the E Bluetooth screen button 3 Your phone must be in the discoverable mode and the Bluetooth feature powered on to be found by the Bluetooth system in the vehicle This is normally in the phone settings Bluetooth option 4 Select the Search screen button The system will search for the compatible Bluetooth devices 5 Choose you...

Страница 151: ...5 Select default so the vehicle will attempt to automatically connect to the phone when you enter the vehicle The following options are available when in the Bluetooth set up screen My Info Information Select this screen button to display the details of your Bluetooth device including the name and passkey information Selecting Device Name allows you to edit the name of the Bluetooth device name Se...

Страница 152: ...ect Select this screen button to connect your phone to the Bluetooth system Receive Select this screen button to have your Bluetooth system connect to your phone when you are using your phone as the device to initiate pairing This allows your phone to search for other devices and to find and connect to your vehicle When this button is pressed the navigation system is waiting to be connected to a d...

Страница 153: ...t this screen button to get to the Bluetooth screen Call Status This area will indicate the call status It will indicate whether or not there is good signal strength and whether or not the phone is in service range q Backspace Select this screen button to delete numbers after they have been entered Select and release to delete numbers one by one or hold it down to delete all numbers at the same ti...

Страница 154: ... end a call at the end of the conversation When you send a call the button will be green When you are in a call the button will be red to indicate that touching the button will end the call Dialing and Making Calls Using Your Bluetooth Phone Once your phone has been set up you are ready to begin using it 1 Press the AUX hard key to enter the BLUETOOTH PHONE screen 2 Select the Bluetooth screen but...

Страница 155: ...e z Scroll Down This screen button scrolls down the list one entry at a time z Page Down This screen button scrolls down the list one page at a time Q OnStar Select this screen button to use the OnStar system to place a phone call See OnStar System on page 74 for more information Video Select this screen button when using an auxiliary device See Auxiliary Devices on page 118 for more information F...

Страница 156: ...te 3 Select the Edit screen button 4 Select the Y delete screen button 5 The system will request confirmation Press Yes to confirm or No to cancel To add a nametag to a specific name 1 Select the g phone book screen button 2 Select the name that you wish to add a nametag to 3 Select the Edit screen button 4 Select the Add Nametag screen button 5 The system will request that you state the name you ...

Страница 157: ...creen button will let you place a call after touching the appropriate phone book entry or to cancel a call at the end of the conversation Last 10 Calls Screen This screen shows either the last 10 calls that have been placed or the last 10 calls received by your Bluetooth system The newest calls are at the top of the list Page Up This screen button scrolls up the list one page at a time y Scroll Up...

Страница 158: ...the appropriate phone book entry or to cancel a call at the end of the conversation Sent Selecting this screen button will give you the list of the last 10 calls sent from the system Received Selecting this screen button will give you the list of the last 10 calls received on the system Dialing from Navigation Screens When a Bluetooth phone is connected you can use the V Send End Call screen butto...

Страница 159: ...nceling Guidance 14 Change Route 34 Cleaning the Display 14 Clock 82 Coordinates 69 D Database Coverage Explanations 90 Destination 55 Dialing and Making Calls Using Your Bluetooth Phone 154 Dialing from Navigation Screens 158 Display Cleaning 14 E Ejecting the DVD Map Disc 19 Emergency 66 Entering the Personalization Menu 140 F Finding a Station 93 Freeway Entrance Exit 64 159 ...

Страница 160: ...dows 27 H Hard Keys 16 Head Up Display HUD 32 Home 70 I Installing the DVD Map Disc 19 Intersection 62 L Language 138 Lights Horn 144 Lock Unlock 142 M Magnetic Ride Control 87 Map 61 Map Adjustments 19 Map Scales 20 Maps 18 Memory Infotainment Settings and Presets 85 Memory Points 40 67 Memory Settings 84 Menu Navigation 33 160 ...

Страница 161: ...view Navigation System 4 Owners Canadian 2 P Phone Bluetooth 150 Phone Number 63 Playing an Audio CD 106 Playing an Audio or Video DVD 112 Playing the Radio 92 Point of Interest POI 59 Preset Destination 70 Preset Stations 94 Previous Destination 68 Problems with Route Guidance 89 R Radio 92 Radio Data System RDS 98 Recall Memory Settings 86 Region 55 Regional Maps 18 Remote Start 148 161 ...

Страница 162: ...tting Up Your Bluetooth Phone 150 Six Disc DVD Changer Errors 117 Store Memory Settings 85 Symbols 21 System Needs Service If 89 T Three Routes 72 Touch Sensitive Screen Buttons 18 Traveling Across Regions 32 U Using an MP3 108 Using Your Home or Preset Destinations 13 V Vehicle 82 Vehicle Positioning 88 Voice Recognition 122 Voice Recognition Commands 125 Voice Recognition Help 123 X XM Radio Mes...

Отзывы: