background image

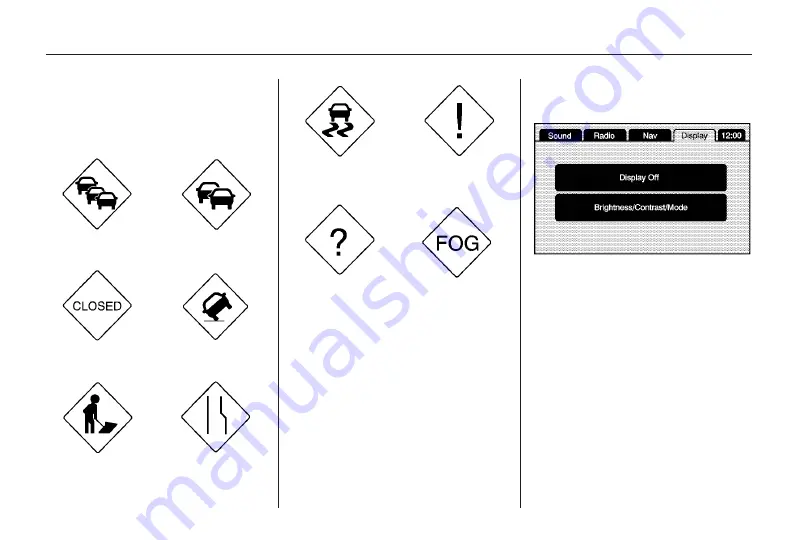
Traffic Condition Symbols

The following are traffic condition
symbols that can appear on the
display:

Display

Press the CONFIG key to enter
the menu options, then press the
CONFIG key repeatedly until Display
is selected or touch the Display
screen button.

Display Off

Touch this screen button to turn the
display off. Press any hard key such
as NAV, AUDIO, FAV, CONFIG,
DEST, SCREEN, or TONE to view
the display.

Stopped Traffic

Traffic Jam

Accident

Road Closed

Lane Narrows

Road work/

Construction

Alert

Road condition

Road Visibility

Other

68

Infotainment System

Содержание CTS 2010

Страница 1: ... Navigation 41 Using the Navigation System 41 Maps 43 Navigation Symbols 45 Destination 50 Configure Menu 62 Global Positioning System GPS 70 Vehicle Positioning 70 Problems with Route Guidance 71 If the System Needs Service 72 Ordering Map DVDs 72 Database Coverage Explanations 72 Voice Recognition 72 Speech Recognition 72 Index i 1 2010 Cadillac CTS CTS V Navigation System M ...

Страница 2: ......

Страница 3: ...rotected by U S patents and other intellectual property rights Use of this copyright protection technology must be authorized by Macrovision and is intended for home and other limited viewing uses only unless otherwise authorized by Macrovision Reverse engineering or disassembly is prohibited The information in this manual supplements the owner manual This manual includes the latest information av...

Страница 4: ... available when the vehicle is moving All functions are available when the vehicle is parked Do the following before driving Become familiar with the navigation system operation hard keys on the faceplate and touch sensitive screen buttons of the navigation system Set up the audio by presetting favorite stations setting the tone and adjusting the speakers Set up the navigation features before begi...

Страница 5: ...urned on a screen may appear with the information below and you must read and acknowledge the information it contains WARNING Taking your eyes off the road for extended periods could cause a crash resulting in injury or death to you or others To help avoid a crash in which you or others could be killed Always concentrate on your driving first by keeping your eyes and mind on the road and your hand...

Страница 6: ...ppears and OK must be pressed to access the navigation map When getting started the navigation system can be set to preferences or information that has been entered can be deleted using various options A VOL O Volume Power Knob See Hard Keys under Using the Navigation System on page 41 for more information B TUNE TONE Knob See Hard Keys under Using the Navigation System on page 41 for more informa...

Страница 7: ...eys under Using the Navigation System on page 41 for more information J o MENU p SELECT Knob See Hard Keys under Using the Navigation System on page 41 for more information K REC Record Key See Hard Drive Device HDD on page 30 for more information L CONFIG Configure Key See Configure Menu on page 62 for more information M k Play Pause Key See Timeshift USB and iPod under AM FM Radio on page 12 Sat...

Страница 8: ...ion system can record and store destinations and personal information such as names and addresses When disposing of the vehicle you may want to delete this information See Previous Destinations Deleting and Address Book Editing and Deleting Entries under Destination on page 50 for deleting this information Storing Radio Station Presets Up to 36 preset stations can be stored AM FM and XM if equippe...

Страница 9: ...es For example the street name N Royal Oak Rd should be entered as royal Space screen button oak Use the backspace q screen button if an incorrect character has been entered If four or less names are available for the entered characters a list displays If more than four are available there is a match counter with a number in it it represents the number of available streets Select the List button t...

Страница 10: ...ere is a match counter with a number in it it represents the number of available POI names Select the List button to view the list Select the POI 6 Select the Go screen button The system calculates the route 7 Select the route preference Fastest Shortest or Easy The system highlights the route 8 Select the Start Guidance screen button The route is now ready to be started See Point of Interest POI ...

Страница 11: ... 4 Select one of the available preset destination screen buttons The system calculates the route 5 Select the route preference Fastest Shortest or Easy The system highlights the route 6 Select the Start Guidance screen button The route is now ready to be started See Preset Destination under Destination on page 50 for more information Canceling Guidance Guidance is canceled once you arrive at your ...

Страница 12: ... FM Radio Playing the Radio O Power Volume Press to turn the audio system on and off Turn the knob to increase or decrease the volume TUNE TONE Knob Turn to go to the next or previous frequency Press this knob to display the Sound menu See Sound Menu later in this section AUDIO Press to display the full audio screen Press the key to switch between AM FM XM if equipped CD DVD HDD and AUX auxiliary ...

Страница 13: ...ect the frequency FM lists may also contain a category to select if stations in the area support Radio Data Systems RDS DEL Delete Press to remove the currently displayed category Restore CAT Touch to restore a category that was just removed Restore All Touch to restore all categories that were removed Refresh Touch to refresh the list of stations When viewing a map screen the name of the station ...

Страница 14: ...Menu later in this section Sound Menu TONE or CONFIG Configure Press this knob or press the CONFIG key to access the Sound menu to adjust the treble midrange bass fade balance and Digital Signal Processing DSP TREBLE Touch the plus or minus sign to increase or decrease the treble If a station is weak or has static decrease the treble MID Midrange Touch the plus or minus sign to increase or decreas...

Страница 15: ... is selected or touch the Radio screen button to make radio system changes Additional Information Displayed Touch the Additional Information Displayed screen button to turn station or channel information on or off Touch the On screen button to receive information when it is available for the following FM radio text information Touch the Off screen button to receive no information Number of Preset ...

Страница 16: ... for an hour it will keep recording and start removing the information from the beginning Press k pause to stop hearing the information through the speakers During this pause time timeshift keeps recording Press k play to continue listening where you left off During pause a progress bar displays to show how much time the system has been buffering Press k before turning the vehicle off so that Time...

Страница 17: ...enu later in this section AUDIO Press to display the full audio screen Press the key to switch between AM FM XM if equipped CD DVD HDD and AUX auxiliary input or touch the screen button See AM FM Radio on page 12 for more information Finding a Station For information on finding and changing a station see AM FM Radio on page 12 earlier in this section AM FM XM Touch the source AM FM or XM if equipp...

Страница 18: ...ifferent listening experiences DSP can be used while listening to the audio system The type of DSP selected is displayed on the status screen Select from the following DSP settings Normal Select to adjust the audio to be in normal mode This provides the best sound quality or all seating positions Driver Select to adjust the audio to give the driver the best possible sound quality Rear Select to ad...

Страница 19: ...cancel XM Satellite Radio Service XM is a satellite radio service that is based in the 48 contiguous United States and 10 Canadian provinces XM Satellite Radio has a wide variety of programming and commercial free music coast to coast and in digital quality sound During your trial or when you subscribe you will get unlimited access to XM Radio Online for when you are not in your vehicle A service ...

Страница 20: ...t a CD or DVD Gracenote logo display starts with the Gracenote database access and the CD DVD tab activates The vehicle must be in P Park The player is only compatible with CDs or DVDs of the appropriate region code that is printed on the jacket of most CDs and DVDs The CD DVD slot is compatible with most audio CDs CD R CD RW DVD Video DVD Audio DVD R RW DVD R RW media along with MP3 and WMA un pr...

Страница 21: ...track selection A sound is heard at a reduced volume Release this button to stop fast forwarding The display shows the elapsed time of the track u SEEK t SEEK Press the right arrow to go to the next track Press the left arrow to go to the start of the current track if more than five seconds have played or to the previous track if five seconds or less have played If either arrow is pressed more tha...

Страница 22: ...are two pages of menu options Press the page number screen button located in the bottom right corner of the screen to use all of the menu screen buttons Menu options are available when they are highlighted Some menu options are only available when the DVD is not playing Full Screen Press this screen button to remove all menu options from the display Press anywhere on the screen to display the menu...

Страница 23: ...er and to change the language heard Repeatedly press this button to toggle through the available languages This may not be available on all DVDs This button is not available when the DVD is stopped Subtitle Stream Touch to playback the video with subtitles Repeatedly press this button to toggle through the available languages To turn the subtitles off press this button until Off is selected This b...

Страница 24: ...hange the language of the subtitles Menu Language Touch English French or Spanish to change the language of the menus Aspect Touch to change the aspect ratio of the DVD This may not be available on all DVDs Brightness Contrast Mode From the DVD Setup screen touch this button to change the brightness contrast and mode of the screen while playing a DVD Brightness Touch the up or down screen arrows t...

Страница 25: ...e DVD is playing the copyright information or the previews t SEEK Previous Track Chapter Press to return to the start of the current track or chapter Press this button again to go to the previous track or chapter This button may not work when the DVD is playing the copyright information or the previews TUNE TONE Knob Turn to go to the next or previous track chapter CD DVD Messages If Disc Read Err...

Страница 26: ... 48 56 64 80 96 112 128 144 160 192 224 256 and 320 kbps ID3 tag information is displayed by the radio if it is available The radio will display a filename song name artist name album name and directory name Maximum number of folders is 255 with a maximum hierarchy of eight folders Create a folder structure that makes it easy to find songs while driving Each folder or album should contain 18 songs...

Страница 27: ...s been played play continues from the first track of the first playlist If the CD does not contain any playlists then play begins from the first track under the root directory When all tracks from the root directory have been played play continues from files according to their numerical listing After playing the last track from the last folder play begins again at the first track of the first fold...

Страница 28: ... Touch the play button to play the CD Random Touch to hear the disc played in random tracks and folders order Touch the Random screen button to turn off random play r Rewind Touch and hold to rewind quickly through a track selection A sound is heard at a reduced volume Release this button to stop rewinding The display shows the elapsed time of the track Forward Touch and hold to fast forward quick...

Страница 29: ...e DISC Select an artist name to view all songs on that list select a song It may take a few minutes for the system to show the list Once a song has been selected from this category the artist name appears in the center button on the main screen to show that music is being played from a specific artist Album Press this button to view the albums that have been stored on the DISC Select an album name...

Страница 30: ...u for information on entering your ID number 2 Press the REC hard key 3 A confirmation window will display Select Yes to record all tracks select No to cancel the operation A progress bar displays if Yes was selected To record selected tracks 1 Load a CD 2 Touch the Track List screen button in the middle of the screen 3 Select the songs from the Music Navigator screen To record an audiobook from a...

Страница 31: ...tton in the middle of the screen 3 Select the media from the Music Navigator screen To record an audiobook from a CD or a USB you must register with audible com to receive an ID number The ID number must be entered into the system See audiobook later in this section for information on audible com See Radio under Configure Menu for information on entering your ID number 4 Press the REC hard key 5 A...

Страница 32: ...moving backward or forward through the HDD The sound mutes while seeking q r Category Select the left or right arrow to go to the previous or next Album Playlist Artist Genre Audiobook on the HDD Press the center button on the main screen to display Music Navigator Music Navigator Screen Selecting any of the following screen buttons when in HDD displays the Music Navigator screen for each of the f...

Страница 33: ...n selected from this category the Genre appears in the center button on the main screen to show that you are playing music in this mode Audiobook Press this button to view the Audiobook that have been stored on the HDD Select an audiobook name book title to view all sections in it Select a section to listen to If the Last position screen button is pressed the audiobook starts playback from the pos...

Страница 34: ...d back on the recording process needs to be started again Saving HDD Favorites During HDD playback select one of the lower buttons to save songs in its category Each category has six presets To add a song from a category you must be listening to the song Press and hold the lower button until Favorite saved displays on the screen Audio Book The system is able to play back audio book content downloa...

Страница 35: ...touch the AUX screen button An auxiliary device must be connected for the AUX screen button to appear as an option to select or the vehicle must have rear auxiliary jacks The screen buttons are dependent of the type of auxiliary device that you are using USB Host Support The USB connector uses the USB 2 0 USB Supported Devices USB Flash Sticks Pen Drives Portable USB Hard Drives CompactFlash or ot...

Страница 36: ...ormation This feature supports the following iPod models Fifth generation or later iPod First or Second generation or later iPod Nano For proper operation make sure the iPod has the latest firmware from Apple The iPod firmware can be updated using the latest iTunes application See apple com itunes To connect and control the iPod connect one end of the specially purchased iPod connection cable to t...

Страница 37: ...me and Genre is retrieved from the Gracenote database stored in the radio The database information uses the information of Gracenote Music Recognition Service See Radio s in the owner manual for more information on the Gracenote Database Gracenote Music Recognition Service Music recognition technology and related data are provided by Gracenote Gracenote is the industry standard in music recognitio...

Страница 38: ...CONSENT This EULA grants you the following license to use the SOFTWARE only on the DEVICE THE SOFTWARE IS NOT FAULT TOLERANT GM HAS INDEPENDENTLY DETERMINED HOW TO USE THE SOFTWARE IN THE DEVICE AND MS HAS RELIED UPON COMPANY TO CONDUCT SUFFICIENT TESTING TO DETERMINE THAT THE SOFTWARE IS SUITABLE FOR SUCH USE THE SOFTWARE is provided AS IS and with all faults THE ENTIRE RISK AS TO SATISFACTORY QU...

Страница 39: ...other EULA terms are provided along with the Supplemental Components then the terms of this EULA shall apply If MS Microsoft Corporation or their affiliates make available Supplemental Components and no other EULA terms are provided then the terms of this EULA shall apply except that the MS Microsoft Corporation or affiliate entity providing the Supplemental Component s shall be the licensor of th...

Страница 40: ... such services If this SOFTWARE contains documentation that is provided only in electronic form you may print one copy of such electronic documentation This EULA does not grant you any rights in connection with any trademarks or service marks of GM MS Microsoft Corporation their affiliates or suppliers Product support for the SOFTWARE is not provided by MS its parent corporation Microsoft Corporat...

Страница 41: ...ss midrange treble and Digital Signal Processing DSP See Navigation Audio System CD Player DVD Player and Hard Drive Device for more information NAV n m Navigation Screen Up Down Press to make the screen go up and down In the up position all touch screen buttons can be viewed or used In the down position a portion of the screen will be shown that displays the current audio source and temperature F...

Страница 42: ...ance is active press this key to access the Route screen See Destination for more information DEL Delete Press to delete XM categories and information from the hard drive See Navigation Audio System and Hard Drive Device for more information INFO Information Press for Speech Help and Weather See Speech Recognition and Weather for more information k Play Pause Press to play and to pause Timeshift C...

Страница 43: ...characters that can follow the last one entered For example if a Z is entered a T may not be available for selection If a name does not display after entry it may need to be entered differently since the map database may not contain that information Maps This section includes basic information needed to know about the map database Map Coverage The maps are stored on the HDD Hard Drive It includes ...

Страница 44: ...contamination or flaws Signals may not read out properly if the disc gets contaminated or flawed If the disc gets soiled use a soft cloth to gently wipe it out from the center of the disc to the outside Do not use photographic record cleaner solvents or other cleaners Do not use the disc to rest on while writing or drawing using any writing utensil or attach a seal to any of the sides or the disc ...

Страница 45: ...ion on the map When scrolling on the map the system displays the address of the scroll symbol location You can use the scroll feature on the map to set a destination See From Map under Destination for more information When scrolling on the map without a planned route press the GO screen button to calculate the route from your current position to the destination mark Navigation Symbols The followin...

Страница 46: ...is feature allows you to add up to three waypoints to the current route between your start point and final destination Once a waypoint has been added the points can be edited or deleted The distance to crosshairs indicates the distance to the crosshair area displayed on the map screen during map scrolling This symbol only appears when time is not available 46 Infotainment System ...

Страница 47: ...rth direction on the map regardless of which direction the vehicle is traveling Select this screen symbol to switch Heading Up North Up and 3 D modes This heading up symbol indicates the map with the vehicle travel direction up known as Heading Up mode While in Heading Up mode the direction the vehicle is traveling will always be at the top of the map screen The shaded triangle indicates the North...

Страница 48: ...display or remove POI icons from the map Displaying POI icons on the map indicates where POIs i e restaurants gas stations etc are located This screen appears after selecting the POI screen button Select one of the POI categories to display or to remove POI icons from the map screen When a category is selected those POI icons display on the map Edit Select this screen button to change one of the c...

Страница 49: ...ook See Address Book under Destination for information on address book entries Go Press to make this POI a destination or a waypoint Map Press to display the map showing the location of the POI Driving on a Route When a destination has been routed and while driving on route the map screen automatically displays the next maneuver This next maneuver pop up displays the next maneuver direction and ho...

Страница 50: ...he Street Name First 1 Press the DEST hard key 2 Select the Street screen button 3 The Street category is automatically selected for entry Start entering the street name It is recommended that directional information or street type is not entered Use the Space screen button between street or city names For example the street name N Royal Oak Rd should be entered as royal Space screen button oak Us...

Страница 51: ...utton and start entering the city name If four or less names are available for the entered characters a list displays If more than four are available there is a match counter with a number in it it represents the number of available cities Select the List button to view the list and select a city 4 Start entering the street name It is recommended that directional information or street type is not ...

Страница 52: ...eet name N Royal Oak Rd should be entered as royal Space screen button oak Use the backspace screen button if an incorrect character has been entered If four or less names are available for the entered characters a list displays If more than four are available there is a match counter with a number in it it represents the number of available cities Select the List button to view the list and selec...

Страница 53: ...t 5 A confirmation screen displays with the POI information If the POI information is correct select the Go screen button The system calculates the route 6 Select the route preference Fastest Shortest or Easy The system highlights the route 7 Select the Start Guidance screen button The route is now ready to be started See Getting Started on Your Route later in this section Entering the City Name F...

Страница 54: ... Select the Browse POI Categories screen button 4 Select a category and then a sub category The system will display available POI names in the selected sub category 5 Select the POI name from the list 6 A confirmation screen displays with the POI information If the POI information is correct select the Go screen button The system calculates the route 7 Select the route preference Fastest Shortest ...

Страница 55: ...stem much simpler It allows subscribers to request and receive navigation assistance on the go Using OnStar Destination Download Press the blue OnStar button and an Advisor can locate a point of interest or an address and download the necessary information or coordinates to your navigation system Once the destination is downloaded the navigation system will search for the address in the mapping di...

Страница 56: ...the downloaded destination as the next waypoint in the existing route All features such as Call and Add to Address Book will be available for the waypoint Refer to the section on Waypoints for more information Previous Destinations Previous OnStar Destination Downloads are saved under Previous Destinations in the navigation system where they can be accessed or saved to the address book Important N...

Страница 57: ...is shown at the top of the screen Getting Started on Your Route Once a destination has been entered there are several functions that can be performed Press the DEST hard key to access the Route screen Turn List Turn List Select this screen button from the Route screen to view the list of maneuvers for the entire route Destination Map Screen Infotainment System 57 ...

Страница 58: ...o fast forward scroll to the final destination This button displays once the forward scroll button has been selected u Fast Forward Skip Select to go to the final destination Detour Detour Select this screen button from the Route screen then select to detour 1 3 5 15 or 25 miles 2 5 10 20 or 40 km around the current route Select Entire Route to detour the entire route This option is only available...

Страница 59: ...y to be started 4 To add more waypoints press the DEST hard key then select the Add screen button where the next waypoint should fall on the route The system calculates and highlights the route The route is now ready to be started To delete a waypoint 1 Press the DEST hard key 2 Select the Delete screen button next to the waypoint to be deleted 3 The system displays a pop up confirmation message S...

Страница 60: ...displays Enter the name 3 Press and hold one of the six screen buttons at the bottom of the screen until the text within the button changes The name appears in that preset destination screen button and is now available to select from the Select Destination screen Adding or Changing Destinations 1 Press the DEST hard key 2 Select the Address Book screen button 3 Select the address book entry to add...

Страница 61: ...ough the list 3 Select the address book entry to change 4 Touch the Phone screen button and use the numeric keyboard to enter or change the phone number 5 Touch the OK screen button to save your changes To change the map icon of an address book entry 1 Press the DEST hard key 2 Select the Address Book screen button A list of address book entries display Use the touch tap arrows to the left to move...

Страница 62: ...ndow displays Select Yes to cancel No to cancel this operation Configure Menu Press the CONFIG hard key to adjust several of the system s features and preferences The last selected menu screen is the screen that displays Sound Radio Nav navigation Display or clock Sound Press the CONFIG key to enter the Menu options then press the CONFIG key repeatedly until Sound is selected or touch the Sound sc...

Страница 63: ...tion Prompt Touch to turn speech recognition prompts on and off Speech prompts are on when the button is highlighted Speech Confirmation Feedback Touch to turn speech confirmation feedback on and off Speech feedback is on when the button is highlighted Route Preference Touch the Route Preference screen button to change route options when the system calculates a route Avoid Freeway The system avoid...

Страница 64: ...ditions for a driver s chosen route XM NavTraffic allows drivers to make the most informed timesaving routing decisions XM NavTraffic is powered by NAVTEQ Traffic data which provides aggregate quality tested information from the leading commercial and public traffic data providers including government departments of transportation police and emergency services road sensors cameras and airborne rep...

Страница 65: ...mbol appears in the Traffic screen button The vehicle traffic symbol is color coded as follows No symbol displays if traffic conditions reported to the navigation system do not affect the vehicle or no information is received while driving on a route that is not active Green indicates that the traffic condition is far away Yellow indicates that a minor traffic condition in the general area Red ind...

Страница 66: ...tons to view the accident locations that are on the list Avoid Traffic Condition Avoid The vehicle must be on Route Guidance and the traffic condition must be on the route for the Avoid feature to work Touch the Avoid screen button next to the traffic condition to be avoided The current route updates to remove the area with the traffic condition from the route Select each traffic condition to avoi...

Страница 67: ... planned route To turn this feature on 1 Press the CONFIG hard key then press the CONFIG key repeatedly until Nav is selected or press the Nav screen button 2 Touch the Traffic Information button 3 Touch the Use Traffic Information for Guidance button This button highlights when it is active Alternate Route When the pop up display Detour Available appears on the screen to notify that a possibly qu...

Страница 68: ...G key repeatedly until Display is selected or touch the Display screen button Display Off Touch this screen button to turn the display off Press any hard key such as NAV AUDIO FAV CONFIG DEST SCREEN or TONE to view the display Stopped Traffic Traffic Jam Accident Road Closed Lane Narrows Road work Construction Alert Road condition Road Visibility Other 68 Infotainment System ...

Страница 69: ...f your vehicles owner manual to change the analog clock time To set the time 1 Press the CONFIG key to enter the menu options then press the CONFIG key repeatedly until the time is selected or touch the clock screen button located in the upper right corner of the screen 2 Press the Hours and Minutes minus and plus signs to decrease and to increase the time 12 24 HR Format Select the 12 HR screen b...

Страница 70: ...After market glass tinting has been applied to the vehicle s rear windshield Notice Do not apply after market glass tinting to the vehicle s windows Glass tinting interferes with the system s ability to receive GPS signals and causes the system to malfunction The window might have to be replaced to correct the problem This would not be covered by the warranty For more information if the GPS is not...

Страница 71: ...ore of the following conditions You have not turned onto the road indicated Route guidance may not be available when using automatic rerouting for the next right or left turn The route may not be changed when using automatic rerouting There is no route guidance when turning at an intersection Plural names of places may be announced occasionally It may take a long time to operate automatic reroutin...

Страница 72: ...d most up to date DVD map disc for your vehicle See Vehicle Identification Number VIN in the Index of your vehicle s owner manual for more information After receiving the updated disc see Installing the DVD Map Disc and Ejecting the DVD Map Disc under Ordering Map DVDs Database Coverage Explanations Coverage areas vary with respect to the level of map detail available for any given area Some areas...

Страница 73: ...h the Overview screen button Available features in the system gives explanation of how to use the feature A list of questions categories display 3 Touch the question category to learn how to use speech recognition A command may be invalid if it does not recognize the command or if it cannot perform the command due to not being in an appropriate area for that command the system states Invalid Comma...

Страница 74: ... button Current Condition Touch to view the current weather condition for the city of the vehicle s current position Extended Forecast Touch to view the current condition with a two day forecast for the city of the vehicle s current position Along Route Touch to view the weather condition s of the current route The vehicle must be driving on a route for this feature to operate Weather Warnings Tou...

Страница 75: ... 11 Canceling Speech Recognition 73 CD DVD Player 20 CD Eject 34 CD DVD Messages 25 Cleaning the Display 12 Commands 73 Compressed Audio 33 Configure Menu 62 D Database Coverage Explanations 72 Deleting Personal Information 8 Destination Navigation 50 Devices Auxiliary 35 Display 68 Displaying Points of Interest POI on the Map Screen 48 Driving on a Route 49 Duplicate Content 34 DVD CD Player 20 E...

Страница 76: ... Map Disc 43 Introduction 3 L Language English Metric 8 M Map Adjustments 44 Map Coverage 43 Map Scales 44 Maps 43 Menu Configure 62 Microsoft License Agreement 38 MP3 26 Music Navigator Screen 32 N Nav Navigation 63 Navigation Destination 50 Symbols 45 Using the System 41 O OnStar Destination Download 55 Ordering Map DVDs 72 Overview 73 Overview Infotainment System 4 i 2 INDEX ...

Страница 77: ...ites 34 Scrolling the Map 45 Setting the Clock 69 Sound 62 Sound Menu 14 18 Speech Recognition 72 Storing Radio Station Presets 8 14 18 Symbols Navigation 45 System Needs Service If 72 T Timeshift 16 Recording from a USB Device 31 Touch Screen Buttons 42 U USB Background Recording 36 USB Host Support 35 USB Media Recording 35 USB Playback 35 USB Supported Devices 35 Using an MP3 CD and DVD 26 Usin...

Страница 78: ...V Vehicle Positioning 70 Voice Guidance 11 Voice Recognition 72 W Weather 74 X XM NavTraffic USA and Canada 64 XM Category Restore 19 XM Satellite Radio Service 19 i 4 INDEX ...

Отзывы: