BZB Gear BG-M88S-H2A-KIT Скачать руководство пользователя страница 48


43 

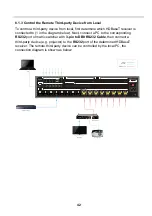
8.1.4 Control the Local Third-party Device from Remote 

To control a third-party device from remote, first determine which HDBaseT receiver is 
connected to (1 in the diagram below). Next, connect a PC to the 

RS232

 port of 

HDBaseT receiver with 

3-pin to DB9 RS232 Cable

, then connect a third-party device 

(e.g. projector) to the 

RS232 

port of matrix switcher. The local third-party device can 

be controlled by the remote PC, the connection diagram is shown as below: 


PC

Tx

Rx

LINK

HDCP

Tx

Rx

LINK

HDCP

Receiver

Display

RS232

Tx

Rx

FW

IR EYE

TCP/IP

1

2

3

4

5

6

7

8

ALL IN

1

2

3

4

5

6

7

8

ALL OUT

Tx

Rx

1

2

3

4

5

6

7

8

1

2

3

4

5

6

7

8

L

R

1

2

3

4

5

6

7

8

H

D

B

a

s

e

T
H

D

M

I

1

2

3

4

5

6

7

8

1

2

3

4

5

6

7

8

Projector

4K Blu-Ray

HDMI:

RS232:

HDBaseT:

Содержание BG-M88S-H2A-KIT

Страница 1: ...BG M88S H2A KIT 8x8 HDMI 2 0 HDBaseT Matrix Switcher All Rights Reserved User Manual...

Страница 2: ...is equipment generates uses and can radiate radio frequency energy and if not installed and used in accordance with the instructions may cause harmful interference to radio communications It has been...

Страница 3: ...l this product near water Do not put any heavy items on the extension cable in case of extrusion Do not remove the housing of the device as opening or removing housing may expose you to dangerous volt...

Страница 4: ...4 System Connection 10 4 1 Usage Precaution 10 4 2 System Diagram 10 5 Button Control 11 5 1 Signal Switching 11 5 2 Panel Button Locking Unlocking 12 5 3 Status Information Inquiry 12 5 4 EDID Manag...

Страница 5: ...al 40 8 1 2 Control the Matrix Switcher from Remote 41 8 1 3 Control the Remote Third party Device from Local 42 8 1 4 Control the Local Third party Device from Remote 43 8 2 RS232 Control Software 44...

Страница 6: ...onitoring purposes large screen displays conference systems television education bank security institutions etc 1 1 Features 8x8 HDBaseT matrix switcher with audio matrix Fully compliant with the HDMI...

Страница 7: ...4 Screws 1x IR Receiver 1x IR Remote 1x RS232 Cable 3 pin to DB9 16x 3 pin Terminal Blocks 1x Power Cord HDBaseT Receiver 8x HDBaseT Receivers 16x Mounting Ears with 32 Screws 32x Plastic Cushions 8x...

Страница 8: ...nk connectors Analog L R Audio Format Supports PCM Digital SPDIF Audio Format Supports PCM Dolby Digital DTS DTS HD Local Audio Sampling Rate Supports 44 1KHz 48KHz 96KHz ARC Audio Sampling Rate Suppo...

Страница 9: ...18Gbps Operation Temperature 5 55 Storage Temperature 25 70 Relative Humidity 10 90 External Power Supply 100V 240V AC 50 60Hz Power Consumption 125W Max Dimension W H D 436 6mm x 88mm x 440mm Net Wei...

Страница 10: ...ds Stereo Channel Separation 70dB 1KHz Control Control Part 1 ARC Mode button 1 FW 1 IR In 1 IR Out 1 RS232 Control Connector 1 Micro USB port 2 3 5mm jacks 1 3 pin terminal block General Bandwidth 18...

Страница 11: ...eives an IR signal from the IR remote to control the matrix switcher The IR sensor is on the right side of the LED INPUT Eight buttons for input source selection OUTPUT Eight buttons for output channe...

Страница 12: ...l the matrix switcher by the IR remote FW Type A USB port for firmware upgrade TCP IP RJ45 port to connect the control device e g PC to control the matrix switcher by GUI RS232 Eight 3 pin terminal bl...

Страница 13: ...source for the SPDIF output of matrix switcher the ARC mode will be enabled automatically ARC Audio In Toslink connector to connect ARC audio source device e g TV FW Micro USB port for firmware upgrad...

Страница 14: ...es green when the video contains HDCP content DC 24V DC connector for the power adapter connection If the switcher transmitter is connected to the power adaptor the receiver doesn t need to connect po...

Страница 15: ...nput and output connections that can be utilized with this matrix switcher Tx Rx LINK HDCP Receiver Projector Blu ray Remote IR Emitter IR Receiver Tx Rx LINK HDCP Receiver Projector Blu ray Remote IR...

Страница 16: ...itching Switch an input to an output Operation INPUT OUTPUT MENU Example Switch Input 1 to Output 2 Press INPUT 1 Press OUTPUT 2 Press to confirm Note In default status 8 IR OUT ports correspond with...

Страница 17: ...sponding input port is connected to a source device N means there is no connection between the input port and source device 1 8 HDBaseT output 1 8 Report the connection status of all HDBT output ports...

Страница 18: ...oke the fifth built in EDID 4K 60Hz HDR 2CH Enter EDID management tab Press Press to select EDID Management Press enter EDID management tab Press or navigation buttons to select the below items Learn...

Страница 19: ...nvoked as shown as below No EDID Video Audio 1 1080p 2CH 2 1080p HDR MultiCH 3 4K 30Hz HDR 2CH 4 4K 60Hz HDR MultiCH 5 Default 4K 60Hz HDR 2CH 6 4K 60Hz HDR MultiCH User Custom Example Input 1 and 2 i...

Страница 20: ...Input Breakout Output Breakout ARC L R OUT 1 In1 Breakout In2 Breakout In3 Breakout In4 Breakout In5 Breakout In6 Breakout In7 Breakout In8 Breakout Out1 Breakout Out2 Breakout Out3 Breakout Out4 Bre...

Страница 21: ...s to confirm L R Output Audio Volume Control Example Set the audio volume of L R OUT 2 port Press Press to select AUDIO Setting Press to enter the tab Press to select L R OUT 2 Vol Press to enter the...

Страница 22: ...l Save the current switching routing to a preset Example Save the current switching routing to preset 2 Press Press and hold at least 3 seconds Press INPUT 2 to select Preset 2 Press to confirm Recall...

Страница 23: ...18 5 7 IP Address Inquiry Press Press to select IP Address Press AUDIO Setting IP Address IP Address 192 168 0 178...

Страница 24: ...t IP settings are IP Address 192 168 0 178 Subnet Mask 255 255 255 0 Type 192 168 0 178 in the internet browser it will enter the below log in webpage Username admin Password admin Type the username a...

Страница 25: ...on on the Input 1 row and Output 1 column directs input 1 to output 1 Use the 9 numbered buttons under scene area to save and load layout presets To save a given layout first click one of the numbered...

Страница 26: ...Audio Setting Audio Source Selection There are sixteen audio sources can be selected for eight analog L R audio output ports and twenty four audio sources can be selected for eight digital SPDIF outpu...

Страница 27: ...22 L R Output Audio Volume Control Adjust L R output audio volume by the volume bar and the three buttons on the right side...

Страница 28: ...nable disable video resolution down scaling function of HDMI output 1 8 ports When enable down scaling the 4K input can be automatically degraded to 1080p output for compatibility with 1080p display w...

Страница 29: ...follows the HDCP version of source device Active Default If the input video has HDCP content the HDCP version of HDMI output is HDCP 1 4 for broader video solution If the input video has no HDCP cont...

Страница 30: ...ngle output port to one or several input ports Operation 1 Select one output port 2 Select one or several input ports Press ALL to select all input ports 3 Click Confirm to save any changes or click C...

Страница 31: ...lt in EDID 2 Select one or several input ports Press ALL to select all input ports 3 Click Confirm to save setting Upload user defined EDID by the below steps 1 Prepare the EDID file bin on the contro...

Страница 32: ...HDBaseT output devices and local HDMI output devices support CEC they can be controlled via the following CEC interface 1 Input Source Device Control Select one or several HDMI input source devices to...

Страница 33: ...28 2 HDBT Output Device Control Select one or several HDBaseT output devices to be controlled and then press function buttons...

Страница 34: ...29 3 HDMI Output Device Control Select one or several HDMI output devices to be controlled and then press function buttons...

Страница 35: ...ich is connected to HDBaseT receiver which must have third party device attached 2 Set the baud rate 3 Typing the commands in the box to control the selected remote third party device which is connect...

Страница 36: ...Setting Reset the login admin and user password Lock or unlock the front panel buttons Get the GUI and firmware version Click Confirm to save any changes or click Cancel to cancel any changes that ha...

Страница 37: ...32 6 7 Interface Setting Modify title bar label LCD readout and button labels Click Confirm to save any changes or click Cancel to cancel any changes that have been made...

Страница 38: ...33 6 8 Network Setting Static IP or Dynamic Host Configuration Protocol DHCP Modify the static IP Address Subnet Mask and Gateway...

Страница 39: ...rd the same as the GUI log in setting modified password will be available only after rebooting to login the configuration interface After that click Administration in the source menu to get to Upload...

Страница 40: ...ttons Menu buttons ALL Select all inputs or all outputs EDID Enable one or several input sources to manually capture and learn the EDID data of output device CLEAR Cancel the current operation if ENTE...

Страница 41: ...rol local input device through IR OUT port Example Switch HDMI input 3 to HDBaseT output 4 Connect an IR receiver to IR IN port on the receiver then connect an IR emitter to the IR OUT 3 on the matrix...

Страница 42: ...HDBaseT receiver as shown in the diagram below RS232 Tx Rx FW IR EYE TCP IP 1 2 3 4 5 6 7 8 ALL IN 1 2 3 4 5 6 7 8 ALL OUT Tx Rx 1 2 3 4 5 6 7 8 1 2 3 4 5 6 7 8 L R 1 2 3 4 5 6 7 8 HDBaseT HDMI 1 2 3...

Страница 43: ...ct an IR receiver to IR IN 3 port on the matrix switcher then connect an IR emitter to the IR OUT on the receiver as shown in the diagram below Tx Rx LINK HDCP Receiver Display IR Emitter RS232 Tx Rx...

Страница 44: ...receiver as shown in the diagram below RS232 Tx Rx FW IR EYE TCP IP 1 2 3 4 5 6 7 8 ALL IN 1 2 3 4 5 6 7 8 ALL OUT Tx Rx 1 2 3 4 5 6 7 8 1 2 3 4 5 6 7 8 L R 1 2 3 4 5 6 7 8 HDBaseT HDMI 1 2 3 4 5 6 7...

Страница 45: ...er from a local PC the 3 pin to DB9 RS232 Cable is used to connect between the matrix and PC The connection diagram is shown as below RS232 Tx Rx FW IR EYE TCP IP 1 2 3 4 5 6 7 8 ALL IN 1 2 3 4 5 6 7...

Страница 46: ...able or disable this control mode For example send the command RS232RCM00ON to enable the remote control mode for all HDBaseT outputs and send the command RS232RCM00OFF to disable the remote control m...

Страница 47: ...then connect a third party device e g projector to the RS232 port of the determined HDBaseT receiver The remote third party device can be controlled by the local PC the connection diagram is shown as...

Страница 48: ...le then connect a third party device e g projector to the RS232 port of matrix switcher The local third party device can be controlled by the remote PC the connection diagram is shown as below PC Tx R...

Страница 49: ...CommWatch exe as an example The icon is shown as below Double click the icon to run and its interface is depicted below Please set the parameters of COM number bound rate data bit stop bit and the par...

Страница 50: ...xxx xx x xxx Set the GUI IP to xxx xxx xxx xxx SetGuiIP 192 168 0 176 SetGuiIP 192 168 0 176 Baudrate115200 Set the serial baud rate of matrix switcher to 115200 Set Local RS232 Baudrate Is 115200 Bau...

Страница 51: ...S232 remote control mode for HDBT output XX that the matrix switcher can be controlled from remote PC XX 00 08 The XX 00 represents all HDBT outputs RS232RCM00ON RS232 Remote 01 Control MCU ON RS232 R...

Страница 52: ...rs position XX 00 08 The XX 00 represents all HDBT outputs IRRCM00OFF IR Remote 01 Control MCU OFF IR Remote 02 Control MCU OFF IR Remote 08 Control MCU OFF STA_IRRCM Report the IR remote control mode...

Страница 53: ...Y STA_OUT Report the connection status of all HDMI and HDBT outputs OUT 1 2 3 4 5 6 7 8 9 10 11 12 13 14 15 16 LINK N N N Y N N N N N N N Y N N N N 8 3 2 Signal Switching Command Description Command E...

Страница 54: ...mote 02 IR IN Local 08 IR Out Switch To Remote 04 IR IN PresetSave XX Store the current switching status to present XX XX 01 09 PresetSave01 Preset 01 Save Success Preset 01 Sta Out 01 In 01 Out 02 In...

Страница 55: ...ut 15 Out7 Breakout 04 In4 Breakout 16 Out8 Breakout 05 In5 Breakout 17 Out1 ARC 06 In6 Breakout 18 Out2 ARC 07 In7 Breakout 19 Out3 ARC 08 In8 Breakout 20 Out4 ARC 09 Out1 Breakout 21 Out5 ARC 10 Out...

Страница 56: ...0 08 The XX 00 represents all L R audio outputs YY 01 16 YY Audio Source YY Audio Source 01 In1 Breakout 09 Out1 Breakout 02 In2 Breakout 10 Out2 Breakout 03 In3 Breakout 11 Out3 Breakout 04 In4 Break...

Страница 57: ...uts XX 01 08 represents HDBT output 1 8 XX 09 16 represents HDMI output 1 8 HDCP00pAS OUT 01 HDCP PASSIVE OUT 02 HDCP PASSIVE OUT 15 HDCP PASSIVE OUT 16 HDCP PASSIVE HDCP XX BYP Set the HDCP mode of o...

Страница 58: ...s Input XX User Define EDID Upgrade OK By RS232 Or GUI EDID XX YY The input XX recall the embedded EDID YY XX 00 08 The 00 represents all inputs YY 01 07 YY EDID 01 1080p 2CH 02 1080p MultiCH 03 4K 30...

Страница 59: ...d rate is 115200 The YY 00 represents all HDBT outputs The YY 01 08 represents the HDBT output 1 8 3 01 123456 Send the ASCII command 123456 to the far end third party device whose baud rate is 9600 T...

Страница 60: ...matrix switcher automatically send ASCII command 123456 to the far end third party device The third party device is connected to the far end HDBaseT receiver of connecting the HDBT output 1 port 8 3...

Страница 61: ...put 03 Send Success CECI AA BB CC 0A Enter main menu CECI0304440A CEC Input 03 Send Success CECI AA BB CC 0D Exit menu CECI0204440D CEC Input 02 Send Success CECI AA BB CC 6D Power on CECI0204446D CEC...

Страница 62: ...med of READY TXT would be showed 5 Directly copy one of two upgrade files e g 08010000 APP to the BOOTDISK U disk 6 Reopen the U disk to check the filename READY TXT whether automatically becomes SUCC...

Страница 63: ...6 7 8 INPUT UP MENU 1 2 3 4 5 6 7 8 DOWN BACK PRESET RS232 Tx Rx FW IR EYE TCP IP 1 2 3 4 5 6 7 8 ALL IN 1 2 3 4 5 6 7 8 ALL OUT Tx Rx 1 2 3 4 5 6 7 8 1 2 3 4 5 6 7 8 L R 1 2 3 4 5 6 7 8 HDBaseT HDMI...

Страница 64: ...d EDID management does not work normally The HDMI cable is broken at the output end Change for another HDMI cable which is in good working condition Static becomes stronger when connecting the video c...

Страница 65: ...s or parts not meeting our specifications No certificate or invoice as the proof of warranty The product model showed on the warranty card does not match with the model of the product for repairing or...

Страница 66: ...this program is simple just follow the steps below 1 Register your product within 90 days of purchase by visiting BZBGEAR com warranty 2 Complete the registration form Provide all necessary proof of...

Страница 67: ...sional products in AV We live in a DIY era where resources are abundant on the internet With that in mind our team offers system design consultation and expert tech support seven days a week for the p...

Отзывы: