background image

Scan QR code for complete version user manual 


Quick Start Guide


SK-DVR-DIY-CVI 


Lifetime Tech Support | 1 Year US-Based Warranty


1-866-514-8998 

9am-5pm CST, Monday-Friday


[email protected]


DIY Kits Setup Instuctions 

**Total 4 boxes: DVR box*1, Camera box*2, 
Accessories box*1 (at the bottom)


1.


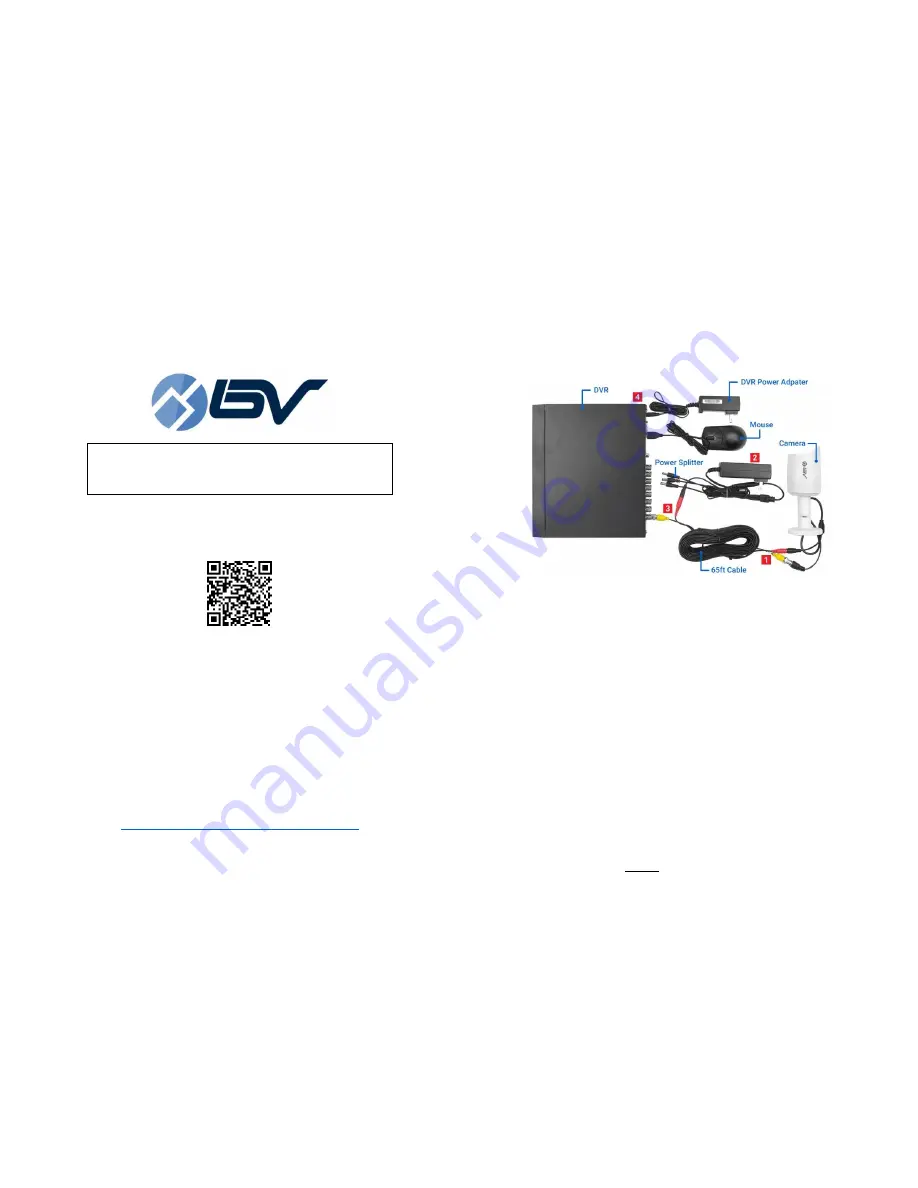
Connect each camera to the 65ft power and video cables. 

2.


Connect the 1-to-4 power splitter to the power adapter (in the 
accessories box). 

**NOTE: Accessories box is under all other boxes.


3.


Plug the video (yellow) connector to the DVR, and plug the power 
(red) connector to the 1-to-4 power splitter. 

4.


Plug the power adapter (in the DVR box) to the DVR. 

5.


Connect DVR with monitor by using VGA or HDMI cable. 

6.


Connect DVR to your router using an Ethernet cable. 

7.


Plug the mouse into USB port on the DVR. 

8.


Plug both power adapters into wall outlet. 

9.


Turn on the power switch on the back of the DVR (if applicable). 
 

Initial Settings


1.


Boot up device, which will display device initialization interface. 

2.


Setup password for admin (default username). 

3.


Set security questions and click “OK.” 

Содержание SK-DVR-DIY-CVI

Страница 1: ...E Accessories box is under all other boxes 3 Plug the video yellow connector to the DVR and plug the power red connector to the 1 to 4 power splitter 4 Plug the power adapter in the DVR box to the DVR 5 Connect DVR with monitor by using VGA or HDMI cable 6 Connect DVR to your router using an Ethernet cable 7 Plug the mouse into USB port on the DVR 8 Plug both power adapters into wall outlet 9 Turn...

Страница 2: ...pliview and add your device with the device serial number SN to add the DVR to your smartphone 5 Leave the Encode settings as default 6 Schedule time and mode of recording for each channel check page 6 Schedule and click Finished App Setup Simpliview Require to connect DVR to network 1 Scan the QR code below and download Simpliview 2 Open Simpliview choose CAMERA 3 Tap at the top left corner for t...

Страница 3: ...7 Input your admin password and then click Start Live Preview Schedule 1 Enter Schedule interface Right click mouse Main Menu Setup Storage Schedule 2 Select the channel you want to set 3 Set record type Regular Continuous or Motion Detection 4 Draw manually to set record period or click to set period in different interface 5 6 ...

Страница 4: ...ting Playback 1 Enter Playback interface Right click mouse Main Menu Search 2 Use the left mouse button to select the date view type and camera channels it is recommended to view one channel at a time for optimal performance The time bar below should display available recordings for the chosen cameras and date 3 To start playback double click the desired area of the time bar Device Selection Searc...

Отзывы: