


5
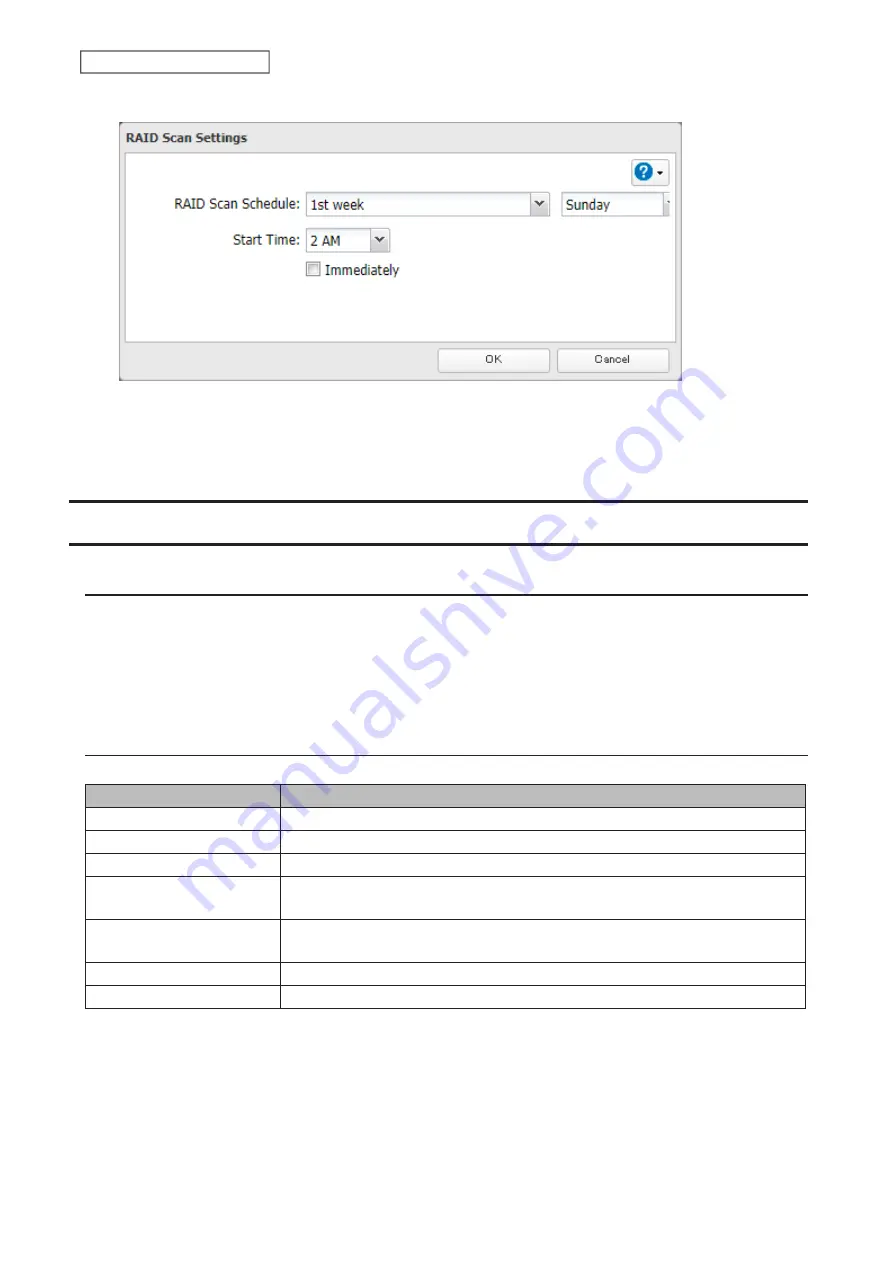
Select when to run the scan and click
OK
.
Notes:
• Select the “Immediately” checkbox to run a RAID scan immediately.
• To stop a RAID scan, click
Cancel RAID Scan
.
Adding an External Drive
Connecting an External Drive
Your TeraStation includes USB ports (the number of ports depends on your model), and you can connect external
drives to these ports. Once connected, they appear as shared folders on the TeraStation. Formatted drives are
detected automatically. Unformatted drives should be formatted in Settings.
After a USB drive is recognized, the TeraStation adds “usbdisk
x
” to the shared folder list, where “x” is the USB port to
which the drive is connected.
Compatibility
Supported file systems for external USB drives are below:
File Systems
Recommended Situation
Btrfs
Connecting to this TeraStation.
XFS
Connecting to another Buffalo NAS device.
Ext3
*
Connecting to another Buffalo NAS device that is a TS-X or older model.
NTFS
**
Connecting to Windows computers. The NTFS-formatted drive can use many
more functions of the operating system than an exFAT drive.
HFS Plus
**, ***
Connecting to Mac computers. The HFS Plus-formatted drive can use many more
functions of the operating system than an exFAT drive.
exFAT
*
Connecting to both Windows and Mac computers.
FAT32
Connecting to both Windows and Mac computers.
*The available USB drive size is up to 16 TB.
**This cannot be formatted from Settings.
***This is read-only from the TeraStation. Files on the USB drive can be copied to the TeraStation.
Connect only one device to each USB port of the TeraStation. Note that only the first partition of a connected USB
drive is mounted. Additional partitions are not recognized.
55
Chapter 4 Storage Management
Содержание TeraStation 6000 Series
Страница 32: ...3 Click Add Group 31 Chapter 3 File Sharing...
Страница 120: ...2 Click Time Machine 119 Chapter 5 Backup...
Страница 121: ...3 Click Select Backup Disk 4 Select the TeraStation then click Use Disk 120 Chapter 5 Backup...
Страница 123: ...7 Time Machine will count down from 120 seconds then backup will begin 122 Chapter 5 Backup...
Страница 131: ...3 From the job list click the job whose settings you want to change 4 Click the Options tab 130 Chapter 6 Remote Access...
Страница 132: ...5 Click Edit 131 Chapter 6 Remote Access...
Страница 136: ...7 Enter the desired job name and click Next 8 Select Backup and click Next 135 Chapter 6 Remote Access...
Страница 144: ...4 Click the Options tab 5 Click Edit 143 Chapter 6 Remote Access...
Страница 153: ...4 Click the Options tab 152 Chapter 6 Remote Access...
Страница 154: ...5 Click Edit 153 Chapter 6 Remote Access...
Страница 169: ...11Click the NFS Rules tab 12Click Add 168 Chapter 7 Advanced Features...
Страница 193: ...3 Click Edit 4 Select or enter the desired MTU size and click OK 192 Chapter 7 Advanced Features...


