On days other than Wednesday, normal operation begins at 9:00 a.m. and the unit goes into sleep mode at 6:00
p.m. On Wednesday, normal operation begins at 10:00 a.m. and the unit goes into sleep mode at 1:00 a.m. of the
next day.
Example 4:
If running at a current time of 10:00 a.m. Wednesday
Timer 1: Daily 9:00–18:00
Timer 2: Wednesday 7:30–22:00
Timer 3: Not used
On days other than Wednesday, normal operation begins at 9:00 a.m. and the unit goes into sleep mode at 6:00
p.m. On Wednesday, normal operation begins at 7:30 a.m. and the unit goes into sleep mode at 10:00 p.m.
• To wake the TeraStation from sleep mode manually, press and hold the power button for 3 seconds.
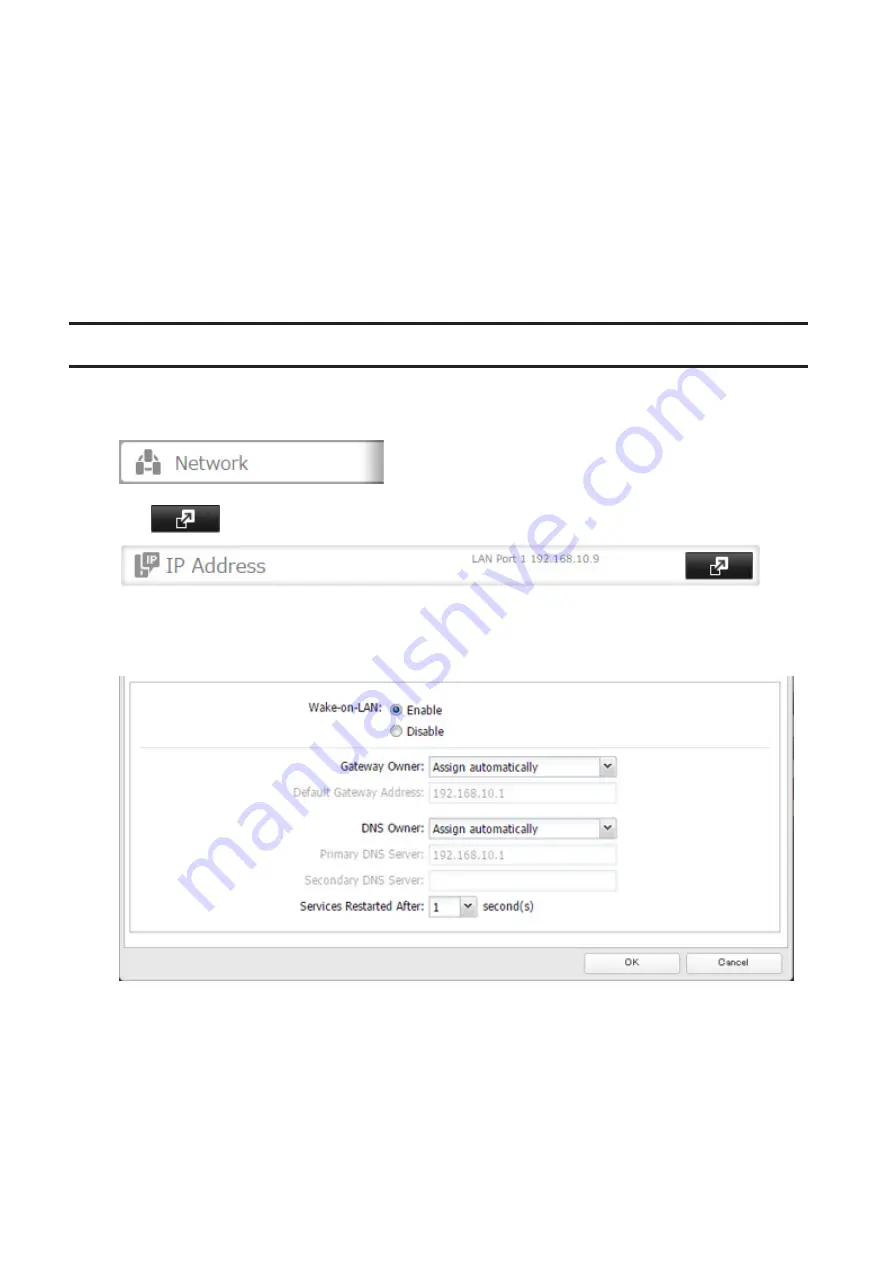
Wake-on-LAN
The TeraStation supports Wake-on-LAN, which allows it to be turned on remotely.
1
In Settings, click
Network
.
2
Click
to the right of "IP Address".
3
Click
Edit
.
4
Enable "Wake-on-LAN", then click
OK
.
Wake-on-LAN is now enabled. As long as the TeraStation is connected to a power source and the network, you can
turn it on remotely.
Notes:
• After receiving the Wake-on-LAN packet, the TeraStation may take approximately five minutes to be ready to use.
• If a power outage occurs while Wake-on-LAN is enabled, the TeraStation will automatically start up after power is
restored.
• To use Wake-on-LAN, you'll need Wake-on-LAN software that sends magic packets. The TeraStation does not
include Wake-on-LAN software.
135
Содержание TeraStation 5010 TS51210RH
Страница 32: ...3 Click Create User 31...
Страница 35: ...3 Click Add Group 34...
Страница 103: ...2 Click to the right of Failover 3 Click the Periodic Sync tab 4 Click Edit 102...
Страница 106: ...15Click Time Machine 105...
Страница 107: ...16Click Select Backup Disk 17Select the TeraStation then click Use Disk 106...
Страница 121: ...3 From the task list click the task whose settings you want to change 4 Click the Options tab 120...
Страница 122: ...5 Click Edit 121...
Страница 145: ...7 Click to the right of NFS 8 Click the Client Settings tab 144...
Страница 159: ...Updating Automatically 1 In Settings click Management 2 Click to the right of Update 3 Click Edit 158...
Страница 168: ...3 Click Edit 167...
Страница 169: ...4 Select or enter the desired MTU size and click OK 168...
Страница 171: ...3 Click Edit 170...
Страница 198: ...1 Open the front cover with the included key 2 Remove the front cover while holding the hook downward 197...
Страница 211: ...IEC60950 1 WARNING Hazardous moving parts Keep away from moving fan blades 210...


